Using jQuery Tools in WordPress
←
→
Page content transcription
If your browser does not render page correctly, please read the page content below

Using jQuery Tools
                                     in WordPress
Throughout this book, we've looked at various examples of what is possible
to achieve using jQuery Tools. However this has been within the confines of a
standalone environment, It's time to have a look at how these tools could be used
within a CMS such as WordPress.

Over the next few pages, we are going to take a look at how jQuery Tools can be
implemented in a CMS, by means of examples based around WordPress. We will
focus on the following:

   •   Incorporating jQuery Tools into your plugin or theme
   •   Incorporating a number of tools into WordPress by using plugins, themes or
       shortcodes, with examples of Overlays, Tabs, and Slideshow
   •   Using one of the original examples from the book, and adapting it for use
       in WordPress

So, in that time honored tradition: "What are we waiting for? Let's get on with it…"

                The examples that feature in this chapter assume a degree of prior
                knowledge of using Wordpress and jQuery together. If you would
                like further information on using both, then it is worth reading
                Wordpress 3.0 jQuery by Tessa Blakeley Silver, which is available
                from Packt Publishing.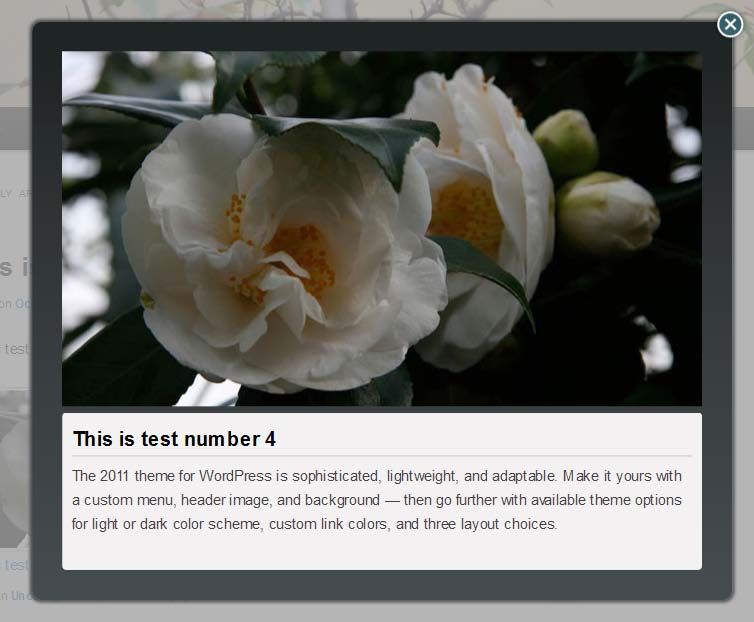
Using jQuery Tools in WordPress

Tools you'll need
To get started with the demos and examples that feature in this chapter, there are a
number of tools you will need. It is assumed that you will have some knowledge of
them, or at least a favorite, so we won't go into too much detail. The critical ones you
need are the following:

    •   A text editor: There are hundreds available, all with differing capabilities or
        features. My personal favorite is Textpad, available at http://www.textpad.
        com. It isn't free, but for 27USD, it is very good value. There are others out
        there with similar features, and available for free or at a small cost; it is a
        matter of personal preference.
    •   A working WordPress installation: As long as you have administration
        access. I use the latest version which is 3.2.1 at the time of writing, but the
        code in this book should work with earlier versions, although some changes
        may be necessary for versions prior to 2.9/3.0.
    •   A working local web server or web site: I use WAMP to host my local
        installation of WordPress. There are others available, such as XAMPP (for
        PC) or MAMP (for Mac).
    •   And of course a working browser: I use Firefox 7 and IE 9 at time of writing;
        older browsers will work, although less so if using old versions such as IE6
        or Firefox 3.x. It is important to note that jQuery Tools relies a lot on CSS,
        and in particular CSS3. To experience the best effect, newer browsers are
        recommended.

Okay, now that we have our tools, let's get started with adding jQuery Tools to
your theme.

Getting jQuery Tools into your Theme
There are two options available for achieving this, jQuery Tools can be inserted
directly into your theme, or by using a small plugin.

Directly into the theme
If you want to put it directly into your theme, then open up the functions.php file
in your theme, and enter the following:
    if (!is_admin()) {
        wp_deregister_script('jquery');
        wp_register_script('jquery', ("http://ajax.googleapis.com/ajax/
                                        libs/jquery/1.6.4/jquery.min.js"),
                           false);

                                          [2]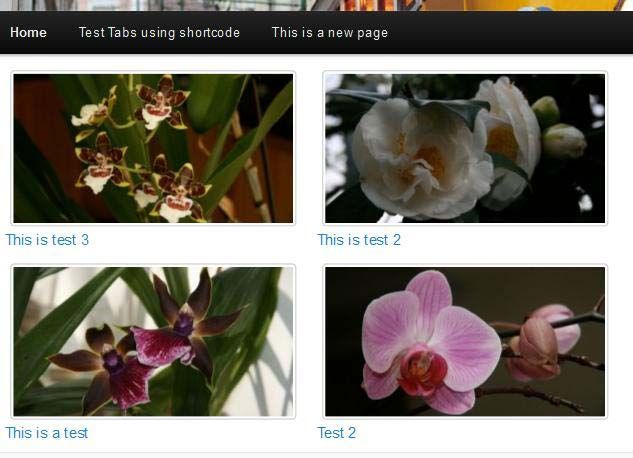
Using jQuery Tools in WordPress

        wp_enqueue_script('jquery');
        wp_enqueue_script('jTools', 'http://cdn.jquerytools.org/1.2.6/
                                     all/jquery.tools.min.js',
                           array('jquery'), '1.2.6');
   }

You can also achieve the same effect by turning this into a function, and adding it to
your theme. This will work better if not all of the content has loaded before loading
jQuery. Putting it into the footer means that your site can load your content quickly,
leaving the scripts to load last. To do this, you will need to make the following
modifications to the previous code:
   function my_init() {
       if (!is_admin()) {
           wp_deregister_script('jquery');
           wp_register_script('jquery', ("http://ajax.googleapis.com/
                              ajax/libs/jquery/1.6.4/jquery.min.js"),
                              false);
           wp_enqueue_script('jquery');
           wp_enqueue_script('jTools', 'http://cdn.jquerytools.org/
                             1.2.6/all/jquery.tools.min.js',
                             array('jquery'), '1.2.6');
       }
       add_action('init', 'my_init');

A cleaner, preferred option is to use a plugin. This can be activated as required
through WordPress' administration, without the need to modify core files in
the theme.

Using a plugin
Using a plugin means a user with the appropriate permissions can modify settings
from within WordPress' administration area, without having to modify the code
directly. Open up your text editor, create a new PHP file, and enter the following: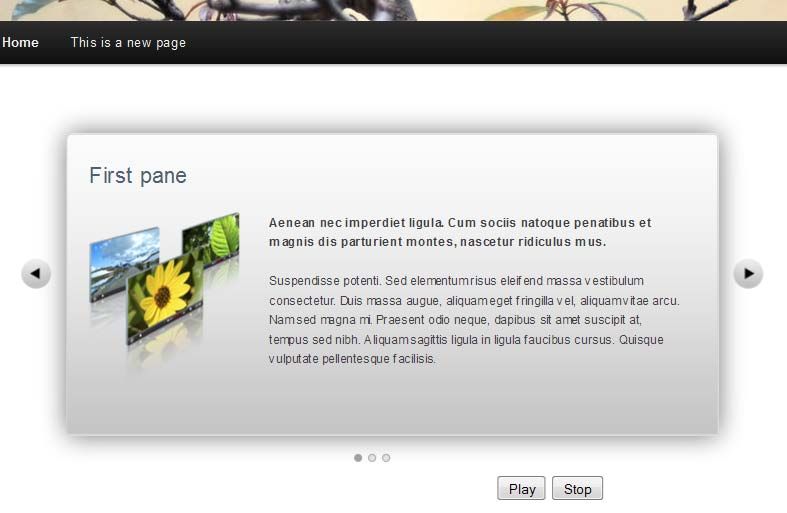
Using jQuery Tools in WordPress

       This program is free software; you can redistribute it and/or
       modify it under the terms of the GNU General Public License,
       version 2, as published by the Free Software Foundation.

       This program is distributed in the hope that it will be useful,
       but WITHOUT ANY WARRANTY; without even the implied warranty of
       MERCHANTABILITY or FITNESS FOR A PARTICULAR PURPOSE. See the GNU
       General Public License for more details.

       You should have received a copy of the GNU General Public License
       along with this program; if not, write to the Free Software
       Foundation, Inc., 51 Franklin St, Fifth Floor, Boston, MA
       02110-1301 USA
       */

       global $wp_version;

       $exit_msg='jQuery Overlay requires WordPress 3.0 or newer.

       Please update!';

       if (version_compare($wp_version,"3.0","
Using jQuery Tools in WordPress

// Draw the menu page itself
function jqt_library_do_page() {
?>

   jQuery Tools - Base Library Options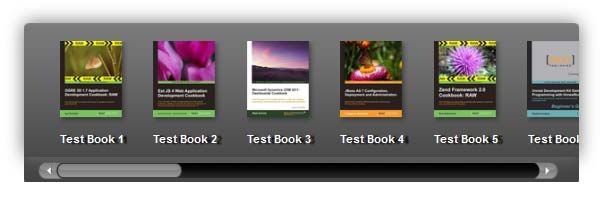
Using jQuery Tools in WordPress

                          >
                             All Tools; no jQuery
                          >
                             jQuery and All Tools
Using jQuery Tools in WordPress

Save the file as jquerytools.php within its own folder in the plugins folder of
WordPress. It can be activated in the usual manner from the WordPress plugins
maintenance area.

              Please note that this plugin was designed to serve as an example of
              how you can include jQuery Tools into your theme—it should not be
              used in a production ready environment without further development.

Now that we have got the basic Tools library into our theme, it's time to look at using
some of the Tools functionality, and how we can implement this in WordPress. This
chapter will look at three tools from the library in particular, although the examples
shown below could equally apply to other tools within the library. We will begin
with Overlay.

Overlay
There are three ways to get jQuery Tools' Overlay to work in WordPress, namely,
by modifying the theme, as part of a plugin, or by use of a shortcode from the
functions.php file. Let's take a look at editing the theme directly first, by way
of creating a page, that could easily be developed into a portfolio of images or
website screenshots.

Adding jQuery Tool's Overlay into a theme
This breaks down into three parts, adding the call to the Overlay functionality,
editing the styles, and setting up the page template. Don't forget, we've already set
up the calls to jQuery Tools and jQuery, by use of our plugin; make sure this is still
activated. Let's begin by adding the styles required for this demo.

                You need to ensure that Post Thumbnails has been enabled for
                the active theme, in order for the demos in this chapter to work
                properly. To do this, you need to include add_theme_support(
                'post-thumbnails' ); in the functions.php file. More
                details are available at http://codex.wordpress.org/
                Function_Reference/add_theme_support.

                                           [7]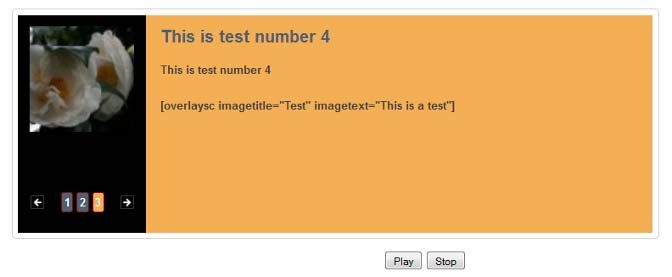
Using jQuery Tools in WordPress

Adding in the CSS styles
Crack open your text editor of choice, and add the following into the styles.
css file—note that this uses CSS3 styles, so you will need to use one of the latest
browsers to really see the effects as intended:
    /* the overlayed element */
    .overlay { display:none; z-index:10000; background-color:#F8F8F8;
               width:860px; padding:30px; min-height:200px;

                   /* background */
                   /* replace this with an image if not using a
                      CSS3-compatible browser */
                   background-image: linear-gradient(bottom, #3C4245 0%,
                                       #272B2C 65%, #181C1C 94%);
                   background-image: -o-linear-gradient(bottom, #3C4245 0%,
                                       #272B2C 65%, #181C1C 94%);
                   background-image: -moz-linear-gradient(bottom, #3C4245 0%,
                                       #272B2C 65%, #181C1C 94%);
                   background-image: -webkit-linear-gradient(bottom,
                                       #3C4245 0%, #272B2C 65%, #181C1C 94%);
                   background-image: -ms-linear-gradient(bottom, #3C4245 0%,
                                       #272B2C 65%, #181C1C 94%);

                   -moz-border-radius:10px;
                   -webkit-border-radius:10px;

                   background-image: -webkit-gradient(linear,
                                       left bottom, left top,
                                       color-stop(0, #3C4245),
                                       color-stop(0.65, #272B2C),
                                       color-stop(0.94, #181C1C));

                   -moz-box-shadow: 0 0 2px 2px #3C4245;
                   -webkit-box-shadow: 0 0 2px 2px #3C4245;
                   box-shadow: 0 0 2px 2px #3C4245; }

    /* close button positioned on upper right corner */
    .overlay .close { background-image:url(/images/close.png);
                      position:absolute; right:-15px; top:-15px;
                      cursor:pointer; height:35px; width:35px; }

    .overlay-content { float:right; width:295px;
                       background-color: #F2EFEF; -moz-border-radius:4px;
                       -webkit-border-radius:4px; padding: 10px;
                       margin-right: 2px; }

                                          [8]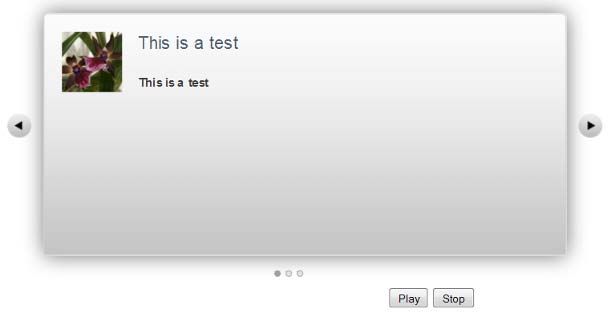
Using jQuery Tools in WordPress

   .overlay-content h2 { color: #fff; font-weight: bold;
                         font-size: 20px;
                         border-bottom: 1px solid #c4c4c4; }

   .overlay-content p { padding-top: 10px; }

   .thumbText { margin-top: -8px; margin-bottom: 10px; }

   /* this is provided for completeness, but is not necessary */
   .thumbImage {   }

   img.overlay-content { width: 510px; padding: 5px; float: left; }

   img.portfolio-thumb { background-color: #FFFFFF;
                         border: 1px solid #CCCCCC;
                         border-radius: 4px 4px 4px 4px;
                         cursor: pointer; margin: 2px 5px;
                         padding: 2px; }

   .norightmargin { margin: 0 !important; }

   .overlayPost { float: left; width: 292px; padding-right: 20px; }

   .overlayPosts { margin: 5px 0 0; padding: 5px 0; }

   #content { margin: 0 34% 0 7.6%; width: 62.4%; }

Moving on, it's time to look at the code you need to add to your index.php file,
which contains the main loop for the theme.

Setting up the portfolio page template
Now that we have added the styles, it is time to set up the page template—copy this
into a new index.php, to replace the existing one in your theme:
Using jQuery Tools in WordPress
* Learn more: http://codex.wordpress.org/Template_Hierarchy
*
* @package WordPress
* @subpackage Twenty_Eleven
*/
get_header(); ?>Using jQuery Tools in WordPress
Adding in the Overlay functionality
The final change to make is to add in the JavaScript call to Overlay into your header.
php file, just after the wp_head() command; this makes the Overlay appear:
wp_head();
?>
jQuery(document).ready(function() {
$('a[rel^="#folio"]').overlay({ mask: '#999999' });
});
If all is well, you should now have something similar to the following:
[ 11 ]Using jQuery Tools in WordPress
This is all well and good, but there's one drawback; the method we've used has
altered the main index page into a format that might not be as useful for your own
projects, in certain instances. If you wanted more control over how many images
were displayed, and where, you would need to use a different method. One such
method would be by using shortcode.
Let's take a look at how this could be implemented in WordPress, using jQuery Tools.
Using shortcode to implement Overlay
Using shortcode will remove the need to customize the index.php file within your
theme—while this may be the route that some people might want to take, it won't be
the most appropriate for others.
For those who want more control over where images are displayed, we can develop
our own shortcode, which allows us to insert a pre-determined block of text or
images, using a shortcode keyword or phrase. We will use the Overlay from the
previous exercise, but convert it into a shortcode.
Adding in the JavaScript
Open your text editor, and add the following into your header.php file:
jQuery(document).ready(function() {
$('a[rel^="#folio"]').overlay({ mask: '#999999' });
});
Adding JavaScript code directly into a theme is not normally
considered best practice; the preferred method is to use
something like wp_enqueue_script, so that the code can then
be hived off into a separate JavaScript file, for security reasons.
For the purposes of the demo, it is being added to show off the
desired effect, although I would recommend that you consider
moving the code into a separate file.
The second part of this is to add the calls to jQuery and jQuery Tools, into your
functions.php file. If you are already using the plugin developed from earlier in
this chapter then please feel free to skip this section:
if (!is_admin()) {
wp_deregister_script('jquery');
wp_register_script('jquery', ("http://ajax.googleapis.com/
[ 12 ]Using jQuery Tools in WordPress
ajax/libs/jquery/1/jquery.min.js"), false);
wp_enqueue_script('jquery');
wp_enqueue_script('jTools', 'http://cdn.jquerytools.org/
1.2.6/all/jquery.tools.min.js', array('jquery'),
'1.2.6');
}
Let's move onto the more important part, adding in the actual shortcode.
Building your shortcode
Here's the interesting part, this is the block of code that will provide our shortcode
functionality in WordPress:
function jqtoverlaysc() {
global $post, $wp_query;
$thePostID = $wp_query->post->ID;
$queried_post = get_post($post_id);
/* get thumbnail trigger image */
$thumbnail_id=get_the_post_thumbnail($post->ID, 'small');
preg_match ('/src="(.*)" class/',$thumbnail_id,$smalllink);
/* get main trigger image */
$thumbnail_id=get_the_post_thumbnail($post->ID, 'large');
preg_match ('/src="(.*)" class/',$thumbnail_id,$largelink);
return '
'.
$queried_post->post_title .'
[ 13 ]Using jQuery Tools in WordPress
'. $queried_post->post_title .'
' . $queried_post->post_excerpt .'
';
}
add_shortcode('overlaysc', 'jqtoverlaysc');
The code was adapted from the original code we used to generate Overlays in
WordPress—after all, there is no point in trying to re-invent the wheel, is there?
Adding in the styling
The final stage is to add some styles, so that the Overlay looks good. Copy the
following code into your styles.css file, within your theme:
/* the shortcode CSS */
.overlay { width: 640px; }
.overlay-content { float: left; width: 620px; }
.overlay-content p { margin-top: -20px; }
.overlay-image img { max-width: 100%; }
Hold on, surely there should be more styles needed, than what we have here? And
yes, you would be correct.
The reason for this is we can reuse the original styles from the first demo in this
chapter, and add in only those required to override the original styles. If you are
working in a different theme from the one used in that demo, then make sure
you copy in the relevant styles. If all has gone well, then you should end up with
something similar to the following:
[ 14 ]Using jQuery Tools in WordPress
Clicking on one of the images will reveal one of the flower images in an overlay:
[ 15 ]Using jQuery Tools in WordPress
Using shortcode—how can I develop it further?
To use shortcode, you need to add [overlaysc] into any post in your WordPress
site, this will display the post's image as shortcode. The shortcode is set to display
the post's title and excerpt when you click on the image. While it is minimal in its
approach, with no flexibility to show different content, it is enough to illustrate how
such a shortcode can work in WordPress. If you want to develop it further, then you
can add in the following (highlighted):
function jqtoverlaysc($atts, $content = null) {
extract(shortcode_atts(array(
"imagetitle" => 'Untitled',
"imagetext" => 'Untitled',
"usewpexcerpt" => 'false'
), $atts));
This picks up any attributes set as part of the shortcode, and splits them into their
constituent parts which can then be used directly as variables. In this instance, as we
want to control if we are going to use our own title and text, or the WordPress title
and excerpt for that post, we are going to do something slightly different:
$imgtitle = $queried_post->post_title;
$imgtext = $queried_post->post_excerpt;
This assigns both the post title and excerpt to two variables; this is assuming that we
have not set the usewpexcerpt attribute to false. If however we have, then we need
to add in the following code to check for this, and reassign the variables accordingly:
$thePostID = $wp_query->post->ID;
$queried_post = get_post($post_id);
if ($usewpexcerpt == "false") {
$imgtitle = $imagetitle;
$imgtext = $imagetext;
}
Using jQuery Tools Overlay in a WordPress
plugin
So far, we've looked at how you could add Overlay to a WordPress site, either
by using a shortcode, or adding it into a theme directly. While both are equally
acceptable methods, they require modifying theme files directly, which in some
instances is not ideal.
[ 16 ]Using jQuery Tools in WordPress
The solution to this is to use a plugin, which modifies the end result, to allow
Overlay to work, but without actually modifying core files. Let's have a look at how
we could create such a plugin.
Adding in the base images
For the purpose of this demo, we're going to use the Overlay demo from the main
site, which uses the "Apple" effect. We need to start with the basic HTML required
to display the images and overlays, so copy this into a new post on your WordPress
site. You will need to replace the links to images with appropriate ones, as long as
you have a small size for the "trigger", and a larger size for the overlay itself:
// triggers for the overlays
Berlin Gustavohouse
The Gustavo House in Storkower Strasse. It was built in 1978
and reconstructed in 1998 by the Spanish artist Gustavo.
jQuery Tools' Overlay allows you to use a number of different Overlay styles,
the class statement controls whether you see a white, black, or some other color
background. You will need to make sure you have the appropriate background
image available:
Berlin Alexanderplatz Station
[ 17 ]Using jQuery Tools in WordPress
Berlin Alexanderplatz is a railway station in the Berlin city
centre and is one of the city's most important interchange
points for local public transport.
For the purpose of this demo, we are hard coding the base
HTML directly into a post; in an ideal world, we would look
to develop the plugin further, so that it adds in some of the
markup automatically.
Developing the plugin code
The next stage is the plugin itself. Open a new PHP file, and copy in the below; save
this as jqtoverlay.php.
At this stage, it is strongly recommended that you download the supplementary
code that comes with this book – it will be very useful in following some of the
comments. We start with the normal default license header that should come
with all WordPress plugins available from the repository:Using jQuery Tools in WordPress
Let's set up the variables required, and put in a sanity check, that prevents usage
below WordPress 3.0 (as some of the functionality is not likely to work in old
versions of WordPress):
global $wp_version;
$exit_msg='jQuery Overlay requires WordPress 3.0 or newer.
Please update!';
if (version_compare($wp_version,"3.0","Using jQuery Tools in WordPress
Note the use of wp_localize_script this is a very useful function to allow you to
correctly use JavaScript from within WordPress. It does not require you to "shell out"
using tags, as the JavaScript is contained in standalone files, while
the variables are assigned, then passed as an array:
$jqtvars = array('ocolor' => $backcolor,
'opacity' => $opacity,
'maskeffect' => $maskeffect,
'closeOnEsc' => $closeonEsc,
);
wp_localize_script('jqt-overlay', 'myVars', $jqtvars);
}
For more information on wp_localize_script, browse to the
WordPress Codex page at http://codex.wordpress.org/
Function_Reference/wp_localize_script.
Setting up the admin pages
The next part is to set up the options menu that is accessed from within the
administration part of WordPress. This only shows a select number of Overlay
options at present, but can easily be extended to include more, by adapting the
following code:
// Draw the menu page itself
function jqt_overlay_do_page() {
?>
jQuery Tools - OverlayUsing jQuery Tools in WordPress
Using jQuery Tools in WordPress

         Function jqt_overlay_validate($input) {

             // Our first value is either 0 or 1
             $input['closeonEsc'] = ( $input['closeonEsc'] == 'true' ? 'true'
                                      : 'false' );
             return $input;
         }

We finally need to add in the admin menu pages, and provide WordPress hooks to
each method:
       // Add menu page
       function jqt_overlay_add_page() {
           add_options_page('jQuery Tools Overlay', 'Overlay Options',
                            'manage_options', 'jqt_overlay',
                            'jqt_overlay_do_page');
       }

       add_action('admin_init', 'jqt_overlay_init' );
       add_action('admin_menu', 'jqt_overlay_add_page');
       add_action('init', 'jqt_init');
    ?>

If all has gone well, you will end up with a basic plugin that you can develop and
extend to your heart's content. The following is a screenshot of what you should see.
Note that we're using images available from the demos on the main jQuery Tools
site, but you are free to use your own as appropriate!

                                        [ 22 ]
Using jQuery Tools in WordPress
Hopefully this has given you some inspiration for how to use Overlay within
WordPress, either as a plugin, shortcode, or directly into a theme. There is plenty
more that you could add to the plugin, particularly in the form of error-checking, or
more options for Overlay. Let's move onto another tool within the library, and see
how we can use it within WordPress—the ubiquitous Slideshow.
Slideshow
Cast your mind back to Chapter 2, do you remember a Polaroid-based gallery that
contained some wonderful pictures of orchids and various other flowers? I'm sure
you do—I was very fortunate to be able to include the pictures with this book!
The reason for taking a little walk back down memory lane is that the tool used
to create that gallery effect was the Slideshow plugin which is used in conjunction
with jQuery Tool's Tabs. In this section, we are going to examine how to include
the Slideshow into WordPress, using the demo available from the main jQuery
Tools web site.
Some preparation needed
The first step is to download, and then make some small changes to a copy of,
the slideshow demo that is available from the main jQuery Tools site at http://
flowplayer.org/tools/demos/tabs/slideshow.htm. The reason for this is that it
will help with the transfer of the code into your WordPress theme. The first change is
the JavaScript code which we've separated out into a separate file:
The tabs-slideshow.css file has already been created, we can reuse that file, along
with the IE conditional:
[ 23 ]Using jQuery Tools in WordPress
Go ahead and encompass the stop and play buttons in a new div, called controls:
Play
Stop
Adding Slideshow to your theme
Now that we've made some minor changes to the original demo, let's look at
transferring the code into WordPress. The first stage is to set up the basic HTML
code that will sit in your theme, beginning with the header.php file.
Setting up the basic HTML in the header
Open up your text editor, and copy this into the header file of your theme. You will
notice that there is a div that has been added, to encompass the whole slideshow,
and make it easier for styling purposes:
prev
First pane
Aenean nec imperdiet ligula.
Cum sociis natoque penatibus et magnis dis parturient
montes, nascetur ridiculus mus.
Suspendisse potenti. Sed elementum risus eleifend massa
vestibulum consectetur. Duis massa augue, aliquam eget
fringilla vel, aliquam vitae arcu. Nam sed magna mi.
[ 24 ]Using jQuery Tools in WordPress
Praesent odio neque, dapibus sit amet suscipit at, tempus
sed nibh. Aliquam sagittis ligula in ligula faucibus cursus.
Quisque vulputate pellentesque facilisis.
Second pane
Consectetur adipiscing elit.
Praesent bibendum eros ac nulla. Integer vel lacus ac
neque viverra.
Vivamus euismod euismod sagittis. Etiam cursus neque non
lectus mattis cursus et a libero. Vivamus condimentum
hendrerit metus, a sollicitudin magna vulputate eu. Donec
sed tincidunt lectus. Donec tellus lectus, fermentum sit
amet porta non, rhoncus ac mi. Quisque placerat auctor
justo, a egestas urna tincidunt eleifend.
Third pane
lectus lacinia egestas. Nulla
hendrerit, felis quis elementum viverra, purus felis
egestas magna.
Aenean elit lorem, pretium vitae dictum in, fermentum
consequat dolor. Proin consectetur sollicitudin tellus,
non elementum turpis pharetra non. Sed quis tellus quam.
next
[ 25 ]Using jQuery Tools in WordPress
Play
Stop
Now that we've added in the basic HTML, let's take a look at adding the slideshow
functionality, to make it work correctly.
Animating the slideshow
We need to add a reference to the slideshow JavaScript file, so open up your text
editor, and add the following code, immediately below the wp_head() command,
as shown:
wp_head();
?>
Make sure you have saved a copy of the slideshow.js file in the relevant folder—
my theme here is called jqtslideshowdirect, but yours will be different. You will
notice that there isn't a link to jQuery included in the previous code, for the purposes
of this demonstration, it is assumed that we are using the plugin we developed
earlier in this chapter, so it is not necessary to add it in separately.
Styling the slideshow in WordPress
The final part required to make it work is the CSS. As we are reusing the code from
earlier, you will need to add in the references to that file, similar to the following:
wp_head();
?>Using jQuery Tools in WordPress
src="http://127.0.0.1/wordpress/wp-content/themes/2011-
jqtslideshowdirect/js/slideshow.js">
You will see references to flowplayer.org for images and CSS
styles throughout this book. The license from the site allows you to
reference the files directly while testing and developing, but if you
are planning on using them in a production environment please
save copies to your own server!
We also have to add some minor tweaks to the styling, to allow for its use in
WordPress, so go ahead and add the following into your theme's style.css file:
#sscontent { padding-left: 10%; }
#controls { margin-right: 300px; margin-bottom: 20px;
float: right; width: 125px; }
[ 27 ]Using jQuery Tools in WordPress
If all is working properly, then you should see something like this in your browser:
"But we can do better than this…"
Absolutely, the example we've just put together serves to illustrate a useful point:
while it demonstrates the Slideshow functionality within WordPress well, it doesn't
take advantage of any of WordPress' power. In this section we're going to have a
look at how you can improve on an existing installation, to take advantage of what
WordPress can offer. Let's begin with the JavaScript and CSS style links—these really
could use being done better!
Modifying the JavaScript and styling links
The first step to improving the code is to alter the links we included in the header.
php file for the library and styles used. Crank up your usual text editor, and add
this to the functions.php file in your theme, which assumes you are still using the
jQuery plugin from earlier:
function my_scripts_method() {
if (!is_admin()) {
wp_enqueue_script('slideshow-js',
get_stylesheet_directory_uri() . '/js/slideshow.js',
[ 28 ]Using jQuery Tools in WordPress
array('jquerytools'), '1.2.6');
wp_enqueue_style('slideshow-css',
get_stylesheet_directory_uri() . '/tabs-slideshow.css');
echo '';
}
}
add_action('wp_enqueue_scripts', 'my_scripts_method');
If you are not, then you need to include these lines, in the previous block of code:
wp_deregister_script( 'jquery' );
wp_register_script( 'jquery',
'http://ajax.googleapis.com/ajax/libs/jquery/1.6.4/jquery.min.js');
wp_enqueue_script( 'jquery' );
It will deregister the current version of jQuery used in WordPress (which at the time
of writing is jQuery 1.6.1), and register the CDN link for jQuery 1.6.4.
It is not considered good practice to hard code your links in
WordPress, but to use WordPress' functionality to determine the
active theme location, such as what was used in the previous code.
Here we've used the CDN links for jQuery Tools and jQuery, but
could easily have created custom downloads of both, and registered
them in the code using wp_enqueue_script.
Let's move on to step 2, which is to add in the HTML required to create the slideshow.
Adding the slideshow HTML code
This is where the real changes need to be made, here we are using WordPress to pull
out the post excerpt and featured image from a selection of posts, that have the tag
word slideshow assigned to them. In your text editor, copy in the code at the bottom
of your header.php file:
prev
[ 29 ]Using jQuery Tools in WordPress
next
Play
Stop
[ 30 ]Using jQuery Tools in WordPress
Styling the slideshow with CSS
All that remains now is the CSS code—we've already included the CSS file from the
standalone demo at the beginning of this chapter. To get the demo to work perfectly
in WordPress, we need to tweak it slightly, by adding the following styles. It is up
to you where you add these, they can be added to the styles.css file that comes
with every WordPress theme, or in the slideshow CSS file referenced earlier in
this section:
slideshow-content { float:left; margin:0 30px 20px 0; }
#ss-content-text { float: left; margin-left: 95px;
position: absolute; width: 500px; }
#ss-content-text p { font-size: 1.2em; font-weight: bold; }
#ss-context-title h3 { margin-left: 95px; margin-top: -85px; }
This completes the changes required to get the demo working, using the power of
WordPress. However, while the previous demo works well in WordPress, it does
beg the question "now we have it working in WordPress, surely we can do better
with the styling?" You're probably thinking: "well, yes, I think we can." But, there
is a reason for asking that question.
Sure, anyone can change CSS, as long as they know what they want to see, and have
the requisite know-how. However, there is an important thing to note with jQuery
Tools: a facet of its design is the ability to abstract CSS away from the main HTML
code, meaning that you should not have to change any HTML to get a completely
new look. Here's how the base design looks now:
[ 31 ]Using jQuery Tools in WordPress
With a very simple change of CSS file, we can completely redesign the appearance,
without having to change the HTML structure. Let's have a look at what this means.
Updating the CSS styles—a new design
If there's one thing you should take as a key point from this book, then it is this:
The power of jQuery Tools is in the ability to abstract CSS styles
away from the main code.
Why make such a fuss about it? Well, it's simple. If your styling contains classes
used everywhere, then it will get confusing if you don't update every instance of
your class style. jQuery Tools was built on the principle that CSS styling should be
abstracted away from the main code, into one file. It also means that you potentially
only need to edit one file, and not several, thereby reducing the need to alter the
main code, and increasing its reusability. Let's have a look at a demo, which helps
illustrate this point.
Demo: "How can I modify a stock racing car?"
Okay, yes, this isn't a book about how to style a racing car! But the principle is the
same: it's still a body, with four wheels, an engine, doors, and so on. The same
principle applies with the slideshow; it doesn't matter how you dress it up—it's
still the same. Let's get going.
Crack open Windows Explorer, and navigate down to your WordPress theme.
You need to rename the tabs-slideshow.css file to something else, as you are
about to replace it. Once you've done that, open up your text editor, and copy in
the following:
/* container for slides */
.images { border: 1px solid #ccc; position: relative; height: 300px;
width: 850px; float: left; margin: -15px; cursor:pointer;
/* CSS3 tweaks for modern browsers */
-moz-border-radius: 5px;
-webkit-border-radius: 5px; }
/* single slide */
.images div { background-color: #000; display: none; font-size: 12px;
height: 256px; left: 0; margin: 7px;
padding: 15px 17px 15px 15px; position: absolute;
top: 0; width: 137px; }
[ 32 ]Using jQuery Tools in WordPress
.images img { height: 138px; width: 138px; }
.images h3 { color: #445566; float: left; font-size: 22px;
font-weight: bold; margin: 0 0 0 170px;
position: absolute; width: 250px; }
/* tabs */
.slidetabs { clear: both; margin-left: 50px; margin-top: 227px;
position: absolute; }
.slidetabs a { background-color: #445566; border: 1px solid #800000;
border-radius: 3px 3px 3px 3px; color: #FFFFFF;
font-size: 1em; font-weight: bold; padding: 3px; }
/* mouseover state */
.slidetabs a:hover { background-color: purple; }
/* active state (current page state) */
.slidetabs a.current { background-color: #F3A649; }
.forward { background: url("carousel_next_bg.gif") no-repeat scroll 0
0 #000000; cursor: pointer; display: block; float: left;
font-size: 1px; height: 30px; margin-left: 128px;
margin-top: 230px; position: absolute;
text-indent: -9999em; width: 30px; z-index: 1000; }
.backward { background: url("carousel_previous_bg.gif") no-repeat
scroll 0 0 #000000; cursor: pointer; display: block;
float: left; font-size: 1px; height: 30px;
margin-top: 230px; position: absolute;
text-indent: -9999em; width: 30px; z-index: 1000;
margin-left: 10px; }
#controls { float: right; margin-bottom: 30px; margin-right: 300px;
margin-top: 30px; width: 125px; }
#ss-context-tt { background-color: #F3A649; float: left;
height: 286px; margin-left: 153px;
margin-top: -158px; position: absolute;
width: 667px; }
#ss-content-text { float: left; margin-left: 20px; margin-top: 60px;
position: absolute; width: 500px; }
[ 33 ]Using jQuery Tools in WordPress
#ss-context-title { margin-left: -150px; margin-top: 10px;
position: absolute; width: 200px; float: left;
width: 500px; }
Save this as your replacement tabs-slideshow.css file.
I've not included links to the two arrows used in the .forward
and .backward styles—you will need to alter your copy of the
file so the URL points to the relevant images.
There is one small additional change we need to make, which is in the style.css
file, within your WordPress theme. Remove the following code, it conflicts with the
intended design in this mini "revamp"!
#ss-context-title h3 { margin-left: 95px; margin-top: -85px; }
See what I mean? You've only had to edit one CSS file (leaving aside this mini
change). You've not had to change the main header.php file at all. If all is well,
then you should see something similar to the following:
Impressed? Let's use some of these techniques, and apply them to another tool in the
library—Tabs, which is the subject of the next section.
Tabs
Tabs are arguably one of the most popular user-interface components on the web, as
people are used to their intuitive, easy-to-use design, which allows you to organize
your pages in a more user-friendly manner. jQuery Tools' Tabs are no different, let's
take a look at how we can incorporate them into WordPress.
[ 34 ]Using jQuery Tools in WordPress
We will go straight into putting this demo into WordPress—if you
want to take a slower approach, then you can use some of the tips
mentioned in the previous section, to adapt the format as a standalone,
before moving to adding code into your WordPress theme.
Using Tabs in your WordPress theme
There are several steps involved in achieving this. The first step is to set up the basic
HTML required to produce the tabs. We're going to use a slight variation of the
demo that is available at http://flowplayer.org/tools/demos/tabs/skin2.htm.
While the original uses images to style the tabs background, we're going to
take advantage of CSS3 to produce a similar effect.
Creating the basic HTML code
Crank up your usual text editor, and insert this at the foot of your header.php file
within your theme in WordPress:
Tab 1
Second tab
A ultra long third tab
Lorem ipsum dolor sit amet
Lorem ipsum dolor sit amet, consectetur adipiscing elit.
Duis viverra, leo sit amet auctor fermentum, risus lorem
posuere tortor, in accumsan purus magna imperdiet sem.
Suspendisse enim. Pellentesque facilisis aliquam enim.
Maecenas facilisis molestie lectus. Sed ornare ultricies
tortor. Vivamus nibh metus, faucibus quis, semper ut,
dignissim id, diam.
[ 35 ]Using jQuery Tools in WordPress
Mauris ultricies. Nam feugiat egestas nulla. Donec augue
dui, molestie sed, tristique sit amet, blandit eu, turpis.
Mauris hendrerit, nisi et sodales tempor, orci tellus
laoreet elit, sed molestie dui quam vitae dui.
Pellentesque nisl. Ut adipiscing vehicula risus. Nam eget
tortor. Maecenas id augue. Vivamus interdum nulla ac dolor.
Fusce metus. Suspendisse eu purus. Maecenas quis lacus eget
dui volutpat molestie.
Maecenas at odio. Nunc laoreet lectus vel ante. Nullam
imperdiet. Sed justo dolor, mattis eu, euismod sed, tempus
a, nisl. Cum sociis natoque penatibus et magnis dis
parturient montes, nascetur ridiculus mus.
In sed dolor. Etiam eget quam ac nibh pharetra adipiscing.
Nullam vitae ligula. Sed sit amet leo sit amet arcu mollis
ultrices. Vivamus rhoncus sapien nec lorem. In mattis nisi.
Vivamus at enim. Integer semper imperdiet massa. Vestibulum
nulla massa, pretium quis, porta id, vestibulum vitae,
velit.
Styling the tabs—the base version
This version of Tabs relies on using two CSS files for styling purposes; the first file,
tabs-no-images.css, is a generic set of CSS styles, which can be used to produce
a standard version of Tabs, but without using images to provide the background.
Open a new document in your text editor, and save it as tabs-no-images.css in
your WordPress theme:
/* root element for tabs */
ul.css-tabs { height: 30px; margin-bottom: 0 !important;
margin-left: 15px; margin-right: 0 !important;
margin-top: 0 !important; padding: 0; }
/* single tab */
ul.css-tabs li { float: left; padding: 0; margin: 0;
list-style-type: none; }
ul.css-tabs a { float: left; font-size: 13px; display: block;
padding:5px 30px; text-decoration: none;
border: 1px solid #666; border-bottom: 0px;
[ 36 ]Using jQuery Tools in WordPress
height: 18px; background-color: #efefef;
color: #777; margin-right: 2px; position: relative;
top: 1px; outline: 0; -moz-border-radius:4px 4px 0 0;
}
ul.css-tabs a:hover { background-color: #F7F7F7; color: #333; }
/* selected tab */
ul.css-tabs a.current { background-color: #ddd; border-bottom: 1px
solid #ddd; color: #000; cursor: default; }
/* tab pane */
.css-panes div { display: none; border: 1px solid #666;
border-width: 0 1px 1px 1px; min-height: 150px;
padding:15px 20px; background-color: #ddd; }
Styling the tabs—some additional styles
The second CSS style sheet provides a number of overrides, in this instance, for
example, we're going to use CSS3 to provide a similar background styling, so we
can avoid the need to use images. Note though, that this will only work for the latest
browsers, if you need to work with older browsers, then you will need to substitute
in the appropriate code, as indicated:
/* alternate colors: skin2 */
ul.skin2 a { background-color: #89a; color: #fff !important; }
/* mouseover state */
ul.skin2 a:hover { background-color: #678; }
/* active tab */
ul.skin2 a.current { background-color: #4F5C6A;
border-bottom: 2px solid #4F5C6A; }
/* tab pane with background gradient */
div.skin2 div { min-height: 200px; color: #fff;
/* background:#234
url(http://static.flowplayer.org/img/global/gradient/h300.png)
repeat-x scroll 0 -50px; */
/* substitute in the above image for the background styles listed
here, if CSS3 is not an option in your environment: */
background-image: linear-gradient(bottom, rgb(25,32,51) 18%,
rgb(45,59,72) 39%, rgb(78,91,105) 74%);
[ 37 ]Using jQuery Tools in WordPress
background-image: -o-linear-gradient(bottom, rgb(25,32,51) 18%,
rgb(45,59,72) 39%, rgb(78,91,105) 74%);
background-image: -moz-linear-gradient(bottom, rgb(25,32,51)
18%, rgb(45,59,72) 39%, rgb(78,91,105) 74%);
background-image: -webkit-linear-gradient(bottom, rgb(25,32,51)
18%, rgb(45,59,72) 39%, rgb(78,91,105) 74%);
background-image: -ms-linear-gradient(bottom, rgb(25,32,51)
18%, rgb(45,59,72) 39%, rgb(78,91,105) 74%);
background-image: -webkit-gradient(linear, left bottom,
left top, color-stop(0.18, rgb(25,32,51)),
color-stop(0.39, rgb(45,59,72)),
color-stop(0.74, rgb(78,91,105)));
border-radius: 5px 5px 5px 5px;
/* IE6 does not support PNG24 images natively */
_background:#4F5C6A; }
Tweak WordPress styles
We need to add two more additional styles, as a tweak to the original design, so that
it sits correctly on the page. Copy the following into your styles.css file:
/* for use in WP */
#tabscontent { margin-bottom: 40px; margin-left: 10%;
margin-right: 10%; width: 80%; }
h2 { clear: none; /* required to reposition text correctly */ }
Adding in the jQuery code
The last stage to produce a basic design is to add in the jQuery functionality to
turn it into a set of tabs. Open the functions.php file in your theme, and copy the
following code—it assumes that you are using the jQuery Tools WordPress plugin
created earlier in this chapter:
function my_scripts_method() {
if (!is_admin()) {
wp_enqueue_script('tabs-js', get_stylesheet_directory_uri() .
'/js/tabs-js.js', array('jquerytools'), '1.2.6');
wp_enqueue_style('tabs-no-images.css',
get_stylesheet_directory_uri() . '/tabs-no-images.css');
wp_enqueue_style('tabs-no-images-overrides',
get_stylesheet_directory_uri() .
'/tabs-no-images-overrides.css');
[ 38 ]Using jQuery Tools in WordPress
}
}
add_action('wp_enqueue_scripts', 'my_scripts_method');
At this stage, you will have a perfectly working demo, but there is one drawback; it
is very "hardcoded", and doesn't really make use of WordPress' power.
To rectify this, we need to make some more changes, beginning with support for
using post images.
Updating it to use WordPress
The first change we need to make is to enable support for using thumbnail images
in your theme. If you do not already have this enabled, then go ahead and add the
following into your functions.php file:
if(function_exists('add_theme_support')) {
add_theme_support('post-thumbnails');
add_image_size('image-thumb', 150, 150, true);
}
At the start of this demo, we added a number of static paragraphs, which will work,
but require effort if they had to be updated at any time in the future. WordPress can
help here, by pulling content from a post directly into the tabs, as long as you set the
appropriate category name within each post.
At this stage we need to completely rewrite the code used to enter the content into
the tab. Open up your header.php or index.php file (as appropriate, depending on
where you want this to show in your theme), and enter the following:
[ 39 ]Using jQuery Tools in WordPress
The code is set to use "books" as the category name from within
the post admin area in WordPress; you can easily change this
to something more suitable for your needs, by simply replacing
this category name.
The last thing we need to add is two more styles, so grab your copy of the
tabs-no-images-overrides.css file, and add the following:
/* for use in WP - improved styles */
/* ----------------------------------------------- */
#ss-content-text p { float: left; margin-left: 20px;
width: 200px; }
#ss-content-image { float: left; }
[ 40 ]Using jQuery Tools in WordPress
If all is well with the code, then you should see something similar to the following:
Now that we have a working example that uses the power of WordPress, let's take a
look at how we can convert this into a shortcode.
Creating shortcode for Tabs in WordPress
Setting up shortcode is easy, we can use the original code from the previous example,
and modify it to add in the additional code required for creating shortcodes.
Our shortcode will take advantage of WordPress' functionality. If
you want to retain the manual approach, then you may like to look
at an example produced by Michael Wender, which is available (at
the time of writing) from his blog at http://michaelwender.
com/blog/2010/11/01/creating-wordpress-shortcodes-
for-jquery-tools-tabs/
Setting up the JavaScript and CSS functionality
Open up your text editor, and copy the following code into your theme's
functions.php file, which we are reusing from the previous example, to import the
necessary JQuery Tools functionality and CSS styles:
function my_scripts_method() {
if (!is_admin()) {
wp_enqueue_script('tabs-js', get_stylesheet_directory_uri() .
'/js/tabs-js.js', array('jquerytools'), '1.2.6');
[ 41 ]Using jQuery Tools in WordPress
wp_enqueue_style('tabs-no-images.css',
get_stylesheet_directory_uri() .
'/tabs-no-images.css');
wp_enqueue_style('tabs-no-images-overrides',
get_stylesheet_directory_uri() .
'/tabs-no-images-overrides.css');
}
}
add_action('wp_enqueue_scripts', 'my_scripts_method');
The code assumes that you are importing jQuery and the
jQuery Tools library using the plugin developed earlier in
this chapter, if not, you will need to alter the lines to include
the appropriate calls.
Creating the shortcode
Here's where the magic happens, this is the shortcode in full. Copy the following
code into your functions.php file:
function jqtools_tab_group( $atts, $content ){
extract(shortcode_atts(array('category' => 'Untitled',
'postcount' => 1), $atts));
$args=array('name' => $category, 'showposts' => 3);
$catposts = get_posts($args);
echo '';
$count = 1;
query_posts(array('category_name' => $category,
'posts_per_page' => $postcount));
if (have_posts()) : while (have_posts()) : the_post(); ?>
[ 42 ]Using jQuery Tools in WordPress
Using jQuery Tools in WordPress

To get around this, you need to adjust the following two styles; the required changes
are highlighted:
    ul.css-tabs { height: 30px; margin-bottom: 0 !important;
                  margin-left: -90px;
                  margin-right: 0 !important;
                  margin-top: 0 !important;
                  padding: 0;
                  width: 800px; }

The second style to change is that of the .css-panes div style, you need to make the
following highlighted changes:
    .css-panes div { -moz-border-bottom-colors: none;
                     -moz-border-image: none;
                     -moz-border-left-colors: none;
                     -moz-border-right-colors: none;
                     -moz-border-top-colors: none;
                     background-color: #DDDDDD; border-color: #666666;
                     border-style: solid; border-width: 0 1px 1px;
                     display: none;
                     margin-left: -100px;
                     min-height: 150px; padding: 15px 20px;
                     width: 800px; }

This will allow you to increase the Tab count to five—you may need to adjust the
CSS to suit your own style and theme. It's important to note that from a functionality
perspective, it is arguably not good practice to have too many tabs, especially if some
of the tab titles are long!

Converting an existing example to use in
WordPress?
Throughout this chapter, we've looked at examples of how to incorporate jQuery
Tools into WordPress, using plugins, shortcodes, or coding directly into a custom
theme. In both cases, the examples were built from scratch. But what if we want to
use some existing code? This is perfectly possible—let's have a look at one of the
examples from earlier in the book: the RangeInput.

                                         [ 44 ]
Using jQuery Tools in WordPress
Introduction
If you remember, the demo illustrated the versatility of the RangeInput library, by
turning a standard range slider into something completely different—a product
gallery (in this instance, showing off some of the books published by Packt!).
Let's have a look at how to achieve this.
The preparation
The first stage is to adapt the existing code slightly, this is to help with importing it
into your theme in WordPress. You need to do the following:
1. Extract out the JavaScript content into a separate file, and call it
productgallery.js. Link this back into your demo, and test that
it still works fine.
2. Let's do the same with the CSS styles, go ahead and copy these out into
a separate file called productgallery.css, and link that back into your
demo in the same manner.
3. Upload your desired images to the gallery in WordPress.
4. Make sure you have switched on your copy of the jQuery Tools plugin that
you created earlier in this chapter.
Transferring to WordPress
Now that we still have our existing demo working, it is time to transfer it over to
WordPress. Here's where things get a little more complicated, but not much! Let's
begin with the basic HTML code for the theme.
Header.php
Go ahead and copy the following into your theme, directly below the line of code:
Test Book 1
[ 45 ]Using jQuery Tools in WordPress
Test Book 2
Test Book 3
Test Book 4
Test Book 5
Test Book 6
Test Book 7
Test Book 8
Test Book 9
Test Book 10
Test Book 11
Test Book 12
[ 46 ]Using jQuery Tools in WordPress
Test Book 13
Test Book 14
Test Book 15
Test Book 16
Test Book 17
Test Book 18
Test Book 19
Test Book 20
Test Book 21
Test Book 22
Test Book 23
[ 47 ]Using jQuery Tools in WordPress
Test Book 24
Test Book 25
Test Book 26
Test Book 27
Test Book 28
Test Book 29
Test Book 30
Inserting the JavaScript
The next task is to include the productgallery.js file you created earlier, into your
theme. Store the productgallery.js file in the js folder located at the root of your
theme, then use the wp_enqueue_script command to call it in, from within your
functions.php file:
Fucntions.php file
function my_scripts_method() {
if (!is_admin()) {
[ 48 ]Using jQuery Tools in WordPress
wp_deregister_script( 'jquery' );
wp_register_script( 'jquery',
'http://ajax.googleapis.com/ajax/libs/jquery/1.6.4/jquery.min.js');
wp_enqueue_script( 'jquery' );
wp_enqueue_script('jquerytools',
'http://cdn.jquerytools.org/1.2.6/all/jquery.tools.min.js',
array('jquery'), '1.2.6', true);
wp_enqueue_script('rangeinput', get_theme_root_uri() .
'/2011-jqtrangeInput/js/productgallery.js',
array('jquerytools'), '1.2.6', true);
}
}
add_action('wp_enqueue_scripts', 'my_scripts_method');
Now, the eagle-eyed among you will spot that I've included some additional code,
to call in the jQuery library. This is not compulsory, but only if you intend to use the
jQuery plugin we created at the beginning of this chapter. If you do, then you can
safely remove the following lines:
wp_deregister_script( 'jquery' );
wp_register_script( 'jquery',
'http://ajax.googleapis.com/ajax/libs/jquery/1.6.4/jquery.min.js');
wp_enqueue_script( 'jquery' );
The jQuery plugin you created earlier should call in version
1.6.4 of jQuery (not the version that comes in WordPress by
default). Earlier versions may not work as well.
I've also set the $in_footer variable that comes with wp_enqueue_scripts to true;
the RangeInput tool is one of a few oddities in the jQuery Tools collection that
requires the script to be run after at the end of the page, after the code.
Okay, let's move onto the styling.
Styling the product gallery
Here's where you can be really clever, remember the demo we created earlier in the
book, and that we subsequently copied out the code into a separate file? The contents
of that file should look something like this:
/* ----------------------------------------------- */
/* Added for Product Gallery */
[ 49 ]Using jQuery Tools in WordPress
#wrap { background: url("productbrowser.jpg") no-repeat scroll 0 0
transparent; }
/* outermost element for the scroller (stays still) */
#scrollwrap { position: relative; overflow: hidden; width: 620px;
height: 150px; margin-bottom: 15px;
-moz-box-shadow:0 0 20px #666;
-webkit-box-shadow:0 0 20px #666;
border-radius: 4px 4px 0 0; }
/* the element that moves forward/backward */
#scroll { position: relative; width: 20000em; padding: 20px 100px;
height:160px; color: #fff; text-shadow: 5px 1px 1px #000;
left:-100px; }
.textfont { font-weight: bold; font-family: sans-serif;
font-size: 12px; color: #fff; float: left;
padding-right: 74.5px; width: 30px; }
.slider { background: url("bkgrdhandle.png") no-repeat scroll 0 0
transparent; position: relative; cursor: pointer;
height: 17px; width: 580px; -moz-border-radius: 2px;
-webkit-border-radius: 2px; margin-top: -10px;
padding: 3px; margin-left: 16px;
background-size: 581px auto; }
.handle { border-radius: 14px 14px 14px 14px; cursor: move;
display: block; height: 18px; position: absolute;
top: 0px; width: 181px; background: url("scroller.png")
no-repeat scroll 0 0 transparent; }
.handle:active { background: blue; }
.range { display: none; }
#scroll UL { list-style: none outside none; margin: 0; padding: 0;
position: absolute; white-space: nowrap; left: 40px; }
#scroll UL LI { display: inline; width: 80px; }
#scroll UL LI img { padding-right: 23px;
/* ---------------------------------------- 8/
/* tweaks: */
#wrap { margin-left: 19%; margin-right: 16%; }
}
[ 50 ]Using jQuery Tools in WordPress
At this point you need to upload the images into WordPress, then update the
following styles: .handle, .slider, and #wrap.
At this stage you now have two choices, you can include the file as a standalone,
and reference it using the following line (add it to the block of code from earlier, that
references the JavaScript files, changing it to suit your own theme structure):
wp_enqueue_style('productgallery', get_stylesheet_directory_uri() .
'/productgallery.css');
The alternative is to copy the contents out into the main style.css that comes with
each theme. Both will work perfectly well, although as the style sheet gets very large,
it may suit your preferences more to have the product gallery CSS in a separate file.
The code from the original demo earlier in this book contained three
additional CSS styles: body, a.active, and focus. These have been
removed from the CSS that goes into the WordPress theme, as they will
conflict with existing styles.
If all is well, you should end up with something similar to the following:
How can I improve the code?
The code we've used in this section may not be the best, but it serves to highlight
how you can add the RangeInput functionality into a theme with relative ease.
However, we can always improve on code; there is one inherent flaw which we need
to resolve. The existing code doesn't use WordPress' capabilities to their best. To
really take advantage of what can be achieved with WordPress, we need to make a
change to the code in the header.php file. Replace the content between the block with the following:You can also read