FOXTEL MANAGEMENT PTY LIMITED - BUSINESS IQ (BIQ) SATELLITE INFRASTRUCTURE GUIDE
←
→
Page content transcription
If your browser does not render page correctly, please read the page content below
FOXTEL MANAGEMENT PTY LIMITED
Business iQ (BiQ) Satellite Infrastructure Guide

                       FXTL-D-0298
            Last Updated: 15/02/2021 5:16:00 PM
                   ISSUE 1 Revision 2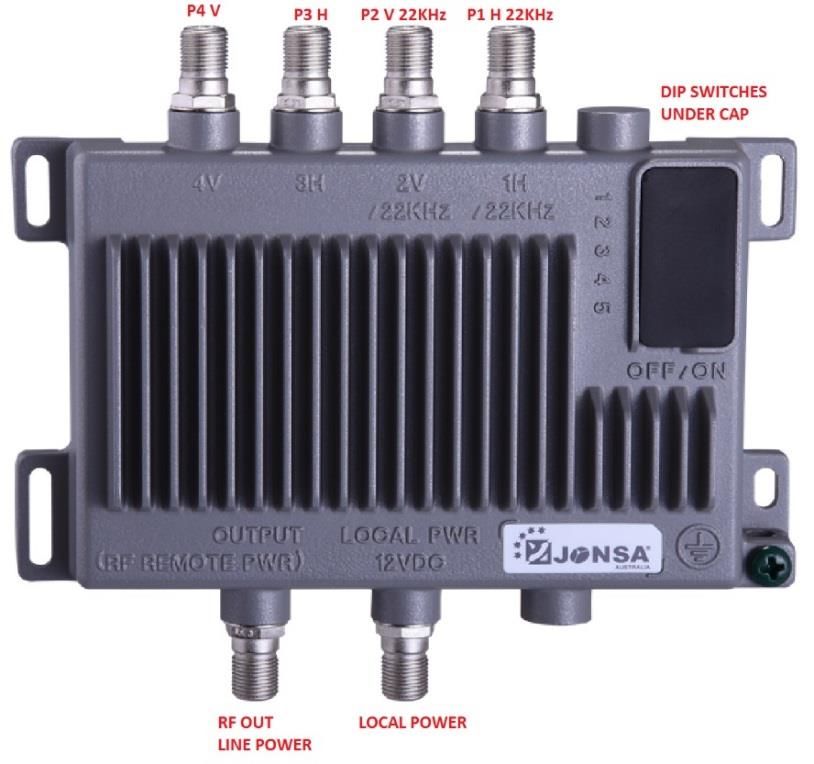
Business iQ (BiQ) Satellite Infrastructure Guide

 Document Control
 © Copyright FOXTEL Management Pty Ltd. All rights reserved. This document
 contains information proprietary to FOXTEL Management Pty Ltd. Except for the
 purposes of evaluation, this document may not be reproduced, in whole or in part, in
 any form, or distributed to any party outside of FOXTEL Management Pty Ltd, by any
 means, without permission in writing, from FOXTEL Management Pty Ltd.
 This document is classified to the level indicated at the top of this page. Any
 classification containing the word confidence or confidential means the document is to
 be placed out of sight when not in use and placed in a drawer or cupboard when the
 room will be unattended. Any classification containing the word secret means the
 document is always to be in someone’s hand or under secure lock when not in use.
Issue Issue Date Revision           Revision        Comments            Prepared By     Authorised By
  #                                   Date
 1     26/03/2020        0                     Updates carried out for Steven Circosta Chris Smith
                                               BiQ RF       Backbone                   John Mitsios
                                               Designs                                 Graham Briscoe
                                                                                       Anthony Carusi
                                                                                       Nicolas Hood
 1     22/04/2020        1      22/04/2020     Section 4.1 Earthing Steven Circosta Steven Circosta
                                               Fibre Hybrid Coaxial                 Graham Briscoe
                                               Systems added
                                               Section 4.2 Isolators
                                               added
                                               SBB installation updates
                                               SBB reference updates
                                               Note:    on     Ethernet
                                               Connection Page 24
 1      15/02/21         2      15/05/21       Distribution list updated Steven Circosta Graham Briscoe
 1      15/02/21         2      15/05/21       Page 21 added BiQ Steven Circosta Graham Briscoe
                                               modulation

 Disclaimer
 This document is correct at time of publication. Foxtel reserves the right to modify
 channel plans or any other item within the document without prior notice to the field.
 Refer to the Foxtel website for the latest version.

 Business iQ (BiQ) Satellite Infrastructure Guide
 Printed: 15/02/21
 © FOXTEL Management Pty Ltd 2021               2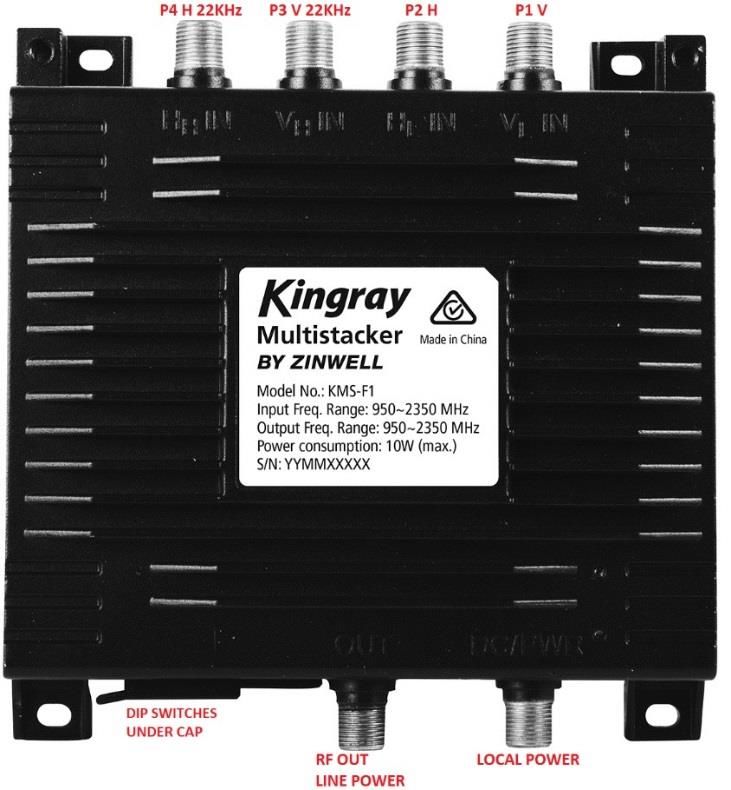
Business iQ (BiQ) Satellite Infrastructure Guide

Distribution List
  Name                             Position                               Company
  Doug Fewtrell                    Head of Field Operations               Foxtel
  Enver Vasfi                      Hardware Development Manager           Foxtel
  Christopher Smith                Commercial Product Solutions Manager   Foxtel
  Graham Briscoe                   Commercial Product Manager             Foxtel
  Adam Brown                       Senior Field Are Manager VIC           BSA
  Dennis Watson                    Field Line Manager Commercial NSW      BSA
  John Mitsios                     Field Line Manager Commercial VIC      BSA
  John Forgione                    Commercial Quote Manager               BSA

Business iQ (BiQ) Satellite Infrastructure Guide
Printed: 15/02/21
© FOXTEL Management Pty Ltd 2021              3
Business iQ (BiQ) Satellite Infrastructure Guide

Document Approval

 Enver Vasfi Hardware Development Manager

                                                                     15/02/21

Business iQ (BiQ) Satellite Infrastructure Guide
Printed: 15/02/21
© FOXTEL Management Pty Ltd 2021              4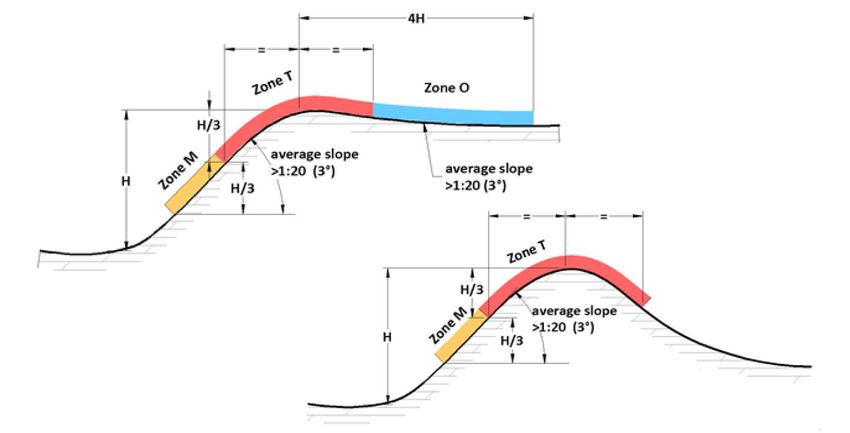
Business iQ (BiQ) Satellite Infrastructure Guide

                                                       Table of Contents
1.      OVERVIEW ....................................................................................................................... 7
2.      OBJECTIVE ...................................................................................................................... 9
3.      SCOPE .............................................................................................................................. 9
4.      INSTALLATION REQUIREMENTS ................................................................................ 12
SBB INSTALLATION .............................................................................................................. 24
RF INPUT PORTS CONFIGURATION SCENARIOS ............................................................. 25
RF INPUT PORTS CONFIGURATION SCENARIOS CONTINUED: ..................................... 26
APPENDIX A. LIST OF OPTUS 10 – D3 STACKED AND NON-STACKED
FREQUENCIES INCLUDING FOXTEL TEST CHANNELS ................................................... 27
APPENDIX B.                 SCOPE OF WORKS ................................................................................... 28
                Post Installation ..................................................................................................................... 28
APPENDIX C.                 EARTHING .................................................................................................. 31
            Equipotential Bonding Commercial Installation (Single Dwelling Residence – more than one
            Wall plate) .................................................................................................................................. 31
            Equipotential Bonding Multi-Dwelling Unit or Commercial Installation ....................................... 32
     4.1.       EARTHING FIBRE HYBRID COAXIAL SYSTEMS .............................................................. 33
     4.2.       ISOLATORS ................................................................................................................ 33
APPENDIX D.                 SATELLITE DISHES ................................................................................... 34
     4.3.   OUTDOOR UNIT (ODU) – DISH AND LNB .................................................................... 34
       4.3.1.    Dish Selection .................................................................................................. 34
       4.3.2.    Dish Alignment ................................................................................................. 35
     4.4.   MOUNTS .................................................................................................................... 35
       4.4.1.    Mount Selection ............................................................................................... 35
       4.4.2.    Location of Mount ............................................................................................ 40
       4.4.3.    Mount and Dish Placement.............................................................................. 40
     4.5.   ROOFING ................................................................................................................... 40
     4.6.   INSTALLATION OF SATELLITE DISH NEAR SOLAR PANELS .............................................. 41
APPENDIX E.                 GLOSSARY OF TERMS ............................................................................. 42
APPENDIX F.                 REFERENCE DOCUMENTS ...................................................................... 43

Business iQ (BiQ) Satellite Infrastructure Guide
Printed: 15/02/21
© FOXTEL Management Pty Ltd 2021                                            5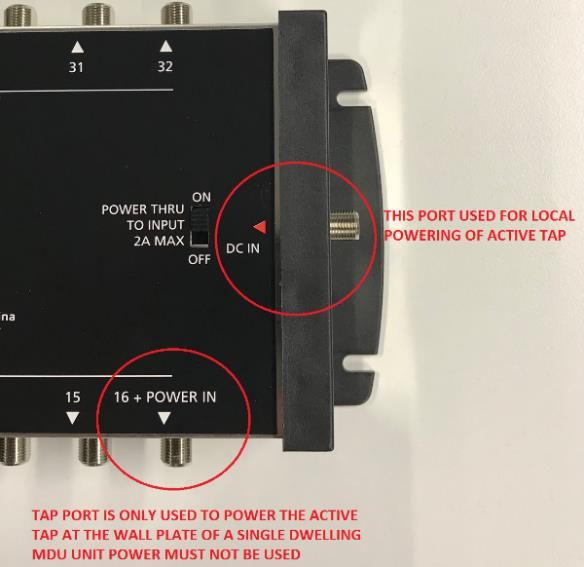
Business iQ (BiQ) Satellite Infrastructure Guide

                                       Table of Contents continued
Diagram 1 Typical Port Configuration of the Satellite Multistacker ........................................... 7
Diagram 2 Dip Switch default Position = Up On & Down Off .................................................. 10
Diagram 3 Looped Backbone Sample Design with a maximum of 6 looped wallplates ......... 14
Diagram 4 Single wire 4 way tap backbone with system calculations .................................... 15
Diagram 5 Single wire 4 way splitter concept design using active taps to feed 128 outlets over
    4 levels ............................................................................................................................. 16
Diagram 6 Active Tap powering options .................................................................................. 17
Diagram 7 Active tap feeding 4 way passive tap within unit ................................................... 17
Diagram 8 Concept optical Backbone via Single mode fibre feeding active taps over 96 floors
    .......................................................................................................................................... 18
Diagram 9 Concept Design 16 way active tap staring out to end of line 32 port active taps. . 19
Diagram 10 Satellite Multistacker - FTA - In-House COFDM Combined Services ................. 20
Diagram 11 2 or 3 wire back bone .......................................................................................... 22
Diagram 12 Existing Two Input Satellite Multiswitch System with Twin Wall Plates ............... 23
Diagram 13 SBB Features ....................................................................................................... 24
Diagram 14 Satellite H &V or Satellite Multistacker Installations with Optional                                                  In-House &
    FTA channels ................................................................................................................... 24
Diagram 15 – Equipotential Bonding in Single Premises ........................................................ 31
Diagram 16 – Equipotential Bonding Multi-Dwelling Unit and Commercial Premises ............ 32
Diagram 17 - Example of Isolators fitted to segregate each cluster of buildings .................... 33
Diagram 18 – Optus O10 FOXTEL Satellite Coverage Zone Map .......................................... 34
Diagram 19 – Wind Regions .................................................................................................... 36
Diagram 20 – Hill Zones .......................................................................................................... 37
Figure 21 – Preferred Dish Locations ...................................................................................... 40

Table 1 Shows Multistacker Dip Switch settings and SBB State Settings .............................. 10
Table 2 shows vertical transponder groups stacked to the new H polarity transponder
    Frequency......................................................................................................................... 11
Table 3 Typical Looped Plate Specification 5-2400 MHz ........................................................ 13
Table 4 Recomended In-House COFDM S Band Frequencies as Listed in AS1367 ............. 20
Table 5 UHF Broadcast and Non Brodcast Frequencies as Listed in AS1367 ....................... 21
Table 6 Frequencies for distribution through an SMS SMATV backbone ............................... 27
Table 7 – Wallplate Signal Level ............................................................................................. 29
Table 8 – Wallplate Digital Performance ................................................................................. 29
Table 9 – Wallplate Digital Slope / Tilt Performance ............................................................... 30
Table 10 – Post Installation Certification Test Locations......................................................... 30
Table 11 – Dish Location Zone to Size Selection Matrix ......................................................... 35
Table 12 – W1 Mount Selection – Wind Rating Chart ............................................................. 37
Table 13 – Exposure Classification ......................................................................................... 38
Table 14 – Rating Increment ................................................................................................... 38
Table 15 – Solar Panel Minimum Distance Guide ................................................................... 41

Business iQ (BiQ) Satellite Infrastructure Guide
Printed: 15/02/21
© FOXTEL Management Pty Ltd 2021                                      6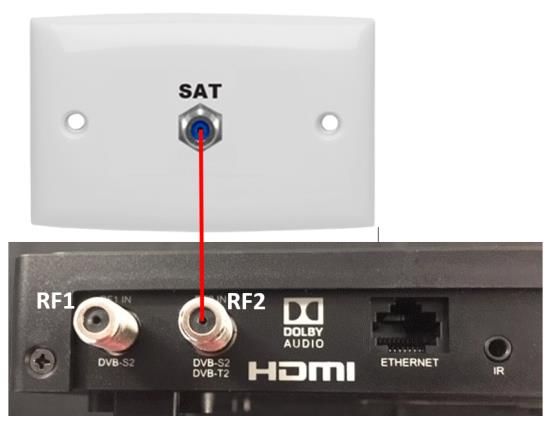
Business iQ (BiQ) Satellite Infrastructure Guide

1.           Overview
There are 2 main distribution methods multistacker and dual polarity H & V distribution.
Option 1: Satellite Multistacker
The Satellite Multistacker combines 2 horizontal & 2 vertical satellite services from 2
orbital locations and combines them on a single RF cable so that a single RF input port
on the SBB can receive the signals.

        Diagram 1 Typical Port Configuration of the Satellite Multistacker

Business iQ (BiQ) Satellite Infrastructure Guide
Printed: 15/02/21
© FOXTEL Management Pty Ltd 2021              7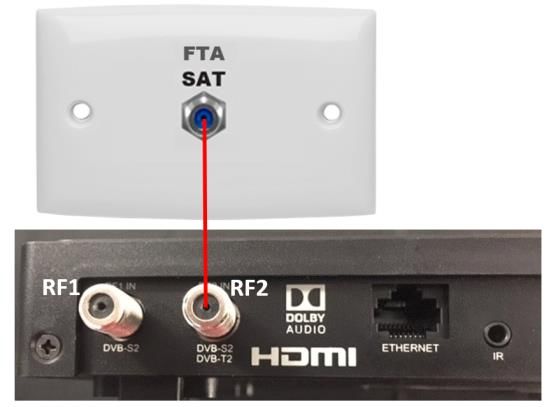
Business iQ (BiQ) Satellite Infrastructure Guide

The Multistackers have 4 input ports which cater for low & high band signals.
Low band via DC Voltage
High band via DC & 22 KHz tone.

        Note: It is important to have the satellite RF feeds connected between the
              LNBF and SMS before the unit is powered up. This will ensure that the
              SMS does not go into automatic search mode that could take up to an
              hour to complete the search. Connecting the cables and power in the
              correct sequence allows the SMS to lock to the Foxtel Transponders
              within 30 seconds.
Kingray
From left to right
    •   Port 4   HH = 18 volts plus 22 KHz (future satellite)
    •   Port 3   VH = 13 volts plus 22 KHz (future satellite)
    •   Port 2   H L = 18 volts (Current Foxtel H pol services)
    •   Port 1   V L = 13 volts (Current Foxtel V pol services)
Jonsa
From left to right
    •   Port 4   V L = 13 volts (Current Foxtel V pol services)
    •   Port 3   H L = 18 volts (Current Foxtel H pol services)
    •   Port 2   V H = 13 volts plus 22 KHz (future satellite)
    •   Port 1   H H = 18 volts plus 22 KHz (future satellite)
The units have 2 ports on the bottom.
    •   Port 1 Stacked satellite output port with the option of line powering via a 12, 15
        or 18 volt DC power injector and power pack.
    •   Port 2 local powering via a 12, 15 or 18 volt DC power pack
        Note: When using the local powering option, the installation of a power block
              at the RF output is required to stop unwanted power entering the SMS.
                 Local powering option can be extended using RG6 coaxial cable, the
                 maximum run of cable depends on the voltage source used. 12 Volt 15
                 metres, Jonsa 15 volt 30 metres, & Kingray 18 volt, 50 metres.
                 When line powering via the RF output with the use of a power injector
                 & FTA – Satellite diplexer in line, the maximum cable runs are reduced
                 to the following. 12 volt 10 metres, Jonsa 15 volt 25 metres, & Kingray
                 40 metres.
                 When line powering the Kingray stacker the local power port shall be
                 terminated with one of the capacitive terminators supplied.

Business iQ (BiQ) Satellite Infrastructure Guide
Printed: 15/02/21
© FOXTEL Management Pty Ltd 2021              8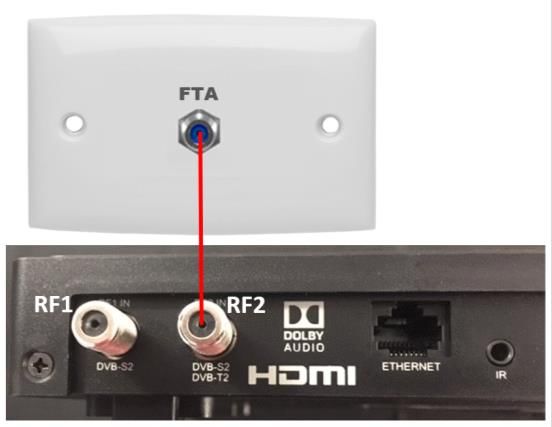
Business iQ (BiQ) Satellite Infrastructure Guide

2.           Objective
The satellite multistacker (SMS) is a standalone device that can be installed directly
after a twin or quad universal vertical - horizontal LNBF. It is typically installed before
the first distribution point in the SMATV system. An amplifier is installed where required
to provide a higher launch level of up to 108dBuV. (The multistacker typically outputs
a level of 80-85dBuV).
Due to the design of the multistacker there is no headend set up procedure, the Foxtel
N.I.T (Network Information Table) is updated which informs the SMS what frequencies
to tune to in the same way we update information to STB’s in the field. This becomes
a simple installation method for a large variety of Commercial building types which
include:
     •   Single cable short stay Commercial accommodation inclusive of Hotels.
     •   Commercial buildings having only a single H pol back bone which are classified
         as MDU lite.
     •   New single wired Commercial Buildings with passive or active taps.
     •   Single wired mining camp estates including RF or Optical distribution.
     •   Shop fronts
     •   Pubs and clubs

3.           Scope
To install a multistacker, all RF distribution components within the network must be
capable of distributing the upper Frequency of 2400MHz, including:
     •   Amplifiers
     •   Power Injectors
     •   Splitters
     •   Taps
     •   Cables
     •   Connectors
     •   Wall plates
Foxtel satellite transponders are distributed on frequencies between 950-2350MHz.
The SMS stacks V polarity transponders onto the H polarity so that a single cable can
distribute up to 32 satellite Transponders. This allows the integration of FTA services
on the one cable with the use of a FTA – Satellite diplexer that combines 45-862 MHz
FTA & 950-2400 MHz Satellite. Foxtel has updated the Installer Product List with
products capable of distributing signals at the higher frequency of 2400MHz which are
listed under the category “Multistacker”.
This allows the combined FTA – Satellite to be distributed down existing single cable
RF distribution networks that are fitted with a minimum of RG6 coaxial cable.
The stacker has been fitted with a 5 position dip switch which is switched to match the
State installed. This allows Foxtel to make better use of Transponder space in the
event that the total 32 transponders are used.

Business iQ (BiQ) Satellite Infrastructure Guide
Printed: 15/02/21
© FOXTEL Management Pty Ltd 2021              9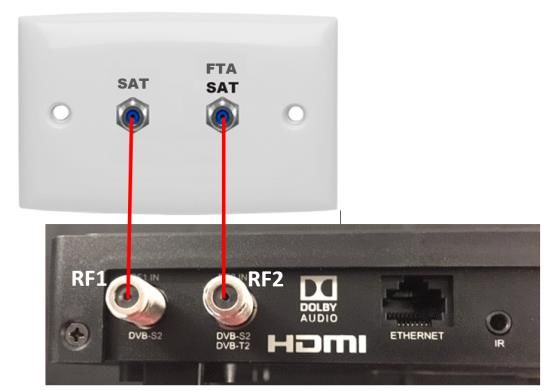
Business iQ (BiQ) Satellite Infrastructure Guide

            Diagram 2 Dip Switch default Position = Up On & Down Off

 The dipswitches on the multistacker are switched to match the state installed

 Switch             1              2          3        4          5        SBB
 Number                                                                   Setting

 National          Off             Off       Off      Off        Off     National 01

   NSW             On              Off       Off      Off        Off      NSW 02

    VIC            Off             On        Off      Off        Off          VIC 03

    QLD            On              On        Off      Off        Off      QLD 04

     SA            Off             Off       On       Off        Off          SA 05

    WA             On              Off       On       Off        Off          WA 06

    TAS            Off             On        On       Off        Off      TAS 07

     NT            On              On        On       Off        Off          NT 08

    Table 1 Shows Multistacker Dip Switch settings and SBB State Settings

Business iQ (BiQ) Satellite Infrastructure Guide
Printed: 15/02/21
© FOXTEL Management Pty Ltd 2021             10
Business iQ (BiQ) Satellite Infrastructure Guide
Vertical Stacked Transponder Frequencies
The following tables shows the vertical stacked transponders for each state throughout
Australia. The multistacker is shipped with all dip switched set to the National Plan or
off position. This plan has higher frequencies which are used to commission an SMATV
or Optical Backbone before the correct state is selected. The new state is retuned
within 30 seconds of selecting the required plan. Meter plans have been listed on the
left from 01 to 08.
12802 12843.5 12885 12926.5 12968
G31 G32 G33
S NAT 01 G35 T4 G34 T8 T10 T11 T12
11679 12227.5 12760.5 12802 12843.5
G31 G32 G33
S NSW 02 T10 T11 T12 G34 T8 G35 T4
G32 G33 G31
S VIC 03 T11 T12 G34 T8 G35 T4 T10
G33 G31 G32
S QLD 04 T12 G34 T8 G35 T4 T10 T11
G31 G32 G33
S SA 05 G35 T4 T10 T11 T12 G34 T8
G31 G32 G33
S WA 06 G34 T8 G35 T4 T10 T11 T12
G32 G31 G33
S TAS 07 T11 T10 T12 G34 T8 G35 T4
G33 G31 G32
S NT 08 T12 T10 T11 G34 T8 G35 T4
Table 2 shows vertical transponder groups stacked to the new H polarity
transponder Frequency
Important Note: It is crucial that the correct plan is selected for the required state. If
this is not carried out the subscriber will be missing some if not all vertical channel
groups. Resulting in a “No Signal” status.
Business iQ (BiQ) Satellite Infrastructure Guide
Printed: 15/02/21
© FOXTEL Management Pty Ltd 2021 11Business iQ (BiQ) Satellite Infrastructure Guide
4. Installation Requirements
Lite Upgrades:
In lite upgrades, all components shall be rated to 45-2400 MHz. The system design
is treated the same as a new backbone.
Notes:
• An existing lite single backbone only caters for H pol transponders for Optus
10 & Optus D3 with a 10.7 L.O LNBF. All actives and passives require upgrade
to 2400MHz rated components.
• All RG11 crimp connectors shall be replaced with compression connectors.
• Existing RG6 crimp connectors are permitted in lite upgrades, under the proviso
that the minimum RF & signal quality levels are met throughout the system.
Refer to tables 5,6,7 & 8 of this document for minimum requirements.
• A GPO is required in the headend location. If this is not achievable line
powering via an in-line power injector with a dedicated “common property” GPO
in another location is possible. The unit is not to be powered from a private
resident’s power source.
• When local powering the SMS via the DC power port, the installation of a DC
block shall be installed at the RF output port.
New Backbone:
• 4 Cables run from the LNBF to the Multistacker.
• A 5th Cable is installed from the roof FTA antenna to the multistacker / headend
location.
• RG11 compression connectors are to be used for all RG11cables.
• RG6 compression connectors are to be used for all RG6 cables.
• Standalone satellite systems require amplifiers with an operational range of
950-2400MHz, no FTA amplifier is required.
• When integrating FTA services, the FTA amplifiers are to operate in the range
45 – 862MHz.
• Refer to the Foxtel Installer Product List for a full range of products that can be
used for SMS installations.
• When local powering the SMS via the DC power port, the installation of a DC
block shall be installed at the RF output port.
Optical Systems and Mining Estates:
• When integrating into an optical fibre network, the components used must be
capable of transmitting signals in the range of 5-2400MHz. Carriers networks
that use RF overlay for combining television services typically use the
wavelength of 1550nm for distribution through the network. Please check with
the carrier’s requirements when choosing the wavelength to be used.
• Optical receivers should be capable of catering for a high channel load of 32 x
36MHz satellite carriers and a minimum of 12 x 7 MHz COFDM FTA carriers.
The channel load may vary depending on the network requirements.
• Wall plate signal levels & quality shall meet the requirements shown in tables
5,6, 7 & 8 of this document.
Business iQ (BiQ) Satellite Infrastructure Guide
Printed: 15/02/21
© FOXTEL Management Pty Ltd 2021 12Business iQ (BiQ) Satellite Infrastructure Guide
Upgrade of an existing FTA RG6 Looped Back Bones:
Using the following loop plate values as a guide, systems that have RG6 looped
plates between floors can be upgraded with F type single Loop plate mechanisms.
Tap Loop Loss in dB Tap Loss in dB
Value 250MHz - 950MHz - 2400MHz 250MHz – 950MHz - 2400MHz
9dB 1.9 - 2.0 – 4.3 9.0 – 9.2 – 9.5
12dB 1.0 – 1.2 – 3.0 12.0 – 12.4 – 13.4
15dB 0.9 – 1.0 – 3.0 14.7 – 15.0 – 15.8
18dB 0.8 – 1.2 – 3.0 17.8 – 18.6 – 19.4
21dB 0.6 – 1.2 – 3.3 21.0 – 21.0 – 22.3
Table 3 Typical Looped Plate Specification 5-2400 MHz
The following page shows a typical 6 storey looped system feeding from the main
distribution point in the communications cupboard. A 4 way splitter is feeding 4 sets
of loop plates for a total of 24 accommodation units.
Business iQ (BiQ) Satellite Infrastructure Guide
Printed: 15/02/21
© FOXTEL Management Pty Ltd 2021 13Business iQ (BiQ) Satellite Infrastructure Guide Diagram 3 Looped Backbone Sample Design with a maximum of 6 looped wallplates Business iQ (BiQ) Satellite Infrastructure Guide Printed: 15/02/21 © FOXTEL Management Pty Ltd 2021 14
Business iQ (BiQ) Satellite Infrastructure Guide

       Diagram 4 Single wire 4 way tap backbone with system calculations

Business iQ (BiQ) Satellite Infrastructure Guide
Printed: 15/02/21
© FOXTEL Management Pty Ltd 2021             15
Business iQ (BiQ) Satellite Infrastructure Guide
Concept Design
The following concept design combines Satellite and FTA channels onto a single
backbone. The use of satellite / FTA diplexers used to separate the satellite and FTA
signals into the business iQ also known as a SBB or STB.
Diagram 5 Single wire 4 way splitter concept design using active taps to feed
128 outlets over 4 levels
Notes:
• The maximum cable length between the 18V DC power supply and active tap
is 40M of RG6.This allows up to 160M of RG6 between the 4 active taps with
a maximum of 1.5 amp current draw through the 4 way splitter.
• The 32 port active tap current draw is in the range of 250-300mA @ 18V DC.
• The maximum combined current draw from a single power supply must not
exceed 1800mA.
• In this scenario, the SMS is powered locally by the 12V DC power supply. The
12 volt power supply can be installed up to 10M from the SMS via the use of
RG6 coaxial cable.
• Powering option #1 shows the active tap powered via an 18V DC power supply
at the input of the 4 way splitter. This option is available for 2, 3 or 4 way
splitters.
• Powering option #2 shows the active tap locally powered via an 18V DC power
supply on level 1. When this option is used powering of the Active Tap & SMS
can be achieved by removing power supplies and power block at the SMS
location.
• Correct splitters with forward or reverse powering options are used.
Business iQ (BiQ) Satellite Infrastructure Guide
Printed: 15/02/21
© FOXTEL Management Pty Ltd 2021 16Business iQ (BiQ) Satellite Infrastructure Guide
Diagram 6 Active Tap powering options
An active tap provides up to 90dBuV output at 2400MHz, a single cable run into the
unit can feed a tap or splitter within the unit. Diagram 7 shows the maximum cable
lengths that can be achieved to provide the require signal at the SBB.
Diagram 7 Active tap feeding 4 way passive tap within unit
Notes:
• 45M run of RG6 can be achieved when installing a 12dB tap with the unit.
• Preference is given to installing a tap within the unit over a splitter due to its
higher port to port isolation performance.
• However, if cable run exceeds 45M, a 4 way splitter can be installed within the
unit to achieve a maximum run of 60M resulting in 58.0dB into the SBB.
Business iQ (BiQ) Satellite Infrastructure Guide
Printed: 15/02/21
© FOXTEL Management Pty Ltd 2021 17Business iQ (BiQ) Satellite Infrastructure Guide
Diagram 8 Concept optical Backbone via Single mode fibre feeding active taps
over 96 floors
Business iQ (BiQ) Satellite Infrastructure Guide
Printed: 15/02/21
© FOXTEL Management Pty Ltd 2021 18Business iQ (BiQ) Satellite Infrastructure Guide
Diagram 9 Concept Design 16 way active tap staring out to end of line 32 port
active taps.
Business iQ (BiQ) Satellite Infrastructure Guide
Printed: 15/02/21
© FOXTEL Management Pty Ltd 2021 19Business iQ (BiQ) Satellite Infrastructure Guide
Diagram 10 Satellite Multistacker - FTA - In-House COFDM Combined Services
Diagram outlines a typical Headend with Stacked Satellite, FTA & In-house service
combined via a 3 way 2.4GHz splitter to provide a single cable output to the SMATV
backbone.
Note: FTA & In-house channels can also be combined into a 3 or 5 wire Multiswitch
SMATV system as shown in Diagram 11.
Modulators shall be tuned to the S-Band Centre Frequencies as listed in AS1367.
Frequencies used will be added into VuTyme and allows the BiQ SBB to tune to the
Centre Frequencies shown in the following table.
Centre Frequencies shown in MHz
233.5 240.5 247.5 254.5 261.5 268.5
275.5 282.5 289.5 296.5 305.5 312.5
319.5 326.5 333.5 340.5 347.5 354.5
361.5 368.5 375.5 382.5 389.5 396.5
403.5 410.5 417.5 424.5 431.5 438.5
445.5 452.5 459.5 466.5
Table 4 Recomended In-House COFDM S Band Frequencies as Listed in AS1367
Frequency limits of 230 – 470.0 MHz.
Business iQ (BiQ) Satellite Infrastructure Guide
Printed: 15/02/21
© FOXTEL Management Pty Ltd 2021 20Business iQ (BiQ) Satellite Infrastructure Guide
Diagram 11 BiQ Modulated Headend and FTA Integration in Licenced Venues
Where RF COFDM modulation of the Sports or non DRM channels are required for
distribution on the FTA backbone, the BiQ is installed at the input to HDMI modulator.
Most domestic TV’s can not tune to the S-Band as indicated in table 4, in this instance
it is recommended that UHF frequencies are used.
Centre Frequencies shown in MHz
529.5 536.5 543.5 550.5 557.5 564.5
571.5 578.5 585.5 592.5 599.5 606.5
613.5 620.5 627.5 634.5 641.5 648.5
655.5 662.5 669.5 676.5 683.5 690.5
697.5 704.5 711.5 718.5 725.5 732.5
739.5 746.5 753.5 760.5 767.5 774.5
781.5 788.5 795.5 802.5 809.5 816.5
823.5 830.5 837.5 844.5 851.5 858.5
Table 5 UHF Broadcast and Non Brodcast Frequencies as Listed in AS1367
• Frequency limits of 526 -694 MHz in the Broadcast Band Recommended
• Frequency limits of 694-862MHz in the Non-Broadcast Band can be used as
an option where the band of 526-694MHz is congested.
Important Note:
• When using the non-broadcast band it’s important to install a good quality LTE
filter on the FTA antenna cabling. This will limit the chance of interference from
LTE services.
• Ensure good quality cabling and shielded components are used throughout the
backbone.
Business iQ (BiQ) Satellite Infrastructure Guide
Printed: 15/02/21
© FOXTEL Management Pty Ltd 2021 21Business iQ (BiQ) Satellite Infrastructure Guide
Diagram 12 2 or 3 wire back bone
There are existing systems in the field with 3 input multiswitches and 2 x RG6 cables
to the outlets. These systems are easily upgraded for BiQ installations as shown in the
sample on the bottom left.
Business iQ (BiQ) Satellite Infrastructure Guide
Printed: 15/02/21
© FOXTEL Management Pty Ltd 2021 22Business iQ (BiQ) Satellite Infrastructure Guide
Diagram 13 Existing Two Input Satellite Multiswitch System with Twin Wall
Plates
In a twin backbone with twin laterals both Ports 1 & 2 of the BiQ are used.
Note: In a two input multiswitch or (optional 3 input FTA - Satellite multiswitch) with
single wall plate port 2 on the BiQ is used.
Business iQ (BiQ) Satellite Infrastructure Guide
Printed: 15/02/21
© FOXTEL Management Pty Ltd 2021 23Business iQ (BiQ) Satellite Infrastructure Guide
SBB Installation
The Quantum SBB (set back box) has the following features.
Important: The Quantum SBB box has 1 terrestrial tuner which is always tied to the external RF2 ‐IN port, and
4 satellite tuners which can each be tied through an internal multiplexer to either the external RF1 ‐IN port or
the RF2‐IN port.
1. RF1 IN (DVB‐S2) ‐ connector for satellite signal reception.
2. RF2 IN (DVB‐S2, DVB‐T2) ‐ connector for satellite and/or terrestrial signal reception.
3. Ethernet port ‐ is preferred for BiQ deployments for 2‐way application traffic flows. Note: If Ethernet
is not available at a property, the SBB’s Wi-Fi must be used for application and VOD traffic.
4. IR ‐ connector for the external infrared receiver input port. Since the SBB is typically mounted to the back
of a TV ‐ or otherwise kept out of sight ‐ an IR Eye Prism Extender Cable is used to pass RCU signals
to the SBB.
5. USB ‐ USB port is used to upgrade the BiQ firmware via a USB stick.
6. HDMI Out ‐ HDMI output to the TV.
7. POWER ‐ Check the power specifications before connecting the set‐back box to the wall outlet.
8. Embedded Chromecast device to support mobile device screen ‐casting
Diagram 14 SBB Features
Satellite In-House and FTA RF Ports can be configured in vuTyme.
Ports 1 and 2 are used for dual polarity backbone systems with optional in-house and
or FTA channels on Port 2.
Port 2 Stacked Satellite on H pole with optional in-house and or FTA channels.
Diagram 15 Satellite H &V or Satellite Multistacker Installations with Optional
In-House & FTA channels
Business iQ (BiQ) Satellite Infrastructure Guide
Printed: 15/02/21
© FOXTEL Management Pty Ltd 2021 24Business iQ (BiQ) Satellite Infrastructure Guide
RF Input Ports Configuration Scenarios
RF connect: use cases & settings Find the use case below (1 to 6) that applies to your
specific installation and use the RF. Note: The BiQ back-office shall be configured by
Foxtel before on-site installation.
Use Case 1: Multi-stacker Satellite Combined (Diplexed) with Terrestrial • Single
lateral (with horizontal + vertical stacked) for full Foxtel satellite service with terrestrial
stations diplexed on same feed • Connections: Connect the multi-stacked satellite RF
cable that also combines the terrestrial stations to RF2; RF1 is unused
Use Case 2: Multi-stacker Satellite + Terrestrial • Single lateral (with horizontal +
vertical stacked) for full Foxtel satellite service • SBB terrestrial on a separate RF cable
for local over-the-air services • Connections: Connect the multi-stacked satellite RF
cable to RF1, and connect the terrestrial RF cable to RF2
Use Case 3: Dual Satellite Laterals + Terrestrial • Two laterals for full Foxtel satellite
service (horizontal [18V] + vertical [13V]) • Terrestrial diplexed on 1 satellite lateral for
local over-the-air services • SBB Connections: Connect one RF cable to RF1, and
connect the other cable that carries the diplexed terrestrial signal with a satellite lateral
to RF2
Use Case 4: Dual Satellite Laterals No Terrestrial • Two laterals for full Foxtel satellite
service (horizontal [18V] + vertical [13V]) • No terrestrial • SBB Connections: Connect
one RF cable to RF1, and connect the other cable to RF2
Use Case 5: Multi-stacker Satellite Only (No Terrestrial) • Single Lateral (with
horizontal + vertical stacked) for full Foxtel satellite service • SBB Connections:
Connect the multi-stacked satellite RF cable to RF2; RF1 is unused
Use Case 6: Terrestrial Only • No satellite • Terrestrial on a separate RF cable for local
over-the-air services • SBB Connections: Connect the terrestrial cable to RF2; RF1 is
unused
Notes:
• Use Case 3: Could be via 2 port F connector wall plate with FTA combined on
one cable as shown in Use Case 3 on page 22, or via a 3 port wallplate with 2
x sat & 1 x FTA. In this scenario a Satellite-FTA diplexer should be installed to
combine signals into RF port 2.
• Ethernet Connection: BiQ SBB relies on an ethernet connection for
applications and VOD traffic. It is essential that all boxes are connected to the
internet via preferred method hard wired ethernet connection, if hardwired
connection cannot be achieved Wi-Fi connection can be used.
• Refer to BUS0403_BiQ Technical Guide for further information.
Also known as Foxtel Business iQ (BiQ) Installation Guide.
Business iQ (BiQ) Satellite Infrastructure Guide
Printed: 15/02/21
© FOXTEL Management Pty Ltd 2021 25Business iQ (BiQ) Satellite Infrastructure Guide
RF Input Ports Configuration Scenarios Continued:
Use Case 1: Satellite multistacker FTA on a Use Case 2: Multistacker satellite with separate
single cable FTA Port
RF2 Sat-FTA connected, RF1 unused RF1 Sat & RF 2 FTA are connected
Use Case 3: Dual H & V Satellite & FTA on same Use Case 4: Dual Satellite ports H & V
cable
RF1 Sat & RF2 Sat are connected
RF 1 Sat & RF2 Sat-FTA
(See note on page 24 for 3 port wall plate)
Use Case 5: Multistacker Satellite only Use Case 6: FTA Only no satellite
RF2 Sat only connected, RF1 not used RF2 FTA connected, RF1 not used
Business iQ (BiQ) Satellite Infrastructure Guide
Printed: 15/02/21
© FOXTEL Management Pty Ltd 2021 26Business iQ (BiQ) Satellite Infrastructure Guide
Appendix A. List of Optus 10 – D3 Stacked and non-
stacked Frequencies including Foxtel Test
Channels
Table 6 Frequencies for distribution through an SMS SMATV backbone
Table shows the I.F Frequencies for distribution through an SMS SMATV backbone.
Note: National plan 01 is used to commission all SMS SMATV backbone systems. The
higher frequencies are listed in the event that a total of 32 transponders are used, this
will result in new V pol stacked frequencies being used in stacked plans 02 through to
08.
Foxtel’s satellite Test Channels are shown in yellow
Once the system logs have been taken on National Plan 01, a log is required out of
the stacker to confirm that the correct state plan has been chosen.
Please note: ACT uses the same plan as NSW 02.
Business iQ (BiQ) Satellite Infrastructure Guide
Printed: 15/02/21
© FOXTEL Management Pty Ltd 2021 27Business iQ (BiQ) Satellite Infrastructure Guide
Appendix B. Scope of Works
Post Installation
At the completion of the installation, an approved ‘as built’ SOW document shall be
forwarded to FOXTEL.
Note: The National Service Provider / installation company submits an
electronic copy of the ‘as built’ Scope of Work document to Foxtel.
Installation ‘As Built’ Drawing
An accurately electronic ‘as built’ design showing all the equipment installed in the
system must be provided with the ‘as built’ SOW document.
Installation Photographs
Photographs shall be provided as appropriate for:
• Dish location – showing skyline and Dish; LNB; Mount – close up photo
• Headend location showing multistacker amplifiers and other devices
• Tap location and earthing
• FTA and FOXTEL integration point.
Installation Certification Testing
Post installation testing involves completion of a commissioning sheet contained within
the ‘as built’ SOW document.
All tests must comply with the wall plate specifications for installations tables and be
documented on the As Built SOW.
Testing by data logging is also acceptable.
LNB Tests
All ports on the LNB must be tested for Digital Channel Power, Modulation Error Ratio
and Bit Error Rate for the following Eight Transponders (as a minimum).
Optus D3 Optus 10
T10, T12,T14,T18,T22,T24 T17 & T24
Multistacker – Back Bone Tests
Note: National Plan 01 used to commission all SMS SMATV systems. The
higher frequencies in plan 01 are used to ensure that higher frequencies
pass through the backbone in the event that 32 transponders are used.
Once the backbone logs are taken throughout the network at the higher
frequencies, a single log is then taken at the output of the SMS to
confirm that the multistacker has been switched to the required state
plan.
Business iQ (BiQ) Satellite Infrastructure Guide
Printed: 15/02/21
© FOXTEL Management Pty Ltd 2021 28Business iQ (BiQ) Satellite Infrastructure Guide
Amplifier Tests
The input and output signal levels are to be tested at the MATV launch amplifier.
Channel loading should be taken into account and launch level adjusted accordingly.
Passive Tap, Active Tap or MultiswitchTests
The Passive Tap, Active Tap, or (multiswitch on upgraded no PDR site) must be tested
for Digital Channel Power, Modulation Error Ratio and Bit Error Rate for Transponders
as per LNB Tests shown above (as a minimum). Testing by data logging is also
acceptable.
Wall plate Tests (Satellite & FTA)
The signal levels must be tested at wall plates:
• Closest to the Headend
• Central to the Headend and
• Furthest from the Headend
All tests must comply with the wall plate specifications for installations tables.
Testing by data logging is also acceptable.
Table 7 – Wallplate Signal Level
Wallplate Level (dBµV)
Commercial Single Dwelling Multi-Dwelling Unit, Multi-
Broadcast Type Residence (SDR) ONLY Residential Estate and Large
Commercial
Systems >20 RF Channels
Standard Modulation type Min Max Min Max
Analogue FM radio 45 80 54 71
DVB-S / S2 QPSK / 8PSK 58 79 58 76
DVB-T COFDM 64 QAM 40 75 54 77
DAB+ DQPSK (EEP3A) 60 86 60 77
Note: All digital levels are RMS voltage or Digital Channel Power. Digital Channel Power
measured values may be +/- 2 dB from the levels listed due to accuracy of meters.
Table 8 – Wallplate Digital Performance
Modulation Error
Broadcast type Bit Error Rate Ratio
(In band noise ratio)
Pre-Viterbi Pre – RS
Standard Modulation Type or Post-Viterbi Minimum (dB)
DVB-S QPSKBusiness iQ (BiQ) Satellite Infrastructure Guide
Table 9 – Wallplate Digital Slope / Tilt Performance
Broadcast Type Wallplate Level Slope Tilt (dB)
Maximum level difference Maximum level difference
Standard Modulation Type at single wallplate ALL wallplates in system
DVB-S QPSK 12 18
DVB-T COFDM 64 QAM 6 12
DAB+ DQPSK (EEP3A) 6 12
Note: Measured values may be +/- 2dB from the levels listed owing to accuracy of meters.
Table 10 – Post Installation Certification Test Locations
Broadcast Type Test Locations
Active Taps
Standard Modulation type Amplifiers Multiswitches and
wallplates
DVB-S QPSK 8 Transponders 8 Transponders
Highest and lowest
DVB-T COFDM 64 QAM All channels
channels
Quality Control
FOXTEL’s quality expectations and processes focus on ensuring that the design and
field installation process is positive and beneficial to everyone involved in the FOXTEL
process and that they will happily recommend the FOXTEL process to others.
FOXTEL reserve the right to actively inspect the work performed by the Service
Provider to ensure that their work meets the required standards. If subsequently the
work is found to be of an inferior standard then the Service Provider will be required to
make the necessary reparations.
Business iQ (BiQ) Satellite Infrastructure Guide
Printed: 15/02/21
© FOXTEL Management Pty Ltd 2021 30Business iQ (BiQ) Satellite Infrastructure Guide
Appendix C. Earthing
Earthing and Equipotential Bonding (CET) Designs
All system components must be earthed in compliance with
AS/NZS 1367:2016, AS/NZS3000:2018, (earthing conductors), and
AS/CA-S009:2013, S009:2019 comes into effect once published.
Equipotential bonding is used to ensure that no hazardous voltages are present on the
outer conductors of a cable or any metallic component within the network.
A licensed electrician must carry out connections within the electrical switchboard.
Note: A suitably qualified person can carry out the connection for protective earthing external
to the switchboard.
Refer to the following designs for specific diagrams for earthing outline the preferred
methods for connection of a CET and bonding conductor.
Equipotential Bonding Commercial Installation (Single Dwelling
Residence – more than one Wall plate)
Diagram 16 shows the method for Equipotential Bonding in a commercial (Single
Dwelling Residence) single premise installation with more than one outlet.
Diagram 16 – Equipotential Bonding in Single Premises
Business iQ (BiQ) Satellite Infrastructure Guide
Printed: 15/02/21
© FOXTEL Management Pty Ltd 2021 31Business iQ (BiQ) Satellite Infrastructure Guide
Equipotential Bonding Multi-Dwelling Unit or Commercial Installation
Diagram 17 shows the method for Equipotential Bonding in a Multi-Dwelling Unit or
commercial multiple premise installation.
Diagram 17 – Equipotential Bonding Multi-Dwelling Unit and Commercial
Premises
Note:
• Equipotential bonding shall be extended in building upgrades that have
equipotential bonding in place.
• Upgraded buildings that do not have equipotential bond in place can remain as
they are.
• All new builds shall incorporate equipotential bonding.
Business iQ (BiQ) Satellite Infrastructure Guide
Printed: 15/02/21
© FOXTEL Management Pty Ltd 2021 32Business iQ (BiQ) Satellite Infrastructure Guide
4.1. Earthing Fibre Hybrid Coaxial Systems
• Earthing is not required when an ONT is installed within the home to convert
Optical signals to coaxial signals, in this instance electrical isolation is achieved
via the optical connection.
• Note: Earthing is required when the coaxial output of the ONT is split to feed 2
or more dwelling or homes.
4.2. Isolators
The use of isolators are used on single cable backbones to electrically separate the
customers equipment from the SMATV network, protecting the network and
technicians working on the network.
• An isolator must be installed between each home – cluster of buildings.
• An Isolator is not required where the headend splitters or taps are installed
within the one building, however earthing of all components are required.
• Isolators are not required where each home or cluster of buildings are isolated
via fibre optic cable / ONT.
• The isolator is to be installed in the home wall box or service cupboard and
must not be installed in a pillar or in the roof space.
• An Isolator must be fitted in all homes at the input to the house tap, splitter or
amplifier unless an ONT is installed before each home.
Diagram 18 - Example of Isolators fitted to segregate each cluster of buildings
Business iQ (BiQ) Satellite Infrastructure Guide
Printed: 15/02/21
© FOXTEL Management Pty Ltd 2021 33Business iQ (BiQ) Satellite Infrastructure Guide
Appendix D. Satellite Dishes
4.3. Outdoor Unit (ODU) – Dish and LNB
This section details the steps required to select and install the satellite dish and LNB.
4.3.1. Dish Selection
The step of selecting the correct dish performance is to ensure that it will
provide appropriate increase in margin of Bit Error Rate, Modulation Error
Ratio (in band noise ratio) and Digital Channel Power performance to ensure it
will cater for rain fade margin and distribution system degradation.
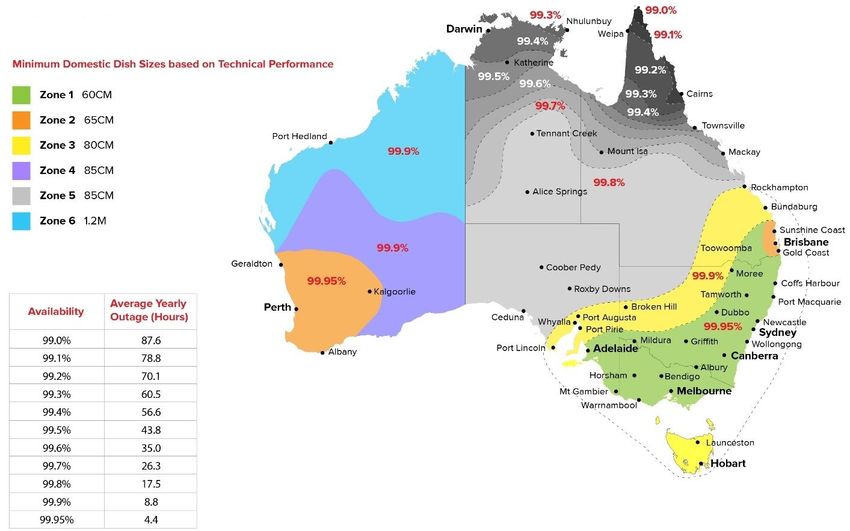
Diagram 19 provides information on the six satellite coverage zones and the
appropriate size dish required for an installation at this location.
Diagram 19 – Optus O10 FOXTEL Satellite Coverage Zone Map
Business iQ (BiQ) Satellite Infrastructure Guide
Printed: 15/02/21
© FOXTEL Management Pty Ltd 2021 34Business iQ (BiQ) Satellite Infrastructure Guide
Table 11 – Dish Location Zone to Size Selection Matrix
MDU MDU MRE Commercial Commercial
≤ 3 Stories ≥ 3 Stories (hotel –MDU) (single
Dwelling)
Zone 1 65cm 90cm 90cm 90cm 65cm
Zone 2 85cm 90cm 90cm 90cm 85cm
Zone 3 80cm 90cm 90cm 90cm 80cm
Zone 4 85cm 1.2m 1.2m 1.2m 85cm
Zone 5 80cm 1.2m 1.2m 1.2m 80cm
Zone 6 1.2m 1.5m 1.5m 1.5m 1.2m
4.3.2. Dish Alignment
There are two steps to aligning a satellite dish for optimum performance, Azimuth
elevation setup and cross-polarisation. A meter must be used for all dish alignment
(see Foxtel Installer Product List for current models). FOXTEL has selected these new
meters to make the dish alignment process more accurate and efficient.
4.4. Mounts
This section describes how to select a mount and where to install it.
Note: No mount is to exceed its maximum rated dish size or wind rating specifications. All
mounts must be installed in accordance with the manufacturer’s instructions.
Note: For further information on mount specifications and details, refer the Manufacturer’s
instructions provided with the mount, or refer to the Manufacturer’s website.
4.4.1. Mount Selection
When selecting a mount, it needs to be suitable for the size of the dish and the
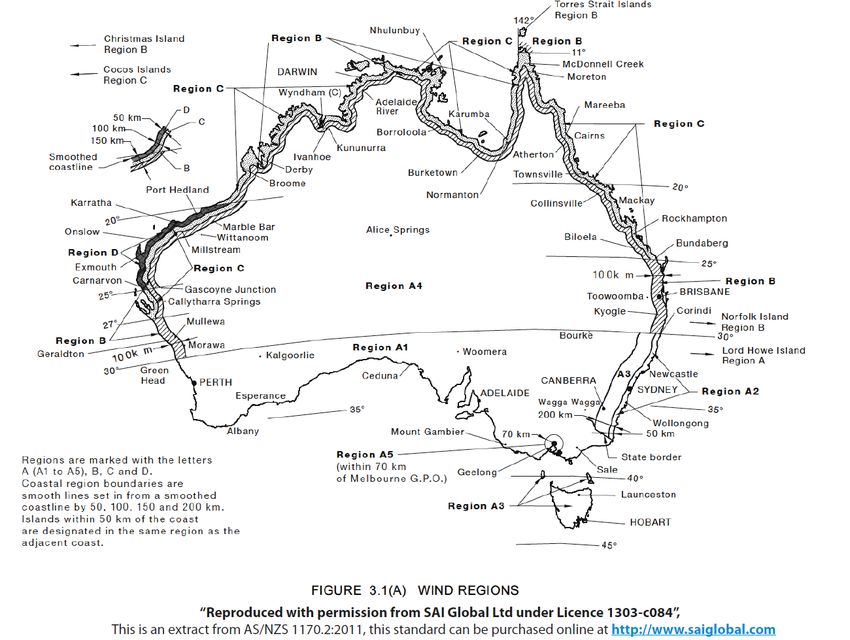
prevailing wind conditions in the area where it will be used. Australia can be divided
into four regions for prevailing wind conditions:
Region A: Normal
Region B: Intermediate
Region C: Tropical cyclones
Region D: Severe tropical cyclones
Use Table 12 below and the map in Diagram 20 to select the appropriate mount for
the location. For further clarification on the suitability of the mount required for your
location in all regions, contact the mount manufacturer.
Refer to the manufacturer’s website for further information relating to mount selection
to suit the dish size used in your region.
Jonsa Australia: https://www.jonsa.com.au/
Hills Limited : https://www.hills.com.au/home#gref
Business iQ (BiQ) Satellite Infrastructure Guide
Printed: 15/02/21
© FOXTEL Management Pty Ltd 2021 35Business iQ (BiQ) Satellite Infrastructure Guide
Mount Wind Rating
Mounting hardware for the installation of satellite dishes on domestic dwellings must
have a wind rating that complies with the requirements of AS 4055-2012 Wind loads
for housing. In particular the Wind Rating of the mount together with the dish must
comply with or exceed that set out in Table 2.2 of AS 4055-2012 for the local Wind
Region and site conditions. The Wind Rating of a mount in combination with the dish
is specified in the mount manufacturer’s installation instructions.
As a guide, the Wind Ratings in the corresponding Wind Regions as listed in Table 12
below are considered to be suitable for satellite dish mounting hardware unless the
site is on a hill or slope.
These Wind Ratings apply to all sites within a Wind Region except where the house or
MDU is located on the mid or top third of a hill, ridge or escarpment of average slope
greater than 1:20 (3°).
Diagram 20 – Wind Regions
Business iQ (BiQ) Satellite Infrastructure Guide
Printed: 15/02/21
© FOXTEL Management Pty Ltd 2021 36Business iQ (BiQ) Satellite Infrastructure Guide
Table 12 – W1 Mount Selection – Wind Rating Chart
Where no Wind Rating is shown in Table 12, wind conditions are likely to be extreme, and
expert advice should be sought from the local building authority.
Higher Wind Ratings are applicable to hill tops and slopes
For sites located in the zones marked M, T and O in the diagrams below, it may be
necessary to use a higher wind rating.
Diagram 21 – Hill Zones
Estimate the height and slope of the hill and the relative position (Hill Zone) of the site
to determine the Exposure Classification (T number) using Diagram 21 above and
Table 13 below.
Then use the Hill Index from Table 12 and the Exposure Classification from Table 13
to determine the Rating Increment from Table 14 below.
Add the Rating Increment to the Minimum Wind Rating from Table 12 to find the Wind
Rating applicable to the site.
Business iQ (BiQ) Satellite Infrastructure Guide
Printed: 15/02/21
© FOXTEL Management Pty Ltd 2021 37Business iQ (BiQ) Satellite Infrastructure Guide
Table 13 – Exposure Classification
Exposure Hill Zone
Classification T Hill
Hill
Zone
Zone M H H H
Average O
less than between more than
Hill Slope 10m 10 & 30 m 30m
1:20 to 1:10 T0 T1 T1 T1 T0
1:10 to 1:7.5 T1 T1 T2 T2 T0
1:7.5 to 1:5 T1 T2 T2 T3 T1
1:5 to 1:3 T2 T2 T3 T4 T2
>1:3 T2 T3 T4 T5 T3
Table 14 – Rating Increment
Rating Exposure Classification
Increment
Hill Index T0 T1 T2 T3 T4 T5
H1 0 0 +1 +1 +1 +2
H2 0 0 +1 +1 +2 +2
H3 0 0 +1 +1 +2 -
H4 0 0 +1 +1 - -
H5 0 0 +1 - - -
H6 0 0 - - - -
H7 0 +1 +1 +1 +2 +3
H8 0 +1 +1 +2 +2 -
H9 0 +1 +1 +2 - -
H10 0 +1 +1 - - -
H11 0 +1 - - - -
Business iQ (BiQ) Satellite Infrastructure Guide
Printed: 15/02/21
© FOXTEL Management Pty Ltd 2021 38Business iQ (BiQ) Satellite Infrastructure Guide
For example, a 4 storey MDU located half-way up a 50 metre hill with a slope of 1:10
in Region B has a minimum Wind Rating of N4 and a Hill Index of H8 (Table 12). It is
situated in Zone M according to Diagram 21. Its Exposure Classification according to
Table 13 is T1 (take the worst case for the slope). By Table 14, the Rating Increment
is +1. Therefore the Wind Rating for the site is N4 +1 = N5.
Where no Rating Increment is shown in Table 4, wind conditions are likely to be
extreme, and expert advice should be sought from the local building authority.
Note: *Refer to manufacturer for appropriate mount.
Refer to the following Australian Standards and Codes.
Wind class and wind speed have been upgraded from
the specified region categories listed in the standards.
• AS/NZS1170.0:2002 Structural design actions Part 0: General Principles
• AS/NZS1170.1:2002 Structural design actions Part 1: Permanent imposed and other
actions
• AS/NZS1170.2:2011 Structural design actions Part 2: Wind actions
• AS4055-2012 Wind loads for housing
• AS4100-1998 Steel structures
• AS1720.1-2010 Timber Structures Part 1: Design methods
• AS1684-2010 Residential timber framed construction
• AS3700-2001 Masonry Structures
Note: No allowance has been made in structural design to comply with the provisions of
AS/NZS1170.3:2003 Snow and ice actions or AS/NZS1170.3:2007 Earth quake actions
Important Note: For installations in the Northern Territory where different regulations apply, refer to the
Building Notes on Satellite Dishes: http://www.lands.nt.gov.au/__data/assets/pdf_file/0003/8193/45.pdf
Business iQ (BiQ) Satellite Infrastructure Guide
Printed: 15/02/21
© FOXTEL Management Pty Ltd 2021 39Business iQ (BiQ) Satellite Infrastructure Guide
4.4.2. Location of Mount
For the FOXTEL satellite installation to work correctly there must be a clear Line of
Sight to the FOXTEL satellite. Locations with a limited Line of Sight can result in
intermittent or complete loss of signal. There should be no obstructions, for example,
trees or parts of buildings in the signal path. An inclinometer should be used to survey
the signal path to ensure a clear Line of Sight. If there is any uncertainty as to whether
the Line of Sight will remain clear in the future (due to vegetation growth), use a
different mount location.
4.4.3. Mount and Dish Placement
Placement of the mount for the dish on a building is aesthetically important and an
essential part of the design for all existing buildings. A photo of the proposed
mount/dish location is to be added to the Scope of Work document, thus ensuring the
Client, knows where the dish will be located before they sign off on the Scope of Work
and design. Figure 22 provides guidance on the preferred mount and dish location
where number 1 is the most preferred location (towards back of building) and 4
(front/side of building) is the least preferred option.
Figure 22 – Preferred Dish Locations
Note: The dish should not be located at the front of the building unless it has been clearly
identified in the Scope of Work documentation submitted to the Client (or equivalent).
Note: Where the mount is installed on either a pre-cast concrete slab, block or wall, or a pre-
mixed concrete slab, block or wall, the mount anchorage points must be greater than
300mm from any corner or edge of the slab, block or wall.
4.5. Roofing
Where necessary, clip-lock tin roof sheets (on flat roofs) may be removed for running
cable through roof. If removed, ensure the roof sheet is re-clipped back into its original
position.
CAUTION: Any damage caused through this action remains the
responsibility of the Contracting company and/or the Customer
Service Technician.
If sarking (water resistant foil membrane used for insulation) needs to be penetrated,
carefully cut the sarking along the joist and repair using sarking tape.
Business iQ (BiQ) Satellite Infrastructure Guide
Printed: 15/02/21
© FOXTEL Management Pty Ltd 2021 40Business iQ (BiQ) Satellite Infrastructure Guide
4.6. Installation of Satellite Dish near Solar Panels
When considering installing a satellite dish near solar panels, install the satellite dish
at a minimum distance shown in the table 12 to prevent shadowing of the solar panels.
At no stage should any part of the Foxtel installation be able to cast a shadow over any
part of the customer’s solar panels. Solar panels are normally connected in series,
where each circuit of panels is called a string. Solar inverters convert the output of the
entire string however, if one of the panels is shaded, it restricts current and reduces
the output of the entire string.
By adhering to this requirement, customer complaints would be avoided therefore
preventing any unnecessary Service Calls to relocate the satellite dish.
Where the minimum distance from the edge of the solar panel to the highest point of
the dish cannot be achieved, choose an alternative location.
Table 15 – Solar Panel Minimum Distance Guide
Latitude Winter Distance 1M to 1.5M to 2M to
Degree +15 x top of top of top of
State Location South degree Height dish dish dish
QLD Somerset 10.81 25.81 2 2 3 4
N.T Darwin 12.5 27.5 2 2 3 4
QLD Cairns 16.92 31.92 2 2 3 4
W.A Broom 17.96 32.96 2 2 3 4
QLD Brisbane 27.5 42.5 2.5 2.5 3.8 5
W.A Geraldton 28 43 2.5 2.5 3.8 5
W.A Perth 31.9 46.9 2.5 2.5 3.8 5
NSW Sydney 33.9 48.9 2.5 2.5 3.8 5
S.A Adelaide 34.9 49.9 2.5 2.5 3.8 5
ACT Canberra 35.28 50.28 2.5 2.5 3.8 5
VIC Melbourne 37.8 52.8 2.5 2.5 3.8 5
TAS Hobart 42.9 57.9 2.5 2.5 3.8 5
TAS Southport 43.5 58.5 2.5 2.5 3.8 5
This table can be used as a guide for minimum distance from the highest point of the
satellite dish to the edge of the solar panels. Worst case scenarios have been catered
for in a magnetic north direction to allow for the lower angle of the sun in the winter
months. The table provides a broad spectrum of angles from Northern Australia to the
bottom end of Tasmania. Choose the closest location to your installation as a guide to
the minimum distance required.
Business iQ (BiQ) Satellite Infrastructure Guide
Printed: 15/02/21
© FOXTEL Management Pty Ltd 2021 41Business iQ (BiQ) Satellite Infrastructure Guide
Appendix E. Glossary of Terms
Term/Acronym Description
SMS Satellite Multistacker
SBB Is a 4k/HD Hybrid Satellite & Terrestrial Set‐Back‐Box with
Ethernet - WiFi capability designed for the hospitality market
SOW Scope of Works
SBB Set Back Box
BiQ Business iQ (Set Back Box used for Commercial Installations)
STB Set Top Box (known as Set Back Box for Commercial Installations)
OB Open Broadcast
FTA Free To Air
In-House Typically an information channel used in a business premise
Business iQ (BiQ) Satellite Infrastructure Guide
Printed: 15/02/21
© FOXTEL Management Pty Ltd 2021 42Business iQ (BiQ) Satellite Infrastructure Guide
Appendix F. Reference Documents
The following 3 documents reference BiQ Installations.
• BUS0403 BiQ Technical Guide
• BUS0355 BiQ Technical Document
• FXTL-D-0298 BiQ Satellite Infrastructure Guide
For further information on 5 wire backbones.
• FD/T/E/2207 Multi-Dwelling Units – Multi Residential Estates and
Commercial Installations
Business iQ (BiQ) Satellite Infrastructure Guide
Printed: 15/02/21
© FOXTEL Management Pty Ltd 2021 43You can also read


