Infinite Campus Teacher Manual-Middle School-Sioux Falls School District
←
→
Page content transcription
If your browser does not render page correctly, please read the page content below
Infinite Campus
Teacher Manual
    --Middle School--
        Standards Based

Sioux Falls School District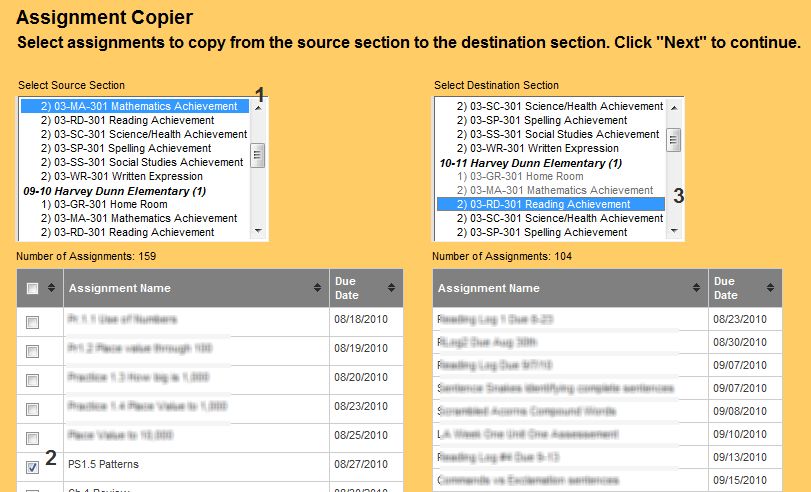
Table of Contents
Accessing Infinite Campus .............................................................................................................. 2
Login for first-time users ................................................................................................................. 2
Locked Out ...................................................................................................................................... 2
Log Off ............................................................................................................................................. 2
Infinite Campus Timeout ................................................................................................................ 2
Using Infinite Campus from Home.................................................................................................. 2
Index Tab ......................................................................................................................................... 3
Account Settings ............................................................................................................................. 5
Search Tab ....................................................................................................................................... 5
Help Tab .......................................................................................................................................... 5
Seating Chart Setup ........................................................................................................................ 5
Attendance...................................................................................................................................... 6
Grade Calculation Options (Instruction > Assignments)................................................................. 7
Create a Category (Instruction > Assignments) .............................................................................. 8
Assignments (Instruction > Assignments) ....................................................................................... 9
Create an Assignment from Assignment link.................................................................................. 9
Create an Assignment from Grade Book link (Instruction > Grade Book) .................................... 12
Scoring an Assignment .................................................................................................................. 13
Deleting an Assignment ................................................................................................................ 14
Copying an Assignment ................................................................................................................. 15
Assignment List Filter .................................................................................................................... 16
Learning Behaviors........................................................................................................................ 16
Tree View ...................................................................................................................................... 17
Extra Credit Assignments .............................................................................................................. 18
Daily Planner ................................................................................................................................. 18
Validate Assignments .................................................................................................................... 18
Grade Book (Beta) ......................................................................................................................... 19
Grade Book ................................................................................................................................... 19
Select A Task ................................................................................................................................. 20
Roster ............................................................................................................................................ 21
Student Groups ............................................................................................................................. 21
Messenger..................................................................................................................................... 22
Reports .......................................................................................................................................... 23
Posting........................................................................................................................................... 24
Posting Mid-term Learning Topics ................................................................................................ 24
Entering Mid-Term Learning Behaviors ........................................................................................ 25
Adding SFSD Canned Comments .................................................................................................. 25
Posting Mid-term for “No Grade” and “Credit/No Credit” Courses. ............................................ 26
Posting Quarter ............................................................................................................................. 26
Changing Posted Grades ............................................................................................................... 27
Grade Book Backup ....................................................................................................................... 27

Sioux Falls School District –- Middle School 8/13                                                                                           Page 1
Infinite Campus
Middle School
For the Middle School Standards Based reporting, each course will contain certain Learning Topics
(Standards) selected by the core teachers, that will be taught each quarter. In addition to Learning Topic
grades, each quarter students will also receive a Learning Behavior score. The Learning Behaviors for
each course consist of: Class Participation, Group Collaboration, and Homework and Practice. Learning
Behaviors are not to be an averaged score, but rather a score that reflects where your students are at
that point in time.
Accessing Infinite Campus
Infinite Campus can be accessed through any computer with Internet access. To access Infinite Campus
go to the Sioux Falls School District Website (www.sf.k12.sd.us) > For Staff > Infinite Campus.
Login for first-time users
Username: SF with your state email username, not case sensitive (ex. sfcr027)
Password: Password1 (case sensitive)
You will be prompted to change your password. Type in the Old Password = Password1.
Then type a new password in both the New Password and the Verify New Password
fields.
The password requirements are: at least 8 characters, case sensitive, must contain
letters AND number or special characters, can not contain any part of your name or
username.
Click Save Changes. (Note: It may be a good idea to write down your Infinite Campus
password and keep it in a secure location.)
Locked Out
Lock out occurs after three incorrect attempts to log in to your Infinite Campus account. Follow the
same procedure as explained above to get your account reset.
Log Off
Always use the Log Off option at the bottom of the Index tab on the left side of the screen. If you use the
Internet browser X button at the top right, you are not ending your connection to the server.
Infinite Campus Timeout
Infinite Campus will time out after 60 minutes of inactivity.
Using Infinite Campus from Home
A great feature of using Infinite Campus is that it is Internet based, which allows you to work from
home. With that, security becomes an issue. Please be sure not to leave your username and password
where someone within or outside of your family could find it.
Having trouble accessing Infinite Campus at home?
Sioux Falls School District –- Middle School 8/13 Page 2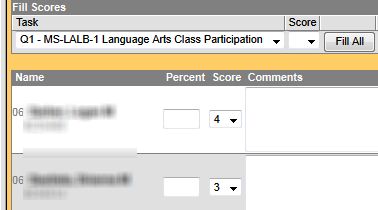
Be sure you are using the Infinite Campus link from the SFSD website (as noted under
the Accessing Infinite Campus heading). Do not use favorites, a bookmark, an icon, etc.
Clear the cache.
Update the Java level.
Index Tab (left side panel)
I. Student Information
General: All of the information specific to the individual for whom you have searched.
Click on General, choose Student in the Search For A dropdown, type in a letter
or student name, click Go. The search will generate a list.
Click the student name and that student’s general information will be displayed
on the right.
Student General Information:
a. Summary tab lists basic demographics about the student.
b. Schedule tab displays student schedule with teacher name and room number.
There is also the option to view the teacher grade book for those who are
responsible for monitoring student progress.
c. Attendance tab displays the student attendance record.
d. Flags tab contains all information related to the student not available on other
Infinite Campus screens.
e. Grades tab displays the student’s grades.
f. Assessment tab displays student assessment data. (when available)
Note: To get back to the Index options, click the Index Tab.
To open a link, click on the plus sign or the word; not the icon.
II. Instruction
Attendance: Link to the Attendance window.
Assignments: This allows instructors to set calculation preferences for the Grade book,
create categories to organize assignments in the Grade book, and enter in assignments.
Grade Book (Beta): This is a beta version of the new Grade Book. See Appendix A for more
information.
Grade book: See Grade book information section.
Grading by Task: This allows teachers to grade a group of students by a task. Comments
may be added and the percentage/letter grade for a student can be modified.
Grading by Student: This allows teachers to grade several tasks, one student at a time.
Comments may be added and the percentage/letter grade for a student can be modified.
Daily Planner: The Daily Planner is provided as a quick view of the assignments. Teachers
can use this screen as a reminder of the assignments that are due on a certain date and the
students that were absent.
Roster: This is a list of all the students in your class. Student names are a hyperlink to the
student information window
III. Admin:
Seating Chart Setup: A seating chart can be created for each section that is taught.
Attendance can also be taken from the seating chart.
Preferences :
Sioux Falls School District –- Middle School 8/13 Page 3o Hide Dropped Students: Hide students from the Grade Book that are no longer
in class. If left unchecked, the student remains visible in the Grade Book, but the
data displays in red. Scores are preserved behind the scenes. This option can be
turned off at any time if the student needs to be viewed again.
o Show Student Numbers:
Includes the Student ID
number on the attendance
tools.
o Show Student Pictures:
Displays the student pictures
for attendance and recording
academic performance levels
(if available at your building).
o Invert Seating Chart Auto
Placement: Applies to both
the Standard and the Lab
Seating Chart. Student
names will populate from
the bottom up (reverse
alpha).
o Use Seating Chart for Attendance: Changes the default attendance view to the
Standard Seating Chart view.
o Use Canned Comments: Allows the teacher to add Canned Comments when
academic performance levels are posted.
o Remove percentages and calculations when using Standards: Displays scores
for standard grading tasks without any calculated grade.
o Reverse assignment sort order in Grade Book: This will change the assignment
sort order in Grade Book.
o Default Standard/Grading Task: This will set the Standard you prefer the Grade
Book to open with when it is first loaded.
o Website Address: Can be used to enter the URL of a class website for display on
the portal.
o Dates: You are able to view the date for when the Grade Book and Teacher
Preferences were last updated.
o Mass Assign to multiple sections: This allows a teacher to apply the same
preferences to other classes.
1. Click on Mass Assign to multiple sections and the window will expand.
2. Check the appropriate boxes to assign the same preferences to other
courses and standards using either the Check All option or by clicking
on individual boxes.
*IMPORTANT: Click Save after making any changes to the preferences.
(Note: Preferences can also be found by going to Instruction in the Index Tab > Assignments > Edit
Teacher Preferences.)
IV. Messenger: Messenger tools allow teachers to communicate with students and/or student
guardians. See Messenger section.
V. Reports: Some useful reports that can be used by teachers. See Reports section.
Sioux Falls School District –- Middle School 8/13 Page 4Account Settings (Index Tab > Account Settings)
To change your password:
From the Index tab on the left side of the window, click Account Settings.
Enter a new password in the New Password and the Verify New Password text boxes.
Enter your old password in the Current Password text box. Click on Save Changes.
(This is also where you can choose to hide the Infinite Campus banner. Refresh is
necessary after saving the changes.)
Search Tab (left side panel)
Click on the Search Tab. The dropdown includes search criteria options:
Student: Search for a student by name.
State ID: Search for a student by their State ID number.
Help: Find help within Infinite Campus.
Note: You will only be able to search for students that you teach, unless you have a need-to-
know and have been granted permissions for additional students (ex. coaches).
Help Tab (left side panel)
Use the Help tab to find “How-To” information for various topics.
a. Click an item in the Index tab for which you would like information.
b. Click the Help tab.
c. You will see results specific to the selected item. You can either print the article or read it.
Seating Chart Setup (Instruction > Admin > Seating Chart Setup)
Teachers can set up two seating charts per section, a Standard Chart and a Lab Chart. The options set in
the Admin > Preferences apply to both charts.
1. From the Index tab, click Instruction > Admin > Seating Chart Setup.
2. Enter classroom dimensions by entering the row and column numbers. Click Save Dimension.
3. If a new chart is desired, click Clear.
4. Seats can be filled:
a. one at a time using the dropdown list OR
b. alphabetized by selecting the AutoFill-Alpha OR
c. randomly by selecting the Auto Fill-Random
The Exclude Seat checkbox is used to leave empty seats on the chart during the auto-fill process.
It can also be used to group desks into table-like arrangements.
5. When the layout is complete, click Save.
6. The Display Lab Chart button allows the setup of a second seating chart for the same group of
students. It is saved separately and can have different dimensions than the Standard Chart.
To Print or Save a seating chart:
1. In the Print Options box, select the Font Size and check if you want to print student pictures.
2. Click Print.
3. The chart will be displayed in a new window.
4. Save or Print the seating chart.
Sioux Falls School District –- Middle School 8/13 Page 5Attendance
There are several different ways to take attendance—Section Roster, Process Inbox, Seating Chart or Lab
Chart. Select whichever method you prefer.
Taking Attendance using the Section Roster:
a. In the Index tab, go to Instruction > Attendance.
b. Click on the period that you need to take attendance for.
c. Click on the absent radio button for each student who is absent. (Default is everyone is
present.)
d. Do not mark Tardies; follow the school procedure for Tardies.
e. Do not enter anything in the comment section.
f. Click Save.
2. Taking Attendance using the Process Inbox:
a. When first logging into Campus, the Process Inbox will display any items the teacher
should attend to, like recording attendance for the day.
b. Click on the course link that shows Period Attendance Required.
c. Click on the radio button under the absent column for each student who is absent.
(Default is everyone is present unless the office has made a change.)
d. Do not mark Tardies; follow the school procedure for Tardies.
e. Do not enter anything in the comment section.
f. Click Save.
Sioux Falls School District –- Middle School 8/13 Page 63. Taking Attendance using the Seating Chart or Lab Chart:
You can also take attendance using the Seating Chart or Lab Chart. The charts need to be set up
prior to taking attendance.
a. In the Index tab, go to Instruction > Admin > Preferences. Check the Use Seating Chart
for Attendance checkbox. Click Save.
b. Click on Instruction > Attendance OR click on the teacher name at the top of the Index
Tab to see the attendance in the Process Inbox area.
c. Click on Display Standard Seating Chart above the roster to display the attendance in
seating chart view.
d. Take Attendance and click Save.
Editing Attendance
Teachers can only edit attendance up to the point that the office processes it. (The time of day will vary
by schools.)
Edit the attendance through the Instruction module in the Index Tab.
Select the period that needs to be edited and make the changes.
Click Save.
Grade Calculation Options (Instruction > Assignments)
Use the Grade Calculation Options editor to set the grading scale, assignment, and score’s % values. You
can also choose to Calculate a Proficiency Estimate. (Note: If the grading scale is not selected, the grade
book will not display the points earned or the letter grade. Important: Be sure to complete the
following steps at the beginning of the school year to set your grading scale for the entire school year.
If the grading scale is not set, you will not be able to post grades.)
Calculate In Progress Grade (Points or Marks)
1. Go to Instruction > Assignments > select your course from the section drop down box.
2. Select Edit Grade Calc Options. (If you do not see any standards listed, click the Show button.)
Sioux Falls School District –- Middle School 8/13 Page 71. To set the grading scale for all quarters in the class you selected, select Calculate In Progress
Grade under Calculation Options, then click the drop down under the Grading Scale box and
select District for all Learning topics and Quarter Grading Tasks.
2. For all Learning Behaviors, select No Calculation. Select No Calculation for all Learning Behaviors
for each quarter.
3. Credit/No Credit and No Grade courses will be scoring Learning Behaviors.
4. Click Save.
5. Decide if you want to check Weight Categories and Use Score’s % value. (Optional)
a. Weight categories: This allows a percentage to be set, such as Daily Work = 10% and
Demonstration of Mastery=90%.
b. Use score's % value:
i. Leaving this option unchecked, the points earned will be divided by the points
possible and then converted to a percentage. For example, a student receives
20/20 on assignment 1 and 50/100 on assignment 2. The percent is calculated
as: 70/120 = 58%.
ii. Leaving this option checked, the percentages are calculated first and then the
percent are averaged. For example, a student receives 20/20 on assignment 1
and 50/100 on assignment 2. The percent is calculated as (100% + 50%)/2= 75%
(The percentages are calculated first and then averaged to determine the
student's grade.)
6. Click Save.
7. Complete this task for each course.
Calculate Proficiency Estimate
Note: This option is only used in the Grade Book (Beta) and only applies to standards scored with
Rubrics. Options are:
1. Highest Score: Indicates the highest proficiency level the student has achieved. Sequence must
be entered for items on the Rubric for this option to calculate correctly.
2. Mode of 3: Indicates the most common score for the student across the most recent three
scores.
3. Mode of 5: Indicates the most common score for the student across the most recent five scores.
4. Power Law: Power Law is a mathematical calculation that converts proficiency levels into
numeric values and determines a trend based on the student's scores. The student's overall
numeric proficiency value is then converted back into a proficiency level (Rubric). Power Law
works on the assumption that standards are assessed at consistent intervals, such as weekly.
Create a Category (Instruction > Assignments)
Categories are needed to create assignments. There is no limit to the number of categories a teacher
can have. You can have one category or multiple categories. Categories are simply a location or folder by
which assignments are organized. Examples of categories include: Assignments and Tests.
1. Select the course from the Section dropdown box at the top.
2. From the Index Tab, go to Instruction > Assignments.
3. Select Edit Categories.
Sioux Falls School District –- Middle School 8/13 Page 84. Click on the Create Category button and the Category Detail editor displays.
5. Type a descriptive name for the new category in the Name field (example: Assessments).
6. Enter a weight for this group in the Weight field. (Optional) If you do not weight your
groups, leave it at 0. No decimal or percentage is needed.
7. Enter the order in which the category should appear in the Sequence field. (Optional) This
number will determine the order in which the groups and assignments appear on reports.
8. Select the checkboxes to activate the following choices (Optional)
a. Exclude this category from calculation: This means the assignments in this group
will not count for the overall grade. This may be an option if you want to enter
student’s assignments or daily work but
you do not want to calculate the
assignments in the student’s overall grade.
b. Drop lowest score: This will automatically
exclude the lowest score (by percentage).
As you enter scores, the lowest score will
be dropped. Important: If using this
option, it must be checked at the
beginning of the term since the calculation
begins on the date the box is checked.
9. Select the section(s) in which to place the
category.
10. Check the correct Standard.
11. Select the Save Category button to return to the Assignments editor or select the Save and
Add Assignment button to save the category and add assignments.
Assignments (Instruction > Assignments)
The Assignments link is used to create and manage assignments as well as setting up grade calculations.
The Assignments link is where you will create assignments.
Create an Assignment from Assignment link (Instruction > Assignments >
Create Assignment)
1. Under the Index Tab, go to Instruction > Assignments > Create Assignment.
2. In the Name Field, enter a descriptive name for the assignment (50 characters or less).
3. In the Abbreviation Field, type an abbreviation for the assignment (5 characters or less).
4. Select whether the assignment will be an Unscored Activity or a Scored Assignment and
enter any Notes desired.
5. Section Placement: This area allows you to select which sections get this assignment.
Section Placement Fields:
Sioux Falls School District –- Middle School 8/13 Page 9a. Section: Teachers have the option to place assignments in one or more sections.
The section selected in the Campus toolbar will display, as well as any additional
sections of the same course that are taught by the same teacher.
b. Active: If you would like the assignment to be included in the student score,
select the Active checkbox. If the assignment will not count towards the score
(such as a pre-test), the Active box may be cleared. If the Active box is cleared
and the assignment does not count towards the score, the assignment will show
up in red in the Grade Book view.
c. Hide: Selecting the Hide checkbox hides the assignment from the Portal, but the
impact of the student’s score on the assignment is still seen in the overall score.
(Not recommended)
d. Assigned Date: The date the assignment is assigned. Can use Fill All.
e. *End/Due Date: The date the assignment is due. Can use Fill All.
f. *Seq: The sequence is managed by the system and keeps the assignments in
order when copying assignments from one calendar to another. Can use Fill All.
g. Student Group: A group of students created by the teacher for the course
section. (See the Student Groups section.)
6. Click the Show Description, Objectives, References link to enter detailed information.
This information is visible on the portal. (This step is optional; disregard if you do not
wish to add detailed information.)
7. Student Work Product: In this section, teachers have the option of allowing students to
submit assignments using the student portal, whether through text responses, by using
file attachments or online assessments completed on the portal. For text and file
submission assignments, teachers provide the details of the assignment within the
Assignment Editor and access the submitted response through the Scoring Editor. For
online assessments, teachers attach established assessments and score responses
within the assessment Scoring Editor. Students respond through the student Portal.
a. Enable Student Submission: There are two Student Submission options, Editor
and File Attachment. These options control what the student is allowed to do;
teachers indicate work needed in the Information for Students area, including
attaching files for the students to download.
The options for Editor and File Attachments only appear when the Enable
Student Submission radio button is marked.
Sioux Falls School District –- Middle School 8/13 Page 10b. Enable Online Assessment: Marking the Enable Online Assessment radio button
will open a window where teachers can select which online assessment to
administer to students through the Portal.
8. Scoring Alignment Detail (Standards):
a. Select which standard gets this assignment.
b. Select which category gets the assignment.
c. Select the Scoring Type.
i. Points: Assignments will be scored numerically. (Most commonly used)
The multiplier works in conjunction with the total points possible to set
how the assignment will affect the student. (For example, a 50 point
assignment with a multiplier of 2 will actually be calculated as 100
points. If you do not want the assignment to count towards the
averaged grades, set the multiplier to 0. Visible on the portal.)
ii. Marks: Assignments will be scored in predetermined Marks (Example:
A, B, C). The multiplier works in conjunction with the total points
possible to set how the assignment will affect the student. (For
example, a 50 point assignment with a multiplier of 2 will actually be
calculated as 100 points. If you do not want the assignment to count
towards the averaged grades, set the multiplier to 0. Visible on the
portal.)
iii. Rubric: Assignments will be scored in predetermined values. These
values will pull from the rubric assigned to the standards in the
Standards Bank. Rubric would be selected when scoring Learning
Behaviors.
FAQ: What do I do if I am unable to select a standard because they are all grayed out? In order to align
an assignment with a standard, a Category needs to be created. See the Create a Category section.
Note: If after scoring an assignment you need to move the assignment to a different
category, changing categories within a standard preserves the scores; however, if
you move an assignment from one standard to another, scores are lost.
d. Grading Tasks: There is nothing to enter in this section.
9. Click Save to return to the Assignments summary or click the Save and Score button to
enter scores for this assignment.
Sioux Falls School District –- Middle School 8/13 Page 11Note: If clicking Save and Score, verify the section to score is selected in the Campus
toolbar. The scoring editor will open for the section that was specified in the toolbar
only. If clicking Save & Create New Assignment, the assignment will be saved and the
user will be returned to the screen for creating assignments.
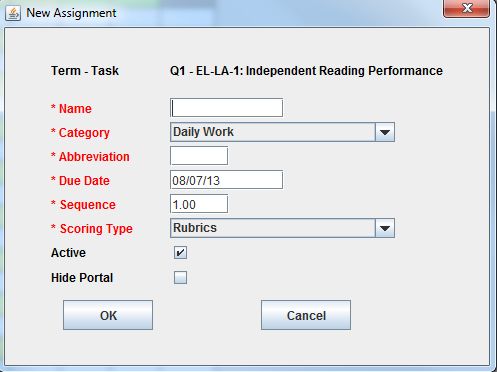
Create an Assignment from Grade Book link (Instruction > Grade Book)
Teachers have the option of adding an assignment within the Grade Book, which is then immediately
available to be scored.
1. Under the Index Tab, go to Instruction > Grade Book.
2. Select the course section at the top and select the Quarter and
Standard using the Select a task dropdown.
3. Right-click in the gray category / assignment name section, as
shown in the circled area.
4. Select Add Assignment > choose either Simple or Full Editor.
a. Simple Editor: A New Assignment window will appear. Fill in the required information.
Click Ok. The assignment will then be added
to the Grade Book. You must Save the Grade
Book for the assignment to be added and
viewable. An assignment added in the Grade
Book view can be immediately scored
(optional). (Note: The Simple option will
match the section, term, and task that was
selected in the Grade Book view. With the
exception of Term and Task, all other fields
are editable.)
b. Full Editor: Selecting the Full Editor option will open the Assignment Editor, while
remaining in the the current Grade Book settings. The Assignment editor matches how
the editor looks in the Assignments link. All fields are editable items. Fill in the
assignment information and select a Save option.
(Note: When creating assignments from the Grade Book view, you will stay within the
context of the Grade Book until you leave the indiviual assignment being created. From
the editor of the new assignment, you can Save and Score the assignment and then
return to the area of the Grade Book to which the assignment was added. )
Sioux Falls School District –- Middle School 8/13 Page 12Scoring an Assignment (Instruction > Assignments)
In the Index Tab, go to Instruction > Assignments > and select a course and assignment to score.
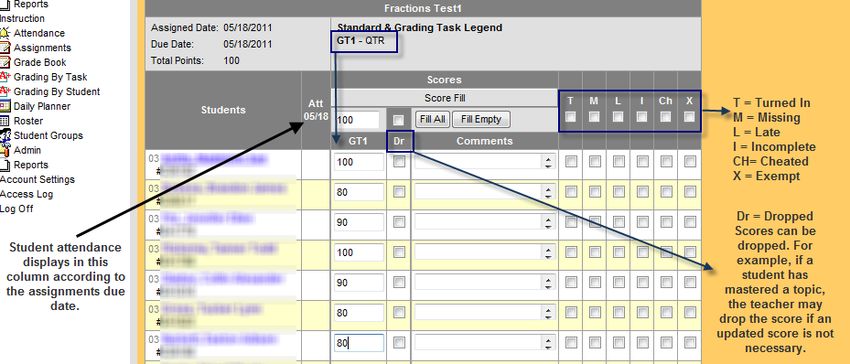
1. There are two methods of entering scores—Mass Filling Scores or Single Entry Scoring.
Mass Filling Scores: Use this option to fill all the scores at once. (Note: If using student groups, this
method does not fill scores for students that are not part of the student group.)
1. If you selected the scoring type as Points (Create An Assignments heading, step 6), enter the
mass fill score in the text box in the Scores section above the assignment.(See below image)
If you selected the scoring type as Marks (Create an Assignments heading, step 6), select the
mark from drop down box of the mass fill score text box.
2. Click the Fill All or Fill Empty button.
a. Clicking Fill All overwrites any previously entered scores except for students with
the Exempt (X) checkbox selected.
b. Fill Empty only writes to scoring fields that have not been previously scored. (For
example, if most of the students received a 90, you could fill in the student’s scores
who received a grade other than a 90. Then select 90 in the mass fill score box and
select Fill Empty.)
3. Enter a comment to attach to the score in the Comment field. (Optional) Comments can be
up to 255 characters in length.
4. To flag assignments, click the checkbox in the column header to mass fill checkboxes or
place a checkmark for individual students.
a. Dropped: Any score entered will not count. (For example, if a student has mastered
a topic, the teacher may drop the score if an updated score is not necessary.)
Sioux Falls School District –- Middle School 8/13 Page 13b. Turned In: Makes a note in the student/parent portal that the assignment has been
turned in. Does not affect the academic performance level.
c. Missing: Regardless of the score entered, the score will count as 0 points.
d. Late: Notes that the student’s score is late; academic performance level is not
affected. The score turns red.
e. Incomplete: Cell can be left blank or a partial score can be entered, either way the
academic performance level is not affected.
f. Cheated: Regardless of the score entered, the score will count as 0 points.
g. Exempt: Takes the grade out of calculation. An assignment flagged as Exempt will
not appear in the student/parent portal view.
5. Click the Save button.
Single Entry Scoring: Use this option to individually enter in student’s scores.
1. If you selected the scoring type as Points (Create an Assignments heading, step 6), type the
student’s score in the text box next to their name. (You can use the Tab key on the keyboard
to navigate to the next student.)
If you selected the scoring type as Marks (Create an Assignments heading, step 6), select the
student’s score from the drop down box next to their name. (You can use the Tab key on the
keyboard to navigate to the next student.)
2. Enter a comment to attach to the score in the Comment field. (Optional) Comments can be
up to 255 characters in length.
3. To flag assignments select any of the following checkbox options:
a. Dropped: Any score entered will not count. (For example, if a student has mastered
a topic, the teacher may drop the score if an updated score is not necessary.)
b. Turned In: Makes a note in the student/parent portal that the assignment has been
turned in. Does not affect the academic performance level.
c. Missing: Regardless of the score entered, the score will count as 0 points.
d. Late: Notes that the student’s score is late; academic performance level is not
affected. The score turns red.
e. Incomplete: Cell can be left blank or a partial score can be entered, either way the
academic performance level is not affected.
f. Cheated: Regardless of the score entered, the score will count as 0 points.
g. Exempt: Takes the grade out of calculation. An assignment flagged as Exempt will
not appear in the student/parent portal view.
4. Click the Save button.
Deleting an Assignment (Instruction > Assignments)
1. Select the title of the assignment you would like to delete.
2. Click the Delete Assignment button. A confirmation message will appear.
3. Select OK to delete the assignment and return to the Assignments tab or click Cancel to
return to the Assignment Detail editor.
Note: Deleting an assignment deletes the assignment from all sections to which the
assignment is aligned and deletes all scores that were entered for that assignment. To
remove an assignment from a single section if it was assigned to more than one section, do
not delete the assignment but clear the checkbox next to the section in the Section Fields.
Sioux Falls School District –- Middle School 8/13 Page 14Copying an Assignment (Instruction > Assignments > Assignment Copier)
The Assignment Copier allows you to copy a single
assignment or a group of assignments from one section For additional assistance on copying
to another section within a calendar and across assignments, check out this video:
calendars. Teachers must have calendar and tool rights http://media.infinitecampus.com/public/l
earn/Video/STP/09/06/01/STP.09.06.01_
for the section from which they want to copy
1314/STP.09.06.01_1314.html
assignments. (Note: Make sure you have set up your
Categories for the section you would like to copy to.)
From the Index Tab, go to Instruction > Assignments > Copy Assignments.
1. Select the section from which to copy assignments in the Select Source Section group box. Upon
selecting a section, the total number of assignments and details for the assignments aligned to
the selected section will appear underneath the Select Source Section.
2. Select the checkbox next to the assignment(s) you want to copy. (Note: Selecting the checkbox
in the grayed section at the top of the Number of Assignments box will allow you to check or
uncheck all of the assignments at once.)
3. Select the section to which you want to copy the assignments in the Select Destination Section
group box. (Note: Be sure to select the correct year.) Assignments already aligned to the section
display below the Select Destination Section box.
4. Click the Next button to open the Copy Assignment Name editor.
5. Select the checkbox next to the assignments to copy and clear the checkbox for assignments or
alignments that should not be copied. Select the dropdown box to display and select a new
Category, if needed.
6. Click the Copy Assignments button. The Assignment Copier will then duplicate the assignments
and assigns them to the destination you requested.
Sioux Falls School District –- Middle School 8/13 Page 15Assignment List Filter (Instruction > Assignments)
Use the Assignment List Filter to filter a search for an assignment. Search by Term,
Standard/Task, Category or Student Group.
Learning Behaviors
Once No Calculation has been set for all of your Learning Behaviors (See Grade Calulations Options
Section), you have the below options for entering Learning Behavior scores:
Option 1:
1. In the Index tab go to Instruction > Grade Book
2. In the Select a Task dropdown, select a Learning Behavior (ex.
Q1 – Language Arts Homework and Practice)
3. In the green and white column, select a Learning Behavior
score (1-4) for each student that reflects the student’s score
at the time of the reporting.
4. Click Save.
(Note: To show a record of Learning Behavior scores earned,
you have the option of creating a Learning Behavior Category
and Assignments to enter in scores (optional). Since Learning Behavior scores are not averaged,
at reporting time you will need to place the Learning Behavior score in the green and white
columns and save.
Option 2:
1. In the Index tab go to Instruction > Grading By Task
2. In the Please Select A Task dropdown, select a Learning
Behavior (ex. Q1 – MS- LALB-1 Language Arts Class
Participation)
3. In the Score dropdown box, select a Learning Behavior
score for each student.
4. Add a comment in the Comment field next to the
student’s name (optional). (Comments will appear on the
Parent and Student Portal and report card.)
5. Click Save.
(**IMPORTANT: Do not right click and post the Learning Behavior Scores. The scores in the green and
white columns are the posted scores that will appear on the Portal and Report Card.**)
Sioux Falls School District –- Middle School 8/13 Page 16The report card will display the Learning Behavior score that was earned (4, 3,2,1) along with
the below rubric.
Rarely Sometimes Usually Consistently
1 2 3 4
Learning Behavior Reference for Teachers:
Learning Behaviors 4 3 2 1
Consistently Usually Sometimes Rarely
Class Participation
Stays focused and actively engaged in class
activities and discussions.
Group Collaboration
takes an active role in the group, stays on
task, cooperates and helps create a
positive group environment.
Homework and Practice
Comes to class prepared. Completes and
hands in work on time. Promptly arranges
for and completed work after an absence.
Tree View (Instructions > Assignments)
The Tree View shows an alignment based view of a section by Term, Task, Category, and Assignment.
1. In the Index Tab select Instructions > Assignments.
2. Select the course from the Section drop down at the top.
3. Click the View Tree button.
4. Users may edit an assignment or category by clicking on the name. You may score an
assignment by clicking the Score link after its name.
5. Scroll down to the Grading Tasks heading. Here you will be able to view each quarter’s
Learning Topics and the percent for each Learning Topic.
Sioux Falls School District –- Middle School 8/13 Page 17Extra Credit Assignments
Extra Credit Assignments are assignments that students may or may not complete. Assignments are
added using the Assignments link as previously explained, with the only difference being that the
possible points should be set at zero. This method allows the students to earn the points, but the points
possible for the quarter remains the same. If a student does not complete the work, exempt the
assignment by using the right-click menu or fill the grades with a value of X. Otherwise, the extra credit
assignment will display on the portal and To Do List.
Daily Planner
The Daily Planner is a view-only screen that provides a snapshot of assignments.
In the Index Tab, click Instruction > Daily Planner.
Options for the Daily Planner include:
o Teachers can use this screen as a reminder of the assignments that are due on the
entered date.
o View a summary of attendance events for a class.
o View the daily planner for a previous or future date; refresh the date field at the top to
the date that is to be viewed. It will always be defaulted to the current date.
o The Daily Planner displays a week of assignments for the sections taught during the
term. The days are listed across the top, while the sections are listed down the side.
o Assignments, in-class activities, absences and tardies will be listed on this screen.
Activities
Activities are non-scored events that can be entered and seen by parents in the calendar view on the
portal. (Ex: Field Trips, Special Events)
Adding a New Activity or Assignment to the Daily Planner:
1. In the Index Tab, click Instruction > Daily Planner.
2. Click on New Assignment.
3. Add the necessary information.
4. Click Save.
Validate Assignments (Instructions > Assignment)
Assignments Validation verifies the status of assignments that have multiple section placements
and/or multiple alignments.
The most common reason to validate a section is the addition or removal of the teacher(s)
scheduled to a section. If a section’s scheduled teacher has changed, the assignments must be
validated. For example, if a teacher placed an assignment in two sections and the teacher was
then removed from one section, the Assignment Validation process splits the assignment and a
unique assignment remains in each section.
If an assignment’s multiple scoring alignments are no longer complementary, they are split into
separate assignments.
If multiple assignments within a section are identical except by scoring alignment, they will be
combined into one assignment with multiple scoring alignments.
Assignments Validation verifies Scored Assignments, Unscored Activities and Categories.
Verifying the state of assignments:
1. Click the Validate button.
2. Select the groups for validation. Click Continue to proceed.
3. All sections taught by the teacher for the selected courses will be validated.
Sioux Falls School District –- Middle School 8/13 Page 18Important: Teachers are automatically notified when they need to validate their sections. If changes are made that require section validation, a message screen will appear when the teacher opens the Assignments tab which reads "Validation of the sections under course #### "Course Name" is required due to changes to the scheduling of teachers within this course. Click "Validate Section(s)" to start this process. Validation may take several minutes per section." The section(s) needing validation are selected automatically and once validation is complete, the Assignments tab will appear. Grade Book (Beta) (Instruction > Grade Book (Beta)) See Appendix A for details on using the Beta version of the new Infinite Campus Grade Book. Grade Book (Instruction > Grade Book) When in the Grade Book view, the Categories are listed across the top with the associated assignments organized within the groups. The assignment abbreviation and points possible will display across the top. Hover over the abbreviation to see additional details, such as the assignment name, points possible, average score and due date. Note: The Grade Book cannot be used until the Categories are set up in the Assignments link. As soon as scores are entered and saved, the student’s grade calculation is made visible to parents, students, admins, and counselors. When in Grade Book view, select the course section at the top. Under the Select a Task dropdown, click on the quarter and Learning Topic (ex. Q1 - Factors and Multiples) or quarter and Learning Behavior (ex. Q1 – Math Class Participation). Toggle Outline button will hide the Index/Search/Help pane on the left side allowing a larger screen for viewing grades. Click again to reverse the action. Hide Grade Totals hides the yellow and green areas of the Grade Book allowing you to view more grades. Click again to reverse the action. The yellow area on the grid is the calculated In Progress grade based on assignment scores the teacher has entered. The green area on the grid is the Posted scores that have been entered for reporting purposes. To enter individual scores, click on the cell, enter the score and use either the enter key or the down arrow to move the cursor to the next student. Remember to save after the scores are entered. To make mass changes to score cells, right click on the assignment name and choose one of the options: Clear all scores, Fill Empty Scores, or Overwrite All Scores. Remember to Save. To make student-level comments, right-click on the student name and choose Edit Comment. Type the comment and click OK. These comments appear at the top of the class grade book screen on the portal. They do not appear on the report cards. These are not the same as the SFSD canned comments used on the report cards. To make score-level comments/flags, right click on the individual student score cell to open the comment box. The student name and assignment name will appear at the top of the window, along with the following options: Sioux Falls School District –- Middle School 8/13 Page 19
Edit comment: Teacher can comment on the score for an individual. These are not the same as
         the SFSD canned comments used on the report cards.
         Turned in: This flag makes a note in the student/parent portal that the assignment has been
         turned in. This flag does not affect the grade.
         Late: Notes that the student’s score is late; grade is not affected. The score turns red.
         Exempt: Takes the score out of calculation. An assignment flagged as Exempt will not appear in
         the student/parent portal view.
         Missing: Regardless of the score entered, the score will count as 0 points. (Not recommended)
         Incomplete: Cell can be left blank or a partial score can be entered, either way the grade is not
         affected.
         Cheated: Regardless of the score entered, the score will count as 0 points.
         Dropped: Any score entered will not count. (For example, if a student has mastered a topic, the
         teacher may drop the score if an updated score is not necessary.)

Flags:
When any of the above options are checked, the cell in the grade book will be coded as described
below.
A blue flag in the lower right corner of a score cell indicates that you have used one of the above flags.
A red flag in the upper right corner of a score cell indicates that you have made a comment on a score.
A red flag in the upper right corner of the student name cell indicates that you have made a comment
on a student.
A green score lets you know that you have entered a score higher than the points possible.

To view a flag or comment in the Grade Book, hover over the cell and a screen tip will appear.

FAQ: Where will my score-level comments appear? It will appear on the portal next to the score.

FAQ: Can I leave a score cell blank in the Grade Book? A score cell that is left blank, without any flags
applied, will not affect the overall student grade. It is not included as part of the grade calculation. It is
recommended to flag the empty cell or enter a comment for blank cells.

FAQ: Why do my yellow In Progress columns not have grades in them? You have not set your Grade
Calc Options; the In Progress grades will not display. See the Grade Calculation Options section.

Select A Task (Instruction > Grade Book)
When you select the drop down box in the Select a Task heading, you will see the quarters, Learning
Topics, and Learning Behaviors for the course listed at the top. Select any task for a Grade Book view.

Color Coded Grading
Teachers may wish to show failing grades in Red and passing grades in Green within the Grade Book.
The color coding appears in the yellow In Progress columns with the background of the cell changing to
either red or green. This does not appear on the parent or student portal.
To turn this option on:
         1. From the Index tab select Instruction > Grade Book
         2. Click on Options at the top and check Show Cut Score Color
             Coding. To remove the option, uncheck it.

Sioux Falls School District –- Middle School 8/13                                                     Page 20
Roster (Instruction > Roster)
The Roster will allow you to print a document that includes the active and dropped students from the
course. In addition to the student name, it also includes the grade level, student number, gender, DOB,
home phone number and address.
1. In the Index Tab, click on Instruction > Roster.
2. Select Print Options. (Print Options will allow you to save the roster without printing.)
3. A Roster Print Option screen appears with different options you can select.
4. Click Generate Report.
5. A PDF Roster will generate. You can Save or Print the document.
Student Groups (Instruction > Student Groups)
Student groups provide a way to sort students in a certain course section to allow for the creation of
different assignments for those students. Teachers can create student groups from their active course
sections. Once a student group is created, teachers can assign students to the appropriate group and
create assignments for each student group.
Creating a New Student Group:
1. In the Index tab select Instruction > Student Groups.
2. Select New from the action bar. A Student Group Detail editor will display below the
Student Groups Editor.
3. Enter a name for the student group.
4. By default, the group is active. Deselect the Active checkbox if you don’t want the group to
be active.
5. Click Save.
Assigning Students to a Student Group:
Once groups are created, the list of students will appear, along with the student number and a
dropdown list to select the student group.
1. Click on the student’s name box located under the Roster Heading and drag them to your
New Group list on the right. Click Save.
Sioux Falls School District –- Middle School 8/13 Page 212. Create new groups as needed following the same process. Note: Once a student has been
assigned to a group, their Group name will appear in their name box.
Assigning Assignments to a Student Group:
When creating a new Assignment (Instruction > Assignments), in the Sections section, click the
down arrow under the Student Group heading to select the Group who receives the assignment.
Note:
o If an assignment is created and assigned to a group, students who are not members of
the group will automatically be marked as exempt for the assignment in Grade Book.
o Teachers can add and remove students from a student group at any time.
Messenger (Instruction > Messenger)
Instruction Messenger tools allow teachers to communicate with students and/or student guardians.
The following tools are available:
Grades Messenger: The Failing Grades tool allows users to create messages based on grades
considered failing and whether to pull calculated or posted grades.
Missing Assignments Messenger: The Missing Assignments tool walks users through the process
of creating missing assignment notifications to be delivered to students and guardians. Only
assignments that have been marked as Missing in the Grade Book will generate notices. All
messages are sent in English, unless typed in a different language and delivered via Email
Messenger.
Teacher Messenger: The Teacher Messenger tool allows teachers to create messages sent to
students and/or student guardians.
Missing Assignments Editor
The following defines the options available on the Missing Assignments Messenger Editor.
a. Student Selection: Select which students should receive the Missing Assignments
message. All students, except those who have dropped the course or are no longer
enrolled in the school, will be automatically selected. Those dropped students appear in
red text. If a student is selected but does not have a missing assignment, that student
will not receive a message.
b. Assignment Selection: Determine which assignments to include in the message.
c. Duplicate Message Filtering: When Allow Repeat Messages is marked, the Message
logic will send multiple messages to the recipient for the same missing assignment until
the student is no longer missing the assignment. If not marked, repeat messages will not
Sioux Falls School District –- Middle School 8/13 Page 22be sent. Note: This option does not AUTOMATICALLY continue to resend the message. If
you have a student with a missing assignment and you check "allow repeat," then the
next message you send will still include any older missing assignments that have been
sent previously.
d. Delivery Devices: Select how the message should be delivered to parents/guardians.
i. The Inbox option is already selected. This option places a note in the parent's
inbox that a new message is available.
ii. The Email option will send an email to the parent's email address on record
(entered in Census Demographics).
e. Message Body: A generic template is provided for sending missing assignment
messages. The teacher doesn't have the ability to select Campus Field properties in the
message, as these are already chosen for the teacher. If desired, the teacher can create
a separate message with specific information about the course(s). Because only
students who are enrolled in the course section selected in the Campus toolbar appear
for selection, the teacher should note the chosen selection before entering additional
information or altering the default message.
f. Delivery Date: Specify the date to deliver the messages
g. Send Emails at: Specify the time to deliver the messages.
Creating a Message Template
a. Select the New option from the Template dropdown list.
b. Configure the message options.
c. Click the Save button at the top of the Message Editor.
d. Enter a name for the template in the pop-up box. The template will appear in the
Template dropdown list and can be used for creating new messages.
Previewing and Sending Notices
a. Preview/Send: Selecting this button will display the message, the recipient count and
email count. From here, the teacher can review the list of recipients receiving the
message or can send the message.
Reports (Instruction > Reports)
1. In the Index Tab, click on Instruction > Reports.
2. Click on the report you wish to create.
a. Attendance Register: The report will open in a PDF (Adobe) format, listing each student
in the chosen section and what days the students were absent.
b. Attendance Summary: The report will open in a PDF (Adobe) format, listing each student
in the chosen section and what type of attendance marks the student has received in
the current term.
c. Blank Spreadsheet: The report will open in a PDF (Adobe) format, listing each student on
the y-axis and blank column headers on the x-axis.
d. Grade Book Export: The report allows student names, assignment names and scores to
be exported to an Excel spreadsheet. This is a good option for a grade book backup. (See
Grade Book Backup section.)
e. Missing Assignments: The report will list all selected students that have missing
assignments on separate pages. Missing assignments are defined as an empty score for
a past due assignment.
f. Portal Usage Roster: The report will display the list of students and or parents/guardians
that have logged into and reviewed their related information on the Portal.
Sioux Falls School District –- Middle School 8/13 Page 23g. Roster Label: The report will open in a PDF (Adobe) format with the appropriate
settings. Selecting mailing label prints addresses; selecting student/teacher based prints
student name and teacher name.
h. Section Summary: The report will open in a PDF (Adobe) format, listing the assignments
that were selected to show on the report, the student names and their scores for each
assignment.
i. Student Summary: The report will open in a PDF (Adobe) format, listing the students
and their assignment scores for each term. This report may be used to give a progress
report to a student/parent.
j. Teacher Schedule: The report will open in a PDF (Adobe) format, displaying the
teacher’s schedule for the current school year.
Posting
The Posting process is completed to make it possible to print progress reports. Learning Topic grades
and Learning Behavior scores can be posted any time throughout the course.
Posting Mid-term Learning Topics (Instruction > Grade book)
Note: Mid-term progress reports will reflect each student’s progress in each Learning Topic that has
been taught and each Learning Behavior. Students will not receive an overall mid-term grade for core
courses.
Mid-term Posting will be completed if requested by the building administration.
Step 1, Post your Learning Topics:
1. In the Index Tab, go to Instruction > Grade book > Select the course number / section. In the
Select a Task dropdown, navigate to the Quarter AND Learning Topic you would like to post (ex.
Q1 Factors & Multiples).
2. The posting area consists of two green columns to the left of your assignments. To post your
Learning Topic grades, right click on any cell in one of the green columns and click Post Grades.
(The Learning Topic posted grades will display in the green columns.)
3. Click Save.
4. Follow these steps to post all of your Learning Topics that were taught.
Note: To reflect the student’s most current scores, the Learning Topics will need to be posted each time a
change is made.
Sioux Falls School District –- Middle School 8/13 Page 24You can also read