Pulse Policy Secure Profiler: Administration Guide - 9.1R4 - 9.1R4 15 January, 2020
←
→
Page content transcription
If your browser does not render page correctly, please read the page content below
Pulse Policy Secure Profiler:
Administration Guide
9.1R4

Product Release    9.1R4

Published          15 January, 2020

Document Version   1.4
Pulse Policy Secure Profiler: Administration Guide

Pulse Secure, LLC
2700 Zanker Road,
Suite 200 San Jose
CA 95134

www.pulsesecure.net

© 2020 by Pulse Secure, LLC. All rights reserved.

Pulse Secure and the Pulse Secure logo are trademarks of Pulse Secure, LLC in the United States.
All other trademarks, service marks, registered trademarks, or registered service marks are the
property of their respective owners.

Pulse Secure, LLC assumes no responsibility for any inaccuracies in this document. Pulse Secure, LLC
reserves the right to change, modify, transfer, or otherwise revise this publication without
notice.

Pulse Policy Secure Profiler: Administration Guide

The information in this document is current as of the date on the title page.

END USER LICENSE AGREEMENT

The Pulse Secure product that is the subject of this technical documentation consists of (or is
intended for use with) Pulse Secure software. Use of such software is subject to the terms and
conditions of the End User License Agreement (“EULA”) posted at
http://www.pulsesecure.net/support/eula/. By downloading, installing or using such software,
you agree to the terms and conditions of that EULA.

                                                                                     © 2020 Pulse Secure, LLC.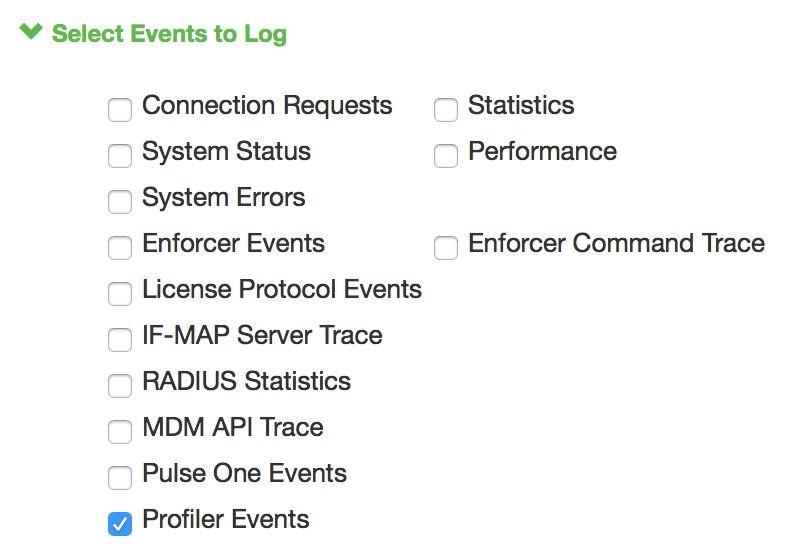
Pulse Policy Secure Profiler: Administration Guide

Revision History
The following table lists changes made to this document:

Document Release            Date         Feature                        Changes
Revision

1.4           9.1R4         January      Role Mapping based on          Included LDAP Collector section. Updated the
                            2020         LDAP attributes and Device     Configuring the Local Profiler Authentication
                                         attributes                     Server section with updates.

1.3           9.1R3         October      --                             Included a note for minimum required
                            2019                                        fingerprint package in Configuring the Local
                                                                        Profiler Authentication Server section.

1.2           9.1R2         July 2019    Profile Groups                 Included Creating Rules for Profile Groups
                                                                        section

1.0           9.1 R1        April 2019   SNMP HOST Collector            Included SNMP HOST collector section.Updated
                                                                        the Configuring the Local Profiler Authentication
                                                                        Server section with updates.
                                                                        Included Diagnostic Logs section
                                                                        Updated Profiling Devices in Branch Office
                                                                        section.

© 2020 Pulse Secure, LLC.                                                                                               3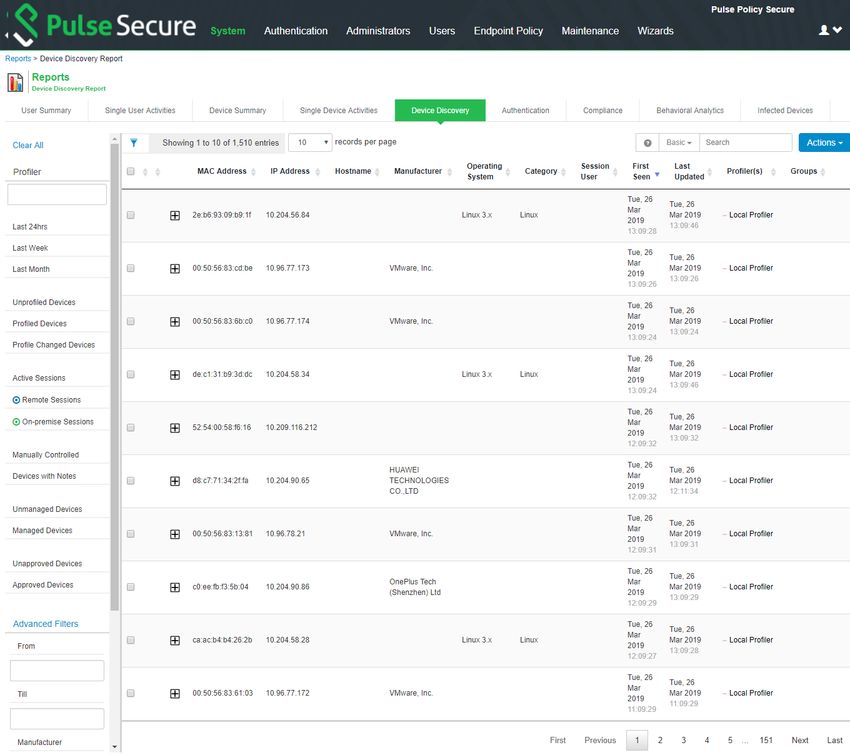
Pulse Policy Secure Profiler: Administration Guide

4                                                    © 2020 Pulse Secure, LLC.
Pulse Policy Secure Profiler: Administration Guide

Contents
           REVISION HISTORY . . . . . . . . . . . . . . . . . . . . . . . . . . . . . . . . . . . . . . . . . . . . . . . . . . . . . . . . . . . . . . . . . . . . 3

           PREFACE . . . . . . . . . . . . . . . . . . . . . . . . . . . . . . . . . . . . . . . . . . . . . . . . . . . . . . . . . . . . . . . . . . . . . . . . . . . . . . . 1
                DOCUMENT CONVENTIONS . . . . . . . . . . . . . . . . . . . . . . . . . . . . . . . . . . . . . . . . . . . . . . . . . . . . . . . . . 1
                     TEXT FORMATTING CONVENTIONS . . . . . . . . . . . . . . . . . . . . . . . . . . . . . . . . . . . . . . . . . . . . . . . 1
                     COMMAND SYNTAX CONVENTIONS . . . . . . . . . . . . . . . . . . . . . . . . . . . . . . . . . . . . . . . . . . . . . . . 1
                     NOTES AND WARNINGS . . . . . . . . . . . . . . . . . . . . . . . . . . . . . . . . . . . . . . . . . . . . . . . . . . . . . . . . 2
                REQUESTING TECHNICAL SUPPORT . . . . . . . . . . . . . . . . . . . . . . . . . . . . . . . . . . . . . . . . . . . . . . . . . . 2
                     SELF-HELP ONLINE TOOLS AND RESOURCES . . . . . . . . . . . . . . . . . . . . . . . . . . . . . . . . . . . . . 2
                     OPENING A CASE WITH PSGSC . . . . . . . . . . . . . . . . . . . . . . . . . . . . . . . . . . . . . . . . . . . . . . . . . 3
                REPORTING DOCUMENTATION ISSUES . . . . . . . . . . . . . . . . . . . . . . . . . . . . . . . . . . . . . . . . . . . . . . . 3

           INTRODUCTION . . . . . . . . . . . . . . . . . . . . . . . . . . . . . . . . . . . . . . . . . . . . . . . . . . . . . . . . . . . . . . . . . . . . . . . 5

           DEPLOYMENT AND LICENSE REQUIREMENTS . . . . . . . . . . . . . . . . . . . . . . . . . . . . . . . . . . . . . . . . 7

           DISCOVERING ENDPOINT DEVICES . . . . . . . . . . . . . . . . . . . . . . . . . . . . . . . . . . . . . . . . . . . . . . . . . . . 9
                PASSIVE COLLECTORS. . . . . . . . . . . . . . . . . . . . . . . . . . . . . . . . . . . . . . . . . . . . . . . . . . . . . . . . . . . . . . 9
                   DHCP COLLECTOR . . . . . . . . . . . . . . . . . . . . . . . . . . . . . . . . . . . . . . . . . . . . . . . . . . . . . . . . . . . . 9
                   USER AGENT COLLECTOR . . . . . . . . . . . . . . . . . . . . . . . . . . . . . . . . . . . . . . . . . . . . . . . . . . . . . . 9
                   NETWORK INFRASTRUCTURE DEVICE COLLECTOR . . . . . . . . . . . . . . . . . . . . . . . . . . . . . . . . . . 9
                   SNMP TRAP . . . . . . . . . . . . . . . . . . . . . . . . . . . . . . . . . . . . . . . . . . . . . . . . . . . . . . . . . . . . . . . . .10
                ACTIVE COLLECTORS. . . . . . . . . . . . . . . . . . . . . . . . . . . . . . . . . . . . . . . . . . . . . . . . . . . . . . . . . . . . . . 10
                   NMAP COLLECTOR . . . . . . . . . . . . . . . . . . . . . . . . . . . . . . . . . . . . . . . . . . . . . . . . . . . . . . . . . . . . 10
                   WMI COLLECTOR . . . . . . . . . . . . . . . . . . . . . . . . . . . . . . . . . . . . . . . . . . . . . . . . . . . . . . . . . . . . 10
                   SSH COLLECTOR . . . . . . . . . . . . . . . . . . . . . . . . . . . . . . . . . . . . . . . . . . . . . . . . . . . . . . . . . . . . . 10
                   MDM COLLECTOR . . . . . . . . . . . . . . . . . . . . . . . . . . . . . . . . . . . . . . . . . . . . . . . . . . . . . . . . . . . 10
                   SNMP HOST COLLECTOR . . . . . . . . . . . . . . . . . . . . . . . . . . . . . . . . . . . . . . . . . . . . . . . . . . . . 11
                   LDAP COLLECTOR . . . . . . . . . . . . . . . . . . . . . . . . . . . . . . . . . . . . . . . . . . . . . . . . . . . . . . . . . . . 11
                CONFIGURING THE LOCAL PROFILER AUTHENTICATION SERVER . . . . . . . . . . . . . . . . . . . . . . . 11

           PROFILER REPORTS . . . . . . . . . . . . . . . . . . . . . . . . . . . . . . . . . . . . . . . . . . . . . . . . . . . . . . . . . . . . . . . . . . 17
                 DASHBOARD . . . . . . . . . . . . . . . . . . . . . . . . . . . . . . . . . . . . . . . . . . . . . . . . . . . . . . . . . . . . . . . . . . . . . 17
                 PROFILER REPORT SCHEDULING . . . . . . . . . . . . . . . . . . . . . . . . . . . . . . . . . . . . . . . . . . . . . . . . . . . 19

           DEVICE DISCOVERY REPORT TABLE . . . . . . . . . . . . . . . . . . . . . . . . . . . . . . . . . . . . . . . . . . . . . . . . . . 21
                 DEVICE DISCOVERY REPORT TABLE . . . . . . . . . . . . . . . . . . . . . . . . . . . . . . . . . . . . . . . . . . . . . . . . . 21
                 ENDPOINT INFORMATION . . . . . . . . . . . . . . . . . . . . . . . . . . . . . . . . . . . . . . . . . . . . . . . . . . . . . . . . . 22

© 2020 Pulse Secure, LLC.                                                                                                                                                            i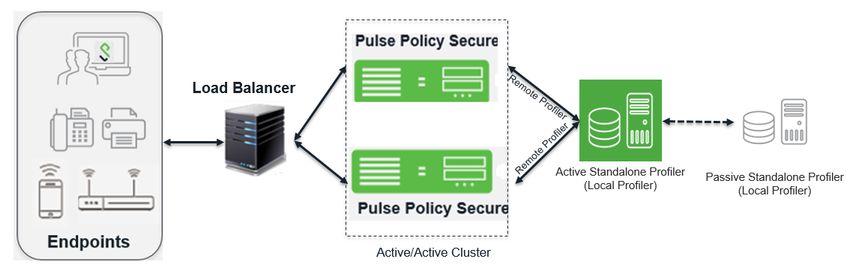
Pulse Policy Secure Profiler: Administration Guide

                        ENDPOINT FILTERS . . . . . . . . . . . . . . . . . . . . . . . . . . . . . . . . . . . . . . . . . . . . . . . . . . . . . . . . . . . . . . . 22
                        REPORT OPERATIONS . . . . . . . . . . . . . . . . . . . . . . . . . . . . . . . . . . . . . . . . . . . . . . . . . . . . . . . . . . . . . 22
                        DEVICE OPERATIONS . . . . . . . . . . . . . . . . . . . . . . . . . . . . . . . . . . . . . . . . . . . . . . . . . . . . . . . . . . . . . 23

           ACCESS CONTROL . . . . . . . . . . . . . . . . . . . . . . . . . . . . . . . . . . . . . . . . . . . . . . . . . . . . . . . . . . . . . . . . . . . . 25
                SPOOF DETECTION . . . . . . . . . . . . . . . . . . . . . . . . . . . . . . . . . . . . . . . . . . . . . . . . . . . . . . . . . . . . . . . 25
                DEVICE SPONSORING . . . . . . . . . . . . . . . . . . . . . . . . . . . . . . . . . . . . . . . . . . . . . . . . . . . . . . . . . . . . . 25
                PROFILE GROUPS . . . . . . . . . . . . . . . . . . . . . . . . . . . . . . . . . . . . . . . . . . . . . . . . . . . . . . . . . . . . . . . . 26
                   CREATING RULES FOR PROFILE GROUPS . . . . . . . . . . . . . . . . . . . . . . . . . . . . . . . . . . . . . . . . 27
                CONFIGURING ROLE-MAPPING RULES FOR PROFILED DEVICES . . . . . . . . . . . . . . . . . . . . . . . . 28

           AGENTLESS HOST CHECKER WITH PROFILER . . . . . . . . . . . . . . . . . . . . . . . . . . . . . . . . . . . . . . . . 33
                OVERVIEW . . . . . . . . . . . . . . . . . . . . . . . . . . . . . . . . . . . . . . . . . . . . . . . . . . . . . . . . . . . . . . . . . . . . . . . 33
                CONFIGURING AGENTLESS HOST CHECKER WITH PROFILER . . . . . . . . . . . . . . . . . . . . . . . . . . . 33

           IMPORT/EXPORT PROFILER DATABASE . . . . . . . . . . . . . . . . . . . . . . . . . . . . . . . . . . . . . . . . . . . . . . 43
                IMPORT / EXPORT PROFILER DEVICE DATA IN BINARY FORMAT . . . . . . . . . . . . . . . . . . . . . . . . 43
                   BINARY EXPORT . . . . . . . . . . . . . . . . . . . . . . . . . . . . . . . . . . . . . . . . . . . . . . . . . . . . . . . . . . . . . . 43
                   BINARY IMPORT . . . . . . . . . . . . . . . . . . . . . . . . . . . . . . . . . . . . . . . . . . . . . . . . . . . . . . . . . . . . . . 43
                IMPORT / EXPORT PROFILER DEVICE DATA IN CSV FORMAT: . . . . . . . . . . . . . . . . . . . . . . . . . . 43
                   CSV EXPORT . . . . . . . . . . . . . . . . . . . . . . . . . . . . . . . . . . . . . . . . . . . . . . . . . . . . . . . . . . . . . . . . .43
                   CSV IMPORT . . . . . . . . . . . . . . . . . . . . . . . . . . . . . . . . . . . . . . . . . . . . . . . . . . . . . . . . . . . . . . . . .43
                IMPORT/ EXPORT OF PROFILE MODIFICATIONS DATABASE IN BINARY FORMAT . . . . . . . . . . . 44

           TROUBLESHOOTING . . . . . . . . . . . . . . . . . . . . . . . . . . . . . . . . . . . . . . . . . . . . . . . . . . . . . . . . . . . . . . . . . 45
                TESTS . . . . . . . . . . . . . . . . . . . . . . . . . . . . . . . . . . . . . . . . . . . . . . . . . . . . . . . . . . . . . . . . . . . . . . . . . . . 45
                DIAGNOSTIC LOGS . . . . . . . . . . . . . . . . . . . . . . . . . . . . . . . . . . . . . . . . . . . . . . . . . . . . . . . . . . . . . . . 46
                PROFILER LOGS . . . . . . . . . . . . . . . . . . . . . . . . . . . . . . . . . . . . . . . . . . . . . . . . . . . . . . . . . . . . . . . . . . 46

           PROFILER DEPLOYMENT CASES . . . . . . . . . . . . . . . . . . . . . . . . . . . . . . . . . . . . . . . . . . . . . . . . . . . . . . 49
                 STANDALONE PROFILER . . . . . . . . . . . . . . . . . . . . . . . . . . . . . . . . . . . . . . . . . . . . . . . . . . . . . . . . . . . 49
                 REMOTE PROFILER . . . . . . . . . . . . . . . . . . . . . . . . . . . . . . . . . . . . . . . . . . . . . . . . . . . . . . . . . . . . . . . 50
                 PROFILING DEVICES IN BRANCH OFFICES . . . . . . . . . . . . . . . . . . . . . . . . . . . . . . . . . . . . . . . . . . . . 50
                    USING PROFILER FORWARDER . . . . . . . . . . . . . . . . . . . . . . . . . . . . . . . . . . . . . . . . . . . . . . . . . 50
                    USING LINKED PROFILER (WITH PPS FUNCTIONALITY) . . . . . . . . . . . . . . . . . . . . . . . . . . . . 51

ii                                                                                                                                             © 2020 Pulse Secure, LLC.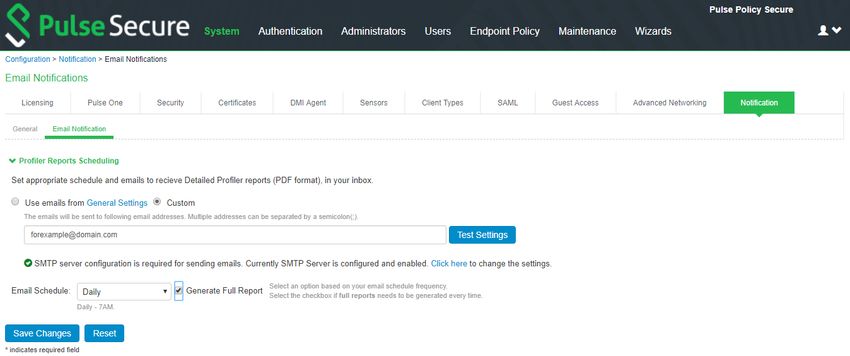
Pulse Policy Secure Profiler: Administration Guide

Preface
     •   Document conventions . . . . . . . . . . . . . . . . . . . . . . . . . . . . . . . . . . . . . . . . . . . . . . . . . . . . . . . . . 1
     •   Requesting Technical Support . . . . . . . . . . . . . . . . . . . . . . . . . . . . . . . . . . . . . . . . . . . . . . . . . . . . 2
     •   Reporting Documentation Issues . . . . . . . . . . . . . . . . . . . . . . . . . . . . . . . . . . . . . . . . . . . . . . . . . 3

Document conventions
The document conventions describe text formatting conventions, command syntax conventions, and
important notice formats used in Pulse Secure technical documentation.

Text formatting conventions
Text formatting conventions such as boldface, italic, or Courier font may be used in the flow of the text to
highlight specific words or phrases.

Format                                   Description

bold text                                Identifies command names

                                         Identifies keywords and operands

                                         Identifies the names of user-manipulated GUI elements

                                         Identifies text to enter at the GUI

italic text                              Identifies emphasis

                                         Identifies variables

                                         Identifies document titles

Courier Font                             Identifies command output

                                         Identifies command syntax examples

Command syntax conventions
Bold and italic text identify command syntax components. Delimiters and operators define groupings of
parameters and their logical relationships.

Convention                               Description

bold text                                Identifies command names, keywords, and command options.

italic text                              Identifies a variable.

[]                                       Syntax components displayed within square brackets are optional.
                                         Default responses to system prompts are enclosed in square brackets.

© 2020 Pulse Secure, LLC.                                                                                                                           1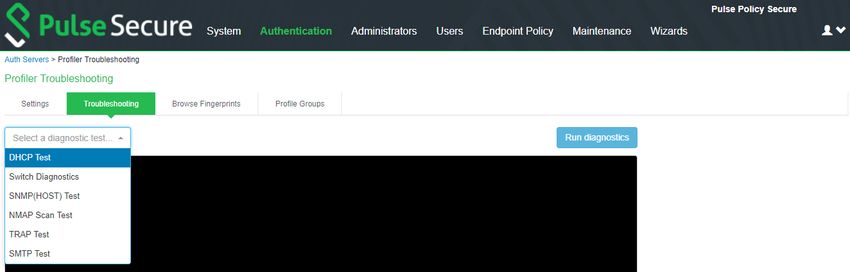
Pulse Policy Secure Profiler: Administration Guide

Convention                      Description

{x|y|z}                         A choice of required parameters is enclosed in curly brackets
                                separated by vertical bars. You must select one of the options.

x|y                             A vertical bar separates mutually exclusive elements.

                              Non-printing characters, for example, passwords, are enclosed in angle
                                brackets.

...                             Repeat the previous element, for example, member[member...].

\                               Indicates a “soft” line break in command examples. If a backslash
                                separates two lines of a command input, enter the entire command at
                                the prompt without the backslash.

bold text                       Identifies command names, keywords, and command options.

Notes and Warnings
Note, Attention, and Caution statements might be used in this document.

Note: A Note provides a tip, guidance, or advice, emphasizes important information, or provides a reference to
related information.

ATTENTION
An Attention statement indicates a stronger note, for example, to alert you when traffic might be interrupted or
the device might reboot.

CAUTION
A Caution statement alerts you to situations that can be potentially hazardous to you or cause damage to
hardware, firmware, software, or data.

Requesting Technical Support
Technical product support is available through the Pulse Secure Global Support Center (PSGSC). If you have a
support contract, file a ticket with PSGSC.

      •   Product warranties—For product warranty information, visit https://support.pulsesecure.net/product-
          service-policies/

Self-Help Online Tools and Resources
For quick and easy problem resolution, Pulse Secure provides an online self-service portal called the Customer
Support Center (CSC) that provides you with the following features:

      •   Find CSC offerings: https://support.pulsesecure.net
      •   Search for known bugs: https://support.pulsesecure.net
      •   Find product documentation: https://www.pulsesecure.net/techpubs
      •   Download the latest versions of software and review release notes: https://support.pulsesecure.net

2                                                                                            © 2020 Pulse Secure, LLC.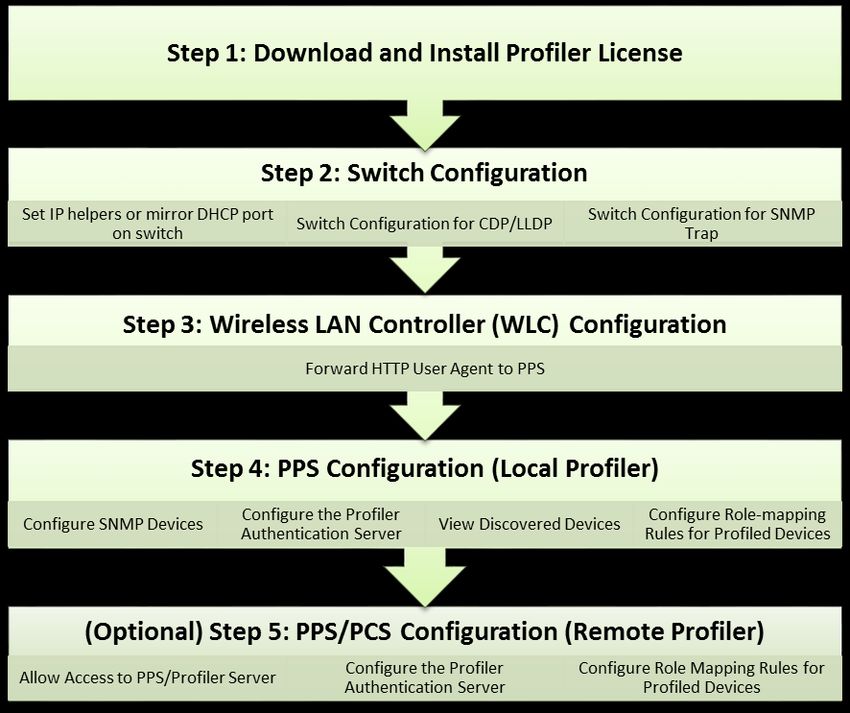
Pulse Policy Secure Profiler: Administration Guide

   •   Open a case online in the CSC Case Management tool: https://support.pulsesecure.net
   •   To verify service entitlement by product serial number, use our Serial Number Entitlement (SNE) Tool:
       https://support.pulsesecure.net
For important product notices, technical articles, and to ask advice:
   •   Search the Pulse Secure Knowledge Center for technical bulletins and security advisories:
       https://kb.pulsesecure.net
   •   Ask questions and find solutions at the Pulse Community online forum:
       https://community.pulsesecure.net

Opening a Case with PSGSC
You can open a case with PSGSC on the Web or by telephone.

   •   Use the Case Management tool in the PSGSC at https://support.pulsesecure.net.
   •   Call 1-844 751 7629 (Toll Free, US).
For international or direct-dial options in countries without toll-free numbers, see
https://support.pulsesecure.net/support/support-contacts/

Reporting Documentation Issues
To report any errors or inaccuracies in Pulse Secure technical documentation, or to make suggestions for
future improvement, contact Pulse Secure Technical Support (https://support.pulsesecure.net). Include a full
description of your issue or suggestion and the document(s) to which it relates.

© 2020 Pulse Secure, LLC.                                                                                        3
Pulse Policy Secure Profiler: Administration Guide

4                                                    © 2020 Pulse Secure, LLC.
Pulse Policy Secure Profiler: Administration Guide

Introduction
Pulse Policy Secure(PPS), an industry recognized Network Access Control (NAC) solution, authenticates users,
ensures that endpoints meet security policies, and then dynamically provisions access through an
enforcement point (such as a firewall or switch) based on the resulting user session information - including
user identity, device type, IP address, and role.

The Pulse Secure Profiler dynamically identifies and classifies both managed and unmanaged endpoint
devices, enabling control of access to networks and resources based on the type of the device.

Pulse Policy Secure(PPS) integrates with the Profiler to provide visibility and control of endpoint devices. This
document focuses on features of the Profiler in a network with an existing Policy Secure deployment already
configured with the basic elements required to provide network access, including authentication servers, sign-
in policies, roles, realms, and SNMP-based enforcement or RADIUS attributes policies for enforcement based
on 802.1X / MAC authentication. Refer to the Pulse Policy Secure Administrator Guide for details.

© 2020 Pulse Secure, LLC.                                                                                       5
Pulse Policy Secure Profiler: Administration Guide

6                                                    © 2020 Pulse Secure, LLC.
Pulse Policy Secure Profiler: Administration Guide

Deployment and License Requirements
From Profiler v1.3 onwards, new license SKUs are available on Pulse Secure license portal, for example, PS-
PROFILER-LG-SKU. The Profiler SKUs are device count based licenses. For more information, see Pulse Connect
Secure Administrator Guide, Pulse Policy Secure Administrator Guide, and PPS License Management Guide.

A high-level overview of the deployment steps needed to set up and run the Profiler is shown below. For
detailed information, see Profiler Deployment Guide.

Figure 1   Profiler deployment process

© 2020 Pulse Secure, LLC.                                                                                     7
Pulse Policy Secure Profiler: Administration Guide

8                                                    © 2020 Pulse Secure, LLC.
Pulse Policy Secure Profiler: Administration Guide

Discovering Endpoint Devices
   •   Passive Collectors . . . . . . . . . . . . . . . . . . . . . . . . . . . . . . . . . . . . . . . . . . . . . . . . . . . . . . . . . . . . . . 9
   •   Active Collectors . . . . . . . . . . . . . . . . . . . . . . . . . . . . . . . . . . . . . . . . . . . . . . . . . . . . . . . . . . . . . . 10
   •   Configuring the Local Profiler Authentication Server. . . . . . . . . . . . . . . . . . . . . . . . . . . . . . . . 11

The profiler uses a combination of active and passive scanning techniques to discover and collect information
about all the endpoints on a network. Collectors are used to collect this information.

Collectors are broadly classified into active and passive collectors.

Passive Collectors
Passive collectors are initiated based on network events or timer events. For example, a new DHCP packet is
received from the network which triggers the DHCP collector to profile the device.

DHCP collector
The profiler uses DHCP fingerprinting for endpoint classification of the end points such as laptops and
desktops that are configured to have a DHCP IP address. One or more switched or WLAN controllers must be
configured to forward all DHCP packets for each VLAN to the internal interface of the PPS appliance. This
enables the on-box Profiler to profile endpoints by parsing the DHCP packets arriving at the PPS appliance.

In some environments, it is easier to forward DHCP traffic to the Profiler using the SPAN/RSPAN configuration.

User Agent Collector
Some devices, like mobile phones, may not be profiled exactly with DHCP fingerprints. For example, an iPhone
6s phone is profiled as an iOS device or a Samsung Android 5.1 phone is profiled as Generic Android. The user
agent information (contains granular information about the operating systems / OS versions) helps to profile
these types of devices with more precision. The Profiler uses HTTP User Agent data that is captured from
network traffic of the device to classify the devices.

Network Infrastructure Device Collector
While DHCP fingerprinting is useful for endpoints with a DHCP-assigned IP address, it cannot detect devices
that are assigned static IP addresses. The Profiler can detect statically addressed endpoints by fetching the
ARP/CAM table from Network Infrastructure Device using SNMP or SSH.

Note: The ARP/MAC tables are fetched from the Network Infrastructure Device periodically. The poll interval can
be configured by the administrator.

CDP and LLDP collection methods is also supported by any other devices that send CDP or LLDP
announcements. CDP and LLDP data provide more accurate version of OS, model, and category information.
The discovery protocols are enabled by default in most of the network infrastructure devices.

© 2020 Pulse Secure, LLC.                                                                                                                                 9
Pulse Policy Secure Profiler: Administration Guide

Network Infrastructure Device Collector -- SNMP
Network Infrastructure Devices that support standard SNMP MIBs are queried through SNMP to get the list of
endpoints connected to them. The list of managed or unmanaged devices is available by querying the MAC
table and ARP tables.

Network Infrastructure Device Collector -- SSH
For Network Infrastructure Devices that do not support standard SNMP MIBs, the Profiler uses SSH sessions to
read the ARP/CAM tables.

Note: In this release, this feature is supported for Palo Alto Network vendors only.

SNMP Trap
Profiler supports SNMP Trap based discovery which helps to accurately detect when the endpoint is
connected to or disconnected from the switch using link down, link up and mac change notification SNMP
traps. This specifically helps in detecting the endpoints that are connected to the switches for brief period of
times that are in between Profiler Poll interval for Network Infrastructure Devices.

Active Collectors
Active collectors are initiated by Profiler. Once devices are discovered using DHCP, SNMP or other
mechanisms, more granular profiling is done only for those devices using various active collectors.

Nmap Collector
Nmap scan runs on all endpoints that have an IP address that are in white listed subnets, as and when they
have discovered by other collectors.

WMI Collector
The Profiler runs WMI scan to collect more accurate and detailed information of Windows endpoints.

SSH Collector
SSH is an active collection method that can be used to gather detailed information which would help to profile
endpoints accurately.

Note: In this release, this mechanism is supported for MAC OSX endpoints only.

MDM Collector
Pulse Policy Secure(PPS) can communicate with Mobile Device Management Platforms such as AirWatch and
MobileIron to retrieve more information about managed mobile endpoints.

As both an MDM server and the Profiler acts as a device attribute server, it is important to provide the
administrator an aggregated view of the attributes. The attributes that are retrieved from the MDM are
merged with the device attributes computed by the Profiler to offer better classification and manageability of
those endpoints.

10                                                                                      © 2020 Pulse Secure, LLC.
Pulse Policy Secure Profiler: Administration Guide

SNMP HOST Collector
SNMP HOST Collector is a collection method that receives endpoint information where the endpoints are
monitored through SNMP.

Note: In release 9.1R1, SNMP HOST collector is applicable for Windows and Pulse-Appliances only.

LDAP Collector
The LDAP collector fetches attributes from the configured LADAP server based on the device attributes from
the profiler.

Note: Configure the LDAP Server under Authentication Servers using  or  as filter.

Configuring the Local Profiler Authentication Server
Ensure the following tasks are performed before proceeding with the Profiler Authentication server
configuration.

   •   If you wish to use DHCP fingerprinting, you have configured the switch(es) to forward DHCP packets to
       the PPS.
   •   If you wish to use SNMP/SSH-based profiling from Network Infrastructure Devices, you have configured
       one or more switches in the Network Infrastructure Device page of the PPS Administrator User.
   •   You have downloaded the latest device fingerprints package from the support portal.
To create a new Local Profiler Authentication Server:

   1. Select Authentication > Auth.Servers.

   2. Select Local Profiler from the server type drop-down list and click New Server.

       Figure 2    Creating a Local Profiler Authentication Server

   3. Enter a name for the Authentication server.

© 2020 Pulse Secure, LLC.                                                                                      11
Pulse Policy Secure Profiler: Administration Guide
Figure 3 Naming a Local Profiler Authentication Server
4. Click Browse and upload the device fingerprints package.
Figure 4 Uploading Device Fingerprints Package
5. (Optional) The SNMP/SSH scan for Network Infrastructure Devices would trigger and look for
connected endpoints after a predefined Poll interval.
• Set SNMP Poll interval, if any Network Infrastructure Devices are configured. By default, the poll interval
is set as 60 minutes.
• Select the DHCP forward mode. RSPAN for external ports and DHCP Helper for internal ports.
• Select the interval to purge older devices from the database periodically. By default, the interval is set to
Never.
Figure 5 General Settings
6. (Optional) Select device categories which trigger e-mail(s) to the administrator for approval. Also create
a role-mapping rule based on status attribute to assign the device to the respective role before and
after approval. For more information see, “Device Sponsoring” on page 25.
Select Use emails from General Settings to send e-mails to address specified in General Settings or
select Custom and enter the e-mail addresses separated by semicolon.
Enter the Profiler hostname or IP address to fill the URL. This link in the e-mail notification allows to
quickly to access the Device Discovery Report and take appropriate action for devices that require
approval.
12 © 2020 Pulse Secure, LLC.Pulse Policy Secure Profiler: Administration Guide
Figure 6 Device Sponsoring
7. (Optional) Upon device discovery, using DHCP, SNMP or other mechanisms, granular profiling is
performed on devices using various active collectors. Add one or more subnets which are included or
excluded for collectors like SSH, WMI, SNMP (HOST), and NMAP. Maximum 100 subnets configuration
are supported.
On-Demand Scan can be triggered anytime on the subnets for selected collectors.
Figure 7 Adding One or More Subnets
8. (Optional) In the SNMP (HOST) Profiling section, enter the possible names, separated by commas, for
the community list for the endpoints monitored through SNMP.
© 2020 Pulse Secure, LLC. 13Pulse Policy Secure Profiler: Administration Guide
Figure 8 Community List
9. (Optional) In the WMI profiling section, select Configure WMI credentials and specify the domain
administrator or user with administrator credentials to fetch accurate endpoint information from
remote desktops running Microsoft Windows. Select Use Active Directory server credentials to use
existing Active Directory server credentials.
Select Allow deep scan to control the level of information to fetch from the Endpoint remotely
through WMI. Deep Scan includes information on ports, process, and security product details such as
product version, signature version, signature date attributes. This option is required if Agentless Host
checker with Profiler policies are configured for endpoint posture assessment.
Figure 9 WMI Profiling
10. (Optional) In the SSH Profiling section, select the Authentication Method and enter credentials as
applicable. Enter the Endpoint IP or hostname to test the credentials.
Figure 10 SSH Profiling
11. (Optional) Specify the existing MDM authentication server for accurate profiling of mobile devices
which are registered through MDM providers.
14 © 2020 Pulse Secure, LLC.Pulse Policy Secure Profiler: Administration Guide
Figure 11 MDM Server
12. (Optional) Select one of the configured LDAP servers where device information is stored.
Figure 12 LDAP Server
13. (Optional) In the Forward and Sync endpoints section, enter the FQDN or the IP address of the linking
local profiler. Enter the API key, or click Get API Key and enter the administrator credentials of the
remote profiler to retrieve and auto fill the API Key.
Figure 13 Forward and Sync endpoints
14. Click Save Changes to save the configuration settings.
Devices that are discovered are profiled and updated in the Device Discovery Table and an overall summary is
shown in the “Dashboard” on page 17.
The devices can be grouped based on group name and rules using device attributes. For more information
see, “Profile Groups” on page 26.
© 2020 Pulse Secure, LLC. 15Pulse Policy Secure Profiler: Administration Guide 16 © 2020 Pulse Secure, LLC.
Pulse Policy Secure Profiler: Administration Guide
Profiler Reports
• Dashboard . . . . . . . . . . . . . . . . . . . . . . . . . . . . . . . . . . . . . . . . . . . . . . . . . . . . . . . . . . . . . . . . . . . 17
• Profiler Report Scheduling . . . . . . . . . . . . . . . . . . . . . . . . . . . . . . . . . . . . . . . . . . . . . . . . . . . . . . 19
Dashboard
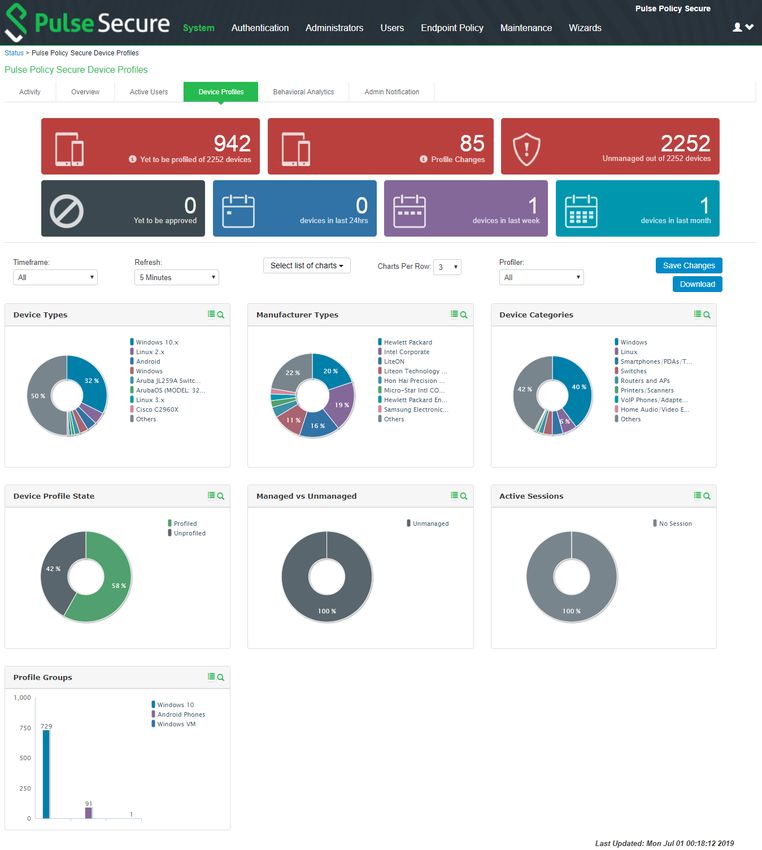
Once the Profiler is configured, profiling starts in the background. Devices that are discovered are profiled and
updated in the Device Discovery Table and an overall summary is shown in the Device Profiles Dashboard.
Click on each chart or numbered panel to view detailed information in the device discovery report.
The upper part of the dashboard displays the number panels representing the number of devices for each of
the following status:
• Devices waiting to be Profiled
• Devices for which the profile has changed
• Unmanaged devices
• Devices waiting for administrator approval
• Devices added in last 24 hours
• Devices added last week
• Devices added last month
The charts in the dashboard can be customized by the administrator by setting the following parameters:
• Timeframe: The charts display information for the specified timeframe. By default, the information for
the last 24 hours is displayed. The timeframe can also be set to 7 days, 30 days, or All.
• Refresh: The refresh time interval to update the charts. By default, the charts refresh every 5 mins. The
time interval can also be set to disabled, 10 minutes, 30 minutes, or 60 minutes.
• Select list of charts: List of charts to select to display in the dashboard.
• Charts Per Row: Number of charts to display in a row on the dashboard. By default, 3 charts are
displayed in a row. 1 or 2 charts can be displayed in each row.
• Profiler: The profiler for which the information is displayed. By default, information for all profilers are
displayed.
The following charts are displayed in the dashboard:
• Device Profile State: Represents the device classification based on Profile status such as Profiled
devices, Unprofiled devices, Profile changed devices.
• Manufacturer Types: Represents the device classification based on the device manufacturer. For
example, VMware. Inc, Apple. Inc
• Device Categories: Represents the device classification based on the device categories such as
smartphones, laptops, windows.
© 2020 Pulse Secure, LLC. 17Pulse Policy Secure Profiler: Administration Guide
• Device Types: Represents the device classification based on device types. For example, Windows,
Apple iPod, iPhone.
• Managed vs Unmanaged: Represent the device classification on the managed and unmanaged device
status. Managed devices are detected by the MDM or a Pulse Client session is established on the
device.
• Active Sessions: Represent the devices based on the device sessions such as Remote sessions and
On-Premise session.
• Profile Groups: Represents the profile groups based on the device classification. For more
information, see “Profile Groups” on page 26.
18 © 2020 Pulse Secure, LLC.Pulse Policy Secure Profiler: Administration Guide Figure 14 Dashboard View The charts can be viewed on the dashboard or can be downloaded as a report in PDF format. The reports can be scheduled to be emailed as well. Profiler Report Scheduling The Profiler reporting can be scheduled, and the reports can be delivered in the e-mail notifications to the specified addresses. © 2020 Pulse Secure, LLC. 19
Pulse Policy Secure Profiler: Administration Guide

     1. Navigate to System > Configuration > Notification > Email Notification.

     2. Choose Use emails from General Settings to send e-mails to address specified in General Settings or
        choose Custom and enter the e-mail addresses separated by semicolon.

     3. Select the interval to generate and send the report e-mail notifications. The reports are sent daily,
        weekly or monthly.

     4. Select Generate Full Report to generate and send complete report every time. If the option is not
        selected, the report with only the incremental changes are generated.

     5. Click Save Changes.

        Figure 15 Report Scheduling

20                                                                                       © 2020 Pulse Secure, LLC.
Pulse Policy Secure Profiler: Administration Guide
Device Discovery Report Table
• Device Discovery report table . . . . . . . . . . . . . . . . . . . . . . . . . . . . . . . . . . . . . . . . . . . . . . . . . . . 21
• Endpoint Information . . . . . . . . . . . . . . . . . . . . . . . . . . . . . . . . . . . . . . . . . . . . . . . . . . . . . . . . . . 22
• Endpoint Filters . . . . . . . . . . . . . . . . . . . . . . . . . . . . . . . . . . . . . . . . . . . . . . . . . . . . . . . . . . . . . . . 22
• Report Operations. . . . . . . . . . . . . . . . . . . . . . . . . . . . . . . . . . . . . . . . . . . . . . . . . . . . . . . . . . . . . 22
• Device Operations . . . . . . . . . . . . . . . . . . . . . . . . . . . . . . . . . . . . . . . . . . . . . . . . . . . . . . . . . . . . . 23
Device Discovery report table
The Device Discovery Report Table contains the list of devices that are discovered in the network. This report
allows to add, modify and delete the endpoints.
1. Select System > Reports > Device Discovery to display the table.
Figure 16 Device Discovery Report Table
© 2020 Pulse Secure, LLC. 21Pulse Policy Secure Profiler: Administration Guide
Endpoint Information
All current and historical information for a device is displayed in an expanded view based on IP address,
sessions (remote, local) or profiles changes.
Expand the required endpoint to display current Details and History.
Figure 17 History based on IP Address
Endpoint Filters
A list of filters is available for quick analysis of discovered devices. The filers are displayed to the left of the
table.
• Filters based on time - Last 24 hours, Last week, Last month
• Filters based on sessions - Active sessions, Remote sessions, On-premise sessions
• Filters based on actions of the discovered devices - Managed devices, Unmanaged devices, Profiled
devices, Approved and unapproved devices, Unprofiled devices, Profile changed devices. Manually
edited devices, Devices with Notes
Note: If an endpoint is classified incorrectly, see the Troubleshooting to rectify the problem.
Report Operations
The Device Discovery Report Table allows the following operations on all the discovered devices.
• Records per page: Allows to customize the number of records displayed in the page.
• Head row: Lists the main attributes for the devices such as IP Address, MAC Address etc. Click the
column head to sort the table with respect to the column. Double click to sort in reverse order.
• Search: Allows to search devices based on the MAC Address, IP Address, or other device attributes.
Click ? for help.
• Basic Search allows to search the device discovery report with any text or keyword.
• Advanced Search allows to enter the expression with operators and wildcards to obtain specific
search results. For example, (snmp.switch_ip = "10.204.58.??" and manufacturer !=
"*juniper*") or (os != "*juniper*" and ip = "10.204*").
• Actions: Allows the following functions:
• Approve/Unapprove selected devices: Allows to manually approve or unapproved the selected
devices.
22 © 2020 Pulse Secure, LLC.Pulse Policy Secure Profiler: Administration Guide
• Add Device: Allows to add new devices. Enter important attributes like MAC Address,
Manufacturer, Operating system, category, IP Address, and Profiler Name. Allows to override the
automatic updates by the profiler and retain the details.
• Download Report: Allows to download and save the report in CSV format.
• Delete Selected: Allows to delete the selected devices.
• Purge Aged Out Devices: Allows to manually purge devices older than the specified interval in the
server configuration. Scheduled purging of the devices happens automatically.
Device Operations
The Device Discovery Report Table allows the following operations for each of the listed devices.
• Approve/Unapprove: Each endpoint has an attribute called status and allows to manually approve or
unappove a specific device. See Device Sponsoring for more information.
• Edit: Allows to edit Manufacturer, Category and Operating System fields. Manually Added or Edited
device attributes are auto updated when the classifier updates its attributes. If you want to avoid
updates from classifier, select Override any updates by the profiler and use this profile always for the
device.
• Edit all similar devices: Allows to edit all similar devices which have same fingerprint. When similar
devices are added, the updated fingerprint is used for profiling.
• Submit a ticket: The Profiler uses Fingerbank database to classify devices.
It is possible that some devices are not correctly classified in this process. In such cases, the
administrator can use the Copy Fingerprint option to copy the fingerprint and send the relevant
information about the wrongly classified device to the Pulse Secure using an E-mail. This information is
verified before updating the Custom Fingerprint database.
Figure 18 Submit a ticket
• Delete: Allows to delete a device. If the deleted devices are rediscovered by the Profiler, they are again
included in the list.
© 2020 Pulse Secure, LLC. 23Pulse Policy Secure Profiler: Administration Guide 24 © 2020 Pulse Secure, LLC.
Pulse Policy Secure Profiler: Administration Guide

Access Control
   •   Spoof Detection . . . . . . . . . . . . . . . . . . . . . . . . . . . . . . . . . . . . . . . . . . . . . . . . . . . . . . . . . . . . . . .    25
   •   Device Sponsoring. . . . . . . . . . . . . . . . . . . . . . . . . . . . . . . . . . . . . . . . . . . . . . . . . . . . . . . . . . . . .       25
   •   Profile Groups . . . . . . . . . . . . . . . . . . . . . . . . . . . . . . . . . . . . . . . . . . . . . . . . . . . . . . . . . . . . . . . .   26
   •   Configuring Role-Mapping Rules for Profiled Devices . . . . . . . . . . . . . . . . . . . . . . . . . . . . . . .                                28

After creating the Local Profiler Authorization Server, you can use device attributes from the Profiler in the role
mapping rules for both MAC Authorization and 802.1X realms for policy enforcement.

Spoof Detection
The profiler allows a mechanism to suspect MAC address spoofing, , provided MAC spoofing results in a profile
change of the device. Profile change would be indicated by the previous_os and previous_category fields.

For example, MAC address spoofing can be detected if an endpoint was a printer in the stored profile and the
latest profile indicates the same device as a Linux endpoint.

To detect spoof for a specific device, use the following Regexp in role mapping rule:

deviceAttr.previous_os != '' AND (deviceAttr.previous_os = 'Cisco VoIP' AND
deviceAttr.os != 'Cisco VoIP')

Use the following Regexp, which is common for all Operating Systems:
deviceAttr.previous_os != ''                              AND (deviceAttr.previous_os != deviceAttr.os)

Note: This feature works only when the actual device is profiled with information of OS and categories before
spoofed device connects and is profiled. Mac spoof suspect may not work when same OS or Category
information is identified for original and spoofed device. Mac spoof suspect may not work when two different
collectors collect valid information, but there is no classification change because of priority order of the
collectors. The Priority of the collectors in order follows, MDM, WMI, SSH, SNMP/TRAP, DHCP, NMAP.

Device Sponsoring
This feature allows an administrator to manually approve devices that belong to a specific category on a
production network. The administrator can configure categories that need approval and the profiler to identify
the devices that belong to these categories.

The profiler notifies the administrator on the user interface or an E-Mail with a link to approve when new
devices are detected. The administrator can approve so that the role of the newly detected device changes
according to the role mapping rules. The profiler allows to update status, ip, manufacturer, os, category, notes,
override, profiler_name attributes using the REST APIs.

For more information on REST APIs, see Pulse Connect Secure/Pulse Policy Secure REST API Solutions Guide.

© 2020 Pulse Secure, LLC.                                                                                                                                    25
Pulse Policy Secure Profiler: Administration Guide
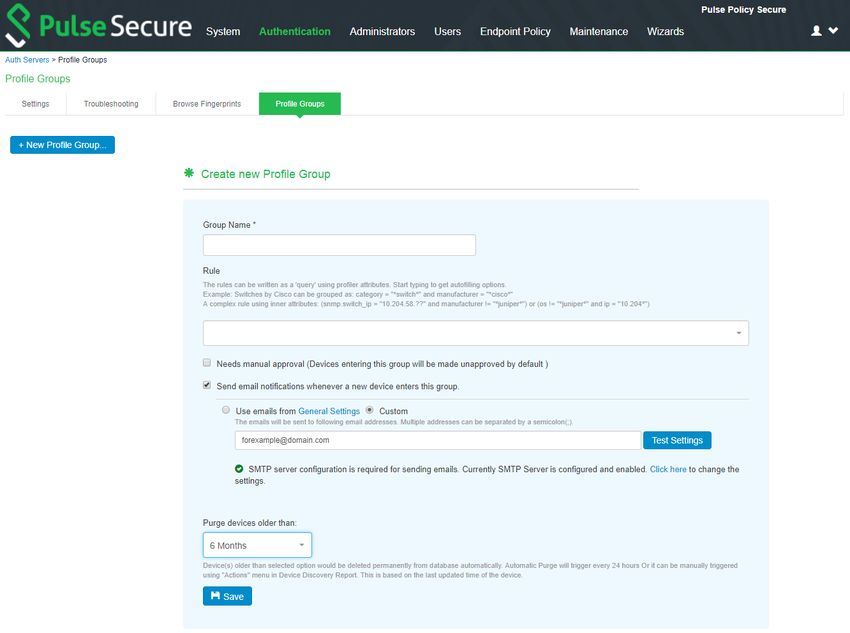
Profile Groups
The devices can be grouped based on group name and rules for easy access and identification. Group names
can be used in role mapping rules, resource policies, filtering etc.
1. Select the Profiler server under Authentication > Auth. Servers.
2. Select Profile Groups tab, select the New Profile Group and enter the Group Name and Rule.: The
rules can be written with device attributes and suggested operators can be chosen from the list.
To create rules for all values including null, use the format: rule: category ="*" or category ="".
3. (Optional) Enable Needs manual approval option to approve the devices added to the profile group
manually by the administrator. The devices in the group are Unapproved by default.
4. (Optional) Email notifications can be enabled to notify when new devices are added to the group.
5. Select the interval from the list to purge the older devices in the group automatically.
6. Click Save.
Note: Updating the profile groups for existing devices may take time if a rule covers more devices. Navigating
away from the page cancels the update for the existing devices. But, the group names are updated when the
device receive updates during regular profiling.
26 © 2020 Pulse Secure, LLC.Pulse Policy Secure Profiler: Administration Guide Figure 19 Profile Groups Creating Rules for Profile Groups To create rules for profile groups, type the expressions in the Rules field. The list appears with suggested device attributes and operators as you type the expression. Create the rule expression using one or combination of the following set of qualified rule attributes and the operators. Attribute Name Rule Attribute Category category Manufacturer manufacturer Operating System os MAC Address macaddr IP Address ip Hostname hostname Profiler Name profiler_name © 2020 Pulse Secure, LLC. 27
Pulse Policy Secure Profiler: Administration Guide

Attribute Name                            Rule Attribute

SNMP Attributes

SSID                                      snmp.ssid

Switch IP Address                         snmp.switch_ip

Switch Name                               snmp.switch_name

WMI Attributes

Classified Category                       wmi.classified_category

Classified OS                             wmi.classified_os

Domain                                    wmi.domain

Hostname                                  wmi.hostname

Status                                    wmi.status

username                                  wmi.username

Operators
     •   == (exactly equal)
     •   != (Not equal to)
     •   AND
     •   OR (enabled to add multiple sets of AND rules - as shown in UI, which internally is called as 'OR')

Examples
     •   macaddr == "64:87*" and manufacturer =="VMWare"
     •   ip =="10.204*" and manufacturer== "VMWare*" and (os != "linux" or os
         !="Linux*")
     •   wmi.classified_category == "Windows" or wmi.classified_os == "Microsoft
         Windows 10 Pro 10.0.17134" or wmi.domain == "WORKGROUP" or wmi.hostname == "
         W71-PC" or wmi. status == "up" or wmi.username == "admin"

Configuring Role-Mapping Rules for Profiled Devices
To configure role-mapping rules:

     1. Select Endpoint Policy > MAC Address Realms (for MAC Authorization realms) or Users > User
        Realms (for 802.1X realms)

     2. Select the realm name.

     3. Select the Local Profiler Authentication Server as Device Attributes Server.

28                                                                                       © 2020 Pulse Secure, LLC.
Pulse Policy Secure Profiler: Administration Guide
Figure 20 Device Attributes
4. Click the Role Mapping tab.
5. Click New Rule.
6. Set Rule based on to "Device Attribute" and click Update.
Figure 21 Rule based on attribute
Note: If a rule exists, then the Rule based on drop-down will not appear.
7. Enter a name for the rule (if creating a new one).
8. Create the new role mapping rules.
a. Select the attributes based on the new device attributes that are now available in the attributes
drop-down field. When setting the attribute value, make sure the value you enter is an exact match
for the value displayed in the Device Discovery Report table. Wildcards (* and ?) can be used in the
attribute value.
Figure 22 Creating New Role Mapping Rule
b. If LADAP server is configured in profiler, select the LDAP attribute from the list or click Attributes to
create new LDAP attributes.
© 2020 Pulse Secure, LLC. 29Pulse Policy Secure Profiler: Administration Guide
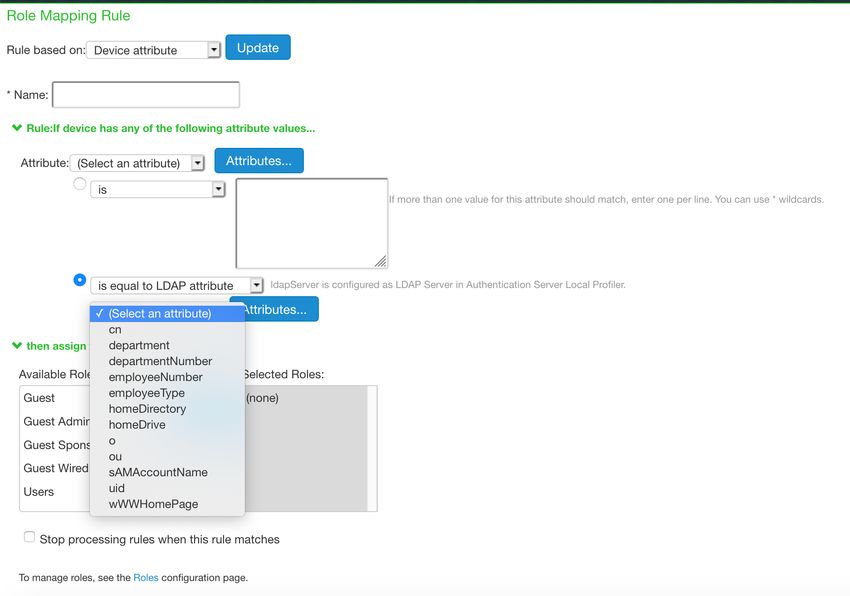
Figure 23 Creating New Role Mapping Rule with LDAP Attributes
9. Assign the roles and click Save Changes.
Note: Role mapping rules in the MAC authorization realm apply to both MAC-RADIUS enforcements in
an 802.1X environment and SNMP-based enforcement.
The Profiler can also work as a device attribute server for authentication. Wildcards (* and ?) can be used in
the attribute value.
The following table lists the device attributes based on which you can create rules and assign to the user roles.
Attribute Description Values/Example
Name
antivirus_name The name of the antivirus running on the device MacAfee, Symantec Endpoint
Protection, etc.
antivirus_status The status of the antivirus running on the device Enabled or Disabled
antivirus_version A check on the antivirus version running on the system is up to Outdated or Current
date or not
Category The category of the device. Windows, Linux, Android, etc.
All devices are broadly classified into 30+ different categories.
Custom The administrator defined value(s) for the device. Administaror defined values
Domain The domain name of the device Administaror defined values
30 © 2020 Pulse Secure, LLC.Pulse Policy Secure Profiler: Administration Guide
Attribute Description Values/Example
Name
first_seen The timestamp of the device discovery 2018-04-04
06:52:16.993606+00:00
Groups The list of groups and rules associated to the device Administaror defined values
Hostname The hostname of the device Admin-pc
last_seen The timestamp when the device was last updated 2018-04-06
05:38:43.877617+00:00
Macaddr The unique hardware address of the device 78:9c:57:4f:2c:**
Manufacturer The device manufacturer name Lenovo*, HP*, etc
Os The Operating system running on the device or the type of the Windows 7.x, AC OS X, Ruckus,
device. Wireless AP, etc
os_patch The patch information of the operating system installed on the "Service Pack *"
device
previous_category When a device category is changed, the device can be listed N/A
using the previous category of the device.
previous_os When a device operating system is changed, the device can be N/A
listed using the previous category of the device.
profiler_name The name of the profiler used to profile the device Local Profiler
Status The administartor approval status of the device Approved or Unapproved
tcp_open_ports The open TCP ports on the device List of port values
udp_open_ports The open UDP ports on the device List of port values
userName The username used to access the device administrator
© 2020 Pulse Secure, LLC. 31Pulse Policy Secure Profiler: Administration Guide 32 © 2020 Pulse Secure, LLC.
Pulse Policy Secure Profiler: Administration Guide

Agentless Host Checker with Profiler
   •   Overview . . . . . . . . . . . . . . . . . . . . . . . . . . . . . . . . . . . . . . . . . . . . . . . . . . . . . . . . . . . . . . . . . . . . . 33
   •   Configuring Agentless Host Checker with Profiler . . . . . . . . . . . . . . . . . . . . . . . . . . . . . . . . . . 33

Overview
Profiler allows to authorize users based on the user device attributes without the need to install agents on
their machines.

Agentless Host checker allows to configure policies to check device compliance. Each policy consists of a set of
rules to qualify the device to be compliant.

The user realms are configured with role mapping rules based on the policies and the users are assigned
appropriate role based on device compliance.

The following rule types are supported for the Agentless Host Checker with Profiler on Windows devices:

Agentless Host Checker with Profiler is supported on Windows devices only. The following is the list of
supported rule types.

   •   Antivirus
   •   Firewall
   •   Antispyware
   •   Operating System
   •   Ports
   •   Process
   •   NetBIOS
   •   Mac address
Note: ESAP package 3.4.5 or higher supports the latest rule type updates.

Configuring Agentless Host Checker with Profiler
To configure Agentless Host Checker mode, perform the following steps.

   1. Select Authentication > Endpoint Security > Host Checker.

   2. Under Policies, click New.

   3. Enter a name for the policy, select Agentless mode with Profiler and click Continue.

© 2020 Pulse Secure, LLC.                                                                                                                                      33
Pulse Policy Secure Profiler: Administration Guide

        Figure 24 Host Checker Policy Creation for Agentless mode

        Note: Host checker Polices configured for Agentless Mode are listed and indicated as (Agentless Mode
        with Profiler), in the policies table under Authentication > Endpoint Security > Host Checker.

     4. Click on the policy name to associate the rules to the policy. select the rule type under Rule Settings
        and click Add.

        Figure 25 Host Checker Rule Types for Agentless mode

        a. If you select Predefined: Antivirus, the rule requires endpoint to have specific antivirus installed
           and running.
            Enter the Rule Name, select required Criteria, Optional rules and click Save Changes.

34                                                                                      © 2020 Pulse Secure, LLC.
Pulse Policy Secure Profiler: Administration Guide
Figure 26 Antivirus Rule Type for Agentless mode
b. If you select Predefined: Firewall, the rule requires the endpoint to have a specific firewall installed
and running.
Enter the Rule Name, select required Criteria and click Save Changes.
© 2020 Pulse Secure, LLC. 35Pulse Policy Secure Profiler: Administration Guide
Figure 27 Firewall Rule Type for Agentless mode
c. If you select Predefined: AntiSpyware, the rule checks for installed AntiSpyware on endpoints.
Enter the Rule Name, select required Criteria and click Save Changes.
36 © 2020 Pulse Secure, LLC.Pulse Policy Secure Profiler: Administration Guide
Figure 28 AntiSpyware Rule Type for Agentless mode
d. If you select Predefined: OS Checks, the rule checks the operating systems and minimum service
pack versions listed.
Enter the Rule Name, select required Criteria and click Save Changes.
© 2020 Pulse Secure, LLC. 37Pulse Policy Secure Profiler: Administration Guide
Figure 29 OS Checks Rule Type for Agentless mode
e. If you select Custom Rule: Ports, the rule controls the network connections that a client can
generate during a session. This rule type checks. if restricted ports are open or required ports are
not open, then endpoint gets limited connectivity to the network.
Enter the Rule Name, enter port numbers to allow or deny under Criteria and click Save Changes.
38 © 2020 Pulse Secure, LLC.Pulse Policy Secure Profiler: Administration Guide
Figure 30 Ports Rule Type for Agentless mode
f. If you select Custom Rule: Process, the rule controls the software that a client may run during a
session.
Enter the Rule Name, enter Process Name to allow or deny under Criteria and click Save
Changes.
Figure 31 Process Rule Type for Agentless mode
g. If you select Custom Rule: NetBIOS, the rule checks the NetBIOS name of the client machine.
Enter the Rule Name, enter NetBIOS Names to allow or deny under Criteria and click Save
Changes.
© 2020 Pulse Secure, LLC. 39Pulse Policy Secure Profiler: Administration Guide
Figure 32 NetBIOS Rule Type for Agentless mode
h. If you select Custom Rule: MAC Address, the rule checks the MAC Address of the client machine.
Enter the Rule Name, enter MAC Addresses to allow or deny under Criteria and click Save
Changes.
Figure 33 MAC Address Rule Type for Agentless mode
5. On adding the Rule Types, select the required option for rules, Remediation and Dashboard
Reporting options and click Save Changes.
6. Enforce the policies for Agentless Mode with Profiler and implement the policy at the realm level.
Navigate to Users > User Realms > Select Realm > Authentication Policy > Host Checker. Select
Agentless mode with Profiler. Select the applicable policies from the list and click Save Changes.
Note: Pre-authentication compliance check is not supported for agentless mode with Profiler. The
Require and Enforce option is disabled for agentless policies.
40 © 2020 Pulse Secure, LLC.Pulse Policy Secure Profiler: Administration Guide
Figure 34 Policy enforcement for Agentless mode with Profiler on User Realm
7. Allow access to devices that comply with Agentless Host Checker policies.
Navigate to Users > User Roles > Select Role > General > Restrictions > Host Checker add or
remove the policies from the list and click Save Changes.
Figure 35 Policy enforcement for Agentless mode with Profiler on User Role
© 2020 Pulse Secure, LLC. 41Pulse Policy Secure Profiler: Administration Guide 42 © 2020 Pulse Secure, LLC.
Pulse Policy Secure Profiler: Administration Guide

Import/Export Profiler Database
   •   Import / Export Profiler Device Data in Binary format. . . . . . . . . . . . . . . . . . . . . . . . . . . . . . . 43
   •   Import / Export Profiler Device Data in CSV format: . . . . . . . . . . . . . . . . . . . . . . . . . . . . . . . . 43
   •   Import/ Export of Profile Modifications database in Binary format . . . . . . . . . . . . . . . . . . . 44

Profiler allows administrator to download the profiled data in CSV or CFG (binary import/export) format for
readability or reporting purpose. The administrators can use this data to analyze and troubleshoot the
configurations of devices. The file can be password protected for security reasons.

The Profiler supports Import / Export of Profiler Device Database in Binary or CSV formats. The database files
can be used to troubleshoot, backup database, or restore the database in case of any crash or data loss.

Import / Export Profiler Device Data in Binary format
To avoid accidental loss of database due to Appliance Hardware failures, software upgrade or accidental
deletion (if backed up), it is required to back up the database and restore whenever required. Profiler device
database can be exported and imported in Binary format.

Binary Export
On export, profiler device data is encrypted and downloaded with filename Profiler*.cfg.

Binary Import
The device database import in Binary format erases the existing database completely. The endpoint session
information is invalidated.

Import / Export Profiler Device Data in CSV format:
The CSV format allows the administrator to add additional endpoints into the profiler device database. The
CSV format also allows to import some custom information into the database.

CSV Export
On export, the complete device data information is exported into a CSV file. This is the same behavior as the
Download Report in the Profiler DDR.

CSV Import
   •   The CSV import to the profiler device database, appends the existing database. It does not erase the
       existing database completely.
   •   The CSV format allows to import only essential endpoint information such as Macaddr, IP, hostname,
       manufacturer, os, category, previous_os, previous_category, notes, first_seen, last_seen, profiler_name,
       groups and custom.

© 2020 Pulse Secure, LLC.                                                                                                       43
Pulse Policy Secure Profiler: Administration Guide
• For existing devices, the data is overwritten for the supported fields from CSV. Remaining data remains
as is.
• For devices that are marked as Manually Edited Devices, no further classification is performed on the
imported endpoints
• To avoid the Operating and Category changes to the devices received by the classifier on importing the
CSV file, include or edit the column override and set the value to TRUE for each device in the CSV file.
• Custom field can be provided in the CSV for import. This column is visible in the DDR only if customer
has imported custom data. Custom field is available for role mapping rules.
Import/ Export of Profile Modifications database in Binary format
This functionality is used when the administrator performs profile modifications and wants the same
modifications to reflect in other profilers (Standalone or forwarders). The profile modifications are appended
to existing modifications on import.
44 © 2020 Pulse Secure, LLC.Pulse Policy Secure Profiler: Administration Guide
Troubleshooting
• Tests . . . . . . . . . . . . . . . . . . . . . . . . . . . . . . . . . . . . . . . . . . . . . . . . . . . . . . . . . . . . . . . . . . . . . . . . 45
• Diagnostic Logs . . . . . . . . . . . . . . . . . . . . . . . . . . . . . . . . . . . . . . . . . . . . . . . . . . . . . . . . . . . . . . . 46
• Profiler Logs . . . . . . . . . . . . . . . . . . . . . . . . . . . . . . . . . . . . . . . . . . . . . . . . . . . . . . . . . . . . . . . . . . 46
Tests
The following tests helps to identify and solve basic problems associated with configurations of the Profiler.
Test Result
DHCP Test • Verify if ports are receiving the DHCP packets.
• Detect a device when connected to network during the diagnostic run.
Switch Diagnostics • Verify switches are enabled
• Check if SNMP walk is successful or not
• Check if Profiler can successfully read ARP table, CAM table, and SSID information
SNMP (Host) Test • Check if the Profiler is able to fetch the Endpoint information through SNMP.
NMAP Scan Test • Check if NMAP scan is working for an IP address, which is prompted during diagnostic
run
Trap Test • Verify if trap is collected or not for a switch event.
• Detect a device when connected to network during the diagnostic run.
SMTP Test • Troubleshoot any problem in configuration/reachability of SMTP server.
Device sponsoring is available with email notification feature. It sends an email through
configured SMTP server and displays the status.
To execute the tests, perform the following steps:
1. Select Authentication > Auth. Servers > and select the Troubleshooting tab.
2. From the drop-down list, select the required test and click Run diagnostics.
© 2020 Pulse Secure, LLC. 45Pulse Policy Secure Profiler: Administration Guide
Figure 36 Troubleshooting
Diagnostic Logs
The Profiler Diagnostic logs include detailed information about endpoints on uploading the endpoint
information to Pulse One. Event IDs PRO31748 and PRO31749 represent the diagnostic log messages.
To enable Diagnostic logs, navigate to Maintenance > Troubleshooting > Monitoring > Diagnostic Logs and
select Profiler Diagnostic Logging On.
Profiler Logs
The Profiler logs all its activities to the Event Log and Administrator Access Logs.
To see the Profiler logs in the Event log, navigate to Log/Monitoring > Events > Log Settings and select
Profiler Events.
Figure 37 List of Events to Log
Table 1 Profiler logs
Event ID Description Log Type
ADM31405 Network Infrastructure Device Poll Interval Updated Admin logs
46 © 2020 Pulse Secure, LLC.You can also read