Setup & Installation Guide - Nextera South Dakota Spring 2019
←
→
Page content transcription
If your browser does not render page correctly, please read the page content below
Setup & Installation Guide
                       Nextera®
              South Dakota Spring 2019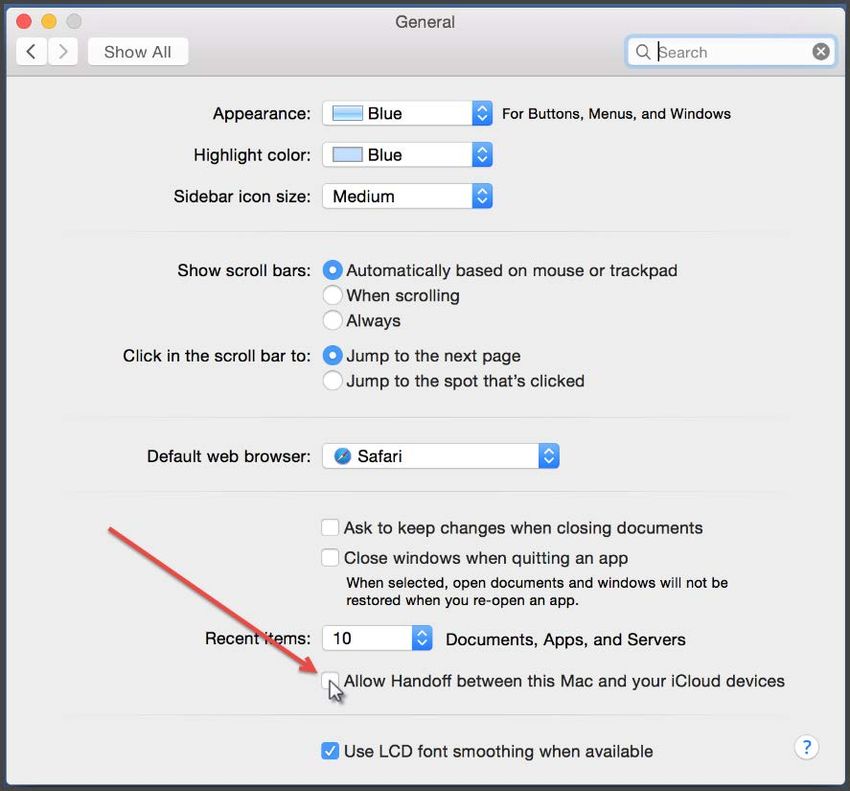
Setup & Installation Guide

©2019 Questar Assessment Inc. All Rights Reserved.

Nextera® is a registered trademark of Questar Assessment Inc. Windows® is a registered trademark
of Microsoft®. Google ChromeTM and Chromebook™ are trademarks of Google®. Casper Suite® is a
registered trademark of JAMF Software, LLC. iPad® and Mac® are registered trademarks of Apple®.
Clean Slate® is a registered trademark of Fortres Grand. Deep Freeze™ is a trademark of Faronics.
VMware Airwatch® is a registered trademark of VMware®. MobileIron® is a registered trademark of
MobileIron®. All trademarks, product names, and logos are the property of their respective owners.
All Rights Reserved.

2                                                                       Last Updated: 01/09/2019
Setup & Installation Guide

Contents

Introduction to the Nextera Assessment System ......................................................................................... 5
    Overview ......................................................................................................................................................... 5
    Security and the Student Experience ......................................................................................................... 5
Preparing your Site - General .......................................................................................................................... 6
    Checklist of Preparation Activities .............................................................................................................. 6
       4 Weeks Prior to Testing .......................................................................................................................... 6
       3 Weeks Prior to Testing .......................................................................................................................... 6
       2 Weeks Prior to Testing .......................................................................................................................... 6
       During Testing............................................................................................................................................ 6
Preparing your Site – Step by Step ................................................................................................................. 7
    Perform Site Setup – System Scan ............................................................................................................. 7
    Perform Site Setup – Test Readiness ......................................................................................................... 7
Network Considerations and Setup ................................................................................................................ 8
    Proxy Servers / Firewalls / Web Content Filters ....................................................................................... 8
Nextera Test Delivery System Installation .................................................................................................. 10
    Windows Installation ................................................................................................................................. 10
       Uninstall ................................................................................................................................................... 11
       Basic Installation- Individual Device ................................................................................................... 11
       File Server Installation ........................................................................................................................... 11
    macOS Installation ..................................................................................................................................... 14
       Permissions ............................................................................................................................................. 14
       Uninstall ................................................................................................................................................... 16
       Install ........................................................................................................................................................ 16
    Apple iPad Installation............................................................................................................................... 21
       Using Automatic Assessment Configuration ..................................................................................... 21
       Using Autonomous Single App Mode or Single App Mode with Apple Configurator or other
       MDM ......................................................................................................................................................... 22
    Chromebooks Installation ......................................................................................................................... 24

3                                                                                                                              Last Updated: 1/9/20199
Setup & Installation Guide
       Questar’s Kiosk App for Chrome .......................................................................................................... 24
       Managing Kiosk Applications ............................................................................................................... 24
       Delivery Modes ....................................................................................................................................... 24
       Single App Kiosk Mode.......................................................................................................................... 24
       Single App Kiosk Mode – Non-managed Chrome devices.............................................................. 25
       Single App Kiosk Mode with Auto-Login ........................................................................................... 26
       About Managed Chromebooks ............................................................................................................ 26
       Preparing Chromebooks ........................................................................................................................ 26
Additional Settings ......................................................................................................................................... 27
    Disable Sticky Keys: Windows .................................................................................................................. 27
    Disable Fast User Switching: Windows & Mac ...................................................................................... 27
       Windows, Process 1 ............................................................................................................................... 27
       Windows, Process 2 ............................................................................................................................... 27
       Mac ........................................................................................................................................................... 27
    Disable Handoff on Mac Devices ............................................................................................................. 28
Sample Test Login .......................................................................................................................................... 29
Appendix A – Student Response Flowcharts ............................................................................................. 30
    Student Response Flow ............................................................................................................................. 30
       Continuous Internet Connection.......................................................................................................... 30
       Internet Connection Lost and Restored During Testing................................................................... 31
       Internet Connection Lost ....................................................................................................................... 32
Appendix B – System Requirements ........................................................................................................... 33
Appendix C –Frequently Asked Questions (FAQ)....................................................................................... 34
Appendix D – Troubleshooting Tips ............................................................................................................ 35
    Issues Loading Test .................................................................................................................................... 35
    Response Recovery When Internet is Disconnected Prior to Test Session Submission ................. 35
    -118 Error Code/Unable to access https://nextera.questarai.com ..................................................... 36
    Graphing Item Issues/Secure Browser Locks Up After Login (Randomly) ........................................ 36
    Issues Editing Constructed Responses .................................................................................................... 36

4                                                                                                                             Last Updated: 1/9/20199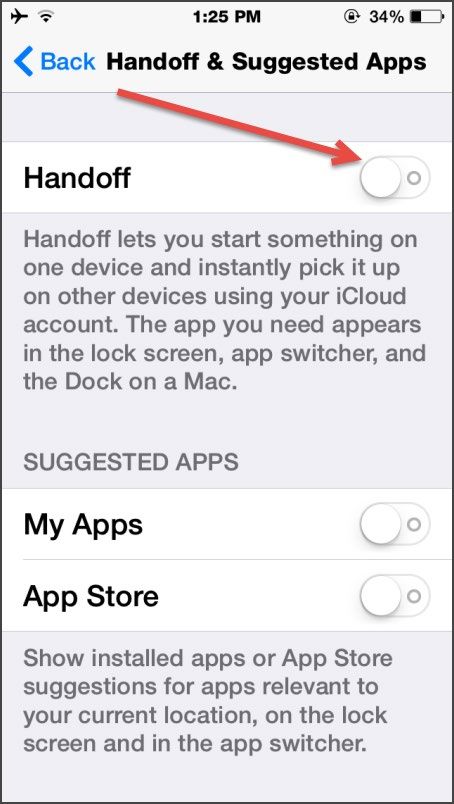
Setup & Installation Guide

Introduction to the Nextera Assessment System

Overview
The Nextera Assessment System is a suite of software applications used for conducting
standardized assessments. This setup and installation guide provides the following information
regarding the Nextera Assessment System:

    •   A high-level overview
    •   Guidelines for deployment and implementation
    •   Troubleshooting Tips

This document is designed for technology coordinators responsible for the installation,
administration, and configuration of the Nextera Assessment System. Successfully deploying the
client software requires a solid understanding of the environment, requirements, and specific
testing needs. Since each device platform has different installation steps, client deployment
methodologies, and system requirements, this guide includes detailed installation instructions for
the commonly used platforms (e.g., Windows).

Note: A current version of this document will be provided at the start of each administration year.
Any updates throughout the administration year will be provided in the form of Release Notes
which will be housed on the Help page in Nextera Admin.

The Nextera Assessment System is comprised of two primary applications.

    •   Nextera Admin is a web-based application for loading and managing district, school,
        class, teacher, and student information. The Help Tab contains links and downloads,
        including the Questar Secure Browser.

          The technology coordinator should have received an email with a URL, username, and
          password to access the Nextera Admin. If this information has not been received, or has
          been misplaced, please contact Customer Support by calling 877-997-0422 or emailing
          customerservice@questarai.com.
    •
        Nextera Test Delivery System (TDS) is a software application for administering student
        assessments delivered through the Questar Secure Browser.

Security and the Student Experience
As a technology coordinator you may be asked about test security, recommendations, and the
student experience. The Nextera Test Delivery System (TDS) is designed to prevent a student from
navigating away from the Questar Secure Browser while testing. Therefore, many keyboard
shortcuts are disabled. For example, if a student testing with a Windows PC attempts to use
Ctrl+Alt+Delete, the student will be logged out of the test and returned to the login screen.

5                                                                         Last Updated: 1/9/20199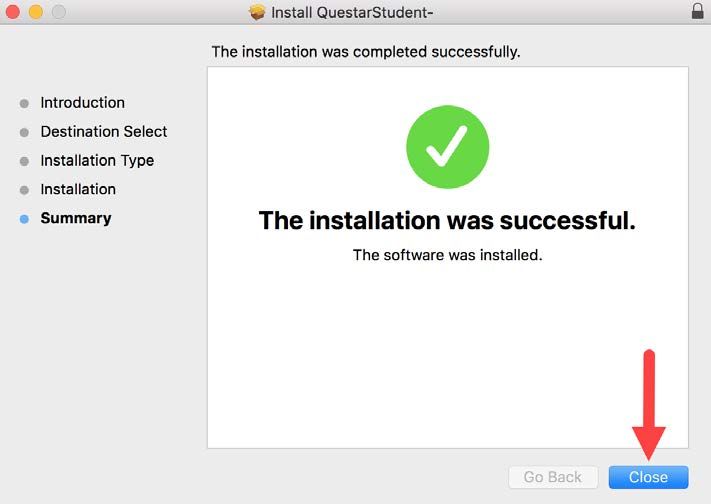
Setup & Installation Guide
Technology evolves constantly. Every effort to engage security measures does not replace the
important role of proctors and their oversight of students while testing.
Preparing your Site - General
Preparedness is the first step toward a successful assessment administration. Use the following
checklist as a guideline for your preparation. Following the checklist, see the instructions to
evaluate your site using the Site Setup tools available on the Questar website at
http://www.questarai.com/readiness/. Using workstations representative of your testing
environment, perform the System Scan and Test Readiness checks to validate that your devices and
network are ready for student testing.
Checklist of Preparation Activities
4 Weeks Prior to Testing
Perform Site Setup – System Scan
o At a minimum, each device type being used for testing should be scanned.
Perform Site Setup – Test Readiness
o If using Wireless Networks, ensure there is ample coverage and capacity to support
testing.
Download/deploy the Questar Secure Browser to all devices being used for student
testing.
3 Weeks Prior to Testing
Log in to the Sample Test using the Questar Secure Browser.
2 Weeks Prior to Testing
Ensure Test Administrators are aware of district policies, expectations, and processes for
troubleshooting issues (see Appendix A).
During Testing
Limit network activity that may impact bandwidth, such as streaming music and video.
Please note: If a new operating system becomes available after the secure browsers for this year
are released and it is not listed in the System Requirements table in Appendix B or addressed in a
subsequent release note by Questar, it may not be supported. Please do not upgrade to new
operating systems on devices that will be used to administer online assessments without
validating that the new operating system is supported.
6 Last Updated: 1/9/20199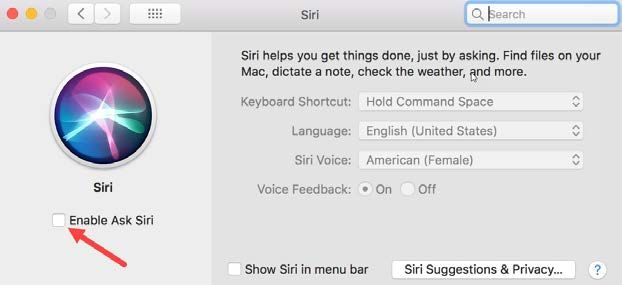
Setup & Installation Guide

Preparing your Site – Step by Step

Perform Site Setup – System Scan
Please note: The System Scan is designed to validate Desktop Device configurations. See the
system requirements for additional detail about Tablet devices and Chromebooks.

    1)   Open a Web browser and access http://www.questarai.com/readiness/.
    2)   Locate the System Scan message and select Scan Now.
    3)   Select Scan Now again on the next page.
    4)   The scan results display. If a warning message displays, verify the workstation has the
         minimum system requirements specified for that type of device. See Appendix B for
         System Requirements.

Perform Site Setup – Test Readiness
    1) Open a Web browser and access http://www.questarai.com/readiness/.
    2) Locate the Test Readiness message and select Test Now.
    3) Select the link www.speedtest.net to determine your download and upload speeds.
    4) Select Go. The test process may take a few minutes to complete. It is recommended that
       you run this test at the same time of day you will be testing.
    5) The results display.
    6) To estimate the number of tests that can be administered at the same time, return to the
       Questar Readiness page, input data in the fields provided, and select Test Now. The
       download and upload speeds are found in the test results from the prior step.
    7) The Test Readiness Check results are calculated and displayed.

7                                                                           Last Updated: 1/9/20199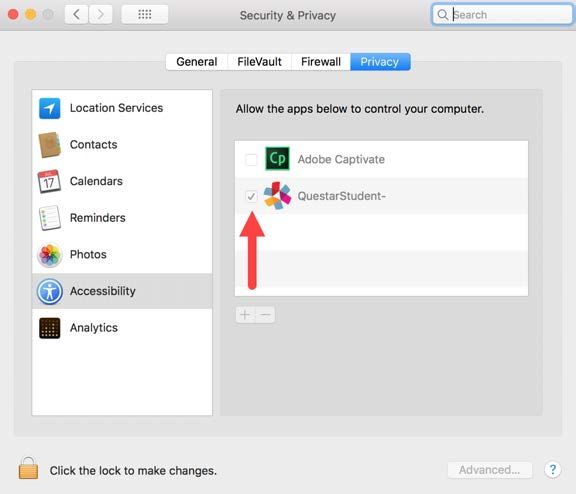
Setup & Installation Guide

        •   Wireless connections can impact testing performance due to access contention,
            interference, or design. A wired LAN connection will always outperform a
            wireless connection.
        •   Results from this test vary from site to site and may not accurately reflect the
            maximum total bandwidth of your connection.
        •   If you have concerns regarding your system readiness or want assistance
            interpreting the results of the compatibility check or network bandwidth test,
            contact Customer Support by calling 877-997-0422 or emailing
            customerservice@questarai.com.

Network Considerations and Setup
Once you have used the Site Setup tools to determine there is adequate available bandwidth,
ensure readiness regarding other upstream network devices (e.g., firewalls, proxy servers, Internet
content filters). Given the wide variety of devices in the market, and their overlapping feature sets,
this guide does not provide specific device-level settings for each possible configuration; however,
since most of these devices perform the same basic functions, the following guidelines will help
you configure your network devices for the Nextera Assessment System. Another important
consideration to note is that because technology is constantly changing and improving it is
possible that some of the file names outlined here may have updated versions. If at any point you
would like assistance please contact Questar’s Customer Support staff.

Proxy Servers / Firewalls / Web Content Filters
A proxy server typically sits between the students’ workstations and the Internet. Proxy servers are
commonly used for caching, filtering, and authentication.

    •   Caching accelerates Web page request time by retrieving content saved from a previous
        request by the same user or other users.
    •   Filtering applies policies to specific networks, protocols and content; blocks undesired
        websites and/or content.
    •   Authentication controls which users and resources can access the Internet.

Nextera Test Delivery System uses the same protocols to communicate on the Internet as standard
Web browsers, so it is critical that proxy servers be configured to allow all HTTP traffic between
the Nextera Test Delivery System and the Internet on ports 80 and 443. The following
domains should be whitelisted at the firewall, authenticating proxy server, or content filtering
server:

8                                                                           Last Updated: 1/9/20199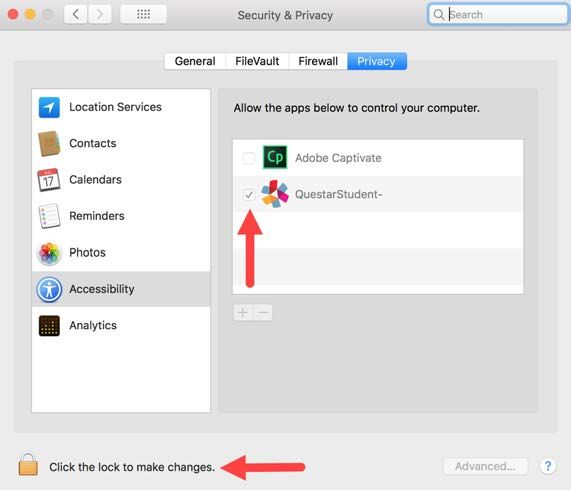
Setup & Installation Guide
       *.questarai.com

       *.questarai.net

       *.mobileapp.questarai.com (for Apple iPad devices)

To avoid possible domain name server problems, ensure the following URLs will pass through
your proxy server, firewall, and Web content filter:

       URL: http://SD.nextera.questarai.com         PORT: 443

       URL: http://SD.nextera.questarai.com         PORT: 80

      •   To ensure a stable testing environment with minimal issues, observe these
          guidelines during student testing:
              o Minimize network traffic load on the network servers and avoid
                  performing client software updates, patching, and data backups.
              o Remove bandwidth throttling on ports 80 and 443.
              o Minimize or turn off network bandwidth intensive programs (e.g.,
                  streaming music and video).
      •   Certain firewalls may present a false positive warning if they incorrectly recognize
          the bit sequence of a particular file as malware or a virus.

      If you have difficulty accessing the Nextera Test Delivery System, please contact our
Customer Support team at 877-997-0422 or customerservice@questarai.com.

9                                                                        Last Updated: 1/9/20199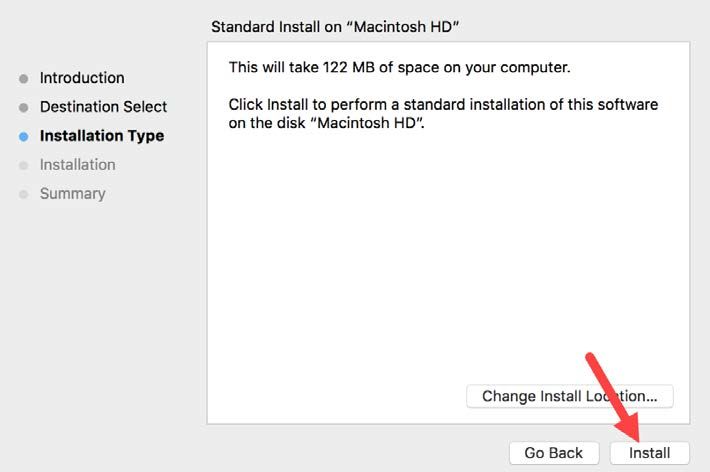
Setup & Installation Guide

Nextera Test Delivery System Installation
The Nextera TDS is available for many types of devices using a variety of software formats, such
as:

           •   Questar Secure Browser – for Windows OS and macOS
           •   Questar Mobile App – for Apple iOS iPad Devices
           •   Chrome Secure Browser or Chrome App – for Google Chromebooks

The Questar Secure Browser for each platform is available on Nextera Admin and the system
requirements for each operating system are listed in Appendix B.

Detailed installation instructions at the device level and the managed level for each device are
provided in the following sections:

       Windows Installation

       macOS Installation

       Apple iPad Installation

       Chromebook Installation

Windows Installation
Windows provides a number of installation types to support nearly every possible configuration
scenario. These include local workstation installations, server-based installations, and terminal
server installations.

For each Windows installation type, the location of the client cache, which contains the encrypted
student responses, must be managed individually for each student according to the deployment
method used. Each student account must also have sufficient rights to this cache location, which
is used to protect the student’s test responses if network connectivity is lost. Refer to Cache
Location for instructions on changing the default location of the cache files.

Each Windows installation scenario makes use of the appropriate .msi file from Nextera Admin.
The following sections describe the steps necessary to perform each of the typical Windows
installation scenarios:

       Basic Installation –Individual Device

       File Server Installation

       Push Installation

10                                                                         Last Updated: 1/9/20199
Setup & Installation Guide
Uninstall
If a previous version of the Questar Secure Browser is available on the device, uninstall the
previous version before installing the updated version. If you are uncertain whether or not there is
a previous version of the Questar Secure Browser on the device, follow steps 1 through 3 below to
verify a previous version exists. Please note that the steps outlined in these processes may vary
slightly depending on your device and system setup.
1) From the Start menu, select Control Panel.
2) Select Programs and Features.
3) Locate the previous Questar Secure Browser.
4) Right-click on the Questar Secure Browser icon.
5) In the drop-down menu that appears, select uninstall.
6) A pop-up window asks you to confirm that you wish to uninstall. Select Yes.
Basic Installation- Individual Device
1) Access Nextera Admin using the URL, User ID, and Password provided by your District Test
Coordinator.
2) Under the Help tab select Downloads. Then select the file to download.
3) Select Next to begin the installation wizard.
4) To use the default destination folder select Next.
To change the default destination folder select Change and enter the new destination.
5) Select Install to start the installation process.
6) Select Finish to complete the installation wizard.
7) Verify the installation is complete by launching the Questar Secure Browser icon from your
Desktop.
8) Follow the Sample Test Log in steps.
File Server Installation
The steps to perform a file server installation are similar to a basic installation, with the primary
difference being the location of the files and the method for sharing the shortcut to the Questar
Secure Browser. Since this method depends largely on the local environment and your
preferences, the following steps highlight the key requirements for deploying the application.
1) Access the Nextera Admin Help tab and downloads page.
2) Locate and select the appropriate download link for your device.
3) The Installation Wizard will be activated.
4) Select Browse and enter the UNC file path to your file server folder.
5) Select Install to start the installation process.
6) Select Finish to complete the installation wizard.
7) The final step in a file server installation is to create and share a shortcut with each
Windows account. This can be accomplished in many ways by using Windows Group
11 Last Updated: 1/9/20199Setup & Installation Guide
Policy, login scripts, PowerShell, or simple batch files. The critical step here is to ensure
students’ accounts have sufficient rights to launch the application. The following steps
demonstrate how to create and apply security rights to a Windows shortcut.
Creating and Sharing a Shortcut
1) Right-click on the QuestarStudent.exe file created from your File Server installation, pasting
the new shortcut to your file share location.
2) Distribute the shortcut to students’ accounts using your preferred distribution method.
Push Installation
Because of their powerful automation capabilities, software packaging and distribution tools have
become a popular way to manage the delivery of software applications. Many of these tools
leverage the Windows Installer and its related MSI files. The Questar Secure Browser is provided
in this standard format to allow administrators and technology coordinators to automate the
installation process. If you need assistance completing the steps for a push installation please
contact Questar’s Customer Support team.
Silent Install
• msiexec.exe /i /quiet WRAPPED_ARGUMENTS="/S"
Silent Install to a specified directory
• msiexec.exe /i /quiet WRAPPED_ARGUMENTS="/S
/D=\\UNCServerName\ShareName\path"
Note: The /D parameter sets the default installation directory. It must be the last parameter used
in the command line and must not contain any quotes, even if the path contains spaces.
The following steps must be run as Administrator from an elevated command prompt.
Silent Uninstall
• msiexec.exe /x /quiet WRAPPED_ARGUMENTS=”/S”
OR
• msiexec.exe /x {productcode} /quiet WRAPPED_ARGUMENTS=”/S”
Silent install via Group Policy Object (GPO) Push
Use the Silent Install parameters above in conjunction with the .mst file that is located on the
Downloads page on the help tab in Nextera Admin. If you do not wish to use the
QuestarStudentSilent.mst provided, use the following instructions to create your own .mst file.
Using ORCA tool, which is part of the Windows SDK Components for Windows Installer
Developers, Edit the entries of MSI file and create Transform (.mst) file.
12 Last Updated: 1/9/20199Setup & Installation Guide
1) Open the MSI file with ORCA.
2) Select New Transform from the Transform Menu.
3) Select the “Property” Table.
4) Add a row to the Property table by Right-clicking in the right pane or select Tables -> Add
Row:
5) Select Generate Transform.
6) ORCA will then ask for the name of new Transformation file.
In your “Software installation” policy, make sure to select the Advanced Deployment Method and
select the MST file in the Modifications tab.
Cache Location
When deploying the Questar Secure Browser in your environment, it is crucial to protect the
location of the cached student responses. This file location contains the encrypted responses for
each student. Therefore, it is important to understand where these files are located for each
possible installation scenario and how it can be changed to suit your environment.
On Windows 7 and later, the cache location is:
%allusersprofile%\QuestarStudent\%username%
(Normally C:\ProgramData\QuestarStudent\%username%)
When the student launches the Questar Secure Browser to begin testing, the folder structure is
created and populated with testing materials. The student’s encrypted responses are also stored in
this location; therefore, the student account used for testing must have permissions to write into
this location. For the normal Windows User profile, these rights are granted by default; however,
when using other deployment methods, it is essential to grant the appropriate rights for the
accounts used for testing.
To accommodate the variety of installation and deployment methods, a command line switch
can be used to change the default location of the Secure Browser cache. The following
example shows the format of this switch and how it can be used to change the location of the
cache.
For example, the Windows shortcut can be modified by adding the command line switch in the Target
field ( --cache-path="C:\temp\%COMPUTERNAME%\cachefolder").
13 Last Updated: 1/9/20199Setup & Installation Guide
Regardless of the deployment method, this command line switch can be used in a variety of ways, on
the condition that the account used for conducting the assessment has sufficient rights to the location
indicated and unique paths are provided for each student.
For example, consider the following scenario where the technology coordinator wants to perform a
network installation with the cache location stored on a network location.
• Installation is performed according to the File Server Installation instructions provided in
this guide.
• A shortcut is created and distributed to all student workstations using a Windows Group
Policy following the instructions Creating and Sharing a Shortcut in this guide, with the
additional command line switch added to change the cache location to a network share.
• In this case, the following cache path was used in the Windows shortcut being distributed:
--cache-path="\\Server\share\%USERNAME%\cache"
Workstation Lockout Applications (DeepFreeze or CleanSlate)
If you do not use the default location and you have any scripts or applications, such as
DeepFreeze or CleanSlate that clear out student profiles, complete one of the following actions:
• Disable the workstation lockout application, or
• Configure the workstation lockout application to exclude the cache location, or
• Use the command line switch described above to change the location where the encrypted
response files are saved. As long as there is a network connection to this folder, and the
account being used has proper rights, Nextera will use this alternate location to save the
encrypted response file.
macOS Installation
Note: Mac installations do not require changing student cache settings.
Permissions
The Questar Secure Browser requires accessibility permission. The required permissions can be
granted to multiple computers via MDM Profile for computers running macOS version 10.13.4 or
greater. While the instructions for configuring your particular MDM solution are outside the scope
of this document, Questar will make available a mobileconfig file that will contain a payload with
the following keys:
PayloadType: com.apple.asam
BundleIdentifier: com.questar.securebrowser
TeamIdentifier:PXK5H529EX
14 Last Updated: 1/9/20199Setup & Installation Guide
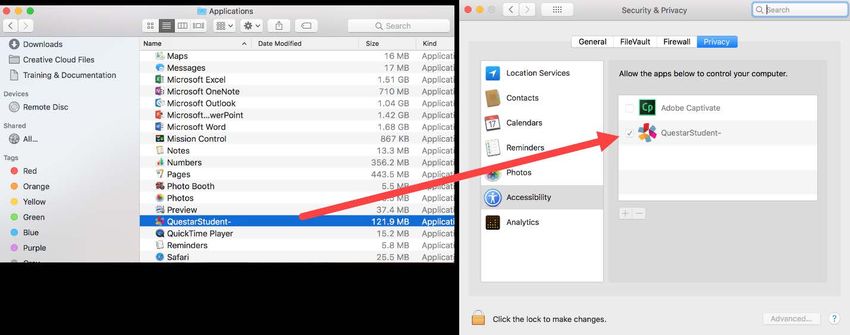
To grant the Accessibility permission manually, open System Preferences -> Security & Privacy ->
Privacy -> Accessibility.
1) Click the padlock icon,
2) Enter your administrative credentials
3) Drag the QuestarStudent application from the Applications folder into the pane on the
right.
4) Ensure that the checkbox is checked and then click the padlock icon to prevent further
changes.
15 Last Updated: 1/9/20199Setup & Installation Guide
There are certain deployment scenarios that will cause the installation to falsely report an error
when it has succeeded. If the Application was successfully installed into the systems Applications
folder and can be launched successfully, the error can be disregarded.
Uninstall
If a previous version of the Questar Secure Browser or QuestarStudent application is available on
the device, uninstall the previous version before installing the updated version.
1) If there is a shortcut on the desktop, drag it to the trash or right click and select Move to
Trash.
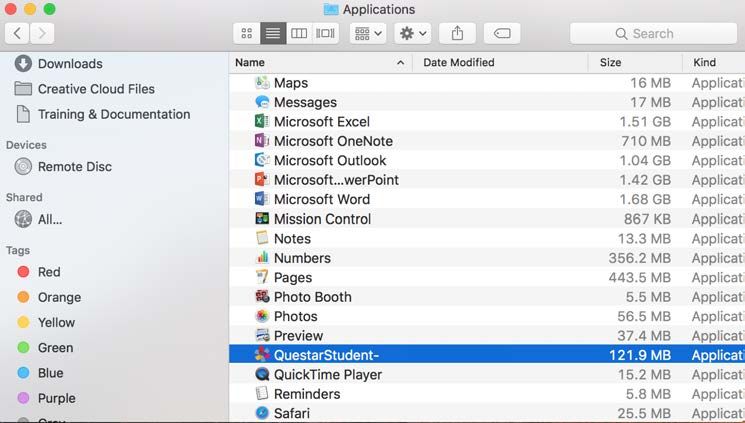
2) Open Finder.
3) On the left side, select Applications.
4) Locate Questar Secure Browser or QuestarStudent.
5) Drag the application to the trash or right click and select Move to Trash.
6) After removing any previous installation of the Questar Secure Browser, open Users &
Groups in System preferences and remove any remaining Questar Assessment User
Account. The Questar Secure Browser no longer uses or requires any special user account.
Install
The Questar Secure Browser requires accessibility permission. If permission is not already
granted, the installation will prompt for permission to access the Accessibility API and will open
the correct pane in System Preferences.
(System Preferences -> Security & Privacy -> Privacy -> Accessibility). To grant the permission:
1) Click the padlock icon.
16 Last Updated: 1/9/20199Setup & Installation Guide
2) Authenticate as an administrator.
17 Last Updated: 1/9/20199Setup & Installation Guide
3) Check the box next to the QuestarStudent application.
The Questar application can be distributed using administrative tools such as the Casper Suite
from JAMF Software. The following steps demonstrate how to manually install the macOS client.
1) Access Nextera Admin using the URL, User ID, and Password provided by your District Test
Coordinator.
2) Under the Help tab, select Downloads, then select the appropriate macOS Questar Secure
Browser, and download the .pkg package.
3) The download starts. If using Chrome, the following image appears in the lower left corner
of the screen.
18 Last Updated: 1/9/20199Setup & Installation Guide
4) After the download is complete, click on the arrow to open the file. You will see the
following.
5) Click Continue.
6) Click Install.
19 Last Updated: 1/9/20199Setup & Installation Guide
7) The browser will install and display this summary page. Click Close.
8) Verify that the Questar Secure Browser is in your Applications folder. You can also search
for this application through Spotlight Search.
User Switching:
Avoid user switching. While it is possible in macOS to switch from one logged-in user to another
without logging out, it is best practice for only one user to be logged in at a time.
20 Last Updated: 1/9/20199Setup & Installation Guide
Important Reminder:
Siri must be disabled prior to testing. Open Siri in System Preferences and uncheck the "Enable
Ask Siri" checkbox.
Please note: You may need to restart the computer after disabling Siri.
Apple iPad Installation
There are two possible methods for the installation and configuration of iPads.
1) Automatic Assessment Configuration (AAC)
or
2) Autonomous Single App Mode (ASAM) or Single App Mode (SAM) with a Multiple Device
Management (MDM) platform.
Using AAC, necessary restrictions will be automatically set using the instructions below. If using
ASAM or SAM with an MDM platform, restrictions must be configured manually.
Using Automatic Assessment Configuration
AAC is recommended for secure testing in the Questar Assessment for Students app. AAC will
automatically be enabled when launching the app.
Use the following steps as a guide for configuring devices using AAC.
1) Download and install the free Questar Assessments for Students app from the iTunes store.
2) When using AAC, the standard Apple QWERTY on-screen keyboard must be installed and
enabled. If a third-party on-screen keyboard is installed, students may not have a
keyboard that will be able to be used for testing.
Use the following steps to choose the standard Apple QWERTY keyboard:
a. From the iOS home page select Settings>General>Keyboard>Keyboards>English.
b. Select QWERTY from the available options.
AAC will automatically set other necessary restrictions.
21 Last Updated: 1/9/20199Setup & Installation Guide
3) After launching the app, select South Dakota from the “Where do you want to go?” page.
If not using AAC, continue to the next section for iPad configuration using MDM.
Using Autonomous Single App Mode or Single App Mode with Apple Configurator or other
MDM
If not using AAC, technology coordinators must use Apple Configurator 2 or a similar Mobile
Device Management (MDM) platform, such as VMware AirWatch, Mobile Iron, or others.
Technology coordinators must enable Autonomous Single App Mode (ASAM) or Single App Mode
(SAM) before the test and disable it when testing is complete.
MDM platforms provide administrators with tools for deploying device profiles, device settings,
and pushing application packages. Apple Configurator 2 is a free application. Contact other MDM
vendors for cost information.
Use the following steps as a guide for configuring devices.
1) Download and install the free Questar Assessments for Students app from the iTunes store.
22 Last Updated: 1/9/20199Setup & Installation Guide
2) Select South Dakota from the “Where do you want to go?” page.
3) Create an MDM profile and supervisory profile. Refer to your MDM vendor for details.
4) Navigate to Systems manager > MDM > Settings > Restrictions > iOS supervised restrictions.
Feature Profile Key Value
Dictionary Lookup allowDefinitionLookup False
Spell Checking allowSpellCheck False
Predictive Keyboard allowPredictiveKeyboard False
Auto-Correction allowAutoCorrection False
Share selected text This feature is disabled when the Dictionary False
Lookup feature is disabled.
Handoff allowActivityContinuation False
5) Select Save Changes.
Additional Resources
For further information about iPad assessment configuration options, contact your MDM vendor
or refer to Apple Support at the following link: https://support.apple.com/en-us/HT204775.
You can find more information on setting restrictions using ASAM or SAM at the following link:
https://support.apple.com/en-us/HT204271
23 Last Updated: 1/9/20199Setup & Installation Guide For more information about using iPads for assessments, contact Questar Customer Support or refer to Apple Support at the following link: http://images.apple.com/education/docs/Assessment_with_iPad.pdf Chromebooks Installation Questar’s Kiosk App for Chrome Questar’s Kiosk app for Chrome is kiosk-enabled so it can be run in a variety of secure modes for student assessment and testing. Using the Chrome management console, test administrators can push the app to Chrome devices in several ways, allowing the app to be run in two primary modes: 1) as a Single App Kiosk Mode app or 2) as a Single App Kiosk Mode app with Auto-Login to Kiosk App. Both of these modes allow the student to begin testing while preventing access to other apps or their account. The Chrome app can be obtained from Help > Downloads on the Nextera Admin. Managing Kiosk Applications Before delivering the app, administrators must configure the app under the Kiosk Apps section within the Device Management > Chrome > Device Settings menu. Select the Manage Kiosk Applications option > Chrome Web Store option. Search "doojcadhfhmgkiadbomdjdpljipodlko" or use the link below, after which the image below displays. Copy and paste the link below. https://chrome.google.com/webstore/detail/questar-sdsa/doojcadhfhmgkiadbomdjdpljipodlko Delivery Modes The following sections briefly describe the two primary delivery methods for Questar’s Kiosk app for Chrome. Single App Kiosk Mode To deliver the app in Single App Kiosk Mode, administrators must first add the app to the Device Settings profile, as shown above, for each organizational unit (OU) where they want to deliver the 24 Last Updated: 1/9/20199
Setup & Installation Guide
app. In this example, we show “School Programs” as our organizational unit. Depending on your
OU structure, you may want to move devices between OUs to dynamically deliver the app to
testing centers or student devices. Also note the “Locally applied” text that indicates these device
settings are applied directly to this OU.

If the app is applied at the highest OU, all lower OUs will automatically inherit the app. If you
want to limit the distribution of the app, then you need to apply different settings to distribute the
app only to the desired OUs.

Note: It may take a period of time for the application to appear on the actual Chromebook. It
depends on how often the Chromebooks are set to link back to the organizational entity for
updates.

                       Image shows the device settings in the Chrome kiosk.

In this delivery mode, students are able to launch the app from the Apps menu on the system
tray, which is located in the lower left area of the login screen. No additional account login is
required to launch the app. Upon launch, the app appears in kiosk mode (full screen), where the
students are then required to log in to the assessment with the unique usernames and passwords
in order to access the assessment content.

Single App Kiosk Mode – Non-managed Chrome devices
Non-managed Chrome devices, those without the Google Admin or Chrome management console,
may also be configured to run Single App Kiosk Mode once the app has been manually installed
on the device. If you are using a non-managed device, follow the steps below:

     1) Open a new tab in Chrome, and enter chrome://extensions in the address bar. Select
        Enter.
     2) Select the box next to Developer Mode.

25                                                                          Last Updated: 1/9/20199
Setup & Installation Guide
3) Select Add kiosk application, and enter the ID of the Kiosk App you'd like to enable.
4) Select Enter.
The installed Kiosk App will now show up in the tray under Apps for a user to open from the tray.
Note: If your Chromebook, Chromebase, or Chromebox is from 2017 or later, it won’t work in kiosk
mode unless it is managed by an administrator.
Single App Kiosk Mode with Auto-Login
The second delivery method is configured the same as above with the exception that the app is
selected under Auto-Launch Kiosk App. In this configuration, the device will automatically launch
the app when powered on, thus preventing the login screen from appearing. While the device is
booting up, test administrators (and students) may press the keyboard shortcut Ctrl+Alt+S to
escape out of this boot up sequence, returning the device to the login screen. This deployment
method is better suited for testing centers where shared devices are used. Please note that this
deployment method is not supported for unmanaged Chrome devices.
About Managed Chromebooks
Managed Chromebooks are set up and maintained by the school. If there is a managed icon in
the status area in the lower right side of the screen when signed into the Chromebook, the device
is managed.
Managed Chromebooks will have sign-in restrictions enabled. The administrator settings may
apply to the Chromebook even when signed in to a personal Google Account. If students are using
managed Chromebooks, the Chromebook administrator will need to authorize the secure domain.
1) As the Chromebook administrator, log in to the Chrome OS management console.
2) Select Settings.
3) Select Device Settings and scroll down to the Sign-in Restriction section.
4) In the text box, enter the following text: *@questarai.net, *@questarai.com.
5) Select Enter.
Preparing Chromebooks
If you are using the downloaded app, the kiosk app is available as soon as the Chromebook is
turned on. Access the app from the lower left corner of the screen.
Note: When the test administration window is closed, under User Data, select Erase all local user
data to erase the student’s data from the device. This is not recommended until after all testing
is complete, as once the student data are deleted, any responses that did not transmit to
Questar for any reason cannot be recovered.
26 Last Updated: 1/9/20199Setup & Installation Guide
Additional Settings
Please follow the steps below to ensure devices have all necessary safeguards in place.
Disable Sticky Keys: Windows
Sticky Keys enables users to enter key combinations in sequence one at a time instead of
simultaneously. This feature is available on Windows machines. Please disable Sticky Keys
using the process below.
1) Open the Control Panel.
2) Open Ease of Access Center.
3) Click Make the keyboard easier to use.
4) Uncheck the Turn on Sticky Keys check box.
5) Click OK.
Disable Fast User Switching: Windows & Mac
Fast User Switching allows multiple users to be logged in to one device and switch between
the user profiles quickly. This feature is available on Windows and Mac machines. Please
disable Fast User Switching using one of the processes below.
Windows, Process 1
1) Open the Control Panel.
2) Open User Accounts.
3) Click Change the way users log on or off.
4) Uncheck the Use Fast User Switching check box.
5) Click Apply Options.
Windows, Process 2
1) From Start, type gpedit.msc.
2) Select Apps from the sidebar on the right.
3) Click gpedit.msc in the main window.
4) In the Local Group Policy Editor window, locate and select Logon in the left pane.
5) On the right, double-click Hide entry points for Fast User Switching.
6) In the Hide entry points for Fast User Switching dialogue box, select Enabled and click OK
7) Close the Local Group Policy Editor and open the Run dialog box (Windows + R). Enter
gpupdate/force and click OK.
Mac
1) From the Apple menu, choose System Preferences.
2) From the View menu, choose Accounts.
3) Click the Login Options button.
4) Deselect the Enable fast user switching option.
Note: Please make sure to complete all iCloud or other configuration tasks prior to testing to
assure that prompts or popups do not interfere with testing.
27 Last Updated: 1/9/20199Setup & Installation Guide
Disable Handoff on Mac Devices
When your macOS computers and iOS devices are within Bluetooth range of each other, they can
automatically “hand off” what you’re doing from one device to another. On newer versions of
macOS and iOS, this feature includes something called the Universal Clipboard that allows one
Apple device to copy and paste to a different Apple device using Handoff.
This feature will need to be disabled through your MDM platform or individually on macOS and
iOS devices prior to testing.
macOS
1) From the Apple menu, choose System Preferences.
2) Ensure the box Allow Handoff between this Mac and your iCloud devices is unchecked.
iOS
1) Navigate to Settings.
2) Choose General.
3) Choose Handoff & Suggested Apps.
4) Ensure Handoff is turned off.
28 Last Updated: 1/9/20199Setup & Installation Guide
Note: The emoji keyboard is not compatible with the assessments on iPads and should be
removed. Remove the keyboard under Settings>General>Keyboards>Keyboards (inside the
keyboards option). Select edit in the top right corner and then select the symbol next to
the Emoji Keyboard. Select delete after it opens.
Sample Test Login
Once the secure browser is available on the student devices, log in to the Sample Test to ensure
the download was successful and the test is available and functioning on the device.
1) Launch Questar Secure Browser from the desktop of student device(s).
2) Enter
User ID: practice
Password: practice
3) Navigate through the sample test to ensure:
* The test loads at an acceptable speed (see Perform Site Setup – Test Readiness for
details)
* Items render correctly and can be answered (items/answers don’t bleed off the screen,
etc.)
* Available tools work appropriately
* The test can be submitted upon completion via the Review screen
29 Last Updated: 1/9/20199Setup & Installation Guide Appendix A – Student Response Flowcharts Student Response Flow After a student logs in and selects a test, the complete test package is downloaded to an encrypted file on the student’s device. The student’s responses are saved to an encrypted local cache on the device. Continuous Internet Connection Optimally, the student’s device will have continuous Internet connection during testing. The student’s responses are sent to the Questar Server in the background. This is referred to as a “heartbeat.” This heartbeat is a configurable time interval. When the student completes testing, the final responses are uploaded to the Questar Server. The Questar Server confirms response receipt and the test will exit on the student’s device. 30 Last Updated: 1/9/20199
Setup & Installation Guide
Internet Connection Lost and Restored During Testing
If Internet connection is lost, the student continues responding to test questions without
interruption. The student should not move to another device as their responses are stored on
their local device until connectivity is re-established. The testing system continuously attempts to
re-establish connection with the Questar Server. When the Internet connection is restored, the
responses are automatically sent to the Questar Server. When the student completes testing, the
final responses are uploaded to the Questar Server. The Questar Server confirms response receipt
and the test will exit on the student’s device.

Note: Text-to-Speech (TTS) requires an Internet connection. When the Internet connection is
restored, the student with the TTS accommodation will be able to hit play again and the TTS will
load again.

31                                                                         Last Updated: 1/9/20199
Setup & Installation Guide
Internet Connection Lost
If Internet connection is lost, the student continues responding to test questions without
interruption. The student should not move to another device as their responses are stored on
their local device until connectivity is re-established. If the student completes testing and the
Internet connection has not been restored, the following process occurs:

•    The system will present an error message directing the student to alert the test administrator.
•    The student’s responses remain on the device. The device should not be used by another
     student before the following steps are completed by the technology coordinator or test
     administrator:
        1) Restore Internet connection to the device.
        2) If the student has logged out, direct them to log in again.
        3) Submit the test.
•    The Questar Server confirms response receipt and the test will exit on the student’s device.
•    Another student can now use the device.

Note: Text-to-Speech (TTS) requires an Internet connection. TTS will be unavailable until the
Internet connection is restored.

32                                                                          Last Updated: 1/9/20199
Setup & Installation Guide
Appendix B – System Requirements
General System Requirements:
• System Memory/Hard Disk Space
o Minimum 512MB Free Ram
o Recommended 1GB Free RAM
o Minimum 1GB Free Storage Space
• LAN Network
o Recommended available LAN bandwidth at each workstation 2 Mbps
• Internet Speed
o Minimum per device:
o 150Kbps
o Recommended: 300Kbps
OS Specific System Requirements:
Operating OS Version Processor Screen Size
System Resolution
Windows 7/8.1/10 Intel Core 2 Duo 1.6 Ghz Minimum 10" screen
equivalent or higher size
performing CPU Minimum 1024 X 768
screen resolution
Recommended 11.6" or
larger screen size
Mac OS Intel Core 2 Duo 1.6 GHz Minimum 10" screen
10.10-10.14 equivalent or higher size
performing CPU Minimum 1024 X 768
screen resolution
Recommended 11.6" or
larger screen size
iOS 10.3.3, 11.2.5 to 11.X 1.0 Ghz dual core Minimum 9.7" screen
(iOS 9.3.5 and 11.0- equivalent or higher size
11.2.2 are not Minimum 1024 X 768
supported) screen resolution
Chrome OS Version 59+ 1.6 Ghz dual core Minimum 10" screen
equivalent or higher size
Minimum 1024 X 768
screen resolution
33 Last Updated: 1/9/20199Setup & Installation Guide Appendix C –Frequently Asked Questions (FAQ) Can a student restart a paused or terminated test session on the same platform but another device? All efforts should be made to have the student resume a test on the same device he or she began testing with. Only if the device is permanently incapacitated or the student cannot be held any longer should another device be used. In this case, the student should be made aware that unsaved or partially saved responses may have to be re-entered before submitting the test. Partially saved responses would occur due to connection loss between heartbeat intervals. Can a student needing accommodations use the native accessibility features of an iPad or Chromebook? No. iPad and Chromebook devices must be locked down to only access Nextera TDS during testing. Can a student use a touchscreen device for testing? Effective October 2018 Nextera supports any touchscreen interaction from devices with supported operating systems that exceed the minimum specifications as noted in the table in Appendix B. 34 Last Updated: 1/9/20199
Setup & Installation Guide

Appendix D – Troubleshooting Tips

Issues Loading Test
If you experience latency while the test is loading, review the following list of possible solutions
presented in order of most likely to resolve the issue:

     •   Confirm the network bandwidth is flowing without impediment.
              o Try opening a website on another device on your network. If you experience
                  latency accessing the Internet on another device, you may be experiencing a
                  broader network issue.
     •   Confirm the Questar domain name (*.questarai.com) is whitelisted in your firewall. If your
         firewall or Web content filter supports SSL inspection, ensure that function is turned off in
         the firewall and/or content filter.
     •   If the error occurs intermittently, it may be that the firewall or Web content filter is
         prioritizing traffic and causing some requests to fail. If the firewall or Web content filter
         allows it, add a rule to allow traffic to the Questar domain *.questarai.com to be top
         priority in the firewall or content filter.
     •   Add *.questarai.com to the ignore list/blanket bypass if one is in use.
     •   Right-click, select quit secure browser, and log in again. This issue may be a result of
         firewall or content filter inspecting the connection; this resolution may create a new
         connection that is unlocked.
     •   If using an iPad, close out of the secure browser then turn on and off Airplane mode under
         Settings. This will reset all radios, allowing the device to create a clean network
         connection.

Response Recovery When Internet is Disconnected Prior to Test Session
Submission
If Internet connectivity is lost for any reason prior to the submission of a test session, the device
cache stores the responses locally until connectivity is restored. The following indicators are visible
when Internet connectivity is lost:

     •   The connection indicator in the upper left corner of the Nextera Test Delivery System
         changes from green to red.

     •   If connectivity is lost for 45 seconds or more, a “Lost Connection” message displays.

35                                                                           Last Updated: 1/9/20199
Setup & Installation Guide
• If the network connection is restored, the responses will automatically submit and the
display will return to the Nextera TDS login screen. It is strongly recommended the device
be left in this state until the network connection is restored.
Once connectivity is restored, the stored responses need to be submitted to the Questar server.
From the device that lost connectivity, follow the steps below to upload the stored responses:
• Refer to the State Department of Education for the state policy regarding teachers or test
administrators logging in with student credentials to submit a student test. If permitted,
complete the following steps.
• Log in to the Nextera Test Delivery System with the user’s login username and password,
select the session that lost connectivity, and enter the session access code.
• After the “Preparing Your Test” message disappears, select “Begin.” The stored responses
are now synced between the device and the Questar server, and the responses are viewed
within the Test Delivery System. The user may resume completing and/or submitting the
test.
-118 Error Code/Unable to access https://nextera.questarai.com
The workstation is unable to access the site.
• If the error occurs routinely, the site is being blocked by a firewall or content filter. Ensure
*.questarai.com is whitelisted in the firewall. If the firewall and/or content filter brand
supports SSL inspection, ensure that function is turned off in the firewall and/or content
filter.
• If the error occurs intermittently, the firewall or content filter is prioritizing traffic and
causing some requests to fail. If possible, add a rule to allow *.questarai.com to be top
priority in the firewall or content filter.
Graphing Item Issues/Secure Browser Locks Up After Login (Randomly)
Check the following items for possible conflicts while troubleshooting display issues:
• Verify the graphics card driver is up-to-date.
• Check for conflicts with an anti-virus program.
Issues Editing Constructed Responses
Press the Insert key to ensure the keyboard is in insert mode rather than overtype mode. When a
keyboard is in overwrite mode, existing text is deleted as new text is written. Pressing the Insert
key again changes back to insert mode.
36 Last Updated: 1/9/20199You can also read