User Guide - T - April 2019
←
→
Page content transcription
If your browser does not render page correctly, please read the page content below

TeamViewer
  Remote Management

TeamViewer Remote Management
                User Guide
    TeamViewer Monitoring & Asset Management
           TeamViewer Endpoint Protection
                  TeamViewer Backup

                                               April 2019
Table of Contents

1. General ................................................................................................................................................ 4
   1.1 About the User Guide ................................................................................................................... 4
   1.2 About TeamViewer Remote Management ................................................................................... 4
2. Requirements ...................................................................................................................................... 6
   2.1 Licensing ........................................................................................................................................ 6
   2.2 License Activation ......................................................................................................................... 7
   2.3 System Requirements ................................................................................................................... 8
       2.3.1 TeamViewer Monitoring & Asset Management .................................................................... 8
       2.3.2 TeamViewer Endpoint Protection .......................................................................................... 9
       2.3.3 TeamViewer Backup .............................................................................................................. 9
3. Get Started ........................................................................................................................................ 10
   3.1 Activation .................................................................................................................................... 10
       3.1.1 TeamViewer Full Version Activation .................................................................................... 10
       3.1.2 Management Console Activation......................................................................................... 13
   3.2 Policies ........................................................................................................................................ 15
       3.2.1 Default Policy and Policy Options ........................................................................................ 16
       3.2.2 Assign a Policy ...................................................................................................................... 17
4. Monitoring & Asset Management .................................................................................................... 18
   4.1 Monitoring & Asset Management Activation ............................................................................. 19
   4.2 Monitoring Checks ...................................................................................................................... 19
   4.3 Monitoring Policy ........................................................................................................................ 27
   4.4 Remote Task Manager ................................................................................................................ 27
   4.5 Alarms and Notifications ............................................................................................................. 28
       4.5.1 Alarms .................................................................................................................................. 28
       4.5.2 Notifications ......................................................................................................................... 29
   4.6 Monitoring Device View .............................................................................................................. 30
   4.7 Monitoring Alarms View ............................................................................................................. 31
       4.7.1 Monitoring Filtering ............................................................................................................. 32
       4.7.2 Monitoring Export ................................................................................................................ 32
   4.8 Network Monitoring ................................................................................................................... 33
       4.8.1 Network Monitoring Activation ........................................................................................... 34
       4.8.2 Network Monitoring Settings............................................................................................... 34
       4.8.3 Network Monitoring Checks ................................................................................................ 35

                                                                               TeamViewer Remote Management User Guide | 1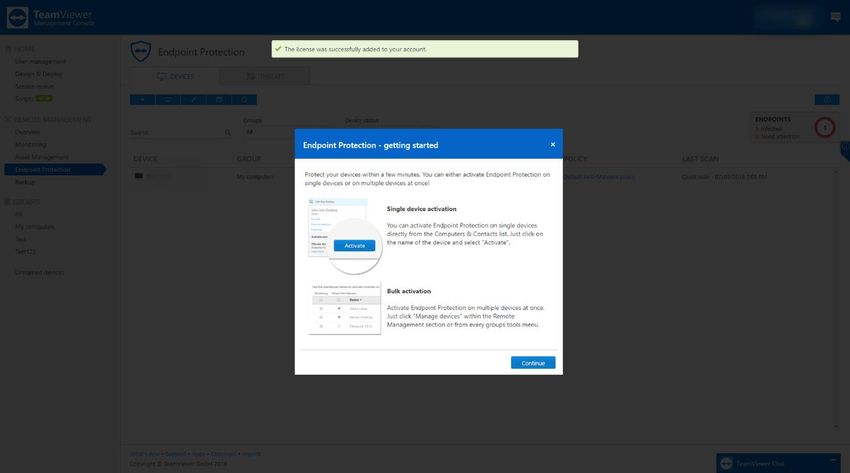
4.8.4 Network Monitoring Policy .................................................................................................. 36
       4.8.5 Network Monitoring Views .................................................................................................. 37
   4.9 Asset Management ..................................................................................................................... 38
       4.9.1 Device View .......................................................................................................................... 39
       4.9.2 Asset View ............................................................................................................................ 41
5. Endpoint Protection .......................................................................................................................... 43
   5.1 Endpoint Protection Activation................................................................................................... 43
   5.2 Endpoint Protection Policies ....................................................................................................... 43
       5.2.1 Endpoint Protection Settings ............................................................................................... 44
       5.2.2 Exclusions ............................................................................................................................. 45
       5.2.3 Notifications ......................................................................................................................... 45
   5.3 Endpoint Protection Dashboard ................................................................................................. 46
       5.3.1 Manage Endpoints ............................................................................................................... 46
       5.3.2 Manage Policies ................................................................................................................... 47
       5.3.3 Manual Scans ....................................................................................................................... 47
       5.3.4 Status of the Device ............................................................................................................. 47
       5.3.5 Quarantine ........................................................................................................................... 48
       5.3.6 Active Ransomware Protection............................................................................................ 48
       5.3.7 Device View .......................................................................................................................... 48
       5.3.8 Threat View .......................................................................................................................... 50
6. Backup ............................................................................................................................................... 53
   6.1 Backup Activation ....................................................................................................................... 53
   6.2 Policies ........................................................................................................................................ 53
       6.2.1 Policy Name ......................................................................................................................... 54
       6.2.2 Add a Backup Policy ............................................................................................................. 54
       6.2.3 File Selection ........................................................................................................................ 54
       6.2.4 Backup Settings .................................................................................................................... 55
       6.2.5 Schedule Backup .................................................................................................................. 56
       6.2.6 Bandwidth Throttling ........................................................................................................... 56
       6.2.7 Exclusion .............................................................................................................................. 56
       6.2.8 Notifications ......................................................................................................................... 57
   6.3 Retention Period ......................................................................................................................... 57
   6.4 Manage Backup........................................................................................................................... 58
       6.4.1 Backup Status ....................................................................................................................... 58
       6.4.2 Status Description ................................................................................................................ 59
       6.4.3 Daily Storage Usage Per Device ........................................................................................... 60

                                                                              TeamViewer Remote Management User Guide | 2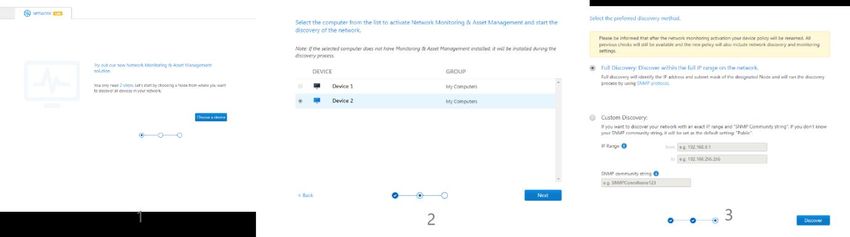
6.4.4 Delete Files from Backup ..................................................................................................... 60
   6.5 Restore Backed Up Files .............................................................................................................. 61
       6.5.1 Download for Web Restore ................................................................................................. 61
       6.5.2 Restore to the Original Device ............................................................................................. 61
       6.5.3 Restore to Another Device ................................................................................................... 62
       6.5.4 Restore from Previous Backup ............................................................................................. 62
   6.6 File Selection for Restore ............................................................................................................ 62
   6.7 Backup Device View .................................................................................................................... 64
       6.7.1 Filtering ................................................................................................................................ 65
       6.7.2 Storage Used Overview ........................................................................................................ 65
7. Support.............................................................................................................................................. 66

                                                                              TeamViewer Remote Management User Guide | 3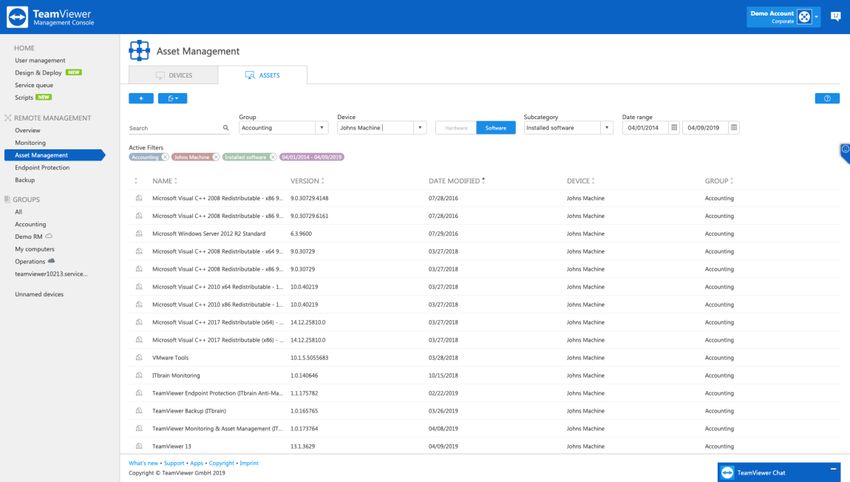
1. General

1.1 About the User Guide

This user guide describes how to work with the Remote Management tool from TeamViewer. Unless
stated otherwise, the functionalities described always refer to the TeamViewer full version for
Microsoft Windows. Mac OS, iPhone, and iPad are trademarks of Apple Inc. Linux® is a registered
trademark of Linus Torvalds in the US and other countries. Android is a trademark of Google Inc.
Windows and Microsoft are registered trademarks of Microsoft Corporation in the US and other
countries. For simplification purposes, this manual refers to the operating systems Microsoft®
Windows® XP, Microsoft® Windows® Vista, Microsoft® Windows® 7, Microsoft® Windows® 8 and
Microsoft® Windows® 10 simply as “Windows.” For a list of all supported operating systems, visit our
website or our Community page to learn more.

1.2 About TeamViewer Remote Management

TeamViewer Remote Management is a professional and efficient IT management platform
integrated into a secure remote desktop access tool, completely tailored to your company's needs.
The platform is designed to protect and remotely monitor devices, to keep track of IT assets, and/or
to store the data in a secure cloud backup. In order to achieve these goals, TeamViewer Remote
Management offers the following services, available on the TeamViewer Management Console and
on the TeamViewer client:

                          TeamViewer Monitoring & Asset Management
                                 TeamViewer Endpoint Protection
                                        TeamViewer Backup

With TeamViewer Remote Management, you will maintain a clear overview of all the important
information and functions of your system and IT infrastructure.

   1. With TeamViewer Monitoring & Asset Management, you can proactively monitor your
      devices, and set up individual checks to receive notifications on, for example, disk health,
      antivirus software, online status, RAM use, and running processes on a computer. The
      integrated Asset Management feature also lets you track your deployed assets and create IT
      inventory reports for your network. Manage all your devices conveniently via the TeamViewer
      Management Console or your TeamViewer Client and receive direct e-mail alerts.

   2. With TeamViewer Endpoint Protection, you can keep your computers clean and safe.
      Endpoint Protection safeguards your devices against threats such as viruses, Trojans, rootkits,

                                                   TeamViewer Remote Management User Guide | 4
and spyware, 24/7 - no matter if on- or offline. Endpoint Protection scans your devices on a
  regular basis, discovers potential threats early, and protects your devices reliably. Discovered
  malware is terminated immediately and can later be completely deleted. With the
  TeamViewer Management Console, you can manage all threats and scans at a glance –
  anytime, anywhere.

3. With TeamViewer Backup, you can store your data in the cloud under the highest security
  standards, and backed up files can be remotely restored from anywhere, at any time. Protect
  your important files by backing up the complete file system, common file formats, or specific
  files and folders regularly. Restore files and thus avoid potential data loss. With the
  TeamViewer Management Console, you have access to each backup of any of your devices at
  any time.

                                                TeamViewer Remote Management User Guide | 5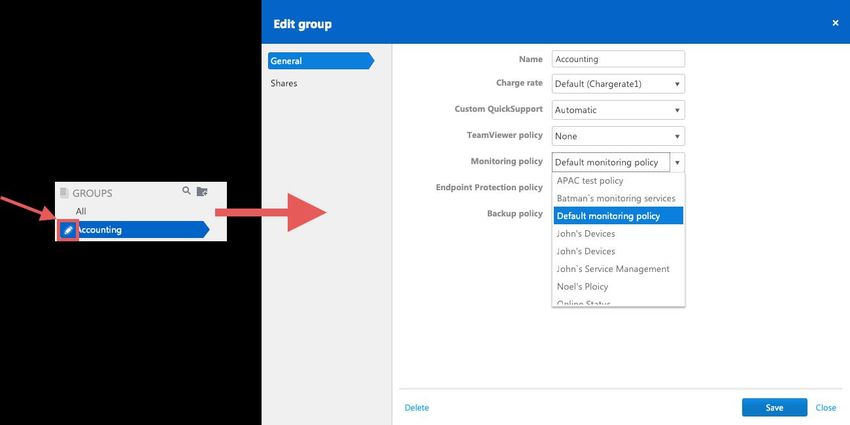
2. Requirements

These are the requirements that must be met in order to use all the functions of TeamViewer
Remote Management.

               Note: You can also try TeamViewer Remote Management free for 14
               days, with no license or obligation to subscribe.

2.1 Licensing

TeamViewer Remote Management is an add-on to the TeamViewer remote control product, but it is
not included in the TeamViewer license model. This means that:

   1. Remote Management is not part of the TeamViewer Corporate, Premium, or Business
      license.
   2. Remote Management can be used even without a TeamViewer Corporate, Premium, or
      Business license.
   3. You'll need a TeamViewer Remote Management license in order to use all the functions of
      Remote Management.

TeamViewer Remote Management services are available as a monthly or an annual subscription.
Under the Remote Management license model, you purchase a so-called "endpoint" for each
computer you want to use Remote Management on. The Backup license counts the storage volume.

    Note: You will need separate endpoints for the TeamViewer Remote Management services:
    Monitoring & Asset Management and Endpoint Protection. The different endpoints can be
    used independently of one another.

For example:

       1. If you want to protect five (5) computers with TeamViewer Endpoint Protection, you'll
          need a TeamViewer Endpoint Protection license with 5 endpoints.
       2. If you want to monitor ten (10) computers with TeamViewer Monitoring & Asset
          Management, you will need a TeamViewer Monitoring & Asset Management license
          with 10 endpoints.
       3. If you want to backup twenty (20) computers with TeamViewer Backup, you will need a
          TeamViewer Backup license with the necessary storage volume. TeamViewer Backup
          can be installed on unlimited devices.

                                                 TeamViewer Remote Management User Guide | 6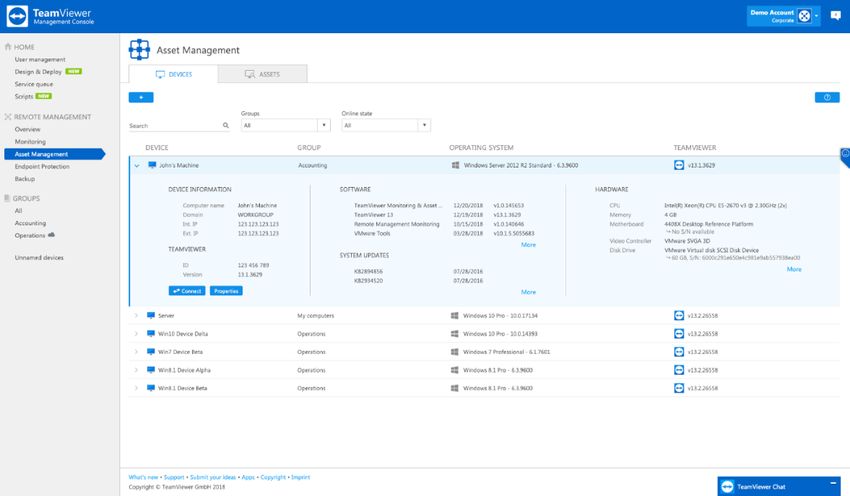
Note: The licensing for the Backup service is based on the consolidated storage
         volume used. Therefore, the service can be used on an unlimited number of
         endpoints.

For more information about the Remote Management license model, visit our TeamViewer Remote
Management shop.

2.2 License Activation

You need a TeamViewer Remote Management license in order to use all the functions of the
TeamViewer Remote Management services.

After you purchase a TeamViewer Remote Management license, you'll receive a confirmation e-mail.
Click on the activation link in the e-mail in order to activate the license for your TeamViewer
account.

Once you have activated the license, it will automatically be linked to your TeamViewer account and
will be ready for immediate use.

                          Image: Remote Management license activation.

                                                  TeamViewer Remote Management User Guide | 7
Note: If you set up your TeamViewer account under a company profile, the
          TeamViewer Remote Management license will be part of the company profile
          and all users with permission will be able to manage the Remote Management
          services.

          Note: TeamViewer Remote Management license activations can only be undone
          in exceptional cases.

2.3 System Requirements

To configure and manage TeamViewer Remote Management services, you will need the
TeamViewer Management Console.
The TeamViewer Management Console is browser-based and is therefore independent of the
operating system.
To activate and to view alerts, you can use the TeamViewer full version with the following operating
systems:
    1. Windows
To view alerts only you can install the TeamViewer remote control application on:
    1. Android
    2. iOS

2.3.1 TeamViewer Monitoring & Asset Management

To use Monitoring & Asset Management, one of the following operating systems must be running on
the devices (endpoints) you wish to monitor:

Windows

    1. Windows 10 / 8.1 / 8 / 7 / Vista / XP SP3.
    2. Windows Server 2012 R2 / 2012 / 2008 R2 / 2008 / 2003 R2 32 bit.
    3. The antivirus software check is not available for server operating systems.
           o Windows Security Center (WSC) is not active on Windows Service OS.
    4. TeamViewer 11 full version of Host (or newer) must be installed.

macOS

    1. macOS Sierra, High Sierra, Mojave, or newer.
    2. TeamViewer 14 full version of Host (v14.2.2558 and newer)
          a. TeamViewer needs to start with the system startup

                                                  TeamViewer Remote Management User Guide | 8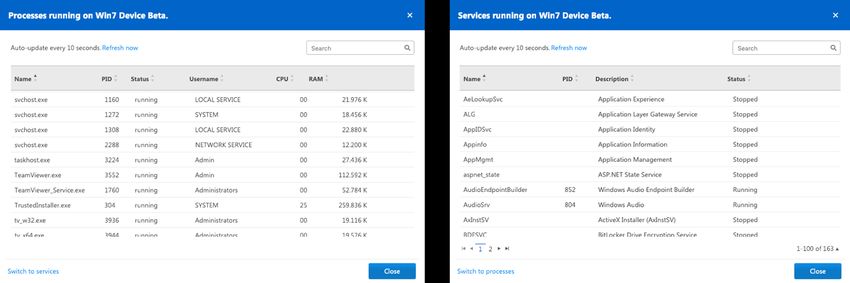
Linux

   1. Debian 9 or newer
   2. GRML, Kali Linux, Purism, Pure OS, Tails, Ubuntu and other .deb distributions.
   3. TeamViewer 14 full version of Host (14.1.9025 and newer).
         a. Account needs to be assigned before activation.

2.3.2 TeamViewer Endpoint Protection

To use Endpoint Protection, one of the following operating systems must be running on the devices
(endpoints) you wish to protect:
   1. Windows 10 / 8.1 / 8 / 7.
   2. Windows Server 2012 R2 / 2012 / 2008 R2.
   3. TeamViewer 11 full version or Host (or newer) must be installed.

2.3.3 TeamViewer Backup

To use Backup, you should make sure that one of the following operating systems is running on the
device(s) you wish to backup using TeamViewer Backup:
   1. Windows 10 / 8.1 / 8 / 7 SP1 and later.
   2. Windows Server 2012 R2 / 2012 / 2008 R2.
   3. TeamViewer 11 full version or Host (or newer) must be installed.

                                                 TeamViewer Remote Management User Guide | 9
3. Get Started
You can use the TeamViewer Management Console to configure all Remote Management services.
To do this, open the TeamViewer Management Console at https://login.teamviewer.com and log in
with your TeamViewer account. All other steps for configuring TeamViewer Remote Management
are described below.
Note: Depending on user permissions, TeamViewer accounts set up under a
company profile can also use the functions described below.
3.1 Activation
All computers that users want to use TeamViewer Remote Management on are called “endpoints.”
The TeamViewer Remote Management service must be activated and configured on each endpoint.
The license can be activated using bulk activation or on each endpoint separately.
After activating Monitoring & Asset Management on the endpoints, the following steps are taken
automatically:
1. The Monitoring & Asset Management service is downloaded and installed on the
device.
2. The default Monitoring & Asset Management policy is assigned to the device.
3. Asset Management data is uploaded for the first time.
After activating Endpoint Protection on the endpoints, the following steps are taken automatically:
1. The Endpoint Protection service is downloaded and installed on the device.
2. The latest Endpoint Protection virus definitions are downloaded.
3. The Default Endpoint Protection policy is assigned to the device.
4. A Quick scan is started.
After activating Backup on the endpoints, the following steps are taken automatically:
1. The Backup service is downloaded and installed on the device.
2. You must define a default Backup policy with file paths to backup.
3.1.1 TeamViewer Full Version Activation
Single Activation
You can activate Remote Management services for individual devices on your Computers & Contacts
list. First, the device is assigned to your TeamViewer account and then the Remote Management
service is configured.
TeamViewer Remote Management User Guide | 10To do this:
1) Click the device name in your Computers & Contacts list.
2) Select Activate for the respective service.
Image: Activation via TeamViewer full version.
If you haven't saved the personal password for the device in your Computers & Contacts list, enter it
in the dialog box.
Image: Device account assignment.
TeamViewer Remote Management User Guide | 11If you have not set a personal password for the endpoint, you can assign the endpoint to your
account via the settings in the TeamViewer full version.
To do so, you'll need to access the settings locally on the computer under:
Extras → Options → General → Account assignment.
Remote Management Tab
Starting with TeamViewer 14 and up, we introduced a new tab in the TeamViewer client.
Remote Management Tab will display the status for all active services, and will contain quick links to
the Management Console:
1. Activate an endpoint button
2. Open Settings
Image: Remote Management tab in the TeamViewer client.
TeamViewer Remote Management User Guide | 123.1.2 Management Console Activation
TeamViewer Management Console can be accessed here: https://login.teamviewer.com
Single activation
You can activate Remote Management services for individual devices in your Groups list. In order to
use this feature, you must have an active license.
1. Go to any group in the left pane, select the device, and click on the desired services icon on
the right side.
2. Click activate.
3. Now, the device is assigned to your TeamViewer account, and then the respective Remote
Management service is configured.
Image: Single activation via TeamViewer MCO.
Image: Activation icons.
TeamViewer Remote Management User Guide | 13Bulk activation
Bulk activation helps you activate TeamViewer Remote Management services on multiple devices
and assigns all of them to your TeamViewer account collectively. By using your personal passwords,
all endpoints are automatically assigned to your account and the TeamViewer Remote Management
service(s) will be activated for the endpoints in one step. In order to use this feature, you must have
an active license.
1. Activate from Remote Management overview.
a. Click on the ‘Overview’ tab under Remote Management section on the left pane.
b. Click on the ‘+’ button from the lower left corner of the service tile.
c. Select the devices from the list and click next.
d. Select the default policy that should be assigned for all devices.
e. Click activate.
Image: Bulk activation via TeamViewer MCO 1.
2. Activate from the service tab.
a. Click on the service tab you want to activate endpoints for.
b. Click on the ‘+’ button on the upper left corner.
c. Select the devices from the list and click next.
d. Select the default policy that should be assigned for all devices.
e. Click activate.
TeamViewer Remote Management User Guide | 14Image: Bulk activation via TeamViewer MCO 2.
Image: Bulk activation via TeamViewer MCO 3.
3.2 Policies
Policies are defined as individual settings which are sent to the endpoints once applied.
They contain all necessary information on how the service will:
1. Remotely manage the device.
2. Alert the user if something is not working properly.
3. Setup thresholds and parameters.
4. Send e-mail notifications.
Monitoring & Asset Management policies: determine the criteria your devices will be set to for
reporting when something is not running within the assigned thresholds or parameters.
Endpoint Protection policies: determine when and to what extent your devices are scanned and
protected against malware.
Backup policies: determine when and to what extent the files on your devices will be backed up.
TeamViewer Remote Management User Guide | 153.2.1 Default Policy and Policy Options
For each service, a default policy is created when the first endpoint is activated.
1. The default policies will be applied to each activated endpoint if no other policy is specified
when activating the endpoint.
2. The default policies can be changed at any time.
3. Newly created policies can be assigned as default policies.
Image: Monitoring default policy.
Find all policies under:
Remote Management → Service name tab → Wrench icon → Manage policies
In the Policies window you can:
1. Create a Policy.
2. Edit a policy.
3. Duplicate a policy.
TeamViewer Remote Management User Guide | 16Image: Manage Monitoring policies.
3.2.2 Assign a Policy
Single policy assignment
You can assign a policy to each device by going to the desired service Tab and selecting the policy
column on the right side of the Device view. Click the check mark to save.
Image: Single policy assignment.
TeamViewer Remote Management User Guide | 17Group policy assignment
If you would like to have a policy for an entire group of computers, select ‘Inherit from group’
located in the Policy row for all computers in a group (you can also filter by individual groups). Click
the check mark to save.
1. Go to the left pane of the desired group.
2. Hover over the group.
3. Click on the pen icon, and then click ‘edit.’
4. Select the policy for the desired service and click save.
Image: Group policy assignment.
4. Monitoring & Asset Management
To monitor your devices and manage your IT assets, use the service TeamViewer Monitoring &
Asset Management.
Monitoring policies will define the proactive behaviors of individual checks assigned to devices.
For license activation, please see 2.2 License Activation.
For system requirements, please see 2.3 System Requirements.
For configuring policies and assigning them to a device, please see 3.2 Policies.
When all defined conditions for a check are met, an alert is triggered and displayed as an alarm
message in the TeamViewer Management Console and in the TeamViewer full version. An e-mail
notification will also be sent if configured in the policy. An alert message indicates that a problem
has occurred on one of the monitored devices.
TeamViewer Remote Management User Guide | 184.1 Monitoring & Asset Management Activation
For activation of endpoints please see: 3.1 Activation.
4.2 Monitoring Checks
Monitoring checks are categorized in 3 Categories which will help you determine how critical the
situation is on a device.
Windows Checks
Image: The three categories of monitoring checks.
1. Health and Security
a. Online state
i. This is a proactive check which will alert the user when the device goes
offline and comes back online.
ii. When the check is applied to a device, it will monitor if the system has
internet connectivity. When the device goes offline for more than 1 minute
an alert will be triggered.
iii. After the device goes offline it will track of length of time in this state.
Additionally, when the device comes back online a recovery notification will
be generated and the state of the check will return to green.
iv. The check can be customized with a time delay of 5 or 10 minutes. When
selecting a time delay, the online state will be reported only after the device
is offline for more than the time delay value selected.
b. Windows Update
i. This check will alert the user if the Windows Update is turned off.
ii. Users will see if there are available updates that can be installed on the
device.
iii. A variation of both ‘Windows Update is off’ or ‘Updates are available’ can be
selected. An alert will be triggered if one of the variables is met.
c. Antivirus
i. This check will be triggered if the installed security solution, which is
registered in Windows Security, is off or if the malware definition updates
failed to be updated for more than 2 days.
TeamViewer Remote Management User Guide | 19d. Firewall
i. A check that will be generated if the Windows firewall or a 3rd party firewall
is turned off.
e. Network Adapter Traffic
i. This check will alert users when there are issues related to network traffic,
such as interruption or high usage, on the network adapter. With this check,
the user can monitor both incoming and outgoing traffic.
1. Type of traffic: incoming or outgoing.
2. Minimum value of traffic: when there is less traffic, the user will get
an alert. There is the option to choose between two metrics – KB/s
or MB/s.
3. Maximum value of traffic: when there is more traffic, users will get
an alert. There is the option to choose between two metrics – KB/s
or MB/s.
ii. Multiple checks can be added in one policy.
2. Software Operations
a. Windows Service
i. This check will monitor a defined Windows service, and it will trigger an alert
if the set service is running or not running.
ii. In order to set up this check, the exact service name must be added in the
check configuration menu.
iii. The exact service name can be found under:
Windows services → Service properties.
Image: Software operation check on local machine.
TeamViewer Remote Management User Guide | 20Image: Software operation check in the Management Console.
Note: Running services can be viewed by opening the Remote Task
Manager.
b. Processes
i. This check will monitor a defined Windows process, and it will trigger an
alert if the process is running or not running.
ii. In order to set up this check, the exact process name must be added in the
check configuration menu.
iii. The name of the process is case sensitive.
TeamViewer Remote Management User Guide | 21Image: Process check in the Management Console.
Note: Running processes on a device can be viewed by opening the
Remote Task Manager.
c. Event Log
i. This check will report event logs from the Windows Event Viewer after an
entry is written in the configured logs folder.
ii. Many applications and critical windows operations record logs making the
event log checks a very powerful check to monitor key operations on a
Windows device.
iii. In order to set up this check, the queried category needs to be selected:
1. Security
2. Application
3. System
iv. After selecting the folder where the logs will be monitored, the source
needs to be selected.
v. After selecting the source, the event ID needs to be added. Multiple event
ID’s can be added separated by “,” (comma).
vi. After selecting the ID, one or more event log categories needs to be
selected:
1. Audit
2. Information
3. Error
vii. When an event log is written and matches the predefined check settings, a
notification is sent. A full description of the triggered event log will be
outlined in the e-mail.
TeamViewer Remote Management User Guide | 223. Hardware
a. Disk Space
i. This check will monitor the free space on a system drive and will report
when the free space is less than the defined value.
ii. Multiple disk space checks can be added to one policy with different drive
letters.
iii. In order to set up the disk space check, first select the desired drive that
needs to be monitored on the device, e.g. C:\ or G:\.
iv. After selecting the drive, select the needed variable:
1. % - percentage of free space left on drive.
2. GB – Gigabytes of free space left on drive.
3. MB – Megabytes of free space left on drive.
v. After selecting the variable, enter the minimum threshold value. Whenever
the disk space falls below this value, an alert will be triggered.
b. Disk Health
i. This check will report any S.M.A.R.T. errors recorded in the Windows
Management Instrumentation module.
ii. S.M.A.R.T. is a standardization of error reporting for storage device
components. More details can be read here:
https://en.wikipedia.org/wiki/S.M.A.R.T.
iii. When an error is triggered, it will be reported, and then an alert will be sent.
iv. If configured, an e-mail notification will also be sent containing all necessary
error reports including the recorded error.
v. If S.M.A.R.T. alerts for a device continue to be triggered, please investigate
the reported errors on the manufacturers’ web resources, or use the
dedicated tools created by the hardware manufacturer.
c. Memory Usage
i. This check will monitor the amount of free Random-Access Memory or RAM
on the device.
d. CPU Usage
i. This check will monitor the CPU usage on the device and an alert will be
triggered if the usage is higher than the defined percentage in the check
configuration menu.
TeamViewer Remote Management User Guide | 23macOS Checks
Image: The three categories of monitoring checks.
1. Health and Security
a. Online state
i. This is a proactive check which will alert the user when the device goes
offline and comes back online.
ii. When the check is applied to a device, it will monitor if the system has
internet connectivity. When the device goes offline for more than 1 minute
an alert will be triggered.
iii. After the device goes offline it will track of length of time in this state.
Additionally, when the device comes back online a recovery notification will
be generated and the state of the check will return to green.
iv. The check can be customized with a time delay of 5 or 10 minutes. When
selecting a time delay, the online state will be reported only after the device
is offline for more than the time delay value selected.
b. System Update
i. This check will alert the user if a System Update is available
2. Software Operations
a. Processes
ii. This check will monitor a defined process, and it will trigger an alert if the
process is running or not running.
iii. In order to set up this check, the process name listed in “Activity Monitor”
must be added in the check configuration menu.
3. Hardware
e. Disk Space
i. This check will monitor the free space on a system drive and will report
when the free space is less than the defined value.
ii. Multiple disk space checks can be added to one policy with different drive
letters.
iii. In order to set up the disk space check, first add the “volume path” that
must be monitored (e.g. Macintosh HD)
iv. After selecting the drive, select the needed variable:
1. % - percentage of free space left on drive.
2. GB – Gigabytes of free space left on drive.
3. MB – Megabytes of free space left on drive.
v. After selecting the variable, enter the minimum threshold value. Whenever
the disk space falls below this value, an alert will be triggered.
f. Memory Usage
i. This check will monitor the amount of free Random-Access Memory or RAM
on the device.
TeamViewer Remote Management User Guide | 24g. CPU Usage
i. This check will monitor the CPU usage on the device and an alert will be
triggered if the usage is higher than the defined percentage in the check
configuration menu.
Linux Checks
Image: The three categories of monitoring checks.
1. Health and Security
a. Online state
i. This is a proactive check which will alert the user when the device goes
offline and comes back online.
ii. When the check is applied to a device, it will monitor if the system has
internet connectivity. When the device goes offline for more than 1 minute
an alert will be triggered.
iii. After the device goes offline it will track of length of time in this state.
Additionally, when the device comes back online a recovery notification will
be generated and the state of the check will return to green.
iv. The check can be customized with a time delay of 5 or 10 minutes. When
selecting a time delay, the online state will be reported only after the device
is offline for more than the time delay value selected.
b. System Update
i. This check will alert the user if a System Update is available
2. Software Operations
a. Processes
ii. This check will monitor a defined process, and it will trigger an alert if the
process is running or not running.
iii. In order to set up this check, the process file name or the absolute path of a
process (e.g. filename: bash or teamviewerd ; absolute path: /usr/bin/bash
or /opt/teamviewer/tv_bin/teamviewerd) must be added in the check
configuration menu.
TeamViewer Remote Management User Guide | 25Image: Activity monitor and service.
3. Hardware
a. Disk Space
i. This check will monitor the free space on a system drive and will report
when the free space is less than the defined value.
ii. Multiple disk space checks can be added to one policy with different drive
letters.
iii. In order to set up the disk space check, first add the “mount point” that
must be monitored (e.g. /home or /media/data)
iv. After selecting the drive, select the needed variable:
1. % - percentage of free space left on drive.
2. GB – Gigabytes of free space left on drive.
3. MB – Megabytes of free space left on drive.
v. After selecting the variable, enter the minimum threshold value. Whenever
the disk space falls below this value, an alert will be triggered.
b. Memory Usage
i. This check will monitor the amount of free Random-Access Memory or RAM
on the device.
c. CPU Usage
i. This check will monitor the CPU usage on the device and an alert will be
triggered if the usage is higher than the defined percentage in the check
configuration menu.
TeamViewer Remote Management User Guide | 264.3 Monitoring Policy
The default Monitoring & Asset Management policy includes the following checks, described in 4.2
Monitoring Checks.
1. Is antivirus software installed and active?
2. Is more than 500 MB of RAM available?
3. Is CPU usage higher than 75%?
4. What is the health of the hard drive?
5. Is the available disk space less than 10%?
6. Is Windows Update active?
7. Is the Windows Firewall activated?
For more policy options please read: 3.2 Policies.
4.4 Remote Task Manager
The Remote Task Manager can be opened for every device that has Monitoring & Asset
Management installed. (Windows)
The window will display a current list of processes or services on the remote device which can be
terminated if necessary.
Note: This is a very important tool when users need to troubleshoot a remote
computer without connecting to it remotely.
Image: Remote Task Manager.
TeamViewer Remote Management User Guide | 274.5 Alarms and Notifications
4.5.1 Alarms
Alarms are generated when there is a risk of breaching a set threshold defined in the monitoring
policy.
Alarms are displayed in the TeamViewer Management Console and TeamViewer application.
There are several alarm types:
1. Raised Alarm
a. When a check is at risk for breaking its configured threshold, an alarm will be
created and reported in the management console.
b. The alarm can be identified by a red triangle.
Image: Raised alarm.
2. Acknowledged Alarm
a. A raised alarm can be acknowledged by the user. Once this is done, the alarm will
become ‘Acknowledged.’
b. Acknowledging the alarm does not mean that the problem is resolved. It only means
that the supporter acknowledged that there is a problem, and will fix it later because
issue is not critical enough to be fixed immediately.
Image: Acknowledged alarm.
3. Recovered/Cleared Alarm
TeamViewer Remote Management User Guide | 28a. When a raised alarm returns to the defined threshold, the alarm will recover
automatically.
b. The majority of monitoring checks will attempt every minute to analyze if the
thresholds are breached or recovered. If the checks have a configured time delay,
they will check based on the time delay (e.g. online state check with a 10-minute
delay configured).
Image: Recovered alarm.
4.5.2 Notifications
E-mail Notifications can be set up in the Monitoring policy. E-mail addresses accepted by the system
are the ones which are recognized by the TeamViewer account or company profile:
1. For TeamViewer accounts, the e-mail address needs to be in the contact list as a contact.
2. For TeamViewer company profiles, the e-mail address needs to be a contact or a user in the
company profile.
E-mail notifications are sent from: notification@teamviewer-rm.com
Note: if working with proxy or custom firewalls, a whitelist to the domain
*.teamviewer-rm.com can be added.
E-mail notifications regarding raised or recovered alarms will contain the following information:
1. Name of the Device where the alert was raised.
2. TeamViewer ID.
3. Date and time when the alarm was raised.
4. Name of the check and the predefined threshold.
5. Alarm description:
a. Check specific information will be written.
b. This will be different for each check.
6. Possible actions:
a. Acknowledge alarm link.
TeamViewer Remote Management User Guide | 29b. View Monitoring Report link.
c. Connect to device link.
4.6 Monitoring Device View
The device view is designed to display metrics relevant to each device that has Monitoring & Asset
Management installed.
In the device view for Monitoring, the user can see all relevant checks that are within their
thresholds and all checks that failed.
Every failed check can be acknowledged and rechecked individually if the user decides that the
raised alarm is not critical for the operation of that device.
Image: Device view for Monitoring for Windows
TeamViewer Remote Management User Guide | 30Image: Device view for Monitoring for macOS.
Image: Device view for Monitoring for Linux.
4.7 Monitoring Alarms View
The alarms view is focused on incident response. All raised alarms where the check threshold has
been breached can be filtered, organized, and exported.
TeamViewer Remote Management User Guide | 31Image: Alarms view for Monitoring.
4.7.1 Monitoring Filtering
Filtering alarms will enable the user to get a comprehensive view based on need:
1. Filter by Alarm Type
2. Filter by Device
3. Filter by Alarm Status
4. Filter by Date Range
View settings can be used to check or uncheck the view structure of the reports:
1. Columns
a. Alert Type
b. Alert Description
c. Device
d. Start
e. End
f. Duration
g. Acknowledged by
h. Group
2. Group By
a. Alert Type
b. Device
c. Group by none
3. Other
a. Charts
4.7.2 Monitoring Export
TeamViewer Remote Management User Guide | 32After filtering monitoring alarms data, the export function can be used to export the Monitoring
Alarms reports.
Image: Export feature in Monitoring.
Export to Print
This function will generate a web view that can be printed out or saved in any document format by
using print plugins.
Export to CSV
This function will generate and download a CSV file that can be stored, managed, or modified as
needed for auditability or other proposes.
4.8 Network Monitoring
To discover and monitor network devices within your local network use network monitoring by
TeamViewer Monitoring.
With network monitoring, your discovered network devices will be sorted into one of the following
categories:
• Computer – For all windows computers detected during the discovery process
• Router & Switch – For all routers and switches detected during discovery process
• Printer – For all network printers which were detected during discovery process
• UPS – For all universal power suppliers detected during discovery process
• NAS – For all network attached storages detected during discovery process
• Other Device – For all other devices which have an IP address and are available in your local
network but do not fit into any other category
Network monitoring was released as a Laboratory version, so right now this feature can be used for
free. In order to use network monitoring, you must have at least one license for TeamViewer
TeamViewer Remote Management User Guide | 33Monitoring, or you can test it during your trial period. When the TeamViewer Monitoring trial
expires, network monitoring will also be deactivated in your account.
For TeamViewer Monitoring license activation, please see 2.2 License Activation.
For system requirements, please see 2.3 System Requirements.
4.8.1 Network Monitoring Activation
In order to activate network monitoring, TeamViewer Monitoring must be activated on the node*
that will be discovering and monitoring your network devices. If you select a node that does not
have TeamViewer Monitoring activated, the system will automatically install it on the node.
*Node: Is the device from which network monitoring will trigger a discovery, and will monitor your
network devices. Each Node can discover its own local network.
Network monitoring can be activated in just a few clicks from the ‘Network’ tab in Remote
Management → Monitoring:
1. Click on “Choose device” in the “Network” tab.
2. Select the appropriate device from your device list. The device should be online. Currently
only Windows devices are supported.
3. Select the needed settings and click the ‘DISCOVER’ button.
a. Full Discovery
b. Custom discovery
i. Enter the IP range
ii. Enter the SNMP community string
Image: Network monitoring activation.
After changing and saving the discovery settings, the system will start a discovery with the new
settings in place. If you do not want to run a new discovery, press cancel.
4.8.2 Network Monitoring Settings
TeamViewer Remote Management User Guide | 34After the discovery is complete, you can always change the discovery settings from the settings
menu.
Image: Network monitoring settings page.
After changing and saving the discovery settings, the system will start a discovery with the new
settings in place. If you do not want to run a new discovery, press cancel.
4.8.3 Network Monitoring Checks
After the discovery of network devices is complete, you can set up checks for periodical monitoring
of your network devices. Currently, network monitoring supports the following checks:
For the Router & Switch category:
Port state: If selected, this will raise an alarm when a port from a router or switch is
blocked or broken. This only works for devices with SNMP support.
For the Network Attached Storage (NAS) category:
Disk Space: If selected, this will raise an alarm when the NAS disk space is lower than
the configured threshold. This only works for devices with SNMP support.
Disk Health: If selected, this will raise an alarm when the NAS disk health reports
hardware errors. This only works for devices with SNMP support.
For the Printer category:
Toner: If selected, this will raise an alarm when the toner from a network printer is
low. This only works for devices with SNMP support.
Paper: If selected, this will raise an alarm when the paper from a network printer is
low. This only works for devices with SNMP support.
For the Uninterruptible Power Supply (UPS) category:
TeamViewer Remote Management User Guide | 35Battery capacity: If selected, this will raise an alarm when the UPS battery capacity
falls below the configured threshold. This only works for devices with SNMP support.
Battery time remaining: If selected, this will raise an alarm when the UPS energy
storage "in minutes" falls below the configured threshold. This only works for
devices with SNMP support.
For the Computer category:
Monitor your computers with the TeamViewer Monitoring service.
Checks will run every 1 min. If any issue is detected, an alert will be displayed in the management
console.
In addition to the above checks, users can see the IP address and on- and offline status for each
discovered device.
Tip: network monitoring uses SNMP protocol for discovering and monitoring the network. In order to
effectively monitor your network devices, SNMP should not be restricted in your local network.
4.8.4 Network Monitoring Policy
Please be informed that after activating network monitoring, your device policy will be renamed. All
previous checks (TeamViewer Monitoring checks) will still be available, and the new policy will also
include network discovery and monitoring settings.
You can open the policy page for network discovery from here:
Image: Icon for opening network discovery policy
Next, choose which policy you want to edit, and select the needed checks for monitoring your
network devices.
TeamViewer Remote Management User Guide | 36Image: Policy page for network discovery
4.8.5 Network Monitoring Views
There are 3 types of views for network monitoring:
All Node View: In this view you can see all your networks in one place with details about device
quantity and alerts. Click on the Home button to get to this view.
Image: All node view in network monitoring.
List View: In this view you can see all your networks in one place with details about device quantity
and alerts. You can click on the Node header and go to list view for more details. You can also extend
rows to see more details about each device.
TeamViewer Remote Management User Guide | 37Image: List view of network monitoring.
Map view: Map view is under construction now. It will allow you to see the interconnections
between discovered network devices.
4.9 Asset Management
After the installation of the Monitoring & Asset Management service, a snapshot of installed
software and hardware will be collected and organized in the device view and asset view.
TeamViewer Remote Management User Guide | 384.9.1 Device View
Image: Device view in Asset Management.
Image: Assets view within Asset Management for Windows.
TeamViewer Remote Management User Guide | 39The device view will sort and display the information in the following categories:
Device Information: Computer Name, Domain, Internal IP, External IP
TeamViewer: TeamViewer ID, TeamViewer version
Software: List of recently installed software (Windows, macOS)
Packages: List of all installed packaged in alphabetical order (Linux)
System Update: List of recently installed updates
Hardware: CPU name and model, physical memory (RAM), motherboard model and serial number (if
available), video controller name and model, disk drives’ name, model, capacity and serial number (if
available).
TeamViewer Remote Management User Guide | 404.9.2 Asset View
From the Asset view, reports can be generated based on the categories below and exported as a
web view (print) or as a CSV file.
Image: Export Assets within Asset Management.
Image: Assets view within Asset Management for Linux and macOS.
TeamViewer Remote Management User Guide | 41Report Description
Software Overview of applications installed on the
devices, including the software version and
date.
Updates Overview of the installed Windows Updates
including the date.
Hardware Overview of installed hardware components,
including Type, Name, and Manufacturer. This
overview contains all reports listed below.
Processor Overview of processors installed on the
devices, including Name, Details, and
Manufacturer.
Motherboard Overview of motherboards installed on the
devices, including Name, Details, and
Manufacturer.
Physical Memory (RAM) Overview of internal memory installed on the
devices, including Name, Details and
Manufacturer.
Disk Drive Overview of hard drives installed on the
devices, including Name, Details, and
Manufacturer.
Optical Drive Overview of input devices connected to the
computers, (including Name, Details, and
Manufacturer.
Video Controller Overview of graphics cards installed on the
devices, including Name, Details, and
Manufacturer.
Network Overview of network cards installed on the
devices, including Name, Details, and
Manufacturer.
Keyboard Overview of keyboards connected to the
devices, including Name, Details, and
Manufacturer.
Pointing Device Overview of input devices connected to the
computers, including Name, Details, and
Manufacturer.
TeamViewer Remote Management User Guide | 425. Endpoint Protection
To protect your devices against malware, ransomware, and more, use the TeamViewer Endpoint
Protection service.
For license activation, please see 2.2 License Activation.
For system requirements, please see 2.3 System Requirements.
For configuring policies and assigning them to devices, please see: 3.2 Policies.
The configured devices are scanned and protected by the assigned policies defined under 3.2
Policies. Whenever malware is detected on the device, an alert is triggered and displayed as an alert
message within the TeamViewer Management Console and the TeamViewer full version. An alert e-
mail notification also indicates that malware was detected on one of the devices.
5.1 Endpoint Protection Activation
For activation of endpoints please see: 3.1 Activation
5.2 Endpoint Protection Policies
The default Endpoint Protection policy includes the following scans and settings:
1. Quick scan, daily 09:00 AM
2. Full scan, daily at 12:00 PM
3. Real-time protection
4. Scan removable drives on connection
5. Tray icon
TeamViewer Remote Management User Guide | 43Image: Policy overview within Endpoint Protection.
5.2.1 Endpoint Protection Settings
Real-time Protection
Choose whether-or-not real-time protection should be activated for the policy. If activated, all files
that are accessed (opened, running, etc.) are scanned for malware. If deactivated, threats are only
detected if a scan is performed.
Note: If real-time protection is disabled, the device is potentially at risk between scans.
Outlook Add-In:
The Endpoint Protection Outlook Add-In is a Visual Studio Tool for Office Add-Ins for Microsoft
Outlook. This will enable TeamViewer Endpoint Protection to delete infected attachments found in
the Outlook archive files (.pst,.ost) while they are in use by Outlook.
Without this, TeamViewer Endpoint Protection is unable to delete these types of threats without
first closing Outlook. The use of this feature requires the activation of the outlook add-in in the
TeamViewer Management Console.
TeamViewer Remote Management User Guide | 44Scan Removable Drives upon Connection:
Enabling this feature automatically starts a scan on any removable drives when they are attached to
the device.
Define any number of scans. Depending on the scan type and schedule, all devices are scanned for
malware on a regular basis.
Click the ‘Add scan’ button and define a scan.
Choose between the following options:
1. Quick scan: TeamViewer Endpoint Protection will only scan certain data, running processes,
and the registry. This way, the scan is completed quickly and the most important data is
protected.
2. Full scan: TeamViewer Endpoint Protection will fully scan all hard drives of your devices. This
scan will take longer than a quick scan. The device's data is completely protected.
3. Custom scan: TeamViewer Endpoint Protection will scan a defined hard drive, folder, or file.
To do so, enter the path as follows: C:\Folder\Filename.fileextension
Note: Please note that the speed of your system may be affected for the duration of a
scan.
Tray Icon:
This will allow the user to see the current state of Endpoint Protection, and the notifications about
detected threats. The user will also be able to trigger quick and full scans.
5.2.2 Exclusions
Here, the user can specify specific drives, folders, files, or file types that should be excluded from the
scan (e.g. D:\ to exclude drive D, C:\\Directory\ to exclude a folder, *.xyz to exclude a file type).
5.2.3 Notifications
The user can set up notifications via the Computer & Contact list. Endpoint protection offers the
possibility to be notified for all detected threats that require immediate attention. The user can also
decide if the notifications should be shown in the TeamViewer console, and can also specify the e-
mail address where the notifications should be sent.
If a threat is detected, Endpoint Protection will send an e-mail notification to the defined e-mail
addresses. The user can enter the e-mail addresses that should receive notifications about detected
threats.
TeamViewer Remote Management User Guide | 45You can also read