NAVY RECRUITING COMMAND

       FACEBOOK
   SOCIAL MEDIA GUIDE

          2020
←
→
Page content transcription
If your browser does not render page correctly, please read the page content below

NAVY RECRUITING COMMAND
FACEBOOK
SOCIAL MEDIA GUIDE
2020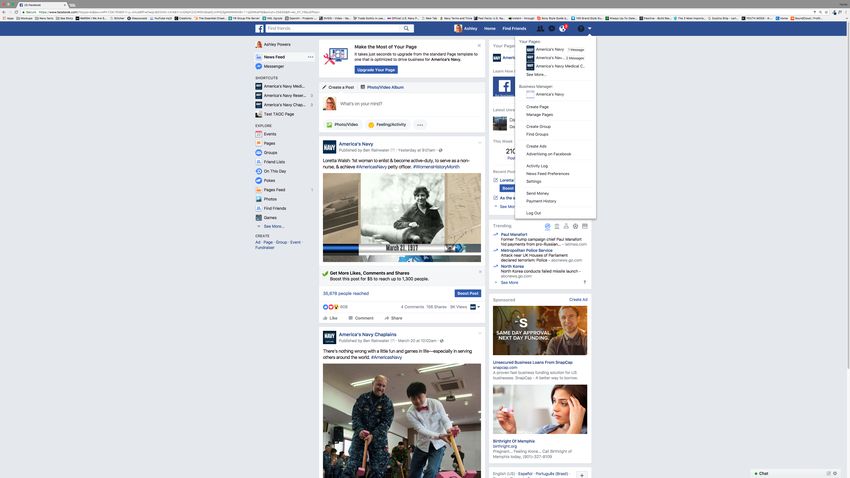
GETTING STARTED

NRC’s nationally managed social media properties (Facebook, Instagram, and
Twitter) are meant to generate awareness, support the brand, and drive visitors to
navy.com. At the NRD/NTAG level, social media is meant to generate leads and
engage prospects with eTalent team members. Everything done on social media
should be aimed at making connections between prospects and recruiters.

This guide provides guidance for Facebook Page maintenance from an
administrative point of view. It covers the steps involved with maintaining a
Facebook Page, including how to set up additional admin accounts, how to
publish posts, and how to comment and respond to messages. The guide will also
provide some best practices, as well as do’s and don’ts for Facebook.

All Master Facebook Pages and any subsequent local Pages will be established by
the NRC management team. For newly established NTAGS, the management team
will work with the field leadership in identifying the appropriate Facebook Page
administrators         and        any          other       necessary       roles.

Designated admins will have the ability to manage all aspects of the Page. Apart
from the eTalent Director and other admins at NRC and The Navy Partnership
(TNP), we recommend sourcers be made admins of their local Pages.

Admins can:

 •   Send messages and publish as the Page
 •   Respond to and delete comments on the Page
 •   Create ads
 •   See which admin created a post or comment
 •   View insights
 •   Respond to and delete Instagram comments from the Page
 •   Edit Instagram account details from the Page
 •   Assign Page roles

                                                                                     3
GETTING STARTED

MANDATORY

In order to be a Facebook Page Administrator, you must first have a
personal Facebook account. Because Facebook is constantly
searching for “fake” accounts, this account should be a genuine
profile, not a persona or separate business-related profile. Using your
one personal profile is required by Facebook usage guidelines and
protects the Navy and all associated parties.

When an admin engages with a Facebook Page, no personal profile
information is shared to the Facebook Page, and all outward
communication takes place on behalf of the Page and not the
individual/personal account.

This document serves as a way to help you set up an account and walk
through each step for the first time, and is also a “How To” guide for
future reference. Refer to the Table of Contents to find the correct
section for help on any issue.

                                                                          4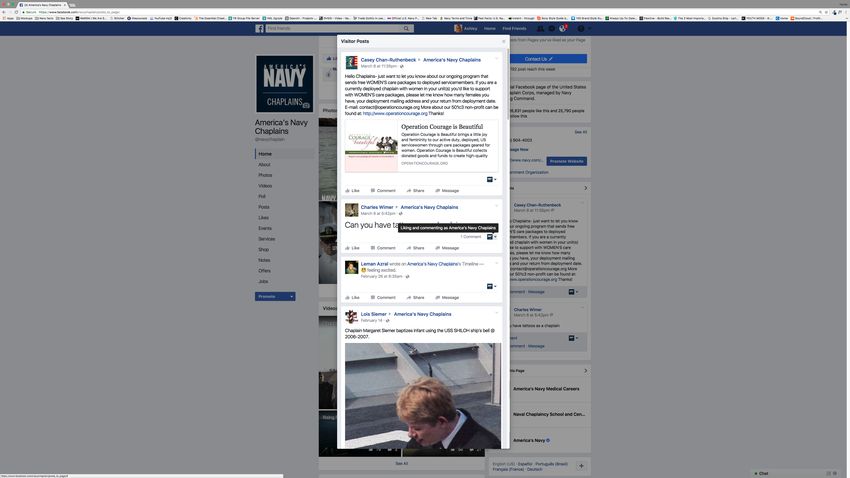
CONTENTS
  I   FACEBOOK OVERVIEW 6                     IV    MESSAGING 51
      1. Responsibilities                           1. Sending A Message from A Page
                                                       Comment
      2. The Cost of Social Cold Calls
                                                    2. Replying Publicly From A Page
      3. Response Decision Tree                        Comment
      4. Engagement Criteria                        3. How to Read & Respond to
      5. Content Criteria                              Facebook and Instagram Direct
                                                       Messages
                                                    4. Marking Messages as Unread
 II   NAVIGATING FACEBOOK 15                        5. Marking Messages as Spam
      1. Finding Managed Pages
      2. Logging Into The Page                 V    MANAGING
      3. The Anatomy of A Page                      SCHEDULED POSTS 69
      4. Using Your Personal Page
                                                    1. Locating Scheduled Posts
                                                    2. Viewing Scheduled Posts
III   POSTS AND POSTING 20
                                                    3. Editing Scheduled Posts
      1.    Post As The Page                        4. Bulk Actions
      2.    Publish New Text-Only Posts             5. Cancelling Scheduled Posts
      3.    Publish New Text & Image Posts          6. Deleting Scheduled Posts
      4.    Publish New Text & Video Posts          7. Creating New Scheduled Posts
      5.    Publishing Media With No Text
      6.    Edit A Post                       VI    SETTING UP ADDITIONAL
      7.    See Which Admin Has Published           ADMINS 80
            A Post or Comment
      8.    Share Content
                                                    1. “Liking” A Page
      9.    Schedule Posts
                                                    2. Adding A New Admin
      10.   Commenting on Posts
      11.   Hiding & Deleting Posts
                                             VII    BOOSTING AND BEST
      12. Hiding & Deleting Comments                PRACTICES 85
                                                    1. Benefits of Boosting
                                                    2. Best Practices of Boosting
                                                    3. Boosting Checklist
                                                    4. Best Practices Checklist

                                             VIII   WHO TO CONTACT 93
                                                                                       5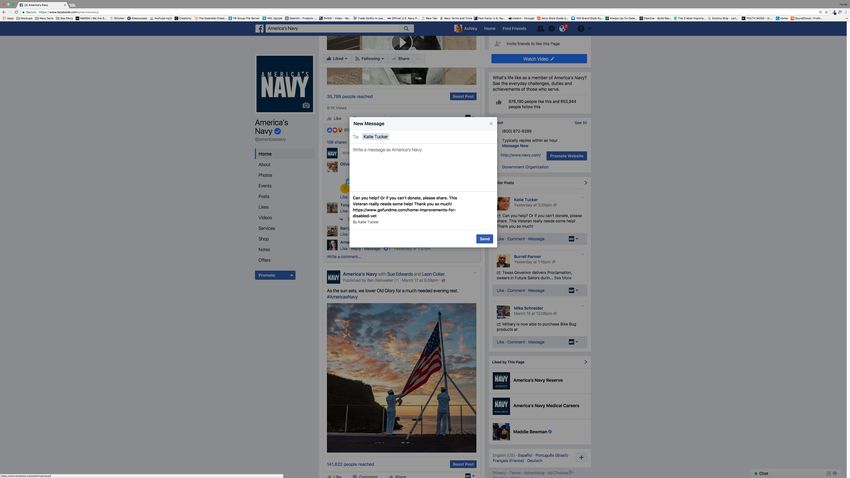
I.

     FACEBOOK OVERVIEW

                         6
I. OVERVIEW

 1.

  RESPONSIBILITIES
The eTalent Director, or whomever the NRD/TAOC designates is responsible for
managing the regional Facebook Pages. This will include creating and sharing
Facebook posts on the wall, responding to posts, and responding to Private
Messages.

FACEBOOK POSTING / CONTENT SHARE-OUT
• Receive and post images and text from the field
• Create and post Facebook content for fans
• Share / Repurpose National Navy content

RESPONDING TO WALL POSTS & COMMENTS
• Address relevant comments on Facebook posts from the Page within 24 hours
• Hide spam or confidential information that has been posted publicly
• Direct questions to a Private message, email or phone number if inflammatory or needs
  to be escalated

 RESPONDING TO PRIVATE MESSAGES
 • Address within 24 hours

 • Don’t ask for confidential information

 • Direct individuals to local recruiter when applicable

                                                                                          7
I. OVERVIEW

2.

THE COST OF SOCIAL
COLD CALLS
 Social Media can be a very useful prospecting tool, but if used improperly, it can
 be worse than having no presence at all. Once someone has decided to like or
 follow your Page, the connection can be made and individual recruiters can
 reach out to the prospects via Direct Message (DM). Reaching out to people who
 have not already made that connection requires finesse.

                                                                                      8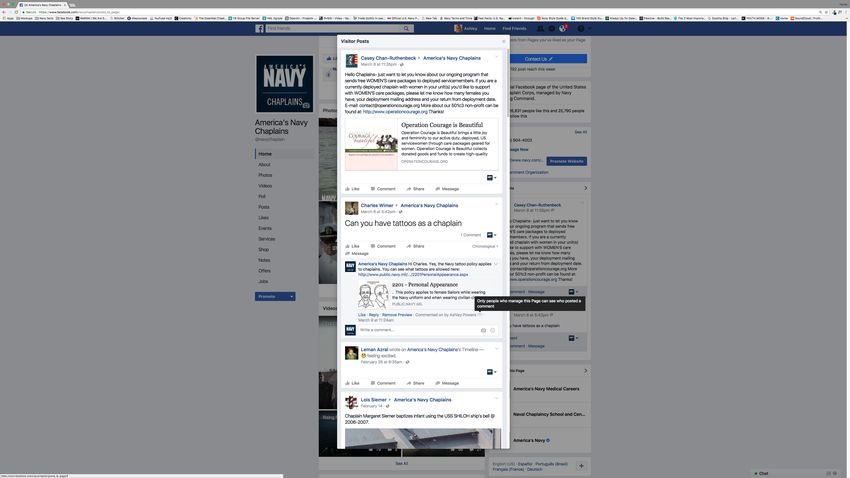
I. OVERVIEW

2.

THE COST OF SOCIAL
COLD CALLS
 Once someone has liked your Page or given some other
 indication that they are interested in the Navy, you may
 reach out.

                                                            9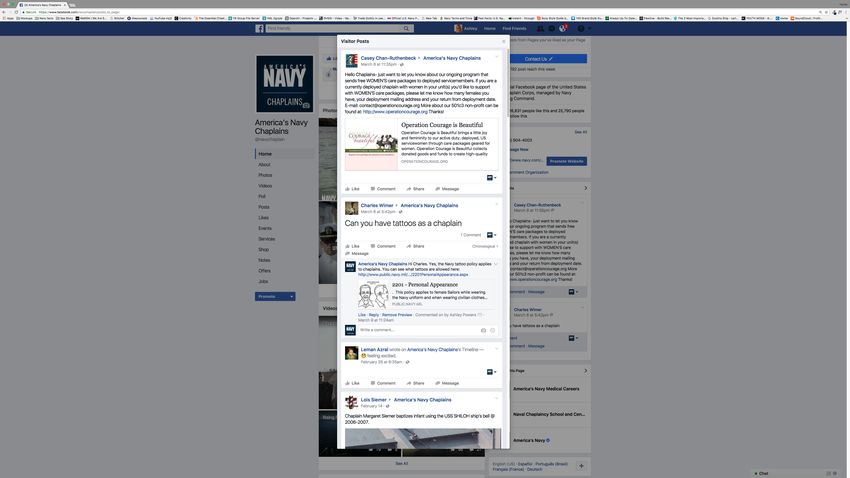
I. OVERVIEW

3.

RESPONSE DECISION
TREE
 Person Posts on      Does it Meet       NO    Hide or Remove
 Wall or Comment      Community
      on Post         Guidelines?                from Page

                     YES

                     Is it a general
                                         YES
                        question                 eTalent Director
                      unrelated to                 Responds
                       recruiting?

                      NO

                    Is it a recruiting         Send to DM, alert
                                       YES
                       question or             specific recruiter
                      directed at a               via email
                   specific recruiter?

                      NO

                    Ask the individual                       Address all questions
                   to send a DM to the                       in a timely manner; do
                      Page or call to                         not ask the recruit to
                    speak to someone                           share confidential
                                                                    information

                                                                                       10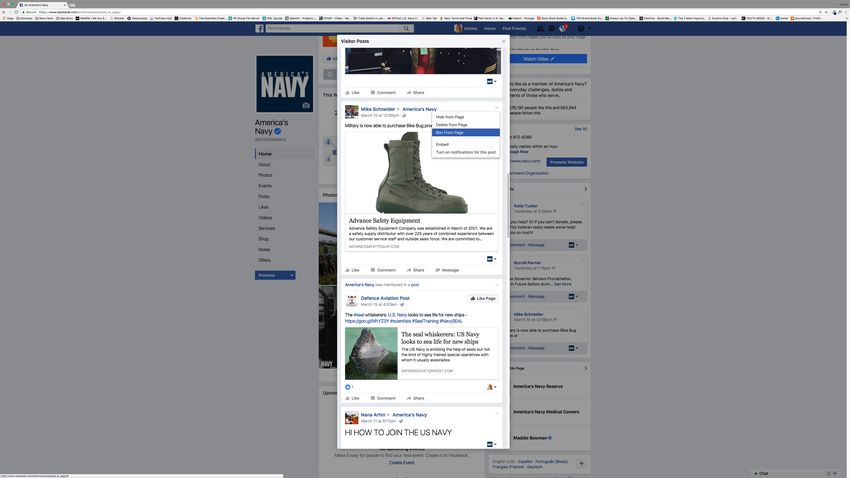
I. OVERVIEW

 4.

 ENGAGEMENT CRITERIA
  Use this to determine how to operate various aspects of your business Facebook
    page. Knowing when to engage with specific users is vital to creating a page
    where your content can flourish. Recognizing the difference between hiding
    and deleting inappropriate comments on your page’s posts, can help control the
    message and keep users engaged on the information you are trying to share.

GENERAL
  ü Review your business Facebook pages at least 3x a day. This should be part of the
    eTalent Director/Page admin’s daily responsibility.
  ü Engagements should take place between 8am and 10pm unless urgent.
  ü Always respond to posts as the voice of the Navy, not as yourself.
  ü Engage or acknowledge people speaking positively.

DO NOT ENGAGE WITH
  ü Minors or anyone under age 13.

  ü Content that is highly political in nature or generally negative.

  ü Users that appear to be spam, robots, or people trying to sell something.

  ü Content that involves illegal activities.

  ü Posts or comments that trash another individual, celebrity, or brand.

HIDE OR DELETE
  ü Photos that are inappropriate, altered, or that may be shared without permission of
    the person in the picture. NOTE: This may be a judgement call. Remove the post if the
    context of the post or photo indicates it could have been shared without permission.

  ü Any information that shouldn’t be shared publicly, including phone numbers, SSN#,
    email address, or medical conditions.

                                                                                            11
I. OVERVIEW
4.
USING
YOUR
PERSONAL
PAGE
If users are engaging and interacting with your business account,
you can try to reach out to them via your personal page. It’s
important that you use your best judgement when determining
who to reach out to and be transparent about the reason you are
contacting them.
12I. OVERVIEW
4.
PERSONAL PAGE
ENGAGEMENT CRITERIA
While we would recommend using your business Facebook page for all Navy
correspondence, use this to determine how to set up your personal Facebook
page. Be very aware of who you are friending and how your audience may
perceive your posts. Remember to keep a balance between Navy centered
content and content highlighting everyday life.
GENERAL
ü Understand your environment and audience when selecting a profile picture and
header image, include appropriate photos from past deployments.
ü Use a government email when setting up your account and when creating your name,
simply put your first and last name without your Navy title.
ü Ensure your page has a personal touch and keep it lighthearted.
WHO TO FRIEND ON FACEBOOK
ü Be careful about who you friend as those people will be the primary sources engaging
in your content.
ü Anyone you interact with in-person above age 13, all Navy applicants or future sailors.
ü Encourage anyone you connect with to request to be your friend on Facebook in
hopes that they engage and share your content.
ü All Navy recruiters.
ü If you use rtools or Salesforce, friend those on your lists slowly over time and not all
at once.
13I. OVERVIEW
5.
CONTENT CRITERIA
Use this to determine how you will obtain, curate and post content on your page.
Keep in mind that sharing posts can diversify your content. Encouraging
followers, like Future Sailors, to share your posts can widen your post’s reach to
individuals potentially interested in the Navy.
DO
ü Confirm that the image, text, and/or link is relevant to your Facebook fans.
ü Secure permission to use the image from the individual who took it.
ü Confirm content being posted is unbiased and does not include personal opinion.
ü Use content that appropriately reflects America’s Navy.
ü Re-share of posted content from fans.
ü Provide future sailors with social media best practices and encourage them to share
your content through their social channels.
ü Encourage future sailors to document their Navy journey include pre-boot camp
workouts, ASVAB studying, etc.
DON’T
ü Use an image, text, or link that has been taken or copied from any other brand, person,
artist, etc.
ü Use images, photos, or logos that are altered or misrepresented.
ü Use photographs that feature minors, unless you have their parents’ or guardian’s
written permission.
14II.
NAVIGATING FACEBOOK
15II. NAVIGATING FACEBOOK
1.
FINDING YOUR
MANAGED PAGES
You can easily find all the Pages you manage and have
administrative rights to by clicking the down arrow on the top
right of your homepage under “Your Pages.”
You can also navigate to individual pages by looking under
“SHORTCUTS” on the left side toolbar.
16II. NAVIGATING FACEBOOK
2.
LOGGING
INTO THE
PAGE
To manage any aspect of the Page, including posting, messaging, or adding
new admins, you will first need to navigate to the Page. You can navigate
there by either finding the Page in your “SHORTCUTS” or through the
dropdown menu in the top right. (Refer to previous section.)
When you’ve landed on the Page, you will see this layout, including the
“Page,” “Inbox,” “Events,” “Creator Studio,” “Manage Jobs,” “Notifications,”
“More,” “Settings,” and “Help” tabs across the top.
17II. NAVIGATING FACEBOOK
Page Navigation
Profile Picture
3.
THE
ANATOMY
OF A PAGE Post Creator
On a Facebook Page, there are several key areas you will become
familiar with. These are the main areas you’ll use to create posts,
manage content, and respond to visitors.
There are several parts to a Facebook Page, but this guide focuses
on how to navigate four specific areas.
18II. NAVIGATING FACEBOOK
Your Page’s
Published Posts
3.
THE
ANATOMY
OF A PAGE
Main Page Navigation: This is where you will create posts for
This area lets you navigate to five your Page.
areas of your Page. Visitor Posts:
• The front end of your Page (pictured) This area lets you see and interact
• Inbox (messages to and from users) with any post a visitor leaves on your
Page. Click “Posts“ to view these
• Notifications (likes, shares, visitor posts.
comments)
Posts:
• Insights (how your page is This area of the home Page lets you
performing) see every post that you or other
• Creator Studio (contains all content, Admins have published to the Page.
insights, inbox etc.) This part of the feed does not include
Visitor Posts or comments.
Post Creator:
19III.
POSTS AND POSTING
As a standard rule, your Facebook posts will show up in
the feed of only a portion of those people who follow or
like your Page. A Facebook algorithm determines
which members of this group will see your post, but
this number will generally be around 2% of your total
followers. Part VII of this guide will explain how you
can increase this % with paid support (or “Boosting”).
20III. POSTS AND POSTING
1.
POST AS
THE PAGE
Logging in and posting from your account is a simple process. There are a
few steps to take and screenshots of this process are included in Part II,
Sections 1-2 for further reference.
1. Log in to Facebook by using your personal Facebook username and
password.
2. Select the Facebook NRD Page that you are admin of, and you will be
able to post to the account as that account.
21III. POSTS AND POSTING
1.
POST AS
THE PAGE
If you see your page’s profile picture in the “Write a post…” box,
you can begin posting immediately.
22III. POSTS AND POSTING
2.
PUBLISH
NEW
TEXT-
ONLY
POSTS
One of the most important features of Facebook is posting new content.
There are five ways to post content:
• Text only
• Text with images
• Text with videos
• Video without text
• Poll with text
To publish a text-only post, click in the content box that says “Write
something.” A content box will “pop out.” Write your message, and select
“Publish.” This will publish immediately.
23III. POSTS AND POSTING
3.
PUBLISH
NEW TEXT
& IMAGE
POSTS
Posts with images tend to garner higher engagement rates than text-only
posts. Whenever possible, include compelling images with your posts.
TIP: You can download and use images found on navy.mil, the Official U.S.
Navy flickr account, or dvids.
Step 1: To include images with your text, click in the same content box. To
add images, select the ”Photo/Video” icon in the lower left.
24III. POSTS AND POSTING
3.
PUBLISH
NEW TEXT
& IMAGE
POSTS
Step 2: Choose “Upload Photos/Video.”
25III. POSTS AND POSTING
3.
PUBLISH
NEW TEXT
& IMAGE
POSTS
Step 3: A finder will open. Find the image on your computer you
wish to share, select “Open,” and it will populate in the draft of
your post.
NOTE: This is what this step looks like on a Mac. For a PC, there
will be slight differences in navigation, though the individual
steps are the same.
26III. POSTS AND POSTING
3.
Write your
post here
PUBLISH
NEW TEXT
& IMAGE This is the image
you selected You can add more
images by clicking here
POSTS
When you are ready,
hit “Share Now”
Step 4: Write your post copy, and hit “Share Now” for your post to
go live immediately.
TIP: The most engaging copy is both natural and short (think 40-
80 characters). Feel free to ask questions in your copy,
encouraging readers to respond.
27III. POSTS AND POSTING
4.
PUBLISH
NEW TEXT
& VIDEO
POSTS
Posts that include video content can also have higher engagement rates.
Step 1: To publish a post including video, click in the content box. Do not write
your copy here; you will write that on the next screen. Writing copy in this box
will not transfer over to the next screen, and you may end up publishing video
without any post copy accompanying it.
Step 2: Select “Upload Photos/Video.”
TIP: Ideal video length can vary based on form and subject. For example, live
video performs better in longer format (at least 5 minutes long). However, non-
live videos are typically shorter, and we recommend keeping yours under two
minutes.
28III. POSTS AND POSTING
4.
PUBLISH NEW TEXT &
VIDEO POSTS
Step 3: On your computer, locate the video file you wish you
upload (Facebook recommends using an .mp4 or .mov format).
Select “Open” and it will begin uploading.
29III. POSTS AND POSTING
Title your video. It can be something
simple, but clear.
Type your comment here for videos,
not in the post box on the main Page
4.
PUBLISH
NEW TEXT
& VIDEO
POSTS
Step 4: Add your post copy. You can also create a title for the
video. Tags are not displayed to the public, but will help you
search for videos within your own library. On the right side
column, you can upload or select a thumbnail image, insert
subtitles & captions, add a poll if your video is longer than 10
seconds and if you are uploading a 360 video, you can use 360
Director Tools to work on the different aspects of the video. Click
“Next” to move to the scheduling portion of the video post.
30III. POSTS AND POSTING
4.
PUBLISH
NEW TEXT
& VIDEO
POSTS
When you’ve decided how to schedule
your post, click here.
Step 5: After you click “Next,” you can select “Publish now,” “Premiere,”
“Schedule,” “Backdate,” or simply ”Save as Draft.” You can also choose where
your post will appear and if you’d like to add it to a specific playlist(s).
Additionally, you can make the post available to other pages you manage or to
other pages you have a crossposting relationship with. Creating a crossposting
relationship with another Recruiter’s page could allow you both to collaborate
and widen the reach of the Navy content. Videos shared from NRC and
America’s Navy’s Facebook page would be ideal to crosspost across different
Recruiter’s Facebook pages. Premiering a video on Facebook gives you the
opportunity to prepare a more refined video, and alert your audience about the
premiere in advance so they can be sure to tune in and engage in real-time.
31III. POSTS AND POSTING
5.
PUBLISHING
MEDIA WITH
NO TEXT
You are able to post video-only posts, though this is not
highly recommended as posts with both media and copy
perform better.
32III. POSTS AND POSTING
6.
EDIT A
POST
If you need to change, add, or remove copy to a post you’ve already
published, you can edit it directly rather than deleting and
reposting. This way, the post can retain its comments and insights.
NOTE: Users will be able to see that the post has been edited, and
will also be able to see the exact changes that have been made to
the post. Anyone may “View edit history” from the drop down
menu attached to the post.
Step 1: Select the down arrow in the top right corner of the post,
and choose “Edit Post.”
33III. POSTS AND POSTING
6.
EDIT A
PHOTO
POST
Step 2: Make any necessary changes, and select “Done Editing.”
34III. POSTS AND POSTING
6.
EDIT A
VIDEO
POST
Step 2: Make any necessary changes, and select “Save.”
35III. POSTS AND POSTING
7.
SEE WHICH
ADMIN HAS
PUBLISHED
A POST OR
COMMENT
When a post has gone live, all admins for that Page will be able to
see who published the post.
You can see who has published a post, and when he or she posted
it, by looking to the right of the profile icon on each post. It will
say “Published by [Admin’s Name].”
No visitors will be able to see which individual admin posted it,
only that the post comes from the Page.
36III. POSTS AND POSTING
8.
SHARE
CONTENT
The Navy Partnership’s social media team moderates and regularly adds content
to five NRC-maintained Pages:
• America’s Navy (https://www.facebook.com/americasnavy/)
• America’s Navy Chaplains (https://www.facebook.com/navychaplain/)
• America’s Navy Reserve (https://www.facebook.com/navyreserve/)
• America’s Navy Medical Careers
(https://www.facebook.com/NavyHealthcare/)
• Commander, Navy Recruiting Command
(https://www.facebook.com/NavyRecruiting/)
You should feel free to share content from any of these Pages whenever possible.
It is simple to share content from one of the America’s Navy Pages to the one you
moderate.
37III. POSTS AND POSTING
8.
SHARE
CONTENT
Step 1: On the Page you choose to share from, select “Share.”
38III. POSTS AND POSTING
8.
SHARE
CONTENT
Step 2: Under the drop-down menu, you may see multiple options,
including “Share” or “Share in a Group.” You will select “Share to a
Page.”
39III. POSTS AND POSTING
This should be the
automatic option
8.
SHARE Post to Page
CONTENT
Step 3: A content box will pop-up prompting you to write your own
content and make a few decisions about where to publish.
The top box will automatically say “Share on a Page You Manage.”
Should it not, hit the drop-down menu to select the correct option.
There are two other drop-down boxes. The one on the left indicates
which Page the post will publish to. This should say the name of
your Page. The “Posting as” drop-down on the right should also say
the name of your Page.
This indicates that you will publish to your Page as your Page.
40III. POSTS AND POSTING
8.
SHARE
CONTENT
Step 4: When your content is written and all boxes are
correct, hit “Post” to make the post go live immediately.
NOTE: You cannot schedule shared posts for a later time or
date.
41III. POSTS AND POSTING
9.
SCHEDULE
POSTS
From the drop down, you
can choose to schedule a
post for a later time.
Sometimes you will want a post you create to go live at a different
time or date. For example, you may want a post to go up at time
when you’re not in the office, or you may want others in the office to
have the chance to preview or approve posts. You may also want to
schedule out a week’s posts in advance so that you don’t have to
remember to do it manually every day at a specific time. You can
schedule your posts to go up at any time you’d like.
Step 1: Once you’ve written your post and added any media you’d like
to share (see sections 3-5 for more on this), click the “Share Now”
button and select “Schedule” from the drop-down menu that
appears.
42III. POSTS AND POSTING
9.
SCHEDULE time.
POSTS
Step 2: On the dialog box that pops up, choose the time and date you
wish your post to go live, and hit “Schedule.”
For more on how to manage scheduled posts, see Section IV.
43III. POSTS AND POSTING
10.
COMMENTING ON
POSTS
Visitors will publicly comment on your posts or post their own content to the
Page. You will want to respond directly to posts on your Page’s wall. It is
important to review and respond to all pertinent comments or posts within 24
hours so that your followers will know that you are actively engaged with your
Page.
There are several ways you can see new comments:
• They will show up as notifications.
• You can see them on the right hand side of your Page under “Visitor Posts.”
• You can click “Visitor Posts” to see a full list of all the comments.
Many comments can be answered publicly, especially if they are questions of a
general nature.
Social media is interactive, and the most effective social media platforms are
those that engage their participants professionally, quickly, and with personal
and well crafted responses. Nothing will reduce the interest on a Page faster
than ignoring comments or questions.
44III. POSTS AND POSTING
10.
COMMENTING
ON POSTS
Step 1: Just as with posts, you will want to ensure that the thumbnail
of a profile image on the left side of the screen matches the profile
image for the Page. This ensures you comment as the Page and not
from your personal account.
When you hover over the icon, a pop-out will indicate who is liking
and commenting on the post. You should see the Page’s profile
image and not your own profile photo.
45III. POSTS AND POSTING
10.
COMMENTING
ON POSTS
Step 2: Type your reply into the content box and hit Enter/Return on
your keyboard to publish immediately.
If you include links in your comment, a box will populate with a
preview of the webpage you’re linking to. You can choose to remove
the preview by selecting “Remove Preview.”
46III. POSTS AND POSTING
10.
COMMENTING
ON POSTS
Only other admins will be
able to see who commented
As with any post, Admins will be able to see who added the
comment, but visitors will not see this information.
47III. POSTS AND POSTING
11.
HIDING &
DELETING
POSTS
Users have the opportunity to leave their own posts on your wall. These will
show up in “Visitor Posts,” which live on a sidebar of your page (see Part II,
Section 3). They may post directly to the wall, or may simply ”tag” you in
content they post to their own walls.
Another critical reason Pages must be systematically monitored is that anyone
can post inappropriate or derogatory comments. If someone posts an
inappropriate or unrelated comment or post to the Page wall, you are able to
either “Hide” or “Delete” them.
Select the down arrow in the upper right corner and choose either “Hide from
Page” or “Delete from Page.”
NOTE: Choosing this will allow only the person who posted it and their friends
or followers to see the post. No other visitors will be able to see this post.
48III. POSTS AND POSTING
11.
HIDING &
DELETING
POSTS
If someone continually publishes spam or inappropriate posts to your page, you
can choose to ban that user from the page by choosing “Ban From Page.”
Sometimes people will publish posts to their own walls, and will tag others in
those posts. For inappropriate posts that you are only tagged in, you cannot
delete them entirely from your Page. You can choose to Hide, Ban, or Report
them, however, by choosing from the drop down arrow in the top right corner.
49III. POSTS AND POSTING
12.
HIDING &
DELETING
COMMENTS
If someone leaves an inappropriate comment on one of your posts, you have the
ability to hide it rather than delete it entirely. It may be better to hide the
comment because even though the user and their friends will still believe it is
public, the audience at large won’t be subjected to it. This will prevent the user
from commenting that their initial comment had been deleted.
Hide the comment by selecting the arrow on the right of the comment and
selecting “Hide Comment.”
NOTE: As with hiding posts, the user and his or her friends/followers will still
be able to see the comment, but no other visitors to your Page will see it.
50IV.
MESSAGING FROM
ADMIN ACCOUNT
51IV. MESSAGING FROM ADMIN ACCOUNT
1.
SENDING A
MESSAGE
FROM A
PAGE
COMMENT
Not all comments should be replied to publicly. If a visitor asks
questions that require you get more personal or provide specific
information, you may want to address them privately. You can do
that by sending a direct message (DM).
Step 1: Select “Message” under their post.
52IV. MESSAGING FROM ADMIN ACCOUNT
1.
SENDING A
MESSAGE
FROM A
PAGE
COMMENT
Step 2: The box should say “Write a message as [Page Name].”
Otherwise, you may be messaging them as yourself. When you have
completed your message, click “Send.” This message will go to their
Inbox and will not be seen by any other visitors to the page.
53IV. MESSAGING FROM ADMIN ACCOUNT
2.
REPLYING
PUBLICLY
FROM A
PAGE
COMMENT
Some comments should be replied to publicly. If a visitor asks a
common question and you believe your answer could benefit other
users viewing the page, you may want to address them on the page
rather than messing them privately. You can do that by clicking
“Comment.”
Step 1: Select “Comment” under their post.
54IV. MESSAGING FROM ADMIN ACCOUNT
2.
REPLYING
PUBLICLY
FROM A
PAGE
COMMENT
Step 2: The box should say “Write a comment...” and you can see
which account you’re commenting from by looking at the icon at the
upper right hand corner of the grey box. Once you ensure you are
commenting from the correct account, type your message into the
box. When you have completed your message, press the “Enter” or
“Return” key. The message will be posted publicly and will be seen
by other visitors to the page.
55IV. MESSAGING FROM ADMIN ACCOUNT
3.
HOW TO Bold
Boldmeans
meansthe
the
message
message
READ & has
has
not
not
been
beenread
read
yet.
yet.
RESPOND
TO
FACEBOOK
DIRECT
MESSAGES
Step 1: Select “Inbox” at the top of the Page to navigate to your direct
messages. Only Page Admins have access to this view of the TAOC
Brand page.
Names and messages in bold are messages that have not yet been
read.
56IV. MESSAGING FROM ADMIN ACCOUNT
3.
HOW TO
READ &
RESPOND
TO
FACEBOOK
DIRECT
MESSAGES
Names and messages that are not bold have been read. This does not
mean that someone has responded to them, just that an account
admin clicked on the message and has read it.
57IV. MESSAGING FROM ADMIN ACCOUNT
3.
HOW TO READ & RESPOND TO
FACEBOOK DIRECT MESSAGES
Message will come from the
Page, but other admins will
be able to see who posted
the message.
Step 2: Select the name/message to read and respond to a certain message.
You will be able to see the entire conversation, as well as see who, if anyone,
has exchanged messages with the individual. The individual will not see
anyone’s name. As with posts and on-page comments, they will only see the
conversation as coming from the TAOC Facebook Page.
To encourage a connection between a prospect and an individual
sourcer/recruiter, the recruiter should feel free to sign messages with his or
her real name and to communicate in a personal, but professional, manner.
58IV. MESSAGING FROM ADMIN ACCOUNT
3.
HOW TO READ & RESPOND TO
FACEBOOK DIRECT MESSAGES
Step 3: To respond to a message, type your comment in the text
box at the bottom of the screen.
When your message is complete, do not hit “Enter” to send the
message. Click “Send.”
59IV. MESSAGING FROM ADMIN ACCOUNT
3.
HOW TO READ & RESPOND TO
INSTAGRAM DIRECT MESSAGES
As long as your Instagram account is linked to your Facebook account (see Instagram
Social Media Guide to learn how to link accounts), you can answer Instagram direct
messages on the Facebook platform. In general, it’s beneficial to create a bond
between Facebook and Instagram because you’ll be streamlining the process of
connecting with audiences through both platforms. Brand consistency is important
and posting content on each platform exposes users to it twice. Answering Instagram
direct messages via the Facebook desktop platform as opposed to the Instagram
mobile app can be advantageous as you can easily include links in your responses
and respond quicker to the user in need of information.
60IV. MESSAGING FROM ADMIN ACCOUNT
3.
HOW TO Bold means the message
has not been read yet.
READ &
RESPOND
TO
INSTAGRAM
DIRECT
MESSAGES
Step 1: With your Facebook and Instagram accounts linked, select
“Inbox” at the top of the Page. Select “Instagram Direct” to navigate
to your Instagram direct messages. Names and messages in bold are
Instagram messages that have not yet been read yet, similar to how
Facebook direct messages would appear.
61IV. MESSAGING FROM ADMIN ACCOUNT
3.
HOW TO READ & RESPOND TO
INSTAGRAM DIRECT MESSAGES
Message will come from the
Page, but other admins will
not be able to see who
posted the message.
Step 2: Select the name/message to read and respond to a certain message.
You will be able to see the entire conversation, but will not be able to see
who specifically has responded to the user. As with posts and on-page
comments, they will only see the conversation as coming from the TAOC
Instagram account.
To encourage a connection between a prospect and an individual
sourcer/recruiter, the recruiter should feel free to sign messages with his or
her real name and to communicate in a personal, but professional, manner.
62IV. MESSAGING FROM ADMIN ACCOUNT
3.
HOW TO READ & RESPOND TO
INSTAGRAM DIRECT MESSAGES
Step 3: To respond to a message, type your comment in the text
box at the bottom of the screen.
When your message is complete, do not hit “Enter” to send the
message. Click “Send.”
63IV. MESSAGING FROM ADMIN ACCOUNT
3.
LIKING AND
SENDING
AN IMAGE
If you want to “Like” a message from a user on Instagram, hover over
the specific message, and click the heart that appears to the right of
the message. If you click the heart outline to the right of the “Write a
message…” box, you can send a heart, although we do not
recommend doing so. You can also send a user an image from your
computer by clicking the box icon next to the heart outline icon.
64IV. MESSAGING FROM ADMIN ACCOUNT
3.
DELETING,
BLOCKING
OR
REPORTING
If you want to “Delete” a conversation, click the trashcan icon
underneath “More” and “Settings.” If you want to “Block” or “Report”
a user, click the “…” box to the right of the user’s name in the upper
right hand corner of the page.
65IV. MESSAGING FROM ADMIN ACCOUNT
4.
MARKING
MESSAGES
AS UNREAD
If you want to easily return to a specific message at another time, or
to signal to another admin to respond to the message, you can mark
the message as “Unread” or as “Follow-Up.” “Unread” will make the
name and message bold again while “Follow-Up” will create an
orange star next to the message.
Select the envelope icon underneath “More” and “Settings” to mark
the message “Unread” and the star to the right of the envelope icon
to mark the message as “Follow-Up.”
66IV. MESSAGING FROM ADMIN ACCOUNT
5.
MARKING
MESSAGES
AS SPAM
If an individual is sending you unrelated or unwanted direct
messages, you can move the conversation to a Spam folder.
Select the “Exclamation Point” icon to the left of the envelope icon,
and choose “Mark as Spam.” You will not see any more posts from
this user unless you go to the Spam folder.
67IV. MESSAGING FROM ADMIN ACCOUNT
5.
MARKING MESSAGES AS
SPAM
NOTE: If you accidentally mark something as Spam, or want to
check your Spam folder, navigate there from the drop-down
menu under “Main.”
68V.
MANAGING SCHEDULED
POSTS
The ability to schedule posts makes it easy to “Set it &
forget it.” However, you may want to see your list of
scheduled posts or make edits or changes. Facebook
makes this simple.
69V. MANAGING SCHEDULED POSTS
1.
LOCATING SCHEDULED
POSTS
All scheduled posts are held
here. Click here to view or edit
posts.
On the Page’s home screen, you will find a box that lets you know
how many posts are scheduled. Select “See Posts” to see full
details about the posts. Only admins can see this box.
70V. MANAGING SCHEDULED POSTS
1.
LOCATING SCHEDULED
POSTS
All your scheduled posts will
be listed here.
After clicking “See Posts,” the grey screen gives you several
options to choose from. In this instance, select “Scheduled Posts.”
You will then navigate to Creator Studio.
71V. MANAGING SCHEDULED POSTS
1.
LOCATING SCHEDULED
POSTS
Creator Studio is a new feature from Facebook that brings together all the
tools needed to post, manage, boost and study analytics across your
business Facebook page and Instagram account. Anyone who manages a
business page can use Creator Studio. You can learn more about the specific
Creator Studio features by clicking on the link here:
https://www.facebook.com/help/publisher/2160250460681592?id=306750746
527717
72V. MANAGING SCHEDULED POSTS
1.
LOCATING SCHEDULED
POSTS
All your scheduled posts will
be listed here.
Once you navigate to Creator Studio, you can see how many posts
are scheduled, and the dates and times they are set to go live.
73V. MANAGING SCHEDULED POSTS
2.
VIEWING SCHEDULED
POSTS
Click here for additional
options.
If you schedule all your page’s posts, this page can be especially useful to
keep all your scheduled posts organized. To make changes to a specific
post, check the box to the left of the post and a variety of options will
appear. The options you’ll primarily use on this page include “Reschedule,”
“Preview Post,” “Edit Post,” or “Delete.” If you click “Preview Post,” you can
preview how it will appear on your desktop and mobile device, and even
edit the post while previewing it.
74V. MANAGING SCHEDULED POSTS
3.
EDITING SCHEDULED POSTS
After clicking “Preview Post,” the drop-down list from the “Options” button
will allow you to choose between the same actions listed above your
scheduled posts. Editing the post in this view can show you exactly how the
post will appear on desktop and mobile devices which is recommended
prior to publishing the post.
75V. MANAGING SCHEDULED POSTS
4.
BULK ACTIONS
Select the action you want
to take.
Select the posts you wish to
publish immediately, cancel,
or delete one by one.
The only options available if you select two or more scheduled posts are
“Publish,” “Cancel Schedule” and “Delete.” Check the boxes next to each post
if you want to make the same action for each of the selected posts.
Publishing two posts at the same time is not recommended as both posts
will take away valuable engagement from one other. Bulk actions should be
used to primarily cancel scheduled posts or delete scheduled posts
altogether.
76V. MANAGING SCHEDULED POSTS
5.
CANCELING SCHEDULED
POSTS
Cancelling a scheduled post
only moves it to drafts, it
doesn’t delete it
permanently.
If you choose to “Cancel Schedule,” posts will be moved to drafts;
they will not be permanently deleted. You can choose to
reschedule or post them at a later date by going into your drafts.
77V. MANAGING SCHEDULED POSTS
6.
DELETING SCHEDULED
POSTS
Click “Delete” to confirm.
Choosing “Delete” will remove a post permanently, and you will
not be able to recover it.
78V. MANAGING SCHEDULED POSTS
7.
CREATING NEW
SCHEDULED POSTS
You can create post, upload
video, go live and post video
across pages from the
Scheduled Posts section,
and choose to schedule it
for later or publish now.
You can also create a new post from this screen by selecting “+”
in the bottom right. If you select ”Create Post,” a content box will
appear on the right side of the page, and you can add copy and
media as you would from the main page.
79VI.
SETTING UP
ADDITIONAL ADMINS
As a designated Admin, you will have the ability to
assign others as Page Admins. The following steps can
be used for adding additional Admins.
80VI. SETTING UP ADDITIONAL ADMINS
1.
LIKING A PAGE
I am logged in to my own
account.
From their personal
accounts, each recruiter will
click “Like”
Before you can set up a new admin for the Page, the individual
should first “Like” the Page.
To like a Page, the user will navigate to the Page and click the
“Like” button.
81VI. SETTING UP ADDITIONAL ADMINS
2.
ADDING A
NEW ADMIN
A person can be added as an admin once he or she has liked the
Page.
Step 1: When you land on the Page, select “Settings” in the upper
right.
82VI. SETTING UP ADDITIONAL ADMINS
2.
ADDING A
NEW ADMIN
Step 2: This page lists all the possible settings for the Page. To add or
remove Admins or other page roles, select “Page Roles.”
83VI. SETTING UP ADDITIONAL ADMINS
2.
ADDING A
NEW ADMIN Be sure to choose “Admin”
from the drop-down menu.
Step 3: To add a new admin, type in the person’s name or email address in the
text box under “Assign a New Page Role.” The email address must be the one
they use to log in to Facebook.
Choose “Admin” from the dropdown menu. This role will allow the user to add
and remove other roles as needed. You may also choose to assign them as
another role, depending on the access you wish for them to have.
Editors can do everything an Admin can do except manage Page roles.
Moderators can send messages and respond to and delete comments from the
page.
84VII.
BOOSTING
NRC will be boosting posts, or putting paid promotion
behind posts, on your behalf. This section will go over
the benefits of boosting and set some expectations
regarding frequency, the type of content you should
promote, and how to set your targeting.
85VII. BOOSTING
1.
BENEFITS OF
BOOSTING
Boosted posts appear higher in the News Feed, so there is a higher
chance that your target audience will see your content. Because only
an estimated 2% of your followers will see any organic post you
publish, it’s important to utilize the paid aspect to better reach your
intended audience.
Boosting can help in other areas:
• Increasing brand awareness. Posts can be boosted to users who
don’t yet follow you, helping you increase your visibility and gain
new followers.
• Increasing engagement, such as shares, likes, and comments.
• Promoting events.
86VII. BOOSTING
2.
BEST PRACTICES
OF BOOSTING
The budget for a paid post can go quickly if goals are not
established ahead of time. Before you submit a post to be
boosted, make sure that you have identified your goals.
• Target Audience: You can boost to your current followers,
or target those who don’t yet follow you. You can also
target to specific demographics:
• Location
• Interests
• Followers of other Pages (i.e. certain high schools, other
military branches)
• Timing: Boost when you know your audience is online.
You can find this information in the Insights section on
your Page under the “Posts” tab.
• Content Type: Choose content that is high quality and
engaging. Copy should be short and informative. Always
boost posts that include videos or images.
87VII. BOOSTING
2.
BEST PRACTICES
OF BOOSTING
When you see the results from boosting, it can be tempting
to boost every piece of content. However, you will quickly
run through your budget that way. Here are some ideas on
what content to promote and when.
• Events.
• Posts that are already doing well organically.
• The Page itself, in order to increase awareness of your
online presence.
• The “Contact Us” button, to encourage Direct Messages.
• Posts that resonate with people who like your page and
their friends.
88VII. BOOSTING
2.
EXAMPLE OF A POST
THAT SHOULD BE
BOOSTED
This is an example of a high quality post that should be boosted. Videos
typically perform better than still images, especially a video with a large
amount of reach and engagement shown by your organic audience. By boosting
your engaging post, you are more likely to reach your intended audience and get
them to make additional actions on your page.
89VII. BOOSTING
2.
EXAMPLE OF A POST
THAT SHOULDN’T BE
BOOSTED
This is an example of a post that you should not boost. This image may not
reach your audience because there's too much text in the ad image. Facebook
prefers ad images with little or no text.
90VII. BOOSTING
3.
BOOSTING CHECKLIST
If you are wondering if your post meets ad guidelines, you can find all Facebook
Advertising Policies here regarding prohibited content:
https://www.facebook.com/policies/ads/prohibited_content.
Before submitting a request for a paid boost, refer to this checklist to ensure
content can be supported.
q Obtain written consent from all non-military people featured in any images.
q An image should not feature minors without parent or guardian’s written
consent.
q Image should not contain more than 20% text. Not sure if your ad complies?
Use this tool to check if your ad makes the cut:
www.facebook.com/ads/tools/text_overlay.
q Ads cannot include vulgar language or deceptive claims.
q Refrain from asking direct questions in your ads such as “Are you” or “Do you”
questions.
q Any URL included with your ad must clearly represent the company, product,
service, or brand being advertised.
q Identify your specific target audiences – Facebook has removed the ability to
target by Age (18+ only), Gender and Zip Code.
q Contact Timothy Andrassy to have your Facebook post boosted.
91VII. BOOSTING
4.
CONTENT BEST
PRACTICES CHECKLIST
Before submitting a request for a paid boost, refer to this checklist to ensure content
can be supported:
q To find optimal asset sizes for all varieties of Facebook ads, you can click on the
link here: https://sproutsocial.com/insights/facebook-ad-sizes/.
q Post copy length for Facebook should be between 40-80 characters.
q Use emojis if they are timely, relevant, straight to the point and to create an
engaging experience with users.
q Users are more comfortable communicating via text and real-time chat functions
online so encouraging people to reach out using those methods as opposed to
calling recruiters via phone, will yield quicker and greater connection results.
q There are a few recommended places to pull content from for the creation of new
posts:
q Recruiter Tool Box
q Dvidshub.net
q Official U.S. Navy Flickr
q Navy.mil photo gallery
92VIII.
WHO TO CONTACT
93VIII. WHO TO CONTACT
CONTACTS
If you come up against any issues on Facebook, or feel you should escalate a
conversation or comment, please reach out to
Timothy Andrassy
Program Advertising Manager Social Media | Direct Mail
Navy Recruiting Command
timothy.andrassy1@navy.mil
(901) 874-7356
DC1 (EXW) Veronica V Scott
SWARM Led/Social-Media Marketing (N9)
Navy Recruiting Command
veronica.v.scott@navy.mil
(901) 350-8559
94You can also read