Graphical User Interfaces
←
→
Page content transcription
If your browser does not render page correctly, please read the page content below

Chapter 5

                   Graphical User Interfaces

What is in This Chapter ?
This chapter discusses developing JAVA applications that bring up windows that the user can
interact with. It discusses Graphical User Interfaces and how we can develop our own to
represent main windows for our JAVA applications. You will learn to use the JavaFX
package.
COMP1406 - Chapter 5 - Graphical User Interfaces                                              Winter 2018

 5.1 User Interfaces and Java FX Applications
All applications require some kind of user interface which allows the user to interact with the
underlying program/software. Most user interfaces have the ability to take-in information from
the user and also to provide visual or audible information back to the user.

In the real world, an interface often has physical interactive components. For example, there
are two obvious ways to interact with (or interface with) our bank account. We may go up to a
teller at the bank and perform some transactions, or we may use an ATM.

In the virtual world, we may interact with our bank account electronically by using a web
browser, or phone app or dedicated stand-alone software from the bank.

In this case, the interaction is through software menus, buttons, text fields, lists, etc..

In this course, we will consider software-based user interfaces such as those shown above.
We will concentrate on stand-alone applications that do not require the use of a browser.

Up until this point, our programs/applications did not really have any interactive user
interface. That is, we defined classes, wrote programs and then simply ran them inside of the
IDE that we were using. The results of our program were displayed as text output in the JAVA
console window.

                                               - 135 -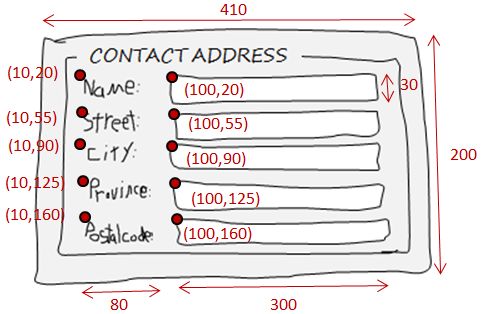
COMP1406 - Chapter 5 - Graphical User Interfaces                                       Winter 2018

When writing programs that bring up a main interactive window (or those that run on a
phone/tablet or in a browser), it is important to understand that more is "going on behind the
scenes". That is, when we use an ATM machine, there is actually quite a bit "going on" in that
our actions at the machine affect the current state of the bank and of our bank account. For
example, the bank account changes, transaction logs are updated and security/error-checking
is taking place. The ATM machine was simply making use of these underlying entities (i.e.,
the Bank and the BankAccount) in order to complete the transaction. It is necessary at this
point to bring up some definitions:

       The model of an application consists of all classes that represent the "business logic"
       part of the application ... the underlying system on which a user interface is attached.

The model is always developed separately from the user interface. In fact, it should not
assume any knowledge about the user interface at all (e.g., model classes should not assume
that System.out.println() is available).

       The user interface is the part of the application that is attached to the model
       which handles interaction with the user and does NOT deal with the business logic.

The user interface always makes use of the model classes and often causes the model to
change according to user interaction. The changes to the model are often reflected back
(visually) on the user interface as a form of immediate feedback.

       A graphical user interface (GUI) is a user interface that makes use of one
       or more windows to interact with the user.

A GUI is often preferred over text-based user interfaces because it is more natural ... more like
real-world applications that we are used to using. Imagine, for example, if the internet was
only text-based with no buttons, text fields, drop-down lists, images, etc..

                                               - 136 -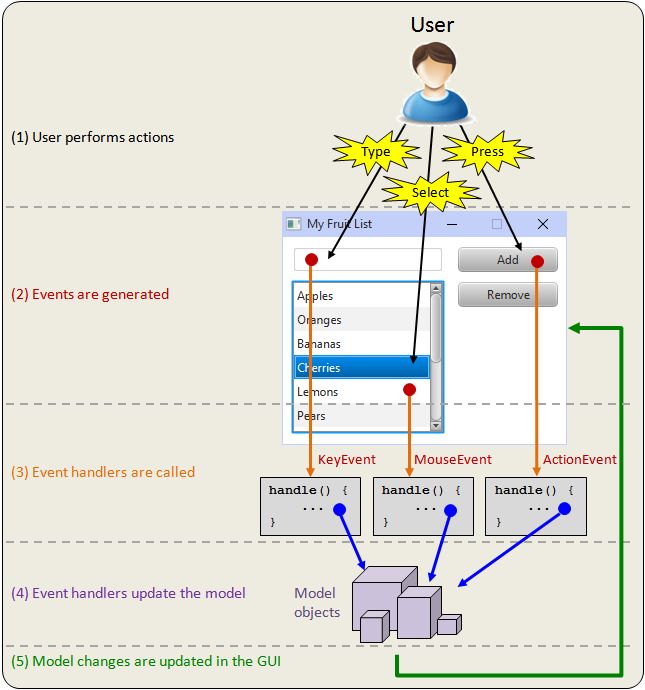
COMP1406 - Chapter 5 - Graphical User Interfaces                                        Winter 2018

So, it is important to understand that there should always be a separation in your code
between the model classes and the user interface classes. Such a separation allows you to
share the same model classes with different interfaces.

In this course, we will develop applications that have graphical user interfaces, hence, we will
use this definition (which I made up):

       An application (or app) is a computer program with a graphical user interface
       which can interact with user to perform tasks & calculations, obtain & visualize
       information, and potentially interact with the real world through sensors and hardware.

We will be using JavaFX to create our applications. It is a
software platform that allows us to create desktop applications
as well as rich internet applications that can run across a variety
of devices and web browsers. It supports desktop computers
and web browsers on Microsoft Windows, Linux, and Mac OS X.

When using JavaFX, all of our main windows for our applications will be instances of the
Application class (i.e., we will extend that class)
which is in the javafx package. To launch (i.e.,
start) the application, we call a launch() method
from our main method. Upon startup, the
application will call a start() method ... which you
must write. Typically, that method will create and
display a window of some sort. Here is a template
of the bare minimum that you need to start a
JavaFX application, although this code does not do anything.

import javafx.application.Application;
import javafx.stage.Stage;

public class MyApplication extends Application {
    // Called automatically to start the application (you must write this)
    public void start(Stage primaryStage) { ... }

     public static void main(String[] args) {
         launch(args);   // Get everything going (call this exactly once)
     }
}

You may also write init() and stop() methods. The init() method is automatically called by the
application to initialize things before the application starts. You may write code there to
perform calculations, read file data, configure things, etc.. When the application terminates
(usually as a result of the user closing the window), the application will automatically call a
stop() method, which you may write. This could be used to close files, release resources,
notify other applications, etc... If ever you want to quit the application at any time within your
code, you should use Platform.exit(), which will also call the stop() method before the
application quits. Here is an expanded (optional) template:

                                               - 137 -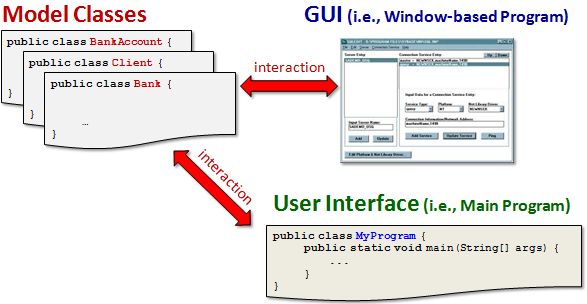
COMP1406 - Chapter 5 - Graphical User Interfaces                                Winter 2018

import javafx.application.Application;
import javafx.stage.Stage;

public class MyApplication extends Application {
    // Initialize things before the app starts (optional)
    public void init() { ... }

     public void start(Stage primaryStage) { ... }

     // Clean up things just before the app stops (optional)
     public void stop() { ... }

     public static void main(String[] args) {
         launch(args);
     }
}

You may have noticed that the start() method has a single
parameter called primaryStage which is a Stage object. A Stage
object is a special kind of Window object. You can think of your
JavaFX application as a theatrical performance, where everything
happens on the stage. The primaryStage is set up automatically
and is the root (i.e., bottom level or foundation) upon which
everything happens.

In order to make something visible, we must
create a Scene object. This is where we
define what the application will look like ...
similar to the notion of deciding what
background set, props, and actors to use and
where they will be placed on the stage at a
theatre.

       A window component is an
       object with a visual representation that
       is placed on a window and usually
       allows the user to interact with it.

In JavaFX, typical window components (e.g.,
buttons, textFields, lists) are Control objects
... and they represent the various components
of the window. Components are often
grouped together, much like adding elements
to an array.

       A container is an object that contains components and/or other containers.

                                               - 138 -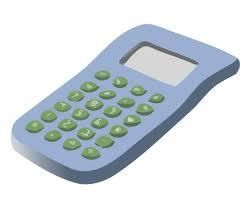
COMP1406 - Chapter 5 - Graphical User Interfaces                                     Winter 2018

The most easily understood container in JavaFX is the Pane class. It is the base class for its
various subclasses that are used to automatically manage the layout of the window
components. Its variety of subclasses allow the components to be resized and repositioned
automatically, while maintaining a particular arrangement/layout on the window.

At this point, let's see how to create a simple window.

Example:
The following code creates a simple JavaFX window. You can use this program as a template
for all of your window-based applications:

import   javafx.application.Application;
import   javafx.scene.Scene;
import   javafx.scene.layout.Pane;
import   javafx.stage.Stage;

public class MyApplication extends Application {
    public void start(Stage primaryStage) {
        Scene scene = new Scene(new Pane(), 300, 100); // Set window size

          primaryStage.setTitle("My Window");                        // Set window title
          primaryStage.setScene(scene);
          primaryStage.show();                                       // Show window
     }
     public static void main(String[] args) {
         launch(args);                                               // Initialize/start
     }
}

So here are the steps involved with creating your
own JavaFX application that uses a main window:

    1. Create a new class (separate from model
       classes) to represent your application. In
       this case we created a MyApplication.java
       file to represent our window-based
       application.

    2. Have this class extend Application. Make sure to import the packages shown at the
       top of the program.

    3. The start() method is automatically called from the launch() method to initialize and
       show the window. Normally, we set the size of the window (i.e., 300 x 100) as well as
       the title of the window (i.e., "My Window") within this start() method.

                                               - 139 -
COMP1406 - Chapter 5 - Graphical User Interfaces                                Winter 2018

5.2 Components and Containers
The scene is arranged as a tree-like graph
containing Node objects, which is called the
scene graph. The scene graph begins with a
root node. The nodes of the graph are
basically the components of the window as
well as the layout regions and the components
within them. If node c is contained within
another node p, then c is called a child of p
and p is the parent of c.

All window components actually keep pointers
to their parent. Parents of nested
components are stored recursively:

   Control            aComponent;
   Parent             p;
   Parent             parentOfParent;

   aComponent = ... ;
   p = aComponent.getParent();
   parentOfParent = p.getParent();

Parents keep pointers to their children and
we can access these using the parent's
getChildren() method:

   Parent     aParent = ... ;

   ObservableList   children
   = aParent.getChildren();

   Node      c1 = children.get(0);
   Node      c2 = children.get(1);
   Node      c3 = children.get(2);

The class hierarchy shown earlier shows the Control and Pane classes. Each of these
classes has many subclasses representing various window components and layout managers.
The next page shows these hierarchies with some of the commonly used classes. There are
even more subclasses ... those dealing with menus will be shown later.

You will get to know more about these components as we use them in our examples. For
now, it is a good idea to understand the common properties and functionality that all
components have.

                                               - 140 -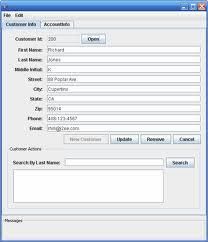
COMP1406 - Chapter 5 - Graphical User Interfaces                                    Winter 2018

Consider a simple button. We can create a button with some text on it as follows:

       new Button("Press Me");

Of course, we can store it in a variable:

       Button    b = new Button("Press Me");

You can change the text at any time by calling the setText() method, but depending on the
size of the button, the text could be cut off:

       b.setText("Don't Press Me");

You can even adjust the alignment of the text by using the setAlignment() method as follows:

                                               - 141 -
COMP1406 - Chapter 5 - Graphical User Interfaces                                             Winter 2018

b.setAlignment(Pos.CENTER);

b.setAlignment(Pos.CENTER_LEFT);

b.setAlignment(Pos.CENTER_RIGHT);

This will require us to import the Pos class at the top of our code:    import javafx.geometry.Pos;

You may even add an image to a component when created, as follows:

Image anImage = new Image(getClass().getResourceAsStream("brain.gif"));
Button b = new Button("Brain", new ImageView(anImage));

This will require us to import these classes at the top of our code:
       import javafx.scene.image.Image;
       import javafx.scene.image.ImageView;

For this to work though, the image must be available to be loaded, otherwise an error will
occur:
       Exception in Application start method
       Exception in thread "main" java.lang.RuntimeException: Exception in Application start method
              at com.sun.javafx.application.LauncherImpl.launchApplication1(LauncherImpl.java:403)
              at com.sun.javafx.application.LauncherImpl.access$000(LauncherImpl.java:47)
              at com.sun.javafx.application.LauncherImpl$1.run(LauncherImpl.java:115)
              at java.lang.Thread.run(Thread.java:745)
       Caused by: java.lang.NullPointerException: Input stream must not be null
              at javafx.scene.image.Image.validateInputStream(Image.java:1001)
              at javafx.scene.image.Image.(Image.java:624)
              at FruitListApp.start(FruitListApp.java:25)
              at com.sun.javafx.application.LauncherImpl$5.run(LauncherImpl.java:319)
              etc...

So you will want to have the image file in the src folder that contains your code so that it can
be found upon startup. If you don't want the text ... just the image, then you can use the
setGraphic() method as follows:

Image anImage = new Image(getClass().getResourceAsStream("brain.gif"));
Button b = new Button();
b.setGraphic(new ImageView(anImage));

Each component also has a variety of style settings that we can set. We will
just look at three here: (1) text color, (2) background color and (3) font. We
can use the setStyle() method to set any of these styles as follows:

b.setStyle("-fx-font: 22 arial; -fx-base: rgb(170,0,0); -fx-text-fill:
rgb(255,255,255);");

Notice that the method takes a string parameter. In that string
we specify a sequence of style tags followed by their values.
The -fx-font: tag allows us to specify a font size followed by a
font type. In this case, we are selecting the 22pt Arial font.
The -fx-base: and -fx-text-fill: tags allow us to specify the
background color and text color, respectively.

                                                - 142 -
COMP1406 - Chapter 5 - Graphical User Interfaces Winter 2018
In the case of -fx-base:, the button's nice beveled border
remains intact. We could instead use -fx-background-color:
and then the border will also be colored over with the
background color as shown here.
In each case, we specify the color as the amount of red, green
and blue (from 0 to 255) that we want. There are also some
predefined colors that we can use as well to simplify, but these
predefined color names may not be what we prefer:
b.setStyle("-fx-font: 22 arial; -fx-base: RED; -fx-text-fill: WHITE;");
At the time these notes were written, here is a reference to many of the styles:
https://docs.oracle.com/javase/8/javafx/api/javafx/scene/doc-files/cssref.html#introstylesheets
It contains some style tag explanations, a list of predefined named colors and many other
interesting details about styles. There are many interesting style settings.
We can also disable components so that they cannot be controlled by the user:
b.setDisable(false);
b.setDisable(true);
By default, all components are enabled when created. At any time, we can also hide a
component completely as follows:
b.setVisible(false);
This will simply make the component invisible ... unable to be seen nor controlled by the user.
All window components have an (x, y) location as well as width and height dimensions. The
location is the (x,y) coordinate of the top/left of the component. It is a coordinate within the
coordinate system defined by the top left corner of the parent node (similar to the position of a
piece of paper on a bulletin board) :
- 143 -COMP1406 - Chapter 5 - Graphical User Interfaces Winter 2018
Once we create the button, we can define how big we want it to be (i.e., it's preferred size) and
where we want it to be located on the window by using these methods:
b.relocate(40, 60); // x and y position with respect to its parent
b.setPrefSize(100, 25); // width and height
There are more attributes that we can set for components and we will investigate some more
of them throughout the course.
Example:
Consider writing a program that creates the window
shown in this rough diagram →
The top/left component is a TextField. The bottom/left
component is a ListView and the right two components
are Button objects to add and remove items to the list.
It is always a good idea to draw out a rough version of
your user interface, identifying the top/left corner or all
components as well as their dimensions and the width
or all margins around the window border and between
the components.
To write the code, we need to create each of the
window components. Here is the code to produce this window:
import javafx.application.Application;
import javafx.collections.FXCollections;
import javafx.scene.Scene;
import javafx.scene.control.Button;
import javafx.scene.control.ListView;
import javafx.scene.control.TextField;
import javafx.scene.layout.Pane;
import javafx.stage.Stage;
public class FruitListApp extends Application {
public void start(Stage primaryStage) {
Pane aPane = new Pane();
// Create and position the "new item" TextField
TextField newItemField = new TextField();
newItemField.relocate(10, 10);
newItemField.setPrefSize(150, 25);
// Create and position the "Add" Button
Button addButton = new Button("Add");
addButton.relocate(175, 10);
addButton.setPrefSize(100, 25);
// Create and position the "Remove" Button
Button removeButton = new Button("Remove");
removeButton.relocate(175, 45);
removeButton.setPrefSize(100, 25);
- 144 -COMP1406 - Chapter 5 - Graphical User Interfaces Winter 2018
// Create and position the "fruit" ListView with some fruits in it
ListView fruitList = new ListView();
String[] fruits = {"Apples", "Oranges", "Bananas", "Cherries",
"Lemons", "Pears", "Strawberries", "Peaches",
"Pomegranates", "Nectarines", "Apricots"};
fruitList.setItems(FXCollections.observableArrayList(fruits));
fruitList.relocate(10, 45);
fruitList.setPrefSize(150, 150);
// Add all the components to the window
aPane.getChildren().addAll(newItemField, addButton,
removeButton, fruitList);
primaryStage.setTitle("My Fruit List"); // Set title of window
primaryStage.setScene(new Scene(aPane, 285,205)); // Set size of window
primaryStage.show();
}
public static void main(String[] args) {
launch(args);
}
}
Here is the window that is produced:
We can also make the window non-resizable so that
it stays at this size, since the components are not
stretched anyway. To do this, we simply do this
before we show the window:
primaryStage.setResizable(false);
You will notice, however, that the window is
slightly bigger (i.e., 12 x 8 pixels bigger). This
messes up the symmetrical look of our window, so
we would need to adjust the size by decreasing
the width by 12 and height by 8:
primaryStage.setScene(new Scene(aPane,
273,197));
Below is the final result:
- 145 -COMP1406 - Chapter 5 - Graphical User Interfaces Winter 2018
5.3 Grouping Components Together
It is a very good idea to keep your window components organized. It is often the case that an
arrangement of components
may be similar (or duplicated)
within different windows.
For example, an application
may require a name, address
and phone number to be
entered at different times in
different windows →
It is a good idea to share
component layouts among the
similar windows within an
application so that the amount
of code you write is reduced.
To do this, we often lay out components onto a Pane and then place the Pane on our
window. We can place the pane on many different windows with one line of code ... this can
greatly reduce the amount of GUI code that you have to write.
You will often want to create
separate Pane objects to
contain groups of
components so that you can
move them around (as a
group) to different parts of a
window or even be shared
between different windows.
The code to do this simply
involves creating our Pane
with its appropriate
component arrangement and
then adding the Pane to the
window.
Pane objects are added to a
window just like any other
objects. So, we can have a
Pane within another Pane.
The following example shows how this can be done. The code will show you how to make a
Pane with a nice titled border.
- 146 -COMP1406 - Chapter 5 - Graphical User Interfaces Winter 2018
Example:
Consider this example in which a Pane is used
in more than one window. We will create a
simple pane called AddressPane that contains
5 labels and 5 text fields for allowing the user to
enter a name and address as shown here →
The pane contains 5 TextField objects that
allow the user to fill-in an address. It also has 5
Label objects (which are simply pieces of text)
to indicate the kind of data expected for each
text field. Lastly, there is a nice border around
the Pane which has the title CONTACT ADDRESS. This pane will not be its own window.
Instead, it will be a pane inside of two other windows that look as shown below. Notice that
each application has the same kind of AddressPane, except that the border's title varies.
Here are the dimensions →
To begin the code, we will want to define an
AddressPane class. It will be a special kind of
Pane, and so it should be a subclass of Pane.
Here is the code to create this Pane:
import javafx.geometry.Pos;
import javafx.scene.control.Label;
import javafx.scene.control.TextField;
import javafx.scene.layout.Pane;
- 147 -COMP1406 - Chapter 5 - Graphical User Interfaces Winter 2018
public class AddressPane extends Pane {
public AddressPane(String title) {
Pane innerPane = new Pane();
innerPane.setStyle("-fx-background-color: white; " +
"-fx-border-color: gray; " +
"-fx-padding: 4 4;"); // margin spacing at bottom right
// Create the labels and textfields
Label label1 = new Label("Name:");
label1.relocate(10, 20);
label1.setPrefSize(80, 30);
Label label2 = new Label("Street:");
label2.relocate(10, 55);
label2.setPrefSize(80, 30);
Label label3 = new Label("City:");
label3.relocate(10, 90);
label3.setPrefSize(80, 30);
Label label4 = new Label("Province:");
label4.relocate(10, 125);
label4.setPrefSize(80, 30);
Label label5 = new Label("Postal Code:");
label5.relocate(10, 160);
label5.setPrefSize(80, 30);
TextField nameField = new TextField();
nameField.relocate(100, 20);
nameField.setPrefSize(300, 30);
TextField streetField = new TextField();
streetField.relocate(100, 55);
streetField.setPrefSize(300, 30);
TextField cityField = new TextField();
cityField.relocate(100, 90);
cityField.setPrefSize(300, 30);
TextField provinceField = new TextField();
provinceField.relocate(100, 125);
provinceField.setPrefSize(300, 30);
TextField postalField = new TextField();
postalField.relocate(100, 160);
postalField.setPrefSize(300, 30);
// Add all labels and textfields to the pane
innerPane.getChildren().addAll(label1, label2, label3, label4, label5,
nameField, streetField, cityField, provinceField, postalField);
// Make a title for border and add it as well as inner pane to main pane
Label titleLabel = new Label(); // Title to be placed onto border
titleLabel.setText(title); // Incoming constructor parameter
titleLabel.setStyle("-fx-background-color: white; \n" +
"-fx-translate-y: -8; \n" +
"-fx-translate-x: 10;");
getChildren().addAll(innerPane, titleLabel);
}
}
- 148 -COMP1406 - Chapter 5 - Graphical User Interfaces Winter 2018
The code starts by creating an innerPane that will hold the 5 labels and 5 text fields. It will
have a white background and gray border. Each of the 5 labels and text fields are created,
and given a location and size. They are all added to the Pane in one method call after their
creation. At the bottom of the method, another Label is created to be the label on the Pane's
border. This border title will be whatever was passed in to the AddressPane constructor.
Finally, the innerPane and titleLabel are added to the AddressPane. The order of adding is
important because we want the titleLabel to be drawn on top of the innerPane.
You may have noticed that we did not set the size of the Pane. This Pane's size is
automatically set according to the width and
height of its components.
The AddressPane class itself is not a runable
application (i.e., there is no main method).
So we will now make our App1 application to
test it out. Here are the dimensions for the
application →
The AddressPane will now be "treated" as a
single component and will be placed on the
main window by specifying its location. We
do not need to specify the size of the
AddressPane, since this is fixed.
The topmost component here is called a
ComboBox and it represents what is known
as a drop-down list. It is similar to a ListView, except that only the selected item is shown
and the remaining items can be shown by pressing the black arrow.
A ComboBox can be created by specifying an array of objects that are to appear in the list
and passing this in as a parameter to the constructor as follows:
ObservableList options = FXCollections.observableArrayList(
"Home Address", "Work Address", "Alternate Address");
ComboBox addressBox = new ComboBox(options);
addressBox.setPromptText("Choose address type");
Notice as well that you can set the prompt text. This is the text that will be displayed in the
ComboBox when the window first opens. It is usually used to provide instructions to the user
of the program to make a selection. Alternatively, you could set the initial value to anything
you want as follows:
addressBox.setValue("Work Address");
In this case, the panel will show "Work Address" as its value upon startup.
Here is the code to create the application. Take note of how the AddressPane is now used as
if it were a single, simple component:
- 149 -COMP1406 - Chapter 5 - Graphical User Interfaces Winter 2018
import javafx.application.Application;
import javafx.collections.FXCollections;
import javafx.collections.ObservableList;
import javafx.scene.Scene;
import javafx.scene.control.ComboBox;
import javafx.scene.layout.Pane;
import javafx.stage.Stage;
public class OneApp extends Application {
public void start(Stage primaryStage) {
Pane aPane = new Pane();
// Add the drop-down list
ObservableList options = FXCollections.observableArrayList(
"Home Address", "Work Address", "Alternate Address");
ComboBox addressBox = new ComboBox(options);
//addressBox.setPromptText("Choose address type");
addressBox.setValue("Work Address");
addressBox.relocate(10,10);
addressBox.setPrefSize(410,30);
aPane.getChildren().add(addressBox);
// Now add an AddressPane
AddressPane myPanel = new AddressPane("CONTACT ADDRESS");
myPanel.relocate(10,50);
aPane.getChildren().add(myPanel);
primaryStage.setTitle("App 1"); // Set title of window
primaryStage.setResizable(false); // Make it non-resizable
primaryStage.setScene(new Scene(aPane, 420,250)); // Set size of window
primaryStage.show();
}
public static void main(String[] args) {
launch(args);
}
}
Here is what the
application will look
like when completed →
- 150 -COMP1406 - Chapter 5 - Graphical User Interfaces Winter 2018
Now let us
consider a
second
application that
makes use of
the same
AddressPane
without altering
the code in that
class. Here
are the
dimensions for
the 2nd
application:
Here is the
code. Again,
notice how the
AddressPane
is used twice in
the same
window with a
different title:
import javafx.application.Application;
import javafx.collections.FXCollections;
import javafx.scene.Scene;
import javafx.scene.control.ListView;
import javafx.scene.layout.Pane;
import javafx.stage.Stage;
public class TwoApp extends Application {
public void start(Stage primaryStage) {
Pane aPane = new Pane();
// Add the list
ListView namesList = new ListView();
String[] fruits = {"Bob E. Pins", "Sunny Day", "Jen Tull",
"Bea Keeper", "Ivona Pass"};
namesList.setItems(FXCollections.observableArrayList(fruits));
namesList.relocate(10, 10);
namesList.setPrefSize(150, 420);
aPane.getChildren().add(namesList);
// Now add an AddressPane
AddressPane myPanel1 = new AddressPane("HOME ADDRESS");
myPanel1.relocate(170,10);
aPane.getChildren().add(myPanel1);
// Now add another AddressPane
AddressPane myPanel2 = new AddressPane("ALTERNATE ADDRESS");
myPanel2.relocate(170,230);
aPane.getChildren().add(myPanel2);
- 151 -COMP1406 - Chapter 5 - Graphical User Interfaces Winter 2018
primaryStage.setTitle("App 2"); // Set title of window
primaryStage.setResizable(false); // Make it non-resizable
primaryStage.setScene(new Scene(aPane, 578,428)); // Set size of window
primaryStage.show();
}
public static void main(String[] args) {
launch(args);
}
}
Notice that the size of the scene will need to be adjusted a bit since we are using a non-
resizable window. In this case, the width was reduced by 12 and the height by 2.
Here is what the application will look like when using the above code:
- 152 -COMP1406 - Chapter 5 - Graphical User Interfaces Winter 2018
5.4 Event Handling
Now that we understand the basics of laying out various components on our graphical user
interfaces, we need to discuss how to allow the user to interact with the window and make
things happen. Here are three definitions that are important to understand:
An event is something that happens in the program based on some kind of
triggering input which is typically caused (i.e., generated) by user interaction
such as pressing a key on the keyboard, moving the mouse, or pressing a mouse
button.
The source of an event is the component for which the event was generated
(i.e., when handling button clicks, the Button is the source).
An event handler is a procedure that contains the code to be executed
when a specific type of event occurs in the program.
When writing GUIs
we need to write
specific event
handlers in order for
our application to
respond to button
clicks, allow selecting
items from a list, allow
typing into a text field
etc...
In JAVA FX, all
Events are
represented by a
distinct class. There
are many kinds of
events, each having
its own unique class.
Here is a partial
hierarchy showing
just a few of the
events in the class
hierarchy. We will
look at the three
highlighted in red.
- 153 -COMP1406 - Chapter 5 - Graphical User Interfaces Winter 2018
You do not need to memorize this whole list ... but you will become familiar with them during
the course.
These events are generated when the user interacts with the user interface as follows:
1. The user causes an event by clicking a button, pressing a key, selecting a list item etc..
2. Events are generated
3. The appropriate event handler is called.
4. The event handling code changes the model in some way.
5. The user interface is updated to reflect these changes in the model.
- 154 -COMP1406 - Chapter 5 - Graphical User Interfaces Winter 2018
Therefore, to perform event handling in JAVA FX, you must first identify the types of events
that you want to handle. Then you need to write the appropriate event handlers. For each
event, there is a corresponding interface in JAVA with a list of methods that you can write in
order to handle the appropriate event in a meaningful way.
Below is a table of three of the commonly-used events along with the list of methods that you
may implement to handle the kind of event that you are interested in. For a more complete
description of these (and other) events, event handlers and their methods, see the JAVA FX
API specifications.
Event Method to Implement
ActionEvent - generated when setOnAction(new EventHandler() {
button pressed, menu item selected, public void handle(ActionEvent actionEvent) {
enter key pressed in a text field or // ...
}});
from a timer event
setOnKeyPressed(new EventHandler() {
public void handle(KeyEvent keyEvent) {
// ...
}});
setOnKeyTyped(new EventHandler() {
KeyEvent - generated when
public void handle(KeyEvent keyEvent) {
pressing and/or releasing a key // ...
while within a component. }});
setOnKeyReleased(new EventHandler() {
public void handle(KeyEvent keyEvent) {
// ...
}});
setOnMousePressed(new EventHandler() {
public void handle(MouseEvent mouseEvent) {
// ...
}});
setOnMouseClicked(new EventHandler() {
public void handle(MouseEvent mouseEvent) {
// ...
}});
setOnMouseReleased(new EventHandler() {
public void handle(MouseEvent mouseEvent) {
MouseEvent - generated when // ...
pressing/releasing/clicking a mouse }});
setOnMouseEntered(new EventHandler() {
button, moving a mouse onto or
public void handle(MouseEvent mouseEvent) {
away from a component, moving the // ...
mouse over a component, and }});
dragging something over the setOnMouseExited(new EventHandler() {
component. public void handle(MouseEvent mouseEvent) {
// ...
}});
setOnMouseDragged(new EventHandler() {
public void handle(MouseEvent mouseEvent) {
// ...
}});
setOnMouseMoved(new EventHandler() {
public void handle(MouseEvent mouseEvent) {
// ...
}});
- 155 -COMP1406 - Chapter 5 - Graphical User Interfaces Winter 2018
So what does all of this mean ? It means, for example, that if you want to handle a button
press in your program, you need to write a handle() method as follows:
aButton.setOnAction(new EventHandler() {
public void handle(ActionEvent actionEvent) {
// Write your code in here
}
});
Notice that we "plug-in" (or register) the event handler by calling the setOnAction() method for
the Button object. In general, many applications can
listen for events on the same component. So when the
component event is generated, JAVA must inform
everyone who is listening. We must therefore tell the
component that we are listening for (or waiting for) an
event. If we do not tell the component, it will not notify
us when the event occurs (i.e., it will not call our event
handler). So, when a component wants to signal/fire an
event, it sends a specific message to all listening objects
that have been registered. For every event, therefore,
that we want to handle, we must not only write the event handler but also register that event
handler too. To help you understand this notion of registering, imagine signing up on a
webpage somewhere to receive an email notification when some event occurs (e.g., when
something goes on sale, or getting an email bill-statement at the end of the month). When we
sign up, we are essentially registering for (or listening to) any updates that may occur as a
result of the event.
In the above code, there is some weird JAVA syntax that makes what is known as an
anonymous class (i.e., a class with no name) and this class simply has a handle() method
within it which we must write.
The handle() method takes an ActionEvent as a parameter. This will allow us to access
information from the event such as the source of the event ... which … in this case ... is the
button object that generated the event. We will see more on this later.
Similar methods are written for events generated from key presses, mouse presses, etc...
according to the table on the previous page. The only different is that the parameter type
changes from ActionEvent to KeyEvent or MouseEvent.
Example:
Consider an application that will handle a simple button press.
- 156 -COMP1406 - Chapter 5 - Graphical User Interfaces Winter 2018
import javafx.application.Application;
import javafx.event.*;
import javafx.scene.Scene;
import javafx.scene.control.Button;
import javafx.scene.layout.Pane;
import javafx.stage.Stage;
public class SimpleEventTest extends Application {
public void start(Stage primaryStage) {
Pane aPane = new Pane();
Button aButton = new Button("Press Me");
aButton.relocate(100, 10);
aButton.setPrefSize(100, 30);
aPane.getChildren().add(aButton);
// Connect the event handler to the button
aButton.setOnAction(new EventHandler() {
public void handle(ActionEvent event) {
System.out.println("That felt good");
}
});
primaryStage.setTitle("Making a Handler"); // Set title of window
primaryStage.setScene(new Scene(aPane, 300,50)); // Set size of window
primaryStage.show();
}
public static void main(String[] args) { launch(args); }
}
Example:
How could we write a program that was able
to distinguish between two different buttons on
the window ?
Adding the buttons to the window is easy.
To connect their event handlers, we have two choices. We can either:
1) write separate event handlers for each button, or
2) write a single event handler for both buttons.
In this example, we will choose the first option. Here is the code with separate event handlers:
import javafx.application.Application;
import javafx.event.*;
import javafx.scene.Scene;
import javafx.scene.control.Button;
import javafx.scene.layout.Pane;
import javafx.stage.Stage;
- 157 -COMP1406 - Chapter 5 - Graphical User Interfaces Winter 2018
public class TwoButtonsApp extends Application {
public void start(Stage primaryStage) {
Pane aPane = new Pane();
Button button1 = new Button("Press Me");
button1.relocate(10, 10);
button1.setPrefSize(100, 30);
aPane.getChildren().add(button1);
Button button2 = new Button("Don't Press Me");
button2.relocate(120, 10);
button2.setPrefSize(170, 30);
aPane.getChildren().add(button2);
// Connect the event handlers to the buttons
button1.setOnAction(new EventHandler() {
public void handle(ActionEvent actionEvent) {
System.out.println("That felt good!");
}
});
button2.setOnAction(new EventHandler() {
public void handle(ActionEvent actionEvent) {
System.out.println("Ouch! Stop that!");
}
});
primaryStage.setTitle("Making 2 Handlers"); // Set title of window
primaryStage.setScene(new Scene(aPane, 300,50)); // Set size of window
primaryStage.show();
}
public static void main(String[] args) { launch(args); }
}
Example:
The previous example showed a good solution if we only have a small
number of buttons. However, if we have more buttons, it is often good
to have them share the same event handler. One way to do this is to
have the Pane implement EventHandler and then
point all the buttons to it. We will create the following keypad using
one event handler →
The event handler will be written as a separate method (i.e., outside of
the constructor), so we will need to store the buttons as instance
variables (i.e., object attributes) so that we can access the buttons
from both the constructor AND the event handler:
import javafx.application.Application;
import javafx.event.*;
import javafx.scene.Scene;
import javafx.scene.control.Button;
import javafx.scene.layout.Pane;
import javafx.stage.Stage;
public class MultipleButtonsApp extends Application {
- 158 -COMP1406 - Chapter 5 - Graphical User Interfaces Winter 2018
Button[][] buttons; // This will store all the Buttons
public void start(Stage primaryStage) {
Pane aPane = new Pane();
buttons = new Button[4][3];
String[] buttonLabels = {"1","2","3","4","5","6","7","8","9","*","0","#"};
for(int row=0; rowCOMP1406 - Chapter 5 - Graphical User Interfaces Winter 2018
different background colors. We will create an array of Buttons and then use the getSource()
method and compare the pressed button with each button in the array. Once we find the
button that matches, we will know its row and column and will be able to toggle the background
color of that button accordingly. Here is the code:
import javafx.application.Application;
import javafx.event.*;
import javafx.scene.Scene;
import javafx.scene.control.Button;
import javafx.scene.layout.Pane;
import javafx.stage.Stage;
public class ToggleButtonsApp extends Application {
Button[][] buttons; // This will store all the Buttons
public void start(Stage primaryStage) {
Pane aPane = new Pane();
buttons = new Button[4][3];
for(int row=0; rowCOMP1406 - Chapter 5 - Graphical User Interfaces Winter 2018
primaryStage.setTitle("Toggle"); // Set title of window
primaryStage.setScene(new Scene(aPane, 225, 295)); // Set size of window
primaryStage.show();
}
public static void main(String[] args) {
launch(args);
}
}
The above code searches all of the buttons in the array to see which one matches the source
of the event. It then displays the row and column of the button that was pressed (according to
the current values of the FOR loops when the match is found).
The code for toggling the button color is not "pretty". It actually replaces the entire style
settings of the button each time. In this case, we only have one style set, so this is not a
problem. However, if style sheets are read in from elsewhere, or the user is able to change
the style of the buttons a various times, then this is bad code. Also, there is no direct way to
access the current color of a button, so the code above simply extracts the style string and
then looks at the character at position 14 in the string. This will be either a '0' in the case of a
black button (i.e., from the rgb(0,0,0) setting) or a '2' in the case of a white button (i.e., from the
rgb(255,255,255) setting). Obviously, if we change the colors of the buttons, this code will
break easily, and so it is not robust.
A better (i.e., cleaner) way to write this code is to have a second boolean array which has the
same dimensions as the buttons array. This can keep track of whether or not a button has
been selected or not. We can simply read this value and toggle it as necessary. Here is the
cleaner version:
import javafx.application.Application;
import javafx.event.*;
import javafx.scene.Scene;
import javafx.scene.control.Button;
import javafx.scene.layout.Pane;
import javafx.stage.Stage;
public class ToggleButtonsApp2 extends Application {
boolean[][] buttonStates; // This will store the state of all the Buttons
Button[][] buttons; // This will store all the Buttons
public void start(Stage primaryStage) {
Pane aPane = new Pane();
buttonStates = new boolean[4][3];
buttons = new Button[4][3];
for (int row = 0; row < 4; row++) {
for (int col = 0; col < 3; col++) {
buttons[row][col] = new Button();
buttons[row][col].relocate(10 + col * 70, 10 + row * 70);
buttons[row][col].setPrefSize(65, 65);
buttons[row][col].setOnAction(new EventHandler() {
- 161 -COMP1406 - Chapter 5 - Graphical User Interfaces Winter 2018
// This is the single event handler for all of the buttons
public void handle(ActionEvent event) {
// Find the row and column of the pressed button
for (int row = 0; row < 4; row++) {
for (int col = 0; col < 3; col++) {
if (event.getSource() == buttons[row][col]) {
System.out.println("You pressed the button at"+
" row: " + row + ", column: " + col + ".");
// Now toggle the button's color
if (buttonStates[row][col]) {
buttonStates[row][col] = false;
buttons[row][col].setStyle(
"-fx-base: rgb(255,255,255);");
} else {
buttonStates[row][col] = true;
buttons[row][col].setStyle(
"-fx-base: rgb(0,0,0);");
}
}
}
}
}
});
// Pick a random color for the button
if (Math.random() < 0.5) {
buttonStates[row][col] = true;
buttons[row][col].setStyle("-fx-base: rgb(0,0,0);");
} else {
buttonStates[row][col] = false;
buttons[row][col].setStyle("-fx-base: rgb(255,255,255);");
}
aPane.getChildren().add(buttons[row][col]);
}
}
primaryStage.setTitle("Toggle");
primaryStage.setScene(new Scene(aPane, 225, 295));
primaryStage.show();
}
public static void main(String[] args) {
launch(args);
}
}
- 162 -COMP1406 - Chapter 5 - Graphical User Interfaces Winter 2018
Example:
Now let us consider an example of
an application that makes use of
TextFields. We will create a
simple application that allows the
user to type in a number into one
text field, then press a button and
have the "square" of that number appear in another text
field and the "square root" of the number appear in yet
another text field as shown here →
In this example, we will only be handling one event ...
that of the user pressing the Compute button. We will
need to extract the text data from the Value field. The getText() method in the TextField
class allows us to get the text (as a String object) that lies in the field. We will need to convert
this String into a number, such as a float, in order to perform computations with it.
In JAVA, we can extract a float from a String by using the following strategy:
float x = Float.parseFloat(aString);
This code will convert the String (called aString in the example) into a float (called x in the
example). There are actually similar ways to convert to other types. Here are some more:
int x = Integer.parseInt(aString);
double x = Double.parseDouble(aString);
boolean x = Boolean.parseBoolean(aString); // "true" to true
Once we have the value as a number, we can compute the square and root and then we
simply need to put the results into the other two text fields. We do that using setText() where
we supply a String with the result in it. The simplest way to convert a number into a String is
to append the number to an empty String object in JAVA as follows:
aTextField.setText("" + x);
This will work for any number x, regardless of whether it is an int, float, double , etc..
One last point ... we will probably want to disable editing in the last two text fields so that the
user cannot type into them, since they are "output only" fields. We use the setEditable(false)
method to do this. Here is the completed code:
import javafx.application.Application;
import javafx.event.*;
import javafx.scene.Scene;
import javafx.scene.control.*;
import javafx.scene.layout.Pane;
import javafx.stage.Stage;
- 163 -COMP1406 - Chapter 5 - Graphical User Interfaces Winter 2018
public class CalculatorApp extends Application {
// Text fields to hold the user data and the computed data
TextField valueField, squareField, rootField;
public void start(Stage primaryStage) {
Pane aPane = new Pane();
// Add the value label and text field
Label label = new Label("Value:");
label.relocate(10,10); label.setPrefSize(100, 30);
aPane.getChildren().add(label);
valueField = new TextField();
valueField.relocate(100,10); valueField.setPrefSize(150, 30);
aPane.getChildren().add(valueField);
// Add the compute button
Button computeButton = new Button("Compute");
computeButton.relocate(10,50); computeButton.setPrefSize(240, 30);
aPane.getChildren().add(computeButton);
// Add the square label and text field
label = new Label("Square:");
label.relocate(10,100); label.setPrefSize(100, 30);
aPane.getChildren().add(label);
squareField = new TextField();
squareField.relocate(100,100); squareField.setPrefSize(150, 30);
squareField.setEditable(false);
aPane.getChildren().add(squareField);
// Add the square root label and text field
label = new Label("Square Root:");
label.relocate(10,150); label.setPrefSize(100, 30);
aPane.getChildren().add(label);
rootField = new TextField();
rootField.relocate(100,150); rootField.setPrefSize(150, 30);
rootField.setEditable(false);
aPane.getChildren().add(rootField);
// Connect the event handlers to the buttons
computeButton.setOnAction(new EventHandler() {
public void handle(ActionEvent actionEvent) {
if (valueField.getText().length() > 0) {
float value = Float.parseFloat(valueField.getText());
squareField.setText("" + value * value);
rootField.setText("" + Math.sqrt(value));
}
}
});
primaryStage.setTitle("Calculator");
primaryStage.setResizable(false);
primaryStage.setScene(new Scene(aPane, 248,178));
primaryStage.show();
}
public static void main(String[] args) { launch(args); }
}
- 164 -COMP1406 - Chapter 5 - Graphical User Interfaces Winter 2018
You may have noticed that we did an error-check for the case where no text was in the text
field. That is because the parseFloat() method generates an ugly error message if the String
passed in is empty.
Example:
Here is another example of a calculator
that can do more operations. It has
been set up using a set of RadioButtons
which work exactly as Buttons do,
except that we will add them to a
ToggleGroup so that only one of the
buttons is able to be selected at a time ... just like an old-
fashioned radio.
To make this work, we will add similar text fields as we did in
the previous example. We will also create an array of
RadioButtons and have all of them go to the same event
handler. Once again, we will search through the button array to find out which button was
pressed and then perform a computation accordingly. In JAVA, a ToggleGroup object is
used to group buttons together so that only one is "on" in the group at a time. We simply add
RadioButtons to the same toggle group to get this desired behavior. Here is the code:
import javafx.application.Application;
import javafx.event.*;
import javafx.scene.Scene;
import javafx.scene.control.*;
import javafx.scene.layout.Pane;
import javafx.stage.Stage;
public class CalculatorTwoApp extends Application {
TextField valueField, answerField;
RadioButton[] buttons;
public void start(Stage primaryStage) {
Pane aPane = new Pane();
// Add the value label and text field
Label label = new Label("Input X:");
label.relocate(10,10); label.setPrefSize(100, 30);
aPane.getChildren().add(label);
valueField = new TextField();
valueField.relocate(80,10); valueField.setPrefSize(140, 30);
aPane.getChildren().add(valueField);
// Add the "operation type" radio buttons to the window
// and to a ButtonGroup so that one is on at a time
label = new Label("Operation:");
label.relocate(10,55); label.setPrefSize(100, 30);
aPane.getChildren().add(label);
- 165 -COMP1406 - Chapter 5 - Graphical User Interfaces Winter 2018
ToggleGroup operations = new ToggleGroup();
buttons = new RadioButton[4];
String[] buttonLabels = {"X + X", "X * X", "X ^ 0.5", "1 / X"};
for (int i=0; iCOMP1406 - Chapter 5 - Graphical User Interfaces Winter 2018
Although the code works, the application still has a couple of undesirable features. First, if we
enter non-numeric characters into the Input X field (or leave the field blank), the code will
crash with a NumberFormatException. We will learn later in the course how to deal with
Exceptions. However, we can easily check for this by examining the characters in the text
field using the matches() method:
if (!valueField.getText().matches("^[-,+]?[0-9]+") {
answerField.setText("INVALID INPUT");
return;
}
The matches() method code above allows you to give an expression where we can define the
types of characters that we want to look for. In this case, the - or + character followed by any
digits from 0-9.
Second, if the user types a new number into the Input X field, the Answer field is not updated
until a radio button is pressed. So, it still shows the previous answer, which may not match
the current input value. Also, when the user clicks on the same radio button that was already
selected, the event handler is not called. It is only called when the user selects a different
radio button. To fix this, we would need to handle the events for entering data into the text
field and reset the selection of the radio buttons. We will look into this in the next chapter.
- 167 -You can also read