X-Mouse Button Control User Guide - Highresolution Enterprises
←
→
Page content transcription
If your browser does not render page correctly, please read the page content below
1

                   X-Mouse Button Control
                        User Guide
X-Mouse Button Control is a Windows application for remapping your mouse buttons. It is not a driver
for pointing devices, but rather works in conjunction with the installed drivers. XMBC supports
binding mouse buttons for an individual process and also allows you to bind to specific window
elements. XMBC is not only for button mapping, various navigation customizations are available;
tuning the pointer and scroll wheel to your needs.

                             To access the setup window, double-click the XMBC icon
                             in the notification area or run the program from the start
                             menu. The tray icon may be automatically hidden on Windows 7 or later,
                             drag the XMBC icon from the hidden section over to the area next to the
                             clock and it will show permanently.

                                               Download X-Mouse Button Control
                                         X-Mouse Button Control @ Highrez Forums
                                                    Frequently Asked Questions
X-Mouse Button Control Author: Phillip Gibbons                          X-Mouse Button Control User Guide: MainTrane & Phillip Gibbons

                                                                                             Copyright © 2005-2019 Phillip Gibbons (Highresolution Enterprises)
2
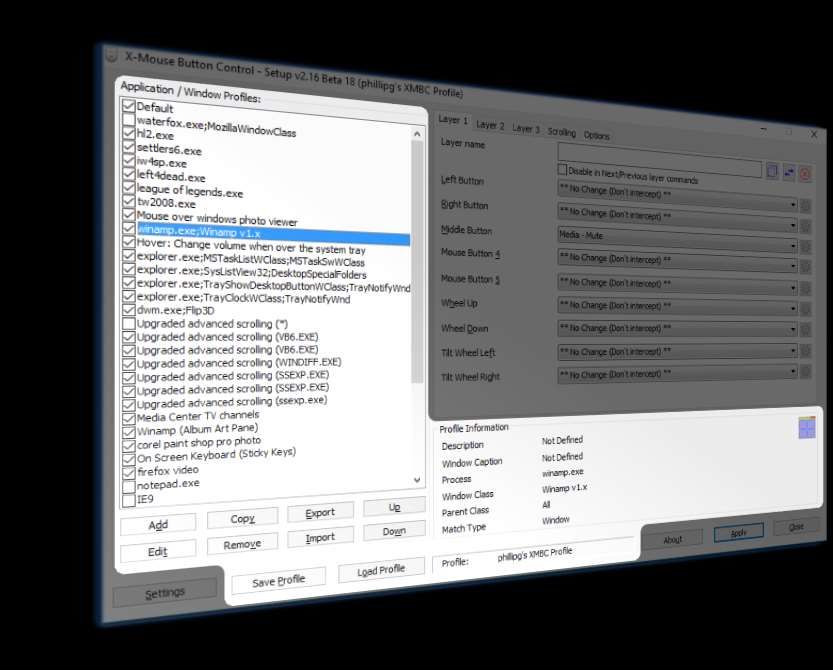
Profile List and Information
Configure applications to suit your individual needs
The Application/Window Profiles list contains all of the profiles you have created and assigned to various applications or windows.
From here you can quickly activate or deactivate profiles using the check box to the left of the profile name, rename profiles, create new
profiles, copy an existing profile, edit the selected profile, import and export profiles or remove an unnecessary profile. Profiles can be
edited, copied or removed via their respective buttons or from the right-click context menu. If a profile’s text is RED, then it is the active
profile, in other words it currently has keyboard/mouse focus for sending commands.
The Profile Information box displays how XMBC identifies the selected process or window
The information is identical to what was entered when
creating the profile.
Importing and Exporting an Application/Window Profile
The X-Mouse Button Control registered file type, xmbcs, is used to save
exported profiles.
By default, profiles are saved to the current user’s %APPDATA%
directory under ‘Highresolution Enterprises’. Save exported profiles
wherever is suitable; the new save location will be remembered.
A batch export is also available for easily backing up the settings of
every single profile in a single .xmbcs file.
An exported file may be opened (double-clicked) to import the
contained profiles into XMBC. If there is a conflict with a current profile
you will be prompted to overwrite the existing one, discard the
inserting entry or cancel the entire import process.
You can also load and save whole profiles using the Save Profile and
Load Profile buttons. This includes ALL XMBC settings and application
profiles.
Copyright © 2005-2019 Phillip Gibbons (Highresolution Enterprises)3
Creating an Application and/or Window Profile
Adding a Process Profile
Pressing the Add or Copy buttons will bring up a dialog box listing
all currently running applications.
Choose from the list of running applications, browse for an
application EXE file, manually enter a process name, or opt to use
a specific window.
The description field is used to give a profile a custom display name
in the profile list.
NOTE: You can specify multiple processes by separating them with
two pipe characters '||' in the application text field.
Adding an advanced Window Specific profile
The advanced 'Find Window' allows you to create advanced profiles
that can be triggered when the mouse cursor is over a specific control
or sub-window, based on their internal Windows classes rather than
the whole application.
You can drag the window finder to the required window in order
to select the desired window and populate the process and class fields
automatically. You can also do this simply by hovering the mouse over
the target window if you first tick the 'Hover' option. This allows you
to select windows that are only visible while the target application has
focus or that are only shown as a result of clicking a button (for
example, a dropdown list). By turning on CAPS lock, the hover
detection will be disabled and the process and class names 'locked in'.
For more information on Window Classes, see the Microsoft MSDN
article About Widow Classes
The 'Only match if there is no parent class' option will force the profile
to match, only when the parent class is empty/undefined, for
example, a top-level window that has no parent.
You can also enable regular expression text matching of the window
caption or class names. Regular expressions allow a much more
complex search to be performed, including wildcards, grouping or
Boolean logic. However, this advanced search comes at the cost of
using more resources and CPU time, so use this option sparingly.
NOTE: When not using regular expressions, you can still specify multiple processes or classes by separating them with two pipe
characters '||'.
You can use the 'Window Regions' options to restrict the profile to individual quadrants of the window, for example, when the cursor
is over the top left of a window, check the top left check box and leave the other three checkboxes unchecked.
Alternatively, you can use 'Activate the profile only…' option to specify a custom rectangular region to restrict the profile activation
to a specific sub rectangle of the specified window. For example, to create a profile that is only enabled when the mouse is over the
application's title bar.
Copyright © 2005-2019 Phillip Gibbons (Highresolution Enterprises)4
Multi-Layered Button Mapping
Providing up to 10 layers of button mapping for every profile
** No Change (Don't intercept) **
** Same As Default Profile **
Activate Monitor Power Saving
Activate Screensaver
ALT-TAB
Back
Brightness Down
Brightness Up
Browser Favourites
Browser Refresh
Browser Stop
Button Chording
Change Movement to Scroll
Change Movement to Scroll (Lock Axis)
Change Movement to Scroll (Sticky Lock Axis)
Change Movement to Scroll (Sticky)
Change Movement to Scroll Inverted
Change Movement to Scroll Inverted (Lock Axis)
Change Movement to Scroll Inverted (Sticky Lock Axis)
Change Movement to Scroll Inverted (Sticky)
Charms Bar (WIN+C)
Click Button 4
Click Button 5
Close (Alt+F4)
Copy (Ctrl+C)
Cut (Ctrl+X)
Disable
Double Click
Double Click Drag
The list of Mapping Commands, available on each of the 9 controls. Drag to Move Window
Drag to Size Window
The list of commands is subject to change with each version of XMBC. Enter
Escape
By default, similar actions are grouped together. You can choose to Flip 3D / Task View
Forward
sort the action list alphabetically in the general settings tab. Launch EMail
Layer (Next)
NOTE: Some items are only available on specific operating systems. Layer (Previous)
Layer 1-10
Left Click
You can re-configure up to 9 mouse controls (Left Button, Right Button, Middle/Wheel Button, XButton1 Lock Workstation
(Button 4), XButton2 (Button 5), Wheel Up, Wheel Down, Tilt Wheel Left and Tilt Wheel Right) on each Magnifier Toggle On/Off
Magnifier Zoom In
and any of the layers. Magnifier Zoom Out
Maximize Window
Media - Last Track
The orange highlight indicates XMBC is currently receiving a standard Windows message from that Media - Mute
Media - Next Track
button/control, in other words you are currently manipulating it. If no highlight is seen when Media - Play/Pause
Media - Stop
manipulating a control, then its current message/button is not compatible with X-Mouse Button Control. Media - Volume Down
Media - Volume Up
Middle Click
The three buttons in the upper right corner can be used to copy the layer (to another profile or layer), Minimize Window
Mouse Wheel Up/Down
swap the layer with another in this profile or revert/reset all controls on the current layer to default. Mouse Wheel Tilt Left/Right
New
Next Window
The gear/cog buttons next to each mouse button drop-down allow you to configure the selected action Open
for any action that can be configured (e.g. Simulated keystrokes, Button chording etc.) Open Control Panel
Open Explorer
Open Explorer at My Computer
Up to ten layer tabs are available. By default, only two layers are enabled/displayed. You can change this Open Explorer at My Documents
Open Explorer at Network Favourites
to any number between 1 and 10 using the “Number of layers” option in the general settings tab. To save Open Explorer at specified folder
Open Help
screen space, if you have more than 5 layers, only the first tab includes the "Layer" text. Other layer tabs Open RUN Command
Open Search
are indicated by number only. Open Web Browser
Paste (Ctrl+V)
PC Settings (WIN+I)
Any layer (other than Layer 1) can be disabled completely for the selected profile by ticking the 'Disable' Previous Window
Print Active Window
checkbox. When a layer is disabled, anything setup on the layer will be ignored and the actions from layer Print Screen
1 (in the current profile) will be performed. Redo (Ctrl+Y)
Restore Window
Reveal Desktop
An enabled layer can be excluded from the next/previous layer commands (global hotkey or simulated Right Click
Run Application
keystrokes command). In this case, the layer will be skipped over when cycling through the next/previous Scroll Window Up/Down/Left/Right
Search Apps (WIN+W)
layers. Search Charm (WIN+Q) / Cortana
Search Files (WIN+F)
Show/Hide Desktop
Each layer can be given a custom name on each and every profile. This name will be displayed in a balloon Simulated Keys
Snap Modern UI Left
notification when switching layers (notification is optional). Snap Modern UI Right
Snap Window Up/Down/Left/Right
Sticky Button
When you configure a layer other than layer 1, you can also instruct XMBC to automatically transition System Menu (WIN+X)
Undo (Ctrl+Z)
(switch) to another layer (or revert to the previous layer) after a configurable time period. Virtual Desktop: Close
Virtual Desktop: New
Virtual Desktop: Switch Left
NOTE: Some of the actions listed to the right are operating system specific. Virtual Desktop: Switch Right
Web Search Selected Text
NOTE: Only operating systems after Windows XP support standard tilt wheel messages. Tilt Wheel Left
& Tilt Wheel Right options will therefore not be available on Windows XP or earlier operating systems.
Copyright © 2005-2019 Phillip Gibbons (Highresolution Enterprises)5
Per-Profile Based Scrolling
The scrolling tab, provides advanced pointer & scroll wheel adjustments on a per-profile basis
NOTE: Prior to XMBC 2.15, the Scrolling and Options tabs were combined in a single 'Scrolling & Navigation' tab.
Scrolling
• Inverting mouse wheel scrolling – Inverts (reverses)
the vertical scroll (wheel) direction.
• Invert mouse horizontal scrolling – Inverts (reverses)
the horizontal scroll (tilt) direction
• Wheel scrolls in pages instead of lines – Makes the
scroll wheel scroll one page at a time instead of line by
line.
• Lines to scroll using the scroll wheel – Allows you to
configure how many lines are scrolled when using the
scroll wheel.
• Force Scroll Pages/Lines… – Can be used if the
application does not correctly respond to the two
settings above. Note that this setting can cause adverse side effects in some Windows applications, so only use it if you have to.
Advanced Window Scrolling
The advanced window scrolling settings allow you to scroll windows that do not usually respond to the scroll wheel, such as old
Windows applications. There are currently 5 methods from which to choose (as well as the default and disabled options). Usually you
would only use these settings for a specific window profile, for those windows that do not behave as expected when using the scroll
wheel, rather than an application profile.
• Default passes through the original uninterrupted message sent by the mouse’ driver.
1. Scroll Message – Send WM_HSCROLL or WM_VSCROLL directly to the window under the mouse. (works with some windows)
2. Scroll Info – Use the Win32 SetScrollInfo API to set the scroll position of a window... (rarely works, but gives great results when it does)
3. Left/Right Keys – Sends left & right arrow keys (only applies to horizontal scrolling)
4. Wheel Message – Send WM_MOUSEWHEEL or WM_MOUSEHWHEEL message to the window (most recognizable/reliable)
5. WPF Scroll Message – Send a special scroll message, for use with newer applications built using the Windows Presentation Foundation.
• None (Disable Scroll) blocks the original message and doesn’t inject anything other messages, thus disabling the scroll wheel.
NOTE: You can reverse scrolling by choose a negative increment in the Vertical Lines or Horizontal Characters fields.
NOTE: When any of the first three methods fails to register for an application XMBC invokes the ‘Default’ scrolling method and applies the
vertical lines or horizontal characters scrolling increments, ‘Method 3’ will resort to ‘Method 1’ for vertical scrolls prior to invoking ‘Default’. This
way scrolling will not cease if one of these methods isn’t recognized by the window.
Copyright © 2005-2019 Phillip Gibbons (Highresolution Enterprises)6
Per-Profile Based Options
The options tab, provides advanced options that only apply when the selected profile is active.
Options
• Disable Scroll Window Under Cursor – Overrides the global
setting 'Make scroll window scroll window under cursor'.
• Override Mouse Speed – Allows you to set the mouse cursor
speed to use when this profile is active.
• Enhance Pointer Precision – Allows you to override the
Windows setting on a per-profile basis. This setting tells
Windows to adjust the sensitivity of the mouse pointe based on
how quickly you are moving the mouse.
• Clip (lock) mouse cursor to active window – Allows you to
prevent the cursor from moving outside the current active
window.
• Ignore Repeated remapped … scroll – The mouse wheel scroll or tilt does not behave like a normal button that sends both a discrete down
and an up message. Instead, it sends one or more single scroll message. When remapping horizontal or vertical scroll to an action that
expects to work with down and up messages (like simulated keystrokes) you may find that the mapped action repeats. You can prevent
this repeat by enabling this option and adjusting the time to suit your scenario/device.
• Enable axis locking modifier keys – Allows you to enable or disable the axis locking hotkeys (you must enable the global hotkeys or layer
modifier keys for Axis Locking for this option to have any effect. Axis locking prevents pointer movement along either the X or Y axis.
• Disable profile switching on mouse move for this profile – Override the global 'Enable profile switching on mouse move' advanced setting
for this profile, so the profile will stick until you physically select (activate) another application no matter where your mouse cursor wanders.
Button Chording Button Mapping
The ability to combine mouse buttons to perform different tasks
Button Chording allows you to combine button presses to perform
different actions. This technique is often known as chording, much
like playing a chord on a musical instrument. It can also be referred
to as shifting, like when you press shift and a key on the keyboard.
When you select Button Chording for a particular button, the
Button Chording window will be displayed. This screen allows you
to select the chord action for each button and also the default (no
chord) action for the original button (for when you don’t press any
other buttons before releasing the defined button).
Chose actions that other buttons should apply while the initial
chord button is held down.
For example, you can make the scroll wheel change the volume
when chorded with the right mouse button!
You can choose to block the original button action until a chord is performed or to allow the original button to pass through.
When blocked, the 'Default (No Chord)' action will apply once you release the button. You can modify this behavior further using the
'Unblock after' and 'Unblock when the cursor moves' options.
• Unblock after – The chord will be 'released' automatically after the time period (in milliseconds) after the chord button is initially pressed.
• Unblock when the cursor moves – The chord will be released automatically if the mouse moves by 4 pixels in any direction. This is useful
to allow drag and drop functionality to operate as normal when chording on the right mouse button.
Copyright © 2005-2019 Phillip Gibbons (Highresolution Enterprises)7
Button Held (Time Dependent Actions)
The ability to perform different actions depending on how long you press a (hold) button down
Button Held option allows you to perform different actions depending on how long you hold a button down for. This allows you to, for
example, to leave the button as normal for a quick press, and do something else if you press and hold the button.
You can define up to four actions and assign the
time for each to trigger.
When you select Button Held for a particular
button, the Button Held Time Dependent Actions
window will be displayed. This screen allows you to
select the actions and times at which thy will trigger.
You can choose to cancel the button held timer if
the mouse is moved while holding the button. In this
case, the button action active at the time the mouse
is moved will stay active until you release the mouse
button.
Copyright © 2005-2019 Phillip Gibbons (Highresolution Enterprises)8
Simulated Keystrokes Button Mapping
Send any custom keystroke, key sequence or mouse action when you press a mouse button .
The simulated keystrokes window is displayed when you select 'Simulated Keystrokes' for a particular button mapping. It allows you to assign any
keystrokes, mouse actions and/or hotkeys to your mouse buttons.
You can type a single key or a series of keys. You can also make use
of special {FUNCTION TAGS} which are described in the text field at
the bottom of the window.
There are 9 methods available for sending your assigned keystroke:
1. Pressed – Send the keys when the mouse button is pressed.
2. Released – Send the keys when the mouse button is released
3. During – Hold the keys while the mouse button is held
[like holding down keys on the keyboard, without the repetition]
4. Threaded Press (*)
5. Threaded Release (*)
6. Repeatedly – Continuously sends the keys while the mouse
button is held down.
[like holding down a key on the keyboard]
7. Sticky Repeat – A ‘Repeatedly’ toggle
[press once to begin repetition, press again to cease]
8. Sticky Hold – A ‘During’ toggle
[press once to activate, again to deactivate]
9. Pressed and Released – A combination of pressed and released.
[The keys will be sent when the button is pressed and sent again when the button is released]
Selecting 'Block original mouse input' will block the source button press. This is usually the desirable outcome. To pass the original button press
as well as the simulated keystrokes through to the window with input focus, clear this option.
Selecting 'Randomize auto repeat delay by 10%' when using a method that repeats, will vary the delay between repeats by up to 10%. This can
be used to try and prevent detection and blocking of simulated input by some programs.
When using the movement function tags, you can change the position of the mouse cursor, either absolute, relative to the active or XMBC profile
window or relative to the current cursor position. The current cursor position is displayed in the bottom of the simulated keystrokes window to
assist in finding the correct coordinates. You can also use the cursor drag tool to drag the cursor to the required position, at which point the
displayed cursor position will be fixed and copied to the clipboard. Hold CTRL while doing this to pick up the position relative to the active window,
and ALT relative to the XMBC profile window.
When using a method that repeats, you can set a custom repeat interval between the collective keys in the 'Auto repeat delay' field.
NOTE: Setting the value to 0ms passes through the control panel’s settings for the keyboard repeat rate.
Selecting 'Only send if profile’s process is active' will only send keys if the application or window currently has input (keyboard) focus.
NOTE: This setting is on by default and it is not recommended that you change this when sending hotkeys.
* NOTE: As of version 2.10, all simulated keystrokes are sent in a separate thread. Therefore, methods 4 and 5 'In another thread as mouse
button is pressed' and 'In another thread as mouse button is released' options are no longer required as they are identical to methods 1 and 2
('As mouse button is pressed' and 'As mouse button is released'). They remain in the list for backwards compatibility.
Copyright © 2005-2019 Phillip Gibbons (Highresolution Enterprises)9
Change Movement to Scroll
Scroll a window by moving the mouse .
The Movement to Scroll Configuration window is displayed when you select 'Change movement to scroll' for a particular button mapping. It
allows you to configure the various movement to scroll options.
• Sensitivity – Adjust how quickly scrolling occurs.
• Invert Vertical Axis – Invert vertical scrolling. For example, the window
scrolls up when moving the mouse downwards.
• Invert Horizontal Axis – Invert horizontal scrolling. For example, the window
scrolls left when moving the mouse to the right.
• Lock Scroll Axis – After the scroll direction is determined, XMBC will lock
onto that axis. So when scrolling up/down, it will lock and prevent scrolling
left and right.
• Sticky (until next click) – Click once to enable scrolling by movement and
click again to stop.
• Block original mouse input – When enabled, the original button press is not
passed through to the window under the cursor. If you untick this, the
window will also respond in the normal fashion to the mouse button
assigned to Change movement to scroll.
• Lock Scroll Axis/Direction – Choose which direction to scroll
• Default Action (no movement) – If no movement occurs, perform the selected action when releasing the mouse button.
Run Application Button Mapping
Run any application or command when you press a mouse button .
The Run Application window is displayed when you select 'Run Application' for a
particular button mapping. It allows you to run any Windows application or command
on the press of a mouse button.
Simply type the full path to the application to run, or use the browse button to browse
to the application
Open Explorer at specified folder
Run any application or command when you press a mouse button .
The 'Browse For Folder' window is displayed when you select 'Open Explorer as specified
folder' for a particular button mapping. It allows you to open any folder in Windows Explorer
on the click of a mouse button.
Simply select or type the full path of the folder to open.
Copyright © 2005-2019 Phillip Gibbons (Highresolution Enterprises)10
Global Settings - General
In order for any of the settings below to take effect, you must OK the changes then press apply in the main dialog.
These options are applied globally (none are profile specific).
• Mouse Speed+ – adjusts the default rate of pointer movement in
relation to physical manipulation of the mouse. This controls the
same option as that found in the Windows Mouse control panel.
• Enhance Pointer Precision+ – toggles the default 'Enhance Pointer
Precision' option found in the Windows Mouse control panel. This
setting tells Windows to adjust the sensitivity of the mouse pointe
based on how quickly you are moving the mouse.
• Make scroll window scroll window under cursor + – sends scrolling
messages to the window/control directly beneath the mouse
pointer, as opposed to the one with keyboard focus
• Activate window when scrolling – Activates (brings input focus to) a
window when you scroll it using the scroll wheel.
• Bypass ALL actions when SCROLL LOCK is ON – disables all of XMBC’s
settings when the keyboard’s Scroll Lock is activated
• Bypass 'disabled' actions when SCROLL LOCK is ON – re-enables all
disabled settings when the Scroll Lock key is activated; cannot be
used when all actions are bypassed by Scroll Lock activation
• Swap 4th and 5th buttons – swaps the side buttons on most mice
(mouse buttons 4/5)
• Swap 4th and 5th buttons… remote desktop – swaps the side buttons
only while the user is connected to a remote desktop session (affects
XMBC on the remote machine)
• Disable when running under remote desktop (RDP) – Disables all of XMBC’s settings when you are connected via Remote Desktop.
• Disable Inverted Scroll when running under remote desktop (RDP) – Disables the individual profile's invert scroll option when running under remote
desktop.
• Show layer switch balloon notifications – toggles balloon tip notification above the notification area when switching layers using a hotkey or button
assignment
• Change cursor when using Movement to Scroll * – Allows XMBC to change the cursor icon to indicate that Movement to Scroll is active *.
• Sort mouse button action list alphabetically –Changes the default sorting/grouping of the list of available mouse button actions.
• Enable On Screen Display for volume and brightness settings – Available only on Windows Vista and 7. Show a Windows 8/10 style OSD when
changing the volume or LCD brightness using XMBC.
• Always show the volume On Screen Display – Available only on Windows Vista and 7. Show the volume OSD when changing the volume from other
applications.
• Number of layers – Configure the number of layers available for use in the layer tabs for each profile.
(*) The cursors used when the change movement to scroll and lock axis functions are active can be customized. Create your cursor (.CUR) files
and place them in your XMBC settings folder. The files should be named as follows
LockX.cur The cursor to display when the X axis is locked
LockY.cur The cursor to display when the Y axis is locked
LockXY.cur The cursor to display when both the X & Y axes are locked
Scroll.cur The cursor to display when change movement to scroll is active for both axis
ScrollX.cur The cursor to display when change movement to scroll is active for only the X axes
ScrollY.cur The cursor to display when change movement to scroll is active for only the Y axes
(+) These options can be overridden on a per profile bases. The default defined here is used when a profile does not specify its own settings.
Copyright © 2005-2019 Phillip Gibbons (Highresolution Enterprises)11
Global Settings - Advanced
In order for any of the settings below to take effect, you must OK the changes then press apply in the main dialog.
These options are applied globally (none are profile specific).
• Enable profile switching on mouse move + – Allows XMBC profiles
to be activated when the mouse pointer is over the identified
object, as opposed to only when the cursor is activated (requires
SLIGHTLY more resources)
• Process non-client mouse messages – If disabled XMBC will ignore
mouse messages sent to the title bar area of a window (Disabling
this option can degrade performance and is NOT RECOMMENDED)
• Reset sticky buttons when any other button is pressed – Clears any
assigned sticky/repeat actions whenever another button is pressed
• Reset sticky buttons when any other key is pressed – Clears any
assigned sticky/repeat actions when any key is pressed
• Reset sticky buttons when the layer changes – Clears any assigned
sticky/repeat actions whenever the layer changes
• Show tray icon by default – Whether or not the XMBC icon is
displayed in the notification area after log on (When this is disabled,
to re-display the icon again simply re-run XMBC which will instruct
the running program to re-show the icon.
• Ignore numlock state for Simulated Keystrokes – Always treats the
number pad on the keyboard as if Number Lock were disabled,
when sending simulated keystrokes
• Load US English keyboard if no equivalent is available – If you do
not have any English keyboard mapping, and find that some
simulated keys or actions do not work, try enabling this option.
NOTE: This may cause a US English keyboard layout to be loaded
and display in the Windows language bar.
• Cycle layers by left clicking tray icon – Allows you to move to the next layer by clicking once on the XMBC icon in the notification area.
• De-bounce (ignore) rapid mouse button clicks – For older mice where the micro-switch is not working (bouncing), you may find that clicking a button
once results in multiple clicks. This option can be enabled to attempt to detect and ignore this switch bounce. You can custo mize the time (in
milliseconds) to ignore bounces to suit your device.
• Start de-bounce timer when button is released – When using the De-bounce option (above), the time to detect bounces usually runs form the first
button down (pressed) message. Enabling this option will run the timer when the first button up (released) message is receive d instead.
• Fix-up (de-bounce) tilt wheel auto-repeat – The tilt wheel does not work like a normal button. Instead it repeatedly sends messages when pressed
which can cause remapped actions to be repeated. Different mice work differently and repeat the message at different rates, m aking it difficult to
detect. When enabled, you can use the 'Initial repeat rate' and 'Repeat tilt rate' fields to adjust timings relative to your device. NOTE: You may find
the 'Ignore repeated remapped scroll' options on the profiles’ scrolling and navigation tab more suitable.
• Delay between simulated keystrokes – Allows you to globally add a small delay between every key in a simulated keystrokes sequence. This can be
useful if your simulated keystrokes are always sent too quickly, instead of using the {WAITMS} tag in the sequence it self.
• Disable inactivity timer while inactive – Allows you to 'cheat' the built in Windows inactivity timer. Useful when your IT department does not allow
you to change the lock time for your PC. This option will simulate input to make Windows believe you are still using your PC and prevent the lock
screen or screen saver from triggering.
• Windows Low Level Hook Timeout – This setting applies globally to all Windows applications that use hooks.
Try increasing this value if the XMBC gets disabled automatically by Windows or stops responding (this should be logged in the log file). NOTE: You
will have to reboot before Windows recognizes any change to this setting.
• CPU Priority – Allows you to configure how much CPU resource XMBC can take relative to other applications. If you notice any mouse stuttering, try
increasing the priority.
(+) These options can be overridden on a per profile bases. The default defined here is used when a profile does not specify its own settings.
Copyright © 2005-2019 Phillip Gibbons (Highresolution Enterprises)12
Global Settings - Language
In order for any of the settings below to take effect, you must press OK then apply and close the main dialog.
These options are applied globally (none are profile specific).
• Language – Change the display language used in XMBC.
Please note that language packs are provided by other users and
community members and are not validated by the author of XMBC.
XMBC comes pre-loaded several language packs that are provided by
the community. NOTE: Some of these language packs are not updated
as often as XMB, in this case, you will see a mixture of English and the
selected language.
You can check the website for new and updated language packs.
I welcome any new or updated language packs. A tool is available on
the website to help translators create or update a language pack.
Global Settings – Updates and Logging
In order for any of the settings below to take effect, you must press OK then apply and close the main dialog.
These options are applied globally (none are profile specific).
Updates
• Check for new version every X days – A version check will be
performed. If a new version of XMBC is available, you will be asked
if you want to download and install it. Automatic updates are
smaller than the full XMBC install so it saves bandwidth for you and
the XMBC servers when using this method of updating XMBC.
• Check for beta versions – Allows for notification of new beta (test)
versions of XMBC when performing the version check.
Logging
• Log File Folder – allows you to configure the location in which XMBC
saves the log file. Leave this option blank to use the default location:
%AppData%\Roaming\Highresolution Enterprises\XMouseButtonControl
You can open the log file by pressing the 'Open log file' button or by
from the context menu on the XMBC icons in the system tray.
• Enable debug logging – activates XMBC’s debug mode, it is useful
when reporting issues to the developer. When enabled, extra debug/diagnostic logging is written to the XMBC log file in the location specified above.
When debug logging is enabled, the XMBC icon in the system tray will have a red outline around it to remind yo u.
NOTE: Debug logging is very resource intensive and may hinder mouse responsiveness, as such the setting is not persistent and will be disabled on any
subsequent launches).
Copyright © 2005-2019 Phillip Gibbons (Highresolution Enterprises)13
Global Settings – Global Hotkeys
In order for any of the settings below to take effect, you must OK the changes then press apply in the main dialog.
These options are applied globally (none are profile specific).
Global Hotkeys
Global hotkeys allow you to assign a key sequence to activate certain
functionality in XMBC. Once a hotkey is trigger, the action will persist,
even when the hotkey is released.
In some cases, the hotkeys will toggle their relevant setting; such as
the first press will enable the setting and the second press, disable it
again.
A hotkey assigned in this tab have a system-wide effect. Make sure
they aren’t already in use somewhere else by other applications.
There are two sub-tabs, the first allowing you to define hotkeys that
manipulate the active layer in XMBC and the second contains all other
XMBC hotkey options such as enabling XMBC and toggling debug
logging.
Don’t forget, when configuring hotkeys, you must also enable global
hotkeys by ticking the ‘Enable global hotkeys’ checkbox.
NOTE: Global Hotkeys are only active when the X-Mouse Button Control settings window is not open.
Global Settings – Modifier Keys
In order for any of the settings below to take effect, you must OK the changes then press apply in the main dialog.
These options are applied globally (none are profile specific).
Modifier Keys
Modifier keys work as instant toggles.
Their assigned actions are only applied while the modifier key is held
down. They are system-wide, so make sure there are no conflicts.
Bear in mind that any key will still be sent to the rest of the system, so,
for example, if you choose to use the control (CTRL) key, when you
press a mouse button, the control key may cause the active application
to behave differently!
There are two sub-tabs, the first allowing you to define modifier keys
that manipulate the active layer in XMBC and the second contains all
other XMBC modifier key options, such as mouse axis locking.
Don’t forget, when configuring modifier keys, you must also enable
modifier keys by ticking the ‘Enable modifier keys’ checkbox.
Copyright © 2005-2019 Phillip Gibbons (Highresolution Enterprises)14
Further Configurations
Using Layered Button Mapping
Layers offer multiple button configurations for each profile. Each layer can be configured differently, and activate in a multitude of way,
including hotkeys and simulated keystrokes to switch layers, modifier keys or mouse buttons to activate a layer while a key is pressed to timer
activate switching/cycling of the active layer.
There are up to 10 fully customizable layers that may be put to use in XMBC. Several methods are available for activating layers.
Global Hotkeys
Assign hotkeys to the desired layers. Sending this hotkey will perform a rigid layer switch, not reverting back to your previous layer or
switching to any other layers until another command to switch layers is received.
Simulated keystroke tags
Tags such as '{Layer:}' can be used to switch to the specified layer in a simulated keystroke script.
You can also use '{Layer:next}' to move to the next layer, '{Layer:back}' to move to the preceding layer & '{Layer:last}' to switch to the
previously active layer. For example, If you go from layer 1 to layer 4 then {Layer:last} will take you back to layer 1 where as {Layer:back}
will take you to layer 3.
Modifier Keys
Assign a modifier key for activating the desired layer. Pressing and holding this modifier key will temporarily activate the layer, reverting
to the previously active layer once the hotkey is released.
NOTE: The modifier key is not blocked, so it will still trigger its normal behavior in the active window.
Button Assignment
Every layer supports mapping buttons to layers other than itself. Button layer assignments work just like modifier keys, activating a layer
only while held. Once a button has been mapped to an alternate layer the button on the subsequent layer will be marked as layer revert
and cannot perform any other functions on that layer.
Context Menu
Layers can also be manually chosen from the XMBC context menu by right-clicking the icon in the notification area (system tray).
NOTE: Be careful when chaining layer switching through use of the modifier keys or button assignments. Activating a layer by holding a button or
modifier key followed by using yet another button on the resulting layer may lead to confusion in certain circumstances.
Locking Axes
In order to lock either the mouse cursor X or Y axis it is first necessary to setup the corresponding hotkey or modifier key and enable axis locking
on a per profile basis.
Global Hotkeys
Go to the ‘Scrolling & Navigation’ tab and mark ‘Enable axis locking modifier keys’ on the desired profile, then use the assigned global
hotkey to enable/disable axis locking for the specified axis.
Modifier Keys
Choose the ‘Scrolling & Navigation’ tab and mark ‘Enable axis locking modifier keys’ for the desired profile, now pressing and holding the
relevant modifier key will toggle axis locking.
NOTE: Axis Locking works by preventing any mouse movement on the chosen axis. So locking the X-Axis will PREVENT the cursor from moving
along the X-Axis, not restrict cursor movement to only along the X-Axis.
Changing the Tray Icon
Use your own icons by placing ICON (.ICO) files in the same folder as the main executable (XMouseButtonControl.exe). A unique icon can be
used to represent each of the 5 layers and the disabled state. Create or download icon files using 16x16 and/or 32x32 (auto-resized)
dimensions. The following naming pattern is necessary in order for the .ico files to be accepted by XMBC. Exit and re-launch the program to load
the icons.
Layer1.ico (the default icon), Layer2.ico, Layer3.ico, Layer4.ico, Layer5.ico, Layer6.ico, Layer7.ico, Layer8.ico, Layer9.ico, Layer10.ico and
Disabled.ico
Copyright © 2005-2019 Phillip Gibbons (Highresolution Enterprises)You can also read