Demonstrating Bicycle Helmet Effectiveness: A How-to Guide - NHTSA
←
→
Page content transcription
If your browser does not render page correctly, please read the page content below
Demonstrating Bicycle Helmet Effectiveness: A How-to Guide

Demonstrating Bicycle Helmet Effectiveness: A How-to Guide

Demonstrating Bicycle Helmet
Effectiveness: A How-to Guide
                                                    Purpose of the Guide:
                                                    This guide provides the necessary instruc-
                                                    tions to demonstrate helmet effectiveness for
                                                    different age groups. Demonstrations to show
                                                    effectiveness of bicycle helmets use a mixture
                                                    of shock value, hands-on learning, group ac-
                                                    tivity, and open discussion to deliver the vital
                                                    message—wear a helmet every time you ride
                                                    a bicycle!

                                                    This guide explains how to perform three
                                                    types of helmet effectiveness demonstrations
                                                    and the suitable target age group for each. The
Introduction:                                       users of this guide—teachers, recreation spe-
This guide is designed to assist the user in vi-    cialists, law enforcement officers, after-school
sually demonstrating how and why wearing a          providers, community and youth group lead-
bicycle helmet is effective in preventing serious   ers, etc.—have the flexibility to decide which
head and brain injuries when a bicycle crash        demonstration will reach the group they are
occurs. While there are many things cyclists        teaching. The three demonstrations discussed
and motorists can do to prevent crashes from        include: (1) the Egg Drop, (2) the Melon Drop,
occurring, the focus here is to show why hel-       and (3) the Hammer.
mets should be worn by bicyclists every time
they ride. Research shows that helmets are ef-      How to Use the Guide:
fective in reducing head and brain injury in a      Consider the age and any unique characteris-
crash. Wearing properly fitted bicycle helmets      tics of your audience (cultural, developmental,
is the single most effective way to reduce head     and environmental) to determine which of the
injuries and fatalities resulting from bicycle      demonstrations you should use to illustrate the
crashes.                                            importance of wearing a bicycle helmet. Then
                                                    follow the step-by-step instructions.

                                                              1
Egg Drop Demonstration
Target Audience: Children, Grades K–3

                              3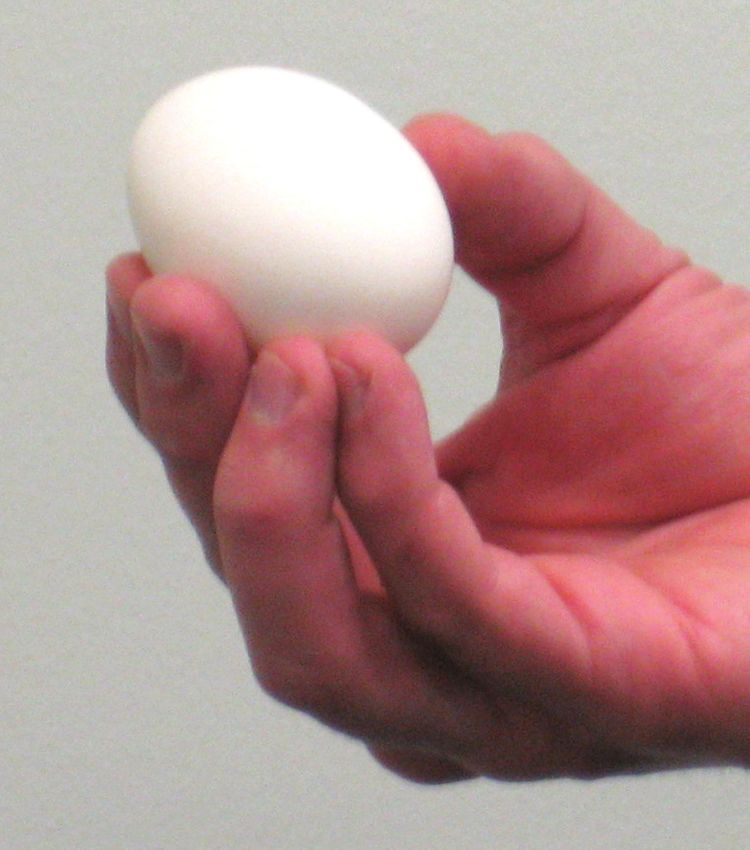
Demonstrating Bicycle Helmet Effectiveness: A How-to Guide

                         Egg Drop Demonstration
                         Target Audience: Children, Grades K–3
                         Description:
                         In this demonstration, the egg represents the head/brain. The demonstration shows what can hap-
                         pen when bicyclists fall and their heads are not protected by bicycle helmets.

                         The Egg Drop demonstration consists of two drops. In the first drop, the egg is dropped into a
                         protective material simulating a protective bicycle helmet. Because the egg is protected, it should
                         not break. In the second drop, the egg has no protective material and breaks.

                         Objectives:
                         By the end of this session, students will be able to:
                         ✓✓ Discuss the importance of wearing a bicycle helmet;
                         ✓✓ Explain what the experiment taught them; and
                         ✓✓ Explain why they should wear properly fitted bicycle helmets each time they ride a bike.

                         Room Set-Up:
                         Gather students in a semicircle or to the side of the demonstration area. Allow an open space of at
                         least 8’ x 8’ for the demonstration.

                         Materials Needed:
                         ✓✓   3 raw eggs
                         ✓✓   2 sealable plastic sandwich bags
                         ✓✓   brick or comparable size rock
                         ✓✓   Paper towels
                         ✓✓   Five-gallon bucket or medium sized cardboard box approximately 12” x 12” x 6”
                         ✓✓   Soft protective material (sand, bubble wrap, tissue paper, Styrofoam pieces or other soft
                              material) to layer the bucket or box.
                         ✓✓   Ladder, chair, or stool
                         ✓✓   Marker
                         ✓✓   Bicycle helmet
                         ✓✓   Handouts:
                              ➤➤ Easy Steps to Properly Fit a Bicycle Helmet:
                                  English: www.nhtsa.gov/staticfiles/nti/bicycles/pdf/8019_Fitting-A-Helmet.pdf
                                  Spanish: www.nhtsa.gov/people/injury/pedbimot/bike/EasyStepsSpan/index.htm
                              ➤➤ The Bicycle Helmet Pledge (click here)

                                                             4
Egg Drop Demonstration

Demonstration Steps:
Step 1: Introduction

A. Engage the students by asking:
   ✓✓ Who rides a bike?
   ✓✓ Who wears a helmet? Always? Sometimes?
   ✓✓ Who has fallen off a bike or knows someone who has fallen off a bike?
   ✓✓ Who knows someone who has hit his or her head hard and possibly had a concussion?

B. Discuss falling off a bicycle:
   ✓✓ Many bicycle injuries are due to falls. Children young and old, adults, and even expe-
      rienced riders can fall off their bicycles. You never know when a crash will happen and
      that’s why it is important to always wear a helmet when riding.
   ✓✓ Reasons why those who ride bicycles might fall/crash:
      ➤➤ Learning to ride a bicycle for the first time, or getting used to a bicycle;
      ➤➤ Riding over road hazards (debris, gravel, wet leaves, or sand), or damaged sidewalks
           or roads (cracks, pot holes, uneven surfaces);
      ➤➤ Bicycle failure (flat tire, bad brakes, etc);
      ➤➤ Bicycle rider’s inexperience riding;
      ➤➤ Motorists’ unsafe driving behavior; or
      ➤➤ Bicyclists’ unsafe riding behavior.

        Motorists’ unsafe driving behavior: Motorists’ driving behaviors causes some crashes
        with bicyclists. Some examples include a motorist:
        ➤➤ Driving too closely to a bicyclist;
        ➤➤ Distracted/not paying attention (cell phone, etc);
        ➤➤ Turning directly in front of a bicyclist;
        ➤➤ Opening a car door in the path of a bicyclist; or
        ➤➤ Failing to see or yield for a bicyclist.

        Bicyclists’ unsafe riding behavior: Bicyclists’ riding behavior causes some crashes be-
        tween bicyclists and motor vehicles. Some examples include a bicyclist:
        ➤➤ Riding on the wrong side of the road;
        ➤➤ Not paying attention;
        ➤➤ Failing to look left, right, left before entering a roadway (driveway or street); or
        ➤➤ Failing to ride in a predictable way, i.e., straight versus weaving between traffic.

C. Discuss the purpose of the demonstration:
   ✓✓ Illustrate why wearing a helmet is important, and
   ✓✓ Demonstrate how a helmet protects a rider’s head and brain.

        Importance of wearing a bicycle helmet:
        ➤➤ Wearing a properly fitted bicycle helmet can protect your brain from injury and can
           possibly save your life.
        ➤➤ Wearing a bicycle helmet is the single most effective way to reduce head injuries and
           fatalities in the event of a crash.

                                                             5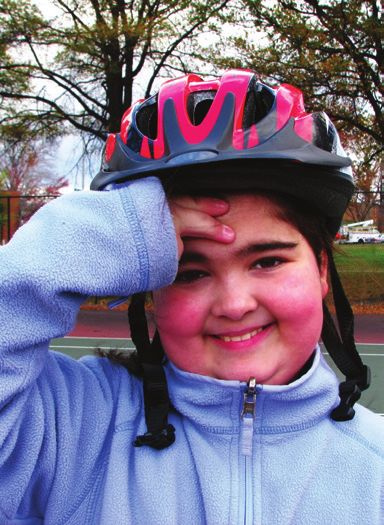
Demonstrating Bicycle Helmet Effectiveness: A How-to Guide

                    1            ➤➤ A properly worn bicycle helmet cushions the head when it hits a hard surface such
                                    as a road or sidewalk; even from hard impacts on grass and dirt. The inner portion
                                    of a helmet is a crushable liner that absorbs and reduces the force of impact to the
                                    head.
                                 ➤➤ Always wear the proper helmet for bicycling; there are varying types of helmets
                                    for different sports. Each helmet is designed based on the particular sport. There
                                    are some helmets that are designed for multi-sport use; make sure the helmet label
                                    reads the helmet is suitable for bicycling.
                                 ➤➤ A proper bicycle helmet should include a manufacturer’s label on the inside of the
                                    helmet stating the helmet meets the CPSC safety standards. (Image 1)

                    2            The demonstration will show:
                                 ➤➤ What can happen to a head and brain when a crash occurs.
                                     ●● The egg represents the human head—the shell is fragile like a skull; the sub-
                                        stance inside the egg represents the brain.
                                     ●● If a head hits a hard surface it can crack and the brain can be injured.

                                 ➤➤ How a bicycle helmet helps protect the head and brain from severe injury.
                                    ●● The helmet is represented by the soft material.

                                    ●● The soft material pads the egg when it is dropped.

                    3    Step 2: Preparing the Egg

                         A. Have the class name the egg. (Optional)

                         B. Hold up the egg and explain that the egg is delicate like our own heads and brains.
                            (Image 2)

                         C. Draw face and hair on the egg with a marker. (Image 3)

                         D. Place the egg in a sealable plastic sandwich bag. (Image 4)

                    4    Step 3: Involve the Students (Optional)

                         A. Ask for a volunteer to help with the demonstration.

                         B. Choose a student who can stand on a chair, stool, or ladder safely.

                         Step 4: First Drop

                         A. Place a minimum of six inches of soft material inside a bucket or box to serve as
                            your “helmet.”

                                                             6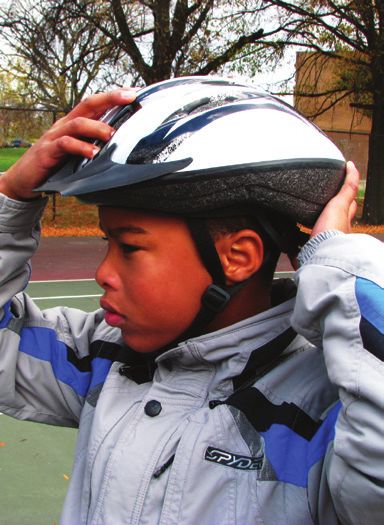
Egg Drop Demonstration
B. Place the “helmet” (soft material) in the middle of the demonstration area. 5
(Image 5)
C. Have the volunteer stand on the chair, ladder, or stool.
D. Assist the student into the position and support the student during the
demonstration.
E. Give the student the egg in a plastic bag and instruct the student to drop the egg
in to the bucket or box from a height of at least four feet. (Image 6)
Step 5: Discuss Outcome
6
A. The egg most likely did not break.
B. Explain that the soft material represents the kind of protection a bicycle helmet
gives in the event of a crash.
C. What should you do if the egg does crack? Use this as a teaching opportunity.
✓✓ Maybe the helmet doesn’t meet the CPSC standards. All helmets sold today are required
to have a CPSC sticker. There may still be a few helmets, however, that are sold at yard
sales and thrift shops that were used prior to required certification and may not meet
the safety standards. (See additional discussion under Demonstration Step 10.)
7
✓✓ Maybe the helmet is damaged (i.e., has foam already crushed or cracked from a previous
fall)? If you are in a crash and hit your head, you should replace the helmet, even if you
can’t see a crack.
✓✓ Maybe the helmet isn’t fitted properly. How a helmet is worn reflects how well it can do
its job. Helmets must always sit properly on the head, and adequately cover the fore-
head. Further, helmets must be buckled and fit securely under the chin. (See associated
handout).
Step 6: Second Drop
A. Set up a brick, rock, or other hard surface in the middle of the demonstration area.
8
(Image 7)
B. Lead the volunteer over to the area and hand the volunteer the sealable plastic bag
containing the egg used in the first drop (or a new egg/bag if needed).
C. Ask the class to guess at what height the egg will break.
D. Instruct student to drop the egg onto the hard surface from a distance of six inches
to one foot.
Note: You might correlate to real life. Consider a scenario: Imagine that you are riding your
bike very fast and hit some gravel and fall. How would you fall and hit your head? What would
happen?
Step 7: Discuss Outcome
A. The egg will most likely break inside the bag when dropped from a distance of six
inches and crack when dropped at a distance of two to three inches. (Image 8)
7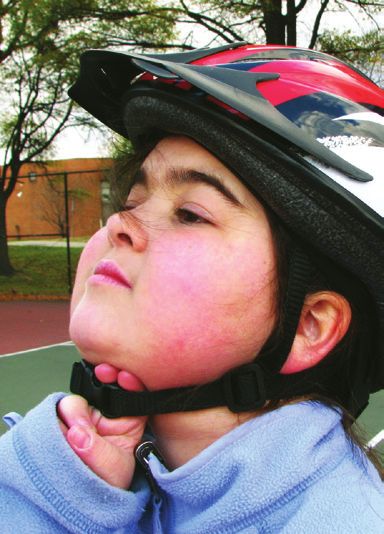
Demonstrating Bicycle Helmet Effectiveness: A How-to Guide
9 B. Use this demonstration to emphasize the delicacy of our own skulls and
brains. E xplain that if a bicyclist falls and hits his or her head, wearing a helmet
significantly decreases the chances of serious brain or head injury or death from
a head injury.
Note: Anytime a young person hits his or her head hard an adult should be told, and a doctor
should check the person out to see if there is swelling to the brain and a possible concussion.
The doctor can instruct the parent or adult about signs to look for at home for 24 hours after
the impact that could indicate swelling and need for additional medical attention.
Step 8: Summary Discussion
10
A. Every person (young and old) riding a bicycle should wear a helmet every ride.
B. A helmet should be worn and secured properly. Discuss the basics of properly
fitting a bicycle helmet:
✓✓ Helmet should fit level on the head (one to two fingerbreadths above eyebrow).
(Image 9)
✓✓ Helmet straps should form a “V” under the ears. (Image 10)
✓✓ Helmet straps must be buckled and tight enough so no more than two fingers can fit
between the chin and the strap. (Image 11)
✓✓ When adjusted, the helmet should not move more than about an inch in any direction.
11 (Image 12)
C. Since the naked eye cannot always see crushed foam or a crack in a helmet, a hel-
met that has been involved in a crash where the head struck a hard surface should
be replaced. For the most recent recommendations on helmet replacement go to:
www.helmets.org/replace.htm.
Optional: Pass your helmet around to the class, pointing out the outside and inside of the hel-
met that protects the head. Both the inner and outer shell of the helmet needs to be inspected
after a crash. If your helmet has been in a crash, the helmet needs to be replaced because partly
crushed foam or small cracks in the lining reduce the protection for your head and brain. You
12 should never use a cracked or otherwise damaged helmet because once damaged it isn’t able
to do its job to protect you.
D. Certified and Proper Helmets:
✓✓ The CPSC sticker tells the consumer that the manufacturer of the helmet certifies the
helmet meets the safety standards established by the CPSC.
✓✓ There are different helmets for different sports.
➤➤ Make sure the helmet you buy is for bicycling; there are varying types of helmets
now for different sports. Each helmet is designed based on the particular sport.
➤➤ Some helmets are designed for multi-sport use; read the label inside the helmet to
make sure you are buying one suitable for bicycling.
8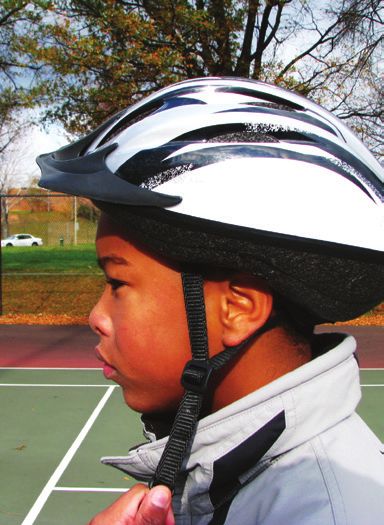
Egg Drop Demonstration

Step 9: Provide Handouts

A. Include a handout on how to properly fit a bicycle helmet in each child’s take home
   material and encourage the child to share this with family and friends.
   ✓✓ English: “Fitting a Helmet” at www.nhtsa.gov/staticfiles/nti/bicycles/pdf/
       8019_Fitting-A-Helmet.pdf or “Wear a Helmet” at www.nhtsa.gov/staticfiles/nti/
       bicycles/pdf/8010-wear_a_helmet.pdf
   ✓✓ Spanish: www.nhtsa.dot.gov/people/injury/pedbimot/bike/EasyStepsSpan/index.htm

B. Bicycle Helmet Pledge: The helmet pledge serves as a commitment that each
   student promises to wear a bicycle helmet every time they ride. Everyone should
   encourage their family members and friends to be safe as well.
   ✓✓ Encourage them to make the commitment and to sign it before the end of the session.
   ✓✓ Include a blank copy of this handout in each student’s take-home material (click here).

Step 10: Discussion of Properly Fitted Bicycle Helmets

A. Using “Easy Steps to Properly Fit a Bicycle Helmet,” demonstrate how to properly
   fit a bicycle helmet.

B. Emphasize that many who wear bicycle helmets wear them incorrectly. The most
   common mistakes are:
   ✓✓ Wearing the helmet too high or too low on the forehead. Helmets should be no more
      than one to two fingerbreadths above the eyebrows (demonstrate based on picture in
      handout).
   ✓✓ Not buckling the helmet.
   ✓✓ Not tightening the chin strap so it holds the helmet securely on the head. The strap
      should be tight enough so not more than one to two fingers fit under the strap when it is
      buckled.

Other Helpful Resources:
✓✓ How to Fit a Bicycle Helmet. This streaming video shows how to select and correctly wear a
   bicycle helmet. Available on the NHTSA Web site at: www.nhtsa.dot.gov, under traffic safety,
   bicycles. Available in English and Spanish.
✓✓ Ride Smart. It’s Time to Start. This 9-minute video is part one of a two-part series. It dis-
   cusses the importance of wearing a bicycle helmet and is presented by middle-school-age
   youth. The video may be viewed on NHTSA’s Web site or ordered via NHTSA’s Material
   Ordering System at http://mcs.nhtsa.gov.
✓✓ Bike Safe. Bike Smart. This 10-minute video is part two of a two-part series. It reviews the
   importance of wearing a bicycle helmet and then discusses the rules of the road. It is presented
   by the same middle-school-age youth as the first video. The video may be viewed on NHTSA’s
   Web site or ordered via NHTSA’s Material Ordering System at http://mcs.nhtsa.gov/.

Helmet Replacement:
For the most recent recommendation on helmet replacement go to:
www.helmets.org/replace.htm.

Bicycle Helmet Site:
For the most up-to-date information on bicycle helmets go to the Bicycle Helmet Safety Institute
Web site: www.helmets.org.

                                                              9
The Melon Drop Demonstration
Target Audience: Children, Grades 4–8

                              11
Demonstrating Bicycle Helmet Effectiveness: A How-to Guide
The Melon Drop Demonstration
Target Audience: Children, Grades 4–8
Description:
In this demonstration, the melon represents a head/brain. The demonstration shows what can
happen when a head (melon) is not protected by a bicycle helmet.
The Melon Drop demonstration consists of two drops. In the first drop, the melon is protected
with a bicycle helmet. Because it is protected, the melon should not break. In the second drop, the
melon has no protection and breaks.
Objectives:
By the end of this session, student will be able to:
✓✓ Discuss the importance of wearing a bicycle helmet;
✓✓ Explain what the experiment taught them; and
✓✓ Explain why they need to wear bicycle helmets every time they ride.
Room Set-Up:
Gather students in a semicircle or to the side of the demonstration area. Allow an open space of at
least 8’ x 8’ for the demonstration.
Materials:
✓✓ A bicycle helmet with no cracks or damage, with the Consumer Product Safety Commission
(CPSC) sticker and sized to fit the honeydew melon
✓✓ One head-size honeydew melon, not ripe enough for seeds to rattle inside when you shake it
✓✓ Tarp
✓✓ Paper towels
✓✓ Ladder, chair, or stool
✓✓ Marker
✓✓ Handouts:
➤➤ Be a Roll Model: Wear a Helmet
English: www.nhtsa.gov/staticfiles/nti/bicycles/pdf/8010-wear_a_helmet.pdf
➤➤ Easy Steps to Properly Fit a Bicycle Helmet:
Spanish: www.nhtsa.dot.gov/people/injury/pedbimot/bike/EasyStepsSpan/index.htm
➤➤ The Bicycle Helmet Pledge (click here)
12Melon Drop Demonstration
Demonstration Steps:
Step 1: Introduction:
A. Engage the students by asking:
✓✓ Who rides a bike?
✓✓ Who wears a helmet? Always? Sometimes?
✓✓ Has anyone ever been involved in a bicycle crash or known someone to be involved in a
bicycle? Was that person wearing a helmet?
✓✓ Who knows someone who has hit his or her head hard and possibly had a concussion?
B. Discuss falling off a bicycle:
✓✓ Many bicycle injuries are due to falls; children young and old, adults, and even experi-
enced riders can fall off their bicycles. You never know when a crash will happen and
that’s why it is important to always wear a helmet when riding.
✓✓ Reasons why people fall/crash:
➤➤ Learning to ride a bicycle for the first time, or getting used to a bicycle;
➤➤ Riding over road hazards (debris, gravel, wet leaves, or sand), or damaged sidewalks
or roads (cracks, pot holes, uneven roads);
➤➤ Bicycle failure (flat tire, bad brakes, etc.);
➤➤ Bicycle rider’s inexperience riding;
➤➤ Motorists’ unsafe driving behavior; or
➤➤ Bicyclists’ unsafe riding behavior.
Motorists’ unsafe driving behavior: Motorists’ driving behavior causes some crashes
with bicyclists. Some examples include:
➤➤ Driving too closely to a bicyclist;
➤➤ Distracted/not paying attention (cell phone, etc);
➤➤ Turning directly in front of a bicyclist;
➤➤ Opening a car door in the path of a bicyclist; or
➤➤ Failing to see or yield for a bicyclist.
Bicyclists’ unsafe riding behavior: Bicyclists’ riding behavior causes some crashes be-
tween bicyclists and motor vehicles. Some examples include:
➤➤ Riding on the wrong side of the road;
➤➤ Not paying attention;
➤➤ Failing to stop and look left-right-left when entering street from a driveway;
➤➤ Failing to see or yield (stop) to traffic at road signs or signals; or
➤➤ Failing to ride in a predictable way, i.e., straight versus weaving between traffic.
C. Discuss the purpose of the demonstration:
✓✓ Illustrate why wearing a helmet is important; and
✓✓ Demonstrate how a helmet protects a rider’s head and brain.
Importance of wearing a bicycle helmet:
➤➤ Wearing a properly fitted bicycle helmet can protect your brain from injury and can
possibly save your life.
13Demonstrating Bicycle Helmet Effectiveness: A How-to Guide
1 ➤➤ Wearing a properly fitted bicycle helmet is the single most effective way to reduce
head injuries in the event of a bicycle crash.
➤➤ A properly worn bicycle helmet cushions the head when it hits a hard surface such
as a road or sidewalk, even from hard impacts on grass and dirt. The inner portion
of a helmet is a crushable liner that absorbs and reduces the force of impact to the
head.
➤➤ Always wear the proper helmet for bicycling; there are varying types of helmets for
different sports. Each helmet is designed based on the particular sport. There are
some helmets designed for multi-sport use; make sure the helmet label reads the
helmet is suitable for bicycling.
➤➤ A proper bicycle helmet should include a manufacturer’s label on the inside of the
2 helmet stating the helmet meets the CPSC safety standards. (Image 1)
The demonstration will show:
➤➤ What can happen to your head and brain when you crash.
●● As you hold up the melon state that the melon represents a human head—it is
fragile; the fruit and seeds inside represent the brain. (Image 2)
●● If a head hits a hard surface it may crack and the brain would be injured.
➤➤ How a bicycle helmet helps protect the head and brain from severe injury.
●● In this demonstration we will place a bicycle helmet on the melon to protect it
3 when it is dropped.
●● After the drop, the melon will show minimal damage due to the bicycle helmet
protection.
Step 2: Prepare the Melon:
A. Personalize the melon by naming it and drawing on a face and hair. (Image 3)
B. Indicate that melons are delicate like our own heads and brains and need to be
protected.
4 C. Properly fit the helmet on the melon, ensuring that the chin straps are tightly
secured. If you choose to do this step ahead of time, indicate to the students that
you have adjusted the helmet to make it fit properly. (Image 4)
Step 3: Involve the Students: (Optional)
A. Ask for a volunteer to help with the demonstration.
B. Choose a student who can stand on a chair, stool, or ladder safely.
14Melon Drop Demonstration
Step 4: First Drop (Melon in Helmet) 5
A. Set up the ladder or chair above the hard floor surface that is covered by a
plastic tarp.
B. Ask a volunteer to stand on a ladder or chair. Hand the volunteer the melon to drop
onto the tarp from six feet above. Drop the melon with the helmet facing down so
the helmet hits first. (Image 5)
Step 5: Discuss Outcome
A. The melon most likely did not break.
6
B. Explain this demonstrates how the head is protected because the helmet
absorbed the force of the fall.
C. If the melon gets injured, note that even with a helmet, the head can get injured
but the amount of damage is less than if a helmet is not worn.
Step 6: Second Drop (Melon Without a Helmet)
A. Repeat the first drop, this time without the helmet—make sure the drop is over
the tarp. (Image 6)
7
B. Ask the class to watch what happens when the drop is made without any helmet.
(Images 7 and 8)
Step 7: Discuss Outcome
A. A head is fragile: it may crack causing temporary damage (concussion) or perma-
nent brain damage as the result of falling off a bicycle. This demonstration empha-
sizes the delicacy of skulls and brains. Explain that if a bicyclist falls or crashes and
hits his or her head, wearing a helmet significantly reduces the chances of serious
brain injuries or death.
✓✓ Most likely, the melon broke. If the melon did not break, it was bruised. Look for a soft 8
spot on the melon and explain that this will be a larger bruise in a few days. Explain
that the same happens with a head. “After you hit your head, even if you can’t see blood,
there can be swelling inside that can cause permanent brain damage.”
✓✓ Talk about brain damage what it means and how it changes a life.
Explain that a helmet absorbs the force of hitting a hard surface only once. A cracked helmet
should be replaced because it cannot protect a head. Optional: pass around a cracked helmet
and discuss helmet care. Helmets are made to absorb force one time. Once the foam is
crushed or the helmet is cracked, it should be replaced.
B. Note: Anytime someone hits his or her head hard an adult should be told, and a
doctor should check the person out to see if there is swelling to the brain and a
possible concussion. The doctor can instruct the parent or adult about signs to look
for at home for 24 hours after the impact that could indicate swelling and need for
additional medical attention.
15Demonstrating Bicycle Helmet Effectiveness: A How-to Guide
9 Step 8: Summary Discussion
A. Every bicycle rider should wear a helmet on every ride.
B. A helmet should be worn and secured properly. Discuss the basics of properly
fitting a bicycle helmet.
✓✓ Helmet should fit level on the head (one to two fingerbreadths above eyebrow).
(Image 9)
✓✓ Helmet straps should form a “V” under the ears. (Image 10)
✓✓ Helmet straps must be buckled and tight enough so no more than two fingers can fit
between the chin and the strap. (Image 11)
10 ✓✓ When adjusted, the helmet should not move more than about an inch in any direction.
(Image 12)
C. Since the naked eye cannot always see crushed foam or a crack in a helmet, a hel-
met that has been involved in a crash where the head struck a hard surface should
be replaced. For the most recent recommendations on helmet replacement go to:
www.helmets.org/replace.htm.
Optional: Pass your helmet around to the class, pointing out the outside and inside of the hel-
met that protects the head. Both the inner and outer shell of the helmet needs to be inspected
after a crash. If your helmet has been in a crash, the helmet needs to be replaced because partly
11 crushed foam or small cracks in the lining reduce the protection for your head and brain. You
should never use a cracked or otherwise damaged helmet because once damaged it isn’t able
to do its job to protect you.
D. Certified and Proper Helmets:
✓✓ The CPSC sticker tells the consumer that the manufacturer of the helmet certifies the
helmet meets the safety standards established by the CPSC.
✓✓ There are different helmets for different sports.
➤➤ Make sure the helmet you buy is for bicycling; there are varying types of helmets
now for different sports. Each helmet is designed based on the particular sport.
➤➤ Some helmets are designed for multi-sport use; read the label inside the helmet to
12
make sure you are buying one suitable for bicycling.
Step 9: Discuss and Provide Handouts:
A. Include a handout on how to properly fit a bicycle helmet handout in each child’s
take-home material and encourage the child to share this with family and friends.
✓✓ English: “Fitting a Helmet” at www.nhtsa.gov/staticfiles/nti/bicycles/pdf/
8019_Fitting-A-Helmet.pdf or “Wear a Helmet” at www.nhtsa.gov/staticfiles/nti/
bicycles/pdf/8010-wear_a_helmet.pdf
✓✓ Spanish: www.nhtsa.dot.gov/people/injury/pedbimot/bike/EasyStepsSpan/index.htm
B. The Bicycle Helmet Pledge: The helmet pledge serves as a commitment that
students promise to wear bicycle helmets every time they ride. Everyone should
encourage their family members and friends to be safe as well.
✓✓ Encourage them to make the commitment and to sign it before the end of the session.
✓✓ Include a blank copy of this handout in each student’s take-home material (click here).
16Melon Drop Demonstration
Step 10: Discussion of Properly Fitted Bicycle Helmet.
A. Using the English or Spanish handout, demonstrate how to properly fit a bicycle
helmet.
B. Emphasize that many who wear bicycle helmets wear them incorrectly. The most
common mistakes are:
✓✓ Wearing the helmet too high or too low on the forehead. The helmet should be no more
than one to two fingerbreadths above the eyebrows (demonstrate based on picture in
handout).
✓✓ Not buckling the helmet.
✓✓ Not tightening the chin strap so it holds the helmet securely on the head. The strap
should be tight enough so not more than one or two fingers fit under the strap when it
is buckled.)
Step 11: Other Helpful Resources:
A. How to Fit a Bicycle Helmet. This streaming video shows how to select and cor-
rectly wear a bicycle helmet. Available on the NHTSA Web site at: www.nhtsa.dot.
gov, under traffic safety, bicycles. Available in English or Spanish.
B. Ride Smart. It’s Time to Start. This 10-minute video is part one of a two-part
series. It discusses the importance of wearing a bicycle helmet and is presented
by middle-school-age youth. The video may be viewed on NHTSA’s Web site or
ordered via NHTSA’s Material Ordering System at http://mcs.nhtsa.gov.
C. Bike Safe. Bike Smart. This 10-minute video is part two of a two-part series. It
discusses the importance of wearing a bicycle helmet and is presented by middle-
school-age youth. The video may be viewed on NHTSA’s Web site or ordered via
NHTSA’s Material Ordering System at http://mcs.nhtsa.gov/.
Helmet Replacement:
For the most recent recommendation on helmet replacement see:
www.helmets.org/replace.htm.
Bicycle Helmet Site:
For the most up to date information on bicycle helmets see the Bicycle Helmet Safety Institute:
www.helmets.org.
17The Hammer Demonstration
Target Audience: Youth, Grades 7–12
19Demonstrating Bicycle Helmet Effectiveness: A How-to Guide
The Hammer Demonstration
Target Audience: Youth, Grades 7–12
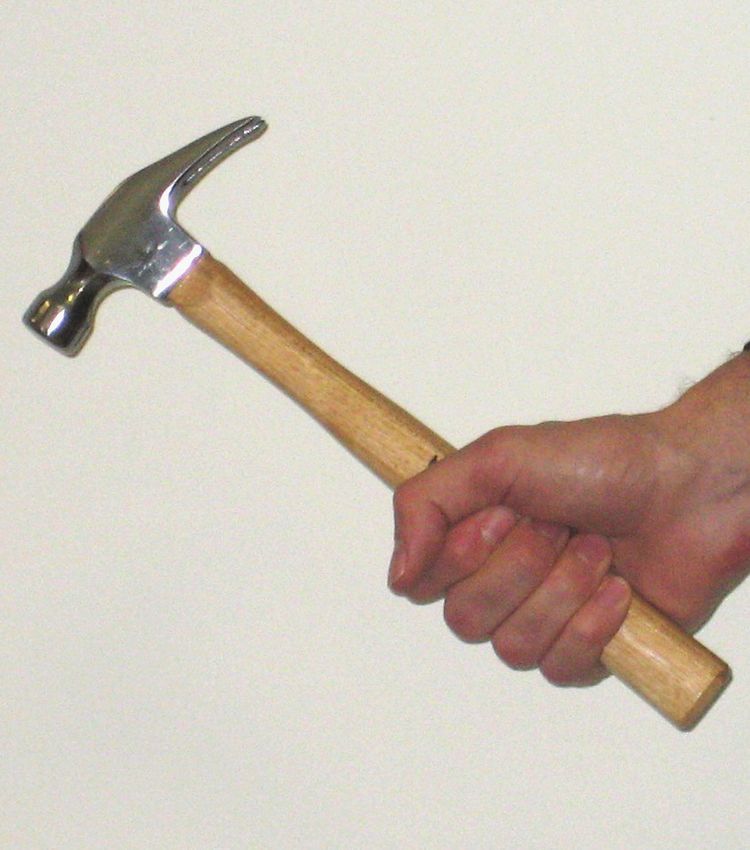
Description:
The Hammer demonstration is an inexpensive and shocking way to show bicycle helmet effective-
ness. In this demonstration, a piece of wood represents a head.
The Hammer demonstration consists of striking a piece of wood two times. In the first strike,
the piece of wood is struck with a hammer, leaving a divot in the wood. In the second strike, a
piece of polystyrene foam (representing the protection of a helmet) placed over a piece of wood is
struck with a hammer, causing the foam to break or crush, but protecting the wood from damage.
(Image 1)
Objectives:
By the end of this session, student will be able to:
✓✓ Discuss the importance of wearing a bicycle helmet;
✓✓ Explain what the experiment taught them; and
✓✓ Explain why they should wear properly fitted bicycle helmets each time they ride a bicycle.
Room Set-up:
Gather students in a semicircle or to the side of the demonstration area. Allow an open space of at
least 8’ x 8’ for the demonstration.
Materials:
✓✓ Bicycle helmet that is in good shape with no cracks, with Consumer Product Safety Com-
mission (CPSC) sticker
✓✓ One hammer
✓✓ Eye protection for the person doing the demonstration (safety goggles)
✓✓ 3 inch × 3 inch × 1 inch soft wood blocks
✓✓ 3 inch × 3 inch piece of polystyrene foam insulation available from a building-hardware sup-
ply or craft stores (approximately 1 to 2 inches thick). A section of a foam picnic cooler can
be used as well.
✓✓ Handouts:
➤➤ Be a Roll Model: Wear a Helmet
English: www.nhtsa.gov/staticfiles/nti/bicycles/pdf/8010-wear_a_helmet.pdf
➤➤ Easy Steps to Properly Fit a Bicycle Helmet:
Spanish: www.nhtsa.dot.gov/people/injury/pedbimot/bike/EasyStepsSpan/index.htm
➤➤ The Bicycle Helmet Pledge (click here)
Demonstration Steps:
Step 1: Introduction
A. Engage the students by asking:
✓✓ Who rides a bike?
✓✓ Who wears a helmet? Always? Sometimes?
20Hammer Demonstration
✓✓ Has anyone ever been involved in a bicycle crash or known someone to be involved in a
bicycle crash? Was he or she wearing a helmet?
✓✓ Who knows someone who hit his or her head hard and has had a concussion? If yes—
any discussion?
B. Discuss falling off a bicycle:
✓✓ Many bicycle crashes are due to falls; children young and old, adults, and even experi-
enced riders can fall off their bicycles. You never know when a crash will happen and
that’s why it is important to always wear a helmet when riding.
✓✓ Examples of why bicyclists fall/crash:
➤➤ Learning to ride a bicycle for the first time or getting used to a bike;
➤➤ Riding over road hazards (debris, gravel, wet leaves, or sand), damaged sidewalks or
roads (cracks, pot holes, uneven roads);
➤➤ Bicycle failure (flat tire, bad brakes, etc.);
➤➤ Bicyclist’s inexperience riding;
➤➤ Motorists’ unsafe driving behavior; or
➤➤ Bicyclists’ unsafe riding behavior.
Motorists’ unsafe driving behavior: Motorists’ driving behavior causes some crashes
with bicyclists. Some examples include:
➤➤ Driving too closely to a bicyclist;
➤➤ Distracted/not paying attention (cell phone, etc.);
➤➤ Turning directly in front of a bicyclist;
➤➤ Opening a car door in the path of a bicyclist; or
➤➤ Failing to see or yield for a bicyclist.
Bicyclists’ unsafe riding behavior: Bicyclists’ riding behavior causes some crashes
between bicyclists and motor vehicles. Some examples include:
➤➤ Riding on the wrong side of the road;
➤➤ Not paying attention;
➤➤ Failing to stop and look left-right-left when entering street from a driveway
➤➤ Failing to see or yield (stop) to traffic at road signs or signals; or
➤➤ Failing to ride in a in a predictable way, i.e., straight versus weaving between traffic.
C. Discuss the purpose of the demonstration:
✓✓ Discuss why wearing a bicycle helmet is important, and
✓✓ Demonstrate how the helmet protects your head and brain.
Importance of wearing a bicycle helmet:
➤➤ Wearing a properly fitted bicycle helmet can protect your brain from injury and can
possibly save your life.
➤➤ Wearing a bicycle helmet is the single most effective way to reduce head injuries in
the event of a bicycle crash.
➤➤ A properly worn bicycle helmet cushions the head when it hits a hard surface such
as a road or sidewalk; even from a hard impact on grass and dirt. The inner p ortion
of a helmet is a crushable liner that absorbs and reduces the force of impact to
the head.
21Demonstrating Bicycle Helmet Effectiveness: A How-to Guide
1 ➤➤ Always wear the proper helmet for bicycling; there are varying types of helmets for
different sports. Each helmet is designed based on a particular sport. There are some
helmets designed for multi-sport use; make sure the helmet label reads the helmet is
suitable for bicycling.
➤➤ A proper bicycle helmet should include a manufacturer’s label on the inside of the
helmet stating the helmet meets the CPSC safety standards. (Image 1)
The demonstration will show:
➤➤ What can happen to your head and brain when you crash.
●● The piece of wood will simulate the human head—it is more fragile than one
2 might think. (Image 2)
●● If your head hits a hard surface it could crack and your brain would be injured.
➤➤ How a bicycle helmet helps protect the head and brain from severe injury.
●● The helmet is represented by a piece of foam. (Image 3)
●● The foam will protect the board when it is struck.
Step 2: Pass Around Helmet
A. Pass a helmet around and point out the non-cracked hard outer skin and undam-
3 aged foam inner core. Explain that a properly worn bicycle helmet cushions and
protects the head from damaging impacts with hard surfaces such as asphalt and
concrete. The inner portion of a helmet is a crushable liner that absorbs and re-
duces the force of impact to the head. These features along with the helmet being
properly fitted make up your best piece of safety equipment when riding a bike.
B. Wearing a properly fitted bicycle helmet is the single most effective way to reduce
head injuries in the event of a bicycle crash.
C. For a helmet to provide protection it must be worn properly.
4 Step 3: Ask for a Volunteer (optional)
Choose a volunteer who you think can safely use a hammer.
Step 4: First Strike (without foam “helmet”)
A. Ask what do they think will happen when the block of wood is hit with the ham-
mer? (Field the students’ responses.) You could ask something like, “When you fall
on your head it is like the street is hammering your head?”
B. Explain that the piece of soft wood represents a head.
5
C. Ask those in the class not wearing eyeglasses to put on their eye protection. If
there are not enough goggles or other eye protection for the class (Image 4), ask
students who are not protected to step away from the demonstration area. Lay out
the wood block. Strike the wood hard with the hammer or have the volunteer do so.
D. Strike the wood. (Image 5)
22Hammer Demonstration
Step 5: Discuss Outcome 6
A. The wood will have a depression in it. Pass around the wood so everyone can see
and feel the depression. You can say something like, “That sure would do a lot of
damage if it had been my brain.” (Image 6)
B. Discuss that heads are fragile; when a head hits a hard object or surface it may
crack, causing permanent brain damage. If there isn’t a big divot in the wood,
explain it doesn’t mean that a head would not have been damaged or that it isn’t
severe. If we hurt the outside of our bodies, we may see some bleeding, or bruis-
ing that indicates there may be some bleeding underneath the tissue. While the
head can bleed if you hit it, or swell if bumped on a kitchen cabinet, for example, 7
this is different. The impact on your head is a lot more forceful when associated
with an impact sport where helmets are worn, such as bicycling, hockey, or foot-
ball. If your head hits during these sports, without the protection of a helmet, you
may not see any damage to the outside; but there could be damage on the inside
that isn’t obvious. Untreated swelling inside the head can cause permanent brain
damage or even death.
Note: Anytime a young person hits his or her head hard an adult should be told, and a doctor
should check the person out to see if there is swelling to the brain and a possible concussion.
The doctor can instruct the adult on signs to look for at home for 24 hours after the impact
that could indicate swelling and need for additional medical attention.
8
C. Discuss brain damage what it means and how it changes a life.
Step 6: Second Strike (with foam “helmet”)
A. Turn the wood block over and show the clean surface to the class. (Image 7)
B. Explain that the lining of a bicycle helmet is made from a special plastic called
expanded polystyrene foam.
C. This material is often used for coffee cups or protective packing material for things
like TV sets and foam picnic coolers. It’s filled with millions of little cells. When you 9
push hard on it the crush slowly absorbs the energy being applied.
D. Explain that the foam will protect the wood just as the helmet will protect a head.
E. Place the foam over the wood. (Image 8)
F. Repeat the first strike. (Image 9)
23Demonstrating Bicycle Helmet Effectiveness: A How-to Guide
10 Step 7: Discuss Outcome
A. The foam will have broken or indented and the wood will not have a divot. If it does
it will be very small.
B. Explain that this demonstrates how a head is protected by a helmet that absorbs
the force of the hit. If the wood has a small divot you should note that even with
a helmet, heads can get injured. The severity of the injury will be reduced by
a helmet.
C. Explain that helmets are meant to absorb this kind of force only once. A helmet
with compressed foam or cracks should be replaced because it will not protect
11
your head. Replace any helmet that has been involved in a crash where the head
hit a hard surface.
Step 8: Summary Discussion
A. Every person (young and old) riding a bicycle should wear a helmet on every ride.
B. A helmet should be worn and secured properly. Discuss the basics of properly
fitting a bicycle helmet:
✓✓ Helmet should fit level on the head (one to two fingerbreadths above eyebrow).
(Image 10)
12
✓✓ Helmet straps should form a “V” under the ears. (Image 11)
✓✓ Helmet straps must be buckled tight enough so no more than two fingers can fit be-
tween the chin and the strap. (Image 12)
✓✓ When adjusted, the helmet should not move more than about an inch in any direction.
(Image 13)
C. Since the naked eye cannot always see crushed foam or a crack in a helmet, a hel-
met that has been involved in a crash where the head struck a hard surface should
be replaced. For the most recent recommendations on helmet replacement go to:
www.helmets.org/replace.htm.
13
Optional: Pass your helmet around to the class, pointing out the outside and inside of the hel-
met that protects the head. Both the inner and outer shell of the helmet needs to be inspected
after a crash. If your helmet has been in a crash, the helmet needs to be replaced because partly
crushed foam or small cracks in the lining reduce the protection for your head and brain. You
should never use a cracked or otherwise damaged helmet because once damaged it isn’t able
to do its job to protect you.
D. Certified and Proper Helmets:
✓✓ The CPSC sticker tells the consumer that the manufacturer of the helmet certifies the
helmet meets the safety standards established by the CPSC.
✓✓ There are different helmets for different sports.
➤➤ Make sure the helmet you buy is for bicycling; there are varying types of helmets
now for different sports. Each helmet is designed based on the particular sport.
➤➤ Some helmets are designed for multi-sport use; read the label inside the helmet to
make sure you are buying one suitable for bicycling.
24Hammer Demonstration
Step 9: Discuss and Provide Handout Materials:
A. Include a handout on how to properly fit a bicycle helmet in each child’s take-home
material for the day and encourage the child to share this with family and friends.
✓✓ English: www.nhtsa.gov/staticfiles/nti/bicycles/pdf/8019_Fitting-A-Helmet.pdf
and www.nhtsa.gov/staticfiles/nti/bicycles/pdf/8010-wear_a_helmet.pdf
✓✓ Spanish: www.nhtsa.gov/people/injury/pedbimot/bike/EasyStepsSpan/images/
EasyStepsSpan.pdf.
B. The Bicycle Helmet Pledge: The helmet pledge serves as a commitment that
students promise to wear bicycle helmets every time they ride. Everyone should
encourage family members and friends to be safe as well.
✓✓ Encourage them to make the commitment and to sign it before the end of the session.
➤➤ Youth Pledge:
www.nhtsa.gov/staticfiles/nti/bicycles/pdf/7505-12a_Youth-Pledge.pdf
➤➤ Parent Pledge:
www.nhtsa.gov/staticfiles/nti/bicycles/pdf/7505-12b_Parent-Pledge.pdf
✓✓ Include a blank copy of this handout in each student’s take-home material.
Step 10: Discussion of Properly Fitted Bicycle Helmet
A. Explain step-by-step how to properly fit a bicycle helmet, using the handout as your
guide.
B. Emphasize that many who wear bicycle helmets wear them incorrectly. The most
common mistakes are:
✓✓ Wearing the helmet too high or too low on the forehead. The helmet should be no more
than one to two fingerbreadths above the eyebrows (demonstrate based on picture in
handout).
✓✓ Not buckling the helmet.
✓✓ The strap under the chin is not tight enough so the helmet doesn’t remain in place when
someone falls. (The strap should be tight enough so not more than one to two fingers fit
under it when it is buckled.)
Other Helpful Resources:
A. How to Fit a Bicycle Helmet. This streaming video shows how to select and cor-
rectly wear a bicycle helmet. Available on the NHTSA Web site at: www.nhtsa.dot.
gov, under traffic safety, bicycles. Available in English or Spanish.
B. Ride Smart. It’s Time to Start. This 10-minute video is part one of a two-part
series. It discusses the importance of wearing a bicycle helmet and is presented
by middle-school-age youth. The video may be viewed on NHTSA’s Web site or
ordered via NHTSA’s Material Ordering System at http://mcs.nhtsa.gov.
C. Bike Safe. Bike Smart. This 10-minute video is part two of a two-part series. It
discusses the importance of wearing a bicycle helmet and is presented by middle-
school-age youth. The video may be viewed on NHTSA’s Web site or ordered via
NHTSA’s Material Ordering System at http://mcs.nhtsa.gov.
25Demonstrating Bicycle Helmet Effectiveness: A How-to Guide
Helmet Replacement:
For the most recent recommendation on helmet replacement see:
www.helmets.org/replace.htm.
Bicycle Helmet Site:
For the most up-to-date information on bicycle helmets see the Bicycle Helmet Safety Institute:
www.helmets.org.
26Take the Pledge:
Smart Riders Wear
Bicycle Helmets
Student Pledge:
I promise to always wear a helmet every time I ride a bicycle. I know that wearing a properly
fitted b
icycle helmet will greatly reduce the chances of my getting seriously hurt and that it
encourages o thers to make the same smart choice to wear one.
Student Signature Date
Parent Pledge:
I promise to always wear a helmet every time I ride and to make sure that my children do the
same. I know that wearing a properly fitted bicycle helmet is the single most effective way to
prevent head injuries resulting from a bicycle crash and that wearing a helmet each ride en-
courages the same smart behavior in others.
Parent Signature Date
For more information on bicycle safety, visit the
National Highway Traffic Safety Administration
Web site at www.nhtsa.gov.YO U T H PLEDGE
RESPONSIBLE
WALKING AND BICYCLING
You know how to walk and bike, but take a second to review what it means to be a responsible pedestrian
and bike “Roll Model” to others. Remember, younger kids look up to you and follow your lead and some
older adults learned differently or don’t remember. You can be an example to others.
By signing this pledge, I agree to be a responsible “Roll Model” by promising to …
■■ Walk on a sidewalk if there is one. If not, I’ll walk on the side of the road facing traffic.
■■ Cross streets safely. I will:
• Cross in crosswalks or at intersections.
• Stop at the edge of the street and look left, right, and left again, and behind me, for traffic. As I’m crossing, I’ll
continue to look for traffic in all directions.
• Stop at the outside edge of parked cars and look left, right, and left again, crossing only when it’s clear. I’ll keep
scanning (looking) for traffic as I cross.
■■ Stay alert, scanning and listening for traffic. I will:
• Stop using personal electronic equipment, such as my phone or mp3 player when walking and biking around traffic.
• Watch out for my own safety by adjusting my position, so I can see and get out of the way of traffic (cars, buses,
trucks, pedestrians, and bicyclists) and avoid obstacles (overgrown bushes, potholes, parked cars, etc.).
■■ Wear my bike helmet correctly (level on my head, covering my forehead and buckled) every time I ride and
encourage my friends and family to do the same.
■■ Always bike in the same direction as traffic whether riding on the sidewalk or road.
■■ Wear bright or fluorescent colors when I walk or bike during the day, to be seen.
■■ When I walk or bike at dusk/dawn, in fog or rain and at night, I will:
• Wear reflective gear (vest, dots, strips, laces, etc.) on my clothes, shoes, backpack, helmet, and bike.
• Use white front lights and red rear lights/reflector on my bike as required by law.
• Use a flashlight or wear lights when walking.
■■ Stay ten feet (five big steps) away from the street when waiting for buses.
■■ Stop, look and listen for approaching trains before I cross railroad tracks.
■■ Walk/bike with my friends or in a group, whenever possible.
Youth Signature Peer Witness
Date Date
7505-12a-050212-v6PAR E N T / C A R E G I V E R
RESPONSIBLE PLEDGE
WALKING AND BICYCLING
As a responsible caregiver, I pledge to my child, to be a safety “Roll Model” when biking, walking, and driving
around bicyclists and pedestrians, leading by example.
As a “Roll Model,” I promise to...
■■ Walk on a sidewalk if there is one. If not, I will walk on the side of the road facing traffic.
■■ Cross streets safely. I will:
• Cross in crosswalks or at intersections.
• Stop at the edge of the street and look left, right, left again, and behind me, for traffic. As I’m crossing, I’ll continue to
look for traffic in all directions.
• Stop at the outside edge of parked cars and look left, right, and left again, crossing only when it’s clear. I’ll keep
scanning (looking) for traffic as I cross.
■■ Stay alert to traffic using my eyes and ears. I will:
• Keep my eyes on the road and not use my personal electronic equipment when walking, biking, or driving in and
around traffic.
• Ensure my own safety and lead by example, using safe behaviors around my children and all others while in and
around all traffic (cars, buses, trucks, pedestrians, and bicyclists). I will avoid obstacles (overgrown bushes, potholes,
parked cars, etc.) that affect my ability to be safe around traffic.
■■ Wear my bike helmet properly (level on my head, covering my forehead and buckled) every time I ride. I will
encourage my adult friends and their children to do the same.
■■ Always ride in the same direction as traffic whether on the sidewalk or road.
■■ Wear bright or fluorescent colors when walking or bicycling during the day, so I can be seen.
■■ Be extra cautious when walking or bicycling in low-visibility conditions and at night. I will:
• Wear reflective gear (vests, dots, strips, laces) on my clothes, shoes, backpack, helmet, and bike.
• Use white front lights and red rear lights/reflectors on my bicycle as required by law.
• Use a flashlight or wear a light and use reflective gear if I am walking.
■■ Stay ten feet (five big steps) away from the street when waiting for buses.
■■ Stop, look and listen for approaching trains before crossing railroad tracks.
■■ Walk and bike as a family, when possible, to reinforce and explain safe behaviors around traffic. By doing so, my
child will develop good traffic safety habits for a lifetime.
Parent Signature Child Signature
Date Date
7505-12b-050212-v6DOT HS 811 110
January 2015
11201-012315-v3You can also read