SAFE ROUTES PHILLY - Biking Activities & Resources Summer 2020
←
→
Page content transcription
If your browser does not render page correctly, please read the page content below
SAFE ROUTES
   PHILLY

Biking Activities & Resources
        Summer 2020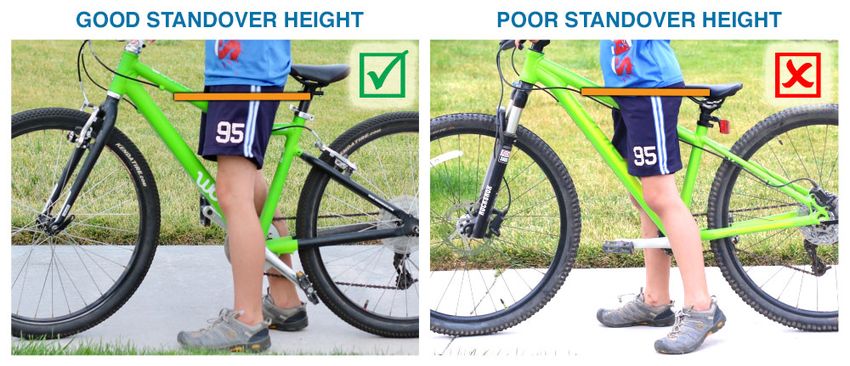
WELCOME
                    Hello students, parents, and caregivers!

         This year, we celebrated Bike to School Day differently than we
      originally planned. Instead of gathering together as a large group with
our classmates, we explored our neighborhoods and communities independently.
 We would like to encourage you to continue to explore ways to stay physically
                        active through cycling this summer!

   While the Safe Routes Philly program gets ready to launch later this year,
   please enjoy these biking resources and activities from other cities, safety
 organizations, and active transportation programs in this packet. To learn more
            about Safe Routes Philly, visit phila.gov/otis or contact
                         SafeRoutesPhilly@phila.gov.

                                Enjoy the ride!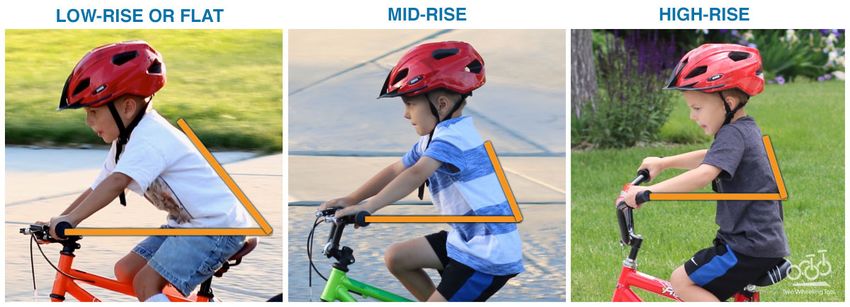
TABLE OF CONTENTS
PART 1: Bicycle Safety Resources
Fitting Your Bike Helmet (all ages)
Materials by NHTSA

Bicycle Size Information Sheet (all ages)
Materials by Two Wheeling Tots, LLC

Riding Safely Information Sheet (all ages)
Materials by NHTSA

PART 2: Bicycle Safety for Elementary Grades
Brainy Bikers (elementary grades)
Materials by The Nemours Foundation/KidsHealth

Bike Safety Memory (activity) (elementary grades)
Materials by NHTSA

Bike Parts Worksheet (elementary grades)
Materials by American Alliance for Health, Physical Education, Recreation and Dance

PART 3: Bicycle Safety for Middle Grades
Bicycle Helmet Function (middle grades)
Materials by American Alliance for Health, Physical Education, Recreation and Dance

Instructional Component – Parts of The Bike (middle grades)
Knowledge of the Bike (flash card 1) (middle grades)
Knowledge of the Bike (flash card 1) (middle grades)
Knowledge of the Bike (flash card 1) (middle grades)
Materials by BikeSafe Physical Education Curriculum, Grades 6-8
PART 1

BICYCLE SAFETY RESOURCES
Fitting Your
Bike Helmet                                        Buy it. Fit it. Wear it.
                                                   EVERY RIDE!
                                                    The Proper Helmet Fit
                                                    Helmets come in various sizes, just like hats. Size
                                                    can vary between manufacturers. Follow the steps
                                                    to fit a helmet properly. It may take time to ensure a
         Size:                                      proper helmet fit, but your life is worth it. It’s usually
         Measure your head to find your             easier to look in the mirror or have someone else
                                                    adjust the straps. For the most comprehensive list
STEP 1   size. Try on several helmets in
         your size until one feels right.           of helmet sizes according to manufacturers, go the
         Now put the helmet level on your           Bicycle Helmet Safety Institute (BHSI) Web site at:
         head and adjust the sizing pads            www.bhsi.org/.
         or fit ring until the helmet is snug.

STEP 2                                           STEP 5
         Position:                                                   Chin Strap:
         The helmet should sit level on your                         Buckle your chin strap. Tighten the strap
         head and low on your forehead—                              until it is snug, so that no more than one
         one or two finger-widths above                              or two fingers fit under the strap.
         your eyebrow.

STEP 3                                           STEP 6
         Side Straps:
         Adjust the slider on both straps
                                                                    Final Fitting:
         to form a “V” shape under, and                             A. Does your helmet fit right? Open
         slightly in front of, the ears. Lock                       your mouth wide…big yawn! The helmet
         the slider if possible.                                    should pull down on your head. If not, refer
                                                                    back to step 5 and tighten the chin strap.

                                                    B. Does your helmet rock back more than two fingers
                                                       above the eyebrows? If so, unbuckle and shorten the
STEP 4   Buckles:
                                                       front strap by moving the slider forward. Buckle and
                                                       retighten the chin strap, and test again.
         Center the left buckle under the
         chin. On most helmets, the straps
                                                    C. Does your helmet rock forward into your eyes? If so,
                                                       unbuckle and tighten the back strap by moving the
         can be pulled from the back of the
                                                       slider back toward the ear. Buckle and retighten the
         helmet to lengthen or shorten the
                                                       chin strap, and test again.
         chin straps. This task is easier if
         you take the helmet off to make            D. Roll the rubber band down to the buckle. All four straps
         these adjustments.                            must go through the rubber band and be close to the
                                                       buckle to prevent the buckle from slipping.
Replace a Helmet.
   Replace your helmet when it has been in a crash; damage
   is not always visible.

   Buy/Fit the Helmet For Now.
   Buy a helmet that fits your head now, not a helmet to
   “grow into.”

   Ensure Helmet Comfort.
   If you buy a helmet that you find comfortable and
   attractive, you are more likely to wear it. Readjust as
   necessary to ensure the helmet fits properly each ride.

   Cover Your Forehead.
   Adjust the helmet fitting based on your helmet first being       side
   in the correct position, level on the head and low on your       strap                                                       side
   forehead.                                                                                                                    strap
   Adjust Straps Until Snug.
   Both the side and chin straps need to be snug.                                                     chin strap
   Avoid Helmet Rocking.                                         chin strap
   Your helmet should not rock forward or backward, or
   side to side on your head.                                                                                         buckle
   If your helmet rocks more than an inch, go back to step                     buckle
   6, and readjust.

   Be a “Roll” Model for Safe Behavior                               Helmet Laws
   Everyone — adult and child — should wear a bicycle                More children ages 5-14 go to emergency rooms for bicycle-related
   helmet each time they ride. Wearing a helmet each ride            injuries than with any other sport; many are head injuries. As a
   can encourage the same smart behavior in others.                  result, many States and local jurisdictions have child bicycle helmet
                                                                     laws to increase and better ensure the safety of children when
   Helmet Certification                                              bicycling. See: www.helmets.org/mandator.htm.
   Bicycle helmets sold in the U.S. must meet the standards          Like car crashes, bicycle crashes can happen at any time, involving
   issued by the U.S. Consumer Product Safety Commission             not only children, but adults, many of whom are skilled riders. In
   (CPSC). Look for the certification label inside the helmet.       fact, middle-age adults represent the average age of bicycle riders
                                                                     killed and injured.
                                                                     Helmets are the single most effective piece of safety equipment for
                                                                     riders of all ages, if you crash. Everyone should choose to wear a
                                                                     helmet; it just makes sense!

        For more information on
    bicycle safety, visit the National
         Highway Traffic Safety
      Administration Web site at:
    www.nhtsa.dot.gov/bicycles
DOT HS 811 568
April 2012
                                                                                                                                 8019-050212-v2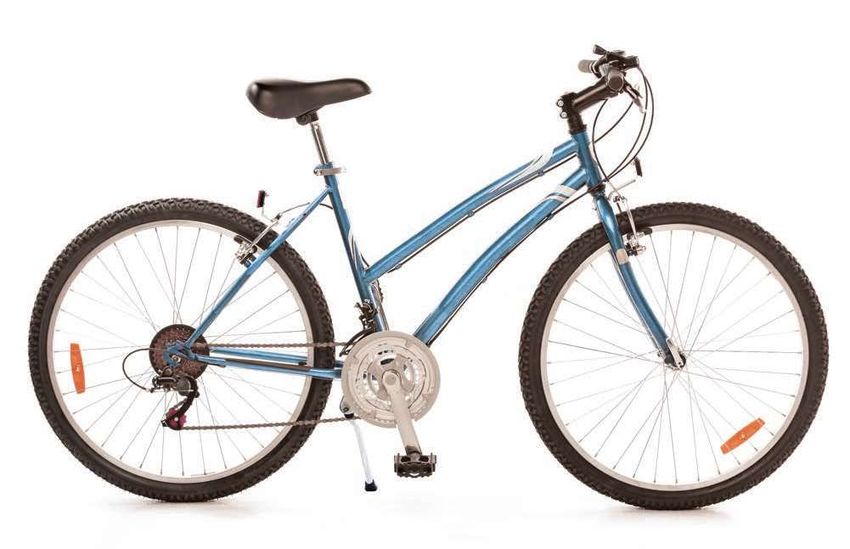
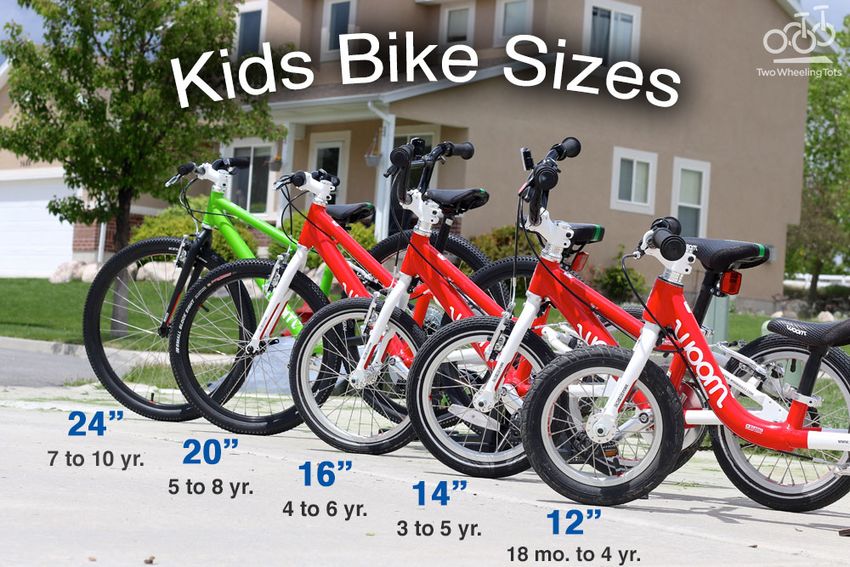
Steps to Choosing the Right Bike
Step One: Choosing the right
size bike
Wheel size is the most
common way to determine
what bike size a child should
be riding.

Step Two: Determine the
appropriate seat height
Seat height should be set in
relation with the child’s
inseam. For beginners or first
time bike riders the bike
height should be set to their
inseam (as picture on the left),
once your child has more
experience they should be
able to stand on their toes
while sitting on the seat (as
pictured on the right).
Step Three: Determine the
appropriate stand over height
The Stand over height is the
height needed to stand over
the top tube of the bike. When
standing over the bike there
should be 1 to 2 inches of
clearance.

           Source- Two Wheeling Tots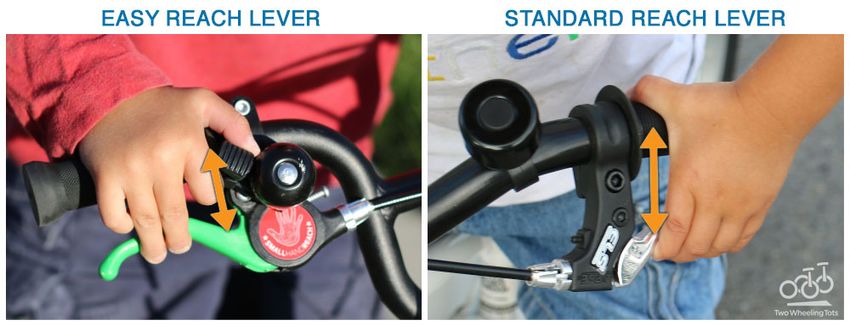
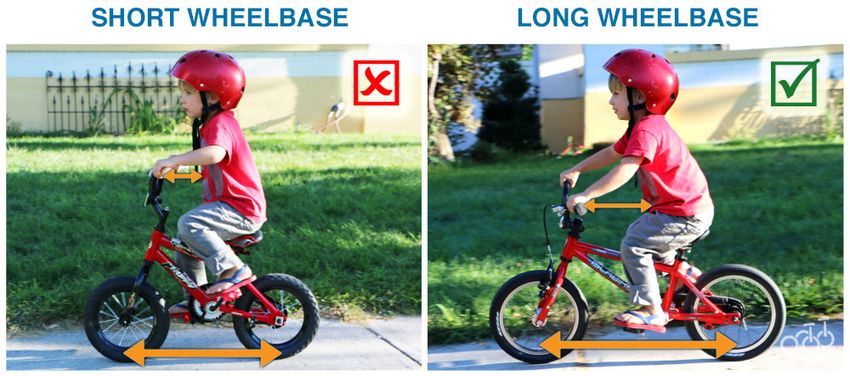
Step Four: Pick a frame design
with a long wheelbase
(pictured on the right) to
provide more stability and
control for the rider.

Step Five: Differences in
handlebars
Tall handlebars (pictured on
the right) limit the riders space
and prevent them from
applying more force on the
handlebars, where as
handlebars that are too low
place (pictured on the left)
beginners in a position that
can cause them to tire more
easily. Mid-rise handlebars
(pictured in the center) are
ideal for children and
beginners.
Step Six: Hand Brakes Levers
Around age 3 ½ children have
the adquet hand-eye
coordination to use standard
hand brakes. There are two
types of hand brakes easy
reach lever designed for
beginners (pictured on the
left) and standard reach lever
(pictured on the right)
designed for intermediate
riders.
             Source- Two Wheeling Tots
TIPS FOR
PARENTS,                                         BICYCLE SAFETY
GUARDIANS,                                                Bicycling is fun, healthy, and a great family activity.
AND KIDS                                                         But a bicycle isn’t a toy; it’s a vehicle!
                                                          Some bike crashes can cause serious injuries and most are
                                                          related to the behavior of you (the bicyclist) or the motorist.
                                                          There are a number of things you can do to prevent a crash,
                                                          and protect your brain if a crash occurs.

Safe Riding Tips
Before riding, make sure you, your family, and the bicycles are
ready to ride. Be a “Roll Model” for other adults and children.
Remember to:
■■   Wear a Bicycle Helmet. Everyone – at every age – should
     wear bicycle helmets. For more guidance on fitting a helmet, see the
     National Highway Traffic Safety Administration’s Fitting Your Bike
     Helmet.
■■   Adjust Your Bicycle to Fit. Stand over your bicycle. There
     should be 1 to 2 inches between the rider and the top tube (bar) if
     using a road bike and 3 to 4 inches if using a mountain bike. The
     seat should be level front to back, and the height should be adjusted
     to allow a slight bend at the knee when the leg is fully extended. The
     handlebar height should be level with the seat.
■■   Check Your Equipment. Before riding, inflate tires properly and
     check that the brakes work.
■■   See and Be Seen. Whether daytime, dawn, dusk, bad weather,
     or at night, make yourself visible to others. Wear neon, fluorescent or
     other bright colors when riding, to be most easily seen. Wear something
     that reflects light, such as reflective tape or markings, or flashing lights.
     Remember, just because you can see a driver doesn’t mean the driver can
     see you.

■■   Control the Bicycle. Ride with two hands on the handlebars, except when signaling a turn. Place books and other
     items in a bicycle carrier or backpack.
■■   Watch for and Avoid Road Hazards. Look for hazards such as potholes, broken glass, gravel, puddles, leaves,
     and dogs. All these hazards can cause a crash.
■■   Use Verbal and Non-Verbal Communication. This includes eye contact with drivers, turn signals, pointing to road
     hazards for bicyclists behind you, and stating “passing on your left,” or “on your left.”
■■   Avoid Riding at Night. It’s hard for road users to see bicyclists at dusk, dawn, and nighttime. Use reflectors on the
     front and rear of your bicycle. White lights and red rear reflectors or lights are required by law in all States.
Rules of the Road - Bicycling on the Road
          In all States, bicycles on the roadway are considered vehicles, and bicyclists are the drivers, with the same rights
          and responsibilities as motorists to follow the rules of the road. When riding, always:
          ■■   Go With the Traffic Flow. Ride on the right in the same direction as other vehicles. Go with the flow – not
               against it.
          ■■   Obey All Traffic Laws. A bicycle is a vehicle and you’re the driver. When you ride in the street, obey all traffic
               signs, signals, and lane markings.
          ■■   Yield to Traffic. Almost always, drivers on a smaller road must yield (wait) for traffic on a major or larger road.
               If there is no stop sign or traffic signal and you are coming from a smaller roadway (out of a driveway, from a
               sidewalk, a bike path, etc.), you must slow down and look to see if the way is clear before proceeding. Yield to
               pedestrians in a crosswalk.
          ■■   Be Predictable. Ride in a straight line, not in and out of cars. Signal your moves to others.
          ■■   Stay Alert at All Times. Use your eyes and ears. Watch out for potholes, cracks, wet leaves, storm grates,
               railroad tracks, or anything that could make you lose control of your bike. Listen for traffic and avoid dangerous
               situations; don’t use personal electronics when you ride.
          ■■   Look Before Turning. When turning left or right, always look behind you for a break in traffic, and then signal
               before making the turn. Watch for left- or right-turning traffic.
          ■■   Watch for Parked Cars. Ride far enough out from the curb to avoid the unexpected from parked cars (like
               doors opening, or cars pulling out).

          Where to Ride Safely
          ■■   Use bike lanes or bike paths, if available.
               • While bicycles are allowed on many roads, riders may feel safer being separated from traffic. A lane or path is a
                 safer choice than riding on a sidewalk.
               • Riding on sidewalks puts you in a place where cars do not look for or expect to see moving traffic.
               • Sidewalk riding puts you at risk for crashes at driveways and intersections.

          ■■   Children younger than 10 years old are not consistently able to make the decisions
               necessary to safely ride unsupervised in the street. Therefore, they are safer riding away from traffic.
          ■■   For anyone riding on a sidewalk:
               • Check the law in your State or jurisdiction to make sure sidewalk riding is allowed.
               • Watch for vehicles coming out of or turning into driveways.
               • Stop at corners of sidewalks and streets to look for cars and to make sure the drivers see you before crossing.
               • Enter a street at a corner and not between parked cars. Alert pedestrians that you are nearby,
                 saying, “Passing on your left,” or use a bell or horn.

                                                                                               For more information
                                                                                               on bicycle safety, visit
                                                                                              the NHTSA Web site at:
                                                                                             www.nhtsa.gov/Bicycles.
DOT HS 811 557
January 2013

                                                                                                                                     9300b-011813-v2a
PART 2 BICYCLE SAFETY FOR ELEMENTARY GRADES
Personal Health Series
                                                       Bike Safety
Brainy Bikers
Promise to follow the #1 bike safety rule by writing your name and today’s date:
I promise to wear a helmet every time I ride a bike.
Name:                                                                                       Date:

Create a cool design for a bike helmet using crayons, markers, and/or stickers.

                                          © 2017 The Nemours Foundation/KidsHealth. Reproduction permitted for individual classroom use.
memory
Cut chips along dotted line ✄
bike sign
stop sign tire hand sign This sign means bicycle
Come to a complete stop Always check the air in your This signals that you crossing warning. Be courteous
when you see this sign. tires before getting on your bike. would like to turn left. to others and stay alert.
green t-shirt hand sign
Green means ‘go.’ See and be seen. Always wear helmet This signals that you
But always use caution. bright clothes when riding. Always wear your helmet. would like to turn right.
bike sign
hand sign This sign means bicycle t-shirt tire
This signals that you crossing warning. Be courteous See and be seen. Always wear Always check the air in your
would like to turn left. to others and stay alert. bright clothes when riding. tires before getting on your bike.
stop sign hand sign green
helmet Come to a complete stop This signals that you Green means ‘go.’
Always wear your helmet. when you see this sing. would like to turn right. But always use caution
DOT HS 810 709w
January 2007memory Cut chips along dotted line ✄
PART 3

BICYCLE SAFETY FOR MIDDLE
         GRADES
bIcyclE hElmEt
fuNctION wORkShEEt
Student Date
directions: Please correctly label the bicycle helmet parts by matching the letter on the
helmet with the part listed on this worksheet. After labeling, please explain the function
of each part of the helmet.
wORkShEEt
•C
•e
d•
i •
Front of helmet
Back of helmet
F • •B
workSHeeT > bicycle HelmeT FuNcTioN
Shell
Foam •A
Universal-fit mechanism
•
g
Straps
h •
Adjuster
Chin buckle
•
Vents
37bIcyclE hElmEt
fuNctION wORkShEEt
ANSwER kEy
A Foam
B Universal-fit mechanism
C Vents
d Front of helmet
e Back of helmet
F
g
Straps
Adjuster
•C
h Chin buckle
i Shell
•e
d •
i •
workSHeeT > bicycle HelmeT FuNcTioN
F • •B
•A
g•
h •
•
38BikeSafe
Physical Education
Curriculum for
Day 2: Preparing to Ride
Grades 6th-8th Instructional Component – Parts of the Bike
www.ibikesafe.us
Day Two Overview: 1) Intro and Review from Day 1
1. Intro and Review of Day 1
(2 minutes) • Have students name parts of the brain, bike safety tips, and purposes of riding a bike.
2. Parts of the Bike (8 • If you used chart paper to record bike safety tips, bring that out for review.
minutes)
3. Optional Activity – Parts of Introduction to Preparing to Ride:
the Bike Worksheet
4. Pre-ride Bike Check
Today we are going to focus on getting
Introduction
(5 minutes) ready to ride. That means getting us ready
5. “ABC Quick” Check & and getting our bikes ready.
Teacher Demo (10 minutes)
6. “ABC Quick” Check Jump,
Link, and Run Activity (15
minutes) 2) Parts of the Bike
Objectives: Before we get on a bike to ride it, we need to know our bike. The more we know about
1. Students recognize the the bike, the safer we are when we are on the bike.
parts of the bike and their
functions. Think about riding a bike like driving a car. We cannot drive the car if we do not
2. Students understand of the know how to start the car or how to make the car go forward. We cannot ride a bike
importance of bike without knowing where the pedals are and what to do with them.
maintenance. Which parts of the bike can you name?
3. Students understand how
to prepare their bodies and
their bikes for safe bike
riding.
Use the Parts of the Bike Flashcards (pgs. 11-13) to review the names of important parts of the
Materials: bike.
• Parts of the Bike Flashcards
(pgs. 11-13) • Start with Flashcard 1 (pg. 11) and have students name as many parts of the bike as they
• Optional: Real-life bicycle can.
• Optional: Parts of the Bike • Use Flashcard 2 (pg. 12) to confirm the part names.
poster • Point to each individual part on the flashcard as the name is said.
• Use Flashcard 3 (pg. 13) to review all major parts and their functions.
Advance Preparation: • Students can share what they already know about the function of each part as it is
• Optional: If using Parts of reviewed.
the Bike Flashcard 1 as a • Correct students’ knowledge, as needed.
worksheet, prepare enough • Do a final quiz/review using the unlabeled bike on Parts of the Bike Flashcard 1 (pg. 11).
copies for each student
If a bike is available, conduct the activity without the Parts of the Bike Flashcards. Instead,
Supplemental: review names and functions of the bike parts by pointing to each on the bike.
N/A
3) Optional Activity – Parts of the Bike Worksheet
Have students complete the Parts of Bike Flashcard 1 (pg. 11) individually as an in-class or
take-home assignment to test knowledge gain from this lesson.
Tell students to name the bike parts indicated on the Flashcard. On the back of the paper,
have students describe the function of each bike part.
10SOURCES PART 1 Title: Fitting Your Bike Helmet NHTSA Retrieved via: https://www.nhtsa.gov/sites/nhtsa.dot.gov/files/8019_fitting-a-helmet.pdf Title: Choosing the Right Bike Table Copyright © 2020 Two Wheeling Tots, LLC Retrieved via: https://www.twowheelingtots.com/ Title: Riding Safely Information Sheet NHTSA Retrieved via: https://www.nhtsa.gov/sites/nhtsa.dot.gov/files/811557.pdf PART 2 Title: Brainy Bikers © 2017 The Nemours Foundation/KidsHealth. Retrieved via: https://classroom.kidshealth.org/classroom/prekto2/personal/safety/bike_safety.pdf Title: Choosing the Right Bike Table Copyright © 2020 Two Wheeling Tots, LLC Retrieved via: https://www.twowheelingtots.com/ Title: Bike Safety Activity Time: Heroes at Home Club NHTSA Retrieved via: https://one.nhtsa.gov/people/injury/pedbimot/bike/bskitboth/3152bskit/pages/section1/section1toc.html Title: Bike Safety Memory NHTSA Retrieved via: https://one.nhtsa.gov/people/injury/pedbimot/bike/BSKitBoth/3152BSKit/pages/Section4/Section4TOC.ht ml Title: Bike Parts Worksheet (elementary grades) American Alliance for Health, Physical Education, Recreation and Dance Retrieved via: https://www.shapeamerica.org/publications/resources/teachingtools/qualitype/upload/bikeology- curriculum-part1-v2.pdf
PART 3
Title: Bicycle Helmet Function Worksheet
American Alliance for Health, Physical Education, Recreation and Dance
Retrieved via:
https://www.shapeamerica.org/publications/resources/teachingtools/qualitype/upload/bikeology-
curriculum-part1-v2.pdf

Title: Knowledge of the Bike Parts 1,2,3
BikeSafe Physical Education Curriculum Grades 6th- 8th
www.ibikesafe.us
Retrieved via: http://www.pedbikeinfo.org/bicyclesaferjourney/bikesafepec.pdf
You can also read