User Guide PULSAR PLUS ENGLISH - Midsummer Wholesale
←
→
Page content transcription
If your browser does not render page correctly, please read the page content below
User Guide
PULSAR PLUS
ENGLISH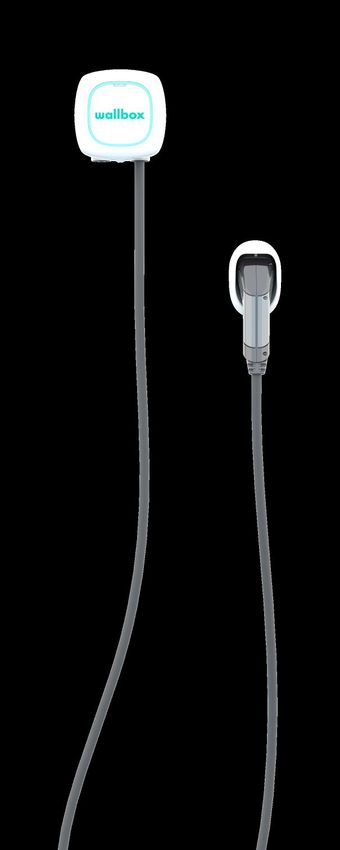
Contents
    Safety Recommendations                          3
    Legal Notice                                    3
    Safety Instructions                             3
    Connector Recommendations                       4
    Welcome to Wallbox                              5
       Get to know your Wallbox Pulsar Plus         6
       Charger Status                               7
    Discover myWallbox                              9
       Wallbox App                                 10
            1-Download the app                     10
            2-Create a myWallbox account/ Log in   10
            3-Adding your first charger            11
            4-List of chargers                     11
            5-Sync with your charger               12
            6-Manage the charger                   12
            7-Configuration					 14
            8-Edit your profile                    17
       myWallbox Portal                            18
            Create a myWallbox account             18
            Access to the website                  20
            First access                           21
            Users                                  23
            User account menu                      26
    Maintenance                                    27
    Troubleshooting                                27
    Service		         			                          30

2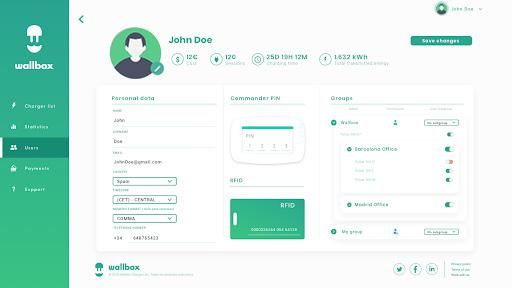
Safety Recommendations
    The user must read and fully understand the safety instructions provided. Disregard of or actions
    contrary to the safety information and instructions contained in this manual and printed on the device
    may lead to electric shock, fire and/or severe injury and either damage to the vehicle or to the Wallbox
    device. Any resulting damage from such actions is excluded from the warranty. The installation of
    the Wallbox device must be performed by a qualified electrician in accordance with the perceptive
    regulation. The information provided in this Installation Guide does not relieve the user of responsibility
    to follow all norms and standards or local regulations that may apply. The Wallbox charger device has
    been designed, developed and manufactured to satisfy requirements, safety dispositions and norms in
    accordance with the directives presented in the declaration of conformity.

    Legal Notice
    This document is intended to be used as a reference guide for the operation of the charger.
    The product images shown are for illustration purposes only and may not be an exact representation
    of the product. Wallbox reserves the right to make changes to the specifications and processes of the
    product and documentation at any time without prior notice.

    Safety Instructions
        • Do not operate if physical defects such as cracking, breakage, corrosion, or other damage are
          observed. In this case, please contact your distributor.
        • Only an authorised specialist and qualified personnel may open, disassemble, repair, alter or modify
          the Wallbox device. Unauthorised modification of the Wallbox equipment makes manufacturer
          warranty void.
        • Unauthorised modifications or conversions are not allowed.
        • Special precautions must be taken with electronic implants. Please contact your medical device
          manufacturer to find out the potential effects that the charging process may cause to it.
        • Do not delete any warning on the device, such as safety symbols, warning notices, rating plates,
          identification plates or cable markings.
        • Protect your Wallbox device from any impact which it may be exposed.
        • The charging station does not have its own power switch. Always respect local electricity rules
          and regulations, as relevant.
        • Wallbox chargers can only be used under the operating parameters specified and within -25ºC to
          40ºC of ambient temperature.
        • Do not use your Wallbox charger under adverse climatic conditions that could affect the vehicle
          or the Wallbox device. Do not open the cover in the rain.

3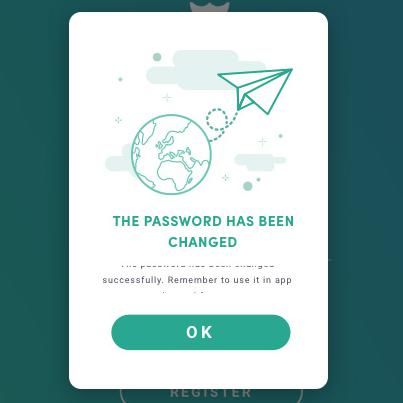
Connector Recommendations
      • Always check the charging cable and the contacts for damage and contamination before use.
      • Never use a damaged charging cable, the vehicle plug, or the infrastructure electrical outlet
        to charge.
      • Never use contacts that are dirty or wet.
      • Only connect the connector to vehicle plug and infrastructure electrical outlets that are protected
        against water, moisture and liquids.
      • After stopping the charging process, the vehicle connector and the equipment plug can be
        disconnected. Never use force to disconnect the vehicle connector from the inlet or the equipment
        plug power outlet. Such dangerous activity can cause serious injuries or even death.
      • Depending on the charging station and the electric vehicle, the time to complete the charging
        process and the duration of unlocking may vary.
      • Some vehicles can be started with the charging cable connected. Be sure to unplug before
        driving off.
      • Do not use the charging cable with an extension cable or an adapter.
      • If the connector emits smoke or begins to melt, never touch the charging cable. If possible, stop
        the charging process. In any event, disconnect the power supply from the Wallbox device.
      • Keep the charging cable out of the reach of children.
      • Be careful with the connector, do not step on it or on the cable.
      • The cable should NOT be tightened under ANY CIRCUMSTANCES while connected to the vehicle.

        Important information for the correct disposal of the product in accordance with Directive
        2012/19/EC. At the end of its useful life, the product will not be disposed of as urban waste.
        It must be taken to a collection center for special and differentiated waste or to a distributor
        that provides this service.

4
Welcome to Wallbox.
    Congratulations on your purchase of the revolutionary
    electric vehicle charging system designed with
    cutting edge technology to satisfy your daily needs.
    This user guide will show you how to charge your electric
    vehicle and will also give you the basic functionalities for
    your interaction with the Wallbox Pulsar Plus.

5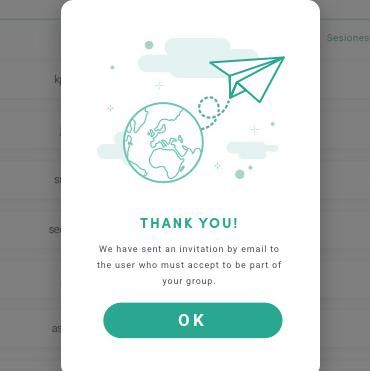
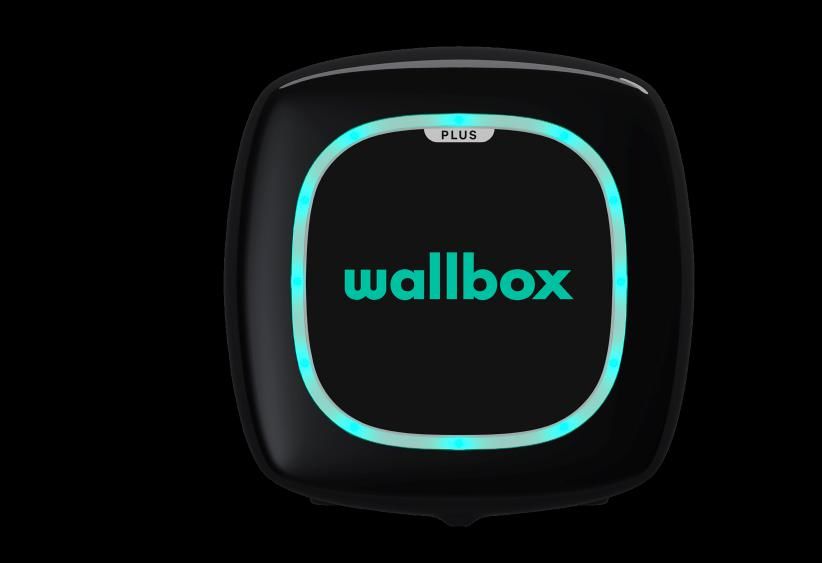
Get to know your Wallbox Pulsar Plus
    Before you start, please take a quick look over your Wallbox Pulsar Plus.

                                              LED HALO

                                                  BODY

                                          FRONT COVER                                      OPENING TOOL

                                       CHARGING CABLE

                                          PLUG HOLDER

                                                                                   PRODUCT INFO STICKER

                                                       Once your Wallbox Pulsar Plus is ready and
                                                       powered on, you will operate it through the Wallbox
                                                       app. Use the myWallbox portal to get information
                                                       about consumption, charging time, energy cost or
                                                       your charger’s uploaded sessions.
                                                       The firmware is specially designed to fully control
                                                       and manage the charging process by simple
                                                       commands, but remember that you will always be
                                                       able to just plug and charge, it can be as simple
                                                       as that.

6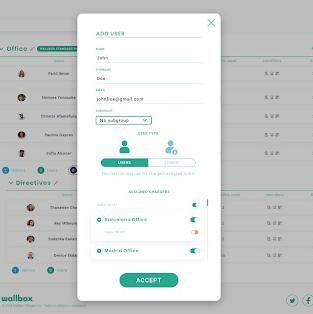
Charger Status
    The Wallbox Pulsar Plus has an LED halo that reflects charging activity using an intuitive colour code.

                             READY
                             The charger remains in this state when it is not connected to a car and ready
                             to be used.

                             CONNECTED
                             The charger detects that it is connected to a car. There are a few situations
                             were the charger can remain in this state:
                               • Waiting for car demand: this situation occurs when the car is not
                                 willing to charge although the charger is ready. This is due to one of
                                 following situations:
                                      Car battery is fully charged.
                                      The transition between connecting the car and start charging.
                                      The transition between resuming the charge and start charging.

                                 • Charge   paused: the user has paused the charge through the app.
                                 • End of schedule: when a schedule finishes, the charger stops the charge.

                             CONNECTED - SCHEDULED
                             When the Pulsar is connected to the car, if the halo is turquoise
                             and pulsing, then a schedule is due before the next 12 hours. It
                             won’t charge until the start time of the programmed schedule.

7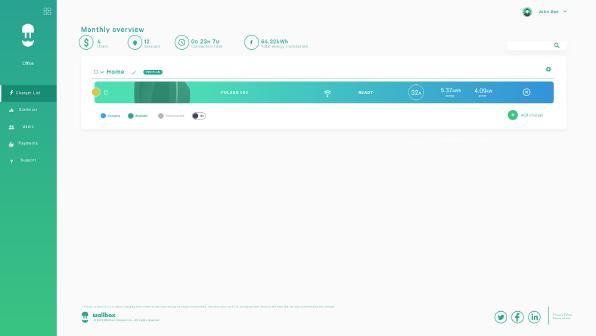
Charger Status

                     CHARGING
                     The charging process has started and the car is being recharged for the
                     next ride.

                     LOCKED
                     The charger is locked. Only an authorised user can unlock it. User
                     authentication must be done with the Wallbox App or myWallbox portal.

                     ERROR
                     The charger is in fault mode. Do not try to charge in this condition. Contact
                     Wallbox Service so they can advise you on this topic.

8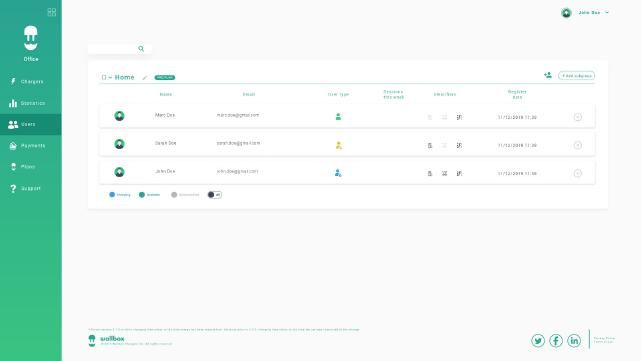
Discover myWallbox.

9

Wallbox App
                              1 Download the App
                                Before you start, we recommend that you download the Wallbox app on
                                your smartphone and create a myWallbox account to manage the charger
                                remotely. The Wallbox app is available on PlayStore and AppStore.
                                To download the Wallbox App, scan the QR code.

     2 Create a myWallbox account / Log in
       If you are already a registered user, use your email
       and password to login in the app.

                                                              For the first time of use, you need an account
                                                              to access the Wallbox App. Click the “Register”
                                                              button so you can fill in your personal details in the
                                                              registration form. A confirmation popup will appear
                                                              on the screen.

10
Wallbox App
You will receive an email in your inbox to confirm
your account. In case you do not have the email in
your inbox, please check the spam folder.
Once in the email, click on the “Confirm” button
to start using your account.
3 Adding your first charger
If you do not have any charger linked to your
account yet, click on “I already have a charger” to
add a charger to your account.
Add your charger by clicking on the“+” button on
the mainpage, introduce the SN, UID, Country and
State/Region of your charger.
Please remember that, Wallbox Standard customers are allowed to have a maximum of five users and
two chargers. Wallbox Pro customers can add an unlimited number of users and chargers.
4 List of chargers
In this screen you will find the following information about the charger:
• Charger name: by default, the charger’s Serial Number is displayed.
Nevertheless, it is possible to edit it.
• Current connection type: Bluetooth connection is only displayed when
the charger is on and nearby.
• Charger status: In grey, the charger is unreachable otherwise is green.
11Wallbox App
5 Sync with your charger
When you connect to a charger the charging sessions are synchronized
with myWallbox cloud through the app. The percentage of sessions
synchronized is displayed.
6 Manage the charger
This screen is shown when you are connected to the
charger. The controls on the upper half of the screen
let you perform the following actions:
• Select the charging current using the wheel.
• Lock/unlock charger.
Charger locked, press to unlock.
Charger unlocked, press to lock.
• Pause/Resume charge.
Charge is paused, press to start charging.
Charging, press to pause
• Access the charger configuration menu.
• Schedule a charging session.
12Wallbox App
SCHEDULES
The lower half of the screen shows the schedules
programmed. In order to edit or delete a schedule,
tap the three vertical points on the right of the
schedule.
In order to set a new schedule tap on the clock
button. The following menu will appear.
Select the START and END time of the schedule
as well as the days of the week as desired. Note
that by default all week days will be active in blue
background.
Finally tap ACCEPT to send it to the charge.
STATISTICS
The lower half of the screen, below the schedules,
show a summary of the charging statistics of the
current month.
When you enter the statistics screen, the displayed
sessions are of the current month. The screen can
be divided into two parts:
Session filtering date: You can select any date range
that you want and show the sessions between those
dates.
Display of the data referring to the filter: When
displaying the data you can see them in two ways:
charts mode and list mode.
• Charts mode: This shows the data depending on
energy or charging time.
• List mode: This shows a list of all sessions
between those dates selected.
13Wallbox App
7 Configuration
In the charger configuration link button,
you will find the active configuration
options of the charger:
POWER SHARING
CHARGER INFO
POWER BOOST
CONNECTIVITY
INSTALLATION OPTIONS
ADVANCED OPTIONS
FIRMWARE UPDATE
(IF AVAILABLE)
CHARGER INFO
This shows information regarding the
charger.
• Name: Click to edit.
• Serial Number
• Charger version
• Max. current per phase
• Adjustable current limitation
After every modification in this section,
please make sure to click “Save” to
ensure the changes are saved.
14Wallbox App
CONNECTIVITY
Pulsar Plus has one additional connection method:
• Wi-Fi
Wi-Fi
The Wi-Fi connection of the charger can be activated or
deactivated. Once activated, the list of available networ-
ks will appear, when you click on one of them, you will
connect to the network or if it is protected, it will ask you
to enter the password.
To know information about the network once connected,
click the icon.
15Wallbox App
ADVANCED OPTIONS
In advanced options you can change the
energy cost for the charger to make an
estimated cost with its sessions. Also,
you can perform a system restore to your
charger from this screen.
INSTALLATION OPTIONS
The charger installation options that can
be made in this screen include:
• Unlink the charger from your user’s
account.
POWER SHARING
If your charger is going to be part of a Power Sharing Smart infrastructure, please be sure you have
the instructions to perform this installation. In case of any doubt contact your sales agent.
POWER BOOST
If your charger is going to be part of a Power Boost infrastructure, please be sure you have the
instructions to perform this installation. In case of any doubt contact your sales agent.
16Wallbox App
FIRMWARE UPDATE
The firmware of the charger can be
updated to incorporate new features
and improvements. When a firmware
update is available, a notification is
displayed in the app. Tab the pop-
up notification to start the firmware
update process and follow the steps.
Note that the firmware update feature requires the charger to be connected to the Internet.
At the end of the process, a confirmation message is shown.
8 Edit your profile
You can edit the information of your myWallbox account in this section. Edit your personal data,
change your myWallbox account password or the currency you want to use.
You can also add a picture of you to your myWallbox profile.
17myWallbox Portal
First access to the myWallbox portal. URL: https://my.wallbox.com/login
myWallbox Portal
NOTE:
If you have already
created an account using
the Wallbox App, use
the same username and
password when entering
the website. Otherwise,
create a new account
now via the website.
Create a myWallbox account
Click on the register button. A registration pop-up will appear.
myWallbox Portal
Fill in your personal
information and
continue.
18myWallbox Portal
After that, a confirmation pop-up appears.
myWallbox Portal
Then you will receive an
email in your inbox to
confirm your account.
In case you do not have
the email in your inbox,
please check the spam
folder.
Once in your email, click
the “Confirm” button to
start using your account.
19myWallbox Portal
Once your account is created, you will belong to a group in which you are the super-administrator.
When other users invite you to join their groups, you will not be the super-administrator. You will be just
an administrator or user, depending on their group invitation specifications.
Access to the website
LOG IN
Once your account is confirmed, you just need to login to the myWallbox
website.
myWallbox Portal
You will be redirected
to the myWallbox main
page.
FORGOTTEN PASSWORD
If you do not remember your password, click on the “Forgot your password?”
link under the login form.
Fill in the form with your email and continue.
myWallbox Portal
After that, a confirmation
pop-up appears.
20myWallbox Portal
Then you will receive an email with the instructions on how to create a new password.
In case you do not have the email in your inbox, please check the spam folder.
Once in your email, click on After clicking on this link, A confirmation popup appears.
the “restore password” button you are redirected to the Now you are able to login with
to start using your account. site again and the restore your new password.
password popup appears.
Fill in the form with your new
password twice and continue.
First Access
Once you are successfully logged into the myWallbox website, you are redirected to the myWallbox
main page which shows the list of all chargers linked to your account.
myWallbox Portal
21myWallbox Portal
CHARGER INFO
Once the charger is linked to the account, it is possible to check the current charger info from the
myWallbox user account..
The information that appears includes:
Locking status: In yellow, the charger is locked. In green, the charger is unlocked.
Charger image.
Charger name / charger serial number. In the beginning, the charger’s Serial Number is displayed.
However, you are able to modify the name in the charger details section and then the new name will
appear instead.
Current internet connection type. An icon appears showing the connection from the first time the
charger is connected to the Internet (before the first connection, there is no icon). Connection types
displayed include: Wi-Fi. Bluetooth connection is not displayed here.
Charger status:
• Offline • Charging
• Ready • Status not available
• Power Sharing: Master Unconfigured • Locked not charging
• Connected: Waiting for next schedule • Waiting for charger to unlock to charge
• Connected: Paused by user • Connected: in queue by Power Boost
• Connected: Waiting for car demand • Error
• Connected: end of schedule
When the charger is connected: Current charge information.
For a disconnected charger: Last connection/synchronisation date.
Clicking on the information element, you are redirected to the charger’s details page.
22myWallbox Portal
Users
Manage the users that have access to the chargers.
myWallbox Portal
ADD A USER TO YOUR GROUP
Add a new/existing user to the group to give them access to the chargers.
Fill in the user information and set user or administrator
permissions.
User: Give them access to the chargers selected on the
charger list below.
Administrator: Give them access to all chargers from
your group and allow them to manage chargers and
users there.
23myWallbox Portal
Once the invitation is sent, a Then invited user appears automatically in the users list
confirmation popup appears and (in case it doesn’t appear, refresh the page).
confirms an invitation has been
sent to the user.
USER INFO
Once the user is linked to the group, it is possible to see main information from the users list.
The information this element shows is:
User name and surname.
User email.
User type: Superadmin
Admin
User
Sessions number: Number of sessions performed by said user.
Registration date.
Delete button. Remove the user from the current group (it does not delete the user account). It is not
always available.
24myWallbox Portal
USER DETAILS
Access to user account details by clicking on the user on users list.
myWallbox Portal
From here you will be able to:
• Get the user’s main information.
• Modify RFID value (only applies to Wallbox Commander 2 and Copper models).
• Get the list of the chargers assigned/not assigned to the user from the group, assign/unassign chargers
from/to the user.
User info
User information is available to see, but not to modify, except RFID value.
Chargers list
List of chargers from users’ groups. This list includes the functionality of knowing which chargers are
available for the user and assigning / unassigning the chargers from the user.
Color meaning:
Not possible to modify charger assignment as it is
an admin user.
User assigned to the charger. By clicking on the
switch, user is unassigned.
User not assigned to the charger. By clicking on
the switch, user is assigned to the charger.
25myWallbox Portal
User account menu
On the top-right hand side of the screen you can access the user configuration.
Here you will be able to modify your user configuration.
myWallbox Portal
26Maintenance
Take some precautions to ensure correct maintenance:
• The are no parts within your Wallbox that the user has to maintain. Only a qualified electrician may open
and modify your Wallbox.
• Remember that you must make sure that the power supply is turned off before you start cleaning your
charger.
• If you want to clean your Wallbox we recommend that you use a soft, dry or damp cloth. Do not use a
spray or direct water stream to clean your Wallbox charger.
• It is mandatory to use the element or protection support provided as an accessory, in order to protect
the connector from falling, dirt and other weather elements.
Troubleshooting
GENERAL
Charger does not power up
This could mean that there is no current reaching the Wallbox. The circuit breaker could be off or has
tripped. Please check the circuit breaker and make sure that it is working. Press the test button on the
circuit breaker - it should disconnect itself.
Charging session did not start
The reasons could be any of the following:
• The vehicle is scheduled to charge at a later time.
• The vehicle is completely charged.
• The vehicle may have an error, check the vehicle.
• The charging plug is not connected properly, reconnect the plug.
• The charging plug may be dirty or damaged, ensure that it is in good condition.
• The charging session was programmed when the EV gun was plugged into the car so the charging
session was not taken into account. Please delete the programmed charge and make sure that the
EV gun is not in the car. Then, sync the app to the Wallbox, then programme the charging session.
The vehicle has not charged completely, the charging time is greater than normal or the
vehicle only charges at a low power
When the vehicle’s charging session is almost complete, the charging speed begins to fall.
On the other hand, if the charger or the vehicle detects a temperature that is too high, the charging
power is reduced for safety reasons.
27Also, you may need to update the firmware of the charger. Enter your Wallbox app and select Settings
and see if at the bottom there is a little pop up saying “Updates are available for this charger”. If so,
select this and update the firmware of the charger.
If the vehicle only charges at a low power, and has never charged at a higher power, please check with
the installer so they can check the current selector inside the Wallbox charger.
The charging cable does not disconnect from the vehicle
The charging session has not been ended by the vehicle. End the charging session from the vehicle
before removing the charging cable. Check the vehicle user guide in order to ascertain how to do this
because each vehicle has different requirements.
CONNECTIVITY
The Wallbox app does not connect to the charger
Assure that the Bluetooth is enabled on your smartphone or tablet.
The BLE range is less than 10 metres - stay inside that range.
Turn off and on your phone’s Bluetooth and try to connect again.
Close the Wallbox app and open it up again.
Check to see that the latest version of the app is downloaded on your phone. The easiest way to do
this is to uninstall the Wallbox app and then reinstall it.
If you use Bluetooth with many other devices sometimes the signals get crossed so they cannot al-
ways communicate. If this is the case please turn on and off the Bluetooth and try connecting again
to the charger.
There is no Wi-Fi coverage where the charger is installed
If it is not possible to install the charger anywhere else, a Wi-Fi extender could be the solution. The
charger can also be connected to the Internet with an Ethernet cable.
A subscription plan called “Wallbox Always Connected” can be purchased with our sales team so you
can always have your charger always connected to the Internet.
There is Wi-Fi coverage, but there are connection problems
Check that your Wi-Fi network and Internet are working correctly.
• Try to connect another device and check that the network is active and can be connected to the
Internet.
• Restart your router and check the connections.
• Open the ports on your router. In order to connect your charger, the following ports will need to be
open:
TCP 80 Used for data transfer
UDP 123 Used for time synchronisation
• Connect using different Wi-Fi Network.
28If you don’t have another Wi-Fi network available, you can create a Wi-Fi network with your mobile
phone data using a Wi-Fi hotspot. Here are the instructions on how to do so with your phone:
iPhone (iOS 12): Android (Pie):
1. Settings 1. Settings
2. Mobile Data 2. Network & Settings
3. Personal Hotspot 3. Hotspot & tethering
4. From the charger select the 4. Wi-Fi hotspot
hotspot you created with your iPhone 5. Select on
6. From the charger select the
hotspot you created with your
Android phone.
Tip: Switching on the hotspot for the first time fills in default settings, like a network name and
password.
Connect your Wallbox to this new Wi-Fi network.
Wi-Fi network disconnections
If the charger has lost its Wi-Fi connection, simply restart your Wallbox charger and it will
automatically reconnect.
Check your Wi-Fi modem as well to make sure it is functioning properly.
Warning messages
Your power supply is constantly checked by the Wallbox in order to ensure safe operation. If one of
the parameters is outside the correct operating range, the Wallbox will not allow you to charge your
vehicle and will show you a warning message on the screen:
Unavailability of the charging station:
• Turn off the circuit breaker and wait a few seconds before turning it back on
• If this doesn’t work then consult with your installer to make sure that the current selector is not
at position 0, 8 or 9.
No power to the charging station:
• Disconnect the charging cable from the vehicle. Then turn off the circuit breaker, wait 10 seconds, then
turn the circuit breaker back on. Then reconnect the charging cable to the vehicle.
29CHARGING LOGS
The charging logs do not appear in the myWallbox website nor the Wallbox App
In order for the charging statistics to appear in the app or the myWallbox portal, the charger must be
connected to the Internet. Please first check the Internet connection.
If the charging statistics still do not appear, you can do the following:
1 Check for the latest version of firmware in your charger and make sure that it is updated.
2 Remove the Wallbox app from your phone, redownload the app, connect to your charger using
Bluetooth and allow the device to sync to your phone. This will let the charger send the statistics
using bluetooth instead of Internet.
3 Reset the charger system. Inside the Wallbox app go to: Settings > Advanced Options > Restart.
Service
Need more assistance? You can reach out to us:
België/Belgique France Norge Schweiz/Suisse
+32 28082353 +33 186260541 +47 51742000 +41 435084675
Danmark Italia Portugal Sverige
+45 89870290 +39 694804494 +351 308809158 +46 852503203
Deutschland Nederland Österreich United Kingdom
+49 303 11 99629 +31 202410845 +43 720882116 +44 2039097682
España
+34 930181668
service@wallbox.com www.wallbox.com
30You can also read