Scribe for Node.js - Sep 07, 2021
←
→
Page content transcription
If your browser does not render page correctly, please read the page content below

Scribe for Node.js

           Sep 07, 2021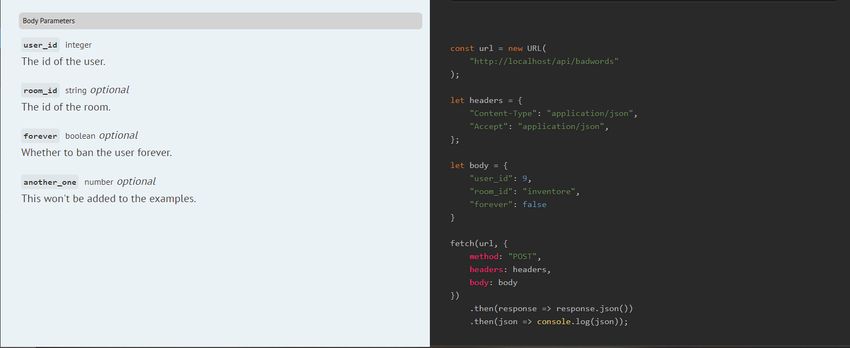
Contents

1   Features                                                                                                                                                                         3

2   Contents                                                                                                                                                                         5
    2.1 Getting Started . . . . . . . . . . . . . . .   .   .   .   .   .   .   .   .   .   .   .   .   .   .   .   .   .   .   .   .   .   .   .   .   .   .   .   .   .   .   .    5
    2.2 Documenting your API . . . . . . . . . . .      .   .   .   .   .   .   .   .   .   .   .   .   .   .   .   .   .   .   .   .   .   .   .   .   .   .   .   .   .   .   .   12
    2.3 Generating Documentation . . . . . . . . .      .   .   .   .   .   .   .   .   .   .   .   .   .   .   .   .   .   .   .   .   .   .   .   .   .   .   .   .   .   .   .   29
    2.4 Configuration . . . . . . . . . . . . . . . .   .   .   .   .   .   .   .   .   .   .   .   .   .   .   .   .   .   .   .   .   .   .   .   .   .   .   .   .   .   .   .   31
    2.5 Customizing the generated documentation         .   .   .   .   .   .   .   .   .   .   .   .   .   .   .   .   .   .   .   .   .   .   .   .   .   .   .   .   .   .   .   34
    2.6 Troubleshooting and Debugging . . . . . .       .   .   .   .   .   .   .   .   .   .   .   .   .   .   .   .   .   .   .   .   .   .   .   .   .   .   .   .   .   .   .   38

3   Supported frameworks                                                                                                                                                            41

4   Usage                                                                                                                                                                           43
    4.1 Adonis.js . . . . . . . . . . . . . . . . . . . . . . . . . . . . . . . . . . . . . . . . . . . . . . . . .                                                                 43
    4.2 Express . . . . . . . . . . . . . . . . . . . . . . . . . . . . . . . . . . . . . . . . . . . . . . . . . .                                                                 43
    4.3 Restify . . . . . . . . . . . . . . . . . . . . . . . . . . . . . . . . . . . . . . . . . . . . . . . . . .                                                                 44

                                                                                                                                                                                     i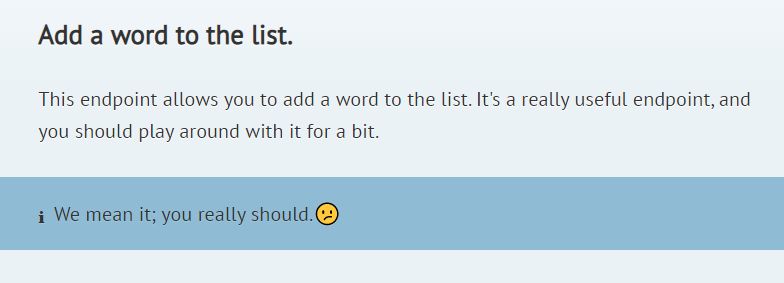
ii
Scribe for Node.js

 Attention: These docs are for Scribe for JS v1, which is no longer maintained. See scribe.knuckles.wtf/nodejs
 for Scribe for JS v2.

Generate API documentation for humans from your Node.js codebase. Here’s what the output looks like.
There’s a Laravel version, too!

Wondering where to start?
Check out our getting started guide for your framework: Adonis.js 4, Express, and Restify,.

Tip: Scribe helps you generate docs automatically, but if you really want to make friendly, maintainable and testable
API docs, there’s a few more things you need to know. So I made a course for you.

Contents                                                                                                           1
Scribe for Node.js

2                    Contents
CHAPTER          1

                                                                                               Features

• Pretty HTML documentation page, with included code samples and friendly text
• Included “Try It Out” button so users can test endpoints right from their browser
• Markdown source files that can be edited to modify docs
• Safely calls API endpoints to generate sample responses, with authentication and other custom configuration
  supported
• Supports Postman collection and OpenAPI (Swagger) spec generation

                                                                                                           3
Scribe for Node.js 4 Chapter 1. Features
CHAPTER          2

                                                                                                  Contents

2.1 Getting Started

 Attention: These docs are for Scribe for JS v1, which is no longer maintained. See scribe.knuckles.wtf/nodejs
 for Scribe for JS v2.

2.1.1 Getting Started with Scribe for Adonis.js

 Attention: These docs are for Scribe for JS v1, which is no longer maintained. See scribe.knuckles.wtf/nodejs
 for Scribe for JS v2.

Install and configure

First, install the package:

npm i @knuckleswtf/scribe-adonis

Then add the service provider to the aceProviders array in your start/app.js:

const aceProviders = [
  '@adonisjs/lucid/providers/MigrationsProvider',
  '@knuckleswtf/scribe-adonis/providers/ScribeProvider', //
Scribe for Node.js
Do a test run
Now let’s do a test run. Run the command to generate your docs.
node ace scribe:generate
Visit your newly generated docs. Find the docs/index.html file in your public/ folder and open it in your
browser.
Tip: Your docs are always accessible by opening the public/docs/index.html file on your machine. However, when
deployed, you’ll probably want to pass it through your Adonis app. To do that, you can either set up your own routing
or uncomment/add Adonis/Middleware/Static, to the serverMiddleware array in start/kernel.js.
There’s also a Postman collection generated for you. You can get it by visiting public/docs/collection.
json. The link will also be added to the sidebar of the webpage.
If you’d like an OpenAPI (Swagger) spec, Scribe can do that too. Set openapi.enabled in your config to true,
then run the generate command. You can get the generated spec by visiting public/docs/openapi.yaml.
The link will also be added to the sidebar of the webpage.
Great! You’ve seen what Scribe can do. Now, let’s refine our docs to match what we want.
Add general information about your API
Here are some things you can customise with Scribe:
• The introductory text
• Authentication information
• Languages for the example requests
• A logo to show in your docs.
For details, check out Documenting API information.
Filter your routes
You might also want to decide what routes you want to document. By default, Scribe will try to document all of your
routes (except websocket routes), so if you’re okay with that, you can leave it at that.
If you’d like to exclude some routes, there are two ways:
• In the docblock for the endpoint, add this tag: @hideFromApiDocs.
• Set the routes key in your .scribe.config.js. Here’s what it looks like:
routes: [
{
include: ['*'],
exclude: ['*.websocket'],
apply: {
headers: {
},
responseCalls: {
methods: ['GET'],
}
(continues on next page)
6 Chapter 2. ContentsScribe for Node.js
(continued from previous page)
}
}
],
With Scribe, you split up your routes into route groups. Each entry in the routes array is a single group. The main
purpose of these groups is so you can apply different settings to multiple endpoints in one go. For instance, for some
routes, you’d like an Api-Version header to be added to some routes, but not others, you can easily configure that
here. You can also configure response calls in here.
By default, all your routes are in a single group, and we recommend leaving them like that. You can split your routes
later if you realise you need to.
Here’s the full documentation on configuring routes.
Add more information to your routes
Scribe tries to figure out information about your routes, but it needs more help from you to go far. Here’s some
information you can enrich:
• Groups (you can group your endpoints by domain eg “User management”, “Order information”)
• URL parameters
• Request Headers
• Body parameters
• Query parameters
• Example responses
• Fields in the response
Check out how to do this in the guide on Documenting your API.
Generate and publish
After making changes as needed, you can run scribe:generate as many times as you want.
When you’re happy with how your documentation looks, you’re good to go. You can add the generated documentation
to your version control and deploy as normal, and your users will be able to access it as you’ve configured.
2.1.2 Getting Started with Scribe for Express
Attention: These docs are for Scribe for JS v1, which is no longer maintained. See scribe.knuckles.wtf/nodejs
for Scribe for JS v2.
Install and configure
First, install the package:
npm i @knuckleswtf/scribe-express
Next, create your config file:
2.1. Getting Started 7Scribe for Node.js
npx scribe init
This will ask you a few questions and create a .scribe.config.js file in your project directory. There are a few
other useful settings you should change in that file, but we’ll leave them as is for now.
Do a test run
Now let’s do a test run. You’ll need to locate your “app file” — the file where you create your main Express app and
attach routes. Usually an index.js or app.js. Run the scribe generate command to generate your docs,
passing in the path to your app file (for example, ./index.js).
npx scribe generate -a
# Example:
# npx scribe generate -a app.js
Visit your newly generated docs. Find the docs/index.html file in your public/ folder and open it in your
browser.
Tip: Your docs are always accessible by opening the public/docs/index.html file on your machine. However, when
deployed, you’ll probably want to pass it through your Express app. To do that, you can either set up your own routing
or make sure you’re using express.static() middleware.
There’s also a Postman collection generated for you. You can get it by visiting public/docs/collection.
json. The link will also be added to the sidebar of the webpage.
If you’d like an OpenAPI (Swagger) spec, Scribe can do that too. Set openapi.enabled in your config to true,
then run the generate command. You can get the generated spec by visiting public/docs/openapi.yaml.
The link will also be added to the sidebar of the webpage.
Great! You’ve seen what Scribe can do. Now, let’s refine our docs to match what we want.
Add general information about your API
Here are some things you can customise with Scribe:
• The introductory text
• Authentication information
• Languages for the example requests
• A logo to show in your docs.
For details, check out Documenting API information.
Filter your routes
You might also want to decide what routes you want to document. By default, Scribe will try to document all of your
routes (except websocket routes), so if you’re okay with that, you can leave it at that.
If you’d like to exclude some routes, there are two ways:
• In the docblock for the endpoint, add this tag: @hideFromApiDocs.
8 Chapter 2. ContentsScribe for Node.js
Note: For Express routes, the docblock containing info for Scribe needs to be on the route declaration, not the
function declaration. For instance:
class UserController {
/**
* This won't work.
* @hideFromApiDocs
*/
createUser(req, res) {
}
}
/**
* This will work.
* @hideFromApiDocs
*/
app.post('/users', UserController.createUser)
• Set the routes key in your .scribe.config.js. Here’s what it looks like:
routes: [
{
include: ['*'],
exclude: ['*.websocket'],
apply: {
headers: {
},
responseCalls: {
methods: ['GET'],
}
}
}
],
With Scribe, you split up your routes into route groups. Each entry in the routes array is a single group. The main
purpose of these groups is so you can apply different settings to multiple endpoints in one go. For instance, for some
routes, you’d like an Api-Version header to be added to some routes, but not others, you can easily configure that
here. You can also configure response calls in here.
By default, all your routes are in a single group, and we recommend leaving them like that. You can split your routes
later if you realise you need to.
Here’s the full documentation on configuring routes.
Add more information to your routes
Scribe tries to figure out information about your routes, but it needs more help from you to go far. Here’s some
information you can enrich:
• Groups (you can group your endpoints by domain eg “User management”, “Order information”)
• URL parameters
• Request Headers
• Body parameters
2.1. Getting Started 9Scribe for Node.js
• Query parameters
• Example responses
• Fields in the response
Check out how to do this in the guide on Documenting your API.
Generate and publish
After making changes as needed, you can run scribe generate as many times as you want.
When you’re happy with how your documentation looks, you’re good to go. You can add the generated documentation
to your version control and deploy as normal, and your users will be able to access it as you’ve configured.
2.1.3 Getting Started with Scribe for Restify
Attention: These docs are for Scribe for JS v1, which is no longer maintained. See scribe.knuckles.wtf/nodejs
for Scribe for JS v2.
Install and configure
First, install the package:
npm i @knuckleswtf/scribe-restify
Next, create your config file:
npx scribe init
This will ask you a few questions and create a .scribe.config.js file in your project directory. There are a few
other useful settings you should change in that file, but we’ll leave them as is for now.
Do a test run
Now let’s do a test run. You’ll need to locate your “server file” — the file where you set up and start your Restify
server, usually an index.js or server.js. Run the scribe generate command to generate your docs,
passing in the path to your server file (for example, ./index.js).
npx scribe generate -s
# Example:
# npx scribe generate -s server.js
Visit your newly generated docs. Find the docs/index.html file in your public/ folder and open it in your
browser.
Tip: Your docs are always accessible by opening the public/docs/index.html file on your machine. However, when
deployed, you’ll probably want to pass it through your Restify app. To do that, you can either set up your own routing
or use the serveStatic plugin.
10 Chapter 2. ContentsScribe for Node.js
There’s also a Postman collection generated for you. You can get it by visiting public/docs/collection.
json. The link will also be added to the sidebar of the webpage.
If you’d like an OpenAPI (Swagger) spec, Scribe can do that too. Set openapi.enabled in your config to true,
then run the generate command. You can get the generated spec by visiting public/docs/openapi.yaml.
The link will also be added to the sidebar of the webpage.
Great! You’ve seen what Scribe can do. Now, let’s refine our docs to match what we want.
Add general information about your API
Here are some things you can customise with Scribe:
• The introductory text
• Authentication information
• Languages for the example requests
• A logo to show in your docs.
For details, check out Documenting API information.
Filter your routes
You might also want to decide what routes you want to document. By default, Scribe will try to document all of your
routes (except websocket routes), so if you’re okay with that, you can leave it at that.
If you’d like to exclude some routes, there are two ways:
• In the docblock for the route declaration, add this tag: @hideFromApiDocs.
Note: For Restify routes, the docblock containing info for Scribe needs to be on the route declaration, not the function
declaration. For instance:
class UserController {
/**
* This won't work.
* @hideFromApiDocs
*/
createUser(req, res) {
}
}
/**
* This will work.
* @hideFromApiDocs
*/
server.post('/users', UserController.createUser)
• Set the routes key in your .scribe.config.js. Here’s what it looks like:
routes: [
{
include: ['*'],
exclude: ['*.websocket'],
apply: {
(continues on next page)
2.1. Getting Started 11Scribe for Node.js
(continued from previous page)
headers: {
},
responseCalls: {
methods: ['GET'],
}
}
}
],
With Scribe, you split up your routes into route groups. Each entry in the routes array is a single group. The main
purpose of these groups is so you can apply different settings to multiple endpoints in one go. For instance, for some
routes, you’d like an Api-Version header to be added to some routes, but not others, you can easily configure that
here. You can also configure response calls in here.
By default, all your routes are in a single group, and we recommend leaving them like that. You can split your routes
later if you realise you need to.
Here’s the full documentation on configuring routes.
Add more information to your routes
Scribe tries to figure out information about your routes, but it needs more help from you to go far. Here’s some
information you can enrich:
• Groups (you can group your endpoints by domain eg “User management”, “Order information”)
• URL parameters
• Request Headers
• Body parameters
• Query parameters
• Example responses
• Fields in the response
Check out how to do this in the guide on Documenting your API.
Generate and publish
After making changes as needed, you can run scribe generate as many times as you want.
When you’re happy with how your documentation looks, you’re good to go. You can add the generated documentation
to your version control and deploy as normal, and your users will be able to access it as you’ve configured.
2.2 Documenting your API
Attention: These docs are for Scribe for JS v1, which is no longer maintained. See scribe.knuckles.wtf/nodejs
for Scribe for JS v2.
Scribe tries to infer information about your API from your code, but you can enrich this information in the config and
by using annotations (tags in doc block comments).
12 Chapter 2. ContentsScribe for Node.js
Important: For Express and Restify routes, the docblock needs to be on the route declaration, not the function
declaration. For instance:
2.2.1 Adding general information about your API
Attention: These docs are for Scribe for JS v1, which is no longer maintained. See scribe.knuckles.wtf/nodejs
for Scribe for JS v2.
Authentication information
You can add authentication information for your API using the auth section in .scribe.config.js.
Important: Scribe uses your specified authentication information in three places:
• Generating an “Authentication” section in your docs
• Adding authentication parameters to your example requests for endpoints marked as @authenticated (or if
you have with auth.default = true)
• Adding the necessary auth parameters with the specified value to response calls for endpoints marked as
@authenticated (or if you have with auth.default = true)
Here’s how you’d configure auth with a query parameter named apiKey:
module.exports = {
// ...
auth: {
enabled: true,
in: 'query',
name: 'apiKey',
useValue: () => process.env.SCRIBE_API_KEY,
placeholder: 'YOUR-API-KEY',
extraInfo: 'You can retrieve your key by going to settings and clicking
˓→Generate API key.',
},
// ...
};
If apiKey were to be a body parameter, the config would be same. Just set in to 'body'.
Here’s an example with a bearer token (also applies to basic auth, if you change in to 'basic'):
module.exports = {
// ...
auth: {
enabled: true,
in: 'bearer',
name: 'hahaha', // process.env.SCRIBE_API_KEY,
placeholder: '{ACCESS_TOKEN}',
extraInfo: 'You can retrieve your token by visiting your dashboard and
˓→clicking Generate API token.',
(continues on next page)
2.2. Documenting your API 13Scribe for Node.js
(continued from previous page)
},
// ...
};
And here’s an example with a custom header:
module.exports = {
// ...
auth: {
enabled: true,
in: 'header',
name: 'Api-Key', // process.env.SCRIBE_API_KEY,
placeholder: 'YOUR-API-KEY',
extraInfo: 'You can retrieve your token by visiting your dashboard and
˓→clicking Generate API token.',
},
// ...
};
You can set whatever you want as the extraInfo. A good idea would be to tell your users where to get their auth
key.
The useValue field is only used by Scribe for response calls. It won’t be included in the generated output or exam-
ples. You can specify a hardcoded value or a function that will be called during the response call. The placeholder
is the opposite of useValue. It will be used only as a placeholder in the generated example requests.
For more information, see the reference documentation on the auth section.
Introductory text
The introText key in .scribe.config.js is where you can set the text shown to readers in the “Introduction”
section. If your text is too long to be put in a config file, you can create a prepend.md containing the intro text and
put it in the resources/docs folder.
Title
You can set the HTML for the generated documentation, and the name of the generated Postman collection
by setting the title key in .scribe.config.js. If you leave it as null, Scribe will infer it from the value of
config('app.name').
Logo
Maybe you’ve got a pretty logo for your API or company, and you’d like to display that on your documentation page.
No worries! To add a logo, set the logo key in .scribe.config.js to the path of the logo. Here are your
options:
• To point to an image on an external public URL, set logo to that URL.
• To point to an image in your codebase, set logo to the path of the image. This path will be used as-is in the
HTML doc.
• To disable the logo, set logo to false.
14 Chapter 2. ContentsScribe for Node.js
2.2.2 Specifying metadata about an endpoint
Attention: These docs are for Scribe for JS v1, which is no longer maintained. See scribe.knuckles.wtf/nodejs
for Scribe for JS v2.
Endpoint title and description
To set an endpoint’s title and description, just write in a docblock at the route declaration. The first paragraph will
be used as the title, the rest as the description. Custom formatting (such as tags) is also supported (see the
Pastel docs).
For instance, this:
/**
* Add a word to the list.
*
* This endpoint allows you to add a word to the list. It's a really useful endpoint,
* and you should play around with it for a bit.
* We mean it; you really should.
*/
app.post('words', (req, res) => {
})
becomes:
Note: There needs to be a blank line between the title and description.
Tip: For best results, all free text (title and description) should come before any annotations.
Grouping endpoints
All endpoints are grouped for easy navigation.
To add an endpoints to a group, use @group in its docblock, followed by the group’s title. You can also add a
description using the @groupDescription tag.
2.2. Documenting your API 15Scribe for Node.js
Tip: You don’t need to specify the @groupDescription in every endpoint’s docblock. Just use it in one and
Scribe’ll pick it uo.
/**
* Change a user's password.
*
* @group Account management
* @groupDescription Managing accounts
*/
app.post('changePassword', (req, res) => {
});
Grouping endpoints is optional. Any endpoints not in a group will be placed in a default group, “Endpoints” (or
whatever is specified in your config file as defaultGroup).
Indicating authentication status
If you have auth.default set to false in your config, your endpoints will be treated as open by default. You can
use the @authenticated annotation on a method to indicate that the endpoint is authenticated.
Similarly, if you have auth.default set to true in your config, your endpoints will be treated as authenticated
by default. You can use the @unauthenticated annotation on a method to indicate that the endpoint is unauthen-
ticated.
Tip: You can also specify @authenticated or @unauthenticated in a controller doc block instead to override the
status for all the routes in that controller.
‘‘‘js /**
• Create a user
•
• This endpoint lets you create a user.
• @authenticated
•
*/
app.post(‘/createUser’, (req, res) => { });
A “Requires authentication” badge will be added to that endpoint in the generated documentation.
16 Chapter 2. ContentsScribe for Node.js
2.2.3 Documenting headers for endpoints
Attention: These docs are for Scribe for JS v1, which is no longer maintained. See scribe.knuckles.wtf/nodejs
for Scribe for JS v2.
To specify headers to be added to your endpoints, you can use the apply.headers section of the route group in
.scribe.config.js. For instance, if you have this config:
routes: {
include: ['v2/*'],
exclude: [],
apply: {
headers: {
'Api-Version': 'v2',
}
}
}
All endpoints that start with v2/ will have the header Api-Version: v2 included in their example requests and
response calls.
Alternatively, you can use the @header doc block tag, in the format @header :
/**
* @header X-Api-Version v1
*/
2.2.4 Documenting query and URL parameters for an endpoint
Attention: These docs are for Scribe for JS v1, which is no longer maintained. See scribe.knuckles.wtf/nodejs
for Scribe for JS v2.
Specifying query parameters
To describe query parameters for your endpoint, use the @queryParam annotation on the method handling it.
The @queryParam annotation takes the type of the parameter (optional), its name, an optional “required” label, and
a description.
Here’s an example:
2.2. Documenting your API 17Scribe for Node.js
/**
* @queryParam sort Field to sort by. Defaults to 'id'.
* @queryParam fields required Comma-separated fields to include in the response
* @queryParam filters[published_at] Filter by date published.
* @queryParam filters[title] Filter by title.
*/
app.get('posts', (req, res) => {
});
The query parameters will be included in the generated documentation text and example requests:
Specifying example values
By default, Scribe will generate a random value for each parameter, to be used in the example requests and response
calls. If you’d like to use a specific example value, you can do so by adding Example: your-example-here
to the end of your description.
Tip: You can exclude a particular parameter from the generated examples by ending with No-example instead. The
parameter will still be included in the text of the documentation, but it won’t be included in response calls or shown in
the example requests.
For instance:
/**
* @queryParam sort Field to sort by. Defaults to 'id'. Example: published_at
(continues on next page)
18 Chapter 2. ContentsScribe for Node.js
(continued from previous page)
* @queryParam fields required Comma-separated fields to include in the response.
˓→Example: title,published_at,id
* @queryParam filters[published_at] Filter by date published. No-example
* @queryParam filters[title] Filter by title. No-example
*/
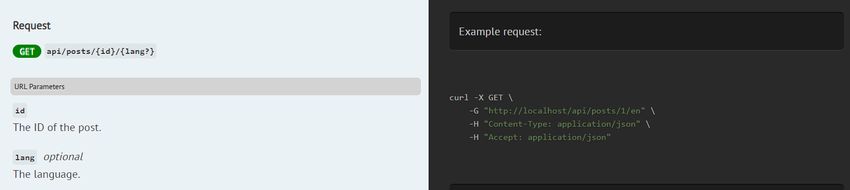
Describing URL parameters
To describe parameters in the URL, use the @urlParam annotation. For instance, if you defined your Express route
like this:
app.get('/posts/:id/:lang?', (req, res) => {
});
you can use this annotation to describe the id and lang parameters as shown below. The annotation takes the name of
the parameter, an optional “required” label, and then its description. Like with @queryParams, a random value will
be generated, but you can specify the value to be used in examples and response calls using the Example: syntax.
/**
* @urlParam {int} id required The ID of the post.
* @urlParam {string} lang The language. Example: en
*/
app.get('posts/:id/:lang?', (req, res) => {
});
Note: If you want Scribe to omit an optional parameter (lang in our example) in requests and response calls, specify
No-example for the parameter.
/**
* @urlParam {int} id required The ID of the post.
* @urlParam {string} lang The language. No-example
(continues on next page)
2.2. Documenting your API 19Scribe for Node.js
(continued from previous page)
*/
app.get('posts/:id/:lang?', (req, res) => {
});
2.2.5 Documenting body and file parameters for an endpoint
Attention: These docs are for Scribe for JS v1, which is no longer maintained. See scribe.knuckles.wtf/nodejs
for Scribe for JS v2.
Scribe can get information about your endpoint’s body parameters from the @bodyParam annotation in JSDoc.
Specifying body parameters with @bodyParam
To describe body parameters for your endpoint, use the @bodyParam annotation when declaring the route.
The @bodyParam annotation takes the type of the parameter, its name, an optional “required” label, and then its
description. Valid types:
• int / integer
• string
• number
• boolean
• array, object (see Handling array and object parameters below)
• file (see Documenting File Uploads below)
By default, Scribe will generate a random value for each parameter, to be used in the example requests and response
calls. If you’d like to use a specific example value, you can do so by adding Example: your-example-here
to the end of your description.
Tip: You can exclude a particular parameter from the generated examples by ending with No-example instead. The
parameter will still be included in the text of the documentation, but it won’t be included in response calls or shown in
the example requests.
Here’s an example:
20 Chapter 2. ContentsScribe for Node.js
function createPost(req, res, next) {
}
/**
* @bodyParam {int} user_id required The id of the user. Example: 9
* @bodyParam {string} room_id The id of the room.
* @bodyParam {boolean} forever Whether to ban the user forever. Example: false
* @bodyParam {number} another_one This won't be added to the examples. No-example
*/
app.post('/posts', createPost)
The body parameters will be included in the generated documentation text and example requests:
Handling array and object parameters
Often you have body parameters that are arrays or objects, or a mix of both. To handle them in @bodyParam, Scribe
follows this convention:
• For arrays: use a single field with type []. For instance, to denote an array cars of
elements of type integer:
@bodyParam {integer[]} cars
• For objects: you need a parent field with type object and an entry for each field, named with the dot notation
.. For instance, to denote an object cars with a field name of type string:
@bodyParam {object} cars
@bodyParam {string} cars.name
• For an array of objects, you need a parent field with type object[], and an entry for each field, named with
the dot notation [].. For instance, to denote an array of objects cars with each
item having field name:
@bodyParam {object[]} cars
@bodyParam {string} cars[].name
For instance, if your request body is in this form:
2.2. Documenting your API 21Scribe for Node.js
{
"user": {
"name": "User's name",
"age": 12
},
"friend_ids": [10, 23],
"cars": [
{
"year": 1997,
"make": "Toyota"
}
]
}
you’d write:
/**
* @bodyParam {object} user required The user details
* @bodyParam {string} user.name required The user's name
* @bodyParam {number} user.age required The user's age
* @bodyParam {int[]} friend_ids List of the user's friends.
* @bodyParam {object[]} cars List of cars
* @bodyParam {int} cars[].year The year the car was made. Example: 1997
* @bodyParam {string} cars[].make The make of the car. Example: Toyota
*/
Documenting file uploads
You can document file inputs by using @bodyParam or FormRequest rules with a type file. You can add a
description and example as usual.
For files, your example should be the path to a file that exists on your machine. This path should be absolute or relative
22 Chapter 2. ContentsScribe for Node.js
to your project directory. If you don’t specify an example, Scribe will generate a fake file for example requests and
response calls.
/**
* @bodyParam {string} caption The image caption
* @bodyParam {file} image required The image.
*/
Note: Adding a file parameter will automatically set the ‘Content-Type’ header in example requests and response
calls to multipart/form-data.
2.2.6 Documenting responses from an endpoint
Attention: These docs are for Scribe for JS v1, which is no longer maintained. See scribe.knuckles.wtf/nodejs
for Scribe for JS v2.
It’s helpful if your API’s consumers can see what a response should be like before writing any code. There are multiple
strategies to provide example responses for your endpoint:
• describing the response using the @response tag
• specifying a file containing the response using the @responseFile tag
• letting Scribe generate the response by making a “response call”
You can use all of these strategies within the same endpoint. Scribe will display all the responses it finds.
@response
You can provide an example response for an endpoint by using the @response annotation with valid JSON:
/**
* @response {
* "id": 4,
* "name": "Jessica Jones",
* "roles": ["admin"]
(continues on next page)
2.2. Documenting your API 23Scribe for Node.js
(continued from previous page)
* }
*/
app.get('users/:id', async (req, res) => {
return res.json(await User.find(req.body.id));
});
You can also specify a status code (otherwise 200 will be assumed):
/**
* @response 201 {
* "id": 4,
* "name": "Jessica Jones"
* }
*/
You can define multiple possible responses from the same endpoint using @response. To distinguish these re-
sponses, you can use the status and scenario attributes. [coming soon]
/**
* @response scenario=success {
* "id": 4,
* "name": "Jessica Jones"
* }
* @response status=404 scenario="user not found" {
* "message": "User not found"
* }
*/
24 Chapter 2. ContentsScribe for Node.js
To indicate a binary response, use as the value of the response, followed by a description.
/**
* @response The resized image
*/
@responseFile
@responseFile works similarly to @response, but instead of inlining the response, you pass a file containing
your JSON response. This can be helpful if your response body is large.
To use @responseFile, place the response as a JSON string in a file somewhere within your project and specify
the path to it, relative to your project root. For instance, we can put this response in a file named users.get.json
in /docs/responses/:
{"id":4,"name":"Jessica Jones"}
Then at the route declaration:
2.2. Documenting your API 25Scribe for Node.js
/**
* @responseFile docs/responses/users.get.json
*/
app.get('users/:id', (req, res) => {
});
You can also have multiple @responseFile tags on a single method, distinguished by status code and/or scenarios.
/**
* @responseFile responses/users.get.json
* @responseFile status=200 scenario="when authenticated as admin" responses/user.get.
˓→admin.json
* @responseFile status=404 responses/model.not.found.json
*/
@responseFile also allows you to overwrite parts of the response from the file with some data of your own. To
do this, add the JSON you want to merge after the file path. For instance, supposing our generic “not found” response
located in docs/responses/model.not.found.json says:
{
"type": "Model",
"result": "not found"
}
We can change the type to User on the fly like this:
/**
* @responseFile responses/users.get.json
* @responseFile status=200 scenario="When authenticated as admin" docs/responses/
˓→user.get.admin.json
* @responseFile status=404 docs/responses/model.not.found.json {"type": "User"}
*/
This JSON string will be parsed and merged with the response from the file.
26 Chapter 2. ContentsScribe for Node.js
Generating responses automatically via response calls
If you don’t specify an example response using any of the other means described in this document, Scribe will attempt
to get a sample response by making a HTTP request to the local endpoint (known as a “response call”).
Important: By default, Scribe will only attempt response calls for GET routes, so no data should be persisted to your
datbase. Still, make sure you aren’t connected to your live database when running generate!
The configuration for response calls is located in the apply.responseCalls section for each route group in .
scribe.config.js. This means that you can apply different settings for different sets of routes. Here are some
important things to note:
• The baseUrl is the URL Scribe will make requests to. Set this to http://localhost:,
whereScribe for Node.js
• You can also modify the environment variables directly by adding a :code:.env.docs file or using the env
key. Scribe will load these env variables after starting your server, but before beginning response calls.
• By default, the package will generate dummy values for your documented query, body and file parameters
and send in the request. If you specified example values using @bodyParam or @queryParam, those
will be used instead. You can configure additional parameters or overwrite the existing ones for the request
in the responseCalls.queryParams, responseCalls.bodyParams, and responseCalls.
fileParams sections. For file parameters, each value should be a valid path (absolute or relative to the
project directory) to a file on the machine.
Note: If you specified No-example for a parameter earlier, it won’t be included when making a response call.
Note: Unlike the other approaches described in this document, the ResponseCalls strategy will only attempt to
fetch a response if there are no responses with a status code of 2xx already.
Adding descriptions for fields in the responses
You can add descriptions for fields in your response by adding a @responseField annotation to your route decla-
ration.
/**
* @responseField id The id of the newly created word
*/
Scribe figures out the type of the field from the 2xx responses for that endpoint.
Tip: You don’t need to specify the full field path if the field is inside an array of objects or wrapped in pagination
data. For instance, the above annotation will work fine for all of these responses:
{ "id": 3 }
[
{ "id": 3 }
]
{
"data": [
{ "id": 3 }
]
}
28 Chapter 2. ContentsScribe for Node.js
If you wish, you can also specify the type of the field:
/**
* @responseField {integer} id The id of the newly created word
*/
2.2.7 Excluding endpoints from the documentation
You can exclude endpoints from the documentation by using the @hideFromApiDocs tag in the relevant doc block
(on the route declaration). Scribe will not extract any information about the route or add it to the generated docs.
2.3 Generating Documentation
Attention: These docs are for Scribe for JS v1, which is no longer maintained. See scribe.knuckles.wtf/nodejs
for Scribe for JS v2.
To generate your API documentation, use the scribe generate command.
2.3. Generating Documentation 29Scribe for Node.js
npx scribe generate -a -s
• Your “app file” is the file where you create your Express app and attach routes. Usually an index.js or
app.js.
• Your server file is the file where you actually start your server (usually by calling app.listen()). Some-
times it’s the same as your app file, sometimes is’s a different file (like bin/www).
Running this command will:
• extract information about your API and endpoints from your app file
• start your app using node (if you supplied one with -s
) in order to extract possible responses
• generate documentation about your endpoints as a series of Markdown files
• pass these Markdown files to Pastel, which wraps the Markdown files in a HTML, CSS and JavaScript template.
2.3.1 Viewing the generated docs
To access your generated docs, find the index.html file in your outputPath folder (by default, public/docs)
and open that in your browser.
2.3.2 Configuring interactive documentation
When interactive is set to true (which is also the default value) in your config, Scribe will add a “Try It Out”
button to your endpoints so users can test them from their browser.
For this to work, though, you’ll need to make sure CORS is enabled.
2.3.3 Postman collection generation
By default, a Postman collection file which you can import into API clients like Postman or Insomnia is generated
alongside your docs. You can view it by visiting public/docs/collection.json. This link will also be added
to the sidebar of your docs.
You can configure Postman collection generation in the postman section of your .scribe.config.js file.
• To turn it off, set the postman.enabled config option to false.
• To override some fields in the generated collection, set the postman.overrides config option to your
changes. You can use dot notation to update specific nested fields. For instance, {'info.version': '2.
0.0'} will override the ‘versionkey in the 'info object whenever generating.
2.3.4 OpenAPI (Swagger) spec generation
Scribe can also generate an OpenAPI spec file. This is disabled by default. You can configure this in the openapi
section of your scribe.config.js file.
• To enable it, set the openapi.enabled config option to true.
• To override some fields in the generated spec, set the openapi.overrides config option to your changes.
You can use dot notation to update specific nested fields. For instance, {'info.version': '2.0.0'}
will override the ‘versionkey in the 'info object whenever generating.
30 Chapter 2. ContentsScribe for Node.js You can view the generated spec by visiting public/docs/openapi.yaml for static. This link will also be added to the sidebar of your docs. 2.3.5 Skipping the extraction phase If you’ve modified the generated Markdown, and you only want Scribe to transform it to the normal HTML output, you can use the --no-extraction flag. Scribe will skip extracting data from your routes and go straight to the writing phase, where it converts your Markdown to HTML or Blade. See Advanced Customization. 2.3.6 Overwriting your changes to the Markdown If you’ve modified the generated Markdown manually, but you’d like to discard your changes and re-generate based on the data Scribe extracts from your routes, you can pass the --force flag. 2.3.7 Further customization [coming soon] Sometimes you need to modify the documentation after it has been generated. See the guide on customization for help on doing that. 2.4 Configuration Attention: These docs are for Scribe for JS v1, which is no longer maintained. See scribe.knuckles.wtf/nodejs for Scribe for JS v2. Here’s a rundown of what’s available in the .scribe.config.js file. Tip: If you aren’t sure what an option does, it’s best to leave it set to the default. 2.4.1 Output settings outputPath Output folder. The HTML documentation, assets and Postman collection will be generated to this folder. Source Markdown will be in /docs. Default: public/docs. baseUrl The base URL to be used in examples. title The HTML for the generated documentation, and the name of the generated Postman collection. 2.4. Configuration 31
Scribe for Node.js

description

A description for the API. This will be used as the info.description field in the Postman collection and
OpenAPI spec, and placed as the first paragraph under the “Introduction” section in the doc webpage (before the
introText.

introText

The text to place in the “Introduction” section. Markdown and HTML are supported.

interactive

Set this to true if you’d like Scribe to add a “Try It Out” button to your endpoints so users can test them from their
browser. Default: true.
..Important:: For “Try It Out” to work, you’ll need to make sure CORS is enabled on your endpoints

logo

Path to an image file to use as your logo in the generated docs. This will be used as the value of the src attribute for
the  tag, so make sure it points to a public URL or path accessible from your web server. For best results, the
image width should be 230px. Set this to false if you’re not using a logo. Default: false.

Note: This path will be used as-is in the HTML doc, so make sure it’s publicly accessible.

defaultGroup

When documenting your api, you use @group annotations to group API endpoints. Endpoints which do not have a
group annotation will be grouped under the defaultGroup. Defaults to "Endpoints".

exampleLanguages

For each endpoint, an example request is shown in each of the languages specified in this array. Currently only bash,
and javascript are supported. Default: ["bash", "javascript"]

postman

Along with the HTML docs, Scribe can automatically generate a Postman collection for your endpoints. This section
is where you can configure or disable that.
The collection will be created in /collection.json.
     • enabled: Whether to generate a Postman API collection. Default: true
     • overrides: List of fields to apply to the generated collection. Dot notation is supported. For instance, if
       you’d like to override the version (in the info object, you can set overrides to ['info.version' =>
       '2.0.0'].

32                                                                                            Chapter 2. Contents
Scribe for Node.js
2.4.2 Extraction settings
auth
Authentication information about your API. This information will be used:
• to derive the text in the “Authentication” section in the generated docs
• to add the auth headers/query parameters/body parameters to the docs and example requests
• to set the auth headers/query parameters/body parameters for response calls
Here are the available settings:
• enabled: Set this to true if your API requires authentication. Default: false.
• in: Where is the auth value meant to be sent in a request? Options:
– query (for a query parameter)
– body (for a body parameter)
– basic (for HTTP Basic auth via an Authorization header)
– bearer(for HTTP Bearer auth via an Authorization header)
– header (for auth via a custom header)
• name: The name of the parameter (eg token, key, apiKey) or header (eg Authorization,
Api-Key). When in is set to bearer or basic, this value will be ignored, and the header used will be
Authorization.
• useValue: The value of the parameter to be used by Scribe to authenticate response calls. You can also
specify a function that will be called during the response call to provide the authentication value. This will not
be included in the generated documentation. If this value is null or a function that returns null, Scribe will use a
random value.
• placeholder: Placeholder your users will see for the auth parameter in the example requests. If this is empty,
Scribe will generate a realistic-looking auth token instead. Defaults to: “{YOUR_AUTH_KEY}”.
• extraInfo: Any extra authentication-related info for your users. For instance, you can describe how to
find or generate their auth credentials. Markdown and HTML are supported. This will be included in the
Authentication section.
routes
The routes section is an array of items describing what routes in your application that should be included in the
generated documentation.
Each item in the routes array is a route group, an array containing rules defining what routes belong in that group,
and what settings to apply to them.
• include: A list of patterns (route paths) which should be included in this group, even if they do not match the
rules in the match section.
• exclude: A list of patterns (route names or paths) which should be excluded from this group, even if they
match the rules in the match section.
For instance, supposing our routes are set up like this:
2.4. Configuration 33Scribe for Node.js
app.get('/users', getUsers);
app.get('/users/{id}', getUserById);
app.get('ping', () => 'pong');
app.get('/admin', launchAdminApp);
If we want to match all routes but exclude the /admin route, we could use this configuration:
routes: {
include: ['*'],
exclude: ['/admin'],
}
Or this:
routes: {
include: ['/users/*', '/ping'],
exclude: [],
}
Tip: You can use * as a wildcard in domains, :code:`prefixes, include and exclude. For instance,
'exclude' => ['users/*'] will exclude all routes with URLs starting with ‘users/’.
• apply: The apply section of the route group is where you specify any additional settings to be applied to
those routes when generating documentation. There are a number of settings you can tweak here:
– headers: Any headers you specify here will be added to the headers shown in the example requests in
your documentation. They will also be included in response calls. Headers are specified as key => value
strings.
– responseCalls: These are the settings that will be applied when making “response calls”.
Tip: By splitting your routes into groups, you can apply different settings to different routes.
fakerSeed
When generating example requests, Scribe uses the faker.js package to generate random values. If you would like the
package to generate the same example values for parameters on each run, set fakerSeed to any number (eg. 1234).
Tip: Alternatively, you can set example values for parameters when documenting them.
2.5 Customizing the generated documentation
Attention: These docs are for Scribe for JS v1, which is no longer maintained. See scribe.knuckles.wtf/nodejs
for Scribe for JS v2.
Scribe offers you multiple options to customize how your documentation is rendered.
34 Chapter 2. ContentsScribe for Node.js
2.5.1 Manually modifying the documentation after generating
Sometimes you might need to add or remove extra information about your API that Scribe doesn’t support. You can
do this by editing the generated Markdown files manually, and then letting Scribe transform them to HTML.
After generation, the Markdown files are located in your resources/docs folder and include the following:
• index.md: This contains the front matter (see the Pastel docs) and the Introduction section
• authentication.md: This contains the Authentication section
• groups/: This folder contains your endpoints. Each Markdown file here represents a group of endpoints (the
ones you specified by using @group).
Tip: You can also add append.md and prepend.md files in this directory. See Specifying content to be added to
the beginning or end of the documentation.
Pastel will combine these files in this order (you can also see it described in the front matter of the index.md):
• index.md
• prepend.md
• authentication.md
• groups/* (the files here will be included in alphabetical order)
• append.md
Warning: You shouldn’t create any files manually in the groups/ folder, as they will be deleted on each run,
After editing the Markdown files, you can use the scribe:generate command to rebuild your docs.
Tip: You can pass the --no-extraction flag to tell Scribe to skip the extraction phase and go straight to
converting your Markdown to HTML.
If you run the generate command after modifying any of the generated Markdown files (even without the
--no-extraction) flag, Scribe will not overwrite your changes to that file. To force Scribe to overwrite them, use
the --force flag.
This means that if, for instance, you modify the groups/user-management.md file, the information about your
endpoints in the “User management” group will remain the same until you use the --force option.
2.5.2 Specifying content to be added to the beginning or end of the documentation
If you wish to automatically add the same content to the docs every time you generate (for instance, a longer intro-
duction, a disclaimer or a list of possible error responses), you can add a prepend.md or append.md file to the
resources/docs folder. They will be included in the generated documentation in the order described above.
The contents of prepend.md will be added after the Introduction section, while the contents of append.md will
show up at the end of the document.
2.5. Customizing the generated documentation 35Scribe for Node.js
2.5.3 Adding more example languages [coming soon]
For each endpoint, an example request is shown in each language configured. To add a language which is not supported
by this package, you’ll have to create your own view for how an example should render. Here’s how:
First, publish the vendor views by running:
php artisan vendor:publish --provider="Knuckles\Scribe\ScribeServiceProvider" --
˓→tag=scribe-views
This will copy the views to resources/views/vendor/scribe.
Next, create a file called {language-name}.blade.php (for example, ruby.blade.php) in the
partials/example-requests directory.
You can then use Blade templates to write Markdown that describes how the example request for the language should
be rendered.
In the template, you have the $baseUrl and $route variables available to you.
$baseUrl is the base URL for the API (for instance, http://your-api.dev).
$route is an array with the following keys:
• methods: an array of the HTTP methods for that route
• boundUri: the complete URL for the route, with any url parameters replaced (/users/{id} -> /users/
1)
• headers: key-value array of headers to be sent with route (according to your configuration)
• cleanQueryParameters: key-value array of query parameters with example values to be sent with the
request.
• cleanBodyParameters: key-value array of body parameters with example values to be sent with the re-
quest.
• fileParameters: key-value array of file parameters with example values to be sent with the request. Each
example value is an instance of \Illuminate\Http\UploadedFile.
Important: Parameters which have been excluded from the example requests (see Specifying Example Values) will
not be present in cleanQueryParameters, cleanBodyParameters, or fileParameters.
Tip: You can make use of some utilities in the class \Knuckles\Scribe\Tools\WritingUtils to help you
easily output data in various forms (such as in key=value format or as a PHP array). Please take a look at that class
and its usages in the included example request templates for details.
Finally, add the language to the exampleLanguages array in your config and generate your documentation as
usual.
2.5.4 Customizing the code used in examples templates [coming soon]
Customising existing language templates follows the same process as described above: publish assets, then modify the
Blade templates in resources/views/vendor/scribe/partials/example-requests as necessary.
36 Chapter 2. ContentsScribe for Node.js
2.5.5 Changing the Markdown templates [coming soon]
If you need to go even further, you can take a look at editing the included Blade views.
Included views
You should see the following Blade files when you publish views:
• index.blade.php: This gets transformed to the index.md. It has access to the $frontmatter and
$introText strings.
• authentication.blade.php: This gets transformed into the authentication.md file. This has
access to the following variables:
– $isAuthed boolean that describes if the API has an auth section configured
– the $authDescription string that contains information parsed from the authentication type, and
– the $extraAuthInfo string that contains the text in auth.extraInfo from the config file.
The following Blade files are present in the partials directory:
• frontmetter.blade.php: This gets transformed into a string, which is then passed to the index.
blade.php file as $frontmatter. It has access to the following variables:
– the $postmanCollectionLink string that contains the URL to the Postman file (typically ./
collection.json), and
– the $settings array that contains logo, languages and title.
Important: These Blade files are all configured for generating Markdown which is then turned into static HTML
(by Pastel). Therefore, hardcoded and relative links are used (eg ). For users
using laravel type documentation, these links are afterwards replaced in the generated HTML file with the correct
Blade helpers (eg ).
• group.blade.php: This is the template for a group of endpoints. For each group of endpoints, this file
is rendered, and gets transformed into the corresponding group file (for instance, endpoints with group “User
Management” are passed through this template to create the file groups/user-management.md). It has
access to the following variables:
– $groupName,
– $groupDescription, and
– $routes, an array containing routes in that group. Each item here contains the route information de-
scribed in the plugin API, plus an output item that contains the Markdown for that route.
• endpoint.blade.php: This is the template for a single endpoint. For each endpoint, it gets rendered and
passed back to the Writer class, which sets it as the output key in the $route variable before passing to
the group template. It has access to the following variables:
– $settings (the same settings variable passed to frontmatter),
– $route: an array which contains the information extracted from the various stages (see the plugin API
for details).
2.5. Customizing the generated documentation 37Scribe for Node.js
Included components [coming soon]
There are also a number of included components that you can utilize in your Blade files, located in the components
folder:
• field-details.blade.php: This is the template for rendering details about a field. It takes in the at-
tributes name, description, type, and required. Typically, you’d use this to render a parameter in your
route Blade file.
• badges/auth.blade.php: A simple ‘requires authentication’ badge. Accepts the attribute
authenticated.
• badges/http-method.blade.php: A component to wrap a HTTP method in a badge. Takes in the
method attribute.
• badges/base.blade.php: The base badge component, used by auth and http-method. Takes in
colour and text attributes, and uses Pastel’s badge classes to create a badge.
2.5.6 Changing the CSS styles
The CSS styling is provided by Pastel, which currently supports only one template. Consider making a pull request to
add your alternative styles.
2.6 Troubleshooting and Debugging
Attention: These docs are for Scribe for JS v1, which is no longer maintained. See scribe.knuckles.wtf/nodejs
for Scribe for JS v2.
This page contains a few tips to help you figure out what’s wrong when Scribe seems to be malfunctioning.
2.6.1 Update your version
First off, try updating your installed Scribe version. Maybe your problem is due to a bug we’ve fixed in a newer
release. You can see a list of releases and major changes on the changelog.
• To find the exact installed version, run npm list @knuckleswtf/scribe
• To update to the latest version, run npm update @knuckleswtf/scribe.
• To update to a specific version (example: 2.0.1), run npm install @knuckleswtf/scribe@2.0.1.
38 Chapter 2. ContentsYou can also read