MACBOOK PRO 13" TOUCH BAR TEARDOWN - IFIXIT
←
→
Page content transcription
If your browser does not render page correctly, please read the page content below

MacBook Pro 13" Touch Bar Teardown                                     Guide ID: 73480 - Draft: 2021-05-19

          MacBook Pro 13" Touch Bar Teardown
  Teardown of the MacBook Pro 13-inch Late 2016, with four Thunderbolt 3 ports and Touch Bar
                             performed on November 15, 2016.

                                        Written By: Jeff Suovanen

This document was generated on 2021-05-25 07:51:45 AM (MST).
© iFixit — CC BY-NC-SA                                www.iFixit.com                          Page 1 of 25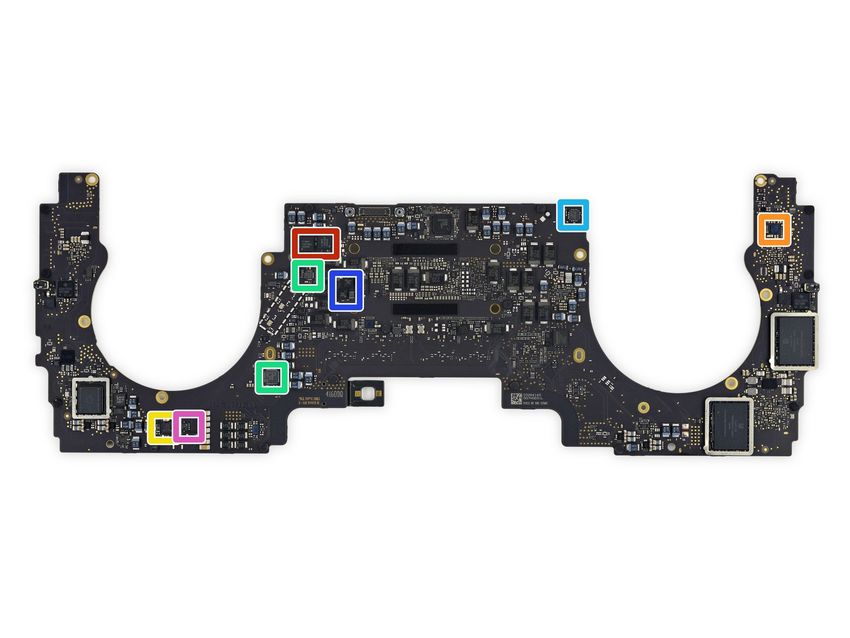
MacBook Pro 13" Touch Bar Teardown                                             Guide ID: 73480 - Draft: 2021-05-19

    INTRODUCTION

    Two weeks ago, we tore down the new entry-level 13" MacBook Pro to discover it was thinner,
    lighter, faster, and (sad face) less repairable than most any other pro-level laptop. Today, we turn
    our tools on its Touch Bar-equipped launch mate. Will this machine surprise us with some upgrade-
    friendly features, or will it be as disposable as the box it comes in? There's only one way to find out:
    it's teardown time!

    Follow along on Facebook, Instagram, or Twitter to keep in touch with the latest and greatest
    hardware teardowns and repair news!

    [video: https://www.youtube.com/watch?v=lBzDGjRge1A]

      TOOLS:
     64 Bit Driver Kit (1)
     iOpener (1)
     Nylon Tipped Tweezers (1)
     Plastic Cards (1)
     iFixit Opening Picks set of 6 (1)
     Spudger (1)

This document was generated on 2021-05-25 07:51:45 AM (MST).
© iFixit — CC BY-NC-SA                                www.iFixit.com                                  Page 2 of 25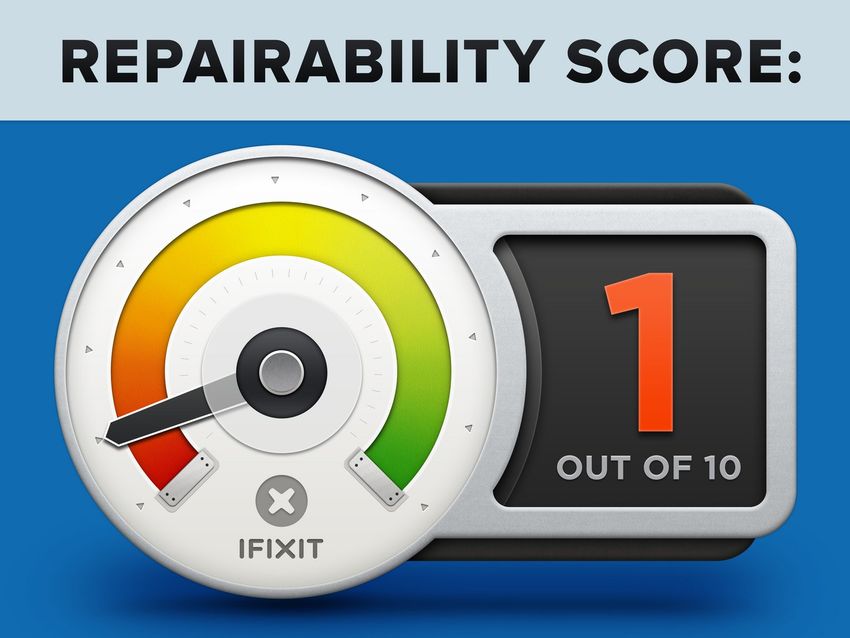
MacBook Pro 13" Touch Bar Teardown Guide ID: 73480 - Draft: 2021-05-19
Step 1 — MacBook Pro 13" Touch Bar Teardown
Today's million-dollar question: Is this a scaled-up version of the 13-inch "Escape Edition," or a
scaled-down version of the 15-inch Touch Bar unit? Here's what the tech specs tell us:
13.3” LED-backlit IPS Retina display with 2560 × 1600 resolution (227 dpi), P3 color gamut
2.9 GHz Skylake dual-core Intel Core i5 (Turbo Boost up to 3.3 GHz) with integrated Intel Iris
Graphics 550
8 GB of 2133 MHz LPDDR3 onboard memory (16 GB configuration available)
256 GB, 512 GB, or 1 TB PCIe-based SSD
Four Thunderbolt 3 (USB-C) ports supporting charging, DisplayPort, Thunderbolt, USB 3.1 Gen
2
Touch Bar with integrated Touch ID sensor
Force Touch trackpad
This document was generated on 2021-05-25 07:51:45 AM (MST).
© iFixit — CC BY-NC-SA www.iFixit.com Page 3 of 25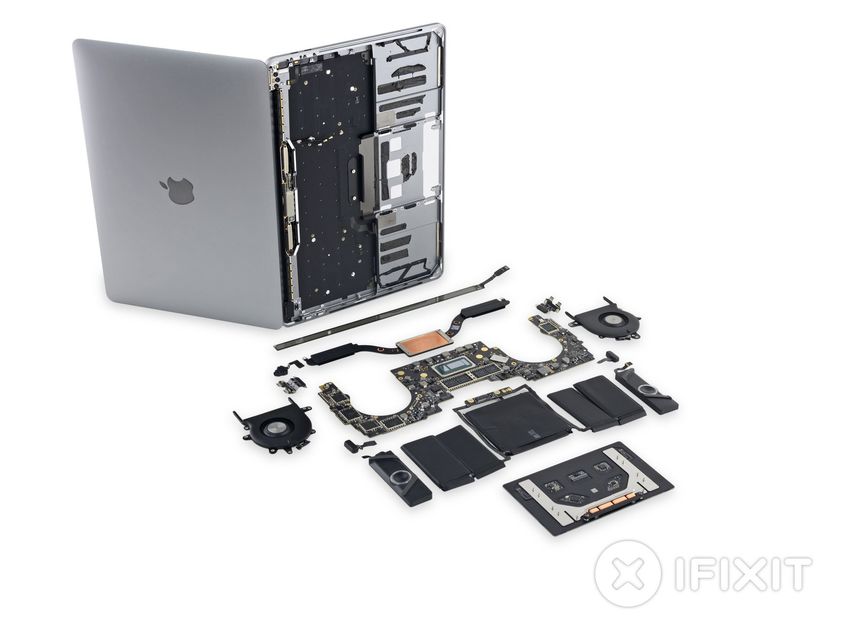
MacBook Pro 13" Touch Bar Teardown Guide ID: 73480 - Draft: 2021-05-19
Step 2
A rudimentary inspection of the outer case reveals the expected FCC certifications, and a new
model number: A1706.
The Touch Bar is pretty, but it's missing ... something.
We won't tell Apple if you won't.
We're itching to grab our screwdrivers and get to work—but first, let's whip out the other Late 2016
13" Retina MacBook Pro for some quick comparisons ...
This document was generated on 2021-05-25 07:51:45 AM (MST).
© iFixit — CC BY-NC-SA www.iFixit.com Page 4 of 25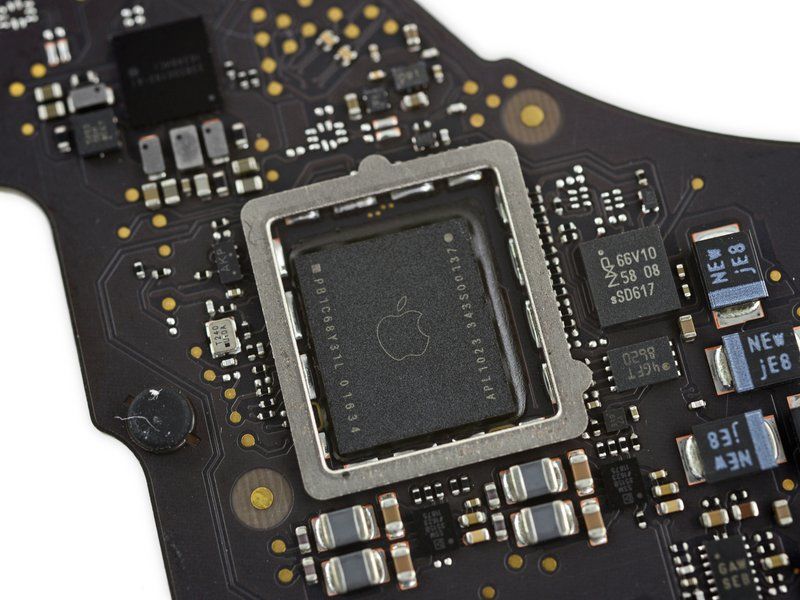
MacBook Pro 13" Touch Bar Teardown Guide ID: 73480 - Draft: 2021-05-19
Step 3
According to Apple, this MacBook Pro's dimensions match exactly with those of the "Escape
Edition" machine we tore down a couple weeks ago. Do we believe it even for a second? Yes we
do.
Do you miss your function keys? Hold down the Function key to see your missing function keys.
Chameleon Mode, engage.
One thing that is noticeably different is, of course, the port situation on the starboard side. This
Touch Bar-equipped machine packs two extra Thunderbolt ports, so you have twice as many
places to plug in your dongles.
Throwing both machines onto the scale, we find the Touch Bar version weighs about 20 grams
less than its counterpart. We're chalking the difference up to this laptop's smaller battery.
Finally, we note a pair of side vents on the underside of the Touch Bar version, similar to the ones
we've spotted in previous Retina MacBook Pros—but absent from the Function Key model.
This document was generated on 2021-05-25 07:51:45 AM (MST).
© iFixit — CC BY-NC-SA www.iFixit.com Page 5 of 25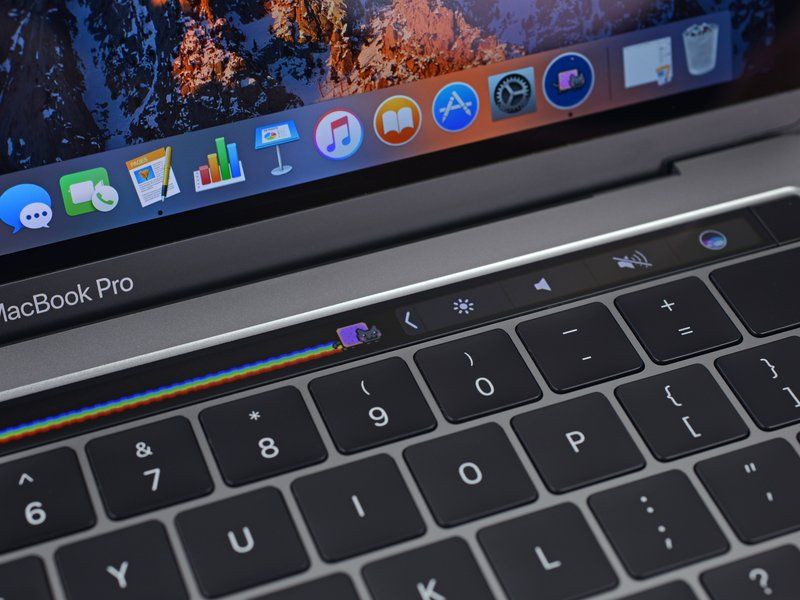
MacBook Pro 13" Touch Bar Teardown Guide ID: 73480 - Draft: 2021-05-19
Step 4
Blasting through the pentalobe-and-suction-cup-dance normally reserved for iPhones, we beast
the lid off with a familiar sliding maneuver.
Let's play "Spot the Differences!" On the left we have the Touch Bar MBP, and on the right is the
Escape Edition MBP.
Touch Bar features: a smaller battery, two fans, double-ended heat sink, no SSD card, and
lower speakers (that don't actually line up with their grilles).
Function Key features: way more components that you can actually remove right off the bat—
namely the SSD, speakers, and battery (well ... sort of).
On the Touch Bar model, it looks like we can only remove the trackpad and headphone jack before
hitting a logic board barrier.
This document was generated on 2021-05-25 07:51:45 AM (MST).
© iFixit — CC BY-NC-SA www.iFixit.com Page 6 of 25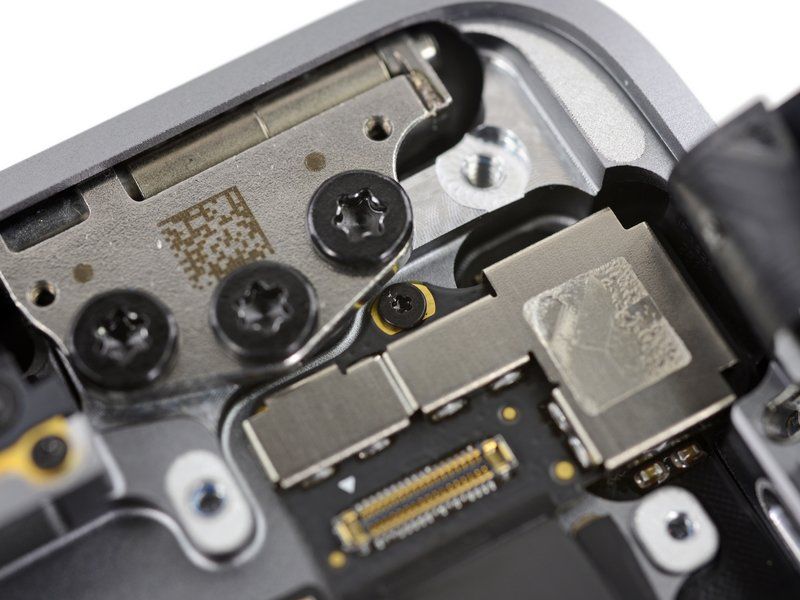
MacBook Pro 13" Touch Bar Teardown Guide ID: 73480 - Draft: 2021-05-19
Step 5
It appears 2016 is the year of the new connector, as this is the second time we've seen the new
approach to the battery bridge.
These copper pads are for the positive and negative terminals of the battery.
Apple also seems to have included a connector that goes ... nowhere?
Could it be a diagnostic port? Circuits and firmware do need testing—although we have seen a
fair amount of test points, which usually cut it.
We also find the modular headphone jack this time without microphone hangers-on. Here we
thought these were a thing of the past.
Nearby we spot a water damage indicator sticker, waiting patiently for the day you spill iced tea on
your Touch Bar and it can fulfill its purpose in life by turning pink.
This document was generated on 2021-05-25 07:51:45 AM (MST).
© iFixit — CC BY-NC-SA www.iFixit.com Page 7 of 25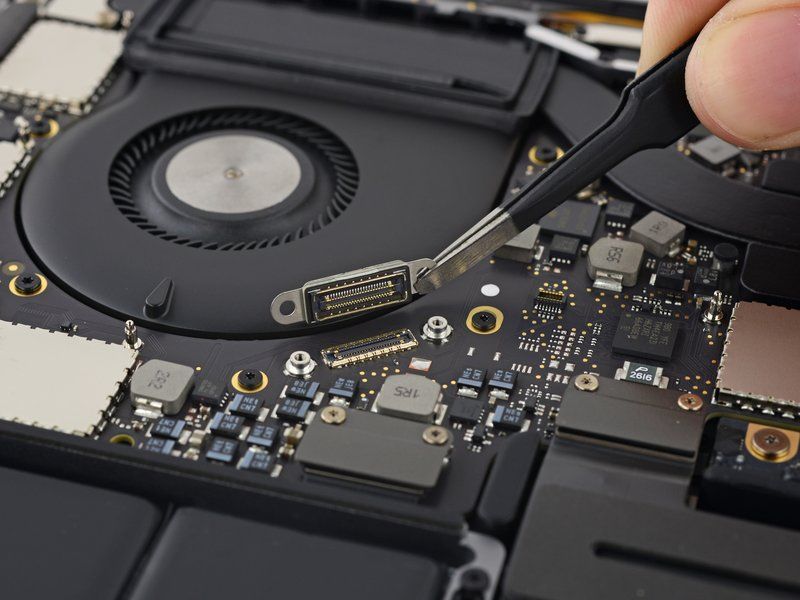
MacBook Pro 13" Touch Bar Teardown Guide ID: 73480 - Draft: 2021-05-19
Step 6
Much like the Function Keys model, the trackpad in the Touch Bar unit slides out easily after
dispatching ten T5 Torx screws.
We can also happily report that the trackpads from these respective models are identical, and likely
cross-compatible.
The cable routing, however, is different to accomodate the modified logic board design. So, if
you're planning on replacing a busted trackpad, be sure to hold on to the original flex.
In case you missed it, here are the ICs we identified the first time around:
STMicroelectronics STM32F103VB ARM Cortex-M3 MCU
Broadcom BCM5976C1KUFBG Touch Controller
Maxim Integrated MAX11291ENX 24-Bit, 6-Channel Delta-Sigma ADC
Monolithic Power Systems MP24830 white LED driver
This document was generated on 2021-05-25 07:51:45 AM (MST).
© iFixit — CC BY-NC-SA www.iFixit.com Page 8 of 25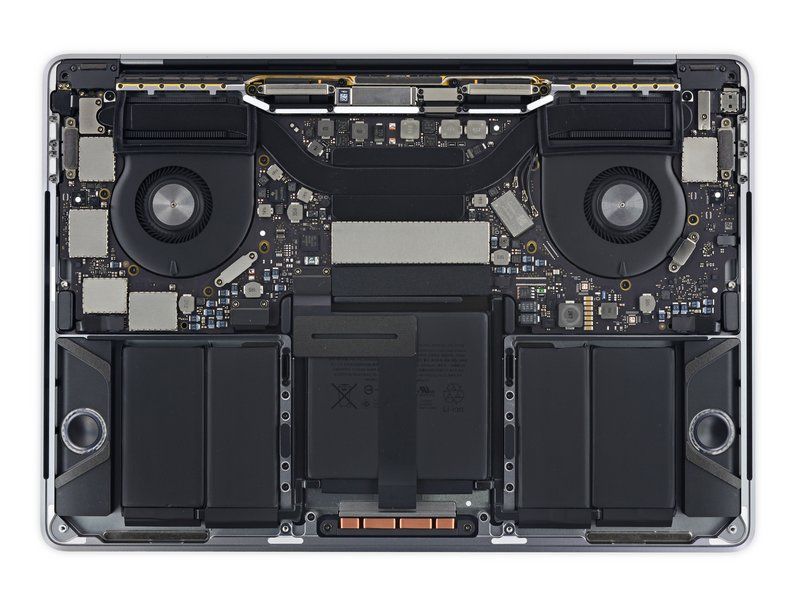
MacBook Pro 13" Touch Bar Teardown Guide ID: 73480 - Draft: 2021-05-19
Step 7
Touchpad IC identification,
continued:
Bosch Sensortec BMA282
accelerometer
Texas Instruments TMP421
remote/local temperature sensor
Macronix MX25L2006EZUI-12G 2
Mb serial NOR flash memory
Maxim Integrated MAX9028
comparator
This document was generated on 2021-05-25 07:51:45 AM (MST).
© iFixit — CC BY-NC-SA www.iFixit.com Page 9 of 25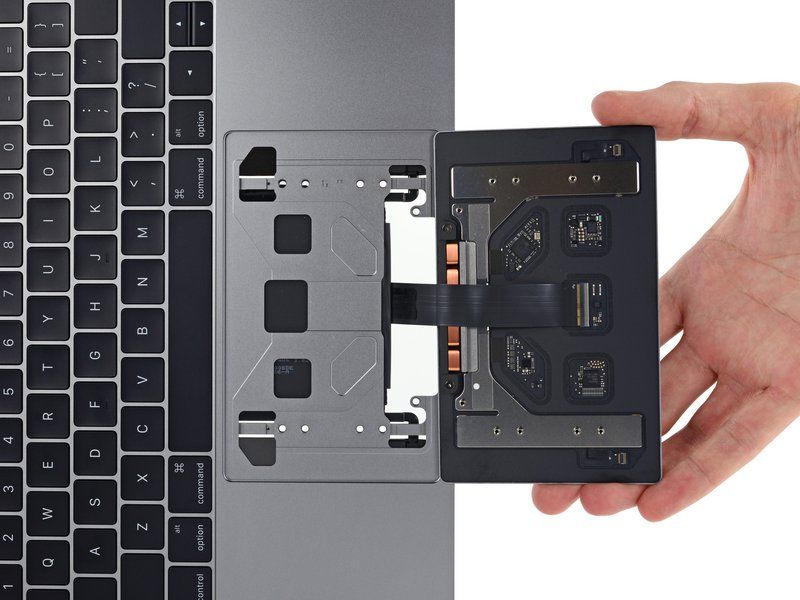
MacBook Pro 13" Touch Bar Teardown Guide ID: 73480 - Draft: 2021-05-19
Step 8
We're ready to remove the rest of the peripherals. It'd be great to get a look at the battery, fans,
heat sink, and speakers. Except we can't.
The symmetrical logic board keeps guard over the remaining components, so we spudger off its
connecting cables and wrest it free from the case.
The heat sink is attached to the logic board with screws on the bottom. With the board out of the
case, we're able to remove the heat sink for inspection—with a heat pipe running in each direction,
it's got twice the pipe of the entry-level model.
This document was generated on 2021-05-25 07:51:45 AM (MST).
© iFixit — CC BY-NC-SA www.iFixit.com Page 10 of 25MacBook Pro 13" Touch Bar Teardown Guide ID: 73480 - Draft: 2021-05-19
Step 9
We now look at the moustache logic board to see what chips make this MacBook a Pro:
Intel Core i5-6267U processor with Intel Iris Graphics 550
Intel JHL6540 Thunderbolt 3 controller
SanDisk SDRQKBDC4 064G 64 GB NAND flash memory (x2 for a total of 128 GB)
Samsung K4E6E304EB-EGCE DDR3 DRAM (4 x 2 GB for 8 GB total)
Texas Instruments SN650839 66AL7XWGI, and TI/Stellaris LM4FS1EH SMC Controller
(Replacement codename for TM4EA231)
Murata/Apple 339S00056 Wi-Fi Module
Likely Apple SSD controller underneath (also likely) Micron R4432ACPE-GD-F 512 Mb
memory, probably similar to this one.
This document was generated on 2021-05-25 07:51:45 AM (MST).
© iFixit — CC BY-NC-SA www.iFixit.com Page 11 of 25MacBook Pro 13" Touch Bar Teardown Guide ID: 73480 - Draft: 2021-05-19
Step 10
Flipping the logic board over, we find no shortage of components, including:
SanDisk SDRQKBDC4 64 GB NAND flash storage (as seen in the Escape Edition's removable
SSD)—bringing the total to 256 GB
APL1023/343S00137 (likely the custom Apple T1 chip that pairs with the Touch Bar)
2x Texas Instruments CD3215C00 USB type-C controller (and 2 on the back)
Intersil ISL95828HRTZ Intel CPU PWM controller
Apple 338S00193-A1 power management
Winbond W25Q64FVZPIQ 64 Mb serial flash memory
NXP 66V10 NFC controller, containing Secure Element 008 and NXP PN549 (as seen in the
iPhone 6s)
This document was generated on 2021-05-25 07:51:45 AM (MST).
© iFixit — CC BY-NC-SA www.iFixit.com Page 12 of 25MacBook Pro 13" Touch Bar Teardown Guide ID: 73480 - Draft: 2021-05-19
Step 11
More chips on the flip:
2x Pericom PI3WVR12612 HDMI
2.0, DisplayPort 1.2 Video Switch
Cirrus Logic CS42L83A Audio
Codec
National Semiconductor
LP8548B1 backlight driver
Texas Instruments TPS51916
memory power synchronous buck
controller, and TPS51980A
synchronous buck controller
Texas Instruments TMP513A
remote/local temperature sensor
2x Fairchild Semiconductor
FDMC7570S 40 A N-channel
MOSFET
Fairchild Semiconductor
FDMC86106LZ PMIC 7.5 A N-
channel MOSFET
This document was generated on 2021-05-25 07:51:45 AM (MST).
© iFixit — CC BY-NC-SA www.iFixit.com Page 13 of 25MacBook Pro 13" Touch Bar Teardown Guide ID: 73480 - Draft: 2021-05-19
Step 12
IC identification, pt. 2:
Vishay SIC635 power stage
Vishay SIC535 power stage
Analog Devices SSM3515B 31 W Class D audio amplifier
Texas Instruments TMP102 temperature sensor
Renesas (formerly Intersil) ISL9239 battery charger
Apple power management (assumption)
Texas Instruments INA214 current sense amplifier
This document was generated on 2021-05-25 07:51:45 AM (MST).
© iFixit — CC BY-NC-SA www.iFixit.com Page 14 of 25MacBook Pro 13" Touch Bar Teardown Guide ID: 73480 - Draft: 2021-05-19
Step 13
IC identification, pt. 3:
Macronix MX25U3235F 32 Mb serial NOR flash memory
Winbond W25Q80DVUXIE 8 Mb serial NOR flash memory
Macronix MX25L2006EZUI-12G 2 Mb serial NOR flash memory
Texas Instruments TPS3895 adjustable voltage supervisor
Diodes Incorporated PI3USB102E 480 Mbps USB 2.0 switch
Texas Instruments SN74LVC1G02 single NOR gate
Likely hall sensor
This document was generated on 2021-05-25 07:51:45 AM (MST).
© iFixit — CC BY-NC-SA www.iFixit.com Page 15 of 25MacBook Pro 13" Touch Bar Teardown Guide ID: 73480 - Draft: 2021-05-19
Step 14
Another new feature of the MacBook Pro with Touch Bar is the addition of Touch ID.
While this is the first Mac computer to feature a fingerprint reader, the tech has been around
since at least 2004.
Welcome to the family.
The hardware helping drive this nifty feature contains a button coupled with capacitive sensors that
can distinguish fingers. Yay for biometrics.
That button also doubles as the power button, so fixing a power button may be a more costly
affair than it once was.
The Touch ID button is topped by sapphire crystal, which should protect the fingerprint scanner
from scratches.
This document was generated on 2021-05-25 07:51:45 AM (MST).
© iFixit — CC BY-NC-SA www.iFixit.com Page 16 of 25MacBook Pro 13" Touch Bar Teardown Guide ID: 73480 - Draft: 2021-05-19
Step 15
Hanging off each end of the logic board, we find a small, modular USB-C board.
Now that our beloved MagSafe connector has been retired, a wayward step on the power cord
is much more likely to damage your ports—so, it's heartening to see the USB-C hardware can
be replaced separately (although you'll have to remove the logic board to get to it).
While both USB-C modules look identical to our eyes, Apple notes that only the left-side ports offer
full-bandwidth Thunderbolt 3 performance.
With that, we can finally extract the fans. These highly-touted blowers measure 43 mm in diameter
—a shade less than the 45 mm fan we found in the entry-level MacBook Pro (but hey, you get two
of them).
Likely Texas Instruments motor controllers are found on the fan flex cables.
This document was generated on 2021-05-25 07:51:45 AM (MST).
© iFixit — CC BY-NC-SA www.iFixit.com Page 17 of 25MacBook Pro 13" Touch Bar Teardown Guide ID: 73480 - Draft: 2021-05-19
Step 16
Gently nestled between MacBook's edge and the keyboard are two speaker grilles—carefully
crafted vents that channel sound waves out of the MacBook Pro straight to ... Wait.
The speakers are not located under the speaker grilles. The speaker grille doesn't even go clear
through the case.
These speakers likely blast their impressive sound through the side air vents.
The "grilles" are seemingly cosmetic, maybe to unify the product line. Curiously, the Function Key
edition also suffers from some fake holes, albeit different ones.
Teardown Update: Alright, most of these holes are cosmetic, but after yanking out the tweeters in
the following step, it's clear that some of these are through-holes that carry sound out of the Mac's
enclosure.
This document was generated on 2021-05-25 07:51:45 AM (MST).
© iFixit — CC BY-NC-SA www.iFixit.com Page 18 of 25MacBook Pro 13" Touch Bar Teardown Guide ID: 73480 - Draft: 2021-05-19
Step 17
Met with resistance from heavy adhesive, we employ a combination of an opening pick and a
spudger to pry the right speaker off the upper case.
We spy with our little eyes what might be a teeny speaker, wedged in the corner above the "true"
speaker.
Judging from the through-holes under the smaller speaker, we assume this is a tweeter
designed to produce high frequency audio.
We loved the cute rubber-bumper sound-isolating screws holding down the speakers in the
Function Keys MBP. Looks like the Touch Bar opted to use extra gooey glue instead.
This document was generated on 2021-05-25 07:51:45 AM (MST).
© iFixit — CC BY-NC-SA www.iFixit.com Page 19 of 25MacBook Pro 13" Touch Bar Teardown Guide ID: 73480 - Draft: 2021-05-19
Step 18
We're so close to the Touch Bar we can almost, well, touch it.
Apple seems to be staking its claim on the cool tech, by slapping a P2 pentalobe screw over the
Touch Bar entry point.
Good thing we always come prepared.
We pluck an interconnect cable from the lower enclosure—this links the logic board to the Touch
Bar display and likely hosts some display silicon. We find:
STMicroelectronics STOD32A AMOLED power management
Winbond W25Q40EWUXIE 4 Mb serial NOR flash memory
Semtech RClamp3324T 4-line ESD protection
This document was generated on 2021-05-25 07:51:45 AM (MST).
© iFixit — CC BY-NC-SA www.iFixit.com Page 20 of 25MacBook Pro 13" Touch Bar Teardown Guide ID: 73480 - Draft: 2021-05-19
Step 19
Things are about to get heated. We call upon our friend the iOpener to assist us in removing the
Touch Bar.
Kids, gather 'round! Today we'll learn how to accidentally break the Touch Bar. Our efforts to
separate the OLED panel from the upper case resulted in the digitizer separating from the display.
You live and you learn.
Adding insult to injury, the Touch Bar flex cable is routed underneath the upper case, making
removal just a tad bit more annoying than we expected.
This document was generated on 2021-05-25 07:51:45 AM (MST).
© iFixit — CC BY-NC-SA www.iFixit.com Page 21 of 25MacBook Pro 13" Touch Bar Teardown Guide ID: 73480 - Draft: 2021-05-19
Step 20
Human touch needs to be processed by a brain. Touch Bar needs to be processed by a chip. With
some surgery we find the Touch Bar brain:
Broadcom BCM5976TC1KUB60G touch controller
Removing the OLED strip is difficult enough, but our efforts will not be in vain! Maybe a little in
vain. Okay, our efforts were crushed (along with our hopes and dreams). The Touch Bar is fragile.
To add to the fragile mystery that is the Touch Bar, we stumble across an unmarked chip. Given
the location, it is likely a display driver of sorts.
After scraping out all that business we uncover a three-microphone array. What is the leftmost one
even listening to? The fan? The keyboard? Who knows!
This document was generated on 2021-05-25 07:51:45 AM (MST).
© iFixit — CC BY-NC-SA www.iFixit.com Page 22 of 25MacBook Pro 13" Touch Bar Teardown Guide ID: 73480 - Draft: 2021-05-19
Step 21
At last we carve out the (mightily adhered) 5-cell battery.
Well, five-ish cells. With a nominal voltage of 11.41 V, the two outer pairs are wired in parallel
and together have the same charge capacity as the center one, to yield three ~3.8 V cells in
series.
You'd better hope your "Pro" career is short; this battery replacement is a doozy.
The battery board hosts a TI BQ20Z451 (a possible variant of the BQ20Z45-R1 line, seen in
MacBook Pros forever)
Listing a 49.2 Wh capacity, this battery seems a little piddly compared to the Function Key edition's
54.5 Wh—especially considering it's driving a lot more functionality (pun intended).
Dotting our i's, we slap these batteries on a scale: the Function Key-equipped MacBook Pro
battery weighed in at 235 grams, while this battery weighs just 197 grams.
The weight disparity probably helps account for a lighter Touch Bar edition, but the battery
seems to rate more watt-hours than the decrease in weight would suggest.
This document was generated on 2021-05-25 07:51:45 AM (MST).
© iFixit — CC BY-NC-SA www.iFixit.com Page 23 of 25MacBook Pro 13" Touch Bar Teardown Guide ID: 73480 - Draft: 2021-05-19
Step 22
Here's the Late 2016 13" MacBook
Pro with all its Touch Bar glory!
Disappointed that we didn't get
around to the display? It's the same
procedure we found in the 13"
Function Key teardown—antenna
bar, springy ribbons, the works.
This document was generated on 2021-05-25 07:51:45 AM (MST).
© iFixit — CC BY-NC-SA www.iFixit.com Page 24 of 25MacBook Pro 13" Touch Bar Teardown Guide ID: 73480 - Draft: 2021-05-19
Step 23 — Final Thoughts
The MacBook Pro 13" with Touch
Bar earns a 1 out of 10 on our
repairability scale (10 is the easiest
to repair):
The trackpad can be removed
without first removing the battery.
Proprietary pentalobe screws
continue to make working on the
device unnecessarily difficult.
The battery assembly is entirely,
and very solidly, glued into the
case, thus complicating
replacement.
The processor, RAM, and flash
memory are soldered to the logic
board.
The Touch Bar adds a second,
difficult to replace, screen to
damage.
The Touch ID sensor doubles as
the power switch, and is paired
with the T1 chip on the logic
board. Fixing a broken power
switch may require help from
Apple, or a new logic board.
This document was generated on 2021-05-25 07:51:45 AM (MST).
© iFixit — CC BY-NC-SA www.iFixit.com Page 25 of 25You can also read