WebCT to ANGEL 7.3 Conversion Guide for Instructors - 6510 Telecom Drive, Suite 400 Indianapolis, IN 46278 www.angellearning.com
←
→
Page content transcription
If your browser does not render page correctly, please read the page content below
WebCT™ to ANGEL® 7.3 Conversion Guide
           for Instructors

              6510 Telecom Drive, Suite 400
                 Indianapolis, IN 46278
                 www.angellearning.com

           Copyright © 2008 ANGEL Learning, Inc.
                  Last Update – April 2008
W E B C T ™ T O A N G E L 7 . 3 C O N V E R S I O N G U I D E F O R I N S T R U C T O R S
®
Table of Contents
Conventions Used in This Manual ............................................................................................... 4
Typographic Convention............................................................................................................... 4
Abbreviation Convention............................................................................................................... 4
Document Icons............................................................................................................................ 4
Introduction.................................................................................................................................... 5
Fundamental Differences.............................................................................................................. 6
Designer Options (WebCT) vs. Perpetual Designer View............................................................ 6
Designer Options (WebCT) ........................................................................................................ 6
Perpetual Designer View (ANGEL) ............................................................................................ 6
Isolated Content Tools (WebCT) vs. Integrated Content Tools.................................................... 6
Isolated Content Tools (WebCT)................................................................................................ 6
Integrated Content Tools (ANGEL) ............................................................................................ 6
Manage Files (WebCT) vs. Course Files Manager ...................................................................... 7
Manage Files (WebCT) .............................................................................................................. 7
Course Files Manager (ANGEL) ................................................................................................ 7
Manage Course (WebCT) vs. Manage Tab.................................................................................. 7
Manage Course (WebCT) .......................................................................................................... 7
Manage Tab (ANGEL)................................................................................................................ 7
Reports & Automate ..................................................................................................................... 8
Reports ....................................................................................................................................... 8
Automate .................................................................................................................................... 8
Are They Really That Different? ................................................................................................... 9
Migrated Your Course from WebCT to ANGEL............................................................................ 9
Build Your Course from Scratch ................................................................................................. 10
Add a Folder ............................................................................................................................. 10
Add a Page............................................................................................................................... 10
Add a Link................................................................................................................................. 11
Add an Assessment ................................................................................................................. 11
Add a Survey ............................................................................................................................ 11
Add a File (upload a file) .......................................................................................................... 11
Add a Drop Box (users submit files for review or grading)....................................................... 12
Add an IMS/SCORM Package ................................................................................................. 12
Copy Items ............................................................................................................................... 12
Communication Tab ................................................................................................................. 12
Appendix 1 ................................................................................................................................... 13
Exporting WebCT Course Content ............................................................................................. 13
2W E B C T ™ T O A N G E L C O N V E R S I O N G U I D E F O R I N S T R U C T O R S
®
Appendix 2 ................................................................................................................................... 16
How to Import a WebCT Course Export ..................................................................................... 16
Appendix 3 ................................................................................................................................... 18
Unsupported Items ..................................................................................................................... 18
3W E B C T ™ T O A N G E L 7 . 3 C O N V E R S I O N G U I D E F O R I N S T R U C T O R S
®
Conventions Used in This Manual
Typographic Convention
Type Style Represents
Example Text Words or characters that appear on the screen. These include field
names, screen titles, and pushbuttons.
Abbreviation Convention
Abbreviation Represents
N Normal view of the content item editor
A Advanced view of the content item editor
Document Icons
Icon Icon Meaning
Tip – a tip is a type of note that helps the users apply the techniques
and procedures described in the test to their specific needs. A tip
suggests an alternative method that may not be obvious and helps
users understand the benefits and capabilities of the item.
Note – Notes call the user’s attention to information of special
importance.
Reference – Refers the user to another source of information.
Caution – Caution advises users of actions that could potentially
cause problems.
Copyright © 2008 Adobe Systems Incorporated. Adobe Acrobat is a registered trademark of Adobe Systems
Incorporated.
Copyright © 2008 Microsoft Corporation. Microsoft, Access, Excel, PowerPoint are either registered trademarks or
trademarks of Microsoft Corporation in the United States and/or other countries.
Copyright © 2008 Blackboard. WebCT is a registered trademark of Blackboard, Inc.
4
Conventions Used in This ManualW E B C T ™ T O A N G E L 7 . 3 C O N V E R S I O N G U I D E F O R I N S T R U C T O R S
®
Introduction
Welcome to the WebCT™ to ANGEL Conversion Guide for Instructors. This guide is
designed to assist Instructors in the transition from WebCT to ANGEL.
ANGEL is a web-based course management and collaboration system that helps
educators to manage course materials effectively, communicate quickly, easily, and
effectively. ANGEL is designed as a complement to traditional courses as well as
distance learning courses.
With ANGEL, Instructors can evaluate comprehension through uploaded assignments
using drop-boxes, assess mastery of content through surveys, quizzes and tests,
encourage communication and interaction through the use of course mail, threaded
discussions and chat rooms, and so much more all via the easy to use and effective
tools built-in to ANGEL. Students are empowered to manage their own learning through
the use of tools that allow them to check their progress and review their grades at any
time during the course. ANGEL even provides tools for creating and managing teams
for project or committee work.
A significant part of ANGEL’s power is its customizability. Whatever your institutional
needs may be, ANGEL can be tailored to meet them. Please note that because your
institution determines which tools are made accessible, some segments of this guide
may not apply to your use of ANGEL. Contact your institution’s support desk for
questions regarding ANGEL.
In this Conversion Guide, we cover the fundamental differences between WebCT and
ANGEL as well as the similarities.
5
IntroductionW E B C T ™ T O A N G E L 7 . 3 C O N V E R S I O N G U I D E F O R I N S T R U C T O R S
®
Fundamental Differences
There are several areas of major differences between WebCT™ and ANGEL:
• Designer Options (WebCT) vs. Perpetual Designer View
• Isolated Content Tools (WebCT) vs. Integrated Content Tools
• Manage Files (WebCT) vs. Course Files Manager
• Manage Course (WebCT) vs. Manage Tab
• Reports & Agents
Designer Options (WebCT) vs. Perpetual Designer View
Designer Options (WebCT)
In WebCT, the Instructor’s default view of the course is from the Student perspective.
This means that any time a change is going to be made to the contents of the course,
the Instructor must switch to Designer Options view. Additionally, this creates a
requirement that the Instructor “Update the Student View” in order to make the changes
available to Students.
Perpetual Designer View (ANGEL)
In ANGEL, the Instructor is always in Designer View. The only time an Instructor must
force a change in perspective is when they want to view the course from the Student
Preview mode. This is easily accomplished by simply clicking on the Sunglasses icon
found in the top right corner of every page of the course.
Isolated Content Tools (WebCT) vs. Integrated Content
Tools
Isolated Content Tools (WebCT)
In WebCT, one is often restricted in course design by the discrete and isolated nature of
the tools available. All quizzes must reside within the quizzing tool. All assignments
must reside within the assignments tool. There are no folders in WebCT for organizing
content pages. Instead, you have an organizer page that acts like a folder and content
modules that are primarily used as table of contents for linking content items together.
And while it’s true that there is an action menu that integrates some of these distinct
tools for the user, for the most part this type of navigation is difficult from both the
developer’s perspective and the users.
Integrated Content Tools (ANGEL)
On the contrary, ANGEL allows for a great deal of flexibility in design and layout as
many of the content components can be integrated into a folder structure that is similar
to the explorer view in Windows. For example, in WebCT there is a distinct tool for
6
Fundamental DifferencesW E B C T ™ T O A N G E L C O N V E R S I O N G U I D E F O R I N S T R U C T O R S
®
Discussions in which all topics for the semester are listed. In ANGEL, an instructor has
the option to put all of their discussion forums in one folder but also may choose to put
the individual discussions into the folder for the unit to which they are related. The same
is true for assignments, and tests and quizzes i.e., the Unit One folder contains Unit One
Discussion, Unit One Notes, Unit One Drop box and Unit One Quiz.
This difference allows the course to be organized in a way that is very intuitive for the
user to navigate.
Manage Files (WebCT) vs. Course Files Manager
Manage Files (WebCT)
In WebCT, an Instructor accesses files by uploading them into the Manage Files area.
In this area, it is possible to create folders for organizing files, and you can create a new
file using the built in text editor or you can upload individual files. You may also upload
and unzip zipped files, rename and delete files. Once files have been uploaded into the
Manage Files area, they can be integrated into the course content through the Add Page
or Tools function.
Course Files Manager (ANGEL)
The Associated File Manager feature allows you to upload, download, rename, copy,
move, zip, manage or delete files associated with a content item. This feature may be
particularly useful when embedding files into content items. For example, if you create a
page of text that also includes an image you can upload the image files as an
Associated File. The associated file manager can be accessed from within an individual
content item or it can be found on the Manage Tab. Because it can be accessed from
these two locations, files may be added in line as needed during development or they
can be added into the Associated File Manager on the Manage Tab, and then integrated
into content items at a later date.
Manage Course (WebCT) vs. Manage Tab
Manage Course (WebCT)
WebCT’s Manage Course area provides access to functions for managing students,
managing and updating the gradebook, tracking student activity and statistics, creating
presentation groups, managing TA’s and backing up and restoring courses.
Manage Tab (ANGEL)
ANGEL’s Manage Tab provides a well-organized interface, which provides access to the
three primary management areas: Course Management, Environment Settings and Data
Management. Course Management contains links to the Attendance Manager,
Assignment Manager, Gradebook Manager, Roster Manager, and Teams Manager. The
Environment Settings area provides the instructor with functionality to customize the look
and feel of the course, as well as manage many of the general and advanced course
settings. The Data Management area organizes many of the essential course functions
such as managing course files, importing and exporting data and course backup
capabilities.
7
Fundamental DifferencesW E B C T ™ T O A N G E L C O N V E R S I O N G U I D E F O R I N S T R U C T O R S
®
Reports & Automate
Reports
In WebCT, the reporting is limited at best. You can view and print statistics about how
often the class as a whole accesses certain course pages and discussions. You can
also view and print a narrow range of statistics specific to individual students such as
which pages a student accessed and how often. Most of the information available is
superficial and incomplete. In reality, instructors want and expect much more detailed
data about their students in order to insure that both the content and the students are on
the right track.
ANGEL is committed to making teaching your priority; therefore, the Reporting tools
have been designed to make managing your classroom easier. ANGEL has a significant
number of preset reports you can run. All the reports can be run over a specified period
of time and include reports regarding learner profile, class level reports, reports about
content usage, and WhoDunIt reports. The WhoDunIt reports can help you find students
at risk long before they really get into trouble.
Not only can you save the reports you generate, you can export the report to Microsoft®
Excel®, Adobe® Acrobat®, or mail it. In addition, for each report you generate, you can
create an agent to run the report automatically and take actions. Reports can be
displayed in graphical format or as a table. The drill-down report view allows you to dig
deeper into the data to recognize trends. It truly simplifies your classroom management.
Automate
ANGEL’s Automate feature takes managing your classroom to a whole new level. In
Reports, you can easily generate a report and take action on those results. With
ANGEL’s easy-to-use Automate feature, you can set up tasks that run automatically
when an event occurs (i.e. when an Exam is taken), or when they are scheduled to run
(i.e. once a week). Let’s say that once a week you are running a report to find out who
has an overall class score of less than 70%, and then you are emailing the learners on
this list to inform them of their status in your class. Instead of running this same report
weekly, and manually sending an email to the identified learners, you can use the
Automate feature to set up a recurring event that runs this same report and sends the
email for you every week. The possibilities are endless, and the focus is to free up the
time you spend managing your classroom so you can spend more time engaging your
students in learning.
8
Fundamental DifferencesW E B C T ™ T O A N G E L 7 . 3 C O N V E R S I O N G U I D E F O R I N S T R U C T O R S
®
Are They Really That Different?
Since both WebCT and ANGEL are Learning Management Systems (LMS), it’s fair to
assume that they have many common elements. All Learning Management Systems
provide tools for completing two primary LMS functions, namely managing users and
managing content. This is certainly true for both WebCT and ANGEL. However, the
trick to making the transition from one LMS to another is correlating the way your use to
doing things in your old LMS (WebCT) to how you need to do things in your new LMS
(ANGEL).
Courses are developed in ANGEL in two ways:
• Migrated from WebCT into ANGEL
• Created from scratch in ANGEL. Let’s take a look at these two scenarios.
Migrated Your Course from WebCT to ANGEL
One of the first things you need to do is decide how you plan to organize your course.
Remember, ANGEL uses integrated content tools that allow you to arrange your course
in chunks that are based on content and not the tools used to deliver the content.
Perhaps you want to organize your course into separate folders based on chapters in a
textbook or objectives from the course curriculum guide. Regardless of the structure you
choose, the most important thing to remember is that it’s your decision to make.
Once you’ve planned the organization of your course, it is time to create the new
structure, rearrange the content that was imported from WebCT, and add any new
content that you want to include in the course. You notice that all of the content came
into ANGEL in folders based on either the tool they used or the structure from the
Manage Files area in WebCT. The Discussions are now separate Discussion forums
but they are located in a folder called discussions. The quizzes are in a folder called
quizzes. The Assignment drop boxes are in their own folder as well. As an example,
let’s say you’ve decided to organize your content by chapters that correlate with the
course textbook. You start by creating new content folders on the Lessons tab (Chapter
One folder, Chapter Two folder, etc.) and moving your files into the appropriate folder.
Chapter One is the holder for Chapter One Discussion, Chapter One Quiz, Chapter One
Drop box and any other content you want to move into or add to the folder.
Now that you have all of your essential content rearranged, you may want to delete
some of the unnecessary components that were included in the migration. An example
of this is the mail tool. In WebCT, you must add the mail tool to your course. In ANGEL,
it is a built in component of the Communication tab. During migration the mail tool
comes over as an extraneous link on the Lessons tab. Feel free to delete it. Other
unnecessary tools that migrate as useless links into ANGEL from WebCT include My
Grades, My Progress, Chats and Calendar.
9
Are They Really That Different?W E B C T ™ T O A N G E L C O N V E R S I O N G U I D E F O R I N S T R U C T O R S
®
If you used the Syllabus tool in WebCT, it also came over as a link to a file in the
associated file manager. Since you have the option to put the syllabus on the course
tab, you need to decide how to move it. A great way to do this is to view the Syllabus by
clicking on the icon on the Lessons tab and once it is open, highlight and copy the entire
page. Now, go to the Course tab and click the edit link for the syllabus. Now click the
Syllabus Files button, then click the add content link and choose to create a file. Open
the html editor and paste what you copied into the new file. Accept the changes and
save. Now your syllabus is incorporated on the Course tab, in the location that students
will learn to expect it in all of their ANGEL courses. You can feel free to delete the old
syllabus link on the lessons tab since it is now redundant.
The last thing to do is organize your gradebook. The gradebook management tools
allow you to create and edit categories, assignments, and macros, and to edit the
grading scale.
Build Your Course from Scratch
The first step in course development is to identify your objectives and goals. Once that’s
been accomplished you can begin to gather your course content. In some cases content
may already exist in the form of text documents, PDFs, spreadsheets, test question
databases, images, etc. In other cases, the content needs to be developed for the very
first time. Either way, ANGEL is a perfect fit. Let’s address some of the development
tools and processes for building a course in ANGEL and how they differ from WebCT.
Add a Folder
In WebCT, content would be organized on an organizer page. You might have an
organizer page for all of your lessons. You might also have an organizer page for all of
your communication tools or for all of your student tools. Additionally, you would use
separate tools for testing, submitting assignments and discussions.
In ANGEL, content can be organized in folders. This allows for related content items
such as discussions, tests, text pages and more to be organized by a common topic or
time frame. This type of organization is very intuitive for students to follow.
Add a Page
In WebCT, you can create new pages of content using the online text editor. Once
these pages have been created they can be included in a content module to organize
them. You can set when the page is available to learners. Through other tools you can
view some limited statistics about the page.
In ANGEL, you can create new pages of content through the use of ANGEL’s online
editing tools. The Add a Page tool recognizes Smart Text, Plain Text, and HTML. You
can also use the built-in online HTML editor. This easy to use tool makes creating
HTML documents online a snap. There is also a Spell Checker to help with your
development. You can even include a custom icon or help file URL. All the options
available in WebCT for a page are available in ANGEL and more. In addition, you can
also set the page only viewable by a specified team, lock the page with a password and
limit who can edit the page.
10
Are They Really That Different?W E B C T ™ T O A N G E L C O N V E R S I O N G U I D E F O R I N S T R U C T O R S
®
Add a Link
In WebCT, you can add a Link to external content not contained in your course along
with a description of the link. You can set when the page is available to learners.
Through other tools you can view some limited statistics about the page.
In ANGEL, you can easily add an external or internal link to content not contained in
your course along with a description of the link. As in “Add a Page”, all options available
in WebCT for a link are available in ANGEL. In addition, you can also set the link only
viewable by a specified team, lock the link with a password and limit who can edit the
page.
Add an Assessment
In WebCT, practice tests and quizzes are created through the add page or tool function
and then by adding questions to the question database and adding them to the Practice
Test or Quiz.
This process is not only simpler is it more robust with the Add an Assessment function in
ANGEL. You can create a new assessment, quiz, practice test or exam all from within
the same location. All the features available for tests in WebCT are available in ANGEL.
In addition, there is extended functionality in the settings that are available with this tool.
You can allow anonymous submissions, scramble the questions and/or the choices,
specify an IP address from which the test can be taken and offer the item as a graded or
upgraded item. Assessments can be used as triggers for other events such as
unlocking the next lesson or placing students in teams.
Add a Survey
In WebCT, you can create a Survey add page or tool function. The survey tool is limited
and difficult to use. It also does not provide extensive functionality or reporting
capabilities.
In ANGEL, you can create a new form or online survey to get more information from your
class. Many of the options available under “Add a Quiz” are available under “Add a
Survey”. You can specify when a survey is available and identify which individuals or
teams have access to it. You can specify a survey to be a gradebook assignment or not.
You can allow anonymous submissions and limit the number of attempts a users has for
the survey. This is a rich and flexible tool with the capacity to meet a variety of needs.
Add a File (upload a file)
In WebCT, uploading files was accomplished through the Manage Files area. Once in
this area, files could be integrated into single pages or other content areas.
In ANGEL, it is easy to add previously created content to your course by uploading it.
Many file types are supported including but not limited to Adobe® Acrobat® (pdf); HTML
(htm); GIF Image (gif); JPEG Image (jpg); Microsoft® Access® (mdb); Microsoft®
Excel® (xls); Microsoft® PowerPoint® (ppt); Microsoft® Word® (doc); Plain Text (txt);
Rich Text (rtf); and ZIP Archive (zip) and Macromedia Flash (swf). A great feature of this
tool is the ability it provides to upload multiple files and even folders via the drag and
drop function. This function does not require zipping the files before uploading.
11
Are They Really That Different?W E B C T ™ T O A N G E L C O N V E R S I O N G U I D E F O R I N S T R U C T O R S
®
Add a Drop Box (users submit files for review or grading)
In WebCT, you could include an assignment drop box tool that allowed you to create
areas where students could submit their work. This tool could not be integrated into
individual content items but had to stand-alone.
In ANGEL, you can add a separate Drop Box for every assignment the students submit.
You can specify that the submissions be anonymous. In addition, there is extended
functionality in the settings that are available with this tool. You can set the number of
allowed submissions and create it as graded or non-graded. You can set the dates the
drop box is available, and secure it with a password. Another great function of this tool
is the ability to download all ungraded submissions at one time to your computer, grade
them and then resubmit them to activate the grades in the gradebook.
Add an IMS/SCORM Package
You can add an IMS/SCORM Package to ANGEL either by uploading the IMS/SCORM
Package, or by linking to the IMS/SCORM Manifest.
Copy Items
In ANGEL, one way to reduce development time is by using the Copy Items function. It
allows the Instructor to create a duplicate of an existing folder or content item. The
system forces you to choose a new name, so there is no danger to the original folder or
item.
Communication Tab
In WebCT, many of the communication tools had to be added one at a time from the Add
page or tool function.
In ANGEL, many of the communication tools are built-in so all you need to do is learn
how to use them. One tool that is available in ANGEL that was not in WebCT is the
Announcements tool. Here an instructor can add announcements for the course. The
HTML editor is available in this area so announcements can be formatted in an attention
getting manner. What’s wonderful about this tool is that the instructor can create
announcements in advance as time allows and ANGEL manages their release based on
the dates established at the time of creation.
12
Are They Really That Different?W E B C T ™ T O A N G E L C O N V E R S I O N G U I D E F O R I N S T R U C T O R S
®
Appendix 1
Exporting WebCT Course Content
For best results, your WebCT course content should be exported in an IMS content
package format. This may require the WebCT administrator to install the WebCT CE
Migration Tool and enable the option to allow instructors to export their courses as IMS
packages for individuals using WebCT version 4.x.
Figure 1. WebCT Administrator Console with CE Migration tool not installed
Figure 2. WebCT Administrator Console without CE Migration tool installed
The following instructions outline the required steps to export WebCT course content in
an IMS content package format (based on WebCT Version 4.1 Campus Edition).
1. Log into your WebCT course.
2. Click the Control Panel button.
3. Click the Manage Course button.
4. Click the Export Content hyperlink.
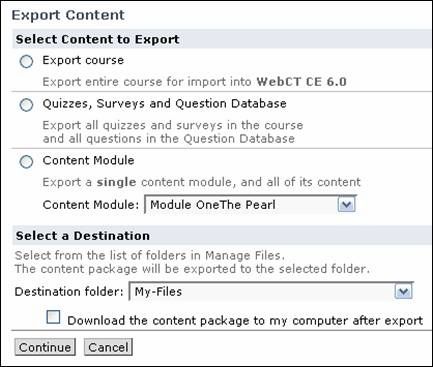
Figure 3. Export Content with CE Migration tool installed
5. Under the option Select Content to Export, select the Export course option.
13
Exporting WebCT Course ContentW E B C T ™ T O A N G E L C O N V E R S I O N G U I D E F O R I N S T R U C T O R S
®
Figure 4. Export Content
6. Under the Select a Destination option, place a check mark in the selection box
adjacent to Download the content package to my computer after export.
Click the Continue button.
7. In the File Download dialogue box click the Save button and select the location
on your computer that you wish to save the archive file.
In the event the course designers do not see the ‘Export entire course for
WebCT CE 6.0’ option displayed above the administrator will need to ensure the
‘Allow designers to export content’ option in the following screen has been enabled
(Admin > Course Mgmt > Settings).
14
Exporting WebCT Course ContentW E B C T ™ T O A N G E L C O N V E R S I O N G U I D E F O R I N S T R U C T O R S
®
If you are unable to obtain an export of your WebCT content in an IMS content
package format, it is possible to export your WebCT course content in an alternate
standard zip file format suitable for import into ANGEL.
For information regarding how to export your WebCT course content in a standard
zip file format, see the ANGEL Knowledge Base document (available at
http://support.angellearning.com) titled How can I export my WebCT course
content?
MSXML 4.0 SP2 on the web server is required for WebCT Imports.
All illustrations in this appendix are copyright of their respective owners.
15
Exporting WebCT Course ContentW E B C T ™ T O A N G E L 7 . 3 C O N V E R S I O N G U I D E F O R I N S T R U C T O R S
®
Appendix 2
How to Import a WebCT Course Export
1. Log into your ANGEL course and click the Manage tab. The Management
Console page appears.
2. Click the Import Wizard hyperlink (located in the right column). The Content
Import Wizard menu appears.
3. Click the Content Package hyperlink. The Content Package Upload page
appears.
4. Click the Browse button. A Choose file dialog box appears on the screen.
5. Locate and select the WebCT Export file and click the Open button.
You may optionally select the Overwrite existing file checkbox to overwrite any
previously uploaded .zip file (source file) with the same filename. Selecting this
option does not overwrite existing or previously imported lesson items.
6. Click the Upload File button once. An Upload Successful message appears
when the upload process is complete.
The upload process may take up to several minutes depending on your
connection speed and the size of the text file.
7. Click the OK button to continue. The WebCT/ExamView Import Settings menu
appears.
If the Zip Import Wizard menu appears instead of the WebCT Import Settings
menu (displayed above), this is an indication that you are importing a WebCT
export file that was exported either using an older version of the WebCT IMS export
utility or by other means. For best results, we recommend exporting the WebCT
content using the latest version of the WebCT IMS export utility.
8. From Add To section, select the Lessons directory you want to import into.
The default setting of Top-level imports the file contents to the root level of the
Lessons tab. Select New Folder and provide a new folder name to import the file
contents into a new folder. Select the Existing Folder option (if applicable) and
select an existing folder from the drop-down menu to import the file contents into an
existing folder.
9. Select the Add system links checkbox if your import file contains WebCT
system link items (such as links to student gradebook, chat rooms, etc.) that you
want to import along with the course data.
10. Select the Add chat rooms checkbox if your import file contains chat rooms that
you want to import along with the course data.
16
How to Import a WebCT Course ExportW E B C T ™ T O A N G E L C O N V E R S I O N G U I D E F O R I N S T R U C T O R S
®
11. Select the Optimize folder structure if you would like ANGEL to attempt to
optimize the folder structure for the content being imported.
12. Select the Remove unused files after import checkbox to remove unused files
from ANGEL once the import is complete.
If the above option is not selected, following the import the unused files can be
located in the root level of the Associated File Manager (Lessons tab > Utilities >
Associated File Manager). For more information about using the Associated File
Manager, refer to the section of this document titled Associated File Manager.
13. Select the Migrate Quizzes to Assessment checkbox if you would like all
quizzes to be available in assessment form.
14. Click the OK button once. If prompted to created backups of quizzes, answer the
prompt. Once the import has completed, an “Import Complete” message
appears on the screen.
The import process may take up to several minutes depending on the number
of entries in the source data file.
15. Click the OK button and navigate to the Lessons tab to view the imported
content.
Depending on the structure of the source course export file, you may need to
rearrange some of the imported content. For more information about rearranging
course content, refer to the sections of this document titled Rearrange and Move
Item.
17
How to Import a WebCT Course ExportW E B C T ™ T O A N G E L 7 . 3 C O N V E R S I O N G U I D E F O R I N S T R U C T O R S
®
Appendix 3
Unsupported Items
The following list contains a list of items or functions from WebCT imports that are not
supported in the ANGEL environment.
Item Reason
Link items opening a new window The file created at the time of the export from
WebCT (imsmanifest.xml) does not contain
the information needed to tell ANGEL that the
link item is to open in a new window.
ANGEL, by default, uses the setting of
opening in the same window.
Quiz points default to 1 point WebCT exports the questions with a
percentage based scoring and does not
include the number of points the question
was assigned inside of WebCT. On import to
ANGEL the default value of 1 is assigned to
the quiz question. For some question types
with partial grading options points may be
based on the number of correct responses
possible.
Matching and ordering survey question Matching and ordering survey question types
types do not import. are not supported by ANGEL surveys.
ANGEL surveys support Text Box (short
answer), Text Area (essay), Checkbox,
Check List, Drop-down list, Option list, and
Likert Scale.
Calculated Questions Calculated Questions are not supported for
versions of WebCT prior to WebCT CE 4.
More information about this topic can be
found in the ANGEL 7.3 Upgrade
Supplement available to ANGEL
administrators through the ANGEL Support
Portal and http://support.angellearning.com.
Gradebook Import Gradebook settings do not import from
WebCT. Once the content is imported and
the course is configured, the Gradebook
Wizard should be run. During the Wizard, all
content will be available for addition to the
gradebook for the course.
Roster Information Roster information does not migrate.
18
Unsupported ItemsYou can also read