Eclipse: C/C++ Programming and Fortran - Carla Guillen Tuesday, 19th of March 2015
←
→
Page content transcription
If your browser does not render page correctly, please read the page content below
Eclipse: C/C++ Programming and Fortran

                                       Carla Guillen
                                     guillen@lrz.de
                       Tuesday, 19th of March 2015

                                                       1
Agenda
09:00-09:20 Introduction to Eclipse, CDT and Photran
09:20-10:10 Hands-on Session 1 (Managed Build Project)
    • Creating a simple Managed Build Project
10:10-11:30 Hands-on Session 2 (Makefile Project)
    • Importing existing code with Makefile into Eclipse.
11:30-12:30 Lunch
12:30-13:30 Hands-on Session 3 (Makefile Project)
    • Coding features, building, running and debugging.
    • Documentation with doxygen
13:30-14:15 Exercises
    • What we learned but on C
14:15-14:30 Introducing elements of Photran.
14:30-14:40 End / Continue with Hands-on with assisted help

                                                              2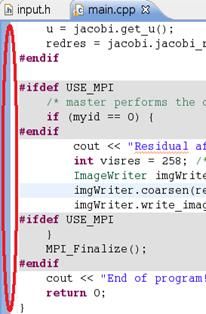
Why Eclipse

• Open source and FREE!
• One IDE for almost all languages!
• Supported on most operating system
OS independent GUI
• Extensibility of features and tools
You can find an app (plugin) for what you think you need
• Easy to install
• Easy to use
• Stable Eclipse core
• A new release every year
• A big user community

                                                           3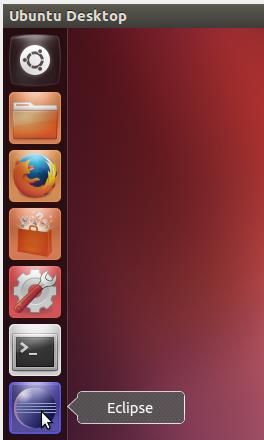
Introduction to Eclipse, CDT and
            Photran

                                   4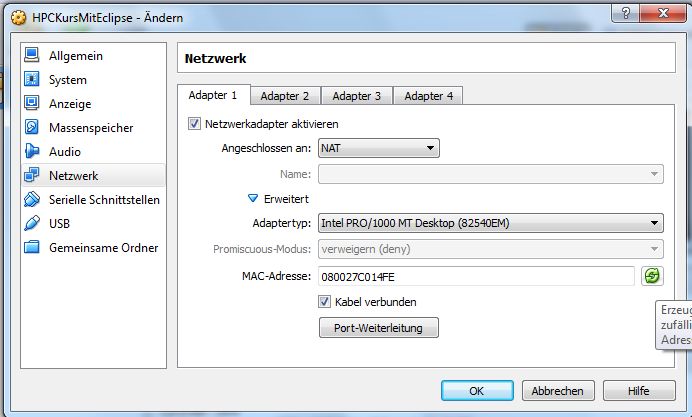
Introduction to Eclipse

• Multi-language software development environment comprising an
  integrated development environment and an extensible plugin
  system
• Started by IBM (Canada) in late 1990s
   – Goal
       • Development tools platform
       • Common platform for all IBM development products
       • Integrated experiences for the customers
• Formed and created Eclipse Foundation (non profit org.) in 2003-
  2004
   – Decoupled from IBM
• Current version: Luna (June 2014)
• Next version: Mars (planned on June 2015)
• We will use the Kepler Version (from June 2013)

                                                                     5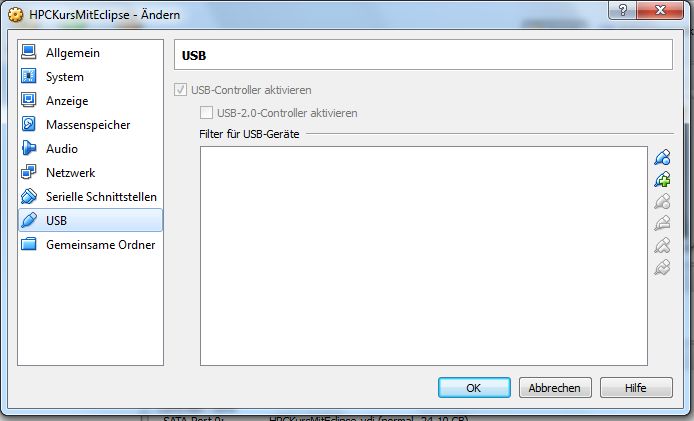
How do I install Eclipse?

• Java Development/Runtime Environment (preferred latest
  Java version 1.7)
   – minimum JDK/JRE 1.5
   – 64 bit Eclipse should use 64 bit JDK/JRE
   – 32 bit Eclipse should use 32 bit JDK/JRE
• OS: Linux, Windows und Mac
• Go to http://www.eclipse.org/downloads/
• Choose your OS and the Eclipse you want to download.
  Extract into preferred directory. Done!

                                                           6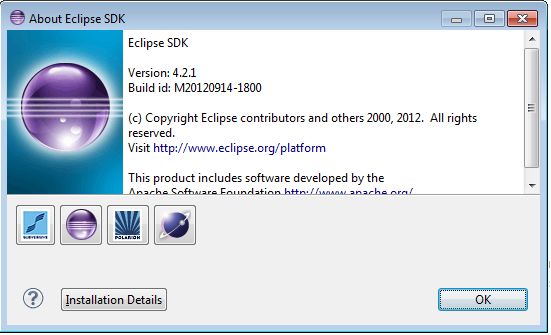
Introduction to Eclipse

 What is eclipse essentially?
 • a small Java program with loader functionality
 • can be infinitely extensible by 3rd parties products
 • products are created in the form of plugins which are then
   loaded by Eclipse
What is a plugin?
• a small unit of Eclipse platform that can be developed
  separately
• can be delivered as a single jar or a collection of jars
• self-describing: describe what it is, what it does and who it
  requires
• xml configuration
Reminder for myself : Show Eclipse!
                                                                  7
How do I install a plugin?

• Go to Help->Install New Software            • Select a site to work
                                                 with (or add one)
                                              • Type in filter text
                                                 what you are
                                                 searching for.
                                                 Hopefully it is there
                                                 and you just need to
                                                 select it.
                                              • Eclipse will calculate
                                                 dependencies
• You will be require to accept terms of license agreements, if you
  agree, Eclipse will install it.
• You will need to restart Eclipse.                                  8
How do I install a plugin?
(manually)
• There is a possibility to do it manually. Usually the
reasons are rather uncommon.
• Go to the folder where eclipse is installed
(/usr/lib/eclipse/ in Linux C:\Programs\Eclipse\ in
Windows or your manually installed path).
• Download from the website the plugin. NOTE! Be
careful to download only trusted plugins
• Put it in your folder dropins the downloaded plugin
and restart eclipse!
9How do I check which plugins Eclipse has
installed?
• Go to Help Menu → About Eclipse SDK → Installation Details
10How do I update or uninstall a plugin?
• Go to installation details (previous slide) and there you will also
find the options to update or uninstall.
11What languages can I install?
Available plugins for different programming languages:
Java C/C++ Fortran Cobol
Python Perl PHP Javascript
Ruby ADA LISP C#
Lua R Pascal/Dephi Curl
Flash
others...
12Glossary
Workspace: a logical collection of projects. Also a directory on
your hard disk where Eclipse stores the projects you define
Perspective: determines the visible actions and views within a
window. Provides mechanisms for task oriented interaction with
resources, multitasking and information filtering
View: Used to navigate a hierarchy of information, open an
editor or display properties for the active editor
Editor: Used to edit or browse a resource. You can use external
editors to eclipse, but eclipse wont recognize the changes (use
refresh F5 button)
13Eclipse Workspace
• Can have multiple switchable instances of workspace
• Features (can be modified in Preferences)
– Build automatically (default: on)
– Save automatically before build (default: off)
– Workspace save interval (default: 5 minutes)
– Refresh automatically (default off)
– Open referenced projects when a project is opened (default: prompt)
14Introduction to CDT
15Introduction to CDT
• Latest Version: CDT 8.6 (For Luna)
• We will be using CDT 8.3 (Kepler Version)
• The C/C++ development tool: Provides a fully functional C and C++
Integrated Development Environment based on the Eclipse platform
• Features:
support for project creation
managed build for various tool chains
standard make build
source navigation
various source knowledge tools
visual debugging tools
16CDT Features
• Check: http://wiki.eclipse.org/CDT/User/NewIn82
• Editor
C/C++ syntax highlighting
Code completion (Camel Case Completion)
Hover help
Automatic indentation
• Parser
Parses source files in project to extract C/C++ elements
Information used to search, outline and code completion
• Search
• API and extension points to allow extensibility
• C++ Development
Class creation wizards
17CDT Build Features
Common build strategies
• Managed Make
– Manages compiles for various toolchains
– No Makefile editing
– Fine control over compile and link settings
• Standard Make
– Re-using existing Makefiles
– Simple integration with arbitrary build systems
– Parsing the toolchain output to generate error makers.
18CDT Debug Features
• Portable source level debugger
• Various views that extend Eclipse debug framework
– Registers
– Memory
– Variables
– Signals
– Shared libraries
• CDI (C Debugger Interface)
– MI (Machine Interface) plugin implementation (interface to GDB through
machine independent interface)
– Allows targeting of a wide variety of CPU architecture
– CDI APIs allow programmatic control over debugger
– Possible to use another debugger
Reminder for my self : Show CDT Perspective!
19Introduction to Photran
20Introduction to Photran
IDE and refactoring tool for Fortran
Latest version 8.1 (June 2013)
IDE features:
• Support for Fortran 77-2008
• Syntax-highlighting editor
• Outline view
• Content assist
• Open declaration
• Declaration view and hover tips
• Fortran language-based searching
• Support for CVS & other VCS's
• Interactive debugger (gdb GUI)
• Makefile-based compilation
• Optional Makefile generation
• Recognition of error messages from most popular Fortran compilers
21Introduction to Photran
Refactoring functionalities
• Rename
• Extract Procedure
• Extract Local Variable
• Introduce IMPLICIT NONE
• Make Private Entity Public
• Encapsulate Variable
• Add ONLY to USE Statement
• Minimize ONLY List
• Make COMMON Consistent
• Move Saved Variables to COMMON
• Loop Interchange (Unchecked)
• Replace Obsolete Operators
• Change Keyword Case
Reminder: show Fortran perspective!
22Eclipse @ LRZ
Available as modules on SuperMUC, SuperMIG and the Linux
cluster the Juno Version.
>module load eclipse
Then type “eclipse” to run it.
• For Hands-on:
Eclipse C/C++ Development Tools (CDT) Version 8.2
Fortran Development Tools (Photran) Version 8.0
23How to read these slides
• Blue means a name of a window, text box name, option name,
keys to type together or buttons which already exists in Eclipse.
• Red is what we will type inside.
• I will tell you when I change a slide.
• Please read the slides when you get lost, they will guide you
through.
• If you are behind two slides and can’t catch up, please ask for
assistance!
24Hands On Session
25Getting into Linux
• Your computer has a Windows System but we will start a Linux
Virtual Machine inside it.
• Click on the Oracle VM VirtualBox icon on the Windows
Desktop. Alternatively, you can find it on the Start Menu.
• Go to Maschine → Hinzufügen
• Click to get to this path: C:\temp\HPCKursMitEclipse and click
on HPCKursMitEclipse.vbox
26Running the virtual machine
• We will first generate another MAC address.
• Click onf Ändern → Netzwerk (on the left)→ Expand Erweitert
→ click on the green symbol to generate a new MAC Address
(MAC-Adresse:)
27Running the virtual machine
• We will disable the configuration on USB.
• If both ticks are enabled then uncheck them.
• Finally, press OK.
28Running the virtual machine
• Click on Starten
• If you get a warning screen, press OK .
29Starting Eclipse
• Click on the Eclipse symbol, or as an
alternative open a Terminal and type
eclipse then enter.
>eclipse
• The Workspace Launcher window will
open.
• Type in Workspace:
/home/kursteilnehmer/workspace
(probably default)
30Getting Help
• If you get the welcome screen you can go to “tutorials”
(otherwise go to workbench)
• You can always get this screen via Help Menu → Welcome
• Get help on the current platform What’s new → Eclipse
Platform
• Other ways of getting help:
Help → Key Assist…
Help → Cheat Sheets
• Search in internet as well, there’s plenty of help for eclipse
available!
31Creating a simple project
• Change to your CDT perspective (Windows → Open Perspective →
Other → C/C++)
• Go to File → New → Project… → expand C/C++ → C++ Project →
Next
• In the text box Project name type in “HelloWorldExec”
• Choose in Project type the option Hello World C++ Project under the
Executable folder.
• Under the Tool Chains select Linux GCC
• Select Next
• On the screen that just appeared write if you’d like, author, copyright
notice, and so on…
• and the click on Finish.
32Comfortably code on the big screen.
• Press Ctrl+M or double click on your editor
33Building and running a project
Managed build project
• Makefile is created for user
• make and make clean can be run via the Menu options: Go to Project →
Build Project
Default setting:
• To select build release or build debug go to Project → Build Configurations
→ Set Active → Release or Debug
• Build Automatically (You can unselect it in Project → Build Automatically
• Running: Run → Run ( Sometimes it appears as Run last application )
• You will be prompted a window: on the C Local Application window
choose Local C/C++ Application → OK and then the generated binary
(Release Version) HelloWorldExec
• Check your Console view
Clean
• Go to the Project Menu → Clean… → Clean projects selected below.
• Select your project and press OK
34Using another compiler (another version of
g++)
• On the Project Explorer view, right click and a menu will
appear.
• Choose Properties on this menu.
• On the Properties Window that appears expand C/C++ Build
→ Settings
• The right side of this window will contain the details to
configure. Choose on Configuration → [All Configurations]
• On Tab Tool Settings choose GCC C++ Compiler
• Type in the text box Command g++-4.6
• Do the same for the GCC C++ Linker and press OK.
• Try cleaning and building again!
35Compilation errors
• On the Project Explorer, go to the HelloWorldExec.cpp file
under src/
• Wrap your cout statement with and if statement introducing an
error:
if(true){x
coutSaving your file
• Use Ctrl + s
• File → Save
• Use the little disk
• Save multiple files with
• Now clean and build the project again (You should have already
learned how!)
• See the error message in the Console view.
• Click on it, Eclipse will take you the line with the error.
• Go to the Problems view expand the error and see all the
detailed errors. You can also click on them and Eclipse will take
you to the line and file.
37Compilation errors
• You will find several indications that there is an error: on your
Project Folder, on the source code folder and on the source
file itself.
• Leave the mouse pointer on the is. A description of the
error is written for you.
• Correct the error and type in an unknown variable x; Don’t
declare it yet!
if(true){
coutFor simple errors get an answer!
• Eclipse will try to advise on the solutions you can code.
• So we created an unknown variable. Put the cursor on this
variable. Press Ctrl+1 or right click on top and go to Quick Fix
• Choose for example: Create local variable
• Eclipse will “guess” the type and declare the variable for you.
39Quick fix is very handy…
• Write a small routine (don’t declare “y” yet!)
double getTwo();
int main(){
…
y = getTwo();
}
double getTwo(){
return 2.0;
}
• Make a quick fix on y to declare this variable! Notice that Eclipse
created at double the type that the function returns.
40Selection Expansion
• Put your cursor over “cout”
• Go to Edit Menu → Expand Selection To → Enclosing Element
• Notice what happens, try this action five more times…
• Try the other items in Expand Selection To
Restore Last Selection
Next Element
Previous Element
41Code completion
• Add the following code in red to generate random numbers:
#include
int main (){
srand(time(0));
int randNumber = rand();
coutSave your file…
• Add also this code:
if(randNumber % 2){
coutBuild code and run again!
• This time try it differently:
• Clean, build like you always do but:
• Now just press the button to run.
• Check your console.
44Refactor: extract function.
• Highlight the entire if-else block.
• Right click on this highlighting and when the menu appears,
choose Refactor → Extract Function .
• On the Extract Function window that will appear, write under
Function name: condition
• Click on Preview to compare the files.
• Click on OK and see how the function will be extracted.
45Refactoring: renaming a variable
Now we would like to rename randNumber to randNum in our
main().
• Highlight in your main the variable randNumber
• Right click on the variable.
• Choose Refactor → Rename…
• Change the name to randNum and press Enter!
• Now try this with the function name condition, rename to
conditionEvenOdd
46Correct your indentation
• On your created function conditionEvenOdd(…) remove all
indentation. Let’s suppose this was a mistake while you were
coding.
• We will correct the indentation by:
• Highlight the entire function condition()
• Right click and on the menu choose:
• Source → Correct indentation.
• Ctrl + I on the highlighted text has the same effect!
• Equivalent is to go to Source → Format or Ctrl + Shift + F
However, if the line is very long, Eclipse will accomodate it in
more lines.
47Comments
• Highlight or leave the cursor on the line
srand(time(0))
• Right click on it. Choose Source → Toggle Comment.
• Now you see it is commented with two slash forwards.
• Repeat the process to uncomment.
• The other option is to use Source → Add Block Comment. This
will comment with /* … */
• To remove the block comment, you need to choose Source →
Remove Block Comment.
48Close your project.
• Go to the Project Explorer view and select the HelloWorldExec
Project.
• Right click and select Close Project.
• All the files should have disappeared.
49New Managed Project from Scratch!
• File → New → Project…
• On the New Project Wizard expand the C/C++ folder. Choose
C++ Project → Next
• In the Project name: text box write lrzcourse and on the left
menu Project type: expand the Executable folder. Select Empty
Project.
• Select under Toolchains: the Linux GCC option.
• Click on Next → Finish. The project was hopefully created.
50New Managed Project from Scratch!
• Now we will create the source folder. File → New → Source
Folder
• On the new window New Source Folder write under Folder
name: src and then click on Finish
• Click on your new src folder. Creating a new source file. File →
New → Source File
• On the new window New Source File write under Source file:
main.cpp and then click on Finish
• Expand the comment on main.cpp and check the automatic
documentation.
• Go to the file you have just created. Go to line 8 and type main
and the press Ctrl + Space
51Code completion • Outside (on top) of your main write: #include using namespace std; • Inside your main let’s write a for-loop. Type • for and then press Ctrl + Space. A list will appear. Choose for – for loop with temporary variable • Change the name var to iter • Press Tab and change max to 5. • Write inside the for loop: cout
Create a project with an existing
           Makefile.

                                    53
Importing existing code with Makefile from SVN
• Create a new project: File → New → Project
• In Select a wizard expand the SVN folder and then Project from SVN
• Click on Next
• The General tab should be active (otherwise choose it!)
• Enter on the URL textbox:
https://svn.lrz.de/repos/hlr_public/eclipse
• Click on Next and wait a few seconds.
• Click on Browse (It will take a few seconds before the available projects
are displayed)
• Select the directory: example_cplusplus
• Click on OK and click on Finish
54Using the New Project Wizard
• The new window Check Out As will appear
• Choose the option Check out as a project configured using
the New Project Wizard
• Click on Finish
• In the New Project Wizard window expand the C/C++ folder
• Select C++ Project
• Click on Next
55C++ Project with empty Makefile
• The C++ Project window appears
• Type in the Project name textbox: jacobi
• On Project type box expand the Makefile Project folder
and then choose Empty Project
• On the Toolchains box choose Linux GCC
• Click on Next
• On the following window click on Advanced settings...
• A window called Properties for jacobi will follow.
56In Advanced Settings...
• Select on the left hand side menu click on C/C++ Build
• On your right hand side you will see 3 tabs: Builder
Settings and Behaviour and Refresh Policy.
• On Builder Settings deselect the Use default build
command option
• Type on the Build command field:
make -f ${workspace_loc:/jacobi}/Makefile
• Tipp: you can also put the full path for example:
make –f /some/path/to/makefilename but we won’t do
this!
57Almost done importing from SVN
• Now go to the Behaviour tab.
• On Behaviour tab, select the option Build on resource save
(Auto build) and write heat on its field. Write the same on the
text field Build (incremental build) (it should also be selected)
• Click on Apply, on Ok and this window will close.
• Back on the C++ Project window click on Finish
• All windows close down and a new one reappears: Secure
Storage
• We have not a set a Secure Storage password so we will ignore
this. Just press Cancel. The project will be checked out.
58Oops… I forgot to click on Advanced Settings…
• You made the project without setting the builder? No
problem! Right click on your project and select Properties
• Choose C/C++ Build
• Type in the Build Command:
make –f {workspace_loc:/jacobi}/Makefile
• Go to the Behaviour tab
• Write on Build on resource save(Auto build):
heat
• Build (incremental build):
heat
• Click on Apply and then Finish
59A few more details on SVN: Compare files
• Click on Solver.cpp file
• Right click on it to compare with version.
• Choose Compare With → Revision or URL
• Select Revision then click on Browse (This action might take some
time...) The Select Revision window will appear.
• Choose in the Revision column 111 and then OK. When taken to the
previous window, select again OK.
• Press Ctrl + M and compare ! What’s different? (Press Ctrl + M when
finished with the comparison)
• You can also select 2 files and use Compare With → Each Other
• Or Compare With → Local History
60CDT: Outline View
• Go to the main.cpp file and check the Outline view.
• Provides a quick view on procedures, variables, declarations,
and functions that appear in source code.
• With outline you can easily jump into the appropriate
reference in the source code.
• Check out the different buttons for sorting and hiding
elements.
61Hover
(What does this function contain?)
• On the main.cpp file go to the line 119. A quick way would be:
Navigate menu → Go to Line and the type in 119.
• Put your cursor over the method jacobi_relax() if you leave it
enough time the contents will appear. You can also press F2.
• If it doesn’t look to good (usually it does…) highlight the
contents of the box which appeared. You should be able to see
the code.
62Open declaration
Now we want to go to the file where this function has been
defined:
• Put your cursor again over the method jacobi_relax() and press
F3. You should have opened the file Solver.cpp
Remember F2 and F3 are very handy for navigating in a code!
63Where am I using this variable?
• Go to the file ImageWriter.h and to the line 19. (Getting to this
line quickly: Ctrl + L )
• Put the cursor on the member variable uvis
• Right click on it and choose References → Project
• Check the Search view. The list of places will be shown where
this variable is being used.
• Click on the different locations of this list, Eclipse will take you
to the lines where it is being used!
• Try this with a function!
64More searching?
• Go to Search → Search…
• You can search on all .h files. In the tab File Search write on the
Containing text w_time and on File name patterns: *.h
• Press the Search button. The Search view will show you again
the location where this text is.
• Click on the found location.
65Tasks for later: ToDos
• Go to the file input.cpp on the line 14 type in the following:
//TODO implement check_output.
• Go to the file ImageWriter.cpp on the line 12 and write the
following:
//TODO improve ImageWriter constructor.
• Save all modified files.
• Go to the Tasks view, all your todo’s are listed (Ideal for
planning tomorrow’s work!)
66Hands-On Session 2
67Coding: Create a new Class
• Right click on your jacobi Project
• Click on New → Class
• Write in Class name: Histogram.
Note you can choose here when you need it: a namespace, a
base class...
• Click on Finish
• You should see two files, the Histogram.cpp and the
Histogram.h file.
• Check them out!
68Coding: getters and setters
(in Java Style...)
• Click on your .h file on the new class you’ve just created.
• Type in the following code in red:
class Histogram {
private:
double average;
double * values;
double * bins;
• Save your file.
• Right click inside the class Histogram. Choose Source → Generate
Getters and Setters...
• Click on the desired getters and/or setters. Preview → OK and check
your .h file.
69Coding: Implementing a method.
• Write on your Histogram.h file the following code in red:
virtual ~Histogram();
double calc_std_deviation(int observ);
};
• Save the file. Right click on your method signature you have just
created.
• Select Source →Implement Method...
• Select the method again (calc_std_deviation).
• Press Preview → OK
• Check your .cpp file !
70Camel case completion
• Write the following member varibles on line 16 of your
Histogram.cpp file:
int varNameOne;
int var_name_two;
Inside the calc_std_deviation type the following:
• vNO and then press Ctrl + Spacebar. Write some value into it.
• vNT and then press Ctrl + Spacebar.
The first capital letters are recognized and expanded!
71Make target
• Go to the Make Target view on your right and click on the
jacobi folder.
• Click on New Make Target and a Create Make Target window
will appear. Write under Target name: heat and click on OK.
• Now double click on the heat target. Your jacobi program
should build.
• Do another target for clean.
Note: this was not really necessary for the jacobi project, because
we had already defined „heat“ as our default build target. We are
just making targets in an alternative way.
72Run
• Go to Run → Run configurations
• Double click on C/C++ Application
(You can also click on the New button to get the same result)
• On the C/C++ Application: text field write heat
• On the Project text field write jacobi
• Go to Arguments tab and write test.dat result.out
• Apply and Run ! (It might take some time until done…)
• Check the Console view.
• For debugging you can use your Run configuration already!
• Check your results: click on your project and refresh (F5) and
check the result.out file.
73Debug
Very important note:
Eclipse Debugger depends on GDB. Therefore: don‘t forget on
your makefiles to include the –g option in the compilation
process.
74Debugging
• Go to Run → Debug configurations, select the jacobi
application. Click on the Debug button.
• Accept opening the Debug perspective. (Click on Yes.
• Shortcut keys:
– Step in: F5
– Step over: F6
– Step out: F7
– Resume: F8
75Step into (F5), Step over (F6),
Step out (F7), Resume (F8)
F8 F5 F6 F7
• Press the green bug button to start debugging.
• Get familiarized with these buttons…
Exercises:
• Step over (F6) until you find on main.cpp this line of code:
if(!check_input(in, &maxiter, &resolution,
&algorithm, &numsrcs,
• Go into check_input(…) by pressing F5 and continue pressing a few times
F6 on the input.cpp file.
• Get out of check_input(…) by pressing F7
• Continue pressing F6 on the main.cpp to go to
jacobi.jacobi_relax();
Step into it… F5
• Got lost? Press Stop and Start again
76Set breakpoints
• If you are not already there go to line 115 from the
Solver.cpp file and double click on the sidebar and set your
breakpoint.
Configure your breakpoints:
• Go to the Breakpoints view.
• Right click on the breakpoint you just did.
Click on Breakpoint Properties…
• Choose Common in the left menu
Type in the Condition text box: i == 5 & j==4
• Press OK and then press the Resume (F8)
button to let the debugging continue…
77See variables
• Go to the Variables view. Check that i is equal to 5
and j is equal to 4.
• Go to the Variables view again.
• Expand this. Right click on u and select Display As
Array. Write in Start index: 3 and in Length 8 and
press OK
• Now expand the folder of u and check the values!
78Change the value of a variable
While debugging you can alter the variables
• Go to the Variables view.
• Click on the Value of npoints and change it to 100
• This will be the value that will stay until a new write is done!
• Go to the Expressions view and click on Add new expression
• Type in an expression with i, j and npoints:
i*npoints + j
• Step over (F6) a few times and see the value of the expression
change.
• Terminate debugging by pressing the stop button.
79Add Symbols
• Switch to the C/C++ Perspective.
• Go to the file main.cpp. We want to activate the MPI code that is
greyed by eclipse.
• Right click on the jacobi Project.
• Select Properties. The window Properties for jacobi will appear. On
the left menu select Paths and Symbols
• Here you can add also Includes an Libraries.
• Go to the #Symbols tab and choose GNU C++
• Click on Add… and in the Add symbol window type in Name:
USE_MPI → OK
• The new variable will appear at the end of the list.
• Click on Apply → OK
• Check how your main.cpp has changed.
80Add a new makefile target
• Go to the line 14 of the Makefile and type the following:
• Type the following:
histogram:
$(CXX) –c $(OPTFLAGS) Histogram.cpp –o \
Histogram.o
• Save the makefile and go to the Make Target view. On this view, click
on the jacobi folder and then right click on it. Choose New…
• The Create Make Target will appear. Under Target name type in
histogram
• Expand the jacobi folder in the Make Target view and double click on
the histogram target we have just created.
• Check your Console view. If you have any errors try fixing them!
81Documentation
• Windows menu → Preferences → expand C/C++ → Editor →
Documentation tool comments → Change workspace default to
Doxygen.
• Now let‘s test it: on the Histogram.h we will declare another
method for the class. Right after calc_std_deviation
double calc_std_deviation(int observ);
double calc_percentiles(int p, double x, int
m_val, double *vect, bool flag);
• Now we would like to document this function with doxygen
style. Insert one line between calc_std_deviation and
calc_percentiles. In this new line write /** and press enter. The
skeleton for documentation should appear.
82Exercises
83Exercises
• Do a C project from scratch, the code could for example make a
print out:
– Try it with a managed build project: Configure the compiler to gcc-4.6.
– Build
– and run.
• Try also a project with a very simple makefile.
– Write the code and the makefile of the following slide.
– Direct the build command to the your created makefile.
– Create another target.
– Run the target.
– Debug it, and check where the values are changing.
84Code and Makefile:
#include
#include
gcc main.c -o exec
int main(int argc, char **argv) {
int n = 10, i = 0, j;
int *u = (int *) malloc(n*n*sizeof(int));
if(!u){
printf("unable to allocate integer array\n");
return -1;
}
for (i = 0; i < n - 1; i++) {
for (j = i; j < n - 1; j++) {
u[i * n + (j - 1)] = i * j;
}
}
exec:
free(u);
return 0;
}
85You can also read