Administration and Configuration Guide - Oracle Financial Services Anti-Money Laundering Event Scoring (AMLES) - Oracle Docs
←
→
Page content transcription
If your browser does not render page correctly, please read the page content below
Administration and Configuration Guide
Oracle Financial Services
Anti-Money Laundering Event Scoring (AMLES)

Release 8.0.7.0.0
April 2019
Administration and Configuration Guide
Oracle Financial Services
Anti-Money Laundering Event Scoring

Release 8.0.7.0.0
April 2019

Part Number: E92600-02

Oracle Financial Services Software, Inc.
1900 Oracle Way
Reston, VA 20190
Part Number: E92600-02
First Edition (April 2019)

Copyright © 2019, Oracle and/or its affiliates. All rights reserved.
Printed in U.S.A. No part of this publication may be reproduced, stored in a retrieval system, or transmitted in any form or by
any means, electronic, mechanical, photocopying, recording, or otherwise without the prior written permission.

Trademarks
Oracle is a registered trademark of Oracle Corporation and/or its affiliates.
Other names may be trademarks of their respective owners.

Oracle Financial Services Software, Inc.
1900 Oracle Way
Reston, VA 20190
Phone: 703-478-9000
Fax: 703-318-6240
Internet: www.oracle.com/financialservices
Contents

   About this Guide .............................................................................................................. 5
   Who Should Use this Guide ............................................................................................................................................... 5
   How this Guide is Organized ............................................................................................................................................. 5
   Where to Find More Information...................................................................................................................................... 6
   Conventions Used in This Guide....................................................................................................................................... 6

   C HAPTER 1                                About Oracle Financial Services Anti-Money Laundering Event
                                             Scoring ............................................................................................. 1
   Introduction........................................................................................................................................................................... 1
   Acronyms............................................................................................................................................................................... 1
   Administration and Configuration Activities ................................................................................................................... 1
       Managing User Administration ................................................................................................................................... 2
       Configuring the Application........................................................................................................................................ 2
       Configuring Administration Tools ............................................................................................................................. 2
       Configuring Web Application ..................................................................................................................................... 2

   C HAPTER 2                                Getting Started................................................................................. 3
   System Requirements ........................................................................................................................................................... 3
   Accessing OFSAA Applications ........................................................................................................................................ 4
       Knowing the OFSAA user-interface components................................................................................................... 5
   Managing Administration Tasks in OFSAA..................................................................................................................... 5
       Change Password .......................................................................................................................................................... 5
   Troubleshooting Your Display........................................................................................................................................... 5
       Enabling JavaScript....................................................................................................................................................... 6
       Enabling Cookies .......................................................................................................................................................... 6
       Enabling Temporary Internet Files ............................................................................................................................ 6
       Enabling File Downloads ............................................................................................................................................ 6
       Setting Printing Options .............................................................................................................................................. 7
       Enabling Pop-up Blocker............................................................................................................................................. 7
       Setting Preferences........................................................................................................................................................ 8

   C HAPTER 3                                Managing User Administration....................................................... 9
   About User Administration ................................................................................................................................................ 9
   Administrator User Privileges............................................................................................................................................. 9
   User Provisioning Process Flow ........................................................................................................................................ 9
      Requirements to Access AMLES Application ....................................................................................................... 10
   Managing User Administration ........................................................................................................................................ 10
      Managing Identity and Authorization ...................................................................................................................... 10

Administration and Configuration Guide                                                                                                                                                   1
Contents
Managing Identity and Authorization Process Flow.................................................................................................. 10
Creating and Authorizing a User............................................................................................................................. 11
Load User Configuration Data into CSSMS_ATTRIB_MAST table Using Excel Upload................................. 11
Creating or Editing User.......................................................................................................................................... 11
Understanding User Roles in OFS Anti Money Laundering Event Scoring ............................................................. 12
Mapping a User with a User Group......................................................................................................................... 12
C HAPTER 4 Configuring the Application.......................................................... 15
Knowing Batches to Run .................................................................................................................................................. 15
Integrating event scoring with behavior detection (BD) using database link............................................................ 16
Integrating event scoring with Enterprise Case Management (ECM) using database link ..................................... 17
Starting a Batch Run and Loading Batch Execution Data........................................................................................... 17
Configuring lookback period (in months) before running ES_AML_HIST_DataMovement and
ES_ECM_HIST_DataMovement ................................................................................................................................... 19
Running Batch Execution ................................................................................................................................................. 22
Getting data from tables in behavior detection application into .dat files................................................................. 26
Accessing event scoring batches from behavior detection application...................................................................... 29
Prerequisites ................................................................................................................................................................. 29
Running Batches in Behavior Detection ................................................................................................................. 30
C HAPTER 5 Configuring Administration Tools................................................ 33
Configuring Administration Tools................................................................................................................................... 33
Configuring Application Server........................................................................................................................................ 34
C HAPTER 6 Configuring Web Application ....................................................... 35
Configuring the Session Timeout Setting ....................................................................................................................... 35
Configuring the Session Timeout Setting................................................................................................................ 35
Configuring the Session Timeout Setting for Administration Tools .................................................................. 35
2 Administration and Configuration GuideRevision History
This section provides the revision details of the document.
Version
Number Revision Date Changes Done
1.0 April 2019 Created administration and configuration
steps for 8.0.7.0.0 Release.
2.0 May 2019 Updated for Doc 29745770.
This document includes the instructions to perform the post-installation
administration and configuration activities for OFS AMLES Application Pack 8.0.7.0.0.
The latest copy of this guide can be accessed from OHC Documentation Library.
Created by Reviewed by Approved by
Brijesh Akhilesh/Swetha Viru/Shandar
34
About this Guide
This guide explains the concepts behind the Oracle Financial Services Anti-Money Laundering Event Scoring (OFS
AMLES) application, and provides comprehensive instructions for system administration, daily operations, and
maintenance.
This section focuses on the following topics:
Who Should Use this Guide
How this Guide is Organized
Where to Find More Information
Conventions Used in This Guide
Who Should Use this Guide
This Administration and Configuration Guide is designed for use by Administrators. The administrator user configures
and maintains the system. The Administrator is usually an employee of a specific Oracle customer, who maintains
user accounts and roles, configures and executes batch jobs, and so on.
How this Guide is Organized
This Administration and Configuration Guide, includes the following chapters:
Chapter 1, About Oracle Financial Services Anti-Money Laundering Event Scoring, provides a brief overview of the
Oracle Financial Services Anti-Money Laundering Event Scoring application architecture and its
components.
Chapter 2, Getting Started, provides the required day-to-day operations and maintenance of Anti-Money
Laundering Event Scoring application users, groups, and organizational units.
Chapter 3, Managing User Administration, provides instructions to set up and configure the Security
Management System (SMS) to support AMLES application, user authentication, and authorization.
Chapter 4, Configuring the Application, provides the administration processes required to configure the
application.
Chapter 5, Configuring Administration Tools, provides instructions to configure parameters specific to
administration tools.
Chapter 6, Configuring Web Application, provides customization features available in the Web Application UI.
This chapter contains information to configure session time out.
Administration and Configuration Guide 5About this Guide
Where to Find More Information
For more information about Oracle Financial Services Anti-Money Laundering Event Scoring application, see the
following documents in the Oracle Help Center (OHC):
Oracle Financial Services Anti-Money Laundering Event Scoring Application Pack Release Note and Readme
Oracle Financial Services Anti-Money Laundering Event Scoring Application Pack Installation Guide
Oracle Financial Services Anti-Money Laundering Event Scoring Application Pack User Guide
Additionally, you can find specific information for OFSAAI documentation in the Oracle Help Center (OHC):
Oracle Financial Services Analytical Applications Infrastructure User Guide
Oracle Financial Services Analytical Applications Infrastructure Installation and Configuration Guide
Oracle Financial Services Analytical Applications Infrastructure Administration Guide
Conventions Used in This Guide
This table lists the conventions used in this guide.
Table 1. Conventions Used in This Guide
Convention Description
Italics Names of books, chapters, and sections as references
Emphasis
Bold Object of an action (menu names, field names, options, button names) in a
step-by-step procedure
Commands typed at a prompt
User input
Monospace Directories and subdirectories
File names and extensions
Process names
Code sample, including keywords and variables within text and as separate
paragraphs, and user-defined program elements within text
Substitute input value
6 Administration and Configuration GuideCHAPTER 1 About Oracle Financial Services
Anti-Money Laundering Event Scoring
This chapter provides a brief overview of the Oracle Financial Services Anti-Money Laundering Event Scoring
(OFS AMLES) application.
The following sections are covered in this chapter:
Introduction
Acronyms
Administration and Configuration Activities
Introduction
Oracle Financial Services Anti Money Laundering Event Scoring application provides a mechanism to score and
categorize the alerts generated by different AML engines thus reducing the manual effort of investigators. The
application uses historical alert transaction to train and validate machine learning models, and apply them to score
new alert data and prioritize alerts for investigation.
Acronyms
The following table describes the acronyms commonly used in this application.
Table 1. Acronyms
Acronyms Description
BA Business Analysts
OFSAAI Oracle Financial Services Analytical Application Infrastructure
OFSAA Oracle Financial Services Analytical Applications
SA System Administrator
URL Uniform Resource Locator
UI User Interface
BD Behavior Detection
ECM Enterprise Case Management
Administration and Configuration Activities
This section covers the following topics:
Managing User Administration
Configuring the Application
Administration and Configuration Guide 11—About Oracle Financial Services Anti-Money Laundering Event Scoring Configuring Administration Tools Configuring Web Application Managing User Administration The system administrators provide users access and authorization to the application. For more information, see the section Managing User Administration on page 9 Configuring the Application The batch execution run performs the process of loading data and preparing the system for users. For more information, see the section Configuring the Application on page 15. Configuring Administration Tools The configurations that involve administration tools. For more information, see the section Configuring Administration Tools on page 33. Configuring Web Application The configurations that involve the web user interface. For more information, see the section Configuring Web Application on page 35. 2 Administration and Configuration Guide
CHAPTER 2 Getting Started
This chapter provides step-by-step instruction to login to the AMLES application and manage the different features
of the Oracle Financial Services Analytical Applications (OFSAA) application page.
The following sections are covered in this chapter:
System Requirements
Accessing OFSAA Applications
Managing Administration Tasks in OFSAA
Troubleshooting Your Display
System Requirements
The following applications are required to run the AMLES application:
Microsoft Internet Explorer (IE) version 11 or later, Google Chrome 57.x, and Mozilla FireFox 52.x.
Earlier versions and other browsers are not supported and can produce errors, inaccurate data and display
failures.
Adobe Acrobat Reader version 9.0, or later.
You can download a free copy of the latest version of the Acrobat Reader at www.adobe.com.
Java should be installed. JDK 1.8 (version 8) or above.
The screen resolution of the system should be set to 1280 × 1024 or higher for proper display of the user
interface (UI).
For more information, see the OFS Anti-Money Laundering Event Scoring Installation Guide and the Tech Matrix.
Administration and Configuration Guide 32—Getting Started
Accessing OFSAA Applications
Access to the Oracle Financial Services Anti-Money Laundering Event Scoring application depends on the Internet
or Intranet environment. Oracle Financial Services Anti-Money Laundering Event Scoring is accessed through a
supported Internet browser. Your system administrator provides the intranet address uniform resource locator
(URL).
Your system administrator provides you with a User ID and Password. Login to the application through the OFSAA
login page. You will be prompted to change your password on your first login. You can change your password
whenever required after logging in. For more information, see Change Password section.
Note: Based on your firm’s configuration, you can login with Single Sign-On (SSO).
To access OFSAA Applications, follow these steps:
1. Enter the URL into your browser using the following format:
://://login.jsp
For example: https://myserver:9080/ofsaaapp/login.jsp
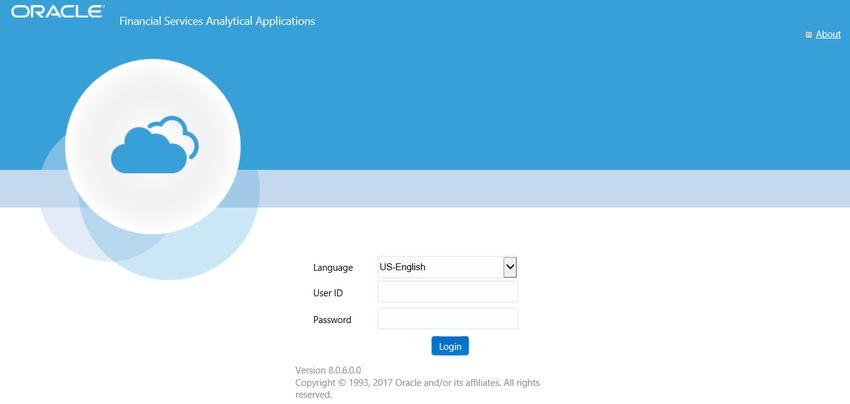
The Login window is displayed
Figure 1. OFSAA Login Page
2. Select the Language from the Language drop-down list.
3. Enter your User ID and Password.
4 Administration and Configuration Guide2—Getting Started 4. Click Login. The OFSAA Application window is displayed. Figure 2. OFSAA Application Page The OFSAA Application window is a common landing window for all users until a preferred application window is set. For more information about how to set your preferred application window, see Setting Preferences. You can use the OFSAA Application window to access the Oracle Financial Services applications in your environment. Knowing the OFSAA user-interface components The OFSAA Applications window has multiple user-interface components, which help user perform regular application-specific functions and administration functions. The applications and features which you can access depend on your user role. For more information about OFSAA user-interface components for AMLES, see the OFS AMLES User Guide 8.0.7.0.0 on OHC. Managing Administration Tasks in OFSAA This section provides information for the user interface components that help perform administration tasks on the OFSAA Application window. For more information about accessing the Administration user-interface, see the OFS AMLES User Guide 8.0.7.0.0 on OHC. Change Password For security purpose, you can change the password. For more information about changing passwords, see the OFS AMLES User Guide 8.0.7.0.0 on OHC. Troubleshooting Your Display If you experience problems logging into Oracle Financial Services AMLES or with your display, the browser settings may be incompatible with running OFSAA applications. The following sections provide instructions to set the Web display options for OFSAA applications within Internet Explorer (IE). Note: The following procedures apply to all versions of IE listed in the System Requirements section. Separate procedures are listed for each version where differences exist in the locations of settings and options. This section covers following topics: Enabling JavaScript Administration and Configuration Guide 5
2—Getting Started
Enabling Cookies
Enabling Temporary Internet Files
Enabling File Downloads
Setting Printing Options
Enabling Pop-up Blocker
Setting Preferences
Enabling JavaScript
JavaScript must be enabled in the browser. To enable JavaScript, follow these steps:
1. From the Tools menu, click Internet Options.
The Internet Options dialog box displays.
2. Click the Security tab.
3. Click the Local Intranet icon as your Web content zone.
4. Click Custom Level.
The Security Setting - Local Intranet Zone dialog box displays.
5. In the Settings list and under the Scripting setting, ensure that Enable is selected for all options.
6. Click OK, then click OK again to exit the Internet Options dialog box.
Enabling Cookies
Cookies must be enabled. If you have problems troubleshooting your display, contact your System Administrator.
Enabling Temporary Internet Files
Temporary Internet files are pages that you view on the Internet and store in a folder for quick viewing later. You
must adjust this setting to always check for new versions of a stored page. To adjust your Temporary Internet File
settings, follow these steps:
1. From the Tools menu, click Internet Options.
The Internet Options dialog box displays.
2. On the General tab, click Settings.
The Website Data Settings dialog box displays.
3. Select the Every time I visit the webpage option.
4. Click OK, then click OK again to exit the Internet Options dialog box.
Enabling File Downloads
File downloads must be available. To enable file downloads, follow these steps:
1. From the Tools menu, click Internet Options.
6 Administration and Configuration Guide2—Getting Started
The Internet Options dialog box displays.
2. Click the Security tab.
3. Click the Local Intranet icon as your Web content zone.
4. Click Custom Level.
The Security Setting - Local Intranet Zone dialog box displays.
5. Under the Downloads section, ensure that Enable is selected for all options.
6. Click OK, then click OK again to exit the Internet Options dialog box.
Setting Printing Options
Printing background colors and images must be enabled. To enable this option, follow these steps:
1. From the Tools menu, click Internet Options.
The Internet Options dialog box displays.
2. Click the Advanced tab.
3. In the Settings list, under the Printing setting, click Print background colors and images.
4. Click OK to exit the Internet Options dialog box.
Tip: For best display results, use the default font settings in your browser.
Enabling Pop-up Blocker
Some users may experience difficulty running the Oracle Financial Services AMLES application when the IE
Pop-up Blocker is enabled. It is recommended to add the URL of the application to the Allowed Sites in the Pop-up
Blocker Settings in the IE Internet Options.
To enable Pop-up Blocker, follow these steps:
1. From the Tools menu, click Internet Options.
The Internet Options dialog box displays.
2. Click the Privacy tab.
3. In the Pop-up Blocker setting, select the Turn on Pop-up Blocker option.
The Settings is enabled.
4. Click Settings to open the Pop-up Blocker Settings dialog box.
5. In the Pop-up Blocker Settings dialog box, enter the URL of the application in Address of website to allow.
6. Click Add.
The URL appears in the Allowed sites list.
7. Click Close, then click Apply to save the settings.
8. Click OK to exit the Internet Options dialog box.
Administration and Configuration Guide 72—Getting Started
Setting Preferences
The Preferences section enables you to set your OFSAA Home Page.
To access this section, follow these steps:
1. On the OFSAA Landing window, click the User Menu from the header to the top right to display the
drop-down list.
2. Click Preferences from the drop-down list to display the Preferences window.
Figure 3. Preferences Window
3. In the Property Value drop-down list, select the application which you want to set as the Home Page.
Note: Whenever new application is installed, the related value for that application is found in the
drop-down list.
4. Click Save to save your preference.
8 Administration and Configuration GuideCHAPTER 3 Managing User Administration This chapter provides instructions to set up and configure the Security Management System (SMS) to support AMLES application’s user authentication and authorization functions. The following sections are covered in this chapter: About User Administration Administrator User Privileges User Provisioning Process Flow Managing User Administration About User Administration User administration involves creating and managing users and providing access based on their roles. This chapter discusses the following: Administrator permissions Creating and mapping users and user groups Loading and mapping security attributes Administrator User Privileges Table 2 lists the access permissions of the AMLES administrator. Table 2. Access Permissions for Administrators Privileges AMLES Administrator User Security Administration Excel Upload Web Service Configuration Common Web Service Preferences User Administration User Provisioning Process Flow Table 3 lists the various actions and associated descriptions of the user administration process flow. Table 3. User Provisioning Process Flow Action Description Managing User Create users and map users to User Groups. The Administrator can provide Administration access, monitor, and administer users. Administration and Configuration Guide 9
3—Managing User Administration Requirements to Access AMLES Application A user gains access to the AMLES application based on the authentication of a unique user ID and password. To access the AMLES application, you must fulfill the following conditions: Table 4. Requirements Applications Conditions Anti-Money Set of policies that associate functional roles with access to specific system functions Laundering Access to one or more business domains Event Scoring Administration Set of policies that associate the admin functional role with access to specific system functions Tools Managing User Administration This section allows you to create, map, and authorize users and define restricted access to the AMLES application. Managing Identity and Authorization This section explains how to create a user and provide access to the AMLES application. This section covers the following topics: Managing Identity and Authorization Process Flow Creating and Authorizing a User Load User Configuration Data into CSSMS_ATTRIB_MAST table Using Excel Upload Creating or Editing User Understanding User Roles in OFS Anti Money Laundering Event Scoring Mapping a User with a User Group Managing Identity and Authorization Process Flow Figure 4 shows the process flow of identity management and authorization. Figure 4. Managing Identity and Authorization Process Flow Table 5 lists the various actions and associated descriptions of the user administration process flow: 10 Administration and Configuration Guide
3—Managing User Administration
Creating and Authorizing a User
The SYSADMN and SYSAUTH roles can be provided to users in the AMLES application. User and role
associations are established using the Security Management System (SMS) and are stored in the Config Schema. User
security attribute associations are defined using Security Attribute Administration.
For more information on creating and authorizing a user, see System Configuration and Identity Management in
Oracle Financial Services Analytical Applications Infrastructure User Guide.
Load User Configuration Data into CSSMS_ATTRIB_MAST table Using Excel Upload
To load user configuration data, follow these steps:
1. Navigate to Anti-Money Laundering Event Scoring, go to Common Tasks.
2. Select Unified Metadata Manager. Click Data Entry Forms and Queries.
3. Click Upload. Select Config Schema Upload.
4. Select the CSSMS_ATTRIB_MAST table in the Select the table drop-down list.
5. In Select the File to Upload field, click Browse. In Choose File to Upload window, specify the path of the
data file (Microsoft Excel 2003/2007) which you want to upload. The CSSMS_ATTRIB_MAST.xlsx will be
available in the /STAGE/ExcelUpload/TEMPLATE path inside the ftpshare folder.
6. Click Select the Sheet button, the Sheet Selector pop-up window is displayed. Select the required sheet from
the drop-down list and click OK. If the excel contains multiple sheets, select the sheet from which data is to be
uploaded. Else, by default the first sheet data is selected for upload.
7. In the Upload Type options, select one of the following:
Incremental: In this type of upload, the data in Excel sheet is inserted / appended to the target database
object. The upload operation is successful only when all the data in the selected Excel Sheet is
uploaded. In case of an error, the uploaded data will be rolled back.
Complete: In this type of upload, the data present in the selected database object is overwritten with the
data selected Excel sheet. In case of an error, data in the selected database object will be reverted back
to its original state.
8. Select Upload. If you have selected Complete upload type, you must need confirm to overwrite data in the
confirmation dialog.
Creating or Editing User
To create or edit user, follow these steps:
1. Create or Edit the user for which you must map the Security Attributes. For more information on creating and
authorizing a user, see System Configuration and Identity Management in Oracle Financial Services Analytical
Applications Infrastructure User Guide.
Administration and Configuration Guide 113—Managing User Administration 2. After updating the fields, click Save. Figure 5. User Maintenance Understanding User Roles in OFS Anti Money Laundering Event Scoring OFS Anti Money Laundering Event Scoring application uses four-eyes functionality to provide two levels of maker and checker to create and approve execution runs. The two levels of users are defined as creators and approvers. For example, if your user profile is mapped to a Creator role, you can create an execution run and request for deployment, which has to be approved by a user with Approver role. Mapping a User with a User Group This section explains how to map Users and User Groups. With this, the user will have access to the privileges as per the role. The SYSADMN user maps a user to a user group in the AMLES application. Table 5 describes the Anti-Money Laundering Event Scoring User Roles and corresponding User Groups. Table 5. Anti-Money Laundering Event Scoring Roles and User Groups Role Group Name User Group Code AO Administrator AO Admin Group AOADMNGRP AO Approver AO Approver Group AOAPPROVERGRP AO Authorizer AO Authorizer Group AOAUTHGRP AO Creator AO Creator Group AOCREATORGRP 12 Administration and Configuration Guide
3—Managing User Administration

Administration and Configuration Guide                              13
3—Managing User Administration

14                               Administration and Configuration Guide
CHAPTER 4 Configuring the Application
This chapter provides the details of AMLES batch run. It involves loading batch execution data from the Rule Run
Framework and executing the batch from Operations for the application to be ready for users.
This chapter includes the following sections:
Knowing Batches to Run
Integrating event scoring with behavior detection (BD) using database link
Starting a Batch Run and Loading Batch Execution Data
Configuring lookback period (in months) before running ES_AML_HIST_DataMovement and
ES_ECM_HIST_DataMovement
Running Batch Execution
Getting data from tables in behavior detection application into .dat files
Accessing event scoring batches from behavior detection application
Knowing Batches to Run
Batch run is required to configure data into your application. Loading of data from files and existing databases
required batch run processes described in further sections. The following table provides a list of batches that you
have to run and with details of the sections to refer to:
Table 6. List of Batches to Run
Run Name Description
ES_AML_DIM_DataMovement Load Dimension Data from AML using Data Movement utility (Database link).
See the following sections for instructions on running this batch:
Integrating event scoring with behavior detection (BD) using database
link
Starting a Batch Run and Loading Batch Execution Data
Configuring lookback period (in months) before running
ES_AML_HIST_DataMovement and ES_ECM_HIST_DataMovement
Running Batch Execution
Administration and Configuration Guide 154-Configuring the Application
ES_AML_HIST_DataMovement Load Historic Event Data for a certain lookback period from AML using Data
Movement utility (Database link).
See the following sections for instructions on running this batch:
Integrating event scoring with behavior detection (BD) using database
link
Starting a Batch Run and Loading Batch Execution Data
Configuring lookback period (in months) before running
ES_AML_HIST_DataMovement and ES_ECM_HIST_DataMovement
Running Batch Execution
ES_DimDataLoad ES Dimension Data Load using .DAT files.
See the following sections for instructions on running this batch:
Integrating event scoring with behavior detection (BD) using database
link
Starting a Batch Run and Loading Batch Execution Data
Running Batch Execution
ES_HistoricDataLoad ES Historic Data Load using .DAT files.
Integrating event scoring with behavior detection (BD) using database
link
Starting a Batch Run and Loading Batch Execution Data
Running Batch Execution
ES_ECM_DIM_DataMovement Load Dimension Data from AML using Data Movement utility (Database link).
See the following sections for instructions on running this batch:
Integrating event scoring with Enterprise Case Management (ECM)
using database link
Starting a Batch Run and Loading Batch Execution Data
Configuring lookback period (in months) before running
ES_AML_HIST_DataMovement and ES_ECM_HIST_DataMovement
Running Batch Execution
ES_ECM_HIST_DataMovement Load Historic Event Data for a certain lookback period from AML using Data
Movement utility (Database link).
See the following sections for instructions on running this batch:
Integrating event scoring with Enterprise Case Management (ECM)
using database link
Starting a Batch Run and Loading Batch Execution Data
Configuring lookback period (in months) before running
ES_AML_HIST_DataMovement and ES_ECM_HIST_DataMovement
Running Batch Execution
Integrating event scoring with behavior detection (BD) using database link
Integrating Event Scoring with BD requires configuration changes in the InstallConfig.xml file. For information on
accessing and configuring the InstallConfig.xml file, see the OFS AMLES Installation Guide 8.0.7.0.0.
Note: Currently, only Single-match alerts are being considered for historic load and prediction.
After you have configured the InstallConfig.xml file during installation with appropriate values for AMLES to work
with BD, perform the following steps to load evented information from BD to AMLES:
16 Administration and Configuration Guide4-Configuring the Application
1. Starting a Batch Run and Loading Batch Execution Data
2. Configuring lookback period (in months) before running ES_AML_HIST_DataMovement and
ES_ECM_HIST_DataMovement
3. Running Batch Execution
Integrating event scoring with Enterprise Case Management (ECM) using
database link
Integrating Event Scoring with ECM requires configuration changes in the InstallConfig.xml file. For information
on accessing and configuring the InstallConfig.xml file, see the OFS AMLES Installation Guide 8.0.7.0.0.
Note: Currently, only Single-match alerts are being considered for historic load and prediction.
After you have configured the InstallConfig.xml file during installation with appropriate values for AMLES to work
with ECM, perform the following steps to load evented information from ECM to AMLES:
1. Starting a Batch Run and Loading Batch Execution Data
2. Configuring lookback period (in months) before running ES_AML_HIST_DataMovement and
ES_ECM_HIST_DataMovement
3. Running Batch Execution
Starting a Batch Run and Loading Batch Execution Data
Start a batch run and load the evented data to prepare the historical data for users.
Note: To execute a batch, do not start two batches simultaneously for the same processing group.
To start the batch run and load batch execution data, follow these steps:
1. Login to the AMLES Application with your credentials to view the Applications window.
2. Click from the header to display the applications in a Tiles menu.
3. Click Anti Money Laundering Event Scoring from the Tiles menu. The Anti Money Laundering Event
Scoring window is displayed with the Navigation list to the left.
4. Click Common Tasks displayed from the Navigation list to expand and view the menu.
5. Click Rule Run Framework to display the various menu items.
Administration and Configuration Guide 174-Configuring the Application
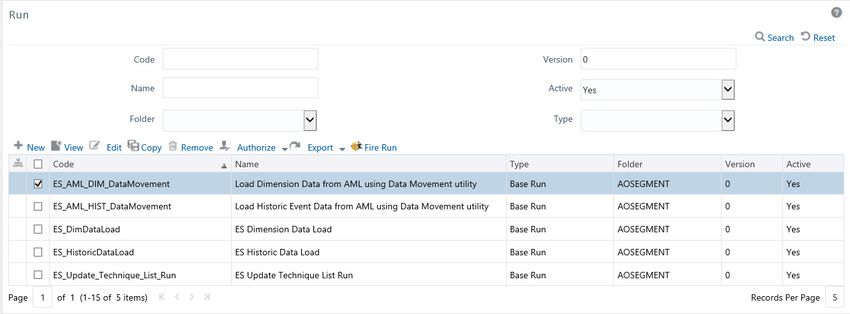
6. Click Run. The Run window is displayed with the available Processes.
Figure 6. Application List
7. Go to the List section. Select a run, for example (ES_HistoricDataLoad).
8. Click Fire Run to load the batch execution data. The Fire Run window is displayed.
Figure 7. Fire Run Window
9. Enter the following details:
Table 7. Adding Fire Run Details
Fields Description
Request Type Select Request Type based on the following options:
Single: If the batch must be executed once.
Multiple: If the batch must be executed multiple times at different intervals.
18 Administration and Configuration Guide4-Configuring the Application
Table 7. Adding Fire Run Details
Batch Select Batch. It has the following options:
Create
Create & Execute
From these options, select Create & Execute
Wait Select Wait. It has the following options:
Yes: This executes the batch after a certain duration. Enter the duration as required.
No: This executes the batch immediately.
Filters Enter the filter details.
Note: $MISDATE option can be used to execute the run for that particular day. The format for it to
enter in the filter details is:
to_date(.)=$MISDATE
Note: For $MISDATE option:
For either Date or Timestamp datatypes, to_date is mandatory for the filter.
Activity Table Name and Activity Column Name should be in uppercase.
10. Click OK to run the batch. The following message is displayed: Batch Execution is in progress.
Note: If batch execution fails, then see the batch details in Batch Monitor. For more information on Batch
Monitor, see the Oracle Financial Services Analytical Applications Infrastructure User Guide.
11. After the batch is triggered, check for completion and perform the steps described in the section Running Batch
Execution, on page 22.
Note: Jump to Running Batch Execution section for batches other than ES_AML_HIST_DataMovement and
ES_ECM_HIST_DataMovement. The two batches mentioned previously require you to configure the lookback
parameter before running the batch. See Configuring lookback period (in months) before running
ES_AML_HIST_DataMovement and ES_ECM_HIST_DataMovement, on page 19 for details.
Configuring lookback period (in months) before running
ES_AML_HIST_DataMovement and ES_ECM_HIST_DataMovement
Before you run ES_AML_HIST_DataMovement for BD, or ES_ECM_DIM_DataMovement for ECM, you must
configure the lookback period (in months) for the ES_AML_EVENT_STG_DATA_LOAD and
ES_ECM_EVENT_STG_DATA_LOAD Processes in the Rule Run Framework. This configuration specifies the
number of months to lookback from the selected date for the historical loading of data.
Note: This section is applicable only to ES_AML_HIST_DataMovement and ES_ECM_HIST_DataMovement
batches. For other batches, skip this section and move to the next section.
Perform the following steps in the application to configure the lookback period:
1. Login to the OFSAA Application with your credentials to view the Applications window.
2. Click from the header to display the applications in a Tiles menu.
3. Click Anti Money Laundering Event Scoring from the Tiles menu. The Anti Money Laundering Event
Scoring window is displayed with the Navigation list to the left.
Administration and Configuration Guide 194-Configuring the Application
4. Click Common Tasks displayed from the Navigation list to expand and view the menu.
5. Click Rule Run Framework to display the various menu items.
6. Click Process. The Process window is displayed with the available Processes.
7. Select the checkbox for ES_AML_EVENT_STG_DATA_LOAD and click to edit to view the Process
Definition window in edit mode.
Figure 8. Edit RRF Process Window
8. Click Component to view the Component Selector window.
Figure 9. Process Definition (Edit Mode) Window
20 Administration and Configuration Guide4-Configuring the Application
9. Click Parameter Definition button to view the Parameter Definition window.
Figure 10. Component Selector Window
10. Modify ##MONTHS## the Parameter Definition window to the number of lookback period (in months). For
example, 60 for sixty months. Click OK to save.
Figure 11. Parameter Definition Window
Administration and Configuration Guide 214-Configuring the Application
11. On the Process Definition window, click save and the pop up [16450] Do you want to save this definition as
new version? appears. Click No.
Figure 12. [16450] Do you want to save this definition as new version? Popup
12. A successful message popup appears. Click Close.
13. Repeat the preceding steps for ES_ECM_EVENT_STG_DATA_LOAD.
Running Batch Execution
Run the Batch Execution to load the data for users.
Note: It is mandatory to name the folders where the data is stored in the format YYYYMMDD (for example,
20180115 for 15 January, 2018). Naming the folders in other formats will not generate the data for the Batch
Execution Run.
To run the batch execution process, follow these steps:
1. Login to the OFSAA Application with your credentials to view the Applications window.
2. Click from the header to display the applications in a Tiles menu.
3. Click Anti Money Laundering Event Scoring from the Tiles menu. The Anti Money Laundering Event
Scoring window is displayed with the Navigation list to the left.
4. Click Common Tasks displayed from the Navigation list to expand and view the menu.
22 Administration and Configuration Guide4-Configuring the Application
5. Click Operations to display the various menu items for administration operations.
6. Click Batch Execution to view the Batch Execution window. On this window, select the Batch ID
ESINFO_xxx (where xxx is a multi-digit identifier).
7. Click the date-picker and select the date for the batch execution data from the Information Date section.
8. Click Execute Batch to execute the batch runs for Batch ID.
Figure 13. Batch Execution
The following table provides details for the batch execution load into the application database:
Table 8. Batch Execution Data Load and Format Details
File Name Table Name Description
F2T_DIM_ES_ENTITY_TYPE DIM_ES_ENTITY_TYPE Load data from .dat file to
DIM_ES_ENTITY_TYPE table.
F2T_DIM_ES_ENTITY_TYPE DIM_ES_ENTITY_TYPE_MLS Load data from .dat file to
_MLS DIM_ES_ENTITY_TYPE_MLS table.
Administration and Configuration Guide 234-Configuring the Application
Table 8. Batch Execution Data Load and Format Details
File Name Table Name Description
F2T_DIM_ES_MEASURE_NAM DIM_ES_MEASURE_NAME Load data from .dat file to
E DIM_ES_MEASURE_NAME table.
F2T_DIM_ES_MEASURE_NAM DIM_ES_MEASURE_NAME_ML Load data from .dat file to
E_MLS S DIM_ES_MEASURE_NAME_MLS table.
F2T_DIM_ES_SCENARIO DIM_ES_SCENARIO Load data from .dat file to
DIM_ES_SCENARIO table.
F2T_DIM_ES_SCENARIO_ML DIM_ES_SCENARIO_MLS Load data from .dat file to
S DIM_ES_SCENARIO_MLS table.
F2T_DIM_ES_SEGMENT DIM_ES_SEGMENT Load data from .dat file to
DIM_ES_SEGMENT table.
F2T_DIM_ES_SEGMENT_MLS DIM_ES_SEGMENT_MLS Load data from .dat file to
DIM_ES_SEGMENT_MLS table.
F2T_DIM_ES_EVENT_WF_ST DIM_ES_EVENT_WF_STATUS Load data from .dat file to
ATUS DIM_ES_EVENT_WF_STATUS table.
F2T_DIM_ES_EVENT_WF_ST DIM_ES_EVENT_WF_STATUS Load data from .dat file to
ATUS_MLS _MLS DIM_ES_EVENT_WF_STATUS_MLS
table.
F2T_FSI_ES_EVENT_INPUT FSI_ES_EVENT_INPUT_STG Load data from .dat file to
_STG FSI_ES_EVENT_INPUT_STG table.
T2T_FSI_ES_EVENT_INPUT FSI_ES_EVENT_INPUT Data is loaded from
F2T_FSI_ES_EVENT_INPUT_STG
file to
F2T_FSI_ES_EVENT_INPUT_STG
table. After a successful DQ
check the data from
F2T_FSI_ES_EVENT_INPUT_STG is
loaded to
F2T_FSI_ES_EVENT_INPUT table
by a T2T.
The following table provides details for the data format for the flat files that load batch execution data into the
application database:
Note: The character ~ denotes a space in the Data Format.
24 Administration and Configuration Guide4-Configuring the Application
Table 9. Batch Execution Data File Format
File Name Data Format
DIM_ES_SEGMENT.dat V_SEGMENT_CODE~V_SEGMENT_DESC~V_SEGMENT_NAME~F_LA
TEST_RECORD_INDICATOR~D_RECORD_START_DATE(dd-mm-y
yyy)~D_RECORD_END_DATE(dd-mm-yyyy)~DESCLOCALE
For example,
FRA~FRAUD~FRAUD~Y~05/15/2017~05/15/2020~en_US
DIM_ES_SCENARIO.dat V_SCENARIO_CODE~V_SCENARIO_DESC~V_SCENARIO_NAME~F
_LATEST_RECORD_INDICATOR~D_RECORD_START_DATE(dd-m
m-yyyy)~D_RECORD_END_DATE(dd-mm-yyyy)~DESCLOCALE
For example,
118810010~(FR/EN) High Risk Transactions: High
Risk Counter Party~(FR/EN) High Risk
Transactions: High Risk Counter
Party~Y~05/15/2017~05/15/2020~en_US
FSI_ES_EVENT_INPUT_STG N_EVENT_ID~D_EVENT_GENERATION_DATE(dd-mm-yyyy)~V_
MEASURE_NAME~V_MEASURE_VALUE~V_SCENARIO_NAME~V_EN
TITY_TYPE_NAME~V_WF_STATUS_NAME~V_SEGMENT_NAME
For example,
11~09/14/2016~tx_amout_cdt~125~Rapid Movement of
Funds~ACCOUNT~SAR Not Filed~High Net Worth
Dim_Measure.dat V_MEASURE_CODE~V_MEASURE_DESC~V_MEASURE_NAME~F_LA
TEST_RECORD_INDICATOR~D_RECORD_START_DATE(dd-mm-y
yyy)~D_RECORD_END_DATE(dd-mm-yyyy)~DESCLOCALE~V_D
ATATYPE~
For example,
Lrf_Prctg~Lrf_Prctg~Lrf_Prctg~Y~05/15/17~05/15/20
~en_US~Number~
DIM_ES_ENTITY_TYPE.dat V_ENTITY_TYPE_CODE~V_ENTITY_TYPE~F_LATEST_RECORD_
INDICATOR~D_RECORD_START_DATE~D_RECORD_END_DATE(d
d-mm-yyyy)~DESCLOCALE
For example,
CU~CUSTOMER~Y~05/15/2017~05/15/2020~en_US
DIM_ES_EVENT_WF_STATUS.dat V_WF_STATUS_CODE~V_WF_STATUS_DESC~V_WF_STATUS_NAM
E~F_LATEST_RECORD_INDICATOR~D_RECORD_START_DATE(d
d-mm-yyyy)~D_RECORD_END_DATE(dd-mm-yyyy)~DESCLOCA
LE
For example,
Y~SAR Filed~SAR
Filed~Y~05/15/2017~05/15/2020~en_US
9. Navigate to the directory /ftpshare//dmt/source.
10. Copy the .dat files to the respective directories shown in the following table:
Administration and Configuration Guide 254-Configuring the Application
Table 10. Directory to File Mapping
Directory Name File Name
AO_Scenario DIM_ES_SCENARIO.dat
AO_Entity_Type DIM_ES_ENTITY_TYPE.dat
AO_Segment DIM_ES_SEGMENT.dat
AO_Processing FSI_ES_EVENT_INPUT_STG
AO_Measure Dim_Measure.dat
AO_Alert_wf_status DIM_ES_EVENT_WF_STATUS.dat
11. Open the preceding directories and create a date directory in each of them in the format (YYYYMMDD). For
example,
/ftpshare//dmt/source/AO_Segment/data//.
Getting data from tables in behavior detection application into .dat files
The following tables in BD are used to get data for .dat files:
1. KDD_REVIEW (Stores Alert Details)
2. KDD_BREAK (Stores Breaks)
3. KDD_BREAK_BINDING (Stores Bindings/measures)
4. KDD_SCNRO (Stores list of available scenarios)
5. KDD_CENTRICITY (Stores list of available Entity Types)
6. KDD_JRSDCN (Stores list of available Jurisdictions)
7. KDD_CODE_SET_TRNLN (Stores the translations for codes such as Closing Class Code CL01, which
means SARed, and CL02 and CL 03, which means non SARed. This is used to derive the Workflow status
codes.)
The following table presents the table and column mapping for AML and Event Scoring:
Table 11. Table and column mapping for AML and Event Scoring
AML Table Event Scoring Table AML Columns Event Scoring Column
KDD_BREAK_BINDING DIM_ES_MEASURE_NAM BINDG_NM V_MEASURE_CODE
E BINDG_NM V_MEASURE_DESC
BINDG_NM V_MEASURE_NAME
26 Administration and Configuration Guide4-Configuring the Application
AML Table Event Scoring Table AML Columns Event Scoring Column
KDD_SCNRO DIM_ES_SCENARIO SCNRO_ID V_SCENARIO_CODE
SCNRO_DISPL_NM V_SCENARIO_DESC
SCNRO_DISPL_NM V_SCENARIO_NAME
Note: To make scenario
name unique, its value is
derived as:
SCNRO_DISPL_NM=
coalesce(cntry_type_c
d, null, 'UD') || '_'
|| scnro_short_nm ||
'_' ||scnro_id
KDD_CENTRICITY DIM_ES_ENTITY_TYPE CNTRY_ID V_ENTITY_TYPE_CODE
CNTRY_NM V_ENTITY_TYPE
KDD_JRSDCN DIM_ES_SEGMENT JRSDCN_CD V_SEGMENT_CODE
JRSDCN_DSPLY_NM V_SEGMENT_DESC
JRSDCN_NM V_SEGMENT_NAME
KDD_CODE_SET_TRNL DIM_ES_EVENT_WF_ST CODE_DISP_TX V_WF_STATUS_DESC
N ATUS CODE_VAL V_WF_STATUS_NAME
Note: Product approach is
that
V_WF_STATUS_CODE is
‘Y’ for closing class code
‘CL01’ and ‘N’ for 'CL02',
'CL03', where Y means
productive and N means
non-productive alerts. This
mapping needs to be
changed as per the
closing class code being
used by banks.
Administration and Configuration Guide 274-Configuring the Application
AML Table Event Scoring Table AML Columns Event Scoring Column
KDD_REVIEW FSI_ES_EVENT_INPUT KDD_BREAK_BINDING.B V_MEASURE_NAME
KDD_BREAK_BINDING _STG INDG_NM
CNTRY_ID V_ENTITY_TYPE_NAME
CLSNG_CLSS_CD V_WF_STATUS_NAME
CREAT_TS D_EVENT_GENERATION
_DATE
JRSDCN_CD V_SEGMENT_NAME
REVIEW_ID N_EVENT_ID
SCNRO_ID V_SCENARIO_NAME
KDD_BREAK_BINDING.V V_MEASURE_VALUE
ALUE_TX
Note: All the Code and ID
columns of KDD_REVIEW
table has to be translated
with the corresponding
name values mentioned in
the respective DIM tables.
Note: If you insert data using Historic Load batch (.dat files), FSI_ES_EVENT_INPUT_STG is required. However, if
you want to directly import data into FSI_ES_EVENT_INPUT table, the following column mappings are required. The
direct import into FSI_ES_EVENT_INPUT table skips data quality checks and this requires that you configure the
relevant data in all the dimension (DIM) tables.
KDD_REVIEW FSI_ES_EVENT_INPUT BINDG_NM V_MEASURE_CODE
CNTRY_ID V_ENTITY_TYPE_CODE
CREAT_TS D_EVENT_GENERATION
_DATE
JRSDCN_CD V_SEGMENT_CODE
REVIEW_ID N_EVENT_ID
SCNRO_ID V_SCENARIO_CODE
VALUE_TX V_MEASURE_VALUE
CLSNG_CLSS_CD V_WF_STATUS_CODE
(Valid Values are
Y and N. Should be
translated based
on
DIM_ES_EVENT_WF_ST
ATUS mapping)
Note: The following new tables are introduced to store and track the production service results:
a. aml_event_lookup (Stores score range for each bucket)
b. aml_fsi_es_raw_events (Stores json of the data posted)
28 Administration and Configuration Guide4-Configuring the Application
Accessing event scoring batches from behavior detection application
The configurations described in this section is applicable to the process of scoring events in AMLES and accessing
the data from the behavior detection (BD) application. The process requires to update tables in BD, and create a
user in BD and map to a user group to enable users access event scoring batches from the BD application. These are
described in the prerequisites section. The process then requires you to run two batches from AMLES, which is
described in Running Batches in Behavior Detection section.
Prerequisites
The prerequisites are in the following:
1. Update the kdd_install_param table as shown in the following tables:
a. For PARAM_ID 500
PARAM_ID 500
PARAM_NM AlertOptimizationRequestService
AlertOptimizationRequestService: POST service
PARAM_DESC_TX
used for passing Request data to production.
USER NAME OF EVENT
ATTR_1_CD ##AO_WEB_USERID## SCORING USER
(APPROVER/CREATOR)
This attribute specifies the user id for the
ATTR_1_DESC_TX webservice of the
AlertOptimizationRequestService
PASSWORD OF EVENT
ATTR_2_CD ##AO_WEB_PASSWORD## SCORING USER
(APPROVER/CREATOR)
This attribute specifies the password for the
ATTR_2_DESC_TX webservice of the
AlertOptimizationRequestService
ATTR_3_CD http://hostname:port/context
URL OF EVENT SCORING
ATTR_3_VALUE_TX ##AO_WEB_REQUEST_URL##
APPLICATION
b. For PARAM_ID 501
PARAM_ID 501
PARAM_NM AlertOptimizationResponseService
AlertOptimizationResponseService: GET service,
PARAM_DESC_TX used to get response based on Request Id
generated by Request Service
USER NAME OF EVENT
ATTR_1_CD ##AO_WEB_USERID## SCORING USER
(APPROVER/CREATOR)
This attribute specifies the user id for the
ATTR_1_DESC_TX webservice of the
AlertOptimizationResponseService
PASSWORD OF EVENT
ATTR_2_CD ##AO_WEB_PASSWORD## SCORING USER
(APPROVER/CREATOR)
Administration and Configuration Guide 294-Configuring the Application
This attribute specifies the password for the
ATTR_2_DESC_TX webservice of the
AlertOptimizationResponseService
ATTR_3_CD http://hostname:port/context
URL OF EVENT SCORING
ATTR_3_VALUE_TX ##AO_WEB_RESPONSE_URL##
APPLICATION
2. Create a user in BD and map Mantas Administrator User Group to this user. This action enables the user to
access Event Scoring batches from BD application.
Running Batches in Behavior Detection
After performing scoring in AMLES, run the following from BD:
1. Login to BD with the credentials for the user created as instructed in the prerequisites section.
2. Click from the header to display the applications in a Tiles menu.
3. Click Anti Money Laundering Event Scoring from the Tiles menu. The Anti Money Laundering Event
Scoring window is displayed with the Navigation list to the left.
4. Click Common Tasks displayed from the Navigation list to expand and view the menu.
5. Click Rule Run Framework to display the various menu items.
6. Click Run to view the Run window.
7. Run AML_AO_Request_Data_Move from the Run window. Running AML_AO_Request_Data_Move,
collects the events from the kdd_review table, in JSON format, and exports to AMLES to score the events.
Note: When you execute this run, select the date that refers to the CREAT_TS date in the kdd_review
table. For example, if you select the date 25-May-2018, the data for CREAT_TS=25-May-2018 is exported
to Event Scoring.
8. Run AML_AO_Response_Data_Move from the Run window. Running
AML_AO_Response_Data_Move presents the response for events exported by the
AML_AO_Request_Data_Move run. After the application scores the events successfully, scores are
assigned to the events. These scored events are inserted in the EVENT_SCORE column of the
kdd_review table.
30 Administration and Configuration GuideYou can also read