Flyers, Brochures, & Business Cards using Illustrator CC
←
→
Page content transcription
If your browser does not render page correctly, please read the page content below
STC 1

Flyers, Brochures, & Business Cards
using Illustrator CC

                               Version 1 (6/16/2014)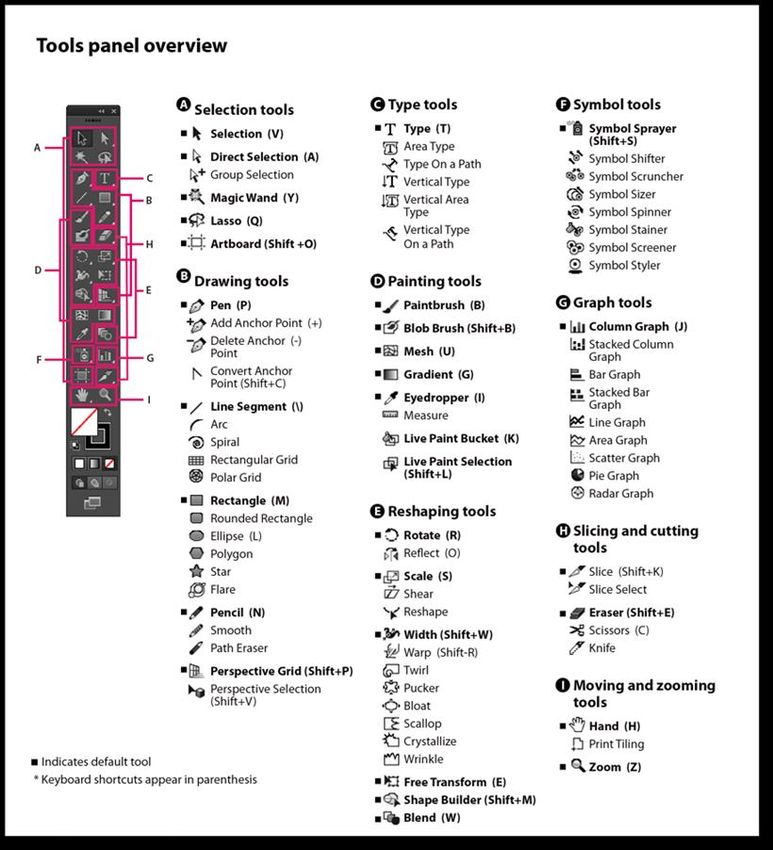
STC 2
Background
This workshop introduces skills and design principles needed to create flyers, brochures, and
business cards. Students will be taught how to integrate pictures, custom shapes, freeform
drawings, and add effects to elements of their document.
Required Skills
The following skills are required before taking the series:
General operating knowledge of a PC (Windows or Mac)
Ability to use a keyboard and mouse
Basic familiarity with Illustrator, its tools, and its workspace
Agenda
Best Practices / Helpful Tips
Before You Begin: Organization and Structure
Getting Started with Illustrator
Adding Objects to Your Document
Utilizing Important Features
Appearance Panel
Graphic Styles
Saving,
Notes, Tips, and Common Issues
Conclusion
Best Practices / Helpful Tips
Flyers
What is a Flyer?
Flyers are usually used as handouts to advertise an event, organization, business, product, or
service. Often times they will combine a few of these categories. For example:
A clothing store is having a weekend sale.
A band is performing at a local event.
A business is offering a free service.
Version 1 (6/16/2014)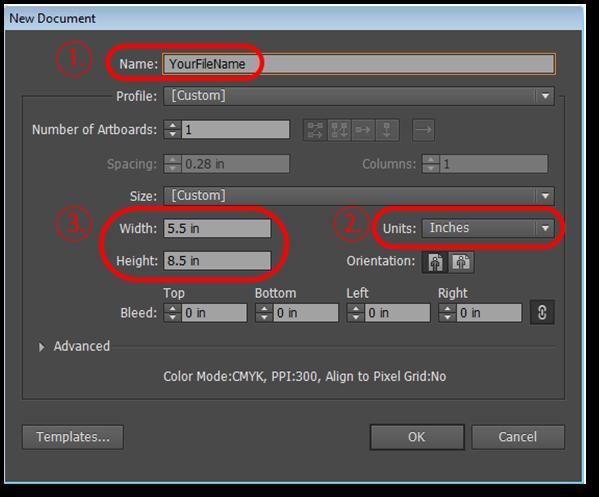
STC 3
Be Concise.
Your flyer exists to grab people’s attention and to inform them of something briefly. You do not
want to give them a lot of information with your flyer. Instead, you should give them just enough
information to spark their interest, tell them what’s going on, and to direct them to resources
where they can learn more about the subject, event, or group.
Tell them Who, What, Where, When, Why, and How:
Who is this flyer about? Who should read it?
What is happening? What is the service they should be aware of?
Where is it happening? Where is this business located?
When does this group meet? When does the sale end?
Why should they care about this paper someone put in my hand?
How can they learn more about it? How can they contact the organization?
Brochures
What is a Brochure?
A brochure is an informational pamphlet used to advertise an organization, business, event,
product, or service. Typically, brochures are more text-based than flyers, but they still include
graphic and design elements.
What makes a brochure successful is not just the information it contains. In order to get a
message across, you still have to convince people to pick up and read your brochure. The more
eye-catching and well-designed your brochure is, the more likely it is that people will read it.
The Front Panel
The front panel of your brochure is arguably the most important element of all. The front panel is
the first part of your brochure people will see. (Depending on how the front is designed, it may
end up being the only panel people see.) People will decide whether or not to open up the rest of
the pages based on what they see on the front panel. Thus, your front panel must grab
attention! There are a few steps you can take to do this.
Use photos that are relevant and eye-catching.
Include a well-worded title that arouses interest.
Use unique graphics, effects, or colors to make your brochure stand out if it is placed in a
rack full of other brochures.
Version 1 (6/16/2014)
STC 4
Remember that only the top third of your flyer may show when it is placed with other
brochures on a stand.
Business Cards
Why Use a Business Card?
Many people overlook the importance of having a professional business card. In the digital age,
it is easier than ever to stay connected with email and social media, yet the business card is still
very important for making a memorable impression.
The business card is often the first impression a client has of you, so make it count. You do not
want to slack off on the design of your card. This is your chance to grab their attention and
showcase your brand, personality, or product. Make it count.
What to Include on a Business Card
You almost always want to include:
Individual’s Name Address
Position / Job Title Phone Number
Company Name
You may also choose to include (optional):
Logo Portrait / Photo
Email Address Tagline
Website Social Media links
Business Card Design Tips
Keep it simple.
o Don’t add a lot of content or make the design busy.
o Use white space to your advantage.
Utilizing white space as a design tool can create a striking effect.
White space can serve a more practical purpose as well. It leaves room for
you to write notes (such as a personal number or other information) on the
card when giving it to someone. It also gives them room to write notes and
reminders about you after they receive your card.
Use branding.
Version 1 (6/16/2014)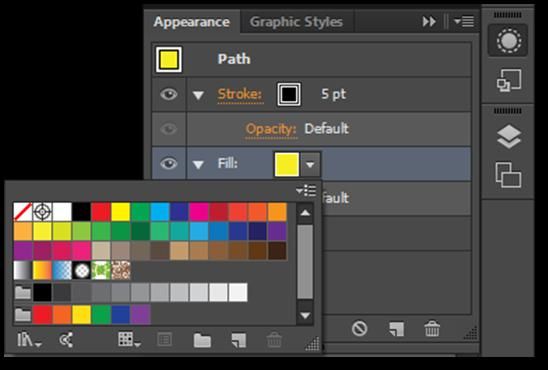
STC 5
o Let your customer know what you, your company, or your services are all about.
A business card should be a simple reflection of your personal or professional
identity or personality.
o Consistent color schemes and logos are a great way to brand yourself and create a
personal or professional public image.
Leave the back of the card blank or reserve it for a few bits of non-vital information.
Color Recommendations
The color scheme you choose can determine the effectiveness of your business card, flyer, or
brochure.
Select a color scheme that reflects who you are and what you do.
Use a consistent color scheme throughout your entire document.
Choose a color palette that does not overwhelm your viewer’s eyes.
Use the Rule of Three: Choose three main theme colors. The lightest color should be the
background color, and the other two colors should be used to break up the sections.
o If you need to add other colors, use different shades of your three main colors. This
will keep your document cohesive.
Use Illustrator’s Color Guide to use colors that complement each other.
o We will talk about this tool later in the workshop.
QR Codes
QR codes are visual displays that encode information like URLs. There are
mobile apps that will ―read‖ these codes and take you to the encoded online
location.
You can get a QR code for any url using sites like http://www.qrstuff.com/
Should you include a QR code on your business card, flyer, or brochure?
Business Cards: NO.
Flyers: Yes, if you have one.
Brochures: Yes, if you have one.
Version 1 (6/16/2014)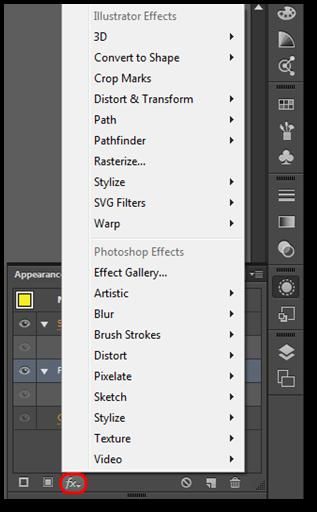
STC 6

Before You Begin: Organization and Structure
Before actually beginning in Illustrator, there are a few things you should do to make the design
process go smoothly.

   1. Gather all of your resources into a working folder on your computer. This will help you
      stay organized as you work on your project.

           a. Create a standardized naming structure for your files. Rename each file something
              that you will easily recognize and understand to save yourself time and
              frustration.

   2. Sketch out a basic outline of what you want to create.

           a. Your outline will help you stay on track and work towards a specific finished
              product, as opposed to aimlessly creating objects and hoping it all comes together
              well.

           b. Your outline can be as basic or as detailed as you need it to be.

                                                                            Version 1 (6/16/2014)
STC 7
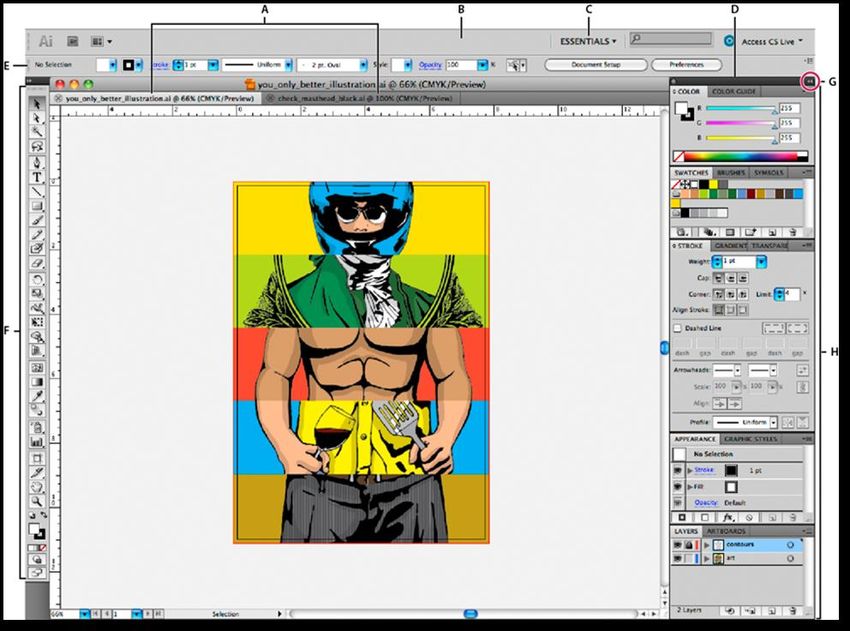
Workspace Overview
Figure 1
A. Tabbed Document windows
B. Application bar
C. Workspace switcher
D. Panel title bar
E. Control panel
F. Tools panel
G. Collapse To Icons button
H. Four panel groups in vertical dock
Version 1 (6/16/2014)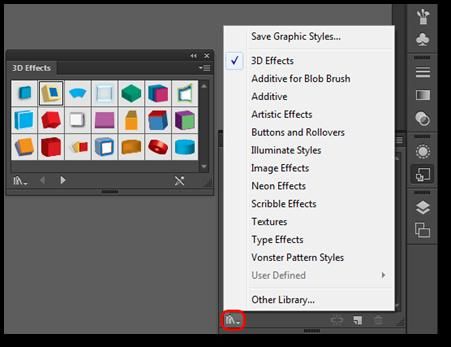
STC 8

Tools Panel Overview

You use tools in the Tools panel to create, select, and manipulate objects in Illustrator. These
tools let you use type, and select, paint, draw, sample, edit, and move images.

You can expand some tools to show hidden tools beneath them. To see the name of a tool,
position the pointer over it. A small triangle at the lower-right corner of the tool icon signals the
presence of hidden tools. View these hidden tools by right-clicking or clicking-and-holding on
the icon.

In this workshop, we will learn about a few key tools for creating flyers, brochures, and business
cards but it may be helpful for you to have a general overview of all of the other tools as well.

                                                                               Version 1 (6/16/2014)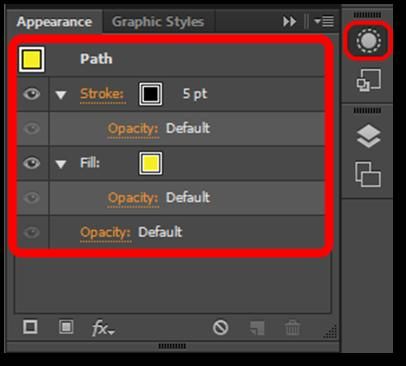
STC 9
Getting Started with Illustrator
Creating a New Document and Saving
IMPORTANT: It is important to continually save your document(s). Sometimes the program
might unexpectedly close or freeze, causing you to lose any unsaved changes. Saving often
can keep you from losing your work.
1. File > New
a. Or use the keyboard shortcut: (Windows) Ctrl+N — (Mac) Cmd+N.
2. File > Save or File > Save As.
a. Or use the keyboard shortcut: (Windows) Ctrl+S — (Mac) Cmd+S.
Adjusting the Artboard
You can customize the Artboard to fit the parameters of your project. The default size is
8.5‖x11‖ but you can adjust it to any size you want. When you open Illustrator and create a new
document, you have the option to change the size of the Artboard (See “Option 1” below). Even
after closing the New Document window, you can still change the size of the Artboard at any
time, and as many times as you want (See “Option 2” below).
To change the Artboard:
Option 1. Adjust it in the dialog box when
you open a New Document.
File/New.
Or use the keyboard shortcut: Ctrl+N
(Windows) or Cmd+N (Mac).
1. Name the file.
2. Be aware of the units. Make
sure to change it to inches.
3. Set the width and height to the
desired values.
Option 2. Click the icon of the box with crop
marks near the bottom on the left Menu Bar.
Version 1 (6/16/2014)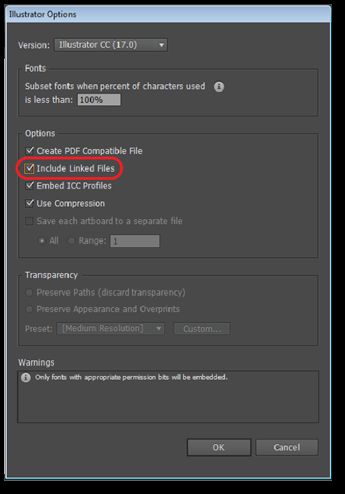
STC 10
1. Locate the dialogue boxes at the top of the page.
2. Input the desired value in the width (W) and height (H) boxes.
3. Finish adjusting by clicking on the Selection Tool.
Sizing
Flyers
Flyers can be any size you desire. Here at the STC, we create flyers that are 3.25
by 8.5 inch (a third of a standard sheet of paper) and 5.5 by 8.5 inch (half a
standard sheet).
Brochures
A standard type of brochure is an 8.5 x 11 inch trifold. This means that you have
six ―panels‖ in your brochure. When the brochure is unfolded, you have three
inside panels and three outside panels.
Business Cards
The standard business card size is 3.5 by 2 inches. Because business cards are
usually stored in standard holders or rolodexes, it is unadvisable to create a card
with a non-standard size.
Activity 1: Open a New Document and set the Artboard to the size you want.
Selection Tool
The Selection Tool selects entire objects and entire groups. Click or click-and-drag over any part
of an object and it will be selected. While using this tool you can scale objects (increase or
decrease in size) and rotate objects.
It can be turned on by:
Clicking the black arrow at the top left of the tools
panel.
Or use the keyboard shortcut: (v).
Notice the white squares (anchor points) around the perimeter of the object. Select any of those
points and drag/move it to where you want it.
Version 1 (6/16/2014)STC 11
Direct Selection Tool
The Direct Selection Tool allows you to select parts of an object, a segment, an individual anchor
point, or multiple points. When a point is selected, that point is filled while the other points
remain open.
It can be turned on by:
Clicking the white arrow on the top right of the tools panel.
Or use the keyboard shortcut: (a).
Activity 2: Using the Direct Selection Tool, click on your object, select a corner and
drag/move it to skew the shape.
Zooming
In Illustrator, you have a few different methods of zooming in and out. The easiest way to zoom
is to use the following keyboard shortcuts.
Effect Zoom In Zoom Out Fit Screen Actual Size*
Shortcut (Windows) Ctrl + (+) Ctrl + (-) Ctrl + (0) Ctrl + (1)
Shortcut (Mac) Cmd + (+) Cmd + (-) Cmd + (0) Cmd + (1)
*As the name implies, this will show the actual size of your document, but it will only be
exact if your monitor is calibrated correctly. This is a great way to check if your text is
large enough or if details of pictures are viewable.
Using Guides
Guides are very useful for helping you lay out and arrange objects on your document. Guide
lines can help you visualize where objects will be placed. You can place guides at the center
lines or create a ―Rule of Thirds‖ grid to help you visualize where objects should be aligned.
Version 1 (6/16/2014)STC 12
Guides also help you align text and graphic objects. Objects will snap align to a guide when they
are placed near it. Guides will not print; they are only visible inside of Illustrator to help you
align the contents of your document.
Create Guides
1. If the rulers aren’t showing, go to View/Rulers/Show Rulers (or use the keyboard
shortcut (Windows) Ctrl+R — (Mac) Cmd+R).
2. Position the pointer on the left ruler for a vertical guide or on the top ruler for a horizontal
guide.
3. Drag the guide into position.
Lock or Show/Hide Guides
1. To lock guides, select View/Guides/Lock Guides.
2. To show or hide guides, choose View/Guides/Show Guides or View/Guides/Hide Guides.
Adding Objects to Your Document
You will want to add objects to your document. There are a few different types of objects you
can easily add using Illustrator: shapes, text, freeform drawings, images, and charts.
Shape Tool
The Shape Tool allows you to draw shapes with a single click. By clicking and holding on the
icon, you can choose from a rectangle, circle, star, or other shapes. These shapes can be used for
backgrounds, added designs, or even text boxes.
It can be turned on by:
Clicking the rectangle icon on the left Menu Bar.
OR use the keyboard shortcut: (M).
To create a shape you can either:
With the Shape tool selected, Click-and-drag anywhere on the artboard. You will notice a
blue preview outline as you drag the cursor around the artboard. This is a preview to
show you where your shape will be located once you release your click. Release the
mouse button to create your shape.
OR with the Shape tool, click anywhere on the artboard and this dialog box will appear:
o Enter a height and width for your new shape and
press OK to create the shape or Cancel to close
the dialog box without creating a shape.
Version 1 (6/16/2014)STC 13
Activity 3: Use the Shape Tool to create various shapes on your artboard.
1. Locate the Shape Tool on the Menu Bar on the left side of the screen.
2. Click-and-hold on the icon.
3. From there, options for other shapes will show up (ex. Star, Flare, Eclipse...etc.).
4. Release the mouse on your desired shape.
5. Continue drawing.
Swatches Palette
The Swatches Palette is a collection of color swatches you can use to fill your objects or change
to color of a line or stroke. This palette should automatically appear when you open a new
document but in case it does not, you can turn it on by going to the top Menu Bar:
Window/Swatches.
This palette also allows you to create your own swatches, create new color groups, and lets you
browse through its mass library of swatch themes and groups.
At the bottom of the left Menu Bar there is a box that represents fill and a box outline that
represents stroke. Once you create a shape you can change the colors by clicking on either one
and applying a swatch. OR use the keyboard shortcut (x) to transition between the two.
Black fill with Black stroke with White fill with White stroke with
invisible invisible fill black stroke black fill
stroke
Activity 4: Use the Swatches Palette to change the fill and stroke of the shapes you created.
Adding a Background Color
Although it is okay to use the default white background for your document, you may wish to add
a different background color to spice it up. Background colors are a great way to make your
business card, flyer, or brochure more interesting. Adding a background color in Illustrator is a
different process than you may be used to in most other software.
1. Create a rectangle that covers the entire space of the artboard. (The rectangle will cover
up any other objects you have already created. Don’t worry about that for now; we will
fix it later.)
Version 1 (6/16/2014)STC 14
2. Using the swatches palette, choose a fill color that you want for your background.
a. PRECAUTION: Do not use busy backgrounds. Do not use multi-colored
gradients or backgrounds with clashing colors.
3. Send the shape to the back of your document.
a. Right-Click on the rectangle.
b. In the popup menu, select Arrange > Send to Back.
c. Now your rectangle will be placed underneath the rest of your content.
4. Once you are satisfied with your background’s color, you may want to lock the
background shape in place to avoid complication later.
a. Select your background shape.
b. Go to Objects in the Control Bar and choose Lock/Selection.
c. This will lock the shape in place so it cannot be accidentally moved or changed.
d. If at any point you feel like making changes to the background, you can go back
to Objects in the Control Panel and choose Unlock All to make the shape editable
again.
Activity 5: Add a background color to your document.
Type Tool
The Type Tool is an essential tool to use when creating a document. You can use it for titles,
captions, bodies of paragraphs, etc. The Type tool allows you to click-and-type, create text
boxes, type inside shapes as well as along paths (lines created with the Pen or Pencil Tool).
It can be turned on by:
Clicking the icon on the left Menu Bar (―T‖ located near the top).
Or use the keyboard shortcut: (t).
To create a single line of text (ex. title, subtitle…), simply click anywhere within the document
and start typing. A SINGLE LINE OF TEXT IS BEST USED for Headlines or Sub-headlines.
You can create another line by pressing (enter) or a soft return (Windows) (Shift+Enter) —
(Mac) (Shift+Return) to continue a sentence without creating a new line of text with a capital
letter.
To create a textbox, click-and-drag the mouse to the desired textbox size and start typing. The
text will remain within the boundary you have set and automatically create a new line when the
text reaches the horizontal length of your textbox.
Note: When pasting text from another source (like a Word document), do not paste it
straight onto the artboard. First, create a textbox and then paste the text into that textbox.
Otherwise, your text will not paste properly and will skew when you try to resize it.
Version 1 (6/16/2014)STC 15
To change the font size and typeface as well as the alignment (Left, Center, Right), open the
Character window:
Window/Type/Character.
Or use the keyboard shortcut: (Windows) Ctrl + T — (Mac) Cmd + T.
Note: A Red Box with a Plus Sign at the bottom right corner of your textbox means
there is hidden text. Either enlarge the textbox or shrink the font size to make that
hidden text visible [see below].
Activity 6: Create a Single line of text (Title) and type a sentence.
1. Go through the library in the Character palette and choose a typeface.
2. Change the font size.
Pencil Tool
The Pencil Tool lets you draw open and closed paths as if you were drawing with a pencil on
paper. Anchor points are set down as you draw with the Pencil Tool; you do not determine where
they are positioned. However, you can adjust them once the path is complete. If you hold down
the SHIFT key while drawing, you will create straight lines.
It can be turned on by:
Clicking the pencil icon on the left Menu Bar.
Or use the keyboard shortcut: (n).
When you turn on the Pencil Tool and begin to draw, make sure that you have turned the stroke
on–apply a color. If there is no stroke, only the outline of what you have drawn will appear. You
must change the stroke (line) in order to see it.
Placing an Image or Chart
To place an image into your document:
1. Go to File/Place.
2. Locate your file.
3. Click Place.
To place an Excel chart into Illustrator:
1. In Excel, copy the chart onto the clipboard by selecting it and pressing the keyboard
shortcut (Windows) Ctrl + C — (Mac) Cmd + C.
2. Inside of Illustrator, go to the Edit tab and select ―Paste‖.
3. Your chart will be placed into Illustrator and will be treated as an image.
Version 1 (6/16/2014)STC 16
Utilizing Important Features
Illustrator is full of useful features that will enhance your design. When designing a business
card, flyer, brochure, or logo, features like the Color Guide, Transparency, and Align are
extremely handy.
Color Guide
Illustrator’s Color Guide can help you select colors that complement each other. You can choose
one main color to use, and the Color Guide will give you several color palettes that work well
based on your main color.
The Color Guide can be found on the Right Menu Bar. It is the second icon from the top.
The Color Guide panel. Notice how the suggested colors change when the main color is changed.
Activity 7: 1. Select a main color to use in your document.
2. Click the dropdown menu in the Color Guide to view several suggested
Harmony Rules.
2. Use one of the Harmony Rules to recolor your project.
Transparency
The Transparency panel allows you to adjust the opacity of an object (or group of objects).
Adjusting the opacity allows light to pass through the object so that objects behind it can be seen
more distinctly.
It can be turned on by:
Window/Transparency.
Clicking on the icon of two overlapping circles on the right Menu Bar.
Activity 8: Change the Transparency of your background or any of your shapes you have
created.
Version 1 (6/16/2014)STC 17
Align
The Align panel allows you to align and distribute objects along the axis you specify. You can
use the objects anchor points, you can align to a selection, an artboard, or a key object as the
reference point.
In order to use the Align panel, you must:
1. Open the Align panel.
a. Window/Align.
2. Click the drop down of the Align panel.
3. Click Show Options.
Select the objects you wish to align.
a. Align Objects:
i. Horizontal Align Left, Center, Right.
ii. Vertical Align Top, Center, Bottom.
b. Distribute Objects:
i. Vertical Distribute Top, Center, Bottom.
ii. Horizontal Distribute Left, Center, Right.
c. Distribute Spacing:
i. Vertical Distribute Spacing.
ii. Horizontal Distribute Spacing.
d. Align To:
i. Selection, Key Object, Artboard.
Activity 9: Align objects on your artboard.
1. Use Horizontal Align Center, Vertical Align Center, and Align to Artboard for your
background.
2. Use Horizontal Align center with Align to Artboard to center your Title.
Appearance Panel
The Appearance panel will allow you to
manage complex shapes including text,
groups of objects, photographs, charts, and
other illustrations. Any object that ―appears‖
on your Artboard can be modified through the
Appearance panel.
The most common options used in the
Appearance panel are stroke, fill, and opacity.
Press Shift + F6 on your keyboard to access
the Appearance panel. Or, select the
Appearance panel icon from the right column
of toolbars.
Version 1 (6/16/2014)STC 18
Fill
1. Click on the Appearance panel icon in the column of toolbars as indicated on the far right
of the Illustrator workspace.
2. Click on the fill box (next to ―Fill‖) and select from the available colors. You can also
hold shift to access the expanded color options.
3. Click on the arrow next to ―Fill‖ to modify the opacity of your fill color.
Figure 2
Stroke
1. Click on the Appearance panel icon in the toolbars as indicated on the far right of the
Illustrator workspace.
2. Click on the stroke box (next to ―Stroke‖) and select your stroke color and also your
stroke width. Your stroke width determines the thickness of your object’s outline.
3. Click on the arrow next to ―Stroke‖ to modify the opacity of your stroke outline.
Effects
There are numerous special effects that you can apply to your object. These include, but are not
limited to, effects such as blurring your object, simulating a
watercolor, adding film grain, or artistic brush strokes.
1. In the Appearance panel, find and select the ―fx‖
icon. This will bring up the various effects option
(both from Illustrator and Photoshop).
2. Each effect will have its own separate set of
properties that you can modify.
a. To view a preview of all the effects, select
the ―Effect Gallery.‖
b. The effect settings can be modified at any
time provided that they were applied through
the Appearance panel.
Version 1 (6/16/2014)STC 19
Activity 10: Explore the Appearance panel and add some different effects to objects in your
document.
Adding/Changing Your Stack
The stack refers to the order of your various fills, strokes, and effect paths. Items at the top of the
stack have the highest priority, while items near the bottom have a lower priority. You can
change the appearance of an object by rearranging the order of elements in the stack.
1. In the Appearance panel, you can add a new fill, stroke, or effects path at any time you
choose.
2. You can clear, duplicate, and delete paths by selecting the indicated icons in the
Appearance panel.
3. Only paths that are at the top of the stack will be visible. To reorder your stack, click,
drag, and place your chosen stroke, fill, or effect to the appropriate level.
Graphic Styles
Styles allow you to create templates or guides from existing stacks (in the Appearance panel) or
objects. Using Graphic Styles will allow to replicate any illustration effects or color patterns
quickly and efficiently.
1. Click on the Graphic Styles icon
in the toolbars as indicated on the
far right of the Illustrator
workspace (below the
Appearance icon). This will open
the Graphic Styles panel.
2. To save a Graphic Style, select
an object with either the
Selection or Direct Selection
tool.
3. With your object selected and the
Graphic Styles open, click the
New Graphic Style icon to save
your Graphic Style.
Version 1 (6/16/2014)STC 20
4. To apply a Graphic Style, select your object with the Selection or Direct selection, then
select your chosen Graphic Style. You can switch between different Graphic Styles at any
time.
a. There are also various preset
Graphic Styles that you can
access through Graphic
Styles Libraries Menu by
clicking on the bottom left
icon of the Graphic Styles
panel.
The Graphic Styles Libraries Menu with “3D Effects” selected
Activity 11: Apply Graphic Styles to objects in your document. Feel free to explore the
Graphic Styles Libraries to find more styles you can apply.
Saving, Exporting, and Print Settings
Saving documents in Illustrator is a simple and straightforward process. The key decision is in
choosing an appropriate file format. First, we will discuss how to save an Illustrator project file
(ai). After that, a brief description of other available files types will be given.
Saving an Illustrator file (ai)
1. File > Save As.
2. Make sure the format is set to Adobe Illustrator (ai) (the
default file format).
3. In the field for File Name, type your Sac State username.
4. Click Save.
5. After pressing save, another window will appear, giving
you more save options. If you have any images or other
linked files, then you want to check the box that says
“Include Linked Files” before pressing OK. For this
Intro course, you can leave all the other options at their
default settings.
Version 1 (6/16/2014)STC 21
Various File Formats
The following file formats can be accessed using File > Save (or Save As).
Adobe Illustrator (*.AI) Illustrator project file. Choose this file format as your original
working file. In order to continue editing your document after
you have closed Illustrator, you must save in this file format.
Adobe PDF (*.PDF) Portable Document Format used to present a fixed non-editable
document. Choose this file format if you have finalized your
document and are seeking to print, publish, or share it.
Illustrator Template (*.AIT) Illustrator template file. Choose this file format if you seek to
use your document as a template for future projects.
The following file formats can be accessed using the File > Export option.
JPEG (*.JPG) Most common file format for digital photography and
illustrations. Choose this file format if you want to email, share,
or view your document as how it would appear online.
PNG (*.PNG) Similar to JPEG, though used for higher quality images at the
expense of overall file size and load times.
TIFF (*.TIFF) Most popular file format for graphic designers, artist, and
photographers. Used primarily for archiving or large format
poster printing. Retains the most quality though also produces
the largest file size.
Notes, Tips, and Common Issues
Moving Objects with Arrow Keys
To move units with more precision:
1. Select the object you want moved with the Selection Tool (black arrow).
2. Use the arrows on the keyboard (up, down, left, right) to move the object.
[Option] Press-and-hold (Shift) to increase the distance/movement 10 times.
The Perspective Grid
If you ever see an orange and blue
grid (like the one on the right) on
your screen and you wish to remove
it, press the keyboard shortcut Ctrl
+ Shift + I (Windows) or Cmd +
Shift + I (Mac) to make it disappear.
Version 1 (6/16/2014)STC 22
Skewed Text The Perspective Grid
Many students have issues with text in textboxes being skewed strangely and with Illustrator not
recognizing the letters as text. This problem is especially common when the text was pasted into
Illustrator from a different program.
To fix the problem, create a textbox in Illustrator. Next, go back to the text’s source file and copy
and paste the text into the textbox in Illustrator.
This issue can easily be avoided. When pasting text into Illustrator, always make sure to
place it in an already existing textbox.
Isolating Objects
If you double-click on an object with the Selection Tool (black arrow), Illustrator will enter
Isolation Mode. Isolation Mode makes it so only the selected object is able to be edited; no other
objects can be adjusted in this mode. When isolation mode is active, the isolated object appears
in full color, while the rest of the artwork appears dimmed.
If you ever have trouble with selecting objects or notice that many of the objects on the screen
are dimmer than they should be, you may have accidentally entered Isolation Mode. Don’t
worry, this happens a lot and is easy to fix. If you suspect you have unintentionally entered
Isolation Mode on an object, simply press the Escape Key (Esc) on your keyboard. If you were in
Isolation Mode, this would exit out and return to normal. If you were not in Isolation Mode, then
pressing (Esc) will have no effect.
Missing Linked Files
You may open your document on a different computer than you originally created it on and see
an error message about missing linked files. If this happens, any images or charts that you placed
on your document will not show up in Illustrator.
You can prevent this from happening or to fix the problem after it occurs. To do this, go back to
the computer where the images are saved and open up your Illustrator file. Re-save the .AI file
and this time check the Include Link Files option in the window that pops up after the save
window.
Conclusion
You now have the technical skills and the knowledge of how to create successful and eye-
catching flyers, brochures, and business cards. You learned standard design principles and best
practices for your flyers, brochures, and business cards. You understand the Illustrator
workspace, tools, and panels. You know how to create custom designs using shapes, freeform
drawings, pictures, and effects. You are ready to create your own custom flyers, brochures, and
business cards.
Version 1 (6/16/2014)You can also read