BLACKBERRY ATHOC SIRCOM INSTALLATION AND CONFIGURATION GUIDE - LAST PUBLISHED: JULY 2019 - BLACKBERRY DOCS
←
→
Page content transcription
If your browser does not render page correctly, please read the page content below

BlackBerry AtHoc
SiRcom Installation and Configuration Guide
Last Published: July 2019
2019-07-11Z

       | |2
Contents

Getting started.................................................................................................. 4

Product requirements....................................................................................... 5
      Hardware requirements......................................................................................................................................... 5
      Software requirements...........................................................................................................................................5

Enable the SiRcom gateway on the BlackBerry AtHoc application server........... 6
      Prerequisites to enable SiRcom gateway.............................................................................................................6
      Configure the SiRcom delivery gateway...............................................................................................................6
      Configure the SiRcom device................................................................................................................................ 6

Setting up mass device endpoints (targets)...................................................... 8
      Create mass device zone and pole endpoints.....................................................................................................8
      Create mass device key endpoints.......................................................................................................................8
            Create the ATHOC-GV-KEYS attribute XML configuration.......................................................................8
            Create the key mass device endpoint.....................................................................................................10

Create and publish a SiRcom Giant Voice alert template................................. 11
      Publish and verify a test alert template............................................................................................................. 11

Configure IIM IP connectivity.......................................................................... 13
      Prerequisites for IIM IP configuration................................................................................................................ 13
             Find required information for IIM IP configuration................................................................................ 13
      Check IIM connectivity to SiRcom using heartbeats........................................................................................ 14
      Configure IIM environment parameters............................................................................................................. 15
      Restart the CapCon service.................................................................................................................................16
      Verify connectivity between the CapCon console and BlackBerry AtHoc....................................................... 17
      Troubleshoot the configuration...........................................................................................................................17

BlackBerry AtHoc customer portal.................................................................. 19

Legal notice.................................................................................................... 20

                                                                                                                                                                          | | iii
Getting started
The BlackBerry AtHoc management system uses the IIM add-on module interface with Giant Voice (GV)
outdoor warning devices to enable wide area Mass Notification System (MNS) broadcasts. Giant Voice
features can broadcast critical information using voice messages, wave files, musical tones, or text-to-speech
(TTS) conversion. This guide describes the AtHoc interoperability using the AtHoc IP Integration Module
(IIM) utilizing the OASIS Common Alerting Protocol (CAP) 1.2 standard. This ability via non-IP means, will
combine the AtHoc network-centric enterprise alerting capabilities with SiRcom Giant Voice notification systems,
while integrating over non IP interfaces.
After the BlackBerry AtHoc management system is integrated with the SiRcom Giant Voice System, operators
can disseminate emergency alerts to the siren system from the BlackBerry AtHoc management console. Alert
messages can be delivered using key functions programmed in the SiRcom Giant Voice hardware or software,
text-to-speech or pre-recorded audio files to dynamically selected targets. Targeting choices are All Poles
simultaneously, individual Zones of poles, and Poles.
The BlackBerry AtHoc integration with SiRcom voice notification systems provides the following capabilities:
• Enable BlackBerry AtHoc to activate emergency notifications in SiRcom Voice notification systems.
• End previously activated messages.
• Monitor the connectivity status to the SiRcom Giant Voice notification system and view its operational
states: All operational, partially operational (degraded), and failure.
• If applicable, provide high availability configurations.
| Getting started | 4Product requirements
This section describes the hardware and software requirements to install and configure the SiRcom Giant Voice
system.
Hardware requirements
• SiRcom SMART Alert (SiSA) v2.0.2 or higher
• 64 bit Processor
• 1.60 GHz CPU
• 4.00 GB RAM
Software requirements
• Windows Server 2012 R2
• Capnode build 10057 or later
| Product requirements | 5Enable the SiRcom gateway on the BlackBerry
AtHoc application server
The device configurator helps to install delivery gateways and enable corresponding SiRcom devices. Here, you
will enable the gateways for the target organizations through the Administration > Setup page.
1. Log in to the BlackBerry AtHoc application server as an administrator.
2. Navigate to and run
the AtHoc.Applications.Tools.InstallPackage.exe file.
3. In the Configure Device Support screen, select SiRcom to make it available in BlackBerry AtHoc.
4. Click Enable.
5. In the pop-up window, click OK to complete the installation.
6. Click Close.
Prerequisites to enable SiRcom gateway
• Configure the SiRcom gateway in the settings section of the BlackBerry AtHoc management system to
enable BlackBerry AtHoc to publish alerts through SiRcom Giant Voice.
• Log in to the BlackBerry AtHoc management console and check the Delivery Gateways section to verify that
the SiRcom device gateway has been installed. If it is installed, skip this section.
Configure the SiRcom delivery gateway
1. Log in to the BlackBerry AtHoc management system as an administrator.
2. Click .
3. In the Devices section, select SiRcom.
4. On the SiRcom page, click Copy default settings.
5. In the CAP Parameter Defaults section, verify that the Sender field is BlackBerry AtHoc Alerts.
If the Sender field contains invalid sender information, it will display an error asking to enter the name of a
sender.
6. Click Save.
Configure the SiRcom device
1. Log in to the BlackBerry AtHoc management system as an administrator.
2. Click .
3. In the Devices section, click Devices
4. In the Search field, search for SiRcom.
5. Click the SiRcom device that you want to edit.
6. On the SiRcom page, click Edit.
7. In the Name field, enter SiRcom.
8. In the Common Name field, enter IIM-SERIAL-GIANT-VOICE.
| Enable the SiRcom gateway on the BlackBerry AtHoc application server | 69. In the Device Group Order drop-down list, select 1 for a single device or 10 for a group of devices.
10.In the Contact Info Editing drop-down list, select All so that operators and end users can edit contact
information in Self Service.
Note: To navigate to Self Service, click . On the Settings page, click General Settings. Then, click the
URL, https:///SelfService/, that is displayed in the User
Login field.
11. Select Users must provide contact info for this Device in Self Service.
12.In the Targeting Help Text section, enter You are targeting a SiRcom device. Please make sure the endpoints
selection is in compliance with vendor specifications.
13.In the Contact Info Help Text, enter text to help user understand format or any specific details that they need
to know. For example, type "When you enter characters into caller ID field, use only letters and numbers."
14.In the Contact Info Tool Tip, enter text for contact information. For example, type "Enter a valid 10-digit phone
number."
15.In the Delivery Gateway section, select SiRcom from the drop-down list.
16.Click Configure.
17.By default, the configuration value appears in the text-entry field. If the text-entry field is empty, complete the
following steps:
a) Click Remove.
b) Select SiRcom from the list again.
c) Click Configure.
d) Copy the following code text into the
field:SERIALGV0211000011falseGiantVoice
18.Click Save.
19.Click Return to Device Manager.
20.If the status is Disabled, select SiRCom.
21.Click Enable.
| Enable the SiRcom gateway on the BlackBerry AtHoc application server | 7Setting up mass device endpoints (targets)
To create a speaker pole, zone, or an all-poles user, complete the normal mass device endpoint creation flow. You
should give an endpoint a functionally descriptive name so that it is recognizable in the End User Manager and
Report Windows as a mass communication device target entity.
Note: An operator must target either a single GV Group (Zone) or multiple GV Towers (Poles) in the alert.
Otherwise, publishing to SiRcom GV can fail and you may get errors.
Create mass device zone and pole endpoints
1. Log in to the BlackBerry AtHoc management system as an administrator.
2. Click .
3. In the Devices section, click Mass Devices Endpoints.
4. On the Mass Device Endpoints screen, click New.
5. Select SiRcom from the list.
6. On the New Mass Device Endpoint screen, in the Endpoint Name field, enter a name.
7. To create a new endpoint for a pole, complete the following steps:
a) In the Configuration section, select the Pole option for Giant Voice type.
b) In the Address field, enter P, C2.
8. To create a new endpoint for a zone, complete the following steps:
a) In the Configuration section, select the Zone option for Giant Voice type.
b) In the Address field, enter Z,1.
9. Click Save.
Create mass device key endpoints
To create the object that displays the list of keys associated with SiRcom Giant Voice system, complete the
following tasks:
• Create the ATHOC-GV-KEYS attribute XML configuration
• Create the key mass device endpoint
Create the ATHOC-GV-KEYS attribute XML configuration
This section describes how to create the key user ATHOC-GV-KEYS attribute configuration. The key name and
description parameters cannot contain spaces or any of the following characters:
' ! $ % ^ ( ) = { } , ; : ? " < > |The Giant Voice key you have
selected on the previous page already has Giant Voice poles and zones targeted,
but you can override them by targeting different zones in the Targeting area just
below.
The Giant Voice key you have
selected on the previous page does not have any targeting information built in,
and will require you to target at least one Giant Voice pole or zone below.
Message 1
Message 2
Message 2
Message 2
Message 3
Message 3
Message 4
Message 4
Message 5
Message 5
Message 6
Message 6
Message 7
Message 7
Message 8
Message 8
Biological Agent
| Setting up mass device endpoints (targets) | 9Biological Agent
Create the key mass device endpoint
1. Log in to the BlackBerry AtHoc management system as an administrator.
2. Click .
3. In the Devices section, click Mass Device Endpoints.
4. Click New and select SiRcom from the list.
5. In the General section, enter a endpoint name and display name.
6. In the Configuration section, select Key for Giant Voice Type.
7. In the Giant Voice Key field, copy the Key XML configuration.
8. In the Address field, K should be auto-populated.
9. Click Save.
| Setting up mass device endpoints (targets) | 10Create and publish a SiRcom Giant Voice alert template
Before you begin:
• Before you start sending test alerts through SiRcom Giant Voice devices, consider the impact it has on
everyone within hearing distance of the poles you are using during the test.
• This process assumes that the IIM is not configured to download data from the BlackBerry
AtHoc management server and is not connected to the giant voice equipment.
• Consult with your POC as to the acceptable content of the test alert. For example, the word "test" should
appear at, or very near to, the start of the broadcast message.
• Although the initial use of this template is to test the data creation process, this template can be used during
the audio tuning phase after the IIM and Giant Voice hardware are connected.
To confirm that the SiRcom Giant Voice device is installed correctly on the BlackBerry AtHoc management
system, create a template.
1. Log in to the BlackBerry AtHoc management system as an administrator.
2. Click Alerts > Alert Templates.
3. Click New.
4. In the Alert Template section, enter a template name and description.
5. Select a folder from the Folder list.
6. Select the Available for quick publish check box.
7. In the Content section, enter the title and content of the alert.
8. In the Mass Devices section, select SiRcom.
9. Select one or more Mass Alert Endpoints from the list.
10.Click the Options link in the top right corner of the Mass Devices section.
11.In the Mass Devices Options screen, select Text to Speech and Alert Body or Custom Text.
12.Click Apply.
13.In the Schedule section, change the Alert Duration to 15 minutes.
14.Click Save.
15.Click .
16.Find the alert template you just created in the Quick Publish section.
17.Click Review and Publish.
18.Review the settings and selections and click Publish.
Publish and verify a test alert template
Before you begin:
• You must have administrator access to test this alert template before publishing an actual alert.
• Before you start sending test alerts through SiRcom GV system, consider the impact on everyone within
hearing distance of the poles you are using during the test.
• Consult with your POC as to the acceptable content, user targeting, and device selection of the pretest
notification.
To create a template that targets end users using desktop pop-up, email, and messages to other devices to inform
them of a Giant Voice System test, complete the following steps:
1. Log in to the BlackBerry AtHoc management system as an administrator.
| Create and publish a SiRcom Giant Voice alert template | 112. Click Alerts > Alert Templates.
3. Click New.
4. In the Alert Template section, enter a Template Name and Description.
5. Select a folder from the Folder list.
6. Select Test if available.
7. Select the Available for quick publish and Available for mobile publishing check boxes.
8. Select Informational from the Severity list and Other from the Type list.
9. In the Content section, enter an Alert Title (can be the same as the template name) and enter the text to be
read by the text-to-speech in the Alert Body field. The Body should contain the details of the testing with
information such as the time testing will start and finish and any actions that should be taken as a result.
10.In the Target Users section, select the appropriate targeting group, individual users, or query to send the
pretest notification to.
11.Click Select Personal Devices, select the Desktop App and Email-Personal check boxes.
12.Click Options in the top right corner of the Personal Devices section.
13.In the Personal Device Options screen, select App Template and App Audio options from the list.
14.Click Apply.
15.In the Schedule section, change the Alert Duration to the expected duration of the testing.
16.Click Save.
17.Click .
18.In the Quick Publish section, find the Giant Voice System Test Notification template and click Review and
Publish.
19.Review the settings and selections.
20.Click Publish.
21.To verify that the alert was published correctly, observe the receipt of desktop pop-up or email messages on
the POC workstation.
| Create and publish a SiRcom Giant Voice alert template | 12Configure IIM IP connectivity
This section describes how to configure the IP Integration Module (IIM) to communicate with SiRcom.
Prerequisites for IIM IP configuration
The BlackBerry AtHoc IIM allows legacy or traditional non-IP based devices to be triggered from the BlackBerry
AtHoc management system. It operates with BlackBerry AtHoc using the Common Alerting Protocol (CAP) to
communicate with SiRcom using a serial interface.
Before you perform any tasks, ensure that the following prerequisites have been met.
Complete Requirement
Install and configure the latest Generic Serial System
device package.
Install and configure the latest Capnode package to
work as part of the BlackBerry AtHoc system.
Verify that you have the BlackBerry AtHoc system
base URL.
Verify that you have the BlackBerry
AtHoc organization ID.
Verify that you have the customer's proxy server and
port information (if applicable).
Note: IIM must be able to communicate with the BlackBerry AtHoc server to download the CAP packets.
Find required information for IIM IP configuration
Before you begin:
1. Use a local computer to log in to your local instance of the BlackBerry AtHoc management console. The URL
can be a base “https” address used to access a specific system.
Note: You can obtain the URL of the system from the local system administrator or from the BlackBerry
AtHoc customer support team.
2. Launch the BlackBerry AtHoc management console. The URL from the “https” to the last character before the
third forward slash (/) is the “base URL” of the system. For example, in the following URL, the full URL for the
sign-on page is: https:///client/auth/login?ReturnUrl=%2fclient%2fathoc-
iws. The “base-URL” of the system is https://domain-name.
3. The organization ID is a 7 or 8-digit numerical identifier of the specific system of that customer.
a. To obtain this organization ID, log in to the BlackBerry AtHoc management system for the customer. Once
logged in, you can find the system’s organization ID at the top right of the Home Page of the system.
4. Navigate to the settings page of the browser and determine if you are using any type of Proxy server for
routing internet traffic. For example, if the browser you are using is Microsoft Internet Explorer (IE), go to
the LAN settings, in Internet Explorer, and select Tools > Internet Options. On the Internet Options screen,
| Configure IIM IP connectivity | 13click the Connections tab. At the bottom of the window, click LAN settings. In the Proxy Server section,
click Advanced. The Proxy Settings screen displays the Proxy Server Address.
Note: Record the proxy server address and the port number.
5. Close the settings windows and exit Internet Explorer.
Note: It is also possible that your Internet Explorer instance may not use proxy servers. If this is the case,
when you click the LAN settings button, no proxy server is used for internet traffic on this network. The proxy
settings will be set to Automatically detect settings.
Check IIM connectivity to SiRcom using heartbeats
IIM sends a communication check (heartbeat) to SiRcom at a regular interval to verify connectivity.
When SiRcom receives the communication from the IIM, it responds by sending a CAP XML payload file. The sent
and received heartbeat files are saved in the capnode folder on your local computer. Once a day, these files are
put into a .zip file and stored in the capnode/archiveGenericSerialCAPMessage folder.
The rate of the communication check can be configured by
setting SirenCentralDeiverGenericSerial.HBFrequency parameter in
the system_private.config file.
Note: The SirenCentralEncoder.RemoteComPort.BaudRate parameter in
the system_private.config file must be set to to 9600 for the heartbeat communication check to function.
To check the current connectivity between BlackBerry AtHoc to SiRcom, view the current heartbeats:
1. Go to the capnode/CAPSentToGenericSerial folder on your local computer.
2. Double click to open the CAPSentToGenericSerial file for the heartbeat XML file you want to view. Each file
name includes the date of the heartbeat.
3. Go to capnode/CapAlertsReceivedFromGenericSerial folder on your local computer.
4. Double click to open the CapAlertsReceivedFromGenericSerial file for the heartbeat XML file you want to view.
Each file name includes the date of the heartbeat.
To check the past connectivity between BlackBerry AtHoc to SiRcom, view past heartbeats:
1. Go to the capnode/archieveGenericSerialCAPMessage folder on your local computer.
2. Double click to open the CAPSentToGenericSerial .zip file for the heartbeat XML file you want to view.
Each .zip file name includes the date of the heartbeat.
3. Go to capnode/archieveGenericSerialCAPMessage folder on your local computer.
4. Double click to open the .zip CapAlertsReceivedFromGenericSerial file for the heartbeat XML file you want to
view. Each .zip file name includes the date of the heartbeat.
The following is a sample heartbeat sent from IIM to SiRcom:
HB !--A unique identifier generated by BlackBerry
AtHoc.
ATHOC !--Sender identity, from BlackBerry AtHoc.
2019-06-28T09:39:07 !--Date and time of message origination.
System
Alert
Private
| Configure IIM IP connectivity | 14If the SiRcom giant voice system is active and fully operational, it responds with the following payload:
SIRCOM_GV_|unique-id !--A unique identifier generated
by SiRcom.
SIRCOM !--Sender identity, from SiRcom.
2019-06-28T09:40:07 !--Date and time of message origination.
System
Ack
Private
ATHOC,HB,2019-06-28T09:39:07 !--Information about the
original message; sender, identifier and time sent.
If the SiRcom giant voice system is active but not fully operational (in a failed or error condition), it responds with
the following payload:
SIRCOM_GV_|unique-id !--A unique identifier generated
by SiRcom.
SIRCOM !--Sender identity, from SiRcom.
2019-06-28T09:40:07 !--Date and time of message origination.
System
Error
Private
Text describing the error.
ATHOC,HB,2019-06-28T09:39:07
The node describes the error conditions of the SiRcom giant voice system:
• NOT-ACTIVE: The SiRcom giant voice system is not active.
• NOT-OPERATIONAL, : The SiRcom giant voice system is not operational due to an error.
• DEGRADED, : The SiRcom giant voice system is operational, but its functionality is degraded.
Note: If the node indicates an error, contact BlackBerry AtHoc customer support.
Configure IIM environment parameters
The most common file you can modify is the system_private.config file. This file is used to
configure the operational environment parameters, as well as the TTS parameters, of IIM. To configure
the system_private.config file, complete the following steps:
1. Open Microsoft Notepad as an administrator.
2. Click File > Open.
3. Navigate to C:\Program Files\capnode and change the file selection from “Text Documents (*.txt)” to “All
Files (*.*)”.
4. Select the system_private.config file.
5. Click Open.
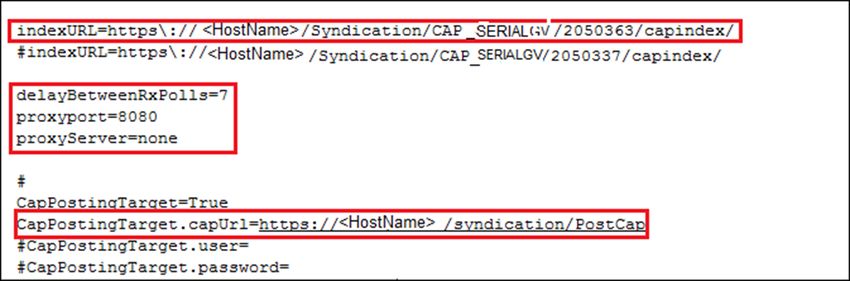
6. Verify the following items in the system_private.config file:
a) The indexURL variable should be formatted similar to the System Private Config XML figure shown below
with highlighted indexURL. The base URL should be followed by “/syndication/”, then the device
| Configure IIM IP connectivity | 15gateway protocol ID. For example, CAP_SERIALGV for a Generic Serial system, the organization ID number,
followed by "/capindex".
b) The “#” at the beginning of a line in the system_private.config file is used to comment out or null out
an unused line. The “#” should be removed from a line to use the variable.
7. Enter the proxy server and proxy port information you collected earlier in the proxyServer and proxyPort
parameters. If the settings on the machine that you tested with are set for “Automatic” in the proxy settings,
the settings for those two lines displays as follows:
• proxyServer=none
• proxyPort=8080
8. Update the CapPostingTarget variables to reflect the correct URL using the same base URL as in
the indexURL variable.
9. The following GenericSerial COM Port settings are default values and should be changed if the com port
settings on your IIM are different:
SirenCentralEncoder.RemoteComPort.monitorRelayInputs=no
SirenCentralEncoder.RemoteComPort.BaudRate=9600
SirenCentralEncoder.RemoteComPort.DataBits=8
SirenCentralEncoder.RemoteComPort.StopBits=1
SirenCentralEncoder.RemoteComPort.Parity=n
SirenCentralEncoder.RemoteComPort.Port=COM7
SirenCentralEncoder.RemoteComPort.FlowControl=none
Note: The SirenCentralEncoder.RemoteComPort.BaudRate must be set to 9600 for communication checks
(heartbeats) between BlackBerry AtHoc and SiRcom to be exchanged successfully.
10.Configure the GenericSerial SirenCentralDriverGenericSerial.HBFrequency parameter to set the
frequency, in milliseconds, of heartbeat communication checks between IIM and SiRcom. The default is 30000
(30 seconds.)
11.Click File > Save. Close the system_private.config file.
12.Restart CapCon console service.
For more information about restarting CapCon services, see Restart the CapCon service.
Restart the CapCon service
If you make changes to the configuration file or properties file, you must restart the CapCon services on the IIM to
apply the changes.
1. Navigate to your IIM system.
2. Go to Start > Run > Services.
| Configure IIM IP connectivity | 163. Launch an instance of the Services application (there should be a quick-launch icon in the taskbar of the
desktop).
4. In the Services (Local) section, scroll down to the IIM CapCon Service.
5. Right-click the CapCon Services row and select either Restart or Stop.
6. Right-click the CapCon Service again and click Start.
Verify connectivity between the CapCon console and BlackBerry
AtHoc
1. Log in to the IIM console as an administrator. The CapCon Console loads automatically. The data in
the CapCon System Activity console polls at the rate set by thedelayBetweenRXpolls=7 variable in
the system_private.config file. The default setting is 7 seconds. A message indicates the total number
of items in the index. The index number is the number of active alerts on the BlackBerry AtHoc system at that
time.
2. Verify that the IIM console does not show any new errors. You will see any errors displayed in the CapCon
system Errors/Exceptions/Warnings in the console area.
3. Verify that the console icon in the task tray appears green, indicating that the connectivity between the IIM and
the BlackBerry AtHoc Alerts system is good.
Troubleshoot the configuration
If the CapCon System activity console indicates anything other than a total number of items in the index and a
number, or if the CapCon System Errors/Exceptions/Warnings console has content in a red color, it indicates that
the configuration has not been executed correctly.
1. If the BlackBerry AtHoc management system (for example, https://athoc-iws) is
available on Internet Explorer on a local computer, then the indexURL should also be available.
a. Enter SiRcom Giant Voice System Integration Guide's indexURL in the browser. For example, https://
/syndication/cap_ SERIALGV_2060520/capindex. If there are no items in the
syndication feed, an XML message similar to the following image should be displayed:
2. If there are items in the feed, an XML message similar to the following image should be displayed.
| Configure IIM IP connectivity | 173. If connectivity is still not good, try commenting out the proxyServer and proxyPort variables.
4. If an HTTP or HTTPS error is displayed instead of XML, this may indicate a firewall or certificate issue or a
configuration problem with the BlackBerry AtHoc server syndication folder or sub-folders.
5. Check the indexURL and proxy settings in the system_private.config file for any misspellings.
6. If any line have been misspelled, repeat the configuration steps above.
7. Check the capnodelog file for errors. Right-click IIM to Open Windows Explorer.
8. Click the Start button and navigate to C:/Program Files/capnode/capnodelogs and open
the capnode.log file with Notepad. Browse the file to find the time that the indexURL was changed and the
CapCon service restarted.
9. Contact BlackBerry AtHoc technical support. Be prepared to provide the system_
private.config and capnode.log files and screen shots of the console screen and the BlackBerry
AtHoc management console pages.
| Configure IIM IP connectivity | 18BlackBerry AtHoc customer portal
BlackBerry AtHoc customers can obtain more information about BlackBerry AtHoc products or get answers to
questions about their BlackBerry AtHoc systems through the Customer Portal:
https://support.athoc.com/customer-support-portal.html
The BlackBerry AtHoc Customer Portal also provides support via computer-based training, operator checklists,
best practice resources, reference manuals, and users guides.
| BlackBerry AtHoc customer portal | 19Legal notice
©2019 BlackBerry Limited. Trademarks, including but not limited to BLACKBERRY, BBM, BES, EMBLEM Design,
ATHOC, MOVIRTU and SECUSMART are the trademarks or registered trademarks of BlackBerry Limited, its
subsidiaries and/or affiliates, used under license, and the exclusive rights to such trademarks are expressly
reserved. All other trademarks are the property of their respective owners.
This documentation including all documentation incorporated by reference herein such as documentation
provided or made available on the BlackBerry website provided or made accessible "AS IS" and "AS AVAILABLE"
and without condition, endorsement, guarantee, representation, or warranty of any kind by BlackBerry Limited and
its affiliated companies ("BlackBerry") and BlackBerry assumes no responsibility for any typographical, technical,
or other inaccuracies, errors, or omissions in this documentation. In order to protect BlackBerry proprietary and
confidential information and/or trade secrets, this documentation may describe some aspects of BlackBerry
technology in generalized terms. BlackBerry reserves the right to periodically change information that is contained
in this documentation; however, BlackBerry makes no commitment to provide any such changes, updates,
enhancements, or other additions to this documentation to you in a timely manner or at all.
This documentation might contain references to third-party sources of information, hardware or software,
products or services including components and content such as content protected by copyright and/or third-
party websites (collectively the "Third Party Products and Services"). BlackBerry does not control, and is not
responsible for, any Third Party Products and Services including, without limitation the content, accuracy,
copyright compliance, compatibility, performance, trustworthiness, legality, decency, links, or any other aspect
of Third Party Products and Services. The inclusion of a reference to Third Party Products and Services in this
documentation does not imply endorsement by BlackBerry of the Third Party Products and Services or the third
party in any way.
EXCEPT TO THE EXTENT SPECIFICALLY PROHIBITED BY APPLICABLE LAW IN YOUR JURISDICTION, ALL
CONDITIONS, ENDORSEMENTS, GUARANTEES, REPRESENTATIONS, OR WARRANTIES OF ANY KIND, EXPRESS
OR IMPLIED, INCLUDING WITHOUT LIMITATION, ANY CONDITIONS, ENDORSEMENTS, GUARANTEES,
REPRESENTATIONS OR WARRANTIES OF DURABILITY, FITNESS FOR A PARTICULAR PURPOSE OR USE,
MERCHANTABILITY, MERCHANTABLE QUALITY, NON-INFRINGEMENT, SATISFACTORY QUALITY, OR TITLE, OR
ARISING FROM A STATUTE OR CUSTOM OR A COURSE OF DEALING OR USAGE OF TRADE, OR RELATED TO THE
DOCUMENTATION OR ITS USE, OR PERFORMANCE OR NON-PERFORMANCE OF ANY SOFTWARE, HARDWARE,
SERVICE, OR ANY THIRD PARTY PRODUCTS AND SERVICES REFERENCED HEREIN, ARE HEREBY EXCLUDED.
YOU MAY ALSO HAVE OTHER RIGHTS THAT VARY BY STATE OR PROVINCE. SOME JURISDICTIONS MAY
NOT ALLOW THE EXCLUSION OR LIMITATION OF IMPLIED WARRANTIES AND CONDITIONS. TO THE EXTENT
PERMITTED BY LAW, ANY IMPLIED WARRANTIES OR CONDITIONS RELATING TO THE DOCUMENTATION TO
THE EXTENT THEY CANNOT BE EXCLUDED AS SET OUT ABOVE, BUT CAN BE LIMITED, ARE HEREBY LIMITED TO
NINETY (90) DAYS FROM THE DATE YOU FIRST ACQUIRED THE DOCUMENTATION OR THE ITEM THAT IS THE
SUBJECT OF THE CLAIM.
TO THE MAXIMUM EXTENT PERMITTED BY APPLICABLE LAW IN YOUR JURISDICTION, IN NO EVENT SHALL
BLACKBERRY BE LIABLE FOR ANY TYPE OF DAMAGES RELATED TO THIS DOCUMENTATION OR ITS USE,
OR PERFORMANCE OR NON-PERFORMANCE OF ANY SOFTWARE, HARDWARE, SERVICE, OR ANY THIRD
PARTY PRODUCTS AND SERVICES REFERENCED HEREIN INCLUDING WITHOUT LIMITATION ANY OF THE
FOLLOWING DAMAGES: DIRECT, CONSEQUENTIAL, EXEMPLARY, INCIDENTAL, INDIRECT, SPECIAL, PUNITIVE,
OR AGGRAVATED DAMAGES, DAMAGES FOR LOSS OF PROFITS OR REVENUES, FAILURE TO REALIZE ANY
EXPECTED SAVINGS, BUSINESS INTERRUPTION, LOSS OF BUSINESS INFORMATION, LOSS OF BUSINESS
OPPORTUNITY, OR CORRUPTION OR LOSS OF DATA, FAILURES TO TRANSMIT OR RECEIVE ANY DATA,
PROBLEMS ASSOCIATED WITH ANY APPLICATIONS USED IN CONJUNCTION WITH BLACKBERRY PRODUCTS OR
SERVICES, DOWNTIME COSTS, LOSS OF THE USE OF BLACKBERRY PRODUCTS OR SERVICES OR ANY PORTION
THEREOF OR OF ANY AIRTIME SERVICES, COST OF SUBSTITUTE GOODS, COSTS OF COVER, FACILITIES OR
SERVICES, COST OF CAPITAL, OR OTHER SIMILAR PECUNIARY LOSSES, WHETHER OR NOT SUCH DAMAGES
| Legal notice | 20WERE FORESEEN OR UNFORESEEN, AND EVEN IF BLACKBERRY HAS BEEN ADVISED OF THE POSSIBILITY OF
SUCH DAMAGES.
TO THE MAXIMUM EXTENT PERMITTED BY APPLICABLE LAW IN YOUR JURISDICTION, BLACKBERRY SHALL
HAVE NO OTHER OBLIGATION, DUTY, OR LIABILITY WHATSOEVER IN CONTRACT, TORT, OR OTHERWISE TO
YOU INCLUDING ANY LIABILITY FOR NEGLIGENCE OR STRICT LIABILITY.
THE LIMITATIONS, EXCLUSIONS, AND DISCLAIMERS HEREIN SHALL APPLY: (A) IRRESPECTIVE OF THE NATURE
OF THE CAUSE OF ACTION, DEMAND, OR ACTION BY YOU INCLUDING BUT NOT LIMITED TO BREACH OF
CONTRACT, NEGLIGENCE, TORT, STRICT LIABILITY OR ANY OTHER LEGAL THEORY AND SHALL SURVIVE A
FUNDAMENTAL BREACH OR BREACHES OR THE FAILURE OF THE ESSENTIAL PURPOSE OF THIS AGREEMENT
OR OF ANY REMEDY CONTAINED HEREIN; AND (B) TO BLACKBERRY AND ITS AFFILIATED COMPANIES, THEIR
SUCCESSORS, ASSIGNS, AGENTS, SUPPLIERS (INCLUDING AIRTIME SERVICE PROVIDERS), AUTHORIZED
BLACKBERRY DISTRIBUTORS (ALSO INCLUDING AIRTIME SERVICE PROVIDERS) AND THEIR RESPECTIVE
DIRECTORS, EMPLOYEES, AND INDEPENDENT CONTRACTORS.
IN ADDITION TO THE LIMITATIONS AND EXCLUSIONS SET OUT ABOVE, IN NO EVENT SHALL ANY DIRECTOR,
EMPLOYEE, AGENT, DISTRIBUTOR, SUPPLIER, INDEPENDENT CONTRACTOR OF BLACKBERRY OR ANY
AFFILIATES OF BLACKBERRY HAVE ANY LIABILITY ARISING FROM OR RELATED TO THE DOCUMENTATION.
Prior to subscribing for, installing, or using any Third Party Products and Services, it is your responsibility to
ensure that your airtime service provider has agreed to support all of their features. Some airtime service
providers might not offer Internet browsing functionality with a subscription to the BlackBerry® Internet Service.
Check with your service provider for availability, roaming arrangements, service plans and features. Installation
or use of Third Party Products and Services with BlackBerry's products and services may require one or more
patent, trademark, copyright, or other licenses in order to avoid infringement or violation of third party rights. You
are solely responsible for determining whether to use Third Party Products and Services and if any third party
licenses are required to do so. If required you are responsible for acquiring them. You should not install or use
Third Party Products and Services until all necessary licenses have been acquired. Any Third Party Products and
Services that are provided with BlackBerry's products and services are provided as a convenience to you and are
provided "AS IS" with no express or implied conditions, endorsements, guarantees, representations, or warranties
of any kind by BlackBerry and BlackBerry assumes no liability whatsoever, in relation thereto. Your use of Third
Party Products and Services shall be governed by and subject to you agreeing to the terms of separate licenses
and other agreements applicable thereto with third parties, except to the extent expressly covered by a license or
other agreement with BlackBerry.
The terms of use of any BlackBerry product or service are set out in a separate license or other agreement with
BlackBerry applicable thereto. NOTHING IN THIS DOCUMENTATION IS INTENDED TO SUPERSEDE ANY EXPRESS
WRITTEN AGREEMENTS OR WARRANTIES PROVIDED BY BLACKBERRY FOR PORTIONS OF ANY BLACKBERRY
PRODUCT OR SERVICE OTHER THAN THIS DOCUMENTATION.
BlackBerry Enterprise Software incorporates certain third-party software. The license and copyright information
associated with this software is available at http://worldwide.blackberry.com/legal/thirdpartysoftware.jsp.
BlackBerry Limited
2200 University Avenue East
Waterloo, Ontario
Canada N2K 0A7
BlackBerry UK Limited
200 Bath Road
Slough, Berkshire SL1 3XE
United Kingdom
Published in Canada
| Legal notice | 21You can also read