Installation and user manual for: Builder Extreme 1000 PRO Builder Extreme 1500 PRO Builder Extreme 2000 PRO - V1.1ENG2021 - Builder 3D Printers
←
→
Page content transcription
If your browser does not render page correctly, please read the page content below
Installation and user manual for:

Builder Extreme 1000 PRO
Builder Extreme 1500 PRO
Builder Extreme 2000 PRO
V1.1ENG2021
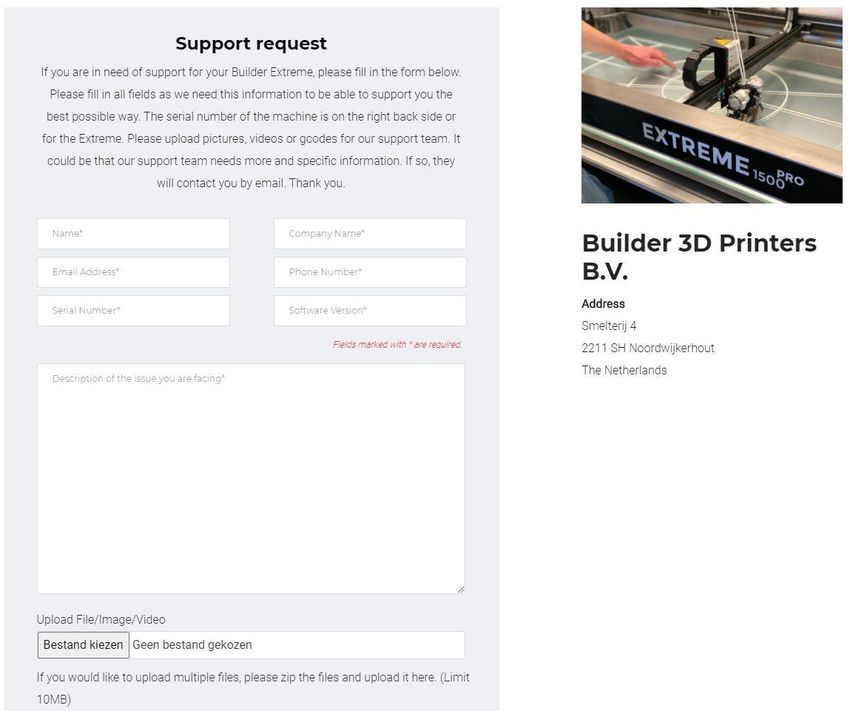
Table of contents
Introduction............................................................................................................................................. 4
Warranty ................................................................................................................................................. 5
Safety Instructions (please read instructions before use)....................................................................... 6
Accessories .............................................................................................................................................. 9
Specifications Builder Extreme PRO series ............................................................................................ 10
Installation of the Builder Extreme PRO................................................................................................ 11
   Step 1. Unboxing ............................................................................................................................... 11
   Step 2. Remove the Builder Extreme from the pallet ....................................................................... 11
   Step 3. Remove accessory box and safety brackets .......................................................................... 11
   Step 4. Level the machine itself, not the bed .................................................................................... 12
   Step 5. Install the optional air filter................................................................................................... 12
   Step 6. Switch on the machine .......................................................................................................... 12
   Step 7. Install filaments ..................................................................................................................... 12
   Step 8. Pre-heat the machine ............................................................................................................ 12
   Step 9. Install filaments ..................................................................................................................... 12
   Step 10. Automatic bed levelling test print ....................................................................................... 12
   Connect to WiFi ................................................................................................................................. 13
   LAN connection ................................................................................................................................. 13
Installation of Simplify3D ...................................................................................................................... 14
   Preparing a 3D print with Simplify3D ................................................................................................ 15
   Important information about Simplify3D.......................................................................................... 15
Nozzle diameters ................................................................................................................................... 16
Print speed ............................................................................................................................................ 16
Touch screen ......................................................................................................................................... 17
   Information about the touch screen ................................................................................................. 18
Materials................................................................................................................................................ 20
Maintenance ......................................................................................................................................... 21
   Software update ................................................................................................................................ 21
   Apply adhesion layer on print bed .................................................................................................... 21
   Maintenance schedule machine/print head ..................................................................................... 22
Frequently Asked Questions ................................................................................................................. 23
   Installation question .......................................................................................................................... 23
   Print quality questions ...................................................................................................................... 25

                                                                             2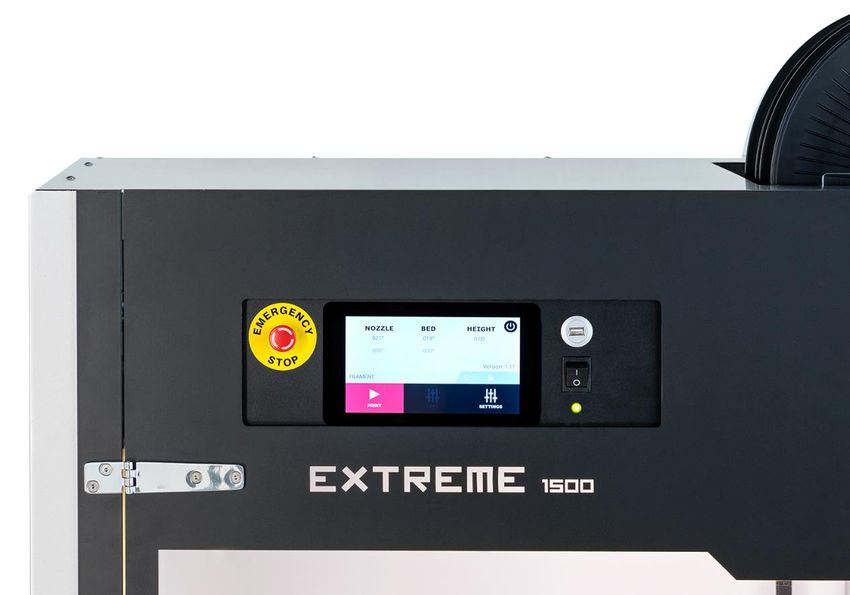
Technical questions ........................................................................................................................... 27
Tips & Tricks........................................................................................................................................... 28
   Before you start printing ................................................................................................................... 28
   During printing .................................................................................................................................. 28
   After printing ..................................................................................................................................... 28
Instruction videos .................................................................................................................................. 29
   Remove the print head for maintenance .......................................................................................... 29
   How to replace the nozzle ................................................................................................................. 29
   How does the UPS (battery pack) work............................................................................................. 29
   How to use manual levelling when needed ...................................................................................... 29
Support .................................................................................................................................................. 30

                                                                             3
Introduction
Thank you for purchasing the Builder Extreme and taking your time to read the manual. To successfully
install and use the Builder Extreme, we strongly recommend to read the full manual. Only then can
you fully benefit from the features the Builder Extreme has to offer.

The Builder Extreme is known as a workhorse, which is able to 3D print your prototypes, statues,
moulds, jigs and fixtures 24/7. The machine is able to print extremely large parts and able to print in
different qualities due to the different nozzle diameters.

The manual will inform you how to

    1.   Successfully install the machine
    2.   Set-up Simplify3D software
    3.   Control the machine
    4.   Use Simplify3D
    5.   Make your first 3D print
    6.   Improve your prints

We advise you to start with an easy and smaller 3D print with our standard profiles in Simplify3D. It is
important to get some experience with the Builder Extreme before starting to print complex shaped
and large prints.

Please make sure that anyone who will be using the Builder Extreme, has fully read the manual to
prevent any personal injuries, bad print quality and damages to the printer itself. We have created this
manual with a team of Builder experts and we believe the most important information is covered in
the manual, yet we cannot be held responsible for incorrect or missing information. If you have any
feedback about missing or incorrect information, please send your feedback to
info@builder3dprinters.com.

Intended use
The Builder Extreme PRO 3D printers are designed and build to 3D print large and complex shaped
parts like prototypes, moulds, statues, jigs and fixtures in a commercial/business environment. The
Builder Extreme PRO prints best with Builder materials and our standard FFF profiles created for
Simplify3D. The user can choose other materials or different settings in Simplify3D, but the user is
responsible for the outcome of the printed part.

                                  Factory tour at Builder 3D Printers

                                                   4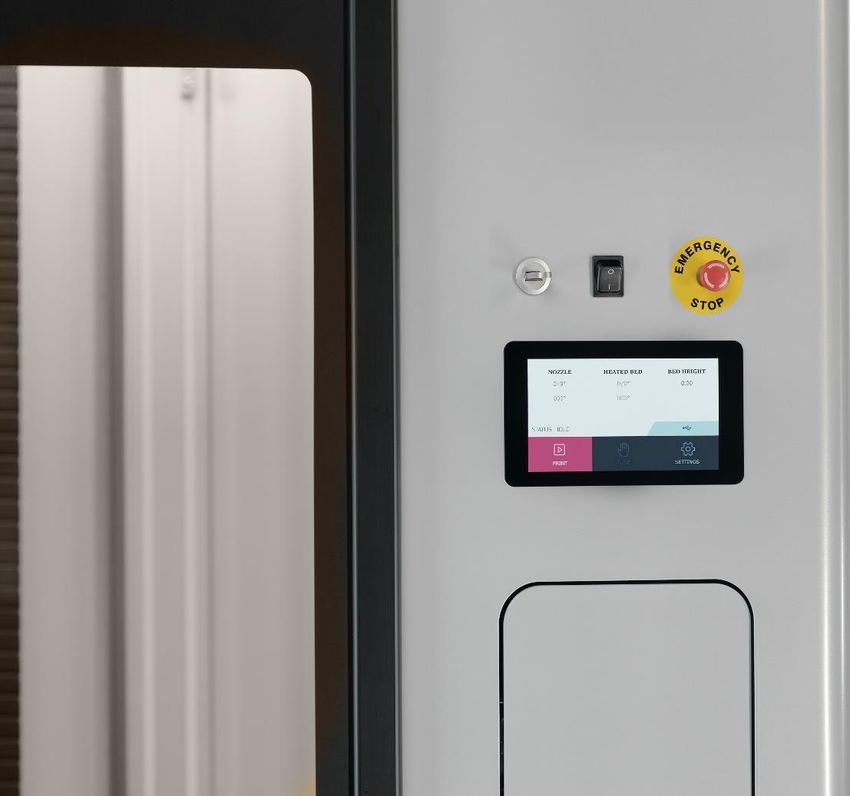
Warranty
The warranty of the Builder Extreme 3D printer, spare parts and filaments is granted to the original
buyer only. The warranty will be activated as soon as the Builder product has left the Builder factory
in the Netherlands. The warranty of the Builder Extreme 3D printer is 12 months. The warranty of the
Builder print head is 3 months. Note that the warranty of the printer is under “carry in” conditions. We
strongly recommend to keep and store the packaging of the Builder Extreme at all times.

The warranty of the Builder Extreme 3D printer, spare parts and filament will immediately expire when:

    1.   Products are damaged by user
    2.   Products are neglected by user
    3.   Water/moisture damaged the products
    4.   Products are used incorrectly by user
    5.   Products are incorrectly installed by user
    6.   Products are dissembled without Builders permission
    7.   Serviced incorrectly by user

Extreme 1000 PRO                        Extreme 1500 PRO                         Extreme 2000 PRO

Product video                           Product video                                    Product video

                                                   5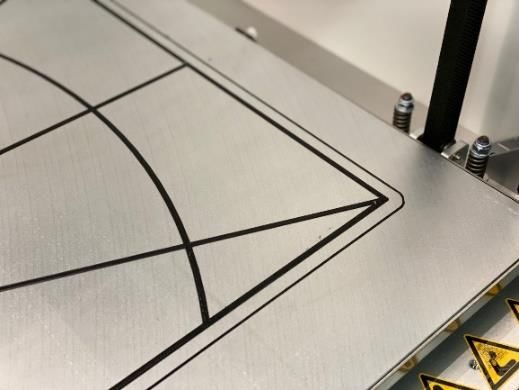
Safety Instructions (please read instructions before use)
Before using the Extreme Builder, read all the instructions and using manuals.
Minimum age for persons using the Extreme Builder is 16 years.
Place the Extreme Builder on a concrete floor and set it level, so that the machine is stable.
Install the Builder in a room with sufficient ventilation.
DANGER! Do not open the electronics cabinet (access only, by authorised personnel). Risk of
electric shock which may result in serious injury or death!
WARNING! Before performing maintenance on the Extreme Builder, or before making
adjustments to the machine, disable the machine by engaging the power off button.
Beware! print head and build plate can still be very hot!
6
WARNING! When the heater is on, the extruder (brass piece) is very hot!
WARNING! When you want to replace the filament on top of the machine use safe
work stairs
WARNING! Do not use flammable liquids inside or outside the Builder.
If you want to clean the glass plate first turn off the power then you can clean the glass plate
with a wet towel. When the glass plate is dry you can turn on the power.
WARNING! Maintenance of the electrical and mechanical components can only be done by
authorized personnel.
WARNING! Do not step lean in or step in to the Builder. (The glass plate will break).
7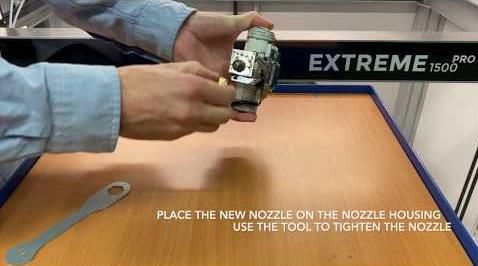
Do not use the machine for other purposes than printing parts.
When the Extreme Builder is in operation, keep the doors closed.
Use only Builder certified materials.
WARNING! Turn off the power and wait 15 minutes when you want to replace the extruder
head, be careful this part is HOT!
Close the doors while printing objects.
When the machine is operated 24/7, mount a working fire or smoke detector in the room
where the Extreme Builder is installed.
8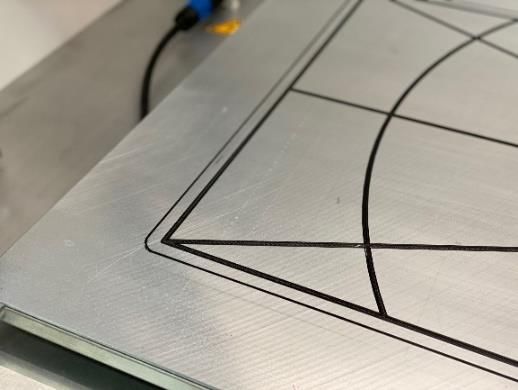
Accessories
What is in the accessory box?
The following accessories are included in the accessories box with the purchase of the Builder Extreme:
Quick start To successfully install the machine
Nozzle 0.4 mm Installed on the print head
Nozzle 0.8 mm For bigger layer heights
Nozzle 1.2 mm For rough prints
Spare Teflon tubes Spare tubes for print head
Allen key 2.5 mm To remove/replace the nozzle
Feeler gauge Check the distance between nozzle and bed
Pressure plug 2 x Remove any stuck filament inside the print head
Power cord Power up the machine
Spare paint roller set To apply glue. (Already applied in the Builder factory)
Wood glue For the print bed (already applied in Builder factory)
Level tools 2 x To level the machine (not the bed)
Heater block key To get grip when removing the nozzle
Wheels 4 x (Extreme 1500 PRO only) To move the machine to another location
Optional
Bofa air filter
Print head (spare)
Filaments
Grease + grease gun
9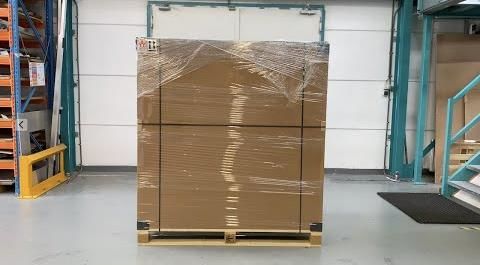
Specifications Builder Extreme PRO series

Properties                Technology          Fused Filament Fabrication

Print head     Dual extruder with one nozzle (3 nozzle diameters included

                          Build volume XYZ    Builder Extreme 1000 PRO - 700x700x820 mm
                                              Builder Extreme 1500 PRO - 1100x500x820 mm
                                              Builder Extreme 2000 PRO - 700x700x820 mm

                          Layer resolution    0.4 mm nozzle – 0.1 - 0.3 mm
                                              0.8 mm nozzle – 0.2 - 0.7 mm
                                              1.2 mm nozzle – 0.3 - 0.9 mm

                          Print speed         up to 300 mm p/s (standard speed 80 mm p/s)

                          Build plate         Heated aluminium plate up to 60 degrees

                          Nozzle diameter     0.4 mm standard. 0.8 and 1.2 are included

                          Operating sound
Installation of the Builder Extreme PRO
The installation of the Builder Extreme is the most critical part and needs to be done correctly, so
please take your time to follow the installation steps in the video. The video below displays how to
install the Builder Extreme step by step. Tip: pause and watch the video several times to follow the
exact steps. The steps are also written out below.
*click on the image to start the installation video
Step 1. Unboxing
Before you start to unbox the machine, please check the condition of the packaging. Are there any
damages on the foil or on the box? If not, you can proceed with the unboxing. If so, please take pictures
and inform the shipment company about this.
Remove the foil and straps from the box. Extras such as filament, air filter or spare parts are located
on top of the box. Remove these boxes from the top. For the 2000 PRO, the extras are shipped
separately. Now gently remove the top panel from the box and remove the black corners to be able to
remove the side panels of the box.
Step 2. Remove the Builder Extreme from the pallet
Use a forklift truck to remove the Builder Extreme from the pallet and use a pallet truck to place it on
a levelled concrete floor. Note: the Builder Extreme must be removed from the pallet before you
continue with the installation. The Extreme 1500 PRO comes with wheels. These are not installed when
the machine is on the pallet due to safety reasons. When the machine is on the forklift or pallet truck,
it is a good moment to install them. They are inside the accessory box.
Step 3. Remove accessory box and safety brackets
Remove the accessory box from the build plate and the bubble wrap from the frame. Now gently
remove the 6 yellow safety brackets from the belts inside the Builder Extreme. Note: the accessories
for the 2000 PRO are located in the bottom drawer. To remove the bubble wrap from the frame, the
doors need to be opened and this is only possible when the machine is switched on. See installation
video
11Step 4. Level the machine itself, not the bed
The accessory box comes with 2 yellow level tools. Place them on the bottom front and side plate of
the machine. Use wrench key 17 to level the machine until it shows a perfect levelled image.
Step 5. Install the optional air filter
Unbox the air filter and connect the tubes and the power cable to the air filter. The power cable goes
into the back of the control box of the Builder Extreme. Note: the air filter for the 2000 PRO is
connected to the right back side of the machine. Switch on the air filter at the back of the filter itself.
Step 6. Switch on the machine
Plug in the power cable at the back of the control box and then into the power socket. Switch on the
battery pack, which is located behind the black control box. Note: the battery pack of the 2000 PRO is
located in the top drawer. Release the emergency stop by turning it to the right. Switch on the Builder
Extreme by pushing the switch-on button for at least 3 seconds. The Builder Extreme will start up and
the button switches back to its original position.
Step 7. Install filaments
Install 2 new filament spools on top of the printer. Make sure you place them between the black sided
corners so the spools can rotate easily. Put the filament through the tubes and filament detection and
gently pull the filament down to the print head.
Step 8. Pre-heat the machine
Pre-heat the machine. Go to settings, pre-heat and press pre-heat nozzle and pre-heat bed. Wait until
the nozzle has reached 210 degrees and the bed 50 degrees. Let the machine pre-heat for about 15
minutes.
Step 9. Install filaments
The test filament must be removed. Push down the silver handle on the print head and pull back the
test filament (only when print head is 210 degrees). Install the new filament (through the white tube)
by pushing down the silver handle again and install the filament. Push it down until you feel some
resistance. Repeat the same on the other extruder until both extruders are filled with new filament.
Push down the silver handle again and push down the filament one by one and repeat this a few times
until new filament comes out of the nozzle. Before you go the next step, remove the extruded filament
from the bed and underneath the nozzle.
Step 10. Automatic bed levelling test print
Go to settings, home and press home. The frame will now go to its home position. When the frame is
all the way down, go to print and click on the Builder logo and start the print “surface test 0.4”. The
Builder Extreme will now print a few lines and circles to check if the machine was levelled correctly
during installation. This print will take about 50 minutes. The images below show how a correct bed
level test should look like. If you think the nozzle is too close to the bed, you can change the offset of
the machine here: Home screen -> settings -> Service -> customer -> Set Z-offset. If you have doubts
about your surface test, contact your local reseller or Builder through this form.
12Connect to WiFi
To connect the Builder Extreme to your WiFi network, please follow these steps:
1. Go to settings, network, WiFi
2. The Builder will now look for available WiFi networks
3. Select the WiFi network you want to connect with and fill in your password
4. The Builder is now successfully connected to your WiFi network
5. Go back to the home screen and press on the WiFi icon. An IP address pops-up
6. Type the IP address in your URL section and press enter. The screen below pops-up
The WiFi connection allows you to monitor the printing process from behind your desk. It shows
which file is printing, on what temperature and also shows which files are saved to the printers
memory. You can also monitor the print with the on-board camera.
We strongly advise to upload files bigger than 50 mb with a USB stick.
LAN connection
To connect the Builder Extreme with your network, please do the following:
1. Connect the Ethernet cable to the back of the control box
2. Go to settings, network, Ethernet and refresh
3. The screen now shows the connection with Ethernet and an IP address pops-up
4. Type the IP address in your URL section and press enter. The screen above pops-up
5. You can now monitor the printing process
13Installation of Simplify3D
After successfully installing the Builder Extreme, it is now time to install the slicing software. The
Builder Extreme comes with a Simplify3D license. With Simplify3D you can convert your 3D file into a
gcode. Please follow these steps to install Simplify3D correctly:
1. Open the email you received from Simplify3D (please check your spam box)
2. Follow the steps in the email to download the software and create your personal log-in.
3. The Builder Extreme is not listed as a standard printer, choose “other printers” and click ok.
4. Go to https://builder3dprinters.com/installation/ step 2. Download the FFF profile for your
Builder Extreme and unzip.
5. Open Simplify3D, go to File, Import FFF profile and select the FFF profile you just downloaded.
6. You now have successfully installed Simplify3D.
The FFF profile you just imported to Simplify3D, contains all the right settings to print with a 0.4, 0.8
and 1.2 mm nozzle. For your first 3D prints, we strongly advise to use the standard settings. These
settings can be adjusted of course, but we advise to change and try out different settings in a later
stage.
Important when not printing dual coloured objects
When not printing dual coloured/material objects, we strongly advise to print with both extruders at
all times. This means you need to install 2 of the same spools/colours and add the following code in
Simplify3D:
1. Open Simplify3D, go to edit process settings, scripts, layer change script.
2. Add this exact code: G93 R50. Make sure you save this setting.
3. From now on, all your prints start to print with 2 filaments all the time.
We strongly advise, when not printing dual coloured/material objects, to print with both motors on
50% at all times. This not only extends the lifetime of your print head, but there is also less chance of
clogging and it also improves the print quality and less stringing. It even allows you to print up to 9 kg
without being interrupted by filament detection.
14Preparing a 3D print with Simplify3D
After you successfully installed the Builder Extreme and Simplify3D, it is now time to set up your first
3D print. During the installation of Simplify3D, you have uploaded the FFF profile so when you open
Simplify3D right now, you will see the print volume of your Builder Extreme. Please take a look at the
video below. The video shows how to upload a STL file, how to slice it and prepare it for 3D printing.
Important information about Simplify3D
1. When not printing dual coloured objects, add this code “G93 R50” here: edit process settings,
scripts, layer change script.
2. The time estimation in Simplify3D is not correct. Multiply print time by 1.5.
3. We recommend you to start printing a few objects with our standard settings. After some
experience, you can for example lower the infill percentage, use a different nozzle diameter
and other support settings.
4. If you make any changes to the Simplify3D profile, make sure you save them as a new profile.
Not all settings work for every object. If prints keep failing, remove all saved profiles and
upload the standard FFF profiles again.
5. Simplify3D has a simple, yet very informative support program. Please visit their page to get
to know Simplify3D and all its settings: https://www.simplify3d.com/support/
First steps in Simplify3D (video)
15Nozzle diameters
The Builder Extreme comes with 3 different nozzle diameters:
0.4 mm (on the print head when machine arrives)
0.8 mm (in the accessory box)
1.2 mm (in the accessory box)
The nozzle can easily be replaced for another diameter. Please check the “how to” video if you want
to change the nozzle diameter. In Simplify3D you can choose which nozzle you would like to use for
your print. When you select the 0.8 mm nozzle, the settings automatically change for this profile, the
same for the other nozzles.
Which nozzle to use:
0.4 mm nozzle The 0.4 mm nozzle is often used when you would like to achieve the highest
resolution/accuracy possible. With a 0.4 mm nozzle you can print with a layer
height of 0.1 to 0.3 mm. Note: the smaller the nozzle, the longer the print time
will be.
0.8 mm nozzle The 0.8 mm nozzle is often used when you would like to achieve a good quality
print in a relative shorter time. With a 0.8 mm nozzle you can print with a layer
height of 0.2 to 0.7 mm.
1.2 mm nozzle The 1.2 mm nozzle is used when you would like to print a rough product in a
short time and quality and accuracy is not that important. With a 1.2 mm
nozzle you can print a layer height of 0.3 to 0.9 mm. When printing with a 1.2
mm nozzle, we recommend to reduce the speed a bit. If you print too fast, the
filament is not fully melted before trying to extrude.
Important when change the nozzle
We always recommend to print the surface test again after changing the nozzle. The test print shows
if you need to change the offset of the nozzle or not. When you change from a 0.4 nozzle to a 0.8 mm
nozzle, and you print with a much bigger layer height, you might need to increase the offset.
Print speed
Print speed is an important factor when it comes to a high quality and detailed prints. Although the
Builder Extreme is able to print at a maximum speed up to 300 mm p/s, the maximum speed for your
object is depending on size, shape, nozzle and required quality. Easy shaped and larger parts can be
printed faster than smaller objects which have a lot of detail. By doing several tests, you will get to
know the limits of the print speed for your objects.
16Touch screen
The touch screen allows you to manage your Builder Extreme at all times. When you switch on the
Builder Extreme, it will take about 20 seconds to start up until the main menu appears. From the main
menu you have access to all features.
The main menu is mostly used for the following processes:
1. Preheat the nozzle and print bed
This option is needed before you start every print. Pre-heating is essential for a successful start
of the print. By pre-heating the nozzle, you make sure the filament is able to extrude properly
as soon as you start printing. Heating the bed for about 15 minutes makes sure the printed
object will stick to the bed properly. Pre-heat longer when the machine is very cold.
2. Start a new print on your Builder Extreme
When pressing the “print” button, you get access to the internal memory of the printer or your
USB stick (only when machine is pre-heated). The touch screen allows you to scroll through
the prints you already printed, or new prints located on your USB stick.
3. Change settings while printing
During printing you can change settings such as print speed, temperature of the nozzle and
bed and maintenance. It is always important to monitor the process of the 3D print. If you
want to reduce the print speed in critical areas, you can easily do that.
17Information about the touch screen
Screen when pre-heating Screen while printing
1: actual nozzle temperature 1: click to see which file you are printing
2: installed temperature gcode 2: printing status
3: actual bed temperature 3: progress of print
4: installed temperature gcode 4: how long it has been printing so far
5: z height of machine at that moment
6: switch of button
7: software version (V1.31)
8: open door of EX 2000 PRO
9: current printer status
Screen when you press print (after pre-heat) Settings (when not printing)
USB: USB stick (with gcodes on it) 1. back to previous screen (home screen)
Disk: prints saved to memory 2. info about current screen
Logo square: standard gcodes provided by Builder 3. go to second setting page
4. move the print head in all directions
Pre-heat: Heat the nozzle and bed
Network: connect to WiFi/network
Material: not activated yet
Lock: lock with your personal code
18Tune (while printing) Information screen
Temp: change temperature while printing The information screens shows how
Utilities: many hours you have printed, the serial
Flow: change the flow or ratio when needed number of your machine, software version.
Print speed: increase/decrease speed while printing This information is needed when you fill in
Replace: when you need to replace the spools a support request on Builders website or to
Lock: lock the printer with your personal code see when maintenance is needed.
19Materials
All materials offered by Builder, are optimized for 3D printing with the Builder Extreme range. The
materials that are currently available for the Builder Extreme, have been extensively tested to achieve
high quality print results. The materials work best in combination with Builders standard FFF profiles
for Simplify3D.
If you would like to use materials, which are not purchased through Builder, we would recommend
you to first make some smaller test prints. Every material can react different when printing with
Builders standard FFF profiles. You might need to adjust print temperature, bed temperature and
retraction.
We recommend you to store open filament spools at a temperature between 15 – 25 degrees at a
humidity below 30% and not in direct sunlight. Please make sure that opened filament spools are
stored properly. If materials are not stored correctly, it may affect the usability and quality.
If you would like to order filaments, please contact us through sales@builder3dprinters.com.
20Maintenance
Software update
Periodically, we update the software for the Builder Extreme. We do this to improve the software,
remove bugs and add new features. When a new software is launched, it will be placed on our website
and communicated through our social media channels and reseller network. The latest software
version can be found here: https://builder3dprinters.com/installation/.
How to update the software of your Builder Extreme:
1. Download the software from our website
2. Put all 5 folders on an empty USB stick. Do not unzip the files Make sure the USB stick is
formatted to FAT32. Otherwise the update will not work correctly.
(the software automatically recognizes which Builder Extreme you have)
3. Turn off the printer
4. Plug in the USB stick and switch on the printer
5. The printer will now be updated (this can take up to 20 minutes)
6. The update has been successful when the home screen pops-up and shows the new software
version.
Apply adhesion layer on print bed
When the machine arrives, the adhesion layer is already applied on the build plate. The layer can be
used many times. We recommend to apply a fresh layer every 6 months. The glue and tools to apply
the new layer are inside the accessories box. Please follow the steps to apply the new adhesion layer
correctly:
1. Please make sure the printer is switched-off
2. Remove all filament leftovers from the build plate
3. Use damp paper towels and start to remove the glue from the build plate
4. When all glue has been removed, make sure the build plate is dry
5. Switch on the printer and pre-heat the bed to 50 degrees
6. Add 70% water and 30% glue to the paint roller set and mix it
7. When the build plate is heated, equally apply the glue
8. Let it dry for about 15 minutes. In the mean time you can clean the paint roller set with water
9. We advise to start the surface test with a 0.4 mm nozzle to check if the adhesion is ok
21Maintenance schedule machine/print head
The maintenance schedule is based on a use of 3000 print hours per year. If your user frequency is
higher, we advise you to maintain the machine more often for optimal print results.
Before every print Clean the printer Keep the printer clean for optimal print results
Remove filament pieces from the build plate
Remove degraded materials from the nozzle
Remove thin pieces of filament from the fans
Checks Check the adhesion layer on the bed
Check if the UPS is activated
Check if the correct nozzle is installed
Every month Checks Check fans on/underneath the print head work
Check if the filament detection works
Check if the Ups function works
Check if the emergency stop works
Every 3 months Cleaning Clean the extruder wheels
Clean the nozzle
Clean the filter in the control box (backside)
Apply grease on X/Y axis if needed (1000 hours)
Apply grease on Z axis if needed (2000 hours)
Every 6 months Replace Replace both motors on print head
Replace the nozzle
Apply a new layer of glue on the print bed
Replace the teflon tubes inside print head
Replace the extruder wheels
Every year Replace Replace the battery pack of the Ups system
Replace the filter inside the air filter
*If you would like to order replacement parts, please contact us through sales@builder3dprinters.com
22Frequently Asked Questions
Installation question
A. The Builder Extreme is delivered on a pallet. How do I remove it from the pallet?
After removing the box, please remove the Builder Extreme from the pallet with a forklift truck.
If you do not have a forklift truck, you could also use a pallet truck.
B. We received our Extreme 1500 PRO, but the wheels are not mounted to the machine.
When the machine is shipped, the wheels are not mounted on the machine for safety reasons.
The wheels are located in the accessories box of the machine. We would advise to install the
wheels when the Builder Extreme is being tilted by the forklift truck.
C. What do I do with the packaging of the machine?
We recommend you to store the box + pallet, just in case you ever need to move the Extreme
to another location. The box is especially designed for the Extreme and we do not recommend
to transport it in any other box. Also, if the machine needs to be repaired at the Builder factory,
we can only do this when the original box is available.
D. The quick start says only the machine needs to be levelled. But what about the print bed?
The Builder Extreme comes with automatic bed levelling, so please do not level the bed, but
only the machine itself. Make sure you follow the quick start. If the surface test is correct, you
do not need to make any further adjustments to the bed.
E. Where can I download Simplify3D?
When the machine is shipped, you will receive an email from Simplify3D. In this email you find
instructions how to set-up your Simplify3D profile.
F. After downloading Simplify3D, I see that the Builder Extreme is not listed as a standard
printer. What to do?
Please choose “other printers” and click ok. Click on this link:
https://builder3dprinters.com/installation/. Download the FFF profile for your specific printer.
Unzip the file and open Simplify3D. Go to File, Import FFF profile and upload the FFF profile.
Now you have successfully uploaded the standard settings Builder has provided for you.
G. How do I switch on the Builder Extreme?
Make sure the machine has power and that the UPS system is turned on. The UPS is located
behind the black control box and has a switch-on button on the side of the casing. Now press
the switch-on button on from of the control box for at least 3 seconds. The Builder Extreme
will now start up.
H. Where can I find the surface test?
The surface test print is the first print that you need to print on the Builder Extreme after the
machine has been installed. The surface test print informs you if the machine is placed
correctly and if the bed levelling has worked successfully. When the machine is pre-heated,
you can press print and there you find the surface test print.
I. Advised is to print 50/50 with both extruders. Can I do this manually or in Simplify3D?
For the extruder it is best to print with 2 filaments at the same time, when not printing dual
objects. This prevents the extruder from clogging but it also improves the quality of the print.
It even allows you to print up to 9 kg without filament changes. Start the gcode created in
Simplify3D. As soon as the prints starts, go to tune, flow and set the extruder ratio to 50/50.
23Now it is printing with both filaments. If you do not want to change the ratio to 50/50 manually,
go to Simplify3D, edit process settings, scripts, layer change script and type G93 R50. If you
save this setting, each gcode will start to print with both motors on 50%.
J. Why is there already filament inside the print head when it arrives?
Every Builder Extreme is tested for 50 hours. These tests are done to make sure the printer
works correctly and that the print head is able to print mono, dual and colour mixed objects.
The filament stays in the print head for safety reasons. When the Builder Extreme is pre-
heated, you can remove the filament one by one and refill it with new filament.
24Print quality questions
K. My print does not stick to the bed. What to do?
First of all, check the bed levelling of the machine. Print the surface test to see if the filaments
equally stick to the bed. If not, please level the bed only on the place where it is needed. Also,
make sure the machine has been pre-heating for about 15 minutes before you start a large
print. The bed needs some time to warm up equally. Please contact us if you have any
questions about the bed levelling.
L. There is a vertical line in my print. What to do?
This line is the start and stop line for each layer. You can change the position of this line in
Simplify3D. Open Simplify3D and go to layer and then choose start point to specific location.
Now you can decide where to position the start and stop layer, but note that it will stay visible.
M. My print looks messy (hairy) from left to right. What to do?
This is called stringing. Make sure you are printing with 2 filaments at the same time and set
both extruders at 50%. There will be less chance of stringing. You could also reduce the print
temperature from 220 to 210 or 200 degrees. Still experience stringing? Please find here some
tips how to solve it with Simplif3D.
N. My print has scars on top of the surface. What to do?
The scars are only visible on the top layer. If you want to achieve a smooth top layer, make
sure you are not over extruding. Please check here. If you are not over extruding, you might
want to try the Z-hop.
O. The support of my object is very fragile and falls down. What to do?
When printing an object with very fragile support, make sure you first print a solid layer under
the support. This makes the support much more stable. Go to Simplify3D, edit process
settings, support and add a Support Base Layer of 1 or 2.
P. The printed objects feel very fragile and there are holes in it. What to do?
Always make sure you print 50/50 with both extruders when not printing dual coloured
objects. If your object feels very fragile, check if the silver handles near the filament, are
levelled. It could be that one of the extruders did not extrude any filaments. So it means that
your product is only printed with 50% filament.
Q. One of my extruders is clogging. What to do?
When clogging during the first layer, make sure the bed levelling is correct. If the nozzle is too
close to the bed, it cannot extrude its material. Please check if the correct nozzle is on the print
head. The nozzles are marked with circles to see which nozzle is what diameter. Use the
pressure plug to unclog the nozzle. Only do this when the other extruder is filled with filament.
See the manual how to unclog. If you tried to unclog with the pressure plug and it still keeps
clogging, make sure you replace the tubes of the extruder. Make sure you go back to the
standard FFF profile for Simplify3D. It could be that you accidentally saved certain settings
which are not ideal for your print. Clogging could also happen because of a too high
surrounding temperature, for example during the summer. When the temperature inside a
room is higher than 25 degrees, we would advise to lower the bed temperature to 50 degrees.
25R. The filament breaks when I just started to print. What to do?
When you are not printing for a few days, and you leave the filament in the print head, the
filament is under tension. Make sure when you start a new print, you cut off the filament that
was under tension (from filament detection until print head).
26Technical questions
S. There was a power failure but the UPS system did not work. What to do?
Please check if the UPS system is switched on. The UPS system is located behind the black
control box. When you are not printing for weeks, make sure the UPS system is switched off.
Was the UPS on, but was it not activated when needed? Please contact us.
T. The touch screen is black, but my print is still printing.
When the touch screen is black, but the print is still printing, please let the printer finish the
print job. After the print is ready, switch off the UPS system and remove the power plug to
fully shut down the printer. Insert the power plug again and switch on the UPS. The printer is
now starting up again.
U. My printer doesn’t switch on
Press the switch on button for a 3 seconds. If you do it shorter, the machine will not switch on.
When you hold it longer than 3 seconds and the printer doesn’t switch on, it could be that a
fuse inside the control box is blown. Please fill in the support form so we assist you how to
check the fuse.
V. My touch screen is frozen
When the screen freezes, but the print is still printing, please let the printer finish the print
job. After the print is ready, switch off the UPS system and remove the power plug to fully shut
down the printer. Insert the power plug again and switch on the UPS. The printer is now
starting up again.
W. My print is not as accurate as it should be
The accuracy of the print is determined by many different factors. Print speed, print
temperature, overall temperature and material are all factors that influence the accuracy.
Please check this page about how to improve the accuracy of the printed object.
X. How can I test if the UPS system (battery pack) is working?
If you would like to test the ups system (battery pack), please do not pull the plug. Make sure
the ups has been charged. It charges when the printer is on and the ups system is switched on
as well. Start a print and leave it printing for about 30 minutes. Then switch off the control box
with the switch on/off button at the back of the control box. The ups system should now take
over. If this works correctly, you can switch on the control box again and continue your print.
Y. How to update my printer to the latest software?
Please check here if there is a software update available for your Builder Extreme. If so, please
follow the instructions in the manual to update to the latest software.
27Tips & Tricks
Before you start printing
1. Before you start a new print, pre-heat the print bed for about 15 minutes.
2. Check if the correct nozzle is installed on the print head.
3. Check if the filament is placed correctly and that the spools are able to rotate easily.
4. If you haven’t printed for days, but the filament was installed, check if the filament doesn’t
break at the print head or filament detection. It has been under tension for a few days.
5. Make sure you remove any leftovers from the build plate from previous prints.
6. Check if the UPS (battery pack) is switched on.
7. Check the temperature of the room where in the printer is located. Is this higher than 25
degrees? You might want to change the standard bed temp from 60 to 55 degrees.
During printing
1. Make sure you keep the doors of the printer closed during printing.
2. Always check if the first layer of the printed object is going well.
3. If you see the first layer not being printed properly, coming loose or not extruding, stop the
print and print the surface test to see if the bed levelling is ok.
4. Make sure you monitor the print every once in a while.
5. Printing an object with support, but the support fell? You can continue the print on your own
risk, but note that the quality of the print will not be as expected.
6. Make sure you do not print too many small objects in one go. This could increase the chance
of a crash.
After printing
1. When the print has finished, let the build plate cool down for at least 30 minutes.
2. Open the doors of the printer to let the build plate cool down faster. Only do this when the
printer is located in a ventilated room.
3. Use a spatula to remove the printed object from the build plate. Make sure one side of the
spatula is sharpened to remove the object easily.
4. When the print is still stuck, leave the spatula underneath the print so cold air is able to go
under the print.
5. Remove any leftovers from the build plate.
6. If you are planning not to print for a couple weeks, make sure you switch off the ups. When
not using the printer, the battery might go low.
28Instruction videos
We have made a range of instruction videos to inform you how to use the Builder Extreme
PRO correctly, but also how to do minor repairs if needed. Please take your time to watch
the instruction videos.
Remove the print head for maintenance How to recognize the nozzle diameter
How to replace the nozzle How does the filament detection work
How does the UPS (battery pack) works How to solve a clogged print head
How to use manual levelling when needed
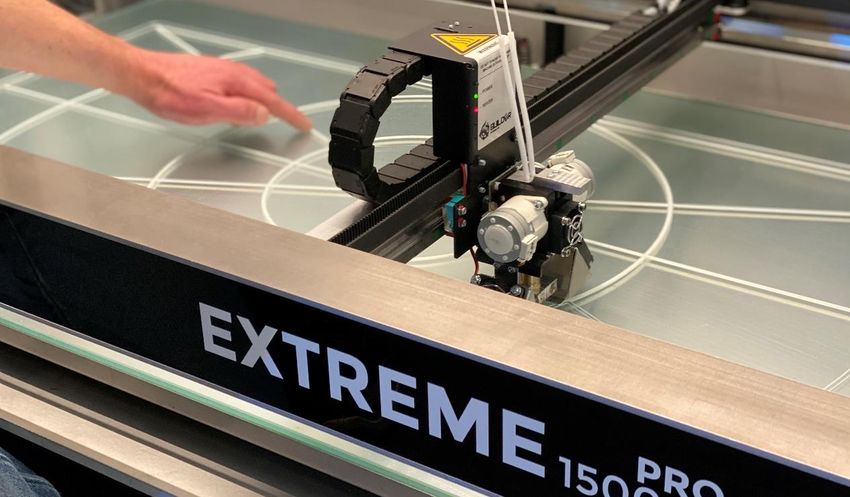
29Support
If you are in need of support regarding the Builder Extreme, please first check our FAQ. If you cannot
find the answer there, please contact your local Builder reseller or fill in the support request form
below. If you have any questions about Simplify3D, please go to:
https://www.simplify3d.com/support/.
30Builder 3D Printers
Smelterij 4
2211 SH Noordwijkerhout
The Netherlands
www.builder3dprinters.com
31You can also read