Nintendo Switch Teardown - iFixit
←
→
Page content transcription
If your browser does not render page correctly, please read the page content below
Nintendo Switch Teardown                                               Guide ID: 78263 - Draft: 2021-07-05

                           Nintendo Switch Teardown
                     Teardown of the Nintendo Switch performed on March 3, 2017.

                                        Written By: Evan Noronha

This document was generated on 2021-07-05 12:51:43 PM (MST).
© iFixit — CC BY-NC-SA                                www.iFixit.com                          Page 1 of 26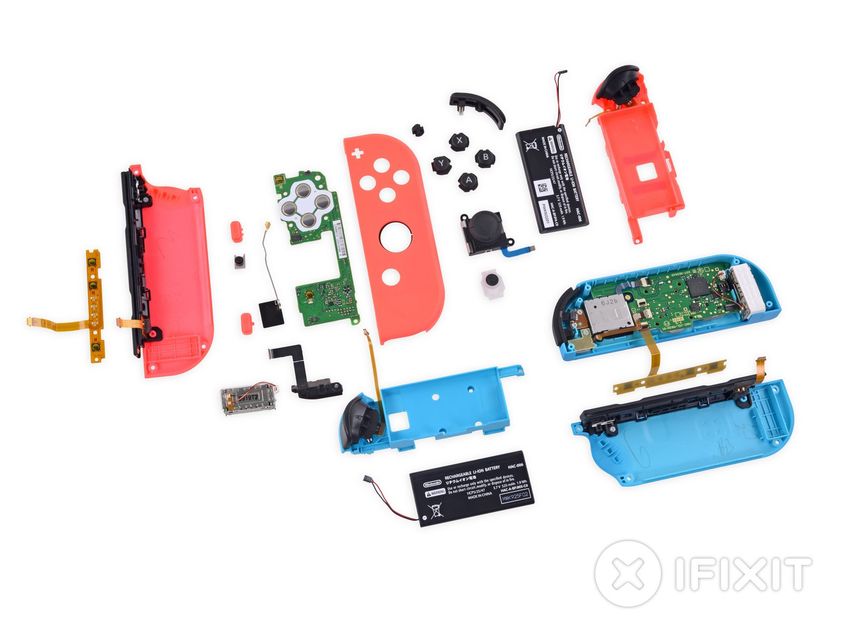
Nintendo Switch Teardown                                                   Guide ID: 78263 - Draft: 2021-07-05

    INTRODUCTION

    This Friday night is the moment you've all been waiting for: Nintento has finally launched its Zelda
    machine new console, the Nintendo Switch. Forget playing games for now, it's time to take a peek at
    the hardware. Let iFixit do the talking, and our tools will do the walking. Come tear down with us!

    When you have to give someone else a turn to play, find us on Facebook, Instagram, or Twitter to
    learn something new.

      TOOLS:
     Phillips #00 Screwdriver (1)
     Spudger (1)
     iOpener (1)
     Suction Handle (1)
     iFixit Opening Picks set of 6 (1)
     Tri-point Y00 Screwdriver (1)

This document was generated on 2021-07-05 12:51:43 PM (MST).
© iFixit — CC BY-NC-SA                                www.iFixit.com                              Page 2 of 26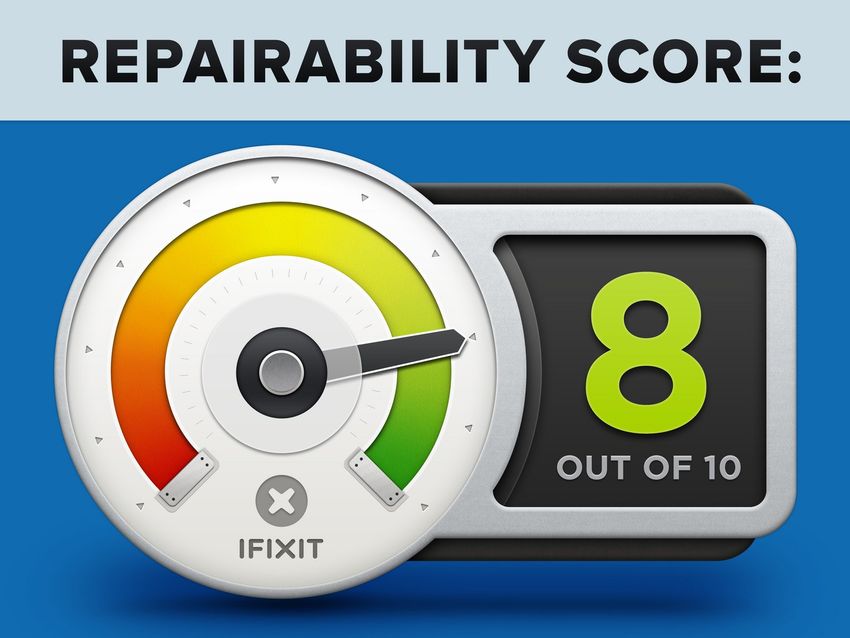
Nintendo Switch Teardown Guide ID: 78263 - Draft: 2021-07-05
Step 1 — Nintendo Switch Teardown
Merry Switchmas everyone! Here's what Nintendo's new handheld/console hybrid holds hardware-
wise:
NVIDIA customized Tegra processor
Built-in 6.2" multi-touch LCD screen with 1280 × 720 resolution (capable of 1920 × 1080 output
on an external display via HDMI)
32 GB of internal storage (up to 2 TB additional storage via microSDHC or microSDXC card)
802.11 a/b/g/n/ac Wi-Fi, Bluetooth 4.1, USB Type-C charge port, and 3.5 mm audio jack on the
console—plus three standard USB ports on the Switch Dock
Stereo speakers
Rechargeable lithium-ion battery capable of 2.5 - 6.5 hours play time
Detachable wireless Joy-Cons
This document was generated on 2021-07-05 12:51:43 PM (MST).
© iFixit — CC BY-NC-SA www.iFixit.com Page 3 of 26
Nintendo Switch Teardown Guide ID: 78263 - Draft: 2021-07-05
Step 2
Teardowns are really hard, so our friends at Creative Electron thought they might save us time by
X-raying the entire box.
But that just got us more excited for a thorough hardware tour. We popped the console out of its
box, and dock, and got another X-ray image just for funsies.
Is that a beefy battery we spy?
Time to switch off the X-rays and break out the tools!
This document was generated on 2021-07-05 12:51:43 PM (MST).
© iFixit — CC BY-NC-SA www.iFixit.com Page 4 of 26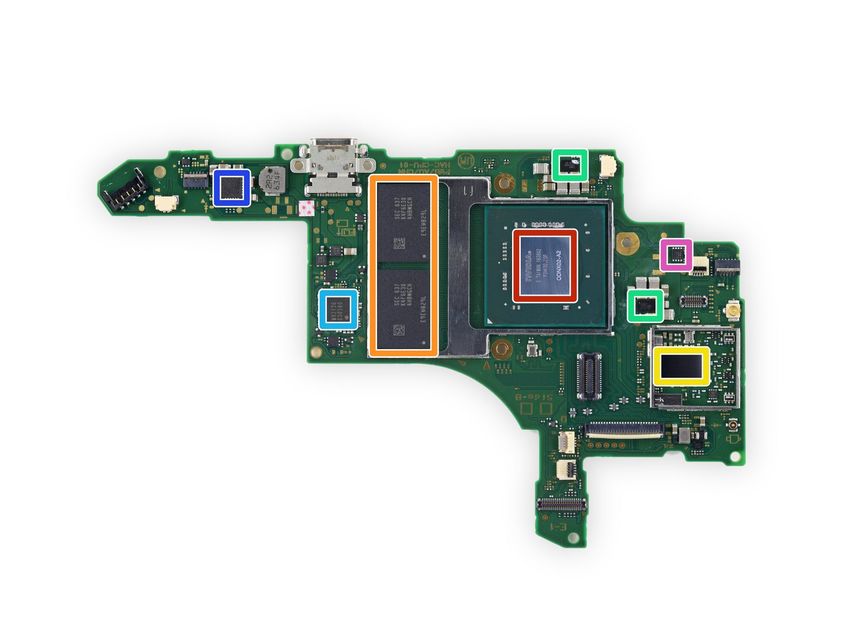
Nintendo Switch Teardown Guide ID: 78263 - Draft: 2021-07-05
Step 3
Before we get too far, we take stock of Nintendo's offerings. We've got the console itself, two Joy-
Cons, a dock, and the Joy-Con Grip.
With the Joy-Cons attached, the Switch console measures approximately 9.4" wide, 4" tall, and
only half an inch in depth.
Despite added functionality, the Joy-Con'd console only weighs 0.88 pounds— less than the 1.1
pound Wii U GamePad.
This document was generated on 2021-07-05 12:51:43 PM (MST).
© iFixit — CC BY-NC-SA www.iFixit.com Page 5 of 26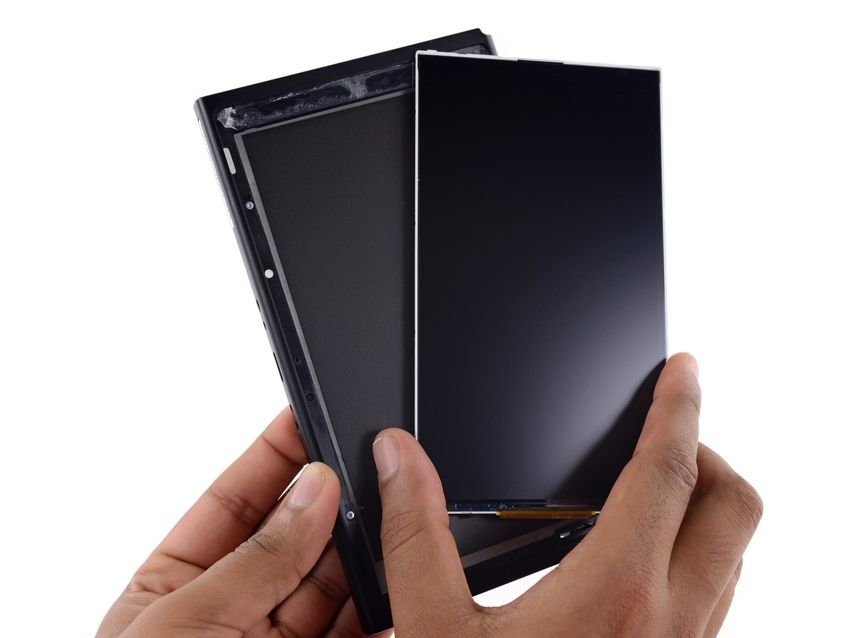
Nintendo Switch Teardown Guide ID: 78263 - Draft: 2021-07-05
Step 4
Let's switch this teardown into gear!
The first thing we note is the weird Domino's logo the model number—HAC-001.
Doing a quick turnaround, ports include:
MicroSD located underneath the (surprisingly stiff) kickstand
USB-C (for the dock)
Standard 3.5 mm headphone jack
Proprietary Nintendo game card slot
The fan vents through the top of the device, and initial reports say the Switch makes heavy use of
that cooling channel while docked and pushing 1080p graphics.
This document was generated on 2021-07-05 12:51:43 PM (MST).
© iFixit — CC BY-NC-SA www.iFixit.com Page 6 of 26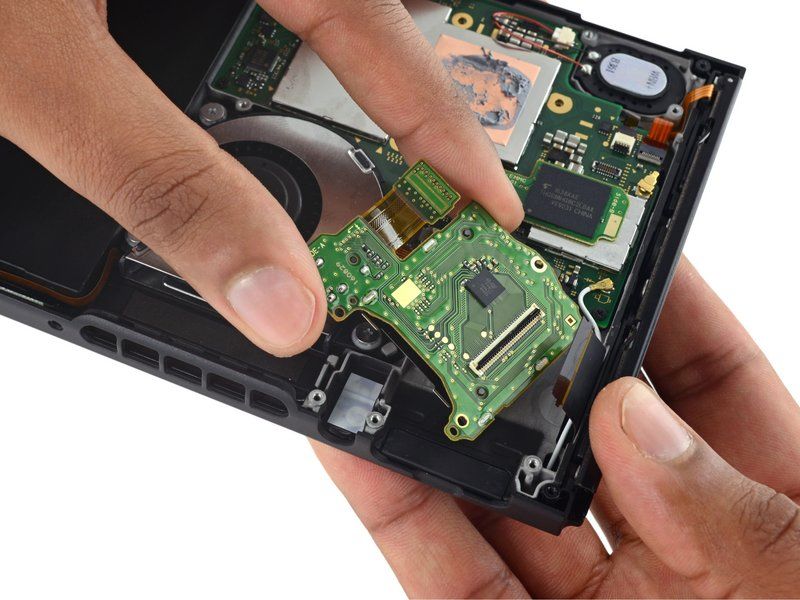
Nintendo Switch Teardown Guide ID: 78263 - Draft: 2021-07-05
Step 5
Disappointingly, tri-point screws guard the entrance to Hyrule the Switch, but we only have to flex
1/64th of our muscle.
Tri-points are Nintendo's version of a "Keep out" sign, but once you're past them the back cover
lifts off easily—no clips or adhesive.
Our first peek inside reveals—nothing much. Just a metal shield.
However, once un-cased the modular microSD card board is readily replaceable. Good news for
future storage!
This document was generated on 2021-07-05 12:51:43 PM (MST).
© iFixit — CC BY-NC-SA www.iFixit.com Page 7 of 26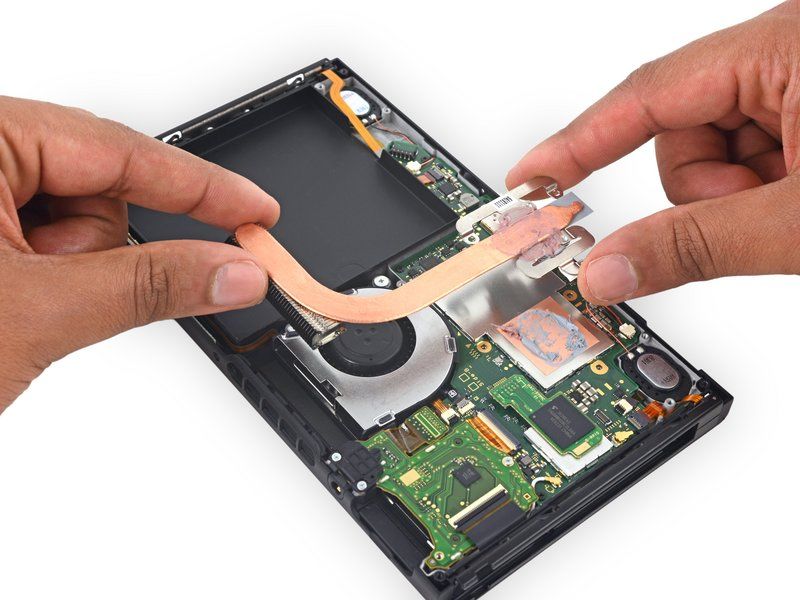
Nintendo Switch Teardown Guide ID: 78263 - Draft: 2021-07-05
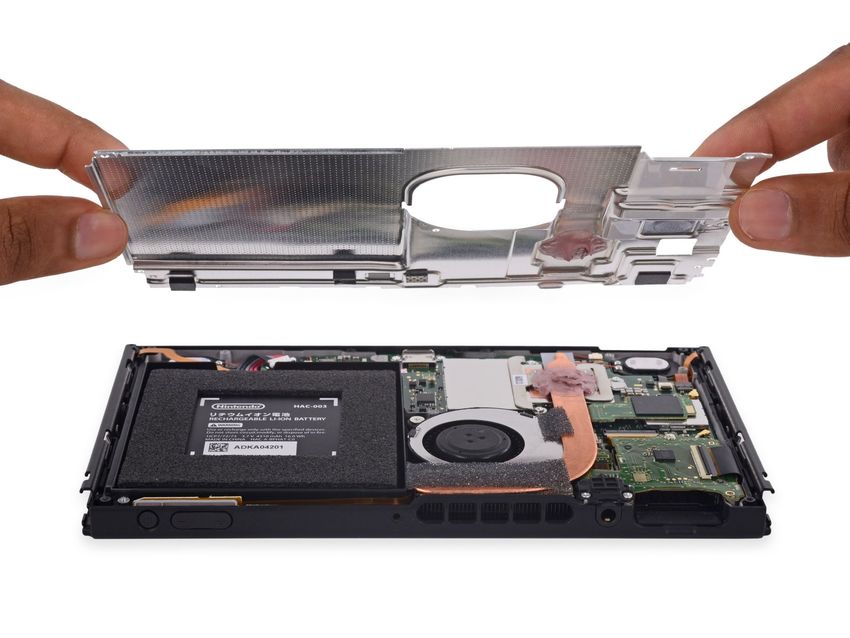
Step 6
And now for the moment we've all
been waiting for...the internal reveal.
It's finally happening!
It... looks like a computer! Battery,
heatpipe, thermal paste, fan. It's all
there.
The Switch's priorities are pretty
clearly battery and cooling.
By the looks of that purple blob, this
metal plate is more than structural
support. It's also a heat sink that
channels heat from the heat pipe to
the rear case.
This should diffuse the heat,
preventing hot spots that could
melt plastic or burn your fingers.
This document was generated on 2021-07-05 12:51:43 PM (MST).
© iFixit — CC BY-NC-SA www.iFixit.com Page 8 of 26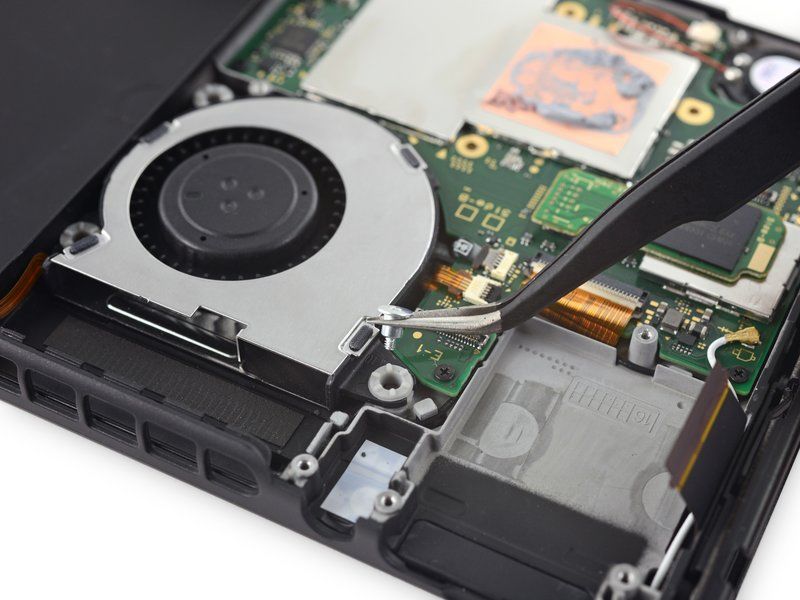
Nintendo Switch Teardown Guide ID: 78263 - Draft: 2021-07-05
Step 7
Safety first—we dispatch the battery connector before prying this sucker off its adhesive.
Most consoles have a power supply, rather than a battery, but the Switch's portability demands
wireless power. And that usually means a limited lifespan.
Unlike the 3DS, the Switch battery isn't meant to be user-replaceable. Instead Nintendo "plans
to" offer a paid replacement program.
The Switch packs a 16 Wh battery—bigger than the 5.6 Wh replaceable battery in the Wii U
GamePad. Then again, this is powering a console, not just a display.
This document was generated on 2021-07-05 12:51:43 PM (MST).
© iFixit — CC BY-NC-SA www.iFixit.com Page 9 of 26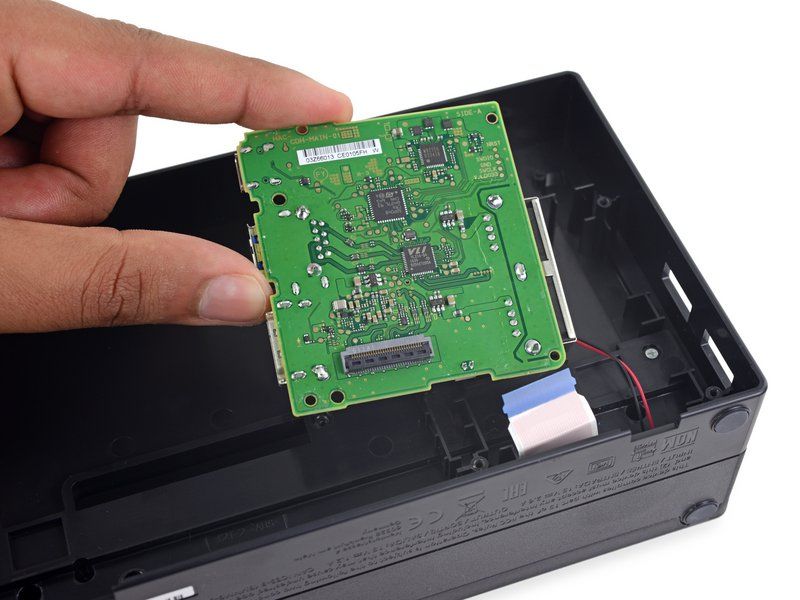
Nintendo Switch Teardown Guide ID: 78263 - Draft: 2021-07-05
Step 8
With battery bested, we turn to the next hardware priority: the cooling system.
The heatpipe is secured by simple Phillips screws, meaning thermal paste reapplication should be
a breeze.
We aim for the fan, but looks like you can only clean it from here—it's trapped under the I/O board.
So we pop out the game card reader, and attached headphone jack.
And no, we didn't lick any cartridges.
STMicroelectronics FingerTip touchscreen controller on the opposite side of the game card reader
This document was generated on 2021-07-05 12:51:43 PM (MST).
© iFixit — CC BY-NC-SA www.iFixit.com Page 10 of 26Nintendo Switch Teardown Guide ID: 78263 - Draft: 2021-07-05
Step 9
With I/O board free, we can focus on the fan.
This Delta electronics fan is held in place by three screws with rubber vibration damping mounts,
and is rated for 5 V and 0.33 A.
A fan can be a death sentence for battery life in any portable device, so it makes sense that
rumors have it that the graphics are drastically underclocked when you're undocked.
In addition to saving power by pushing fewer pixels, this ought to also let the Switch save juice
by running the fan quite a bit less.
This document was generated on 2021-07-05 12:51:43 PM (MST).
© iFixit — CC BY-NC-SA www.iFixit.com Page 11 of 26Nintendo Switch Teardown Guide ID: 78263 - Draft: 2021-07-05
Step 10
This is a well-connected motherboard; to get it free, we pop off the digitizer, backlight, and speaker
connectors, two antennas, and the two Joy-Con rails. And then remove six Phillips screws.
But hey, that's some awesome modularity. Even the eMMC storage pops off with an independent
PCB!
Nintendo made a 6.2" tablet with removable flash storage, so don't say it can't be done.
The storage board contains a single Toshiba THGBMHG8C2LBAIL 32 GB eMMC NAND Flash
IC.
Sadly, the modularity ends at the USB-C port. This high-wear component will require some intense
soldering skills to replace.
This document was generated on 2021-07-05 12:51:43 PM (MST).
© iFixit — CC BY-NC-SA www.iFixit.com Page 12 of 26Nintendo Switch Teardown Guide ID: 78263 - Draft: 2021-07-05
Step 11
A small gathering of Miis ICs
populates the front side of the
motherboard:
NVIDIA ODNX02-A2 (presumably
the Tegra X1-based SoC)
Samsung K4F6E304HB-MGCH 2
GB LPDDR4 DRAM (x2 for a total
of 4 GB)
Broadcom/Cypress BCM4356
802.11ac 2×2 + Bluetooth 4.1
SoC
Maxim Integrated
MAX77621AEWI+T three phase
buck regulator (x2)
Rohm BM92T36 USB-C controller
Texas Instruments BQ24193
single cell battery charger
(possibly)
Texas Instruments TMP451
remote/local temperature sensor
This document was generated on 2021-07-05 12:51:43 PM (MST).
© iFixit — CC BY-NC-SA www.iFixit.com Page 13 of 26Nintendo Switch Teardown Guide ID: 78263 - Draft: 2021-07-05
Step 12
And on the back of the motherboard:
Pericom Semiconductor
PI3USB30532 USB 3.0/DP1.2
matrix switch
Realtek ALC5639 audio codec
Maxim Integrated
MAX77620AEWJ+T PMIC
B1633 GCBRG HAC STD
T1001216 (probably a Nintendo
secure MCU)
STMicroelectronics LSM6DS3H
3-axis accelerometer/gyroscope
(likely)
Maxim Integrated MAX17050
battery fuel gauge
Rohm BH1603FVC ambient light
sensor
This document was generated on 2021-07-05 12:51:43 PM (MST).
© iFixit — CC BY-NC-SA www.iFixit.com Page 14 of 26Nintendo Switch Teardown Guide ID: 78263 - Draft: 2021-07-05
Step 13
The stereo speakers are lightly adhered to the rear case, but don't put up much of a fight.
These speakers are trying hard to pump that bass. The larger diaphragms will displace more air,
and a ported back allows for booming bass. But initial reports say they still " favor treble."
Phillips screws secure a Joy-Con rail to either end of the console.
Each rail has a set of pin contacts that interlock with contacts on the Joy-Cons to pass charge,
and button presses to the motherboard via ribbon cable.
This document was generated on 2021-07-05 12:51:43 PM (MST).
© iFixit — CC BY-NC-SA www.iFixit.com Page 15 of 26Nintendo Switch Teardown Guide ID: 78263 - Draft: 2021-07-05
Step 14
Unlike a lot of modern touchscreen devices, the digitizer on the Switch is not fused to the display,
meaning you can replace the two parts independently. Thanks for keeping repairability in mind
Nintendo!
The digitizer is adhered by a double-sided adhesive strip that runs around the perimeter of the
display. With a bit of heating and prying, we manage to coax the digitizer off.
But in all our excitement, our hasty teardowner severed the digitizer data cable. Fixers be
warned, this book opens longways.
Step 15
And for the cherry on this sundae?
The LCD display is easily
removable!
Increasing a device's portability
usually means increasing its
likelihood of getting dropped. So
way to go Nintendo for making a
more breakable device more
fixable.
With that, the console is dispatched
—but we're not done yet.
This document was generated on 2021-07-05 12:51:43 PM (MST).
© iFixit — CC BY-NC-SA www.iFixit.com Page 16 of 26Nintendo Switch Teardown Guide ID: 78263 - Draft: 2021-07-05
Now where did we put those
controllers...
Step 16
Nintendo provided some color coding to remind us that these seemingly identical Joy-Cons
actually house different hardware.
With different contents come different model numbers: The neon blue controller is designated
HAC-015, while the neon red is HAC-016.
Neon not your thing? If you're good at stickers, you can mask their true colors with a skin.
The Joy-Cons aren't waterproof, and Nintendo even recommends that you don't use them near
your fish tank.
... or a laptop, wireless headset, wireless printer, microwave, wireless speakers, smart watch,
cordless phone—basically, this is best used in a cave.
This document was generated on 2021-07-05 12:51:43 PM (MST).
© iFixit — CC BY-NC-SA www.iFixit.com Page 17 of 26Nintendo Switch Teardown Guide ID: 78263 - Draft: 2021-07-05
Step 17
Although we aren't geneticists, we bust out the scalpel spudger to compare these fraternal twins.
Each controller is fitted with a 1.9 Wh lithium-ion battery, Bluetooth, accelerometer/gyroscope, and
a haptic "HD Rumble" motor.
Battery replacements certainly aren't as easy as in the original Wii Remotes, but it can be done.
Nintendo claims that the Joy-Con controllers offer up to 20 hours of game time, but it'll take a
whole 3.5 hours to charge 'em back up.
If that doesn't cut it, the Joy-Con charging grip adds a battery boost as well as a (more
ergonomic) grip.
This document was generated on 2021-07-05 12:51:43 PM (MST).
© iFixit — CC BY-NC-SA www.iFixit.com Page 18 of 26Nintendo Switch Teardown Guide ID: 78263 - Draft: 2021-07-05
Step 18
There have been early rumors of
durability problems with the rail
mechanism for the Joy-Con units, so
we pause for a closer look.
The rail itself, on the edge of the
Switch Console, is metal and seems
like it should hold up pretty well.
Its mate on the Joy-Con side is
plastic, which is probably exactly
what you want—any failure will most
likely be in the detachable controller,
which should be cheaper to repair or
replace if necessary.
This document was generated on 2021-07-05 12:51:43 PM (MST).
© iFixit — CC BY-NC-SA www.iFixit.com Page 19 of 26Nintendo Switch Teardown Guide ID: 78263 - Draft: 2021-07-05
Step 19
The controllers shed their skin for a close-up comparison. We bring you, Red vs. Blue.
We aren't shallow—it's what's inside that counts. The red Joy-Con comes out ahead with IR
hardware and an NFC antenna.
The IR hardware consists of an IR camera and four IR LEDs. Nintendo says that the camera
can detect different hand shapes, distance, and in the future will be able to record video. As for
the LEDs, our bet is that they cast IR light onto nearby objects to make them easier to identify.
You know what both have though? Two Phillips screws holding the joystick and two Phillips screws
holding the board. That's what.
Blue, you are there for us repair folk when it counts.
On the bottom of each rests a hefty HD Rumble motor weighing in at 5.5 grams.
This document was generated on 2021-07-05 12:51:43 PM (MST).
© iFixit — CC BY-NC-SA www.iFixit.com Page 20 of 26Nintendo Switch Teardown Guide ID: 78263 - Draft: 2021-07-05
Step 20
We lay out the controller boards in search of more silicon. Here's the feature-rich red board in all its
glory (the blue board is shaped a bit differently, but has most of the same bits):
Broadcom BCM20734 Bluetooth 4.1/2.4 GHz Transceiver
STMicroelectronics ST21NFCB NFC controller
Macronix International MX25U4033E 4 Mb CMOS Flash
STMicroelectronics STM32P411 32-bit microcontroller
STMicroelectronics LSM6DS3H 3-axis accelerometer/gyroscope (likely)
Texas Instruments BQ24072 linear battery charger w/ power path management
Rohm BD27400GUL mono class-D audio amplifier
This document was generated on 2021-07-05 12:51:43 PM (MST).
© iFixit — CC BY-NC-SA www.iFixit.com Page 21 of 26Nintendo Switch Teardown Guide ID: 78263 - Draft: 2021-07-05
Step 21
Teardown Update: Just to make sure we were getting our fill of secret sauce, we popped the top
off the haptic feedback motor, a linear resonant actuator (LRA) that powers Switch's HD Rumble.
These LRAs look very similar to the ones we pulled out of the Oculus Touch controllers, HTC
Vive, and the Steam Controller.
We took a second to pop open a Oculus Touch haptic motor and it seems to be internally
identical to this one.
On the inside, this vibration motor seems fairly standard. It's essentially a voicecoil installed in a
moving mass assembly, flanked by a pair of powerful magnets.
However, it's interesting that this LRA seems to vibrate along its short axis, while many haptic
feedback motors that we've seen vibrate along their long axis.
This document was generated on 2021-07-05 12:51:43 PM (MST).
© iFixit — CC BY-NC-SA www.iFixit.com Page 22 of 26Nintendo Switch Teardown Guide ID: 78263 - Draft: 2021-07-05
Step 22
Before breaking into the Switch's home, we had our friends at Creative Electron perform some
recon. We didn't want to hit any booby traps.
Let's be honest: that X-ray image is cooler than our findings. For all intents and purposes, the dock
consists of a board in a box with a handful of ports including:
Two USB 2.0 Ports
AC Adapter Port
HDMI Port
One USB 3.0 Port
According to Nintendo, the rear USB port will only have USB 2.0 support at launch. A future update
will bring USB 3.0 support.
This document was generated on 2021-07-05 12:51:43 PM (MST).
© iFixit — CC BY-NC-SA www.iFixit.com Page 23 of 26Nintendo Switch Teardown Guide ID: 78263 - Draft: 2021-07-05
Step 23
Dockside fish and chips:
Macronix International MX25L512E 512 Kb CMOS flash
Macronix International MX25V2006E 2 Mb CMOS flash
Megachips STDP2550 Mobility DisplayPort (MyDP) to HDMI Converter
Rohm BM92T17 USB-C power delivery controller
STMicroelectronics STM32P048 32-bit microcontroller
VIA Labs VL210 USB 3.0 Hub Controller
Rohm BM92T55 USB-C power delivery controller
This document was generated on 2021-07-05 12:51:43 PM (MST).
© iFixit — CC BY-NC-SA www.iFixit.com Page 24 of 26Nintendo Switch Teardown Guide ID: 78263 - Draft: 2021-07-05
Step 24
It's time to hit you with our best shot some layout shots! Here are the Nintendo Switch's delicately
laid out internals.
Thanks again to our super-vision-having heroes over at Creative Electron!
Now we're gonna reassemble this thing as quick as we can—it's game time.
This document was generated on 2021-07-05 12:51:43 PM (MST).
© iFixit — CC BY-NC-SA www.iFixit.com Page 25 of 26Nintendo Switch Teardown Guide ID: 78263 - Draft: 2021-07-05
Step 25 — Final Thoughts
Nintendo Switch Repairability Score:
8 out of 10 (10 is the easiest to
repair)
Aside from the digitizer, screws
are used instead of adhesive to
hold components in place.
Most components, including the
analog sticks, game cartridge
reader, and headphone jack are
modular and can be replaced.
Batteries, while adhered to their
housing, are modular and can be
replaced by end users.
The digitizer and display are not
fused, reducing the cost of repair
but increasing complexity.
Proprietary tri-point screws
restrict users from opening the
Switch.
Replacing a display or digitizer
requires heating and prying
against strong adhesive.
This document was generated on 2021-07-05 12:51:43 PM (MST).
© iFixit — CC BY-NC-SA www.iFixit.com Page 26 of 26You can also read