UVMSQL Appliance Installation Guide - BeyondTrust
←
→
Page content transcription
If your browser does not render page correctly, please read the page content below
UVMSQL Appliance
                                                              Installation Guide

©2003-2020 BeyondTrust Corporation. All Rights Reserved. Other trademarks identified on this page are owned by their respective owners. BeyondTrust is not a chartered bank or trust company, or depository   TC:9/3/2020
institution. It is not authorized to accept deposits or trust accounts and is not licensed or regulated by any state or federal banking authority.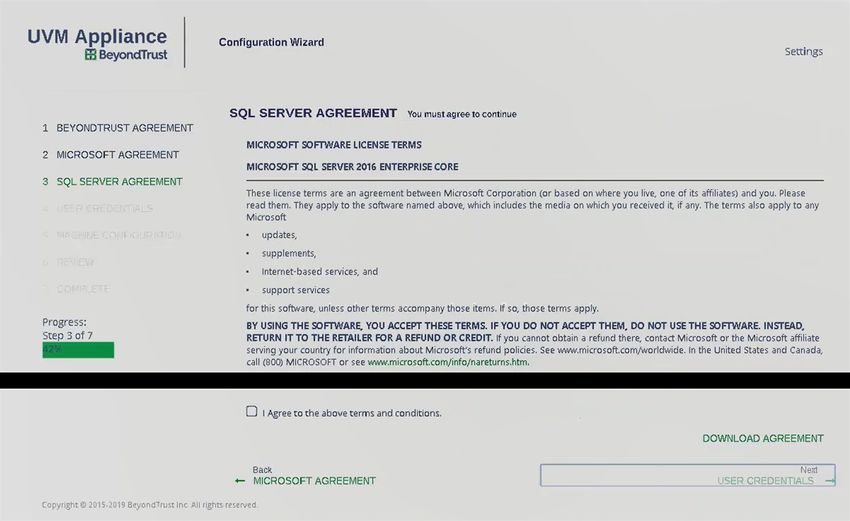
UVMSQL APPLIANCE
                                                                                                                                                                                          INSTALLATION GUIDE

                                  Table of Contents

                                       UVMSQL Appliance Installation Guide                                                                                                               3
                                       UVMSQL Appliance Requirements                                                                                                                     5
                                           Physical Appliance Specifications                                                                                                             6

                                       View UVMSQL Appliance Firewall Settings and Port Requirements                                                                                     8
                                       UVMSQL Setup Worksheet                                                                                                                          10
                                       PowerShell Commands for the UVMSQL Appliance                                                                                                    11
                                       Access Features from the UVM LCD Panel                                                                                                          13
                                       Set Up the UVMSQL Appliance                                                                                                                     14
                                       Configure the BeyondTrust UVMSQL Appliance                                                                                                      15

SALES: www.beyondtrust.com/contact                SUPPORT: www.beyondtrust.com/support                   DOCUMENTATION: www.beyondtrust.com/docs                                                                        2
©2003-2020 BeyondTrust Corporation. All Rights Reserved. Other trademarks identified on this page are owned by their respective owners. BeyondTrust is not a chartered bank or trust company, or depository   TC: 9/3/2020
institution. It is not authorized to accept deposits or trust accounts and is not licensed or regulated by any state or federal banking authority.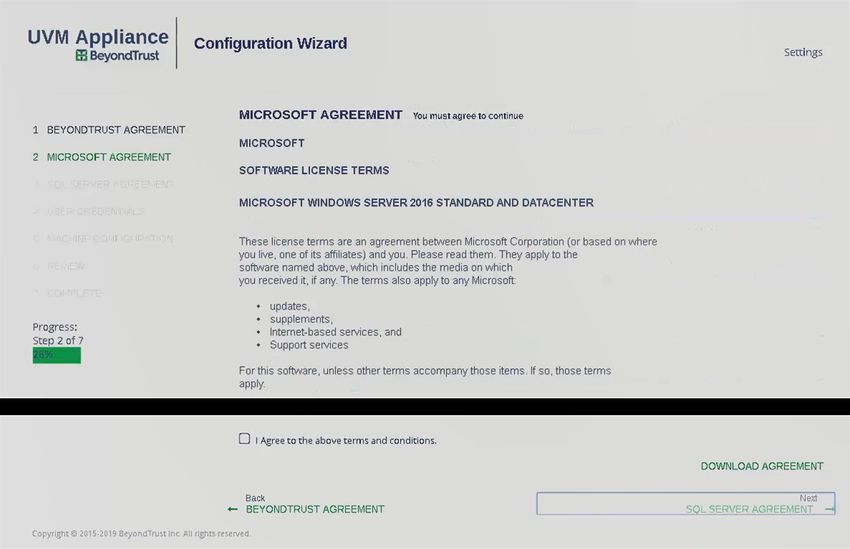
UVMSQL APPLIANCE
                                                                                                                                                                                           INSTALLATION GUIDE

      UVMSQL Appliance Installation Guide
      The UVMSQL cluster appliance is specifically designed to offer SQL Server Always On Availability Group (AOAG) configuration on a
      BeyondTrust UVM appliance. This guide is intended for network security administrators responsible for protecting their organization's
      computing assets. The administrator should be familiar with networking and security, as well as with SQL Server.

      FCC Certification
      This equipment has been tested and found to comply with the limits for a Class A digital device pursuant to Part 15 of the FCC Rules.
      These limits are designed to provide reasonable protection against harmful interference when the equipment is operated in a
      commercial environment. This equipment generates, uses, and can radiate radio frequency energy and, if not installed and used in
      accordance with the manufacturer’s instruction manual, may cause harmful interference with radio communications.
      Operation of this equipment in a residential area is likely to cause harmful interference, in which case you will be required to correct
      the interference at your own expense.

      Limited Hardware Appliance Warranty
      This hardware appliance is accompanied by a three-year manufacturer’s warranty based on the invoice date. (Extended warranties
      available on request.) The warranty covers all hardware, including internal components supplied in this shipment. The warranty does
      not cover additional items, such as keyboards, monitors, and mice, not included in this shipment. During the warranty period, the
      appliance will be repaired or replaced at no cost under the warranty terms.
      Due to continuing changes in the computer industry, if a replacement is necessary, the appliance manufacturer reserves the right to
      make product substitutions of equal or greater value.
      Do not ship any appliance without first contacting BeyondTrust Technical Support to coordinate any repairs or replacements. Do not
      try to repair the appliance yourself.
      Please back up all data before having the appliance serviced or repaired. Neither BeyondTrust nor the appliance manufacturer
      warrants that operation of the appliance will be uninterrupted or error-free. In no event will BeyondTrust or the appliance
      manufacturer be responsible or liable for loss or integrity of any data on the appliance or any storage media.

      Warranty Invalidation
      This warranty is void in the event that:

              l   the appliance is damaged due to accident, abuse, misuse, problems with electrical power, modifications or servicing not
                  authorized by BeyondTrust or the appliance manufacturer, or failure to operate in accordance with the appliance instructions;
              l   serial tags, receiving numbers, product stickers, or manufacturer seals have been removed, altered, or tampered with;
              l   the appliance is opened for any reason;
              l   the appliance is damaged due to improper or inadequate packaging when returned for repair or replacement;
              l   the appliance has been tampered with, such as overclocking.

      Labor and services performed on items or systems that are found not to be defective may be subject to a separate charge. In addition,
      the appliance manufacturer reserves the right to charge a ten percent restocking fee for items returned which are found not to be
      defective.

SALES: www.beyondtrust.com/contact                SUPPORT: www.beyondtrust.com/support                   DOCUMENTATION: www.beyondtrust.com/docs                                                                        3
©2003-2020 BeyondTrust Corporation. All Rights Reserved. Other trademarks identified on this page are owned by their respective owners. BeyondTrust is not a chartered bank or trust company, or depository   TC: 9/3/2020
institution. It is not authorized to accept deposits or trust accounts and is not licensed or regulated by any state or federal banking authority.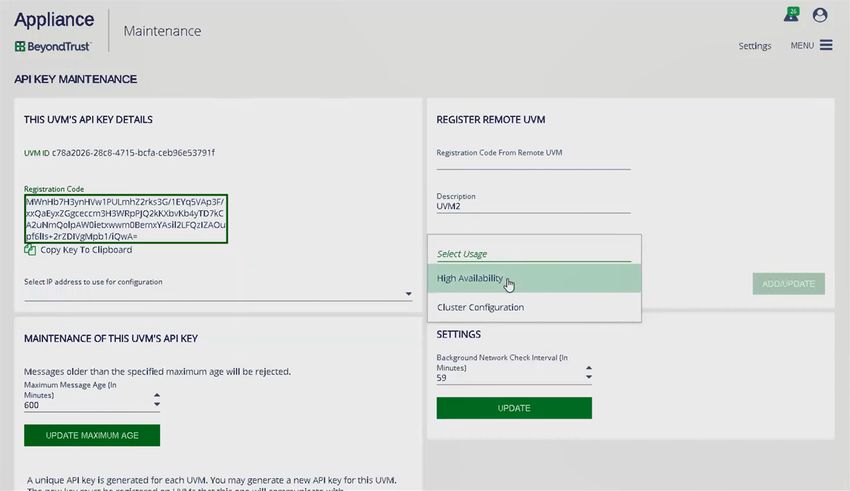
UVMSQL APPLIANCE
                                                                                                                                                                                           INSTALLATION GUIDE

                      IMPORTANT!

          Do not log on to the Console or Remote Desktop to the virtual appliance unless directed to do so by BeyondTrust Technical
          Support. Installing any software or changing any additional settings may void your warranty.

SALES: www.beyondtrust.com/contact                SUPPORT: www.beyondtrust.com/support                   DOCUMENTATION: www.beyondtrust.com/docs                                                                        4
©2003-2020 BeyondTrust Corporation. All Rights Reserved. Other trademarks identified on this page are owned by their respective owners. BeyondTrust is not a chartered bank or trust company, or depository   TC: 9/3/2020
institution. It is not authorized to accept deposits or trust accounts and is not licensed or regulated by any state or federal banking authority.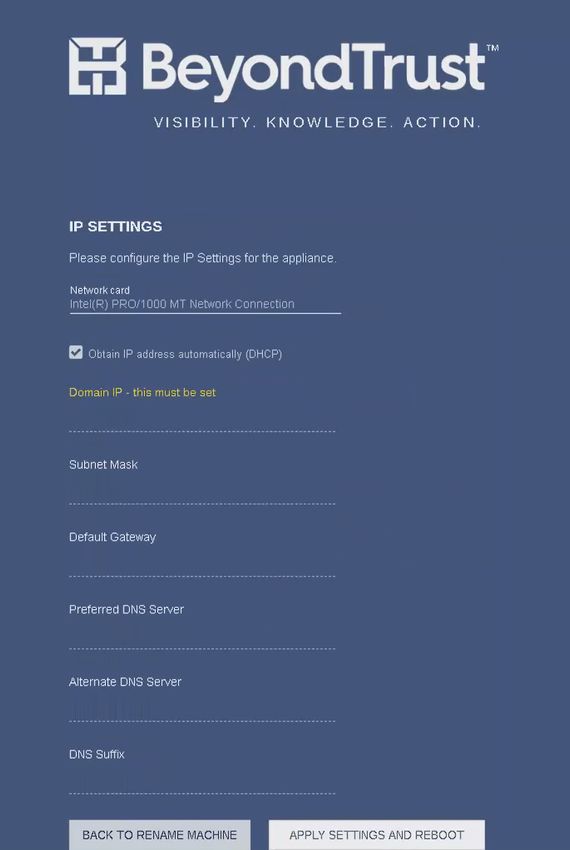
UVMSQL APPLIANCE
                                                                                                                                                                                           INSTALLATION GUIDE

      UVMSQL Appliance Requirements

      Prerequisites

      The BeyondTrust UVMSQL Appliance requires the following at a minimum:

              l   Two available power outlets
              l   A high-speed network connection
              l   A network router or switch
              l   A unique, static IPv4 address for the BeyondTrust appliance
              l   A private DNS A-record resolving to the static IP of your appliance.
              l   An SSL web server certificate, intermediate SSL certificates, and SSL root, OR a self-signed certificate.

      Preliminary Steps

      You should take several steps before the BeyondTrust hardware is delivered and installed:

            1. Allocate the necessary rack space for the appliance. Ensure the space has the necessary power and network access. The
               rack space required is 1U.
            2. Determine a machine name (15 characters or less) and reserve a static IP address for each UVMSQL appliance on the
               network.
            3. Identify the domain that the UVMSQL appliances will be joined to for the purpose of clustering.
            4. Identify or create Domain Administrator credentials to be used during the cluster configuration process.
            5. Identify the organizational unit (OU) to which the UVMSQL appliances will belong. This OU is required to have group policy
               inheritance blocked.
            6. Identify or create the Group Managed Service Account that will be used for the ongoing operation of the cluster.

                    For more information about Group Managed Service accounts, please see https://techcommunity.microsoft.com/t5/Core-
                    Infrastructure-and-Security/Windows-Server-2012-Group-Managed-Service-Accounts/ba-p/255910.

            7. Allocate a name and static IP address for the cluster that will be created with the UVMSQL appliances.
            8. Allocate a name and static IP address for the availability group listener.

                    For a useful tool to prepare for initial setup, please see "UVMSQL Setup Worksheet" on page 10.

      Client Requirements
      Supported browsers:

              l   Microsoft Edge
              l   Firefox
              l   Google Chrome

SALES: www.beyondtrust.com/contact                SUPPORT: www.beyondtrust.com/support                   DOCUMENTATION: www.beyondtrust.com/docs                                                                        5
©2003-2020 BeyondTrust Corporation. All Rights Reserved. Other trademarks identified on this page are owned by their respective owners. BeyondTrust is not a chartered bank or trust company, or depository   TC: 9/3/2020
institution. It is not authorized to accept deposits or trust accounts and is not licensed or regulated by any state or federal banking authority.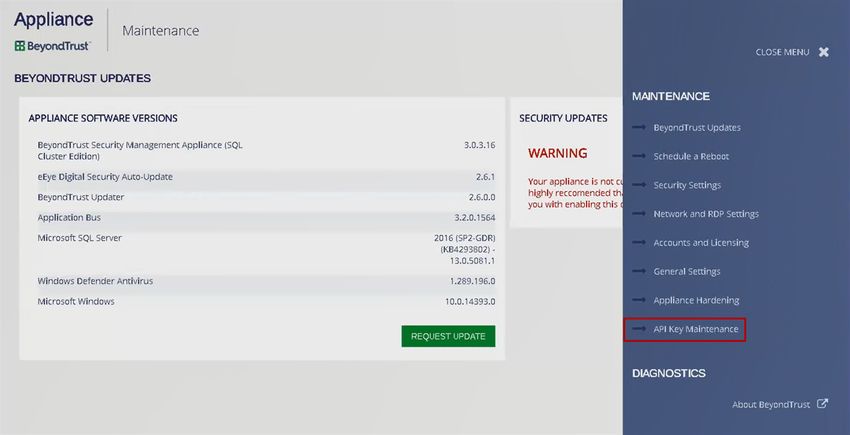
UVMSQL APPLIANCE
                                                                                                                                                                                           INSTALLATION GUIDE

              l   Safari
              l   Microsoft Internet Explorer (IE) 11

      Appliance Requirements

              l   10/100/1000 MB Ethernet Connection
              l   TCP/IP v4
              l   Rack Mount

      UVMSQL Package Contents
      The UVMSQL package consists of the following items. Please verify all materials listed are present and free from visible damage or
      defects before proceeding. If any item appears to be missing or damaged, please contact BeyondTrust Technical Support.

              l   UVMSQL Appliance
              l   Two Power Cords
              l   Getting Started Guide
              l   Rack Mount Kit
              l   Bezel Key
              l   Certificate of Authenticity with SQL Licenses

      Physical Appliance Specifications

      UVMSQL Specifications

        Specification                                       Description
        AC Input Voltage                                    110 to 240 V AC, autoranging
        Rated Input Frequency                               50 to 60 Hz
        Cooling                                             8 Standard Fans, 2 Standard 1U Heatsinks
        Chassis                                             Chassis with up to 8, 3.5" Hard Drives
        Dimensions                                          1U rack-mountable server
                                                            H: 1.68 in. (4.28 cm) (10.75 in. shipping)
                                                            W: 18.97 in. (48.18 cm) (24 in. shipping)
                                                            D: 26.89 in. (68.30 cm) (35.75 in. shipping)
                                                            Weight: approx 45 lbs. (48 lbs. shipping)
        Microprocessor                                      2 x Intel Xeon Silver 4110, 2.1 GHz, 8-Core, 16-Thread, 11M Cache, Turbo, HT
        Hard Drive                                          8 x 960 GB SSD SAS Mix Use 12Gbps 512n 2.5in Hot-plug
        RAM                                                 256 GB
        RAID Configuration                                  RAID 10
        RAID Controller                                     PERC H740P, 8GB NV Cache
        NIC                                                 Broadcom 57416 2 Port 10Gb Base-T + 5720 2 Port 1Gb Base-T, rNDC
        Power Supply                                        Dual, hot-plug, Redundant Power Supply (1+1), 750W
        Power Cords                                         2 x NEMA 5-15P to C13 Wall Plug, 125 Volt, 15 AMP, 10 Feet (3m)

SALES: www.beyondtrust.com/contact                SUPPORT: www.beyondtrust.com/support                   DOCUMENTATION: www.beyondtrust.com/docs                                                                        6
©2003-2020 BeyondTrust Corporation. All Rights Reserved. Other trademarks identified on this page are owned by their respective owners. BeyondTrust is not a chartered bank or trust company, or depository   TC: 9/3/2020
institution. It is not authorized to accept deposits or trust accounts and is not licensed or regulated by any state or federal banking authority.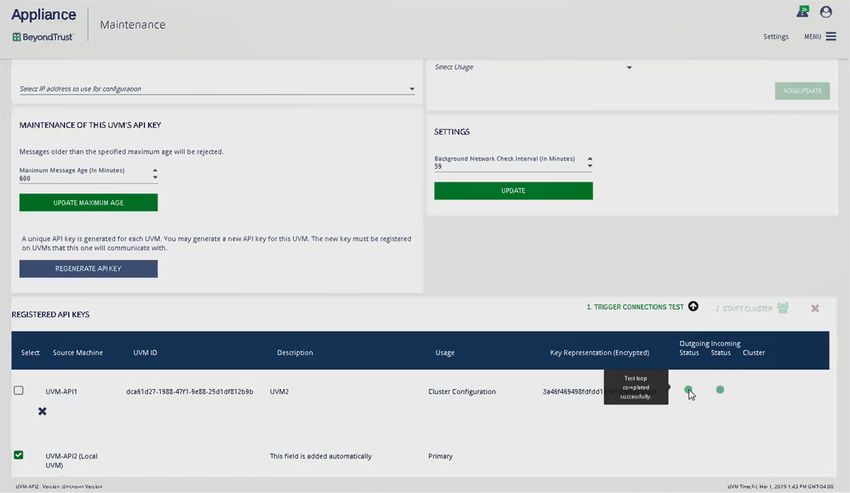
UVMSQL APPLIANCE
                                                                                                                                                                                           INSTALLATION GUIDE

        Rack Rails                                          ReadyRails™ Sliding Rails with Cable Management Arm
        PCIe Riser                                          Risers with up to 4, x8 PCIe slots + 2, x16 PCIe slots
        Operating System                                    Embedded Windows Server 2016 Standard
        Database                                            Microsoft SQL Server 2016 Enterprise

                    Note: All BeyondTrust UVM appliances, physical and virtual, are licensed for the Microsoft Windows Server Operating
                    System and Microsoft SQL Server based on Microsoft Core CAL licenses. Appliances ship with the Microsoft Certificate of
                    Authenticity (COA) as proof of this licensing.

SALES: www.beyondtrust.com/contact                SUPPORT: www.beyondtrust.com/support                   DOCUMENTATION: www.beyondtrust.com/docs                                                                        7
©2003-2020 BeyondTrust Corporation. All Rights Reserved. Other trademarks identified on this page are owned by their respective owners. BeyondTrust is not a chartered bank or trust company, or depository   TC: 9/3/2020
institution. It is not authorized to accept deposits or trust accounts and is not licensed or regulated by any state or federal banking authority.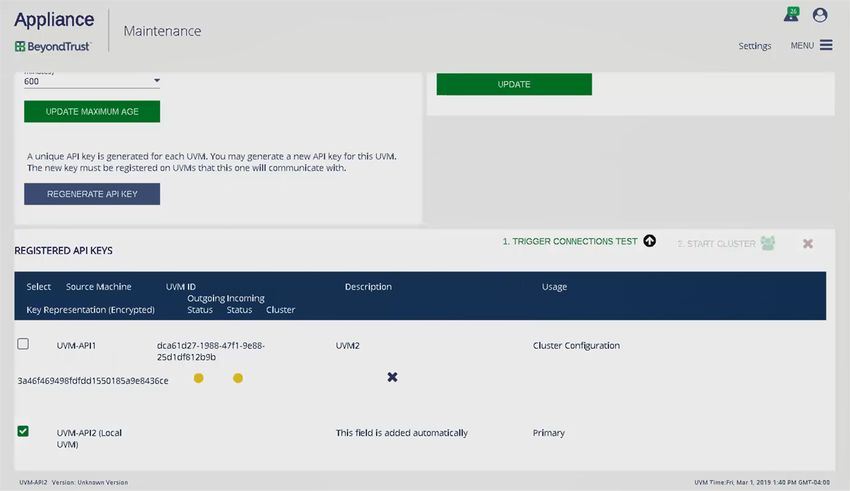
UVMSQL APPLIANCE
                                                                                                                                                                                           INSTALLATION GUIDE

      View UVMSQL Appliance Firewall Settings and Port
      Requirements
      Firewall Settings

              l   All outgoing ports are allowed.
              l   Incoming ports are limited to the default Windows rules (includes allowing DCOM), plus the following:

      TCP Ports

                                                                                                                                                                                                        Initial
                         Port                                      Purpose                                        Target Program/System Resource
                                                                                                                                                                                                        Status
        80                                           HTTP                                          System                                                                                             Enabled
        443                                          HTTPS                                         System                                                                                             Enabled
        445                                          SMB                                           System                                                                                             Disabled
        1433                                         SQL Server                                    C:\Program Files\Microsoft SQL                     Enabled
                                                                                                   Server\MSSQL13.MSSQLSERVER\MSSQL\Binn\sqlservr.exe
        2000                                         App Bus                                       C:\Program Files(x86)\Common Files\eEye Digital                                                    Disabled
                                                                                                   Security\Application Bus\eeyeevnt.exe
        2383                                         SQL Analysis Services                         C:\Program Files\Microsoft SQL                                                                     Enabled
                                                                                                   Server\MSAS13.MSSQLSERVER\OLAP\bin\msmdsrv.exe
        3389                                         RDP                                           C:\Windows\System32\svchost.exe                                                                    Enabled
        4422                                         Session Monitoring SSH                        C:\Program Files(x86)\eEye Digital Security\Retina                                                 Enabled
                                                                                                   CS\pbsmd.exe
        4489                                         Session Monitoring RDP                        C:\Program Files(x86)\eEye Digital Security\Retina                                                 Enabled
                                                                                                   CS\pbsmd.exe
        5022                                         SQL Server Mirroring                          C:\Program Files\Microsoft SQL                     Enabled
                                                                                                   Server\MSSQL13.MSSQLSERVER\MSSQL\Binn\sqlservr.exe
        5985                                         WinRM                                         System; Restricted to 10.0.0.0-16                                                                  Enabled
        8530                                         WSUS HTTP                                     System                                                                                             Disabled
        8531                                         WSUS HTTPS                                    System                                                                                             Disabled
        10001                                        Central Policy v1                             C:\Program Files(x86)\eEye Digital Security\Retina                                                 Enabled
                                                                                                   CS\REMCentralPolicyService.exe
        21690                                        App Bus                                       (C:\Program Files(x86)\Common Files\eEye Digital                                                   Enabled
                                                                                                   Security\Application Bus\eeyeevnt.exe
        21690                                        Event Server                                  C:\Program Files(x86)\Common Files\eEye Digital                                                    Enabled
                                                                                                   Security\Event Server\REMEventsSvc.exe
        21691                                        Android Mobile Connector                      C:\Program Files(x86)\eEye Digital Security\Retina                                                 Disabled
                                                     via BeyondInsight Web                         CS\eEye.RetinaCS.WebService.exe
                                                     Service

SALES: www.beyondtrust.com/contact                SUPPORT: www.beyondtrust.com/support                   DOCUMENTATION: www.beyondtrust.com/docs                                                                        8
©2003-2020 BeyondTrust Corporation. All Rights Reserved. Other trademarks identified on this page are owned by their respective owners. BeyondTrust is not a chartered bank or trust company, or depository   TC: 9/3/2020
institution. It is not authorized to accept deposits or trust accounts and is not licensed or regulated by any state or federal banking authority.
UVMSQL APPLIANCE
                                                                                                                                                                                           INSTALLATION GUIDE

      UDP Port

                                                                                                                                                                                                    Initial
        Port             Purpose                                                       Target Program/System Resource
                                                                                                                                                                                                    Status
        4609 Appliance                              C:\Program Files(x86)\Common Files\eEye Digital                                                                                            Enabled
             Discovery                              Security\Scheduler\eeyeschedulersvc.exe

      ICMPv4 Protocol

                                                                                                                         Target Program/System                                                        Initial
        Port                                              Purpose                                                                                                             Protocol
                                                                                                                                Resource                                                              Status
        Any       ICMP Type 3, Code 4- Destination Unreachable                                                      Any                                                       ICMPv4              Enabled
                  Fragmentation Needed
        Any       ICMP Type 8- Echo                                                                                 Any                                                       ICMPv4              Enabled

SALES: www.beyondtrust.com/contact                SUPPORT: www.beyondtrust.com/support                   DOCUMENTATION: www.beyondtrust.com/docs                                                                        9
©2003-2020 BeyondTrust Corporation. All Rights Reserved. Other trademarks identified on this page are owned by their respective owners. BeyondTrust is not a chartered bank or trust company, or depository   TC: 9/3/2020
institution. It is not authorized to accept deposits or trust accounts and is not licensed or regulated by any state or federal banking authority.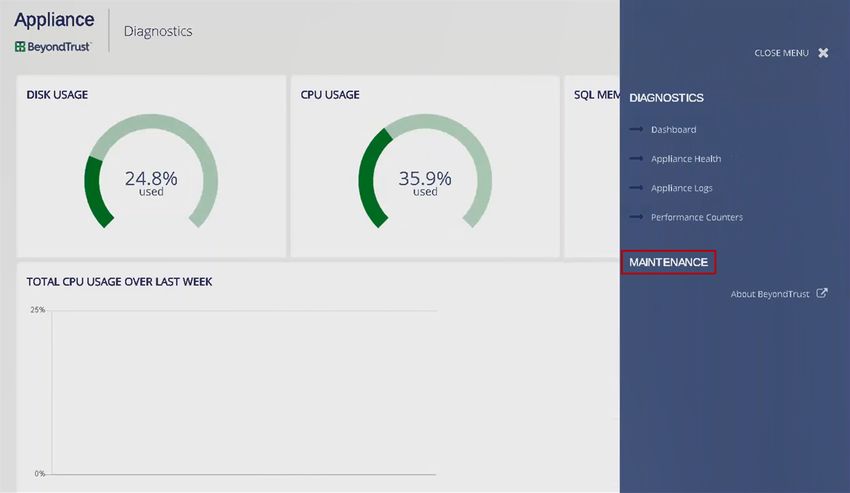
UVMSQL APPLIANCE
                                                                                                                                                                                           INSTALLATION GUIDE

      UVMSQL Setup Worksheet
      UVMSQL Machine Name
      Each UVMSQL appliance requires a unique name using Microsoft naming standard.
      UVMSQL Appliance Name: ________________________________________________________________________________

      Domain Admin Credentials
      Each UVMSQL appliance must be joined to an Active Directory domain. Please note the credentials used to make this connection.
      Username: __________________________________________ Password: _________________________________________

      Organizational Unit (OU) Name
      The OU name is the location where the UVMSQL appliance will exist in Active Directory as a part of the clustering process.
      Organizational Unit Name: _________________________________________________________________________________

      Security Group for UVMSQL Appliances
      The security group that all UVMSQL appliances will be added to during AOAG configuration. This group must be created in the OU.
      Server Security Group Name: ______________________________________________________________________________

      Security Group for Service Account
      This group is used to give the Group Managed Service Account local administrator permissions on the UVMSQL appliance. The
      security group must be created in the OU.
      Service Account Security Group Name: ______________________________________________________________________

      Group Managed Service Account (gMSA)
      This account will be used in the AOAG configuration process. The associated Windows services on the UVMSQL appliance will
      continue to run under this account. The Server Security Group must be given permission to retrieve the password of the gMSA. The
      gMSA must to be a member of the Service Account Security Group.
      Username: _____________________________________________________________________________________________

      Name and Static IP for Windows Cluster
      Every cluster has an endpoint consisting of a name and an IP address.
      Cluster Name: ________________________________________ Cluster IP: _________________________________________

      Listener Name and Static IP Address for Each Availability Group
      Listener Name: ________________________________________ Listener IP: _______________________________________

SALES: www.beyondtrust.com/contact                SUPPORT: www.beyondtrust.com/support                   DOCUMENTATION: www.beyondtrust.com/docs                                                                       10
©2003-2020 BeyondTrust Corporation. All Rights Reserved. Other trademarks identified on this page are owned by their respective owners. BeyondTrust is not a chartered bank or trust company, or depository   TC: 9/3/2020
institution. It is not authorized to accept deposits or trust accounts and is not licensed or regulated by any state or federal banking authority.
UVMSQL APPLIANCE
INSTALLATION GUIDE
PowerShell Commands for the UVMSQL Appliance
This section contains a sample of PowerShell commands that could be used to prepare the OU, security groups, and gMSA. This
example assumes the following:
Domain UVMLAND.LOCAL
OU UVMSQL.CLUSTER
Server security group UVMServerGroup
Service account security group UVMSvcAcctGroup
Group Managed Service Account UVMSvcAccount
Create an Organizational Unit (OU) for the UVM appliances
New-ADOganizationalUnit -Name "CLUSTER" -Path "OU=UVMSQL,DC=UVMLAND,DC=LOCAL"
Block inheritance for the OU
Set-GPinheritance -Target "OU=CLUSTER,OU=UVMSQL,DC=UVMLAND,DC=LOCAL" -IsBlocked Yes
Create a Security Group for the UVM servers in the OU
New-ADGroup -Name "UVMServerGroup" -SamAccountName UVMServerGroup -GroupCategory Security -
GroupScope Global -DisplayName "UVM Servers" -Path "OU=CLUSTER,OU=UVMSQL,DC=UVMLAND,DC=LOCAL" -
Description "Members of this group are UVM Appliances"
Create a Security Group for the UVM service accounts in the OU
New-ADGroup -Name "UVMSvcAcctGroup" -SamAccountName UVMSvcAcctGroup -GroupCategory Security -
GroupScope Global -DisplayName "UVM Service Accounts" -Path
"OU=CLUSTER,OU=UVMSQL,DC=UVMLAND,DC=LOCAL" -Description "Members of this group are UVM Service
Accounts"
SALES: www.beyondtrust.com/contact SUPPORT: www.beyondtrust.com/support DOCUMENTATION: www.beyondtrust.com/docs 11
©2003-2020 BeyondTrust Corporation. All Rights Reserved. Other trademarks identified on this page are owned by their respective owners. BeyondTrust is not a chartered bank or trust company, or depository TC: 9/3/2020
institution. It is not authorized to accept deposits or trust accounts and is not licensed or regulated by any state or federal banking authority.UVMSQL APPLIANCE
INSTALLATION GUIDE
Create the KDS Root Key if one is not already created for the forest
Note: This is required for creating gMSAs. The EffectiveImmediately argument takes about ten hours to create and
propagate the key.
Import-Module ActiveDirectory
Add-KdsRootKey -EffectiveImmediately
or
Add-KdsRootKey -EffectiveTime ((Get-Date).AddHours(-10)) //to use immediately
Create the Group Managed Service Account (gMSA) giving the UVM Servers security group permission to retrieve
the managed password
New-ADServiceAccount -Name UVMSvcAccount -DnsHostName UVMSvcAccount.UVMLAND.LOCAL -
PrincipalsAllowedToRetrieveManagedPassword "UVMServerGroup"
Add the gMSA to the UVM service accounts security group
Add-ADGroupMember -Identity UVMSvcAcctGroup -Members "CN=UVMSvcAccount,CN=Managed Service
Accounts,DC=UVMLAND,DC=LOCAL"
Give the UVM service accounts group full control of the UVM OU
$ou = "AD:\OU=CLUSTER,OU=UVMSQL,DC=UVMLAND,DC=LOCAL"
$group = Get-ADGroup UVMSvcAcctGroup
$group_sid = New-Object System.Security.Principal.SecurityIdentifier $group.SID
$ou_acl = Get-Acl $ou
$ace = New-Object System.DirectoryServices.ActiveDirectoryAccessRule $group_sid, "GenericAll",
"Allow"
$ou_acl.AddAccessRule($ace)
Set-Acl -AclObject $ou_acl $ou
SALES: www.beyondtrust.com/contact SUPPORT: www.beyondtrust.com/support DOCUMENTATION: www.beyondtrust.com/docs 12
©2003-2020 BeyondTrust Corporation. All Rights Reserved. Other trademarks identified on this page are owned by their respective owners. BeyondTrust is not a chartered bank or trust company, or depository TC: 9/3/2020
institution. It is not authorized to accept deposits or trust accounts and is not licensed or regulated by any state or federal banking authority.UVMSQL APPLIANCE
INSTALLATION GUIDE
Access Features from the UVM LCD Panel
You can access the following features from the UVM LCD panel.
Access Settings Menu
To access the settings:
The LCD panel displays Please wait. Once the appliance completes the powering procedures, UVM displays the following actions.
LCD Panel Functionality
LCD Panel Description
Press the check to enter or accept the setting.
Press the up or down arrow to navigate through the menus.
Press the right or left arrow to access settings in the menu.
Press the X to cancel the setting.
Enable RDP
From the LCD panel, start where UVM 20 Ready is displayed.
1. Press the check to enter Settings / Show IP.
2. Press check . The IP address of the appliance is displayed.
3. Hold both the up and down button for four seconds. Do not do anything else between the previous step and this one.
Reset Administrator Password
1. Check the Allow LCD Panel to Reset Administrator Password box.
2. If needed, go to the appliance to reset the administrator password.
3. Select Show IP to view the IP address.
4. Hold the up and down buttons simultaneously on the UVM LCD panel. A random password is generated.
5. Press the check to accept the changed password.
Power Off
You can power off the appliance using the LCD panel. To power off, on the LCD panel, select Power Off. The appliance powers off.
SALES: www.beyondtrust.com/contact SUPPORT: www.beyondtrust.com/support DOCUMENTATION: www.beyondtrust.com/docs 13
©2003-2020 BeyondTrust Corporation. All Rights Reserved. Other trademarks identified on this page are owned by their respective owners. BeyondTrust is not a chartered bank or trust company, or depository TC: 9/3/2020
institution. It is not authorized to accept deposits or trust accounts and is not licensed or regulated by any state or federal banking authority.UVMSQL APPLIANCE
INSTALLATION GUIDE
Set Up the UVMSQL Appliance
Your UVMSQL Appliance is designed to be configured and used with a web browser.
IMPORTANT!
If you purchased Professional Services, schedule your engagement with your Professional Services representative before
starting the configuration wizard.
Power on the Appliance
1. Plug the power cables for the appliance into a safe power source. The appliance’s power supplies will automatically switch
between 120v and 240v, as needed.
2. Plug a network cable into the network interface port.
3. Press and release the power button on the front of the appliance. The power LED immediately to the right of the reset button
will illuminate, and the HDD activity LED (immediately to the right of the power LED) will begin to flash. Initialization of the
appliance will complete in about 60 seconds.
Note: The NIC1 and NIC2 LEDs may illuminate and show activity even when the appliance is not powered on; therefore, it
is important to check the power and HDD LEDs to confirm that the appliance is on.
Perform Initial Network Configuration
The appliance is configured to use DHCP and will receive an assigned IP address. To access your appliance the first time, open a
browser on a device on the same network subnet as the appliance. Enter the appliance's factory IP address as displayed on the LCD
screen, preceded by https:// (example, https://10.10.123.456). You can find this IP address using the LCD display of the appliance.
You will need the IP address later in the process when you configure the UVM Appliance.
Display IP Address
To display the IP address, select Show IP on the LCD panel. The IP address automatically displays.
Automatically Enter IP Address
On the LCD panel, select Config IP, then select Auto DHCP. The UVM automatically updates the IP address to the DHCP protocol.
Manually Enter IP Address
On the LCD panel, select Config IP, then select Manual. Enter the IP Address, Subnet Mask, Gateway, DNS 1 and DNS 2.
Hardware Notes
The integrated Dell Remote Access Controller (iDRAC) is configured to use the primary interface (LAN1). The iDRAC shares the
interface with Windows. By default, iDRAC is not configured.
The appliance has more than one adapter. If all adapters are used, the adapter chosen during scan time is determined by the route
associated with it.
SALES: www.beyondtrust.com/contact SUPPORT: www.beyondtrust.com/support DOCUMENTATION: www.beyondtrust.com/docs 14
©2003-2020 BeyondTrust Corporation. All Rights Reserved. Other trademarks identified on this page are owned by their respective owners. BeyondTrust is not a chartered bank or trust company, or depository TC: 9/3/2020
institution. It is not authorized to accept deposits or trust accounts and is not licensed or regulated by any state or federal banking authority.UVMSQL APPLIANCE
INSTALLATION GUIDE
Configure the BeyondTrust UVMSQL Appliance
1. To access your appliance the first time, open a browser on a
device on the same network subnet as the appliance. Enter the
appliance's factory IP address as displayed on the LCD screen,
preceded by https:// (example, https://10.10.123.456). You can
find this IP address using the LCD display of the appliance.
2. You will see an SSL certificate notification. Click Continue. You
will replace the default certificate with a signed certificate later in
the process.
3. On the welcome page, create a name for your UVMSQL
appliance.
IMPORTANT!
Once you have named your appliance, it cannot be renamed.
SALES: www.beyondtrust.com/contact SUPPORT: www.beyondtrust.com/support DOCUMENTATION: www.beyondtrust.com/docs 15
©2003-2020 BeyondTrust Corporation. All Rights Reserved. Other trademarks identified on this page are owned by their respective owners. BeyondTrust is not a chartered bank or trust company, or depository TC: 9/3/2020
institution. It is not authorized to accept deposits or trust accounts and is not licensed or regulated by any state or federal banking authority.UVMSQL APPLIANCE
INSTALLATION GUIDE
4. On the IP Settings page, select the network card to use. The
drop-down list shows only connected network ports. If you select
Obtain IP address automatically, the following fields will fill
automatically. Otherwise, enter the IP and DNS information.
Note: The domain IP must be a static IPv4 address. Use quad-
dotted notation for the subnet mask (example, 255.255.255.0).
5. If you are satisfied with the settings, click Apply Settings and
Reboot. If you need to rename your appliance, click Back to
Rename Machine.
6. You will be prompted to confirm your appliance name. Click
Cancel to go back, or click Apply Name and Reboot to continue.
IMPORTANT!
Once you pass this step, you cannot rename your appliance.
7. The appliance reboots to apply its name and IP address settings.
SALES: www.beyondtrust.com/contact SUPPORT: www.beyondtrust.com/support DOCUMENTATION: www.beyondtrust.com/docs 16
©2003-2020 BeyondTrust Corporation. All Rights Reserved. Other trademarks identified on this page are owned by their respective owners. BeyondTrust is not a chartered bank or trust company, or depository TC: 9/3/2020
institution. It is not authorized to accept deposits or trust accounts and is not licensed or regulated by any state or federal banking authority.UVMSQL APPLIANCE
INSTALLATION GUIDE
8. Once the reboot completes, you are prompted to upload a saved
configuration file or to start the configuration wizard.
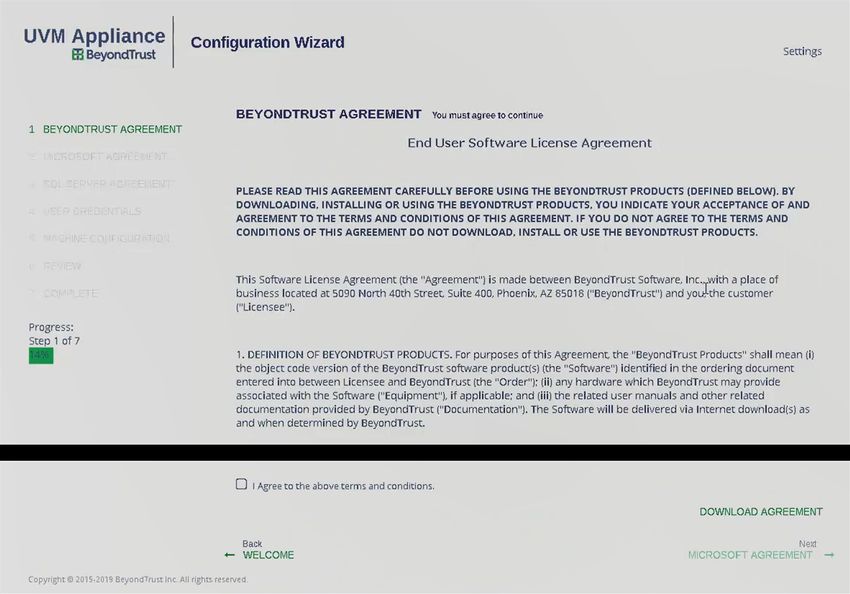
9. The configuration wizard starts with the BeyondTrust license
agreement. After reading the terms, click I Agree to the above
terms and conditions. Then click Next: Microsoft Agreement.
10. After reading the Microsoft agreement, click I Agree to the above
terms and conditions. Then click Next: SQL Server Agreement.
11. After reading the SQL Server agreement, click I Agree to the
above terms and conditions. Then click Next: User
Credentials.
SALES: www.beyondtrust.com/contact SUPPORT: www.beyondtrust.com/support DOCUMENTATION: www.beyondtrust.com/docs 17
©2003-2020 BeyondTrust Corporation. All Rights Reserved. Other trademarks identified on this page are owned by their respective owners. BeyondTrust is not a chartered bank or trust company, or depository TC: 9/3/2020
institution. It is not authorized to accept deposits or trust accounts and is not licensed or regulated by any state or federal banking authority.UVMSQL APPLIANCE
INSTALLATION GUIDE
12. On the User Credentials page, set up an administrator
username, password, and email address for the BeyondTrust
software. You will also set up a username and password for the
BeyondTrust Updater tool, as well as a password for the SQL
Server Administration account. Then click Next: Machine
Configuration.
Note: The email address is used as a reply address, as well as
if the administrator password is forgotten.
13. Under Machine Options, select a time zone. You can configure
the date and time manually, or you can synchronize the time
using an NTP server or VMware Tools. Click Next: Review.
SALES: www.beyondtrust.com/contact SUPPORT: www.beyondtrust.com/support DOCUMENTATION: www.beyondtrust.com/docs 18
©2003-2020 BeyondTrust Corporation. All Rights Reserved. Other trademarks identified on this page are owned by their respective owners. BeyondTrust is not a chartered bank or trust company, or depository TC: 9/3/2020
institution. It is not authorized to accept deposits or trust accounts and is not licensed or regulated by any state or federal banking authority.UVMSQL APPLIANCE
INSTALLATION GUIDE
14. On the Review page, confirm that your settings are correct. You
can go back and make changes as needed. You can also
download the configuration file for backup or to use on another
system. Click Next: Complete.
15. The configuration wizard applies the settings to the UVMSQL
appliance. Once the configuration is complete, click Proceed to
Diagnostics.
16. Enter your BeyondTrust administrator username and password to
log in.
17. From the home page, open the menu and select Maintenance.
SALES: www.beyondtrust.com/contact SUPPORT: www.beyondtrust.com/support DOCUMENTATION: www.beyondtrust.com/docs 19
©2003-2020 BeyondTrust Corporation. All Rights Reserved. Other trademarks identified on this page are owned by their respective owners. BeyondTrust is not a chartered bank or trust company, or depository TC: 9/3/2020
institution. It is not authorized to accept deposits or trust accounts and is not licensed or regulated by any state or federal banking authority.UVMSQL APPLIANCE
INSTALLATION GUIDE
18. The maintenance page loads your appliance software versions.
Once this information has loaded, open the menu and select API
Key Maintenance.
19. Under This UVM's API Key Details, copy the registration code to
your clipboard.
Note: Each API key is generated for a specific appliance. The
key itself cannot be viewed. The registration code encrypts the
key along with additional metadata, such as the UVM ID and
the IP address.
20. To pair two UVMSQL appliances, switch to the configuration page
for the second appliance.
a. Open the menu and select API Key Maintenance.
b. From Select IP address to use for configuration, select the appropriate IP address.
c. Under Register Remote UVM, paste the copied code into Registration Code from Remote UVM.
d. Enter a Description to identify this appliance.
e. From Select Usage, choose Cluster Configuration.
f. Click Add/Update.
g. You will see a prompt that the key has been registered. Click OK.
h. Copy the registration key from this appliance's details.
Note: Registering a key from another appliance allows this appliance to accept calls from the other appliance.
21. Switch to the first appliance's configuration page.
a. From Select IP address to use for configuration, select the appropriate IP address.
b. Under Register Remote UVM, paste the copied code into Registration Code from Remote UVM.
c. Enter a Description to identify this appliance.
d. From Select Usage, choose Cluster Configuration.
e. Click Add/Update.
f. You will see a prompt that the key has been registered. Click OK.
SALES: www.beyondtrust.com/contact SUPPORT: www.beyondtrust.com/support DOCUMENTATION: www.beyondtrust.com/docs 20
©2003-2020 BeyondTrust Corporation. All Rights Reserved. Other trademarks identified on this page are owned by their respective owners. BeyondTrust is not a chartered bank or trust company, or depository TC: 9/3/2020
institution. It is not authorized to accept deposits or trust accounts and is not licensed or regulated by any state or federal banking authority.UVMSQL APPLIANCE
INSTALLATION GUIDE
IMPORTANT!
You can regenerate an API key if needed. However, doing so also regenerates the registration code, breaking the any link
between this appliance and another. You must copy the new registration code and paste it to the paired appliance to reestablish
the connection.
22. Scroll down to view the registered API keys.
23. Click Trigger Connections Test.
24. You are notified that the test has started. Click OK.
25. When the test completes, the page displays the results.
26. To group UVMSQL appliances into a cluster, select the
appliances, and then click Start Cluster.
SALES: www.beyondtrust.com/contact SUPPORT: www.beyondtrust.com/support DOCUMENTATION: www.beyondtrust.com/docs 21
©2003-2020 BeyondTrust Corporation. All Rights Reserved. Other trademarks identified on this page are owned by their respective owners. BeyondTrust is not a chartered bank or trust company, or depository TC: 9/3/2020
institution. It is not authorized to accept deposits or trust accounts and is not licensed or regulated by any state or federal banking authority.UVMSQL APPLIANCE
INSTALLATION GUIDE
27. In the top section, you can view the IP addresses, cluster roles,
and cluster node status of the selected appliances.
28. Enter the domain name, organizational unit, security groups,
service account, and domain administrator account.
29. Choose if the cluster should use DHCP.
30. Create a name for the cluster.
31. If the cluster is not using DHCP, enter a dedicated static IP
address for the cluster.
32. Click Apply Cluster Settings.
33. The SQL cluster wizard runs, showing status messages of its
progress.
34. When the wizard completes, the appliance appears as part of the
cluster. Click on the cluster database icon.
IMPORTANT!
Before the availability group can be created, the database must exist
on the UVMSQL appliance that will be the primary replica. There are a
few ways to do this; choose the method most appropriate for your
situation.
l During the configuration wizard on a SQL Free UVM, at the
SQL Server Agreement step, create a database on the
primary replica using the option to create a remote database.
l From a configured UVM or SQL Free UVM, go to the Database
Utilities page of the Maintenance application and use the
Create a Remote BeyondInsight Database feature to create a
database on the primary replica.
l Restore a BeyondInsight database backup on the primary
replica on the SQL Cluster using SQL Server Management
Studio.
SALES: www.beyondtrust.com/contact SUPPORT: www.beyondtrust.com/support DOCUMENTATION: www.beyondtrust.com/docs 22
©2003-2020 BeyondTrust Corporation. All Rights Reserved. Other trademarks identified on this page are owned by their respective owners. BeyondTrust is not a chartered bank or trust company, or depository TC: 9/3/2020
institution. It is not authorized to accept deposits or trust accounts and is not licensed or regulated by any state or federal banking authority.UVMSQL APPLIANCE
INSTALLATION GUIDE
35. In the top section, you can view the IP addresses, cluster roles,
and cluster node status of the clustered appliances.
36. Select a SQL database.
37. Enter a database listener name, IP address, and subnet mask.
38. Provide a domain name, domain administrator account, and
service account.
39. Click Apply Listener.
40. The SQL database wizard runs, showing status messages of its
progress.
41. When the wizard completes, the listener name and IP address
are displayed.
SALES: www.beyondtrust.com/contact SUPPORT: www.beyondtrust.com/support DOCUMENTATION: www.beyondtrust.com/docs 23
©2003-2020 BeyondTrust Corporation. All Rights Reserved. Other trademarks identified on this page are owned by their respective owners. BeyondTrust is not a chartered bank or trust company, or depository TC: 9/3/2020
institution. It is not authorized to accept deposits or trust accounts and is not licensed or regulated by any state or federal banking authority.You can also read