Qualtrics Survey System Reference Guide - Queen's University
←
→
Page content transcription
If your browser does not render page correctly, please read the page content below

Qualtrics Survey System Reference Guide
This document provides information on how to create a Qualtrics Project (survey, questionnaire or form)
and additional functionality to get you started using the survey system at Queen’s University.

1 – Getting Started
Sign On to Qualtrics

Go to queensu.qualtrics.com. The Sign On page is a Queen’s branded screen, as shown below on the
left. (The generic sign-in on the right will not work.) Log in with your netid and password.

         If you have trouble signing in, try clearing the cache and delete cookies in your browser.

The My Projects Section

When you first sign on to Qualtrics, the My Projects section appears. (You can also get to it by clicking
the words My Projects in the upper left corner when you’re on any other Qualtrics screen.) The My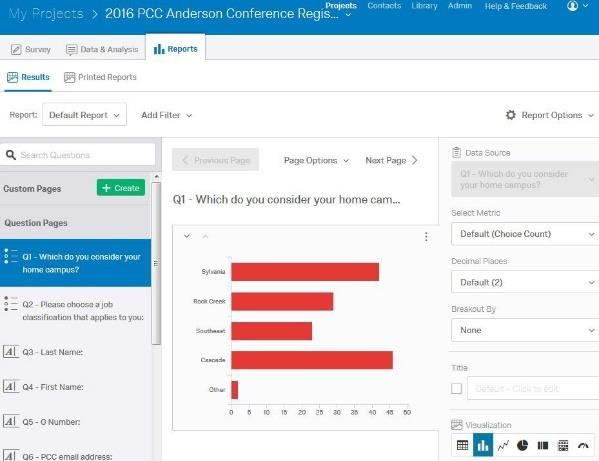
Projects area is your home base, with a list of all the surveys you have created, plus any surveys that
have been shared with you. You can also view how many people have taken each survey, whether it is
active, and perform actions on your survey such as duplicate, delete, or share with others.
Click on the name of any survey listed to start working with it.
2 - Create a New Survey
Click the green Create Project button, located near the upper right corner, to start creating a new
survey, questionnaire or form.
Type in a name for your survey or form, then click Create Project
again to get started.
Or, if you prefer, you can pick one of the options
on the left column -- From a Copy (use a
previously-created survey as a starting point),
From a Library (start with a survey template).
Create Questions
Once you’ve followed the steps above to start creating a survey, you can begin adding questions to
your survey.
Click the green Create a New Question button.
A multiple choice question will be created by
default.
If you want to change the question type, click the
green Multiple Choice button, located near the top
of the right column, and select a different
question type.
Create your survey question and answer(s) by
typing over the sample text that appears.
Repeat the steps to create additional questions.
Office of Institutional Research and Planning, Queen’s University - Page 2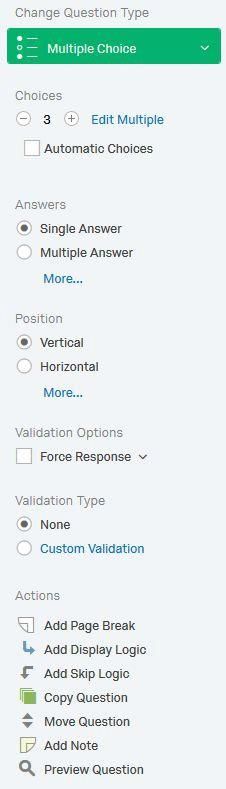
Question Types

Qualtrics provides over 100 different ways to ask a question. There are 22 primary question types and a
variety of settings that can be used to access each of these possibilities. This page provides a brief
description of the 22 question types.

      Descriptive Text
Descriptive Text questions can be used to add an introduction or instructions to your survey, or wherever
you need to display content to the respondent, without asking for feedback.

      Graphic
Graphic questions can be used to display an image to your respondents without asking for feedback.

      Multiple Choice
Multiple Choice questions form the basis of most research. They can be displayed as a traditional list of
choices or as a dropdown menu, select box, etc.

      Text Entry
Text Entry is used to gather open-ended feedback from respondents. These responses can be lengthy
essays, standard form information such as name and email address, or anything in between.

      Rank Order
Rank Order is used to determine each respondent’s order of preference for a list of items.

      Matrix Table
Matrix Table is used to collect multiple pieces of information in one question. This type provides an
effective way to condense your survey or to group similar items into one question.

       Slider
Sliders let respondents indicate their level of preference with a draggable bar rather than a traditional
button or checkbox.

      Side by Side
Side by Side questions let you ask multiple questions in one condensed table and provides an effective
way of shortening your survey while gathering the same amount of data.

      Constant Sum
Constant Sum collects numeric data and displays a sum to the respondent. This type is often used for
allocation assessments, such as defining how you spend your time in different activities.

       Hot Spot
Hot Spot allows respondents to interact with regions of an image. This type is often used in usability
testing and concept testing.

      Graphic Slider
This variation of the Slider question has respondents use various graphic options, such as changing a
frown to a smile or choosing a grade, to indicate their level of preference.

                    Office of Institutional Research and Planning, Queen’s University - Page 3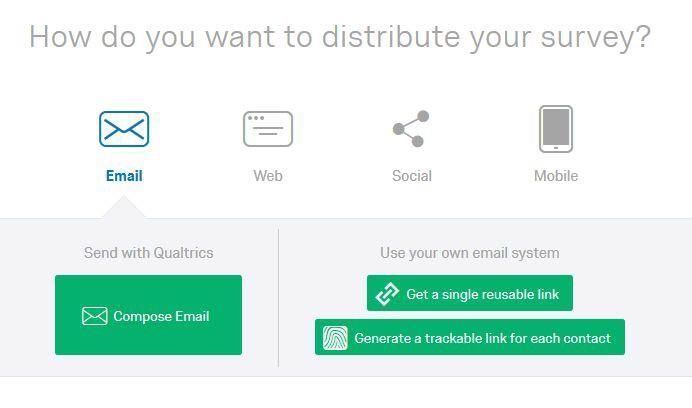
Drill Down
Drill Down helps respondents choose from a long list by starting with a broad category and then honing in
on the choices that are relevant to the respondent.

      Pick Group and Rank
Pick Group and Rank is used for sorting activities. Respondents place items into groups and have the
option to rank the items within the group.

       Heat Map
Heat Map lets respondents click a specific point on an image. In your data, you can see a heat map that
shows which parts of the image were most often clicked. This type is often used for web development
(e.g., eye flow analysis) and advertisement testing.

       Gap Analysis
This variation on the Side by Side question measures satisfaction and then detects why any gaps in
satisfaction exist.

      Net Promoter® Score
NPS® tracks customer loyalty with one simple, standardized question: “On a scale from 0-10, how likely
are you to recommend our company to a friend or colleague?”

       Timing
This hidden question is used to time—as well as limit—how long participants spend on a page of the
survey.

      File Upload
File Upload is used to collect information beyond the survey questions, such as user-uploaded photos or
documents.

      Captcha Verification
Captcha Verification is used to ensure that your respondents aren’t robots. This question has participants
respond to a challenge to verify they are real humans.

      Meta Info
Meta Info reports the public information about the respondent’s computer, such as their browser and
operating system. The question requires no respondent action and is completely hidden.

Format Your Questions

Once you start creating questions, you may want to refine the details of your questions. For example,
multiple choice questions allow 4 options (a, b, c, d) by default. But what if you want more than 4, or
less?

When you click to highlight a survey question you’ve created, you will see options on the right column
(see picture on next page). You can change the question type, from Multiple Choice to another type,
add and remove answer choices, make a question a required question, and more.

                   Office of Institutional Research and Planning, Queen’s University - Page 4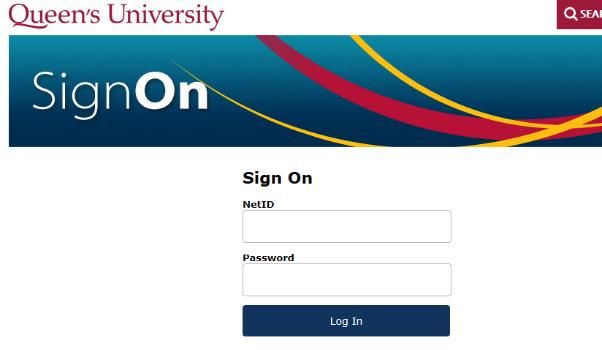
Change Question Type: Change the type of question being used
(Multiple Choice is the default question type). By clicking on the
big green button (it will say Multiple Choice until you change it)
and choosing from the different options shown.
Question Type Sub-Choices: Each question type has multiple
variations. Hover over the Down Arrow to see a preview of each
and find the selection you are looking for.
Choices: Click the plus or minus buttons (just below the green
button) to change the number of multiple choice answers that will
appear in your question.
Automatic Choices: Choose from dozens of pre-populated answer
scale choices. You can also edit them after selecting.
Answers Options: Allows you to choose between Single Answer,
Multiple Answer, Drop-down List, Select Box and more.
Position: Allows you to choose between a Vertical, Horizontal, or
Column layout.
Validation Options: Allows you to enable Force Response, which
requires participants to respond to the question before moving to
the next page. Another choice is Request Response, which notifies
the participant when they do not answer a question, letting them
choose to move on or to respond.
Question-Specific Options: You will notice that each question type has
different formatting options in the right column. These options vary
depending on the type of question (for example, Multiple Choice or Text
Entry) you choose.
Preview / Test Your Survey
To see how your survey will look to a user, click on the blue Preview Survey button near the top of the
survey creation page. You can take the survey in preview mode as often as you need to test your
survey questions and flow.
From the Preview screen you can add bookmarks to proceed to a certain section of your survey quicker
the next time. You can also choose to ignore validation (forced responses) for testing purposes.
Office of Institutional Research and Planning, Queen’s University - Page 5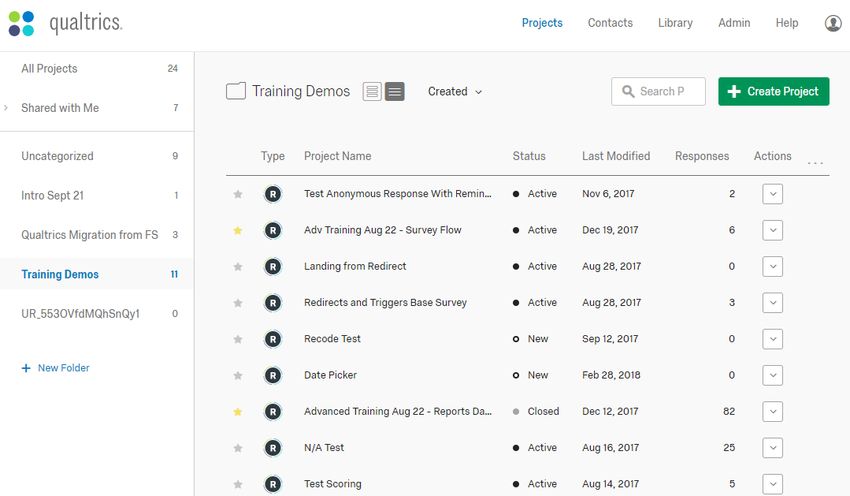
3 – Survey Logic
The logic features in Qualtrics enable you to show or not show certain questions based on an earlier
answer (Display Logic), or skip the user to another part of the survey (or terminate the survey) based
upon their answer to a certain question (Skip Logic).

Display Logic

This enables you to make a question visible or not visible under certain
conditions. Click on the question to highlight it, then click the gear icon to
the left of the question and choose Add Display Logic. Next, use the drop-
down menus provided to build your question conditions. Press Save when
you are finished.

In the example below, the question will only appear to survey-takers who
answered ‘Yes’ to the earlier question ‘Were you helped by an Advisor?’
Otherwise, it will not display.

Skip Logic

If you want to skip the survey-taker to a later question, section (Block) or to the end of the survey,
choose Skip Logic from the gear icon drop-down menu. Use the options provided to build your logic,
then press Done.

                                                                                    In this example, if the
                                                                                    survey-taker answers ‘No’
                                                                                    to the question ‘Are you
                                                                                    a PCC student?’ they will
                                                                                    be taken to the end of
                                                                                    the survey.

                    Office of Institutional Research and Planning, Queen’s University - Page 6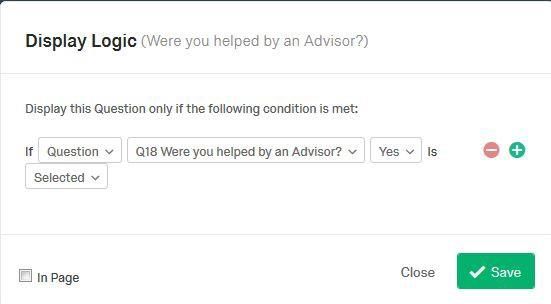
4 - Distribute Your Survey
Once you have created your survey, it’s time to send it
out to people so they can complete it. Click on the
word Distributions, located near the top left corner,
then click the green Distribute Survey button.
You will be asked to choose how you want to send out
the survey.
Compose Email
Choose this Qualtrics Mailer option if you have a Contact List of survey-takers already created and you
want to send the survey out to them. The Qualtrics Mailer allows you to send other types of links in
addition to the Individual Link. The following link types are available by clicking Show Advanced
Options at the bottom of the Compose Email window:
Individual Link (Default): Each participant receives a personal link that can only be used once.
Multiple Completes Link: Each participant receives a personal link that can be used multiple
times. Each time this link is used, a new response is added to your results and the same contact
information is recorded. Reminder and Thank You emails are not compatible with this link.
Anonymous Link: Each participant receives the Anonymous Link. Reminder and Thank You emails
are not compatible with this link.
Reusable Anonymous Link
This option is recommended if you do not need to track how each respondent answered each question,
who completed the survey and who didn’t. When you choose this option, use the link provided
(copy/paste this link into an email message) and send out your survey using your regular email. (Or, you
can put this link onto a department website if you prefer.)
Personal Links
This option is for users who DO need to track how each survey-taker answered each question, and/or
whether they completed the survey, but you need to use a third-party mail system to distribute
survey invitations (instead of the Qualtrics Mailer). You’ll need to provide the email addresses of each
person you anticipate will be taking the survey if you choose this option.
Other modes of distribution that are available are Social Media links and QR Codes.
Office of Institutional Research and Planning, Queen’s University - Page 7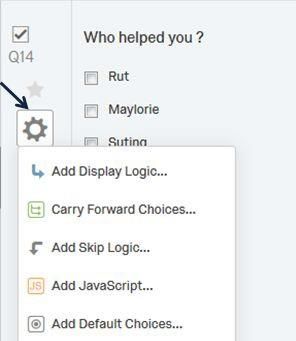
5 - View the Results
The Data & Analysis Tab

Once you have distributed your survey and people have taken it, you can view the results. Click Data
& Analysis near the upper left. The picture below is intended as a guide to interpreting the data on
this tab.

Survey results that are incomplete (i.e. the survey-taker did not finish taking the survey) will not show
up on this tab. If you want to see them, click Responses in Progress on the upper right.

If you want to include the incomplete responses in your data analysis, first go to Responses in Progress
on the upper right corner and use the drop-down menu to Close the incomplete responses. They will
then be treated as completed responses and included in the data displayed.

One way to see how many people answered Yes to question 1, for example, is to create a Filter based
on that question, then view how many results come up. Just click Add Filter, specify the question you
want to use to narrow down your data, and use the drop-down menus to indicate the specifics of what

                    Office of Institutional Research and Planning, Queen’s University - Page 8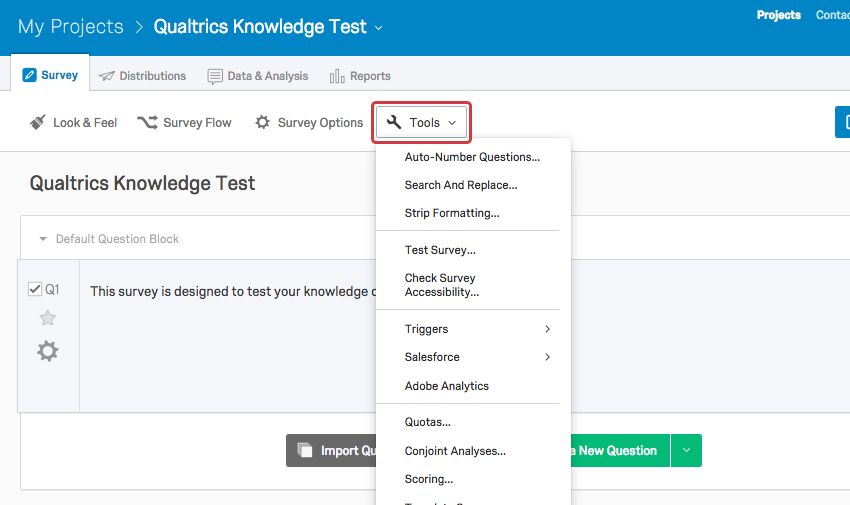
you want. Then scroll down to the bottom of the page to see how many results match your filter
criteria.
Your results can be exported to CSV or SPSS file using the Import/Export button.
The Reports Tab
To look at your aggregate (as a whole) results in
summary format, choose the Reports module. This
is also where you can create printable reports and
add graphs.
Click one of the Visualization options in the
right column to add a bar graph, pie chart,
etc.
Click on the questions on the left column,
or press Next Page, to toggle through the
questions of your survey
To get a .pdf, Word, or Excel-friendly
version of the report, click Report Options.
6 - Survey Tools
Survey Tools are features to help you create surveys and give them advanced functionality. These
features include options like Auto-Number Questions, Email Triggers, Quotas, Translations, and Scoring.
You can access the Survey Tools by clicking on Tools in the Survey module.
Auto-Number Questions: Change the Question Numbers for all of
your questions. You can auto-number sequentially, by block, or by
the internal ID number.
Search And Replace: Quickly find specific words in a survey and replace them with another
word.
Strip Formatting: Remove all formatting from the selected questions. Use this option if questions
in your survey have different fonts or styles that you want to remove.
Test Survey: Generate automated dummy responses for your survey to see what the dataset and
report will look like before sending the survey to actual participants.
Check Survey Accessibility: Determine whether your survey is accessible for respondents who
use screen readers, and receive suggestions for improving your survey’s accessibility.
Triggers: Every time a response is submitted, automatically send emails through the Email
Trigger or add respondents to a contact list through the Contact List Trigger.
Salesforce: Integrate survey information with your Salesforce database through the Response
Office of Institutional Research and Planning, Queen’s University - Page 9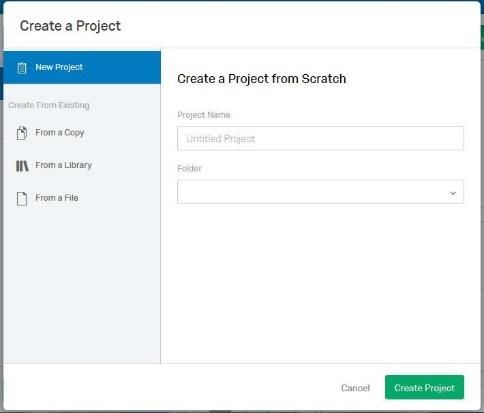
Mapping and Triggering
Surveys features.
Quotas: Create and
monitor quotas on your
surveys.
Scoring: Assign point
values to answer choices
to use your survey as a
test or quiz.
Translate
Survey: Translate your
survey into multiple
languages, allowing respondents to choose which language to view the survey in.
Create New Revision: Save a revision of your survey in order to view and restore it later if
needed. By default, Qualtrics will also periodically create revisions for you that can be viewed
and restored.
View Revision History: See past revisions of your survey and, if desired, restore them so they
become the current survey revision.
Print Survey: Use this option to print or save a PDF version of your survey. This PDF file can also
be exported to your computer or mobile device.
Export Survey to Word: Export your survey as a DOCX Word document that contains the plain
text of your survey questions and answer choices. (The exportable Word document can also be
used as a data dictionary or codebook for those who need to know which recode values are
associated with each answer choice.)
Export/Import Survey: Export your survey as a QSF file to be imported into another account;
Import from QSF or TXT.
7 - Survey Options
Survey Options is where you go to change many general survey settings, such as the survey expiration
date or the message that will appear to respondents when they finish the survey. To access these
settings, click Survey Options at the top of the Survey module. Survey Options is divided into six sections,
as described below.
Survey Experience: Survey Experience includes options that will directly impact the respondent
experience, such as whether or not a back button will be included and whether respondents can
return and finish the survey at a later date if they don’t finish in one sitting.
Survey Protection: Survey Protection helps you ensure that only the appropriate people take
your survey. You’ll also find options like password protection and expiration dates.
Survey Termination: Survey Termination contains options for controlling the survey ending
experience. From here, you can choose different endings, such as redirecting respondents to a
specific website or displaying a custom message. You can also choose to anonymize dataset
responses.
Inactive Surveys: Inactive Surveys lets you choose what message respondents see when they
Office of Institutional Research and Planning, Queen’s University - Page 10attempt to open a survey that is not currently collecting responses.
Partial Completion: Partial Completion lets you specify how long a respondent can leave an
unfinished survey before that survey is automatically closed out.
8 - Survey Blocks
Blocks are sets of questions within your survey. Typically, questions are separated into blocks for the
purpose of conditionally displaying an entire block of questions, or for randomly presenting entire blocks
of questions.
These branching and randomization options are found in the Survey Flow.
Blocks can also be used to organize longer surveys. For example, the first two questions in your survey
might be in a block called Introduction, and the rest of your survey questions in a block called Main
Survey.
Respondents won’t see
these block titles, but
to add a description
that they will see, add
a Descriptive Text
question as the first
question in your block.
This is found in the
question types menu,
or by removing all the
choices from a multiple
choice question.
Block Options can be
found on the top right
of every block. There
are options that allow
you to manipulate the
block as a whole.
9 - Survey Flow Module
The Survey Flow is a block-level view of your survey. From here, you can customize where respondents
go in your survey and what they see. You can perform simple tasks like rearranging blocks, or you can
add elements like Branch Logic that direct and personalize your respondents’ survey experience.
Respondents will start at the top of the flow and work their way through until they reach an end point
and finish the survey.
Office of Institutional Research and Planning, Queen’s University - Page 11The following is a list of the different Survey Flow elements that can be used in combination with each
other to create a well-designed research project.
Question Blocks: Show a block of questions (typically used in conjunction with other Survey Flow
elements).
Advanced Branch Logic: Conditionally display blocks and other elements. You can use Branch
Logic to branch respondents to different Survey Flow elements based on variables like question
responses or Embedded Data. Depending on how your respondents answer certain questions, they
will take different routes through your survey.
Embedded Data: Add any extra information beyond the question responses (such as panel data or
other variables from your contact list or assigned according to how a question is answered).
Randomizer: Randomly present question blocks and other elements. Question Randomization
allows you to randomize the order of the questions in your block, display only a subset of the
questions, and even permanently hide certain questions.
End of Survey Element: Even though you can easily change the default end-of-survey experience
in Survey Options, you sometimes may want a different end-of survey experience for different
respondents.
Table of Contents: You can use the Table of Contents (ToC) feature to allow your respondents to
easily navigate between your question blocks while taking your survey.
10 – Other Survey Concepts
Randomization
There are many ways to randomize various elements of your Qualtrics Survey. You can randomize
responses (use the question’s Settings gear), questions (use block settings), and blocks or pages (see
above, Survey Flow Randomizer). There is a lot of flexibility in what you would like randomized, using
the advanced options. You can randomize some or all of the items, or randomly provide a subset of all
possible items.
Recode Values
When you create a question, a numeric value (known as a recode value) and variable label are
automatically assigned to each answer choice. By default, the first answer choice will be coded as a 1,
the second choice as a 2, and so forth, even if you remove answer choices or change the answer choice
order.
These recode values and labels are recorded in the collected dataset and you can modify them to align
with your desired statistical analysis.
Loop and Merge
Loop and merge allows you to present the same questions to a respondent multiple times. For example,
if your block is a set of product satisfaction questions, you might want to repeat the block for each
product the respondent has purchased.
Office of Institutional Research and Planning, Queen’s University - Page 12Carry Forward
Carry Forward allows you to copy specific answer choices from one question and bring them into a future
question in your survey. For instance, you can first show your respondents a question that asks which
products they have bought from your company in the last six months. You can then carry forward the
choices they selected into the next question and ask the respondents to rank their preference from those
previously selected choices only.
Rich Content Editor
Wherever text is entered, you can
choose the Rich Content Editor for
more display options. Here you can
take advantage of standard text
editing options such as formatting,
font, alignment, tables, bullets,
adding hyperlinks, etc., as well as
insert graphics, videos and. You can
also Pipe Text such as survey
responses or contact list data into
your text for personalization.
Look and Feel
To add a progress bar, headers and footers, and change to another branded theme choices go to the Look
and Feel module.
11 - Best Practices for Libraries and Sharing Projects
A Library consists only of what you choose to copy into it, whether it be all or part of a project (survey),
files, contact lists, etc. A project that you create does not, by default, go to your personal Library.
If you’re building a project that you want to share with a Group or with individual Qualtrics account
Office of Institutional Research and Planning, Queen’s University - Page 13holders, but you do not want others to collaborate on the project, first finish creating it in your own
account, then copy the entire project to a Group Library or user, via your main Projects page.
You also can copy Blocks to your Group Library as you create them, for sharing purposes. This is useful
for projects/questionnaires that people in a group want to copy into their own projects (e.g. a standard
demographics set of questions).
Keep in mind that you can only fully collaborate when you first Share a Project with another user.
Important: The creator of any project owns that project, even if they have shared it with full permissions
to others. If the creator deletes the shared project, it is deleted for all users.
If you have created a project that you no longer wish to own, contact the Brand Administrator (email
oirp@queensu.ca) or your Division Administrator (if your unit has a Division) to transfer the survey to
another Qualtrics account holder.
Office of Institutional Research and Planning, Queen’s University - Page 1412 – Where to Find More Information
Qualtrics Online Resources
The Qualtrics website includes comprehensive and easy-to-follow help documentation. Tutorials,
webinars and detailed directions are available via Qualtrics’ extensive online resource, Qualtrics Support.
Qualtrics Research Core (Getting Started page, comprehensive):
https://www.qualtrics.com/support/survey-platform/getting-started/survey-platform-overview/
More information on Qualtrics’ Check Accessibility Tool (survey creators should use this to help make their
surveys accessible).
https://www.qualtrics.com/support/survey-platform/survey-module/survey-tools/check-survey-
accessibility/
Queen’s Planning and Budgeting Survey Tool FAQ Page
http://www.queensu.ca/planningandbudget/survey-information/queens-survey-tool/survey-faq
Qualtrics 24/7 Technical Support
For fast, individualized support over chat, email or
a scheduled phone call, please start here (scroll to
bottom of page to access the choices as shown in
the image to right):
www.qualtrics.com/support-center
Office of Institutional Research and Planning, Queen’s University - Page 15You can also read