SQL Protection Evaluator's Guide - 2015 Software Pursuits, Inc.
←
→
Page content transcription
If your browser does not render page correctly, please read the page content below
SQL Protection
Evaluator’s Guide

 ©2015 Software Pursuits, Inc.
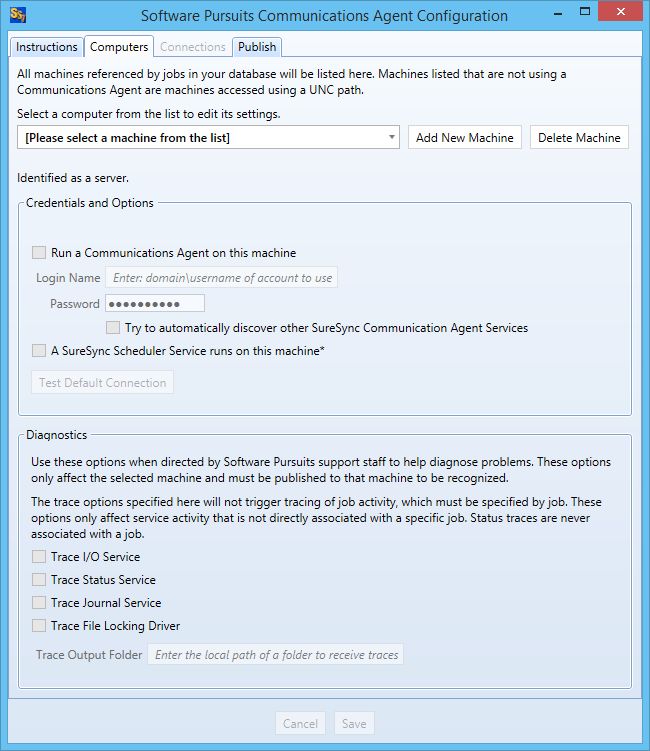
Table of Contents

Introduction .....................................................................................................................2
System Requirements .....................................................................................................2
Contact Information .........................................................................................................3
Our Scenario ...................................................................................................................3
Installation of Microsoft Required Components ............................................................... 3
Understanding SQL Protection’s Architecture.................................................................. 4
   A Basic UNC Path Backup ..........................................................................................5
   SQL Backups with the Communications Agent ............................................................ 5
Understanding the Types of Backups ..............................................................................7
   Determining Acceptable Data Loss..............................................................................7
   A Simple Acceptable Data Loss Example .................................................................... 7
Understanding the Purpose of the Standby Server .......................................................... 8
Installation .......................................................................................................................8
Understanding the SureSync Desktop .............................................................................9
   If you have SureSync deployed ...................................................................................9
   If you’re new to the SureSync Data Protection & Availability Suite .............................. 9
Launch the SureSync Desktop for the First Time ............................................................ 9
   Creating a SureSync Database ................................................................................. 10
   Configuring the Local Communications Agent ........................................................... 11
Importing a License ....................................................................................................... 13
   If you have SureSync deployed ................................................................................. 13
   If you’re new to the SureSync Data Protection & Availability Suite ............................ 13
Installing the SureSync Scheduler ................................................................................. 14
Configuring the Communications Agent Machines ........................................................ 16
Creating a SQL Protection Job ...................................................................................... 17
   Name Your Job ......................................................................................................... 18
   Define the Source Database...................................................................................... 18
   Define the Authentication Type .................................................................................. 19
   Define the Database & Source Staging Area ............................................................. 20
   Define the Destination Staging Area .......................................................................... 21
   Define the Authentication Type for the Destination Database .................................... 23
   Define the Database Name ....................................................................................... 24
   Set Restore Options .................................................................................................. 24
   Set Restore Files ....................................................................................................... 25
   Define Scheduling Frequency.................................................................................... 26
   Configuration Complete ............................................................................................. 28
Configuring E-mail Alerts ............................................................................................... 28
   Configuring a SMTP Profile ....................................................................................... 28
   Configuring an Alert User .......................................................................................... 30
   Configuring the Schedule to Send Alerts ................................................................... 30

                                               Software Pursuits, Inc.                                                             1
                                             www.SoftwarePursuits.com
Introduction
SureSync SQL Protection is an easy-to-use and affordable software solution for protecting critical
Microsoft SQL Server databases. Information is the lifeblood of modern business. That
information is often stored in Microsoft SQL Server databases. Protecting these databases is an
essential component of any company's data protection and availability plans. With SureSync SQL
Protection, you can quickly and easily protect these databases.
SureSync SQL Protection shares a common interface with SureSync making it easy to manage
both file replication/synchronization and SQL protection jobs from one solution. This reduces the
information technology overhead involved in maintaining multiple solutions for different data
management needs.
System Requirements
SureSync SQL Protection’s basic operating system and hardware requirements are:
• Supported Operating Systems: Windows Server 2012 R2; Windows Server 2012;
Windows Server 2008 R2; Windows Server 2008; Windows Server 2003 R2; Windows
Server 2003; Windows 8.1; Windows 8; Windows 7; Windows Vista; and Windows XP
• Processor: Minimum: 1 GHz (x86 processor) or 1.4 GHz (x64 processor).
Recommended: 2Ghz or faster processor (x86 or x64 processor)
• RAM (total for system): 1GB (Minimum); 2GB (Recommended)
• Hard Disk: 30MB for application files; 20MB+ for database
• Display: 1024x768 high color, 32-bit (Minimum)
SureSync SQL Protection can be run on Windows operating systems hosted in virtualization
software such as VMWare or Hyper-V without issue. Each virtual machine being protected by
SQL Protection must have the appropriate licensing.
SureSync SQL Protection requires a number of Microsoft components to be installed on the
system. The installer will inspect your system for these components and offer to upgrade or install
them as needed.
• Microsoft .NET Framework 4.5.2 (Windows 2008/Vista and newer)
• Microsoft .NET Framework 4.0 (Windows 2003/XP)
• Microsoft MDAC 2.8 Refresh with Service Pack 1
• Microsoft Visual C++ Runtime 12.0
• Microsoft Windows Installer 3.1
• Microsoft XML Parser 6.0
• Microsoft System CLR Types for SQL Server 2012
• Microsoft SQL Server 2012 Management Objects
Software Pursuits, Inc. 2
www.SoftwarePursuits.comContact Information
If you need further information about SureSync SQL Protection or need clarification on anything
within this guide, please contact our support group and they will be happy to assist you with your
evaluation.
Software Pursuits, Inc.
1900 South Norfolk Street, Suite 330
San Mateo, CA 94403
Phone: +1-650-372-0900
Fax: +1-650-372-2912
Sales e-mail: sales@softwarepursuits.com
Support e-mail: support@softwarepursuits.com
Technical support is available between 8:00AM and 5:00PM PST Monday through Friday.
Our Scenario
This guide will walk you through the configuration of SureSync SQL Protection to generate SQL
backups from a source server named DEV13. These files will be transferred using the TCP/IP
based Communications Agent over the Internet to a machine named SPITest-Win2K8. The
backup files sent to SPITest-Win2K8 will be automatically restored into a standby SQL server on
that same machine.
In this scenario, a full database backup will be performed once a day at midnight. A differential
backup will be performed once an hour. In addition, SQL Protection will thin the staging folders to
store only the 4 most recent full/differential backup sets.
SureSync SQL Protection can also be used to generate and copy SQL backup files to UNC paths
allowing storage on devices that cannot run the Communications Agent.
Installation of Microsoft Required Components
A few components from the Microsoft SQL Server Feature Pack must be installed on each SQL
server that SureSync SQL Protection will interact with. The required components are:
• Microsoft System CLR Types for SQL Server 2012
Software Pursuits, Inc. 3
www.SoftwarePursuits.com• Microsoft SQL Server 2012 Management Objects
These components must be installed manually using installers from Microsoft before using
SureSync SQL Protection. CLR Types must be installed first and then Management Objects.
Clicking the links below will download the correct components for you to install on the relevant
systems.
32-Bit Installers
• Microsoft System CLR Types for SQL Server 2012
• Microsoft SQL Server 2012 Management Objects
64-Bit Installers
• Microsoft System CLR Types for SQL Server 2012
• Microsoft SQL Server 2012 Management Objects
All other required components will be checked by the installer. If those components are not at
adequate levels, the installer will offer to install them for you.
Understanding SQL Protection’s Architecture
SQL Protection provides a comprehensive set of functionality to protect your SQL databases.
This functionality includes:
• Communications Agent: The Communications Agent is a TCP/IP based agent that
allows you to copy your SQL backup files securely to remote locations even over the
Internet. Storing SQL backups at remote locations is an excellent way to protect mission
critical SQL databases from natural disasters and other threats.
• Encrypted data transmission: The Communications Agent offers a number of FIPS
certified encryption algorithms to ensure data security when transferred over public
connections like the Internet.
• Automated Restore to Destination SQL Server: SureSync SQL Protection allows you
to automatically restore the SQL backup files to a destination SQL server on a scheduled
basis. On the destination SQL server, the database will be in the “restoring” state. This
state allows you to continue restoring additional backup files and prevents users from
accessing the database. As an administrator, you can switch the database out of the
“restoring” state when necessary to allow users to access the database.
• Automatic thinning of old backups: Manage storage usage by automatically thinning
old backup files. SQL Protection can be configured to keep x number of full backups.
When a new full is generated, the oldest full and all associated differential or log backups
can be automatically deleted.
• Quick and easy restores: An easy to use restore wizard is provided to allow your
organization to quickly recover from any SQL database issues. You can also use the
built-in SQL Management Studio tools to restore backups generated by SQL Protection
giving you flexibility.
• UNC path support: SQL Protection can process SQL backups to any machine
accessible via UNC path allowing you to store backups on devices that do not support
running the Communications Agent. However, doing so eliminates the ability to use
features of the Communications Agent including encryption. You also cannot
automatically restore to a destination standby SQL server.
Software Pursuits, Inc. 4
www.SoftwarePursuits.comA Basic UNC Path Backup
SureSync SQL Protection is a flexible software solution allowing you to design a backup
procedure that meets your specific needs. In the most basic form, SureSync SQL Protection will
allow you to generate SQL backups on a schedule and replicate those files to another machine
accessible via UNC path.
The basic backup process consists of two steps:
• In Step 1, the backup file is generated. SureSync SQL Protection uses standard
Microsoft APIs to generate these backups ensuring that your backup files are consistent
with Microsoft standards and are supported. This backup file is generated into a folder
named the Source Staging Folder. Generally, this folder is on the same machine as the
SQL Server software. The Source Staging Folder can also be a share on the same local
network as the SQL server that can be accessed via UNC path. The Source Staging
Folder is simply a staging area for the backup files.
• In Step 2, the backup file generated in the Source Staging Folder will be replicated to the
Destination Staging Folder. The Destination Staging Folder is the final destination for the
backup files. This folder is on a second machine that is accessible via UNC path.
With this solution, you have two usable copies of the SQL backup files generated automatically. A
copy is available locally in the source staging folder and in the remote destination staging folder.
This provides some additional redundancy of the backup files.
SQL Backups with the Communications Agent
When implementing the Communications Agent in SureSync SQL Protection, the basic
architecture is unchanged. The Schedule produces a backup from the SQL server and stores it in
a local Source Staging Folder. From there, the backup file(s) are replicated to a Destination
Staging Folder.
The Communications Agent adds the following:
• The Destination Staging Folder does not have to be accessible via UNC path. The
Communications Agent is installed on the destination Windows based machine. The
Communications Agent is a TCP/IP enabled Agent. With Communications Agents
Software Pursuits, Inc. 5
www.SoftwarePursuits.cominstalled, SureSync SQL Protection can replicate the backup files to a Destination
Staging Folder accessible by IP address or DNS name even over the Internet.
• The Communications Agent encrypts data transmitted with FIPS certified encryption
algorithms. This enables the safe transmission of the SQL backup files to remote
Destination Staging Folders even over the Internet.
• SureSync does not need to be installed on each SQL source server. With a
Communications Agent installed on the SQL server, you can perform backup operations
from a SureSync installation on a different machine.
• SQL Protection provides the option of automatically restoring the backup file onto a
destination SQL server in the remote location. The database will be in the “restoring”
state on the destination server. This allows you to continue restoring additional backup
files and prevents users from accessing the database. As an administrator, you can
switch the database out of the “restoring” state when necessary to allow users to access
the database.
A visual representation of a fully implemented SureSync SQL Protection environment with the
Communications Agent deployed and an automatic restore to a standby server would look like:
SQL Protection provides for the automatic thinning of backups stored in the staging folders. This
feature helps control storage space consumed by backups. In-depth detail about SureSync SQL
Protection can be found in the SureSync Data Protection & Availability Suite help file distributed
with the product. Pressing F1 on any tab of the user interface will provide detailed context
sensitive help about the options available on that screen.
Software Pursuits, Inc. 6
www.SoftwarePursuits.comUnderstanding the Types of Backups
If you are unfamiliar with SQL database backups, the first concept that must be understood is the
difference between database backup types. Three different types of available backups are
available: Full, Differential, and Log.
• Full Backup: A complete backup of the SQL database. This type of backup contains all
of the data in the defined database. A full backup provides the foundation for Differential
and Log backups. Without a Full database backup, the other database backup types are
useless. Your SureSync SQL Protection Schedule must create a Full backup.
• Differential Backup: A Differential backup includes all of the data that has changed
since the last Full backup. You must have access to the Full backup when performing a
restore with Differential backups. For example, assume your full backup runs on Sunday
nights at 11:00PM. For the remaining days of the week, you run a Differential backup at
11:00PM. If the database failed on Wednesday, you would need the Differential backup
from Tuesday night and the Full backup from Sunday to perform a restore.
• Log Backup: This type of backup can only be used when the SQL database being
backed up is in full recovery or bulk-logged recovery models. SQL databases using the
simple recovery model cannot use a Log backup. Like Differential backups, a Log backup
is dependent upon a Full backup of the database. A log backup contains the part of the
transaction log that was active when the backup was created and includes all records not
backed up in the previous log backup. If you maintain an uninterrupted set of log backups
and are running the full recovery model then you can use the logs to restore to a point in
time using SQL Management Studio.
Determining Acceptable Data Loss
In any disaster recovery scenario, your company must determine the acceptable amount of data
loss. For example, could your company recover a day worth of lost data? An hour? If you're
running something simple like a database of prices for products then the information lost could be
entered into the database again after recovery. Generally, the more sensitive the data in the
database the smaller the amount of data loss that is considered acceptable. When dealing with
databases that have a very low level of acceptable data loss, you have to perform much more
frequent backups. The ideal backup configuration is going to be the one that provides your
acceptable measure of data loss.
Constraints exist on how frequently you can backup your SQL servers. These constraints are no
different than for file backups. One, you have a limited amount of bandwidth available to move
data. If you're copying a TB worth of data, that will take a certain amount of time based on the
speed of the connections involved. Two, the machines and storage systems involved have a
maximum capacity. For example, storing 6 months worth of backups for a 1TB database where a
full backup is generated once a week will consume 24TB of storage for just the full backups. Any
differential and/or log backups add to the storage requirement. The machines involved must have
adequate storage available to meet your backup goals.
A Simple Acceptable Data Loss Example
A company is protecting a SQL database that includes information used by the company’s human
resources department. The company decides that 1 hour of data loss is acceptable. This is a
commonly accepted measure and can be easily obtained with Scheduled backups in most
situations.
Software Pursuits, Inc. 7
www.SoftwarePursuits.comThe company creates a SureSync SQL Protection Schedule that runs a Full backup once a day.
In addition, Differential backups are configured to be run once an hour. By taking the latest full
and differential backup the company will be able to restore to the acceptable level.
Understanding the Purpose of the Standby Server
When running SureSync SQL Protection, you have the option of automatically restoring the
backup files to a standby SQL server. The files restored to the standby SQL server are the
backup files copied into the destination staging folder by the SQL Protection Job. Understanding
the purpose of the standby SQL server is critical. With SureSync SQL Protection, the standby
server is left in "Restoring" mode. This SQL mode allows differential and/or log backups to
continue being restored to the database. While in "Restoring" mode, the database is unavailable
for end user use. The goal is not to create an automated failover solution but to provide the
following benefits:
• Automatic validation of backups: Simply having a backup file doesn't mean that it will
restore properly. The entire restore process completing to the standby SQL server proves
that the backup files are valid and function correctly.
• Speed recovery in the event of disaster or hardware failure: SQL Protection keeps a
database in another office in "standby" mode with content as recent as the last backup.
This speeds recovery in the event of a disaster or hardware failure.
The actual switch over process in the event of a disaster is a manual process of pointing users to
the standby machine. This would only be done in situations where the primary SQL server goes
down permanently due to some kind of hardware failure or other issue.
You do not want to allow write changes to the destination database if you ever intend to go back
to the source server. This would result in two different copies of the same database. Write access
on the destination server should only be allowed if you're making a permanent switch to the new
location. Otherwise, you would have to perform backups from the destination machine and
restore those backups on the source before allowing anyone to make additional changes to the
original source machine.
If you decide to do nothing but backup and restore full backups, you can have the destination
SQL database in a ready state. However, you still do not want to make write changes to this
destination database unless you're planning to permanently switch. In general, write access to
the destination server unless in the situation of a full and permanent switch over is a bad idea.
The standby server provides organizations with an affordable means of quickly moving to a new
SQL server that contains copies of the databases current as of the last backup. This process is
quicker in the event of a major failure than having to build a new server, install SQL server and
have to restore copies of all of the databases. Instead, the server is already there with the
databases and it's ready to go.
Installation
To begin your SureSync SQL Protection trial, you must install the appropriate components on the
correct machines. For SQL Protection, the full SureSync application must be installed on one
machine and the Communications Agent installed on any other machine that will be used as
either a source SQL server or a remote staging / remote restore location.
Software Pursuits, Inc. 8
www.SoftwarePursuits.comIn our example, SureSync will be installed on the DEV13 database server. To install the
SureSync components, launch the SureSync7Setup.exe installer on the machine in question and
follow the prompts. Selecting “SureSync” will install the SureSync Desktop and all required
components.
With SureSync SQL Protection, the Communications Agent must also be installed on the
destination side. For this example scenario, the destination machine is SPITest-Win2K8. The
same SureSync7Setup.exe should be run on that machine and the “Communications Agent”
option selected.
Understanding the SureSync Desktop
The SureSync Desktop is a user interface component shared between all members of the
SureSync Data Protection & Availability Suite. The SureSync Desktop is used to configure and
manage SureSync SQL Protection Jobs, Schedules and Restores.
If you have SureSync deployed
SureSync SQL Protection shares the SureSync Desktop and your SureSync database. If you
intend to run SureSync SQL Protection Jobs and Schedules from the same main SureSync
machine used to run your SureSync tasks then you scan skip ahead in this guide to the
“Importing a License” section.
If you’re new to the SureSync Data Protection & Availability Suite
If you are new to the SureSync Data Protection & Availability Suite, you will be installing
components for the first time and will need to configure a SureSync database.
Launch the SureSync Desktop for the First Time
Now that the required components have been installed, we can continue with the configuration.
To launch SureSync for the first time, go to the Start menu, select the SureSync folder and click
on the SureSync Desktop icon. This will launch the SureSync Desktop where you will perform
your entire synchronization job configuration.
Software Pursuits, Inc. 9
www.SoftwarePursuits.comOn the first launch of the application, SureSync will present you with a series of questions to aide
in completing the initial configuration.
Creating a SureSync Database
The prompt displayed below informs you that a SureSync database needs to be created. The
SureSync database is used to store all of your synchronization/replication configuration and
related information. This database can be either an Access or SQL database.
Click “OK” to continue on with the creation of the database.
The next dialog box allows you to select an existing SureSync database to open with the new
installation or allows the creation of a new database. For our example, this is a new installation
and “Yes” should be selected to create a new database.
On the next panel, the type of database is selected. For our example, we will select “Create a
new Access/Jet database”.
Software Pursuits, Inc. 10
www.SoftwarePursuits.comThe form will change to show the path to the Access/Jet Database. We will select the default
location of C:\Users\Public\Software Pursuits\SureSync7\SureSync.mdb.
Configuring the Local Communications Agent
The next step in the initial configuration involves defining a credential for the local
Communications Agent to run under.
Click “OK” and the Communications Agent Configuration panel will be launched.
Software Pursuits, Inc. 11
www.SoftwarePursuits.comThe local Communications Agent must be given a credential for
SureSync to function properly. We recommend this account be either a
local administrator on the machine or a domain administrator to ensure
rights to all the files and folders being synchronized. The local
Communications Agent must be configured even if you’re not licensed
for the Communications Agent Add-on. The Add-on functionality is
enabled by a license but the Communications Agent on the SureSync
machine is responsible for all the basic I/O as well.
The only exception to the need to configure the local agent is if no paths
of any kind, including UNC paths are referenced from the local machine.
This scenario is extremely rare.
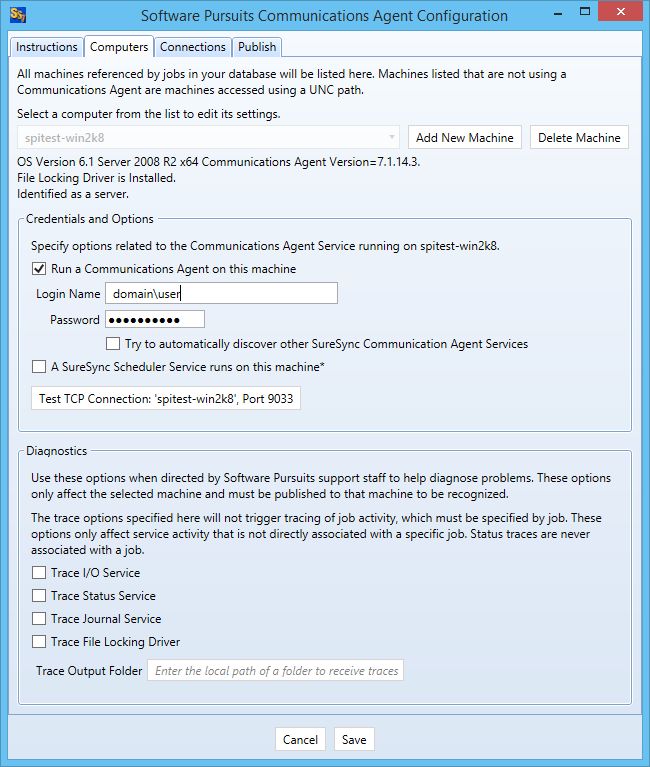
When the Communications Agent Configuration panel loads, click on the “Computers” tab. From
the “[Please select a machine from this list]” dialog, select your local machine. In this case, the
machine is “DEV13”.
Check the “Run a Communications Agent on this machine” option and enter your credential in the
“Login Name” and “Password” fields. The “Login Name” field should be in the format of
domain\user or machinename\user. Click the “Save” button to save the credential.
When a Communications Agent configuration is saved, a default connection for TCP port 9033 is
created automatically. In most environments, only the default connection is used.
Software Pursuits, Inc. 12
www.SoftwarePursuits.comIf you want to test the configuration, click the “Test TCP Connection” button. Click the red X on
the upper right hand corner of the Software Pursuits Communications Agent Configuration panel
when done to close the panel and move on with the configuration process.
Importing a License
The SureSync Data Protection & Availability Suite installer does not contain a license file. To
enable functionality, you must import a trial license or your purchased license obtained from
Software Pursuits.
If you have SureSync deployed
If you are a current SureSync user and want to trial SQL Protection, you should request trial
licensing be added to your existing license. This can be done by e-mailing our sales team at
sales@softwarepursuits.com. You can also call the sales team at 1-800-367-4823.
Once an updated license file has been provided to you, click the “Licenses” button ( ) in the
ribbon bar of the SureSync Desktop and click the “Import License…” button to import the updated
file.
If you’re new to the SureSync Data Protection & Availability Suite
Software Pursuits, Inc. 13
www.SoftwarePursuits.comIf you are new to the SureSync Data Protection & Availability Suite, you should request a trial
license from http://www.softwarepursuits.com/suresync/download_trial.asp. A license file will be
generated and sent to you via e-mail. You can also call our sales team at 1-800-367-4823.
Once an updated license file has been provided to you, click the “Licenses” button ( ) in the
ribbon bar of the SureSync Desktop and click the “Import License…” button to import the updated
file.
Installing the SureSync Scheduler
The SureSync Scheduler is a Windows service that runs on the main SureSync machine. This
service is responsible for launching Schedules at the correct times and for running Real-Time
Monitors. You must have a Scheduler running in order for your Schedule to execute at the
configured time.
To install the SureSync Scheduler service, click on the Home button in the upper left hand corner
of the SureSync Desktop and click on “Scheduler Services.”
To install the Scheduler, click the “Install” button, which will launch a window like the one below.
Software Pursuits, Inc. 14
www.SoftwarePursuits.comThe user account the Scheduler service runs under must be a member
of the local administrators group on the SureSync machine. If using
SQL, the account must also be a DBOwner on the SureSync database.
Enter the username formatted as machinename\username or domainname\username. This
account must be an administrator on the machine. Click “OK” to install the service.
You will receive a confirmation dialog box that the Scheduler service was installed successfully as
shown below.
Software Pursuits, Inc. 15
www.SoftwarePursuits.comOnce the service has been installed, click on the machine name and click “Start.” The Scheduler
will now be listed as Machine Name (Running).
Configuring the Communications Agent Machines
The next step in the configuration is to define the remote Communications Agent machines in
SureSync. To do this, launch SureSync, click on the “Home” button, click “Communications
Agent” and click the “Configure Communications Agents” button.
Select the Communications Agent from the drop-down menu to begin configuring it. If the
machine you want to configure does not appear in the list, you may enter a name for it by clicking
the “Add New Machine” button.
The machine name listed in the "Select a computer from this list to edit
its settings" drop-drop menu must be the actual machine name for the
machine you’re trying to connect to. Using an IP address or a random
name in the drop-drop menu will result in the test failing.
You will then want to:
Software Pursuits, Inc. 16
www.SoftwarePursuits.com1. Check the box that says "Run a Communications Agent on this machine."
2. Enter a username with adequate permissions to that machine in the “Login Name” field.
We recommend a domain administrator account. Be sure to configure the account as
domain\user. If you wish to use a local account on that computer, it can be formatted as
machinename\user.
3. Enter the password for the account in the "Password" field.
4. Click the “Save” button. When a Communications Agent configuration is saved, a default
connection for TCP port 9033 is created automatically. In most environments, only the
default connection is used.
5. If you want to test the configuration, click the “Test TCP Connection” button.
These steps should be done for each remote Communications Agent that will be used. In the
example scenario, SPITEST-WIN2K8 would be defined. For SQL Protection, each SQL machine
remote from the machine where SureSync is installed, must have a Communications Agent
installed and be configured here. An example of a completed Communications Agent
configuration is shown in the screenshot below.
Creating a SQL Protection Job
Software Pursuits, Inc. 17
www.SoftwarePursuits.comSQL Protection Jobs are run on a Scheduled basis. A SQL Protection Job consists of a Schedule
and the Job definition. Both components created using the same wizard. The Schedule will
automatically be given a name based on the name of the Job. To launch the wizard, click on the
“Job” button ( ) in the ribbon bar.
Name Your Job
The first wizard panel allows you to configure the Job name, an optional description and define
the number of full backups that the Job should keep. When a number of backups is defined in the
“Set to the number of full backups you want to keep” option, SQL Protection pruning is enabled.
This means that SQL Protection will keep the number of full backups and associated differential
and log backups defined here. When a new full is generated, the oldest one and the related
differential and log backups are automatically purged. This feature helps keep the storage
requirements for your SQL backups under control.
For this Schedule, we will use the name “SQL Protection Demo” and define 4 as the number of
full backups to maintain.
Define the Source Database
The next panel in the Wizard is where you provide details about the source SQL database that
you are looking to protect with the Job.
Software Pursuits, Inc. 18
www.SoftwarePursuits.comClick the “Browse” button next to “Server\Instance Name” to select the SQL Server that hosts the
database to be backed up.
Select the SQL Server and click the “Save” button.
Define the Authentication Type
The next step is to define the correct authenication type for the SQL server using the
“Authenticiation” drop-down menu. The available options are “Windows Authentication” or “SQL
Software Pursuits, Inc. 19
www.SoftwarePursuits.comServer Authentication.” If using “SQL Server Authentication” you must also provide the SQL
username and password in the available fields. The “Windows Authentication” option will use the
username and password provided in Communications Agent Setup for the Agent in question.
For this example, we will use “Windows Authentication.”
Define the Database & Source Staging Area
The “Database” drop-down will display a list of all SQL databases on the configured SQL server.
For this example, we will select the “SQLProtectTest” database.
Finally, you must define a source staging area. The source staging area is a folder on the source
SQL machine where the SQL backup files will be generated before they are replicated to your
remote destination machine.
To define the Source Staging Area, click the “Browse” button and select the correct folder. For
this example, we will use a folder “C:\SQL Staging.”
Software Pursuits, Inc. 20
www.SoftwarePursuits.comClick the “Save” button to return to the main Job wizard.
The completed “Define the Source” panel looks like:
Click the “Next” button to continue the Job configuration.
Define the Destination Staging Area
The Destination Staging Area is a folder on a remote machine where the SQL Protection Job
should copy the backup files generated on the source.
Software Pursuits, Inc. 21
www.SoftwarePursuits.comYou cannot restore a SQL database backup to a SQL server running an
older version of SQL than used on the source. For example, if your
source SQL server is running SQL 2012, your destination server must be
as well (or newer).
SQL Protection provides access to the Communications Agent. This powerful TCP/IP based
agent allows you to communicate with any Windows machine accessible via DNS name or an IP
address. The Communications Agent allows you to replicate SQL backups generated by SQL
Protection to remote machines even over the Internet.
In addition, with SQL Protection you can chose to restore the backup files copied to the
Destination Staging Area
When selecting a remote Communications Agent from the drop-down, the browse panel will
display the drives and folders from that remote machine as if you were sitting down in front of the
computer.
You do not have to restore to a standby server. If you do not provide the
database details on the “Define the Destination” panel then the SQL
backups will simply be copied to the Destination Staging Area for
backup storage.
To define the Destination Staging Area, click on the “Browse” button. In this scenario, the
destination is the remote SPITest-Win2K8 machine. Select the “SPITest-Win2K8” machine from
the “Path to be accessed via this Communications Agent” drop-down menu.
When selecting a remote Communications Agent from the drop-down,
the browse panel will display the drives and folders from that remote
machine as if you were sitting down in front of the computer.
The path that we will store the SQL backup files on SPITest-Win2K8 is
“C:\SQLStagingDestination” which we then select using the browse.
Software Pursuits, Inc. 22
www.SoftwarePursuits.comClick the “Save” button to return to the main Job wizard.
With SQL Protection, the option to restore the transferred backups to a standby server
automatically is available. For this example, we will fill out the rest of the “Define the Destination”
wizard panel.
Click the “Browse” button next to “Server\Instance Name” to select the SQL Server that will be
used to host the standby database.
Click the “Save” button to save your selection and return to the main wizard panel.
Define the Authentication Type for the Destination Database
Software Pursuits, Inc. 23
www.SoftwarePursuits.comThe next step is to define the correct authenication type for the SQL server using the
“Authentication” drop-down menu. The available options are “Windows Authentication” or “SQL
Server Authentication.” If using “SQL Server Authentication” you must also provide the SQL
username and password in the available fields. The “Windows Authentication” option will use the
username and password provided in Communications Agent Setup for the Agent in question.
For this example, we will use “Windows Authentication.”
Define the Database Name
The “Database” drop-down on the “Define the Destination” panel allows you to select or enter the
name of the database that SureSync SQL Protection should restore into. Often, this will be the
same name as the source database. However, it can be a different name.
For this example, the database name on the destination will be “SQLProtectTest.”
The completed destination database configuration will look like this:
Click the “Next” button to continue.
Set Restore Options
The next panel of the wizard allows you to set options related to the restored standby database.
Software Pursuits, Inc. 24
www.SoftwarePursuits.comYou have the option of “Allow additional restores” which leaves the database in the “Restoring”
state and allows additional transaction log restores. This is the default setting. The “Restore in
ready state” option will restore the database ready for use on the destination but does not allow
any additional restores. This setting is only useful if you plan to restore nothing but full backups.
For this example, we will select “Restore with Recovery” and check “Verify backup file before
restore.”
Click the “Next” button to continue.
Set Restore Files
The paths where the data file (*.mdf) and log file (*.ldf) are located on the source server are
stored within the SQL backup file. This next wizard panel sets options about the database paths
for the destination server.
Software Pursuits, Inc. 25
www.SoftwarePursuits.comIf the same folder structure exists on the destination to support storing the *.mdf and *.ldf files, the
default “No Relocation” option can be selected. Otherwise, you must define a folder that exists on
the destination server to serve as the storage location for the restored SQL data files.
Define Scheduling Frequency
SQL Protection provides powerful Scheduling of Full, Differential and Log backups. Each backup
type can be configured with different repeat settings. For our scenario, a full backup will be
performed once per day and a differential backup will be performed every hour.
Please note that Log backups are only available when processing a
database that is using the full or bulk-logged recovery model. Databases
using the simple recovery model can only use Full and Differential
backups.
First, we will configure the Full backup scheduling. To perform this task, click the triangle next to
“Full Backup Scheduling” to expand the selection:
Software Pursuits, Inc. 26
www.SoftwarePursuits.comFor the Full backup, we want this to run once per day at midnight. To configure this, select “Run
Schedule Every Day” and enter 12:00AM for the start time.
Second, we will configure the Differential backup scheduling. To perform this task, click the
triangle next to “Differential Backup Scheduling” to expand the selection:
For the Differential backup, we want to run it every hour. To configure this, select “Run Schedule
Every Day” and check the “Run Multiple Times Each Day” option. For the “Repeating Values”
change the “Time between each execution (hours:minutes)” option to 01:00 to tell the Schedule to
run the Differential every hour.
Software Pursuits, Inc. 27
www.SoftwarePursuits.comIt is natural to have times for Full, Differential and Log backups that
conflict. In our example scenario, the Full and Differential backups will
want to run at the same time once per day at 11PM.
SureSync SQL Protection gives Full backups priority over all other
backup types and Differential priority over Log. In this scenario, at 11PM
the Full backup will “win” and be selected to run.
Click “Finish” and SureSync SQL Protection will build the SQL Protection Job and Schedule.
Configuration Complete
You have now successfully configured a SQL Protection Schedule and Job! The SQL database
will be backed up according to the scheduling options defined in the Schedule automatically as
long as your Scheduler service is running.
Configuring E-mail Alerts
E-mail alerts can be a useful way of notifying the SureSync SQL Protection administrator of a
problem that should be investigated.
Configuring a SMTP Profile
To start the configuration of alerts, you must launch the SureSync Alerts Configuration utility and
create a SMTP profile. The SMTP profile provides SureSync with the necessary details about
your SMTP e-mail server so the program can send messages to you.
To launch the SureSync Alerts Configuration utility, open SureSync, click on the “Home” button
and click on “Alert User List”
To create a SMTP Profile, go to the SMTP Profiles menu and select “New SMTP Profile”
Software Pursuits, Inc. 28
www.SoftwarePursuits.comThe “Add SMTP Profile” panel allows you to define the SMTP settings for your mail server. The
following fields must be configured:
• Profile Name: The name of the profile that you are configuring. For example, you might
use the name of the SMTP server.
• SMTP Server: The server address of the SMTP server. For example, smtp.mail.com.
• Port: The SMTP port for the SMTP server. The default SMTP port is 25.
• Use TLS Encryption: If your SMTP server requires encryption, check this box.
• Sender Name: The name that will appear in the From: field of messages sent by
SureSync.
• Sender Address: The e-mail address that will appear on messages sent by SureSync.
• Reply Address: The reply address that will appear on messages sent by SureSync.
You can also define SMTP Server Authentication settings if your SMTP server requires a valid
logon to send messages (most do). The following fields can optionally be configured:
• User Name: The username that SureSync will log into this SMTP server with when
sending an e-mail alert.
• Password: The password for the username defined in "User Name" should be entered
here.
• Confirm Password: The password for the username defined in "User Name" should be
confirmed here.
Click “Save” to create the SMTP Profile. Clicking on the SMTP Profile tab of the SureSync Alert
Configuration utility will show the new profile.
Software Pursuits, Inc. 29
www.SoftwarePursuits.comConfiguring an Alert User
The second part of configuring E-mail Alerts is to define an Alert User. The Alert User defines the
e-mail address(s) that will be sent messages when errors occur. To configure an Alert User, click
on the “Alert Users” menu and select “New Alert User”
The “Add User to Alert” field has the following fields to be configured:
• User Name: The username that will be used in SureSync to represent this e-mail
address.
• E-mail Address: The e-mail address that SureSync will send the alert messages to.
• Mail Profile Name: The SMTP profile that will be used to send the message.
Multiple e-mail addresses can be added by separating the addresses
with commas (,) or semi-colons (;). This allows you to easily send
messages to a group of SureSync administrators.
Configuring the Schedule to Send Alerts
The final step of the alerts configuration is to tell the Schedule to use the Alert User, and at what
level of errors to send alerts. This is accomplished by clicking on the Schedule in the SureSync
desktop, clicking on the Alerts tab, selecting the Alert User from the drop-down menu and then
clicking “Apply.”
Software Pursuits, Inc. 30
www.SoftwarePursuits.comAdditional details about the E-mail Alert levels available can be found by pressing “F1” while on
the Alerts tab.
Software Pursuits, Inc. 31
www.SoftwarePursuits.comYou can also read