NCC NEWS Quick Guide to - Syracuse University
←
→
Page content transcription
If your browser does not render page correctly, please read the page content below
NCC NEWS Quick Guide to

                                               1/27/2019       © 2019 Newhouse School, Syracuse University

Checklist for audio editing projects:
  •   Don’t begin until you have this list complete!
  •   Script written
  •   Narration recorded
  •   Headphones
  •   Audio recorder
  •   USB/Portable/External Drive

Getting Started
  1. Important!!!!! Always reboot the computer before beginning.
  2. If recording a phone interview, make sure the audio board is powered. The blue light should be
     on. Using an adapter, plug headphones/earbuds into the audio board (upper right, labeled
     ‘phones’)—DO NOT PLUG EAR BUDS INTO FRONT AUDIO JACK OF COMPUTER when you are
     recording a phone interview in Audacity. Otherwise, you may plug the ear buds into the front
     audio jack.
  3. Log into the computer. Select Audacity  from the Desktop. (See end of guide for tips on
     downloading Audacity to your own computer.)

Audacity – A Quick Overview

                                   Quick Guide to Audacity – Page 1
Selection F1
Click to select a start point for audio playback, or click and drag to select a range of audio to play or edit.
Envelope F2
Allows smooth volume changes to be made over the length of a track by means of embedded volume "control
points". Click in the track to create a control point, then set the volume of that point by dragging one of its four
vertically arranged "handles".
Zoom F4
• Left-click zooms in one step
• Shift-click or right-click zooms out one step
Time Shift F5
Selecting this tool lets you synchronize audio in a project by dragging individual or multiple tracks or clips left or
right along the timeline. Also use this tool to drag individual tracks or clips up or down into another track.
To use Time Shift Tool, click in the audio you want to move, then drag in the required direction. To drag multiple
tracks, click in the Track Control Panel of the first track you want to move, then hold down and click in
the Track Control Panel to select the other tracks you want to move.
You can now click and drag in any track to move all the selected tracks, providing you drag with the pointer
inside a selection region.
When Sync-Locked Tracks is enabled, dragging one of the linked tracks will drag all the tracks in that group and
the labels as well.
Multitool F6
Combines all five tools in one. One tool is available at a time, according to the mouse position. The shape of the
pointer changes to show which tool is active.
Quick Guide to Audacity – Page 2CUSTOMIZE AUDACITY (for first time users)
• Choose to automatically NORMALIZE the audio you import: click on the
EDIT>PREFERENCES>IMPORT/EXPORT choice, then check the NORMALIZE ALL TRACKS IN
PROJECT option. Normalization is the process of adjusting the loudness of an audio track so it is
the same throughout the entire track.
• Next…to eliminate an annoying window that pops up when exporting, UNCHECK the SHOW
METADATA EDITOR PRIOR TO EXPORT STEP option
• Next, to make track names easier to see in the Timeline, click on the TRACKS option choice,
then check the SHOW AUDIO TRACK NAME AS OVERLAY option.
• Next, to make your projects more portable (so you can continue editing at home, etc.), click on
the PROJECTS choice, then check the COPY ALL AUDIO INTO PROJECT (safest) option.
• Finally, click OK to exit the PREFERENCES WINDOW
Getting Sound Into Audacity
AUDACITY EDITING FOR USB RECORDERS RECOGNIZED BY WINDOWS
• First, you’ll want to copy the audio files you will be editing FROM your recorder TO your
portable/external drive:
• Make sure your external drive is plugged in. Create a folder with your story slug on it, and open
that folder.
Quick Guide to Audacity – Page 3• Open up the drive representing your recorder to see your recorded audio files. You may have to
select a subfolder where your recorder actually recorded the files -- sometimes they’re labeled
“A”, “B”, “C”, etc.; look for a date next to the files that represents the day you recorded the
audio
• Drag and drop the audio files from the recorder window into your story slug window (on your
portable drive.) This is a good time to rename them.
Basic Editing
Before actually putting a story together, you can trim the sound cuts to the exact in and out you want
to use in the final story.
When editing digital audio files, you need to use both your ears and your eyes. There are many ways to
edit, so be aware of choices within the EDIT MENU.
The Edit Menu
1. Basic editing consists of clicking and
dragging to select the audio that you want
to modify.
2. Select an option from the Edit menu.
Edit Menu Options include:
Copy and Paste
Duplicate (copy the selected audio to a
new track – this will be an important
one!!!)
Here are our suggestions for quick editing:
1. For phone recording, make sure the MIC pot on the audio board (channel 1), and all other POTS
except the two on the right (PHONES and MASTER/MAIN MIX) are turned all the way to the left (off).
Turn the PHONE pot up to the center, or about “12 o’clock”.
2. If recording Internet audio on the PC, turn the PC pot (3rd from the left) to the center, or “12
o'clock”. Otherwise, keep it OFF (all the way left/counterclockwise.)
3. Open all of the sound files you will be using to put the story together: select FILE>OPEN, choose the
E: USB/PORTABLE/portable drive (you can choose the proper file type, usually mp3.) To add another
soundfile to this one window, use PROJECT>IMPORT AUDIO (or just drag and drop files into the
window.) Make sure you have all of the raw digitized soundfiles open before continuing to the next
step.
Quick Guide to Audacity – Page 44. Now choose the soundfile you will use to pick your first story element (voice track? Nat sound?) For
a closer view of the section you’re working on, click on the magnifying glass icon at the top of the
screen (upper right). Click either the Zoom in vertically or Zoom in horizontally button. These buttons
resemble magnifying glasses with a + or – sign on them, respectively.
5. Click the left mouse button at the point where you want to start playing. [NOTE: the I-bar cursor
(SELECTION TOOL) must be selected, and on the waveform. Normally we do all our selecting, cutting,
pasting, etc., with the Selection Tool (at right)].
6. Press the PLAY transport button to begin playback. To stop, tap the spacebar or use your mouse to
hit the stop transport button. This program may only play what is visible on the screen so if you want
to play a sound file longer than one screen, ZOOM OUT, or click the far right-hand magnifying glass,
which fits the entire project in the window.
Then click and put the I-beam cursor wherever you want, and PLAY to begin hearing the sound.
Setting Edit Points:
After you’ve determined your edit points, mark them as follows:
1. Use the left mouse button and click on the place where you want to start the edit—your inpoint.
(Use the ZOOM IN feature if you need to determine the exact in and out points.)
2. Hold down the left mouse button and drag the cursor to the point where you want to end the edit—
your outpoint.
3. The marked area should be highlighted in grey.
4. Press the spacebar or play transport button to play the marked area.
5. Adjust the inpoint and outpoint (if necessary) by moving the I-beam cursor toward the inpoint
or outpoint (the beginning or end of the grey); it will change into a hand icon, sort of like this:
Now just drag the in/outpoint left or right as appropriate.
6. Be careful not to click the mouse anywhere outside of the grey area right now, or your in and
outpoints may be lost.
Quick Guide to Audacity – Page 5Saving and Building a Story
The process of marking selected grey areas is the first step in creating your final audio story. After
highlighting such an area, the next step is isolating it:
Press and hold Ctrl and press D. As the next illustration shows, this creates a new track, which contains
a copy of the bite or section you had selected.
Instantly you have a new track containing only that selected sound bite. Your original track is
unchanged. NAME this track by clicking in the Name Tab next to the X, selecting NAME, and change it
to something better, like Track 1, Mayor Sot 1, etc.
Don’t worry that the new soundfile is in the middle of the track; we’ll move it later.
To hear the new track, first MUTE the original larger track by pressing MUTE. (Each track has its own
“Mute” button. Click it to mute the track, then again to un-mute that track.) Click PLAY on top.
Quick Guide to Audacity – Page 6Once you start creating new tracks, it’s a good idea to start saving your work.
Saving the story in progress (the story project)
• Select FILE>Save Project
• Give the story a project name; because it will be saved as a .aup file, it can share the
same name as other mp3 file or file in your story
• Be sure you save it on your USB/PORTABLE drive – not on the computer’s c:\ drive!
• The “project” will be the file you reopen in the future to continue working on a story,
but it will not work without your external drive (which has all of the actual sound files
it needs), and the drive HAS TO APPEAR WITH THE SAME COMPUTER DRIVE
ASSIGNMENT as it has right now, when the project was created!!! For you to continue
editing this at home, this is mandatory; for directions on how to assign drive letters at
home, visit http://windows.microsoft.com/en-US/windows-vista/Change-add-or-
remove-a-drive-letter
Go ahead and save it, and save frequently as you create more tracks. Finish isolating all of the pieces of
your story, and when you have all the pieces on separate tracks, close the raw original mp3 files,
leaving only the story elements (tracks) pieces on your AUDACITY window.
Editing Fine Points
• If you want to remove unwanted parts in the middle of a file (like pauses, umms, stray noises,
etc.), once you’ve saved it as a separate track, just highlight the junk, and press the DELETE key
(or click EDIT >CUT) ; this will slide the "good stuff" around the removed junk together,
eliminating the junk WITHOUT leaving dead air
• Selecting view>>history will show you a list of your actions, and by clicking on the various
entries, the edits will revert to that stage of the edit, you can then discard all moves after that
point by clicking the discard button. The history list is cleared whenever you save, as in most
programs, you cannot undo after a save.
Arranging Files
You build a story by adding and moving files, one at a time, into a timeline. Although it can be done a
number of ways, it is suggested for consistency that you edit sequentially, meaning line each element
of your story (each track) up in the order it appears in the story. If you start with nat sound, move that
track up to the top, etc.
Begin by following your script: what story element is first? If it is a voice track, move it up to the top of
the timeline by:
• Clicking on the track just above the SOLO button
• DRAG the track up or down to the desired spot and release
• Continue lining up the elements of your story sequentially, by moving them up or down in the
timeline
Quick Guide to Audacity – Page 7Deleting Files from the Timeline
To delete a file from the timeline, just click the X in the upper left-hand corner of the file, next to the
filename: If you accidentally remove a file, click CTRL-Z (undo) to bring it back.
Moving Files in the Timeline
To create a sequential story, you'll need to move the files so they are heard only when they're
supposed to be heard (e.g., after the first file has finished.)
To move files in the timeline, first change the cursor to the Time Shift Tool , then click in the file
you want to move, and drag the waveform left or right, wherever you want.
To play back the entire story, make sure the story is "cued" to the beginning by clicking the "return to
start" transport button , make sure you are ZOOMED OUT enough to see the entire timeline,
and press the PLAY transport control.
Your final story will be a collection of files, which might look something like this
Adjusting volume of files in a Timeline (layering sounds, fading, etc.)
Adjusting volume of an entire file
a. Select the file
b. Adjust the relative volume of the entire file with the volume slider at the left of the track
window:
Quick Guide to Audacity – Page 8Adjusting volume in various parts of a file
a. To do a simple fade in or out:
a. First, select the part of the file where you want to fade in or out (i.e., you need a
grey area selected)
b. Then click EFFECT>FADE IN (or OUT); it's as simple as that. But most audio
blending in news stories is usually not that easy; you might not want to fade out
completely, but lower the volume at some point and maintain that lower volume
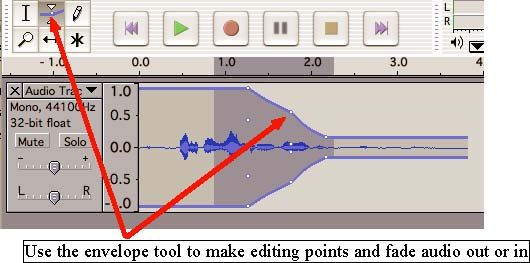
"in the background". For this kind of editing, you need: the Envelope Tool:
b. Select the envelope tool and click on the waveform to make nodes, then drag the nodes
up and down to create a volume envelope. These volume adjustments remain
adjustable, just grab a node and move it up or down, or drag it completely off the track
to delete it altogether. Play the file to hear what the audio sounds like.
i. Add as many points as you want by clicking on the line, and move them up or
down to make volume rise, lower, etc.; it’s pretty intuitive
ii. You can always slide these envelopes left, right, up, down
Save the story
There are two main things you might want to save: your story in progress (the EDIT MODE version of
your story, called a “project”), or you may want to ultimately “mix” the final EDIT MODE version of
your story down to a single mp3 file you can play on any computer.
2. Saving the story in progress (the story project)
• Select FILE>Save Project
• Give the story a project name; because it will be saved as a .aup file, it can share the
same name as other mp3 file or file in your story
• Be sure you save it on your USB/PORTABLE drive – not on the computer’s c:\ drive!
• The “project” will be the file you reopen in the future to continue working on a story
3. Saving the final story as a single mp3 file
• Select FILE>Export, then choose EXPORT AS MP3 files
Quick Guide to Audacity – Page 9• IMPORTANT: Give the story a unique file name – different from your sound files! If
you save it as an mp3 file with a name you have already used, you might overwrite the
original file!!!
• Be sure you save it on your USB/PORTABLE drive – not on the computer!
• Saving the mixdown will create a new copy of the story that does not need the files
anymore; it will play on any computer as an mp3 file (but it can not be re-edited; you'd
have to open your project (.aup) file to do that.
File Format Audio Quality File Size Compatible with Best format for
Files you plan to
Audacity Project Excellent BIG! Only Audacity! continue editing in
Audacity
NPR, Audio CDs,
Most media
.wav Excellent BIG! High Quality
players
Recordings
Most media NCC News, Web
.mp3 Good Small
players audio
Leave the system
To exit the system, first make sure you have saved anything you’ve recorded: sound files, files, or final
story mixes.
Then make sure you’ve saved the “project” (the EDIT version of your story, which includes the files and
tracks you’ve organized, and allows you to continue editing this story later.)
Exit AUDACITY by clicking the X in the upper-right of the AUDACITY window.
Don’t forget to log off Windows if you are leaving the computer for good.
Special Effects
Audacity can help improve audio that was poorly recorded. Although there are several effects that can
be applied, you should only consider using effects that try to simply correct poor sound quality, and
never use an effect that changes the integrity of the original sound (such as an effect that changes the
speed, pitch, tempo, or adds anything that wasn't there originally: echo, reverb, etc.) The only effects
you are likely to consider are:
• Noise Removal: This effect is ideal for removing constant background noise such as fans, tape
noise, or hums. It will not work very well for removing talking or music in the background.
o Removing noise is a two-step process. In the first step, you select a portion of your
sound which contains all noise and no signal; in other words, select the part that's silent
except for the noise. Then choose Noise Removal... from the Effect menu and click Get
Quick Guide to Audacity – Page 10Profile. Audacity learns from this selection what the noise sounds like, so it knows what
to filter out later.
o Then, select all of the audio where you want the noise removed from and choose Noise
Removal... again. This time, click the "Remove Noise" button. It may take a few seconds
or longer depending on how much you selected.
o If too much or not enough noise was removed, you can Undo (from the Edit menu) and
try Noise Removal... again with a different noise removal level. You don't have to get a
new noise profile again if you think the first one was fine.
• Equalization: This provides a more precise method of altering the gain or volume of specific
frequencies within a given audio region. For example, if your mic was too far away from your
subject, your recording might suffer from excessive hiss at the high end of the spectrum;
equalization here might help. The same technique can be applied for minimizing the effects of
wind on a microphone or reducing the pronounced sound of the occurrence of "S" sounds
during voice tracks.
o You can apply the Equalizer effect by first selecting the portion of the file you want to adjust,
and then going to the Effect Menu and selecting Equalization to bring up the Equalizer. This tool
works in a similar way to the Envelope Tool. The blue line represents your audio track. The
frequencies are listed across the bottom with the low or bass frequencies on the left, the high
(hissy) or treble frequencies on the right and the midrange frequencies in the middle. By clicking
on the line at any location, you will create a handle that can be move up or down to increase or
decrease the volume at that frequency.
This is the Equalization after clicking on the line and increasing and decreasing the volumes at the
various frequencies. The white dots are the handles that can be grabbed with your mouse. To decrease
hiss, for example, drag the right side, or higher frequency part of the line down. (In the screen shot, it's
"up", so you would have to lower it…)
Quick Guide to Audacity – Page 11Recording voice tracks in the radio master control room
1. sign out headphones (if necessary) from the edit suites
2. make sure headphones are plugged into the front earphone jack on the computer on the right
(WE DO NOT USE THE COMPUTER ON THE LEFT FOR ANY OF THIS!)
3. press the MIC 1 red button on the audio board, and raise the slider
4. insert your USB/PORTABLE drive into the master control room computer on the right, and log
into same computer
5. open Audacity
6. check the record pointer in the Audacity Mixer Toolbar:
- the pointer should be near the + of the meter, to ensure the sound is loud enough
- then check the meter level on the Audacity Meter Toolbar (upper right corner of screen):
- click ONCE in the bar area above the microphone; as you speak into the MIC, you should see
red bars increase as sound gets louder. If you do NOT see anything happening, make sure that the
drop-down window next to the microphone icon on the screen says LINE IN (it should by default.) The
sound should stay in the -15 range, and should peak no higher than -12 on the number scale.
This is really important: make sure that the levels stay not too high, not too low:
Here you are determining the audio quality of your final product. So set this carefully and monitor it for
EVERY piece of sound you put in.
Record the sound into the computer
To record sound from the mic, simply click on the red record button located with the transport buttons
(top of screen). Recording begins. Then speak into the mic.
Quick Guide to Audacity – Page 12As it’s recording, monitor the audio levels – keep the levels in the preferred area (generally between
-24 and -15) by adjusting the MIC pot on the audio board. To stop recording, press the [STOP] transport
button (the yellow square).
NOTE: you have just digitized a sound file. If you have more sound to digitize, you can repeat the
recording process; Audacity will automatically start recording a brand new track, each time you click
on the RED Record button. It is possible in Audacity to continue recording in the same track you just
recorded in. To do this, when you finish recording the first recording, you must click the blue PAUSE
button instead of STOP. Then just “UNPAUSE” it (by clicking PAUSE again) to continue recording in
the original track.
7. To check the track:
a. Turn the MIC 1 pot off, and put headphones on
b. Recue the voice track, then press the PLAY button in the Audacity transport area; if it’s
OK, save it, if not, delete it and begin again
Now, save the file:
• select FILE>Export, Save as type: mp3 files
• If saving to a USB/PORTABLE drive, choose the drive
• Give the "file" a filename, such as Voice Tracks
• Go ahead and save it
Finally, close Audacity, remove the USB/PORTABLE drive, and return the mic (if you signed it out) to the
edit suites.
Recording from telephones in the Radio Labs
Follow the steps you normally would to digitize a soundfile:
1. Plug in earbuds or headphones into the PC (to play back the recorded file)
2. insert your USB/PORTABLE drive into one of the telephone computers, and log into computer
3. Pot everything down on the audio board except for the PHONE and MASTER pots. (Notice that
the telephone pot is labeled PHONE and the headphones pot is labeled PHONES--there is a
difference.)
4. Before opening Audacity, check the audio settings on your computer:
• RIGHT CLICK on the volume button in the bottom right of your screen and click
RECORDING DEVICES.
5. Make sure that:
• Microphone (ATR2USB) is enabled
• Microphone (ATR2USB) is set to DEFAULT DEVICE with a green checkmark. To ENABLE or
to set as DEFAULT, right-clock on the icon and select either ENABLE or SET AS DEFAULT.
6. In Audacity, make sure your input device (next to the little mic) is set to Microphone
(ATR2USB). This is a drop-down bars in the upper right hand portion of the screen.
Quick Guide to Audacity – Page 137. Finally, when recording, make sure your guest’s audio level in AUDACITY is averaging around
level -15. You may have to adjust the input record level (next to the mic icon on top), or the
PHONE pot on the audio mixer.
8. Check the record pointer in the Audacity Mixer Toolbar:
9. the pointer should be near the + of the meter, to ensure the sound is loud enough
10. then check the meter level on the Audacity Meter Toolbar (upper right corner of screen):
11. click ONCE in the bar area above the microphone; after you connect the telephone (in the next
step of this handout), as you speak into the phone, you should see red bars increase as sound
gets louder. If you do NOT see anything happening, make sure that the drop-down window next
to the microphone icon on the screen says Microphone (ATR2USB.) The sound should stay in
the -15 range, and should peak no higher than -12 on the number scale.
This is really important: make sure that the levels stay not too high, not too low:
Here you are determining the audio quality of your final product. So set this carefully and monitor it for
EVERY piece of sound you put in.
• Pot everything down on the audio board except for the PHONE and MASTER pots. (Notice that
the telephone pot is labeled PHONE and the headphones pot is labeled PHONES--there is a
difference.)
• Press the red DROP button on the little black phone box, then dial the number on the
telephone. Remember, if you are dialing a 315 phone number, most of the 315 area code is
long-distance, so you would dial 8-1-315-xxx-xxxx (substitute your number for the x’s), then
wait for the dial tone, and enter 146670. Wait a good 10 seconds or so, and you should hear the
call going through.
• Once the phone starts ringing, push the white CALL button on the telephone interface box. This
sends the audio through the computer. You should see the audio levels light up on the audio
board and, if you've already started recording, on the computer. This 'call' button MUST be on
in order to record the interview. You don't need your headphones during the interview as you'll
be listening through the telephone receiver.
• Adjust the levels using the PHONE and MASTER pots based on the levels you see on the
computer and on the audio board.
Quick Guide to Audacity – Page 14• When the level looks good, press the red REC button in the transport control area of Audacity
and conduct the interview. Remember to use the MUTE button on the telephone during the
answers. You will still hear what the interviewee is saying, but he or she won't hear all of the
ambient newsroom noise around you and you'll get a cleaner recording. Remember to
UNMUTE the phone when you ask your next question!
• IMPORTANT: When you are finished with the interview, hang up and press the red DROP
button on the black telephone interface box. This hangs up the phone and allows calls to come
in to the newsroom.
• To listen back to the interview, turn the PHONE pot down and the PC pot up on the audio mixer
and listen through your headphones. ALWAYS leave the MASTER pot turned on.
• Export right away to avoid losing it if the PC crashes
NOTE: you have just digitized a sound file. If you have more sound to digitize, you can repeat the
recording process; Audacity will automatically start recording a brand new track, each time you click
on the RED Record button. It is possible in Audacity to continue recording in the same track you just
recorded in. To do this, when you finish recording the first recording, you must click the blue PAUSE
button instead of STOP. Then just “UNPAUSE” it (by clicking PAUSE again) to continue recording in
the original track.
Now, save the interview file:
• select FILE>Export, Save as type: mp3 files
• If saving to a USB/PORTABLE drive, choose the g:\ drive
• Give the "file" a filename, such as Mayor Interview
• Click SAVE
Finally, close Audacity, remove the USB/PORTABLE drive.
Some parts of the guide excerpted from:
https://alphamanual.audacityteam.org/man/Main_Page
http://audacity.sourceforge.net/manual-1.2/
http://www.tuxmagazine.com/node/1000154
Quick Guide to Audacity – Page 15Table of Contents
Checklist for audio editing projects: 1
Getting Started 1
Audacity – An Overview Error! Bookmark not defined.
Audacity – A Quick Overview 1
Selection F1 2
Envelope F2 2
Zoom F4 2
Time Shift F5 2
Multi F6 2
CUSTOMIZE AUDACITY (for first time users) 3
Getting Sound Into Audacity 3
AUDACITY EDITING FOR USB RECORDERS RECOGNIZED BY WINDOWS 3
Basic Editing 4
The Edit Menu 4
Setting Edit Points: 5
Saving and Building a Story 6
Editing Fine Points 7
Arranging Files 7
Deleting Files from the Timeline 8
Moving Files in the Timeline 8
Adjusting volume of files in a Timeline (layering sounds, fading, etc.) 8
Adjusting volume of an entire file 8
Adjusting volume in various parts of a file 9
Save the story 9
Leave the system 10
Recording voice tracks in the radio master control room 12
Record the sound into the computer 12
Recording from telephones in the Radio Labs 13ss
Quick Guide to Audacity – Page 16You can also read