Creating and Editing Instruments in Tangerine: User Manual - June 2019
←
→
Page content transcription
If your browser does not render page correctly, please read the page content below
Creating and Editing Instruments in
     Tangerine: User Manual
              June 2019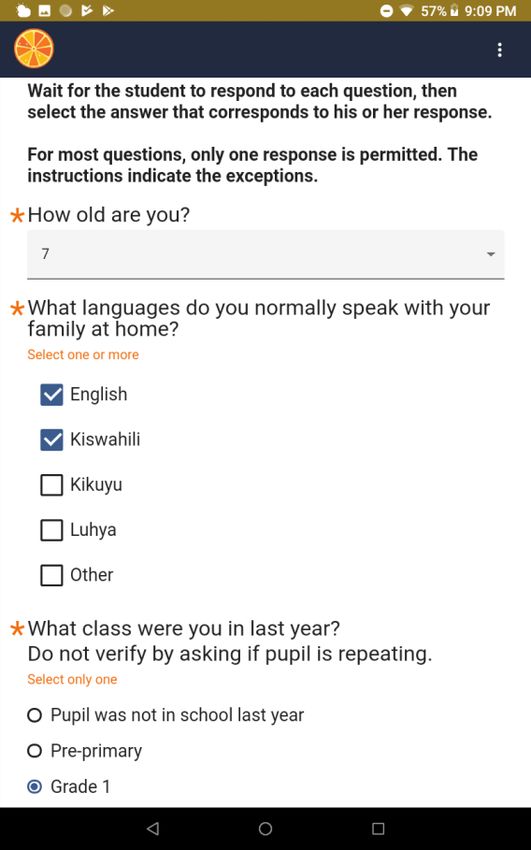
About TangerineTM
Tangerine is open source electronic data collection software designed for use on Android
mobile devices. Its primary use is to enable recording of students’ responses in oral early grade
reading and mathematics skills assessments. Tangerine is also used to capture interview
responses from students, teachers, and principals; as well as in simple surveys and other data
collections.

Tangerine was developed by RTI International with funding from RTI and Google.org.

For more information on Tangerine, visit http://www.tangerinecentral.org.

About this Manual
The procedures outlined in this document assume that the user has a valid Tangerine editor
username and password and is able to login to their Tangerine instance on the web. If you do
not have a Tangerine instance or have any questions about Tangerine, please contact
support@tangerinehelp.zendesk.com.

This manual outlines the critical steps from creating an instrument in Tangerine to downloading
the collected data for analysis. It provides tips and recommendations for instrument rendering
in Tangerine and software use.

                                                                                                2
Table of Contents
About TangerineTM .......................................................................................................................... 2
About this Manual .......................................................................................................................... 2
Table of Contents ............................................................................................................................ 3
1.      Creating a New Group............................................................................................................. 5
2.      Creating a New Instrument/Form........................................................................................... 5
3.      Editing Instrument Sections .................................................................................................... 6
     Adding Sections to an Instrument/Form .................................................................................... 7
     Section Editor .............................................................................................................................. 7
     Copying Items ........................................................................................................................... 10
4.      Item Editor ............................................................................................................................ 11
     GPS Item .................................................................................................................................... 12
     LOCATION.................................................................................................................................. 14
     CHECKBOX GROUP (Checkbox, Radio Buttons, or Dropdowns) ............................................... 17
     RADIO BUTTONS ....................................................................................................................... 19
     DROPDOWN .............................................................................................................................. 19
     TIMED GRID ............................................................................................................................... 19
     HTML CONTENT CONTAINER .................................................................................................... 21
5.      On-Open / On-Change (Skip) Logic Editor ............................................................................ 23
        Logic at instrument/form level ............................................................................................. 23
        Logic at section level ............................................................................................................. 23
        Logic at item level ................................................................................................................. 24
        On-open and on-change ....................................................................................................... 24
        (Skip) Logic Examples ............................................................................................................ 24
6.      Field Validation ..................................................................................................................... 26
     Field Validation Examples ......................................................................................................... 27
7.      The Instrument/Form HTML Editor ...................................................................................... 28
8.      Deploying Tangerine for Offline (or Online) Data Collection ............................................... 28
     Android Installation .................................................................................................................. 30
     Web Browser Installation ......................................................................................................... 30
9.      Download CSV ....................................................................................................................... 32
10. Using Tangerine on the Mobile Device ................................................................................. 34

                                                                                                                                                   3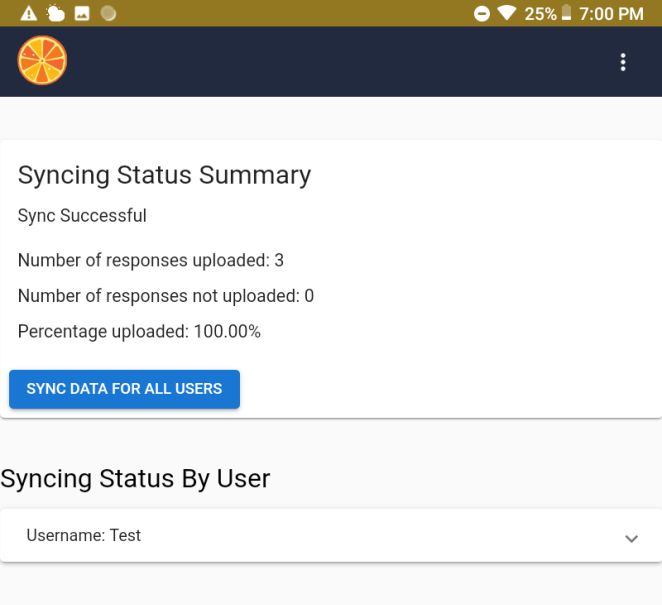
Registration and Log in ............................................................................................................. 34
Administrating Instruments ...................................................................................................... 36
Resuming Instrument................................................................................................................ 36
Syncing Data.............................................................................................................................. 37

                                                                                                                                           4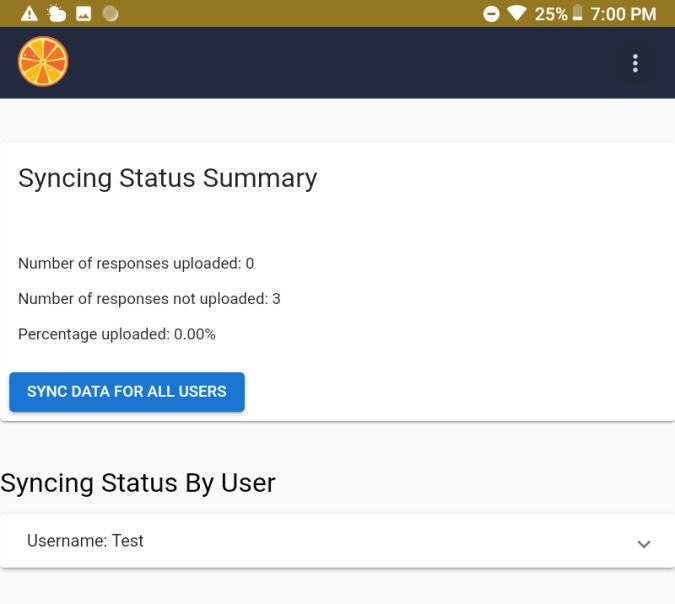
1. Creating a New Group
Upon logging into your Tangerine instance, you will see a screen listing your Tangerine groups
and/or the opportunity to create new groups. You might think of groups as discrete data
collection efforts that might contain several instruments or forms. If you have, e.g., a baseline
data collection and an endline data collection for the same project, you might make these two
different groups. When packaging your instruments into the apk (.apk is the application
installation file format for Android devices) for installation on an Android device, Tangerine
packages all instruments in a group. Thus, you should set up groups and categorize instruments
accordingly.

Click “Create New Group” in the screen below.

Enter a name for your group: all lower case, no space, only letters.

   2. Creating a New Instrument/Form
When you create a group, it will show up in the list groups in your Tangerine instance. Click on
the group name to start creating your instruments in Tangerine.

                                                                                                   5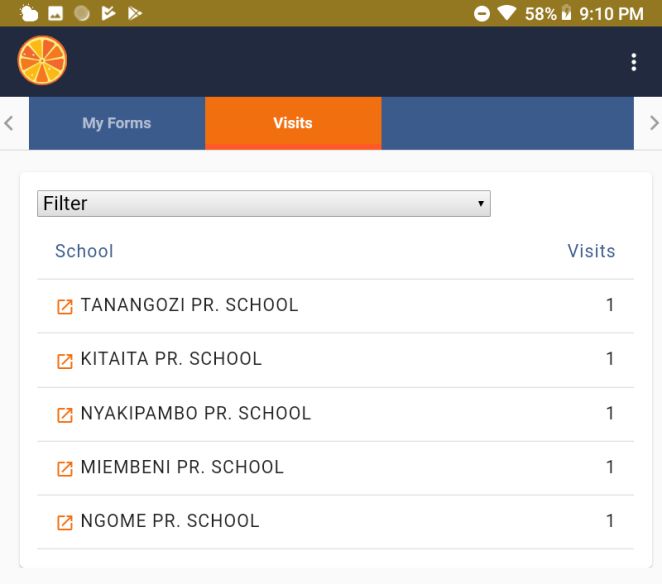
When you create a new group, Tangerine automatically creates an example instrument/form.
To add a form or instrument, click on the ADD FORM button.

This will add an entry to the already existing list of forms but with a default name, ‘New Form’.

Click on the pen icon   to modify the name of your instrument and to start adding/editing
instrument sections and items.
Click on the eye icon      to preview your instrument in data collection mode.

Click on the print icon    to open a new printable browser window and details for each item in
your instrument. This is the view we often use to quality assure (QA) the instrument.

Click on the trash icon     to delete this form.

As you will see later, by clicking   from this view, you can also access your data.

To rename your instrument/form, click on the pen icon for the form, overwrite the “New Form”
entry under “Form Title” and hit “SAVE”.

    3. Editing Instrument Sections
Once you have selected to edit your new or existing instrument/form, you will see a screen like
the one below. This view lists the different sections of your instrument. Each section can
contain one or more items.

                                                                                                    6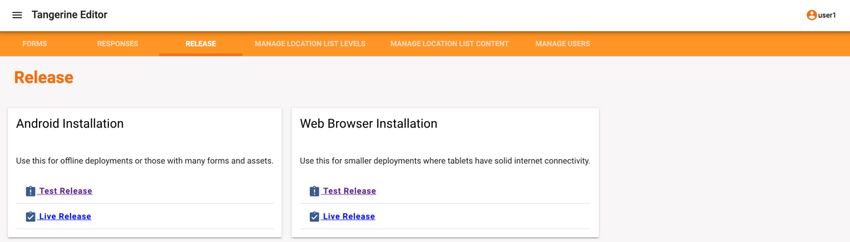
On the tablet, items in any one section can be seen on a single screen. The user moves through
items by “scrolling” down the screen. The user moves through sections by hitting “Next” or
“Back” on the tablet.

The form editor provides the interface for adding and editing instrument sections and items.
This interface provides controls that make the following actions possible:
    • EDIT HTML - This converts the interface from a WYSIWYG (“what you see is what you
        get”) to a HTML code interface
    • PREVIEW – This control enables you to have a preview of your form in the current state
    • SAVE – This control allows you to save the form in its current state
    • ADVANCED – This Control enables you to access the on-open logic and on-change logic.
        This logic is used for skipping an entire instrument section.
    • ADD SECTION – This allows you to add a section of items to your instrument.
   •   EDIT      – This icon opens the interface to edit an instrument section (e.g., add items)
   •   DELETE       – This icon deletes this instrument section

In this view, you can drag sections to reorder them.

Adding Sections to an Instrument/Form
To add a new section to your instrument, hit “ADD SECTION”.

The interface allows a drag-and-drop feature which enables reordering of the sections already
created. The order in which the sections are listed, is the same as the sequence of screen that
will be shown on the tablet.

Section Editor
Upon adding a new section, or selecting to “EDIT” your instrument section, you will see the
section editor screen below.

                                                                                                   7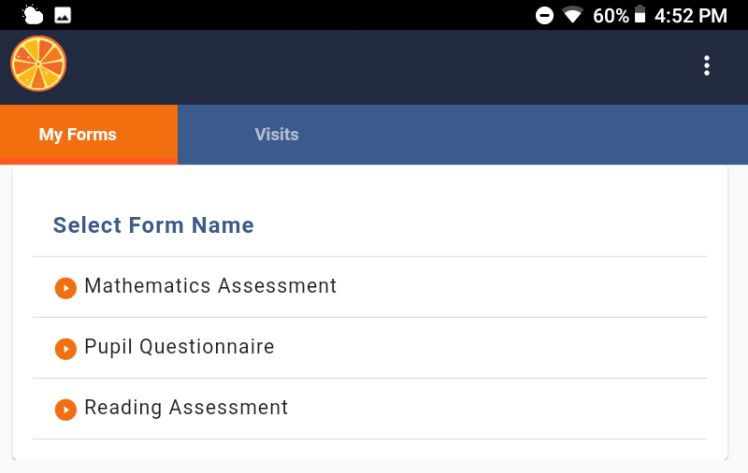
If this is a new section, you might give it a section header. Click the pen icon on the right of the
blue bar and overwrite the “…” under “title”. The hit SUBMIT to save your edits.

To add an item to your instrument section, click

This opens the item type selection interface.

These elements are subdivided into groups of item types (e.g., inputs, location, lists, misc):

Inputs
INPUT-DATE: This item type renders a calendar widget on the tablet

                                                                                                       8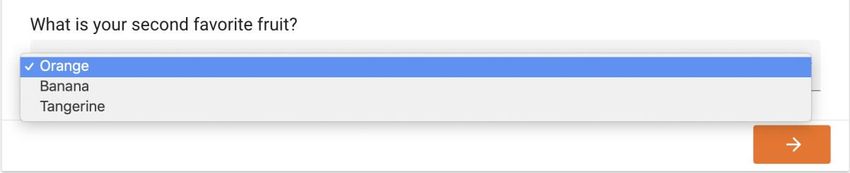
INPUT-TEXT: This item type is a standard numbers and letters field

INPUT-TIME: This item type displays a clock hour selection on the tablet

INPUT-NUMBER: This item type opens up the number keyboard on the tablet and doesn’t allow
any other non-number characters to be inserted here

Location
GPS: This item type automatically collects GPS coordinates of the tablet

LOCATION: The location item type requires a list of locations, e.g. school names by district and
region to be imported to the Tangerine editor.

Lists
CHECKBOX: This item type allows for multiple answers to be selected from a list of options

CHECKBOX GROUP: Allows for multiple answer options to be selected from a group of options

DROPDOWN (select): This item type allows for a single answer selection for longer lists

RADIO BUTTONS: This item type only allows for a single answer selection from a list of answer
options

                                                                                                   9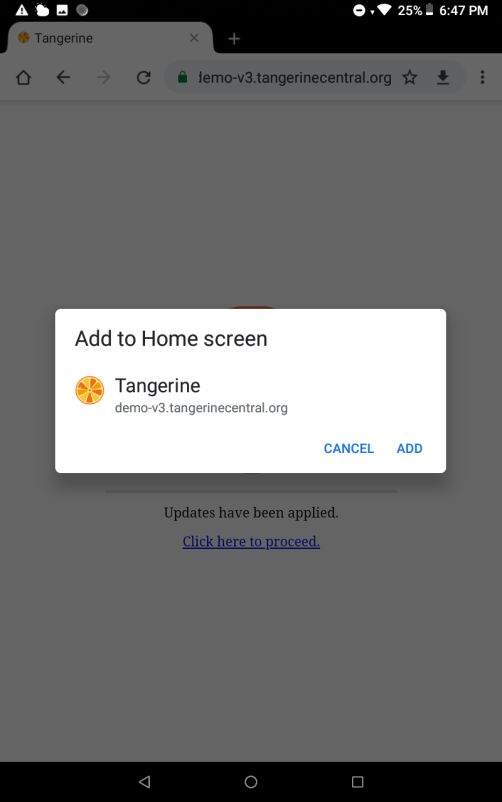
Misc
HTML CONTENT CONTAINER: This item type allows for flexible integration of headers, help text,
or transition messages that do not require any user input or response.

QR CODE SCANNER: This item allows scanning of a QR code. Tangerine will capture and save the
target info (e.g. URL).

EF TOUCH: This item type is to assess children’s executive functions, including working memory,
inhibitory control, and cognitive flexibility (requires RTI manual support to upload your images
and sounds).

TIMED GRID: This item type facilitates timed assessment approaches, e.g., to assess letter
sound knowledge, oral reading fluency or math operations.

UNTIMED GRID: This item type facilitates assessment approaches that are not timed, but
require many items, e.g. oral counting, untimed reading comprehension tasks, etc.

CONSENT: This item is a special function for participant consent. If the participants responds
that no consent is given, the form will be closed and data saved accordingly.

Depending on the element chosen, an interface for providing more detail on the item being
rendered/created is presented in the Item Editor.

Copying Items
If you have an element and/or content which is the same as a previous element (e.g., radio
buttons) that you would like to insert into your instrument quickly, without having to click
“INSERT HERE” again, there is a COPY feature that you can use to do this. First, enter your
original content (e.g., variable name, labels, and values) and then click SUBMIT. Once the first

step is complete, next you click on the      icon. Doing so automatically creates a duplicate of

                                                                                                 10
all your original content, except the variable name, which you will need to edit, if desired. In
the image below, you can see that all duplicates are auto-populated with the name “widget,”
followed by an underscore, and a mix of letters and numbers (always different from the
previous copy). If you would like to, you can edit all the content of the copy to fit your needs.
4. Item Editor
The item editor screen is similar for many of the item types. It usually contains the following
elements:
11Variable name: This name has to be unique for any instrument/form, as this will be used for the
CSV data output as column header with each observation/child assessed/interview being a row.
Avoid special characters and spaces, use lowercase only (e.g., “age”).
Label: This will be the item label/name that will be displayed to the user (e.g. “How old are
you?”)
Hint Text: This field allows you to add text that acts as a hint for the user (e.g., “Enter child’s
age or year of birth, if known”)
Show if: This is the place to enter item-level skip logic (see section 5 of this manual).
Required: Selecting this checkbox marks the element as a required field. This ensures that users
will enter a value before proceeding to other instrument sections or finalizing the
instrument/form.
Disabled: Selecting this checkbox marks the element as inactive. The item is visible to the user
on the tablet, but its value cannot be changed.
Hidden: Selecting this checkbox makes the element inactive AND invisible on the tablet.
GPS Item
Use the GPS item to record the location (longitude & latitude) of the user while filling in the
instrument/form.
We suggest placing a GPS item always in its own section. Do not combine with other items.
When selecting to add an item of the GPS type, Tangerine presents the below item editor
screen.
12The following might be a way to configure this item:
Variable name: Enter “gps”.
Hint Text: Leave blank
Show if: Leave blank
Valid if: Leave blank
Required: Select this checkbox to make this a required field.
Disabled: Leave blank
Hidden: Leave blank
Hit “SUBMIT” to see the below item added to the section editor.
13On the tablet this item will look like this:
LOCATION
This item type offers a dropdown listing of predefined location information such as, e.g., region,
district, and school name. Before you add this item to your form, you need to upload a location
list and configure Tangerine:
First, decide what levels you would like to show and prepare a CSV file that contains your
locations accordingly. Each column header will present a location level (e.g. column A header
might be region; column B header might be district, etc.). Make sure each level/column header
contains only a single word and no spaces.
Second, define the location levels for Tangerine. Click on the tab “MANAGE LOCATION LIST
LEVELS” located at the top of your group’s main page that lists your instruments/forms.
Click “Create a New Location Level”.
On the next screen, enter the name of the “highest” location level under “Label” (e.g. region).
Repeat this process for all other location levels, however, for each “child” level, select which is
the parent level. E.g. in the case of district, the “Parent Level” would be “region”, and so forth.
Hit “Submit” to save.
NOTE: You cannot delete location levels. Be careful and deliberate as you define them for your
group. If you made a mistake or need to make changes, contact the Tangerine helpdesk.
14Next, navigate to the “MANAGE LOCATION LIST CONTENT” tab and select “Import Location
List”. Double check that your CSV file contains only those columns that you have defined as
levels and spelled exactly the same!
Once you selected the CSV, Tangerine will ask you to map the location levels you already
defined to the column headers found in your csv file.
Click on the small arrows to select the matching column header. For each ID field, select “Map a
column to a level and select “AutoGeneratedID” for the ID as shown in the example below.
15Then click “Process CSV” as shown in the screen above. Once processing is completed, you will
receive a notification like this:
Once you have successfully uploaded a location list and prepared Tangerine, you can add the
location item to your form. The following might be a way to configure this item, once you
completed the above steps.
Variable name: Enter
“location”.
Hint Text: Leave blank
Show levels (ex.
county,subcounty): Enter
“province,district,school”
Show if: Leave blank
Valid if: Leave blank
Required: Select this
checkbox to make this a
required field.
Disabled: Leave blank
Hidden: Leave blank
Show meta-data: Leave
blank
Hit “SUBMIT” to see the
below item added to the
section editor.
16On the tablet this item will look like this:
NOTE: Without a location list, no location will be displayed, and the item will be seen as
“loading”. If you need to make changes to your location list, contact the Tangerine helpdesk.
CHECKBOX GROUP (Checkbox, Radio Buttons, or Dropdowns)
This item type lets you define a checkbox item that lets a user pick one or more options.
The following might be a way to configure this item:
Variable name: Enter “books”.
Label: Enter “What kind of books do you like
to read?”
Hint Text: Enter “Tick all that apply”
Show if: Leave blank
Valid if: Leave blank
Required: Selecting this checkbox to make
this a required field.
Disabled: Leave blank
Hidden: Leave blank
Value (answer option): Enter the data value
for the first answer option, e.g., “0”
Label (answer option): Enter the label for the
first answer option, e.g., “None”
Hit “ADD ANOTHER” to add additional answer
options, e.g.:
Value (answer option): “1”
Label (answer option): “Storybooks (fiction)”
Hit “ADD ANOTHER” to add additional answer
options, e.g.:
Value (answer option): “2”
17Label (answer option): “Books about real things (non-fiction)
When done adding all answer options, hit “SUBMIT”.
On the tablet this item will look like this:
NOTE: The item type “CHECKBOX” only adds a single checkbox to the form, with the item label
being the answer option label.
On the tablet this single checkbox item will look like this:
18RADIO BUTTONS
Radio buttons are an item type used for items that allow for only one answer. The configuration
for radio buttons is the same as for checkbox group.
On the tablet the radio button item will look like this:
DROPDOWN
Dropdown is an item type used for items that allow for only one answer to be picked from a
dropdown list of items. This item type is convenient when there are many options to choose
from. The configuration for a dropdown item is the same as for checkbox group.
On the tablet the dropdown item will look like this:
TIMED GRID
This item type facilitates timed assessment approaches, e.g., to assess letter sound knowledge,
oral reading fluency or math operations. The following might be a way to configure this item:
Variable name: Enter “letter_sound”.
Number of columns: Enter the number of columns by which you’d like to organize the items.
Enter, e.g. “4” (Tip: choose less columns for larger items, like words or operation problems)
Hint Text: Leave blank
Auto Stop: The autostop field defines the number of consecutive incorrect items, starting from
the first one, after which the test stops automatically. For example, with an autostop value of
10, if a child has the first 10 items all incorrect, the test will stop. If a child has the first 4 items
correct and then the following 10 items incorrect, the test will not autostop.
19Show if: Leave
blank
Valid if: Leave blank
Mark entire rows:
This option allows
the user to mark
and entire row of
items as incorrect
(e.g. if a child
skipped an entire
row of sounds in a
letter sound
assessment)
Required: Selecting
this checkbox to
make this a
required field.
Disabled: Leave
blank
Hidden: Leave
blank
Duration in
seconds: Enter the
time allowed to
complete this assessment, e.g. “60” for 60 seconds or one minute.
Options (each option separated by a space): Enter all grid items here. Separate each item by a
space from the next; if you have extra spaces please remove them!
When done adding all answer options, hit “SUBMIT”.
NOTE: For these kids of assessments there are usually instructions preceding the assessment
items. Insert those instructions as a “HTML CONTENT CONTAINER” item first, as shown below,
followed by the “TIMED GRID” in the same section. We recommend to only feature the
instructions (HTML Content) and Timed Grid in any one section of your instrument/form
On the tablet the timed grid item will look like this:
20.
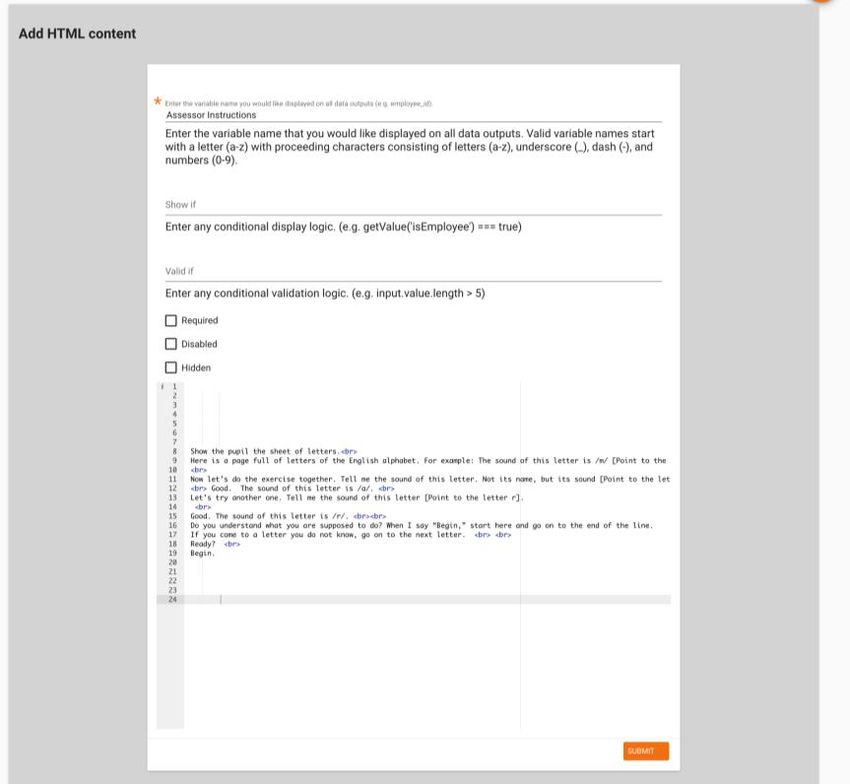
HTML CONTENT CONTAINER
This item type allows for flexible integration of headers, help text, or transition messages that
do not require any user input or response. You can treat this container as a variable and hide or
show different instructional text upon the selection of different options.
The following might be a way to configure this item:
Variable name: Enter “Assessor instructions”.
Show if: Leave blank
Valid if: Leave blank
Mark entire rows: This option allows the user to mark an entire row of items as incorrect (e.g. if
a child skipped an entire row of sounds in a letter sound assessment)
Required: Leave blank
Disabled: Leave blank
Hidden: Leave blank
Rows 1-X: Insert assessor instructions, use html tags to insert line breaks or formatting (e.g.
for a line break; text for bolding a piece of text, etc.).
When done adding all answer options, hit “SUBMIT”.
21On the tablet this HTML container item will look like this:
225. On-Open / On-Change (Skip) Logic Editor
Every instrument/form, section, and individual item provides an interface for adding logic, e.g.
skip logic, that controls the interactivity and presentation of the instrument, section, or item.
Logic at instrument/form level
At the instrument/form level, accessing this logic editor is via advanced settings in the section
editor.
Click on ADVANCED to see the screen below with “on-open” and “on-change” entries.
Logic at section level
At the section level, the logic editor can be accessed by editing the Section Details clicking the
pen icon on the right of the blue bar (where one can also rename the section).
23Logic at item level
As outlined earlier, at the item level, such logic can be added in the “Show if” field in the item
editor.
On-open and on-change
As the name suggest,
on-open logic is only
executed when the
form is opened
whereas on-change
logic is always
executed whenever a
change happens in
the whole form.
When selecting on-
open logic either at
the instrument/form
level or in the section
editor, the following
screen appears. The
interface allows
JavaScript logic to be
incorporated into the
instrument.
(Skip) Logic Examples
You want to skip an entire section:
Navigate to and select the “on-change” at the instrument/form level. This logic will not work if
you insert it in a section (it must be defined on form level)
In this example, the section gets skipped based on responses from a previous item, e.g., if the
respondent answered negatively to a previous question “Do you have children?”. Note that the
sectionID is provided in Tangerine in the section details as shown below. Form level skip logic is
used to present or hide an entire section page to the user. This is very useful when managing a
workflow and you need to display some sections but hide others according to the selected
option for a question. For example, you can show a certain section only for grade 1 and hide it if
grade 2 is selected.
24if(getValue('children') == '1')
{sectionEnable('item_1')}
else
{sectionDisable('item_1')}
You want to hide a set of items based on responses to an item in a previous section:
Navigate to and select the “on-open” at the section level.
In this example several items in this section are hidden based on the participant’s response to
the item about the child’s schooling experience in a previous section.
if(getValue('school') == '1')
{itemShow('grade')
itemShow(‘repeatedgrade’)
itemShow(‘dropout’)}
else
{itemHide('grade')
itemHide(‘repeatedgrade’)
itemHide(‘dropout’)}
You want to hide a set of items based on responses to two items in a previous section:
Navigate to and select the “on-open” at the section level.
In this example the item “teachers_name” should only be shown if the participant’s previous
response to “teacher_available” was yes = 1 AND if the participant’ previous response to
“class_selected” was “1”.
if(getValue(' teacher_available') === '1' && getValue('class_selected') === '1' )
{itemShow('teachers_name')}
else
{itemHide('teachers_name')}
The Logic interface offer syntax highlighting. This is handy when you have errors in your code.
Below is an example of an error and sample message.
25You want to skip an item:
Navigate to the “Show if” in the Item Editor.
In this example this item (e.g., “Which grade did you repeat?” will ONLY be shown if the
response to the previous item (e.g., asking about whether the person ever repeated a grade)
was “yes” (data value 1).
getValue('repeatedgrade') == '1'
Alternatively, for a preceding question that had “Other” as an answer option, the logic here
might look like this:
getValue('q10') == '9'
Other examples might include a specific value of a preceding item. Use the below example for
questions of type checkbox group, where more than one answer can be selected.
getValue('q12').includes('5')
NOTE: The skip logic commands used in Tangerine are case-sensitive and space-sensitive. You
must type precisely the name of the variables which you want to reference.
NOTE: Use single straight quotation marks to demarcate variables names ', do NOT use single
slanted quotation marks ‘ or double quotation marks “.
6. Field Validation
Tangerine provides the option to check the validity of an input field. Navigate to the “Valid if”
field in the Item Editor.
26Field Validation Examples
If, for example, the value entered into an “INPUT-NUMBER” field should have 9 or more
characters, enter the following into “Valid if” for this item:
input.value.length > 9
Tangerine also allow you to compare the value entered in the current item to a value entered
for another, earlier item. This might be the case, e.g. for attendance when observing a
classroom. That is, when recording attendance, the number of children present should not
exceed the number of children enrolled. Assume that a relevant variable name of the earlier
item was “boys_enrolled” and the current items is about the boys present, this might be the
validation logic to enter under “Valid if” for boys_present.
input.value < inputs.boys_enrolled.value || input.value == inputs.boys_enrolled.value
277. The Instrument/Form HTML Editor
The Form HTML Editor provides a high-level interface to the form creation or modification of an
entire instrument or form. We suggest avoiding this interface unless familiar with JavaScript,
CSS and HTML5. This view allows direct editing of instrument properties for advanced users.
8. Deploying Tangerine for Offline (or Online) Data Collection
Once the user is done creating the instruments/forms the next step is to deploy the instrument
to an Android device for data collection. To release your instruments or instrument updates,
select the “Release” tab in the top menu of the main group page.
28Upon selecting “Release”, you will see the screen below.
Tangerine offers two deployment types, test release and live release:
1. Test Release – This release option (“release to QA”) is recommended for testing the
instruments. When you make changes and updates to the instruments and release your
changes as “Test Release”, tablets that have the “real” version of Tangerine installed will
NOT receive this update. HOWEVER, any data synced from the tablet devices even in a
“Test Release” deployment goes into the main database (thus mark your tests clearly as
“TESTS” to facilitate data cleaning.
2. Live Release – When instruments/forms are final, or instrument edits have been tested,
use this release option (“release to production”). In this case, tablets that are already
collecting data, or have the group’s apk installed, will received an update request when
connecting to the Internet the next time. All data collected from this release will also be
added to the main database.
Tangerine also offers two deployment /installation strategies, Android installation or web
browser installation:
• Android Installation. This is the standard deployment package where an actual apk file
can be generated on the computer, downloaded, and then copied over to a mobile
device via a USB cable and installed. This method of deployment is suitable in slow
network environment or when the apk is large.
29• Web Browser Installation. This deployment strategy requires an Internet connection on
the tablet for the Tangerine to be installed. Once installed, the app can work again
offline. This method is suitable in places of good connectivity.
NOTE: We recommend thoroughly testing your instruments and its data output before
releasing them!
Android Installation
This deployment strategy creates an APK file which can be installed on an Android tablet or
smartphone. Click on Android Installation Test Release/Live Release as shown in the screen
above. Wait.
Once Tangerine has compiled the apk, click on “Download your APK here”, as shown below.
This will download an apk file into your computer’s downloads folder.
NOTE: Every time an instrument/form is changed, added, or deleted from the group, it is
necessary to create a release and alert each tablet user to use the “Check for Update” option in
order to update their application.
Web Browser Installation
This deployment strategy creates a link/URL to a “progressive web app” (PWA) for direct
installation from the web to the Android tablet or smartphone. Click on Web Browser
Installation Test Release/Live Release. Wait.
Once Tangerine has compiled the PWA, it will show an installation URL like in the screen below.
Use this URL from the Chrome browser on the tablet to install the PWA on the tablet devices.
You can also copy the URL and open a new browser tab with this URL on your computer to test
your instruments online. The browser window may require you to confirm that you want to
apply the updates.
30After “Click here to proceed”, Tangerine will show an online data collection version of your
instruments with a similar look and function as on a tablet/smartphone.
NOTE: Every time an
instrument/form is changed, added,
or deleted from the group, it is
necessary to release the apk/pwa
again, but NO NEW INSTALLATION
is necessary on the tablets. Instead,
instruct Tangerine tablet users to
connect their tablets, select their
profile page (3 vertical white dots on
top right of tablet screen).
31Select “Check for Update” and proceed to install the update.
NOTE: This update approach will not only apply any instrument/form edits, new forms, or form
deletions, but also any updates to the Tangerine application made in the meantime and
applied to your group (if any).
9. Download CSV
As mentioned earlier, on the group’s main page listing the instruments/forms for the group,
Tangerine provides a download CSV function on the main Tangerine editor page.
Click the download icon to see the interface below. From here, you can select the results for
a specific month or year of data collection.
32NOTE: To be able to download all the data select the * on both Month and Year and click the
SUBMIT button.
If the CSV generation was successful, the following screen will present the group name, Form id
, Start time and progress of the CSV download.
Once the CSV has been created, you can find it in your Downloads folder.
3310. Using Tangerine on the Mobile Device
When using “Android Installation”, install the
Tangerine apk upon moving it onto the tablet
device. Make sure you have selected “Unknown
sources” under Settings > Security to allow
installation of apps from sources other than the
Play Store.
When using the “Web Browser Installation”
strategy, enter the PWA URL generated above into
the URL field of the Chrome browser. Upon start
of the download process, you will be prompted
about “Adding Tangerine to Home screen”.
Confirm this with “ADD” on the next prompt.
Close your browser and open Tangerine from your
device’s home screen or app drawer. Do not use
the browser link anymore.
Registration and Log in
Have users register on the tablet. This is only required once for each user on a given tablet.
34Log in following registration.
You should now see the main Tangerine screen with your group’s instrument listed on the
tablet.
NOTE: Hitting the tangerine icon in the top left corner will return the user to Tangerine’s home
screen.
35Administrating Instruments
Select the instrument to use, and follow the prompts, sections, and items on the screen, as
generated in the instrument/form editor. To select an answer option, just tab on it.
NOTE: Different to all other inputs, where the user/assessor selects the applicable / correct
response which will then be marked in blue, in grids, the user has to select all INCORRECT items
(they will turn blue).
Resuming Instrument
Should an administration be interrupted, or to be completed at a later stage, navigate to
“Visits” on the top of the tablet screen.
NOTE: You have to have a location section and location list loaded for your instrument to be
able to access the resume feature in Tangerine. Make up a location list, even if it only has one
column header entry and one item underneath (e.g. column A header is “site”, row 2 entry is
“test site”. Without a location list loaded, you will not have a “Visits” tab on the tablet from
which to resume the instrument.
36Select the appropriate location and date (as applicable) from the menu. Tangerine will
automatically return the user to the last, incomplete section/page of the instrument.
You can return from the “Visits” page to the main screen by hitting the Tangerine icon.
Syncing Data
Whenever possible during data collection, recommend that
users / assessors to sync their data to the tablet by
navigating to the profile menu, and select “Sync”.
37The Sync screen provides an overview of the data upload/sync status to date, including the
number of responses not yet uploaded as shown below.
Once the sync is complete, Tangerine will show “100%” for the field “Percentage uploaded”.
38You can also read