Reserved Net Conference with Cisco WebEx Event Center Frequently Asked Questions
←
→
Page content transcription
If your browser does not render page correctly, please read the page content below

Reserved Net Conference with
Cisco WebEx Event Center
Frequently Asked Questions
This document addresses how to use Reserved Net Conference with Cisco WebEx Event Center service – from scheduling a
Reservation, to confirming or changing a reservation and ultimately to hosting an event.

    1. How do I obtain a Manage My Meetings account?

        Follow the steps below to register and begin using today!
        •    Go to http://e-meetings.verizonbusiness.com
        •    In the top right corner of the page, select Need to Register?
        •    Click on Register (Audio/Net/Video Customers).
        •    Click Yes to proceed.
        •    Create your leader profile:
                  o    Select a login name
                  o    Select a password or let the system create one for you
                  o    Set a security question and answer
                  o    Complete the fields on the page with your information details
                  o    Authorization code: your conference administrator will provide this to you
                  o    Click Proceed

1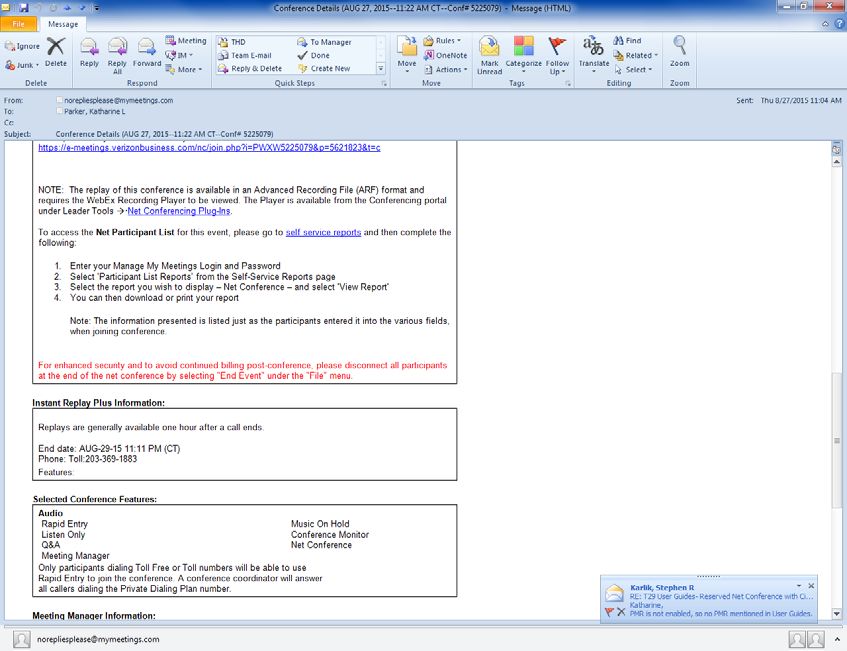
2. How do I schedule a call?
       You will need to schedule the Reserved Net conference with a Premier or Standard audio conference, via either
       the Conferencing Scheduling Assistant (CSA) tool or by calling Reservations.

       •   Conferencing Scheduling Assistant:
           o   Go to http://e-meetings.verizonbusiness.com
           o   Go to Leader Tools and click on Conferencing Scheduling Assistant
           o   Log In

                o    Follow the instructions within Conferencing Scheduling Assistant

       •   Calling Reservations
           o    Go to: https://e-meetings.verizonbusiness.com/global/en/globalResNumbers.php
           o    Click on Contact Us

    3. Confirmation Email

       •   Once the leader schedules the meeting, they will receive an email confirmation with the details of the event
           which they can share with their participants.
       •   See higlighted sections below for the Reserved NetConference portion of the email confirmation.
       •   Sample Reserved Net Email Confirmation:

2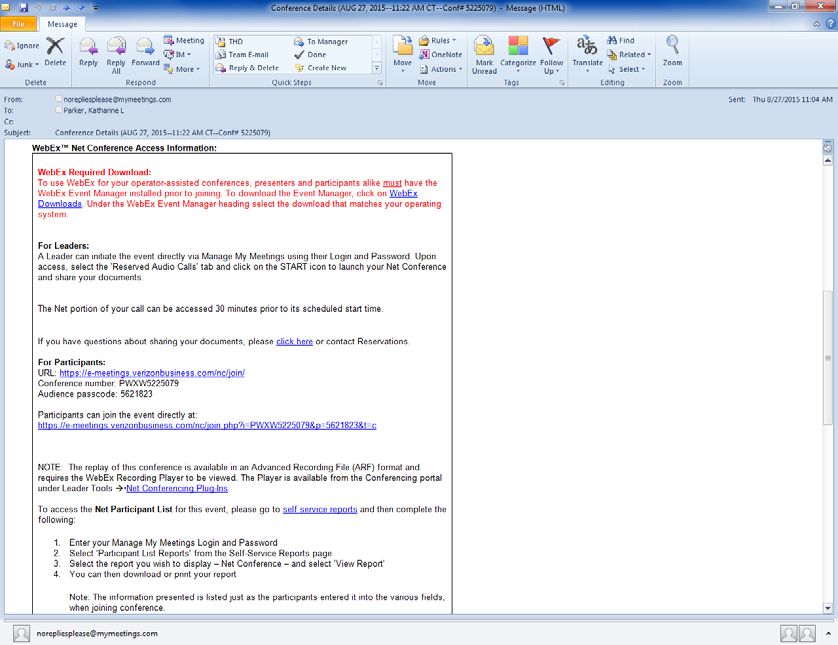
Confirmation email continued:

3
4. Do I need to download software to my PC to join the Reserved Net Conference?
       Yes, as you join a Reserved Net Conference, the Event Center Meeting Manager software will load on your PC.
       If you wish to download the software prior to joining the call please go to the Plug-Ins page of e-meetings to
       download the Event Center Meeting Manager software. You may also test that it loaded correctly by clicking on
       the Setup link under the Event Center section.

       Note: If you do not have administrative rights to your PC, the Event Center Meeting Manager software will need to be
       downloaded by your company’s IT organization. They may obtain access to the software on the Plug-Ins page.

            •    Go to the Plug-Ins page on e-meetings:
                      o   https://e-meetings.verizonbusiness.com/emeet/join/src/plugins_em.php?langKey=en
            •    Scroll down to the WebEx Event Manager under the WebEx Plug-Ins section
            •    Choose which version of the Event Center software to load on your PC based on your operating system
            •    Click Setup which will launch you into a test Event Center session if the software load was successful

    5. Where will I access the event?
       •    Email invitation:
            o  Participants:
                     •    The Reserved Net Confirmation email will be sent to the leader of the event who will forward
                          the invitation to all participants. The participant link to the Reserved Net meeting will be
                          included in that invitation. Audio details will also be included for participants to dial into the
                          audio bridge.
            o  Leaders:
                     •    Leaders will log into their Manage My Meetings account to start their Reserved Net for Cisco
                          WebEx Event Center meeting.
                     •    The Reserved Net meetings will be listed under the tab for Reserved Calls. See instructions
                          under the next e-meetings sub-bullet.

       •    e-meetings: The meeting link will also be listed on the leader’s Manage My Meetings account on the
            Reserved Calls tab
            o    Go to http://e-meetings.verizonbusiness.com
            o    Enter your login and password. (Note: If you do not have a Manage My Meetings login and password,
                 Click on the Need to Register link and simply follow the instructions.)
            o    Select the Reserved Calls tab.
            o    Locate the appropriate confirmation number for the conference.

4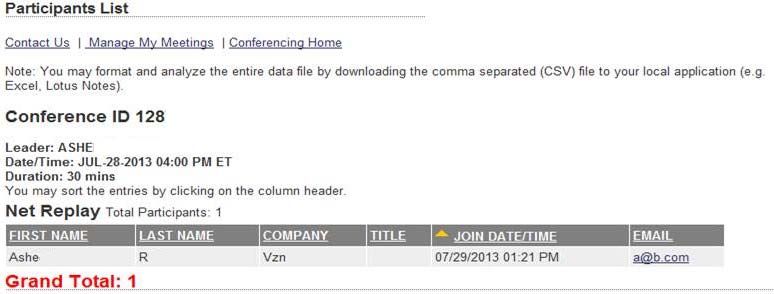
o    Select the arrow icon to initiate the conference.

        Note: You will need access to Manage My Meetings to use Reserved Net Conference with Cisco WebEx Event
        Center. If you do not have access to Manage My Meeting, you should continue to use Reserved Net Conference
        with Microsoft Live Meeting for the short term.

    6. Is there a cancellation policy?

    •   Yes, Reserved Net calls may be cancelled up to 30 minutes before the event without incurring a cancellation fee.
        If canceled within 30 minutes of the scheduled start time, a cancellation fee may be assessed.

    7. Can my call be recorded?

        •   Yes, you may request the call to be recorded. For each call that is recorded, there is a setup fee that
            includes storage of the recording for 30 days. If you’d like to maintain the availability of the recording after
            this time, there is extra charge for each additional 30 day period.
        •   The Net Replay will be available after the call via the link included in the Reserved Net email confirmation.
        •   You may also request an FTP File Download of the recording for an additional fee. The link to the FTP File
            download will be included in an email sent to you after your call.

    8. Is software required to view the replay of the meeting?
        •   Yes, the replay and the FTP file Download are both available in an Advanced Recording File (ARF) format
            and require the WebEx Recording Player to be viewed. The Player is available from the Conferencing portal
            under Leader Tools and then Net Conferencing Plug-Ins.
            https://www.mymeetings.com/emeet/join/src/plugins_mm.php?sigKey=mymeetings

    9. How do I retrieve the recorded file from my Reserved Net call?

        •   The host of the call will receive the below email
        •   The “From” field will come from the person who hosted the meeting.

        •   Click the link provided in the email as seen in the below screen shot.

5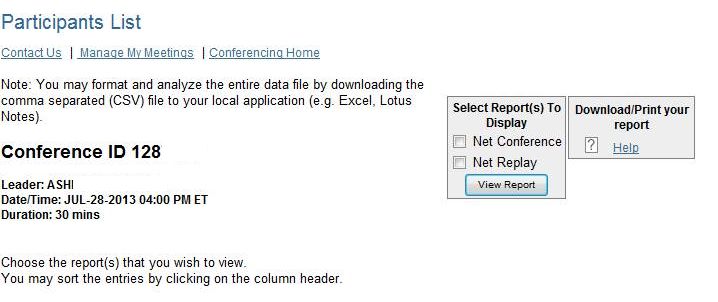
•   You will be redirected to a page as seen in the below screen shot, that will provide them with the ability to
           Download the recording.

       •   After selecting “Download” the following page will appear and you will have the ability to “Save” the file in a
           location of their choosing.
       •

                                 If you do not have the ARF player installed,
                                 you may click the “download” link to install it.

    10. How can I convert the recorded file to a different format?

       •   The FTP recording will be downloaded in an Advanced Recording File (ARF) format that is WebEx
           proprietary software which will require the user to install the WebEx Player to view the recording.

       •   You may convert the recording to one of the following formats:
                   o   .WMV – Windows Media Video
                   o   .SWF – Macromedia Flash Format
                   o   .MP4 – MPEG Audio Layer

       •   This is a Real Time conversion process: A presentation with a duration of 1 hour and 15 minutes will take 1
           hour and 15 minutes to convert.

       •   In the Network Recording Player select File
       •   Select Convert Format

6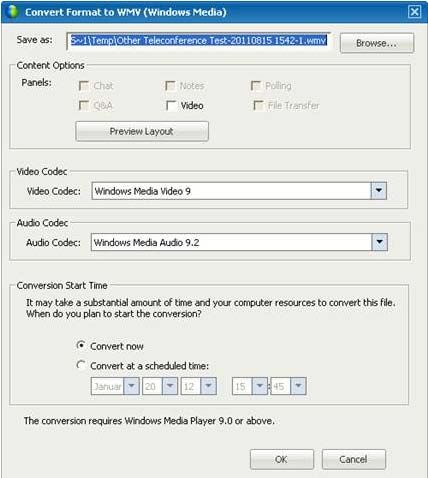
•   Select either WMV, SWF or MP4

    •   The Convert to window appears.
    •   Select OK to proceed to start the conversion.

    •   The below message will appear.
    •   Select OK and this message will disappear, leaving the conversion process to run in the back ground as you
        work on other things.

7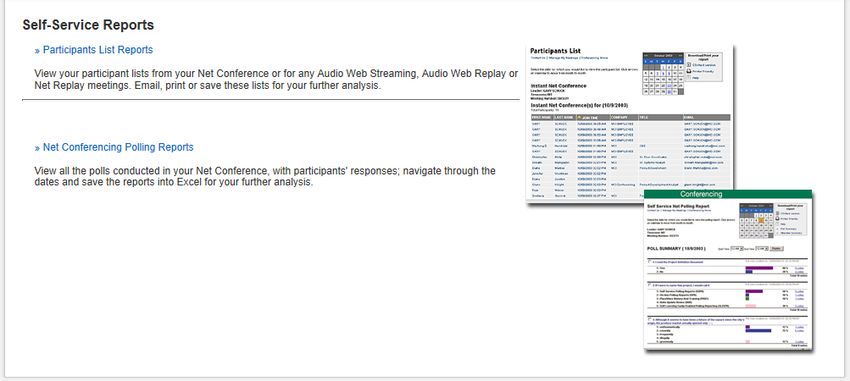
• You may check the conversion progress by placing your mouse over the following icon in at bottom-right of
your screen (system tray):
11. Is operator assistance available to me during my conference?
• Before the event:
o Yes, operator assisted services are listed under Net Feature Support on the scheduling systems.
This feature allows you to request a Net Conferencing Specialist to provide event support
services during a Net Conferencing session on your behalf.
An additional charge applies per session per Event Support service. Examples of Event
Support Services include:
• Video playback: Assistance and coordination of the video playback to allow the
audio to play through the audio conference.
• Advancing slides: Advancement of the slides on behalf of the leader
• Closed Captioning: Coordination of closed captioning for the event
• During the event:
o The operator will attend a Premier Level Audio conference for the entire time to attend to Q&A, or
address issues during the call.
o The leader will enter *0 to have the operator rejoin the audio conference to attend to an issue.
• After the event:
o Charges for Operator Hosting services will be included on your invoice for the call.
12. How many participants may I have for my event?
• Up to 3,000 participants (including the presenter and the event operator) are supported on Reserved Net
Conference for Cisco WebEx Event Center.
13. What is the WebEx Event Center Leader Console?
The console is an easy interface that makes controlling a meeting very intuitive. Leaders can select to have
only those windows that are most important to them open during the meeting, showing the participants, chat,
notes, or video. Simple tabs make it easy to flip from presentation to presentation.
8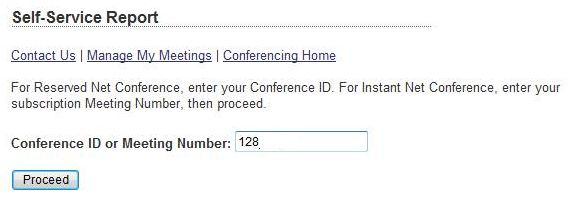
Toolbar       Participant List

                                                                                                                       Chat

                                                                                                                      Recorder

    14. How do I Share Content in the event?
       A best practice for presenting content in a WebEx Event Center session is to use File Share.

       File sharing is ideal for presenting information that you do not need to edit during the event, such as a video or
       slide presentation. Participants can view shared files in their content viewers without the need for the application
       with which it was created. They may view a media file, such as a video, without the need for special software or
       hardware. They can also view any animation and transition effects on shared Microsoft ®PowerPoint ®slides.
       After an event starts, you can open a presentation or document to share. You do not need to select it or loadit
       before the event. However a best practice is to arrive to the call about 15 minutes before the call to initiate the
       File Share for any documents you intend to share during the call. They will be arranged in folder across the top of
       your meeting for easy selection during the call.

       While sharing a file, you can:
       •   Draw on the screen

9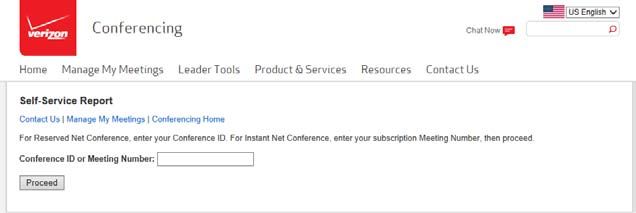
•   Use a pointer to emphasize text or graphics
     •   Print it
     •   Display it at various magnifications, in miniature (thumbnails), and in a full-screen view
     •   Synchronize all participants' displays with the display in your content viewer
     •   Save it to a file

     At any time during a meeting, you can grant participants privileges that allow them to annotate, save, print, and
     display different views of shared content.

     Sharing a file
     You can share a file, such as a document, presentation, or video that resides on your computer. Participants view
     the shared file in their content viewers.

     To share a document or presentation:
         •   On the Share menu, choose File (Including video). The Share File dialog box appears.
         •   Select the file that you want to share.
         •   Click Open.

     The shared file appears in the content viewer.

     Tips for sharing files:
     These tips can help you share files more effectively.
     •   To import slide presentations quickly:

              •    Limit the number of animations and slide transitions.
              •    Minimize the number of screen shots that you add to slides, especially bitmap graphics. Bitmaps
                   do not compress well.
              •    To improve the speed at which shared pages or slides appear in participant content viewers, save
                   the document or presentation as a .ucf (Universal Communications Format) file before the event
                   starts. Then share the .ucf file instead of the document or presentation itself.
              •    You can annotate shared presentations or documents in the content viewer; however, you cannot
                   edit them. If you want to edit shared information, you can use application sharing instead.

     To save time during an event, begin sharing the document or presentation before the event's starting time. That
     way, after participants join the event, they can begin viewing your presentation.

     Choosing an import mode for presentation sharing:
     For Microsoft Windows® users only

     Before you share a presentation, you can choose one of the following import modes:
     •   Universal Communications Format (UCF)-The default mode. Allows you to display animations and slide
         transitions in Microsoft PowerPoint presentations. In the UCF mode, Event Manager imports presentations
         more quickly than it does in the printer driver mode. However, pages or slides may not appear consistently in
         Event Manager across platforms.

     •   Printer driver-Displays shared presentations as they appear when you print them, providing a consistent
         appearance of pages and slides in Event Manager across platforms. However, this mode does not support
         animations or slide transitions. In this mode, the first page or slide may appear quickly, but the total import
         time for all pages or slides is usually longer than it is in the UCF mode.

     Note: Changing the import mode does not affect any presentations that you are currently sharing. To apply a
     new import mode to a shared presentation, you most close it first, and then share it again.

     To choose an import mode for shared presentations:

         •    In the Event window, on the Event menu, choose Options. The Event Options dialog box appears, with
              the Options tab selected by default.
         •    Click the Import Mode tab.

10
• Select either Universal Communications Format or Printer driver.
Closing shared files:
You can close any files that you are sharing in your content viewer.
To close a shared file:
• In the content viewer, select the tab for the file that you want to close.
• On the File menu, choose Close.
If you have not yet saved any annotations that you made on the document or presentation, a message appears,
allowing you to save it.
15. What file types are supported for sharing in Cisco WebEx?
16. How do I share a video as a Presentation or Document?
• In the meeting window, go to the Share menu, then select File (Including Video)
11• The 'Share Document' window appears.
• Navigate to and select the file you would like to share in the meeting.
• Click Open.
Notes:
• A video file must buffer before it can play back.
• It is recommended that the video file being shared is no larger than 5mb.
WebEx supports the following video formats as a Presentation or Document share:
• .flv (FLV files using the VP6 codec are not supported on SP22 or newer sites)
• .swf
• .asf
• .wmv
• .avi
• .mpg
• .mpeg
• .m1v
• .mpa
• .mpe
• .wm
17. What is the Maximum Recommended Size for a Shared PowerPoint File?
For best results when sharing a PowerPoint file, refer to the following guidelines:
• Do not include more than 20 to 30 slides in one presentation file. If you want to share more slides,
create a separate presentation file for each set of 20 to 30 slides.
• Keep the size of the presentation file to no more than 5 MB.
• It is recommended to not share embedded media objects that are larger than 5MB.
Note: You may exceed the 5mb recommendation if the service type used has the ability to stream video files.
18. What is the best method to share a video file in a WebEx meeting?
Follow the steps below to stream a video file in a WebEx meeting:
• On the Quick Start, click the Share File button.
• If the Quick Start is not visible, go to the Share menu, then select File (Including Video)
• Navigate to and select the video file you would like to share and then click the Open button.
• The video will begin playing in the WebEx meeting.
Notes:
• Recommended for sharing video files stored on your computer or a network location.
• Starts playing for attendees instantly.
The following file types are supported with streaming video sharing:
• .WMV
• .WMA
• .WAV
• .MP3
• .ASF
• .AVI
• .MPG
• .MPEG
• .MOV
• .FLV (Video codec must be H.264, files using the VP6 codec will not playback properly)
• .F4V
• .QT*
• .MP4*
12*The computer sharing the video must be able to playback the file locally.
19. How do I share a video from a web site or web page?
Follow the steps below to share Web Content:
• In the meeting window, go to the Share menu and then choose Web Content....
• The 'Share Web Contents' window appears.
• In the Address box, enter the address, or URL, at which the content resides.
• Note: If you have previously shared the content, select it in the drop-down list.
• In the Type: drop-down menu, select the type of Web content that you want to share.
• Click the OK button.
• Tip: You can copy a URL from any source, such as another browser window, and then paste it in the
Address box.
Notes:
• The video file must be on a publicly accessible web address and not password protected.
• Can also be used to display a web page that contains a video, such as YouTube.
20. Which Webcams are supported?
• Camera hot-plugging is supported with WebEx HD/HQ video. This means cameras can be plugged in and
detected by WebEx during a live meeting.
• IP or web-based cameras are not supported by WebEx. Virtual webcams such as YouCam, ManyCam and
WebCamSplitter are also not supported.
• Webcams listed in Microsoft's Hardware Compatibility List (HCL) should work with any WebEx product that
supports video conferencing. If your device is not listed, it may not work with WebEx.
• Hi-Definition video is not yet supported on Event Center.
Cameras compatible with High Quality Video:
Manufacturer Model
Cisco
• Cisco VT Camera II
• Cisco VT Camera III
Tandberg • Tandberg Precision HD
• Logitech Quick Cam Pro 9000
• Logitech Quick Cam Orbit AF
Logitech • Logitech Quick Cam C905
• Logitech Quick Cam S7500
• Logitech HD Pro Webcam C910
• Microsoft LifeCam HD
• Microsoft LifeCam VX-1000
Microsoft
• Microsoft LifeCam Cinema
• Microsoft LifeCam VX-6000
• Microsoft LifeCam NX-6000
• Microsoft LifeCam VX-3000
Cameras compatible with Standard Quality video:
Most PC-compatible cameras should work with WebEx. The following cameras were tested by WebEx:
• Cisco VT Camera II • Logitech QuickCam for Notebooks Pro
• Creative WebCam Notebook • Logitech QuickCam Zoom
• Creative WebCam NX Ultra • Logitech QuickCam Express
• Creative WebCam PRO • Logitech ClickSmart 310
• EzpmocsEZCam USB III • Logitech QuickCam pro 4000
13• Logitech QuickCam Messenger • SUMSUNG S-1288
• Aiptek VGA+ • Microsoft LifeCam NX-6000
• SUMSUNG S-1298
21. Wh o c a n s h a re th e ir We b c a m in a n e ve n t?
Only the host, presenter or a panelist may broadcast their webcam video in an event.
By default, panelists cannot broadcast video in an event. The host must allow a panelist to send video
22. Ho w Ma n y Vid e o Ca m e ra s c a n b e d is p la ye d ?
The number of video cameras that can be displayed in a session of Event Center is one.
23. How does a panelist send video in an event?
The host of the call must follow the steps below to allow a panelist to send video:
• In the Participant panel, place your mouse over the large video window, then click the button.
• The 'Panelist Video Options' window appears.
• Go to the Allow to Send Video tab.
• Check the boxes of the panelists you would like to send video, then click the OK button.
• The selected panelists may now send video by clicking the button.
24. What are the bandwidth requirements for in-meeting video?
WebEx generally recommends network bandwidth above 1Mbps per participant. A dual-core PC @ 2.0 GHz w/
1GB ram should be used. The minimum network bandwidth to view video should be above 320Kbps per
participant. Standard WebEx video generally requires bandwidth between 90-130Kbps per video participant at the
default configuration, which is QCIF resolution (176 x144 pixel) at 15fps.
Bandwidth requirements for High Quality (HQ) video are as follows:
• High Quality - 360p (640x360) - Up to 1.5 Mbps of your internet connection will be used when sending video
• Standard Quality - 180p (320x180) - Up to .5 Mbps of your internet connection will be used when sending
video.
Note: The figures above are only for webcam video and do not include any other in-meeting activities. You will
need to additional bandwidth to use desktop sharing, integrated VoIP, etc.
25. Q&A
Questions can be answered publicly or privately in a Q&A session.
Providing a public answer to a question:
• On your Q&A panel, go to the tab you received the question in, and click on the question.
• A number will be displayed in the tab the question was received in.
• Type your answer into the text box and click the Send button or press enter.
• The answer will appear on all panelists' and attendees' Q&A panel.
Providing a private answer to a question:
14• Go to the tab the question was received in, and click on the question.
• Type your response, and click the Send Privately... button.
• The answer will only be sent to the attendee that asked the question.
Responding to questions answered verbally:
• Right-click on the question in the Q&A panel.
• Select Answered Verbally from the context menu.
Answering indicator
When a panelist is typing an answer to a question that hasn't been responded to yet, an in-progress indicator will
display below the question for all participants. See the example below:
26. Saving a Q&A session
At any time during a session, you can save the questions and answers on the All tab on your Q & A panel to a .txt
or .csv file.
• In the Session window, on the File menu, choose Save>Questions and Answers.
• The Save Questions and Answers As dialog box appears.
• Choose a location at which to save the file.
• Type a name for the file.
• In the Save as type box, select TextFiles(*.txt) or CSV (comma-separated/comma-delimited values).
• Click Save.
27. Who can present during the Event?
Your event production team can be broken down into the following roles:
Role Description
Host The participant who schedules, starts, manages, and ends the event and designates the presenter,
panelists, and polling coordinator.
The event host initially is the presenter. After the invited panelists join the event, the host can pass the
presenter control to any of the panelists at anytime during the event.
Presenter
The participant, with the presenter control symbol ,who is responsible for sharing and presenting
information during the event.
Panelist A participant who is primarily responsible for assisting the presenter and participating in presentation.
Attendee A participant who mainly listens or watches and does not present information during the event.
1528. What can each role perform during the event?
• Hosts can do the following:
A host is responsible for coordinating and controlling an event. Only one person can be an event host at
a time.
o Schedule and start an event
o Start and end a practice session among the panelists
o Invite attendees to a scheduled event
o Invite attendees to an event in progress
o Grant privileges to attendees or panelists during an event
o Designate a presenter
o Assign the host role to another panelist, and reclaim the host role
o Answer attendees' questions during a question-and-answer (Q & A) session
o Restrict access to an event
o Specify or edit a greeting or message for attendees during an event
o Act as poll coordinator to start a poll
o Pass the poll coordinator role to another panelist
o Record an event
o End an event
Note: Once an event starts, the host is initially the presenter as well. The host can then designate another
participant to be the presenter.
• Presenter can do the following:
An event host can designate any attendee as a presenter. A presenter is responsible for providing
content during an event.
o Documents, presentations, and whiteboards
o Save documents, presentations, and whiteboards in the content viewer
o Share applications, Web browsers, and desktops
o Share multimedia Web content
o Take a poll if the host passes the poll coordinator role to the presenter
o Save a poll questionnaire and poll results to a file
o Answer attendees' questions during a question-and-answer (Q & A) session
o Send text responses to attendees' questions on the Q & A tab
o Participate in a practice session
o Participate in a chat
o Save chat messages to a file
o Save a Q & A session to a file
o Record an event
• Panelists can do the following:
A host can designate any attendee as a panelist during an event. A panelist is a participant who is
primarily responsible for assisting the presenter and participating in presentation. Any number of
attendees can be panelists.
o Participate in discussions to which other attendees listen
o Respond to public and private chat messages
o Annotate shared documents
o Start a poll if the host passes the poll coordinator role to the panelist
o View and answer attendees' questions in a Q & A session
o View poll results
o Annotate shared applications, Web browsers, and desktops, if the presenter grants annotation control to
the panelist
o Participate in a practice session
o Save chat messages to a file
o Download files that the presenter publishes
o View live video that the presenter sends
o View feedback
o Record an event
• Attendees can do the following:
An event attendee participates in an event, but generally does not present information.
o View shared documents, presentations, and whiteboards in the content viewer
o View shared applications, Web browsers, and desktops
o View shared multimedia Web content
o Participate in a poll
o Participate in a chat
o Save chat messages to a file
o Download files that the presenter publishes
o View live video that the presenter sends
16• If the event host or presenter grants the appropriate privileges to attendees, an attendee can also:
o Annotate shared documents and presentations in the content viewer
o Write and draw on shared whiteboards in the content viewer
o Save documents, presentations, and whiteboards in the content viewer
o Annotate shared applications, Web browsers, or desktops, if the presenter grants annotation control to
the attendee
o Copy and paste pages, slides, and whiteboards in the content viewer
o Display different views of pages, slides, and whiteboards in the content viewer - for example, full-screen
view or thumbnail (miniature) view
o Print shared pages, slides, or whiteboards in the content viewer
o Record an event
• Polling Coordinators can prepare a poll questionnaire and conduct a poll during the event.
29. How do I use Polling during an Event?
Polling enables the Leader to utilize the operator to survey all conference participants. You determine the
questions prior to the conference and participants respond using their telephone keypads. Polling allows you to
collect instant feedback and increases participants’ involvement in the call. You receive a report with all
responses that is organized by question and participant. The poll coordinator is responsible for creating
and conducting the poll during the event. The host can assign the role of poll coordinator to a presenter or
a panelist.
How Do I Open a Poll
After you finish preparing a poll questionnaire, you can open the poll.
If you prepared your questionnaire in advance and saved it, you must first display it on the Polling panel.
• In the event window, go to the View menu, then select Panels>Manage Panels....
• The 'Manage Panels' window appears.
• In the Available panels: section, select Polling, then click the Add >> button.
• Click the OK button.
• In the Question section in the Polling panel, select the type of question you would like to add, if the question
will have a single or multiple answer, then click the New button.
Note: You may open a previously saved poll by clicking the button and selecting the poll.
• Type out your questions and answers. Repeat to add multiple questions to the poll.
• Click the Open Poll button.
• The questionnaire appears on attendees' Polling panels. Attendees can now answer the poll.
• As attendees answer the questions, you can watch the polling status on your Polling panel.
• Click Close Poll when the time is up.
• If you specify a timer and the poll times out, the poll automatically closes.
• Attendees can no longer answer questions.
• Once you close a poll, you can view the poll results and optionally share them with attendees.
Preparing a Poll Questionnaire - Presenter only
To conduct a poll, you must first create a poll questionnaire. You create a questionnaire in a meeting. To save
time during a meeting, you can start the meeting earlier than the scheduled time, create a questionnaire on the
Polling panel, save it, and then open it during the actual meeting.
This figure shows a portion of the Polling panel, which offers the tools you can use to create a questionnaire.
17Follow the steps below to create a questionnaire:
• Open the Polling panel in a meeting.
• In the Question section, select one of these question types:
o To create a multiple-answer question, select Multiple choice, and then select Multiple Answers in the
drop-down list.
o To create a single-answer question, select Multiple choice, and then select Single Answer in the drop-
down list.
o To create a text question, select Short answer.
• Click New.
• Type a question in the box that appears.
• In the Answer section, click Add.
• Type an answer in the box that appears.
• To type another answer, click Add once you finish typing an answer.
• The question and answers appear in the Poll Questions area.
This figure shows an example of a poll questionnaire.
Note: The character limit for the polling question & answer fields are 250 characters.
30. How do I end the Event?
• The Host will End the Event by clicking on End Event under the File menu.
1831. How can I obtain a list or Participants who joined my Event?
The link to your Reserved Net participant list can be found in the Reserved Net email confirmation. However you may
also follow the instructions below.
• Log into Manage My Meetings
• Use the Leader Tools and Self Service Reports link
o Click Leader Tools in your Manage My Meetings account and select Self Service
Reports
• Enter the Conference ID or Meeting Number and click Proceed
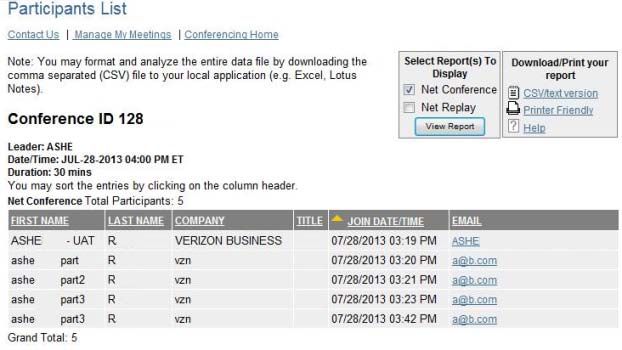
19• Choose Participant List Reports
• Choose Net Conference and Click View Report
• Report will display the people who viewed your Net Conference.
Note: Participant list names will appear as entered by the participants when joining the conference.
32. How can I obtain a list of Viewers who viewed the Replay of my meeting?
• Log into Manage My Meetings
• Click Leader Tools in your Manage My Meetings account and select Self Service Reports
20• Enter the Conference ID or Meeting Number and click Proceed
• Choose Participant List Reports
• Choose Net Replay and Click View Report
• Report will display the people who viewed your Replay.
21Note: Participant list names will appear as entered by the participants when joining the conference. verizonenterprise.com © 2015 Verizon. All Rights Reserved. The Verizon name and logo and all other names, logos, and slogans identifying Verizon’s products and services are trademarks and service marks or registered trademarks and service marks of Verizon Trademark Services LLC or its affiliates in the United States and/or other countries. Microsoft,Windowsand Internet Explorer are either registered trademarks or trademarks of Microsoft Corporation in the United States and/or other countries. All other trademarks and service marks are the property of their respective owners. 22
You can also read