What's New in Destiny Version 16.0 - Follett
←
→
Page content transcription
If your browser does not render page correctly, please read the page content below
What's New in Destiny Version 16.0
What's New 16.0

                                       Table of Contents
Destiny 16.0 Features                                                  3
All Products                                                           6
   Upload Patron Pictures at the District Level                         7
   Support for Current Microsoft Excel File Format                      9
   Improved District Access Level Management                           10
Destiny Library Manager and Destiny Discover                           13
   Lexile Service Update                                               14
   Expanded Reviews                                                    16
   Spine Label Improvements                                            17
   OverDrive Integration Enhancements                                  18
   Limit Task Options                                                  20
   Enhancements to Current Checkouts/Fines – Reports and Notices       22
   Support for Web Accessibility                                       24
   New eBook and Audiobook Experience Simplified                       26
Destiny Resource Manager                                               27
   Components Enhancements                                             28
   New Reports for Components and Containers                           29
   Report Builder Enhancements                                         32
   Add Levels Under the Textbooks Branch                               37
   Mark Consumables as Lost                                            38
   Ability to Choose Textbook Barcode Symbology                        39
   Bulk Delete Unbarcoded Materials                                    40
   Set Up Refund Notifications                                         41
   Increased Textbook Title and Description Fields to 150 Characters   42
   Export Resources                                                    43
   Add Order Numbers to Transfers                                      44
   New Duplicate Barcodes Report                                       46
Destiny Analytics                                                      47
   Improvements to Sharing                                             48
   Customization Enhancements                                          49

©2018 Follett School Solutions, Inc.                   2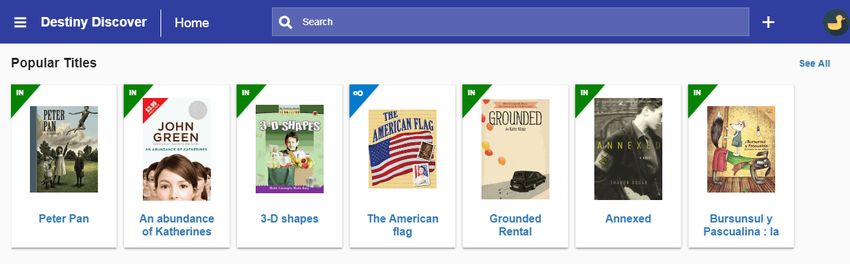
What's New 16.0

Destiny 16.0 Features
Welcome to Destiny® v16.0. This new version incorporates many of your suggestions, and we're confident
you'll find the enhanced features and functions meet your needs. We continue to improve Destiny®
Discover™ for today’s students, teachers and librarians.
We know you'll want to start using these enhancements right away.
Important: To update to the latest version of Destiny, you must be on Destiny v12.0 or later. If you
have a version of Destiny earlier than v12.0, you must first update to Destiny v12.0 before you can
update to v16.0.
Note: Some Destiny Discover features will not be completely visible to customers who have earlier
versions of the software installed, until they upgrade to Destiny v16.0.

All Destiny Products
           Upload Patron Pictures at the District Level: In addition to importing patron pictures at the site
           level, you can now import them at the district level.

           Improved District Access Level Management: Push one or more access levels to an individual
           site, a group of sites, or the entire district.

           Support for Current Microsoft Excel® File Format: All Destiny reports now use the most current
           Excel format.

Destiny Library Manager and Destiny Discover
           Lexile Service Update: The Reading Program Service now offers improvements in searching
           and displays the most up-to-date Lexile values.

           Expanded Reviews: Destiny review length is now increased from 1,000 to 2,000 characters.

           Spine Label Improvements: A new label stock is available for printing spine labels.

           OverDrive Integration Enhancements: Now, Destiny automatically integrates MARC records for
           OverDrive eBooks and audiobooks.

           Limit Task Options: Ensure daily functions are not impacted by scheduled maintenance jobs.

           Enhancements to Current Checkouts/Fines – Reports and Notices: Add cover images next to
           titles on checkouts/fines reports and notices.

           Support for Web Accessibility: Destiny now supports web accessibility guidelines for the
           Americans with Disabilities Act (ADA).

©2018 Follett School Solutions, Inc.                       3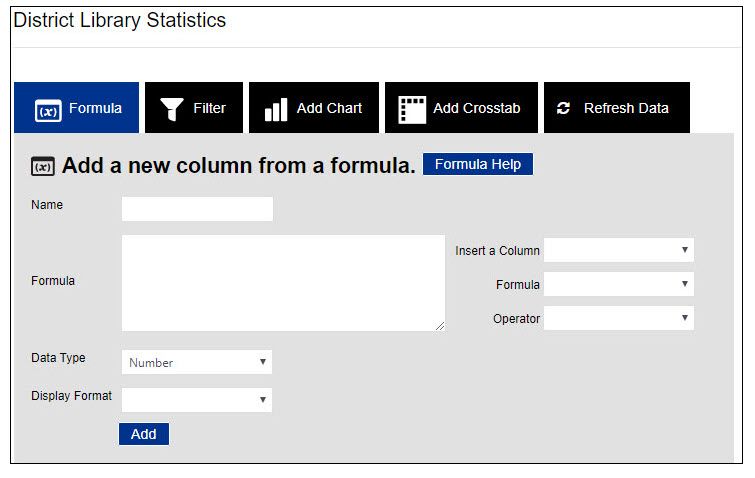
What's New 16.0

           eBook and Audiobook Experience Simplified: Destiny now provides an easier eBook/Audiobook
           experience to drive increased Follett digital content usage.

Destiny Resource Manager
           Components Enhancements: It is now easier to find resources that have associated components
           by doing a keyword search for the component. You can also add a price.

           New Reports for Components and Containers: Resource Manager now provides reports to
           support your purchasing needs.

           Report Builder Enhancements: Expand your reporting capabilities with a new report,
           checkboxes and a template selector.

           Add Levels Under the Textbooks Branch: Now, in the Textbooks branch, you can group
           textbooks by type.

           Mark Consumables as Lost: You can now mark consumables as lost at the site level, as well as
           create fines for these items.

           Ability to Choose Textbook Barcode Symbology: Automatically assign barcode numbers to
           library materials, instructional media materials, textbooks, patrons, resources and locations.

           Bulk Delete Unbarcoded Materials: You can now bulk delete unbarcoded materials at the district
           level.

           Set Up Refund Notifications: Deliver an email to the person in charge of certain resources when
           a refund is generated.

           Increased Title and Description Fields to 150 Characters: The textbook Title and resource
           Description fields now hold more characters.

           Export Resources: Export some or all of the records in your database.

            Add Order Numbers to Transfers: To better track and organize your resource transfers, you
           can now use an Order Number field.

           New Duplicate Barcodes Report: Run the new Duplicate Barcodes report to identify any
           duplicate barcodes that are causing issues.

©2018 Follett School Solutions, Inc.                     4
What's New 16.0

Destiny Analytics

           Improvements to Sharing: Share customized analyses, dashboards and reports.

           Customization Enhancements: Save your preferences when you customize your Analytics
           Dashboard.

©2018 Follett School Solutions, Inc.                  5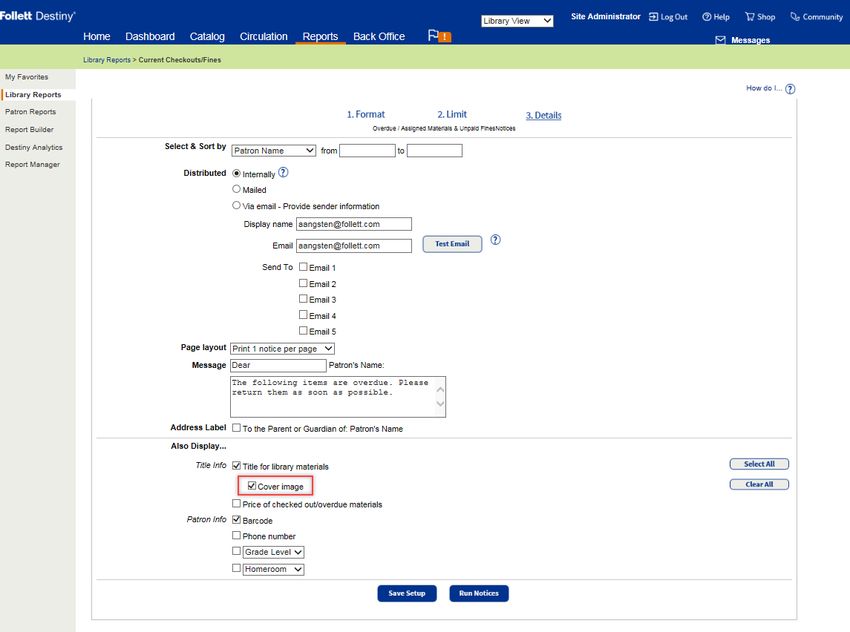
What's New 16.0

                                       All Products

©2018 Follett School Solutions, Inc.         6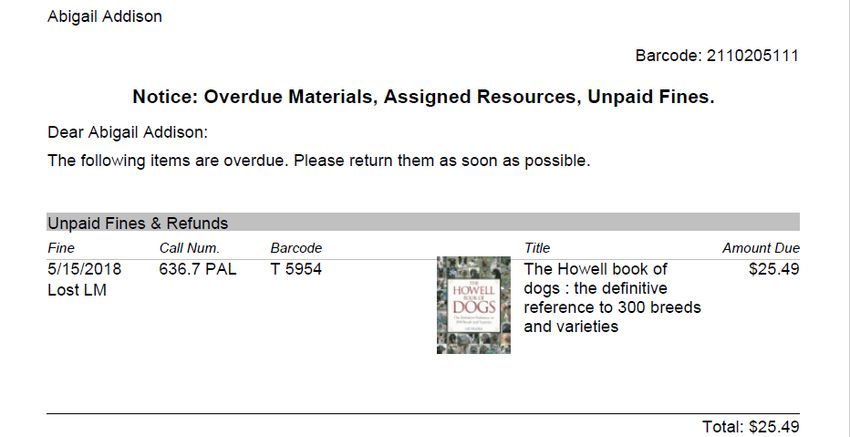
What's New 16.0

All Products
Upload Patron Pictures at the District Level
Feature Description
In the past, you could only import patron pictures at the site level. Now in Destiny, you can also import
them at the district level.
Note: When importing patron pictures at the site level, the patron Barcode is used; at the district level, the
patron District ID is used.

Feature Information
Before you begin:
Before you upload multiple patron pictures, you need to:
     n   Create a picture-to-patron map file, including patron District IDs.

     n   Gather all the patron image files you want to upload.

     n   Create a zip file that contains the picture-to-patron map file and all the patron images to upload
          (Supported file types are .gif, .jpg, .jpeg and .png. Files must be at the root of the zip file).

    Note: The maximum file upload size is 500 MB.

To upload patron pictures at the district level:

1. Log in as a district user with the Manage Patrons for the District permission.

2. Click Log In, then enter your User Name and Password.

©2018 Follett School Solutions, Inc.                       7
What's New 16.0 3. Go to Back Office > Upload Patron Pictures. 4. Depending on your operating system, click Browse or Choose File. 5. Select the zip file you want to upload, and then click Open. 6. Click Upload Pictures. 7. On the Job Manager page, select Refresh List. 8. Find your job in the list, and when upload is complete, click View. All pictures added successfully appear. ©2018 Follett School Solutions, Inc. 8
What's New 16.0

All Products
Support for Current Microsoft Excel File Format
Feature Description
Destiny now uses the .xlsx file extension for all reports that support Microsoft Excel output. The previous
.xls extension exported 65,000 rows of information; the new .xlsx extension uses 1 million rows of
information.

Feature Information
To download a spreadsheet file in .xlsx format for any Destiny report that supports Excel
output:

1. Create a report, or go to Report Manager to find a saved one.
2. On the Report Manager page, find the report you just ran, and then click View.
3. Click Excel® File to open or save the .xlsx spreadsheet file.

©2018 Follett School Solutions, Inc.                    9
What's New 16.0

All Products
Improved District Access Level Management
Feature Description
The Destiny Admin can now push one or multiple access levels to a single site, a select group of sites, or the
entire district.
For example, if you update the Staff access level for a new high school librarian, you have the option of
pushing the edited access level to only that school, a combination of schools, all high schools, or the entire
district.
Note: Site-created custom access levels and resource groups are no longer removed. You can push all
access levels except the District Warehouse access level.

Feature Information
To push an access level(s) from the district:
Note: This can only be done if Setup initial access levels for users here is selected.

1. Log in as a Destiny Admin.
2. Go to Setup > District Options > Access Levels > Edit.

©2018 Follett School Solutions, Inc.                    10
What's New 16.0

3. Select Setup initial access levels for users here.

4. Add, edit or review access levels and associated permissions, as needed.

5. Select the checkbox(es) of the access level(s) you want to push.

6. Click Push.

©2018 Follett School Solutions, Inc.                  11
What's New 16.0

7. Select the checkbox(es) of the site(s) you want to push the access level(s) and associated
   permission(s) to.

    The following appears: "Warning: This process cannot be reversed."

8. Click Yes.

©2018 Follett School Solutions, Inc.                  12
What's New 16.0
Destiny Library Manager
and
Destiny Discover
©2018 Follett School Solutions, Inc. 13What's New 16.0 Library Manager Lexile Service Update Feature Description Follett has updated the Lexile Reading Program Service to ensure that your collection only shows the current Lexile measure for any title. Lexile measures appear in Search Results and Title Details. Search Results ©2018 Follett School Solutions, Inc. 14
What's New 16.0

Title Details

    Note: Lexiles appearing in Destiny are the most current values available from MetaMetrics.

©2018 Follett School Solutions, Inc.                  15
What's New 16.0
Library Manager
Expanded Reviews
Feature Description
Destiny Classic has increased the number of characters you can enter when reviewing materials from 1,000 to 2,000. A
new counter tracks the characters.
Feature Information
Patrons can enter ratings and reviews for all materials in Destiny.
To add a review:
1. Go to Catalog > Library Search, and search to find a title you want to review.
2. Click the title.
3. Click the Reviews sub-tab.
4. On the Reviews page, click Add Review.
5. Select the desired number of stars to rate the title (one to five, with five being the highest).
n One star: Poor
n Two stars: Fair
n Three stars: OK
n Four stars: Good
n Five stars: Awesome
6. In the review comments field, type your comments (up to 2,000 characters).
7. Click Save.
©2018 Follett School Solutions, Inc. 16What's New 16.0
Library Manager
Spine Label Improvements
Feature Description
Destiny has added a new label stock, "Zebra 4000T – 83258 (spine-vertical)," for printing spine/pocket
labels. Use it with the Zebra TLP 2824 PLUS printer.
Feature Information
To print spine pocket labels:
1. Go to Reports > Library Reports > Labels > Spine/Pocket Labels.
2. On the Create Spine/Pocket Labels page, select the appropriate options.
3. At the Label Stock drop-down, select Zebra 4000T - 83258 (spine-vertical), and click Print
Labels.
Note: This label stock prints most successfully when used with Chrome and Firefox web browsers.
©2018 Follett School Solutions, Inc. 17What's New 16.0 Library Manager OverDrive Integration Enhancements Feature Description Follett has enhanced Destiny's integration with OverDrive. Now, you do not have to import MARC records for OverDrive eBooks and audiobooks – the system automatically adds or deletes records based on the OverDrive titles you own. Also, Destiny now sends District ID information to OverDrive. OverDrive then assigns class sets to patrons based on Destiny District ID. Note: Class sets do not appear in Destiny. Feature Information To control which MARC records are at the site level or district level by Library ID: 1. Go to Back Office > Site Configuration > Site Info. 2. Enter your District OverDrive Website ID. 3. Click Run Report. ©2018 Follett School Solutions, Inc. 18
What's New 16.0

©2018 Follett School Solutions, Inc.   19
What's New 16.0

Library Manager
Limit Task Options
Feature Description
An update to district functionality lets you prevent certain jobs from running during the school day. This
ensures that daily functions are not impacted.
Tasks you can now limit:
      n   Follett Digital Update Jobs

      n   Accelerated Reader Update Jobs

      n   Reading Counts Update Jobs

      n   Lexile Update Jobs

Feature Information
To limit a task:

1. Log in as a Destiny Admin.
2. Go to Setup > District Options > Limit Tasks > Edit to see the District Tasks page.
3. Select the checkbox next to the job(s) you want to limit.

©2018 Follett School Solutions, Inc.                   20
What's New 16.0 4. Click Save. ©2018 Follett School Solutions, Inc. 21
What's New 16.0

Library Manager
Enhancements to Current Checkouts/Fines – Reports and Notices
Feature Description
When running a Current Checkouts/Fines report or notice, you can now include a cover image next to each
title.

Feature Information
To show cover images for checked-out titles:

1. Go to Reports > Library Reports > Circulation > Current Checkouts/Fines.

2. In the "Set up a new report or notice" section, enter the appropriate information.
3. Next to Format, select Notices -- Language: English.
4. Click Continue.
5. Enter the appropriate information on the Limit page.
6. Click Continue.
7. Enter the appropriate information on the Details page. Under Also Display..., select the Cover image
   checkbox.
8. Click Run Notices.

Notes: For reports, the Cover image checkbox is deselected by default; for notices, it is selected.

©2018 Follett School Solutions, Inc.                   22
What's New 16.0

The cover image appears next to the title in the notice.

©2018 Follett School Solutions, Inc.                   23
What's New 16.0

Destiny Discover
Support for Web Accessibility
Feature Description
In Destiny Discover, improvements have been made to support web accessibility guidelines for the
Americans with Disabilities Act (ADA) and the Accessibility for Ontarians with Disabilities Act (AODA). The
Voluntary Product Accessibility Template (VPAT) documentation will be available in Fall 2018. As a result of
these improvements, you may notice minor changes to the user interface.

The Destiny Discover Help system has been revamped for ease of use. You can search for a topic via the
Search bar, or click a category button to access commonly-used information.

©2018 Follett School Solutions, Inc.                  24
What's New 16.0

To access the new Destiny Discover Help system, in the Destiny Discover header, click   , and select
Help in the slide-out menu.

©2018 Follett School Solutions, Inc.                 25
What's New 16.0

Destiny Discover
New eBook and Audiobook Experience Simplified
Feature Description
The new reader functionality provides for an easier eBook/audiobook experience for students and teachers
to drive more usage of your Follett digital content. The new reader is automatically used for all your
existing Follett eBook and audiobook content. There is nothing that you need to install. When your patrons
use the Destiny Discover app for iOS they will automatically be directed to the new reader experience. The
first time the user sees the new reader (first usage of a Follett eBook or audiobook), we have included a
simple page to introduce them to new functionality and user interface.
Highlights on the new reader include the following:
 n   Follett eBooks are automatically sized for optimal reading experience – there is no longer a need for
     pinching and zooming to try to resize an eBook when it opens
 n   Simplified functions and user interface for note taking, highlighting and searching within the eBook
 n   New support for offline access on Chromebooks – leverages the most popular 1:1 device in K-12 schools
 n   Easier process to download and read offline eBooks – utilizes browser storage (no special app required)
 n   New export notes functionality – export notes to Google or Microsoft cloud docs
 n   New Google search capability (select a word and perform a Google search it)
 n   Faster and easier-to-use Destiny Discover experience on devices (same performance as desktop)
Additional resources to support you and your patrons are available in our Resource Center and also from
Help when the user has opened an eBook or audiobook.

©2018 Follett School Solutions, Inc.                     26
What's New 16.0
Destiny Resource Manager
©2018 Follett School Solutions, Inc. 27What's New 16.0 Resource Manager Components Enhancements Feature Description It is now easier to find resources that have components by doing a keyword search for the component name. Also, you can now add a price to components. This will help you better track your component pieces and the value of items being lost or needing replacement. The Price field appears everywhere that component information does. Feature Information To search for resource components, and add price information: 1. Go to Catalog > Resource Search > Search. 2. Use the Where Resource drop-down to select Keyword, and enter your term in the field. 3. Select the appropriate resource. 4. Click the resource's Details. 5. Click Components. 6. Add the Price. 7. Click Save. ©2018 Follett School Solutions, Inc. 28
What's New 16.0

Resource Manager
New Reports for Components and Containers
Feature Description
Resource Manager now provides reports to support your purchasing needs.
Resource Components report: Lists your resource-related components and quantities, displays counts
and costs of components, and lets you find quantity issues.
Components are multiple items that should stay together. For example, a particular biology textbook might
have a study guide and poster that go along with it, or a laptop might include a charging cable, mouse and
bag.
Resource Containers report: Lists your container resources with their contents, and displays counts and
costs of items in containers.
For example, say a high school has 10 laptop carts. A laptop cart is considered a container and a resource.
The laptops are considered resources and contents of that container.

Feature Information
To run a Resource Components report:

1. Go to Reports > Resource Reports.
2. Under Catalog -- Resources & Items, click Resource Components. The Resource Components page
   appears.

3. Fill out the appropriate information.
    Note: If you only want to see a list of items where the actual quantity differs from what should exist,
    select the Limit to resources / items where quantities do not match checkbox.
4. Click Run Report.

©2018 Follett School Solutions, Inc.                    29
What's New 16.0 5. On the Report Manager page, click Refresh List and then View. 6. Click Report to view the report, or download it as an XML or Excel file. To run a Resource Containers report: 1. Go to Reports > Resource Reports. 2. Under Catalog -- Resources & Items, click Resource Containers. The Resource Containers page appears. 3. Fill out the appropriate information. 4. Click Run Report. 5. On the Report Manager page, click Refresh List and then View. ©2018 Follett School Solutions, Inc. 30
What's New 16.0

6. Click Report to view the report, or download it as an XML or Excel file.

©2018 Follett School Solutions, Inc.                  31
What's New 16.0

Resource Manager
Report Builder Enhancements
Feature Description
The Report Builder enhancements expand your reporting capabilities as follows:
New report:
      n   Resource - Classes Report: The new Resource - Classes Report lets you find resource shortages
          and surpluses at each school.
New checkboxes:
      n   Date Last Accounted For: The Resource - Items Report now helps you report on lost copies.

      n   Unpaid Resource Fines: The General - Statistics report now lets you include the total amount of
          unpaid resource fines.

      n   Resource Fines Count: The Patron - Transaction Summary Report now adds the count of fines
          related to resources.
New template selector:
      n   Template drop-down: You can now filter down to a resource type within the following reports:
          Resource - Statistics, General - Statistics and Patron - Transaction Summary.

Feature Information
For all features, go to Reports > Report Builder, then click New Report to view the enhancements.

Resource - Classes Report

©2018 Follett School Solutions, Inc.                    32
What's New 16.0
1. Go to Resource > Classes > .
2. Run a Resource - Classes Report to find resource shortages and surpluses at each school.
Note: For this report to be meaningful, class schedule information must be loaded, and class/resource
associations must be defined.
Date Last Accounted For
1. Go to Resource > Items > .
2. Select the Date Last Accounted For checkbox to help report on lost items.
Unpaid Resource Fines
©2018 Follett School Solutions, Inc. 33What's New 16.0 1. Go to General > Statistics > . 2. Use the Template drop-down to select a resource type. 3. Select the Resource Unpaid Fines Amount checkbox to include the total amount of unpaid resource fines in your report. ©2018 Follett School Solutions, Inc. 34
What's New 16.0

Resource Fines Count

1. Go to Patron > Transaction Summary >            .

2. Use the Template drop-down to select a resource type.
3. Select the Resource Fines Count checkbox to add the count of fines related to those resources to your
   report.

Resource - Statistics Report Template drop-down

1. Go to Resource > Statistics >         .

©2018 Follett School Solutions, Inc.                   35
What's New 16.0

2. Use the Template drop-down to select a resource type you want to run statistics on.

©2018 Follett School Solutions, Inc.                 36
What's New 16.0

Resource Manager
Add Levels Under the Textbooks Branch
Feature Description
In Resource Manager, templates let you organize your resources by type to better track them. Now, in the
Textbooks branch, you can group textbooks by type. For example, create templates for math, science and
English.

Feature Information
To add a level to the Textbooks branch of your resource tree:

1. Go to Catalog > Add Resource > Edit Templates.

2. Next to Textbooks, click            . The following appears.

    Note: The Represents Textbooks checkbox is selected by default.

3. Fill out the other information as needed, and then click Save.

©2018 Follett School Solutions, Inc.                      37
What's New 16.0 Resource Manager Mark Consumables as Lost Feature Description You can now mark consumables as lost at the site level, as well as create fines for these items. Do this for both barcoded and unbarcoded items. For example, you can hold a student responsible for replacing a consumable item, such as a workbook, prior to the end of the loan period. Feature Information A new Lost button appears for consumable items in two places. Mark consumables as Lost on the Patron Status page (Circulation > Patron Status): You can also mark consumables as Lost on the Check Out Items page (Circulation > To Patron > Check Out Items): The standard Fines payment page appears. ©2018 Follett School Solutions, Inc. 38
What's New 16.0

Resource Manager
Ability to Choose Textbook Barcode Symbology
Feature Description
In Destiny you can automatically assign barcode numbers to library materials, instructional media
materials, textbooks, patrons, resources and locations. The available barcode symbologies depend on the
Destiny product you use.
When you transition textbooks into Resource Manager, you can continue to use your current symbology by
selecting it from a list of symbologies specific to textbooks.

Feature Information
To assign or edit textbook preferred symbology:

1. Go to Back Office > Site Configuration > Circulation.
2. Under Preferred Barcode Symbologies, use the Resources - Textbooks drop-downs to select the
   symbology to use for your textbooks.

©2018 Follett School Solutions, Inc.                 39
What's New 16.0

Resource Manager
Bulk Delete Unbarcoded Materials
Feature Description
You can now bulk delete unbarcoded materials at the district level.

Feature Information
To bulk delete unbarcoded materials:

1. Go to Catalog > Resource Search > Search. After searching for a resource, go to the Items subtab.

2. Click the Items without barcodes icon         to delete all unbarcoded items with one click.

    Note: Items must be grouped by site.

©2018 Follett School Solutions, Inc.                  40
What's New 16.0 Resource Manager Set Up Refund Notifications Feature Description Set up notifications so that the person in charge of a particular resource receives an email when a refund generates. For example, maybe a student loses a calculator and is fined. Later in the year, that student finds the calculator and can be issued a refund. You can now set up a notification so that the Math department head receives an email when the refund is issued. Feature Information To set up notifications by product: 1. Go to Back Office > Site Configuration > Receipts/Refund Notification. 2. In the When a refund is generated, notify... section, select the proper Product checkbox. 3. From the For: drop-down, select a specific resource type that the person manages. 4. Send a Test Email if desired. The designated person will receive an automatically generated message. 5. After you complete the details in this section, click Add. 6. Repeat steps 2-5 to add another person/email. ©2018 Follett School Solutions, Inc. 41
What's New 16.0

Resource Manager
Increased Textbook Title and Description Fields to 150 Characters
Feature Description
The textbook Title field and the Description field for a resource now hold up to 150 characters, instead of
only 50. This is especially useful when adding items with long names, such as a textbook titled Holt World
History California: Interactive Reader and Study Guide Grades 6-8 Ancient Civilizations.
In addition, it is now possible to use 150 characters when searching for a textbook or resource.

Feature Information
To enter your textbook title or resource description:

1. Go to Catalog > Add Resource.

2. Do one of the following:

     n   If the Resource Type is Textbooks, enter up to 150 characters in the Title field.

     n   If the Resource Type is Resources, enter up to 150 characters in the Description field.
    Note: To edit the name of the resource description field prior to adding resources, edit the template.
To conduct a search for a resource:

1. Go to Catalog > Resource Search > Search.

2. At the Find all drop-down, select either Resources or Textbooks.
3. After the Where Resource drop-downs, enter up to 150 characters for a resource description or
   textbook title.

©2018 Follett School Solutions, Inc.                    42
What's New 16.0
Resource Manager
Export Resources
Feature Description
As a Destiny Administrator, you can now use the Export Resources option to export some or all of the
records in your database.
For example, you can share resource records with a different district. Just select a site to export item
records owned by that site.
Feature Information
To export resources:
1. Log in as a Destiny Admin.
2. Go to Catalog > Export Resources.
3. To limit the export to certain types of resources, click Update.
4. To delete the resource and item records after export, select the Delete resources after export
checkbox.
5. When you are done making your selections, click Export.
6. In the Job Manager, click Refresh List and then View to:
n See a summary of the export.
n Download the export file (in .xml format).
©2018 Follett School Solutions, Inc. 43What's New 16.0 Resource Manager Add Order Numbers to Transfers Feature Description To better track and organize your resource transfers, you can now use an Order # field. The number you put in is viewable in the Job Summary when a transfer completes, on the Track subtab for all types of transfers, as well as on the printed receipt. Feature Information When a sending site is ready to fulfill a transfer, they upload the resources and can add an order number. To add an order number to a transfer: Go to Catalog > Transfer Resources > Upload. After uploading resources in Resource Manager to transfer them to the requesting school, the order number appears in Job Manager > Job Summary. Whether your site is sending or receiving a transfer, the order number is also found on Catalog > Transfer Resources > Track. ©2018 Follett School Solutions, Inc. 44
What's New 16.0

From there, you will see the order number when you view a transfer. In addition, it is included if you
choose to print on the View Transfer page.

©2018 Follett School Solutions, Inc.                   45
What's New 16.0

Resource Manager
New Duplicate Barcodes Report
Feature Description
In the past, as a district user, you might have run into issues with duplicate barcodes when transferring
textbooks/resources. For example, if a patron changes schools within a district and has textbooks,
duplicates might be a problem. Now you can run the new Duplicate Barcodes report for your sites.

Feature Information
To run a Duplicate Barcodes report:

1. Go to Reports > Resource Reports.

2. Under Catalog -- Resources & Items, click Duplicate Barcodes. The Duplicate Barcodes page
   appears.

3. Use the Include drop-down to limit the report to site type, such as the whole district or type of school.
    Note: Your report will be limited to the first 1,000 duplicate barcodes. To see additional barcodes and
    compare only two schools within the chosen group, select the Only compare sites checkbox, and
    select two sites from the drop-downs.
4. Click Run Report.

©2018 Follett School Solutions, Inc.                   46
What's New 16.0
Destiny Analytics
©2018 Follett School Solutions, Inc. 47What's New 16.0
Destiny Analytics
Improvements to Sharing
Feature Description
It is now easier to share customized analyses, dashboards and reports in Destiny Analytics. Also, the Find
field shows more accurate results tailored to your search.
Feature Information
To find a user to share an analysis, dashboard or report with:
1. Go to Analyzer > Home.
2. Click . A share pop-up appears.
Note: If the icon is gray, the item has not been shared with anyone. If it is green , it has been shared.
3. In the Find field of the Share pop-up, type a whole or partial name.
4. Click Search. Matching users appear in a list.
Note: Up to four matches appear per page.
5. To filter the list, use the drop-down on the right to select Groups, People or All users.
6. Next to a user's name, click . The selected user appears in the Shared With area.
7. Repeat as necessary for each user.
8. When you are done, click Close.
Note: Users can see items that have been shared with them by going to Analyzer > Home > Shared
with Me.
©2018 Follett School Solutions, Inc. 48What's New 16.0
Destiny Analytics
Customization Enhancements
Feature Description
Now, when you customize your Analytics Dashboard, all of your preferences are saved. Creating your own
calculated columns in an analysis table is easier, too.
Feature Information – Dashboard
To customize your Analytics Dashboard:
You can edit, rename and remove panels on your Analytics Dashboard.
Click to do any of the following:
n Edit the panel, such as change the chart type or number of results.
n Rename the panel title.
n Remove the panel from the dashboard.
You can also:
n Rearrange panels by dragging the title bar areas.
n Change the chart or panel size by hovering over a panel and clicking .
n Save an image to your computer by hovering over a panel and clicking .
Feature Information – Formula
New Formula and Operator drop-downs make it easier to add a column from a formula.
©2018 Follett School Solutions, Inc. 49What's New 16.0
To add a calculated column to an analysis:
1. Click the Formula tab of an analysis you are working on.
2. In the Name field, enter your column name.
3. To select a column, use the Insert a column drop-down. Its name appears in the Formula text box.
Repeat as needed.
4. To add a function that returns values, use the Formula drop-down. The function appears in the Formula
text box.
5. To add a math operator symbol that does arithmetic or logical comparisons, use the Operator drop-
down. The operator appears in the Formula text box.
Note: Or, you can type a formula into the box. If you enter a formula, enclose column names within
square brackets [ ] and use typical operators, such as +, -, *, and /. You can edit or delete anything in
this space.
6. Specify your Data Type for the new column in the drop-down.
7. Specify a Display Format in the drop-down. Options include numeric and date formats.
8. Click Add. The table refreshes, and the new column appears.
Note: At any time, click Formula Help for help constructing a formula.
©2018 Follett School Solutions, Inc. 50You can also read