Zoom Instructor Handbook Werklund School of Education - April 2020 Version 4.1 - Werklund School of ...
←
→
Page content transcription
If your browser does not render page correctly, please read the page content below
Zoom
    Instructor Handbook

Werklund School of Education

          April 2020

          Version 4.1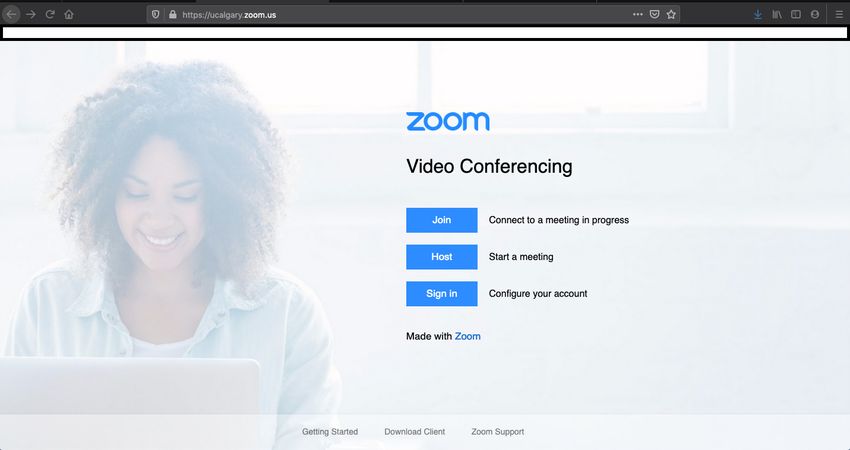
2

What is Zoom?
Zoom (https://ucalgary.zoom.us) is a video conferencing platform that allows users to
connect from computers and mobile devices. It is an enterprise video platform across
University of Calgary. It has been integrated into D2L for the scheduling of synchronous
video sessions for instruction and it can be accessed via your UCID username and
password.

Zoom accommodates video conferencing for large groups, can facilitate breakout room
discussions and collaboration along with the sharing of PowerPoints and other
documents for presentation by instructors and students.

In Werklund Sschool of Education, Zoom can also be used for synchronous sessions for
graduate exams, (e.g., candidacy and final), meetings with research teams and students,
etc. Whenever a meeting is scheduled, a URL is created to share with the participants.
For recurring sessions such as classes or regular meetings a single link can be used for
multiple sessions.

Video Resources
The following videos have been created by Werklund School of Education as tutorials to
help demonstrate features and functions of Zoom:
Breakout rooms - https://vimeo.com/338899748
Guidelines for Exam Neutral Chair - https://vimeo.com/338899619
Student screen sharing for presentations:
https://ucalgary.yuja.com/V/Video?v=38109&node=240655&a=687979056&autoplay=1

There are further training videos provided by Zoom as well.

Activating Your Zoom Account
•   When activating your account visit https://ucalgary.zoom.us and click on Sign In.
•   This will generate an email to your ucalgary.ca email. Open that email and follow the
    directions to either launch your new account or, if you have another account, merge
    it into the licensed University of Calgary account.
3

•   If there are issues with this activating your account, please contact
    tandl@ucalgary.ca for guidance.
•   If you wish to use Zoom on your smart devices, complete the account transfer on
    your computer first. After that, launch the Zoom app on your devices and Sign In via
    SSO. Add “ucalgary” in the company domain field and then log in with your UCID
    username and password.
•   New: Zoom can also be linked to your email, whether Outlook, Gmail or another
    platform. This will help synch Zoom events into your calendar.
•   The Zoom app is available for all smart devices.
         o Download it from your respective app store. After installing the app, please
            review your device settings to ensure the Zoom app has access to your
            microphone and camera.

Audio and Video Equipment Considerations
Remote session – All participants at distance
If all participants are participating remotely and you are hosting from your personal
computer your laptop should provide decent audio and video quality. If you are
participating from a desktop computer, it is recommended that you have a peripheral
camera and headset with microphone to ensure best sound quality
• If you wish to hide the background in the environment you are broadcasting from
     there is a virtual background feature under Video setting. You can select one of
     three default images or an image from your computer.

Creating and Scheduling a Meeting
To schedule a meeting or a synchronous class session, you have the options of
scheduling through D2L or through your account at https://ucalgary.zoom.us. To
schedule Zoom sessions for your classes, it is recommended that you schedule for your
classes through D2L. This will schedule sessions in D2L and provide students a link to
join.

Scheduling via D2L
After logging into D2L and accessing the Shell for a course, you will find “Zoom” under
the Communications tab in your drop-down toolbar.

Once you go to the Zoom page in the D2L shell, you will see the meetings scheduled and
a button to add new meetings to the schedule for this course. Once you schedule your
meetings they will appear in your students’ version of the shell under Zoom and it will
also appear in your Zoom account as well.

IF you have already scheduled meetings in Zoom that you plan to host with your classes
you can click on the “three-dot” button to the right of “Schedule a New Meeting” and
import the Meeting ID of sessions you had previously created in Zoom.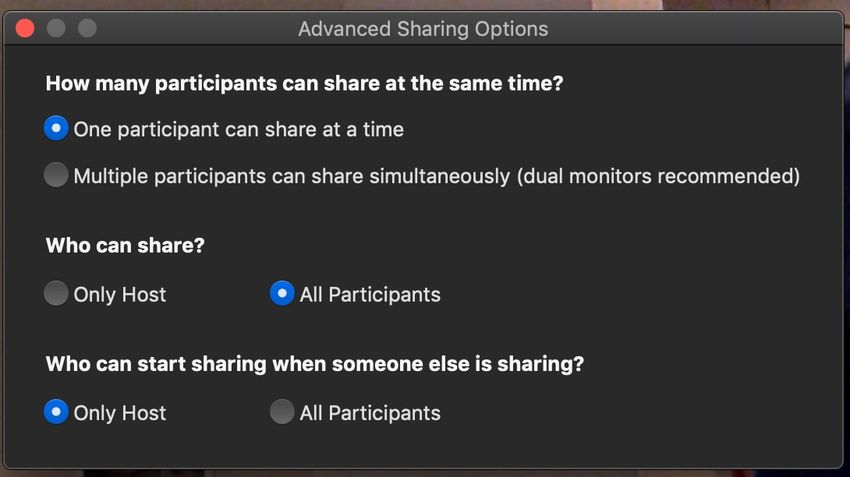
4

Zoom scheduling page in D2L.

If you are scheduling Zoom meetings that are not for your classes, you should do it
within your Zoom profile page. In the upper right corner of that page, you will see
options for scheduling, joining or creating a meeting.

Zoom meetings page under the Zoom profile.

As a meeting organizer, you would do the following:
• Go into your Zoom account
• Click on Schedule a Meeting
       o You will be taken to a page to set:
              ! Topic – the default is My Meeting; replace this with your course title
                 and number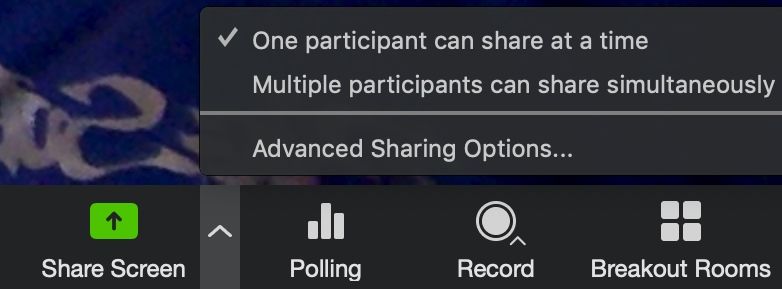
5

Schedule a Meeting page in Zoom

        !    Start time of session (When) – please start 30 minutes prior to
             scheduled start to allow participants to test their audio)
        !    Duration – please add an extra 30 minutes beyond the anticipated
             end of the session
        !    Determine if this is a Recurring Meeting or not. You can schedule
             daily, weekly or monthly sessions and weekly sessions can be
             scheduled for multiple weekdays (e.g. Mondays and Wednesday) If it
             is recurring, but not on a consistent schedule, you can indicate the
             number of sessions you anticipate and modify them after the
             meetings are saved OR select “No fixed time” and it would be
             available to launch at your convenience. (You would have to tell your
             participants the schedule for the meetings, however.)
        !    Registration – this is usually NOT required for classes
        !    Meeting ID – this is can be generated automatically for scheduled
             meetings
        !    Meeting Password – this is usually NOT required
        !    Video – this determines whether video is on or off when the host and
             participants join the meeting. Everyone has the option to turn their
             video on or off at any time after the meeting starts. It is also valuable
             to reserve video for only those who are speaking or presenting. This
             will minimize the demand on broadband during the session and the
             amount of data needed for the recording of the session.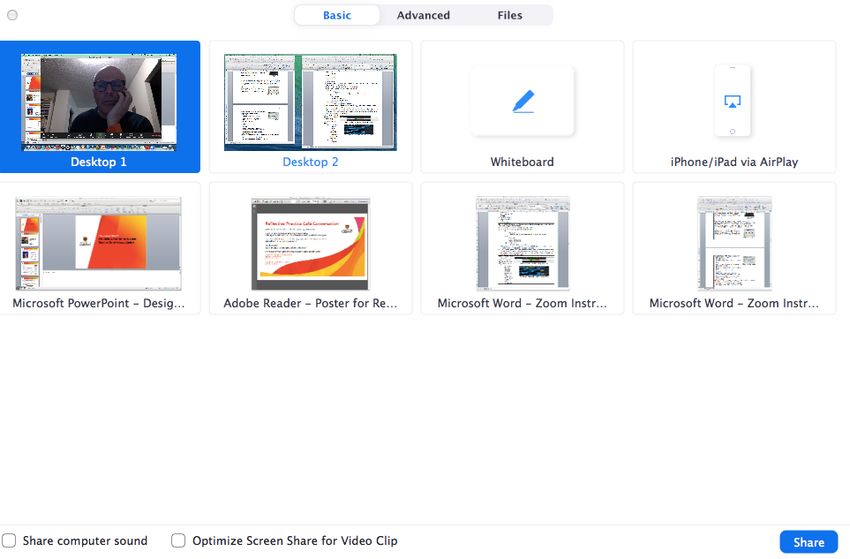
6

       !  Access options for Audio - please set to “Both” to allow participation
          via computer audio and, if necessary, Telephone. (Dialing, however, is
          not recommended due to the potential cost of long distance fees.
          The Canadian dial-in number is NOT toll free and is a Toronto-area
          exchange.) Also, advise participants joining by their smart devices
          that they would still use internet audio rather than telephone.
       ! Meeting Options:
              • For WSE synchronous classes, enable participants to join
                 before the host. This will allow participants to test their audio
                 settings prior to the meeting.
              • We also recommend muting participants upon entry
o Once the meeting settings are saved, a URL featuring a 9 or 10 digit access
  code is generated to allow access to the session. The meeting(s)
o If you have created recurring meetings that need to be modified to fit your
  schedule, you can edit them individually.

   The screen after selecting a recurring meeting.

   All occurrences with options to edit and delete sessions.

o New: After a recurring meeting is saved, you can open the meeting to add
  and modify sessions. The Time of the meeting in the listing to review the
  recurring meetings currently scheduled and add further meetings to the list.
o New: You can assign scheduling responsibilities for another person to your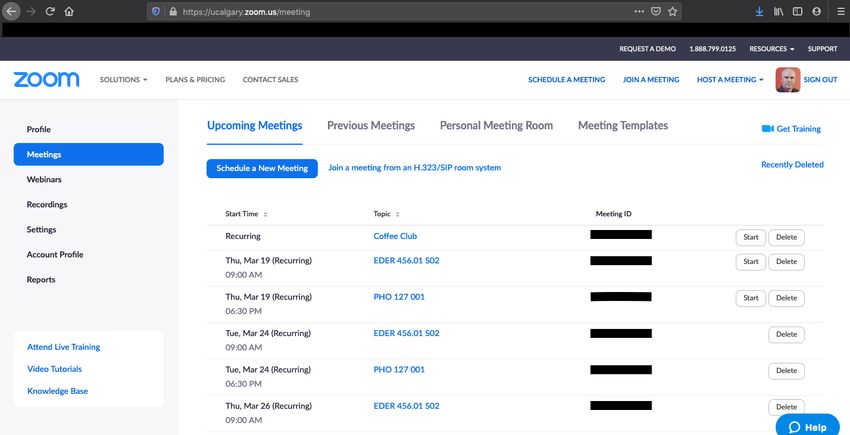
7

         account under Settings. There is a Schedule Privilege option that would allow
         you assign scheduling privileges to another individual with a ucalgary.ca
         email account. You would also see accounts that you have scheduling
         privileges for. If you have these privileges you would see a “Schedule for”
         option when scheduling new meetings.
       o Note: When setting up a class/session, you may want to use the Poll feature.
             o In Zoom, you will need to modify the poll setting on the Settings page.
                 After setting this, polling will be available to the account holder for all
                 scheduled meetings.

Virtual Office Hours
                                     Bear in Mind
     One Zoom Meeting at a Time - With your account, you can only host one
     Zoom session at a time. For example, if you want to have an open session for
     students to use Zoom, you will not be able to have your own meeting
     concurrently on the same account. If you happen to be scheduling or hosting
     sessions back to back, make it clear to participants that a session needs to end
     and that they will have to continue their discussions in a different session.

If you need to host office hours, this can be done through Zoom as well. You would
schedule office hours as you would a regular session with the additional step of clicking
“Enable waiting room” under Meeting Options. With the Waiting Room enabled,
incoming participants would appear on your Participants list, but not interrupt the
appointment you are having. You will have the opportunity to send a private message to
advise people you are aware of their arrival. (Also advise them to remain in the
session.) When you have the opportunity to meet them, you can invite them into the
session. You may use the waiting room for multiple participants and invite more than
one individual from the waiting room into your meeting.

Hosting a Meeting Instantly
To host a meeting instantly, log into your account at https://ucalgary.zoom.us and click
the Host a Meeting link in the top right corner of the screen. You can select the options
of With Video On, With Video Off or Screen Share Only to launch with a Meeting ID. You
may wish to modify your “Personal Meeting ID” on your profile page to use the same
meeting ID for all instant meetings that you host. If you do not log into your account
and simply click on a URL for a meeting you are hosting you will NOT have hosting
privileges.

Starting a Scheduled Meeting
You have the option of launching a meeting from either your Zoom account or the D2L
Zoom page for your course. In either instance, there will be a Start button next to the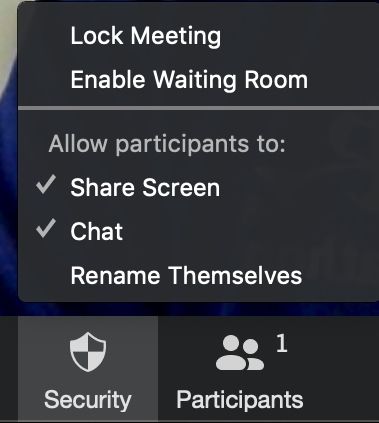
8

meeting. If your participants are already in the room, Start will have changed to Join.

Tools for Use During a Zoom Videoconference
During a Zoom videoconference session, the meeting toolbar is located along the bottom of the
screen. The toolbar will appear when the cursor is moved along the bottom of the screen.
During a share session, the Zoom toolbar moves to the top of the screen and will only appear
when hovered over.

The host/instructor has controls for managing participants, chatting, recording the meeting,
starting breakout rooms, sharing documents and ending the meeting. When screen sharing,
additional features for annotating the document on the screen, saving screen grabs and giving
remote control to another participant in the meeting will be available.

Participants/students will see similar controls for video, audio, sharing and chat. When a screen
is being shared, students will have the opportunity to annotate on the shared screen as well.

Control Panel/Toolbar

                                          Toolbar (Host)

Audio/Mute – By
clicking on the
microphone icon,
you can mute and
unmute yourself.
When the
microphone is live, it
will flicker in green to
indicate audio levels
of your input. If you
are doing interactive
dual delivery to a
face-to-face
                                                  Options for changing microphone
classroom and a
remote audience,
you will also use this
feature to select and
test the microphone
and speaker you’re
your session.
Selecting the arrow
to the right of the
microphone icon, will
let you adjust audio
9
controls, including
volume and choice of
microphone and
speaker.
Video – By clicking on the video camera icon, you can turn your camera on or off. If a participant’s
video is off, the user’s name would appear where their video stream would appear to indicate
connection to the session. If video is turned on, the participant’s camera image would appear with
a name at the bottom of the screen. This video thumbnail can also indicate non-verbal
communication by that participant.
Security – this new
feature gives you the
option to modify
permissions to chat,
share screen and
enable the waiting
room so you can
screen participants
before they join your
session. You can also
lock the meeting to
prevent people from
leaving or joining the
meeting at any time.
Security Pop-up Window
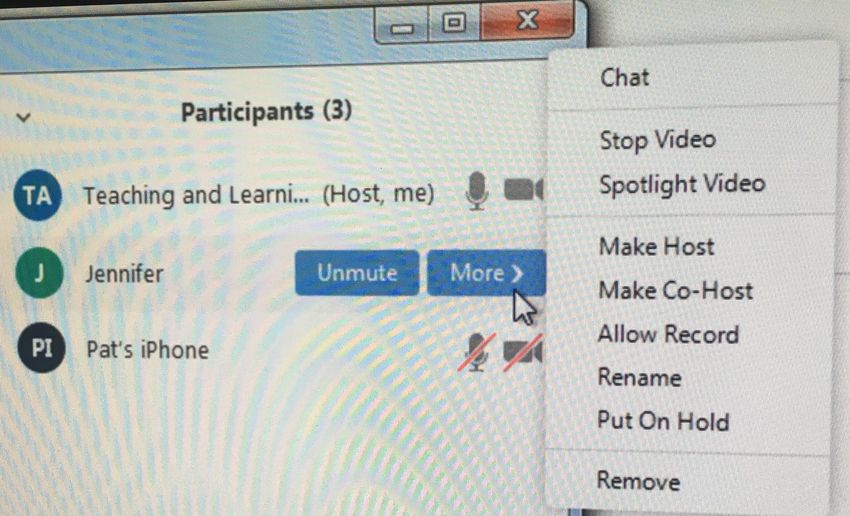
Manage Participants
– This will open a
segment of the Zoom
meeting screen to
allow you to:
• Mute/unmute
participants
• Turn off
participants’
video or invite
them to turn it on
• Chat with Manage participant options
individual
participants10
privately
• Make
participants host
or co-host of the
meeting
• Reclaim your role
as host
• Remove
participants.
• Identify and
respond to
participants who
have raised
hands.
• Raise your own
hand when host
duties have been
delegated
• Give permission
to record the
session. WSE
Guideline:
Instructors should
not give
participants this
privilege out of
consideration of
FOIP policies.
• Monitor
participant
responses via
non-verbal
communications.
Chat – Select the chat icon to open a text dialogue box. This box will appear below the Participants
window on the right side of your screen.
• At the top of this chat window, text chat will be displayed
• At the bottom of the window, you will see the following:
o To
! “Everyone”
! Individuals – done by selecting their names from a drop down menu
o More
! Save Chat
! Share File in Meeting11
! Modify Chat permissions
o Type message here…
! Enter your chat text in this space.
• If this window is not open, the chat icon in the toolbar will illuminate and generate a message
count for unanswered messages that you have accumulated.
• All participants have the option of saving the chat from a Zoom session. The transcript, along
with other artifacts saved from Zoom sessions, (whiteboards, video recordings, etc.) would
appear in your Documents folder of your computer in a Zoom sub-folder. The folder will be
identified by the date, title and meeting ID for the session in the following format “YYYY-MM-
DD hh.mm.ss Meeting Title Meeting ID#”.
Screen Share – This
will allow you to
choose from a screen
or open document
on your computer to
share with the class.
You can share:
o An open file
from your
computer
o An open
program from
your computer
o An Internet Options for items to share when doing Screen Share.
browser Note the options for share computer sound and optimizing video for share.
o A Zoom
whiteboard.
o Content from an
iPad or iPhone.
(Android device
are not
supported at this
time.)
o If you wish to
share audio and
video during
your screen
share click on
the “share
computer audio”
and “Optimize
Screen Share for Pop-up window to modify Screen Share Options
Video Clip” Click Advanced Sharing Options for participants
features.12
o A document
does not have to
be uploaded to
Zoom for
sharing.
o A student can
present or share
their document
but you may
have to modify
screen sharing
privileges to
allow this. Click Settings to allow Participants to Share Screen
on the ^ button
next to “Screen
Sharing” and
then click on
“Advanced
Sharing
Options…” if you
have not Toolbar view and annotation bar during screen share
modified this on
your profile
page.
o While sharing,
the toolbar will
move to the top
of the screen.
Also, it will add
features to allow
you to annotate
the shared
document or The More Menu to access Chat and Record during Share
take remote
control of the
shared
computer.
o While sharing,
the speaker
video will go into
picture-in-
picture mode.
Participants will
see the shared13
screen, as well as
video of the
speaker.
o It is
recommended
that you use
“Desktop” to
share in Zoom to
ensure a “what
you see is what
you get”
presentation.
For example, if
sharing a
PowerPoint that
features URLs
you intend to
click on, you
would see the
webpage that
you launch but it
would not be
transmitted to
the rest of the
participants.
o When sharing
from your
desktop, ensure
the document
covers your
desktop to avoid
sharing personal
or sensitive
materials.
Polling: This feature allows you to create multiple choice questions to use in class. It is
recommended that you create your poll questions in advance of the session. The poll questions
can be created synchronously, if necessary. For a lower stakes survey, encourage getting
participants to use the YES/NO options for non-verbal feedback in the participants window. You will
see the responses next to their names and there will be a tally of results above the Yes and No
icons.
• When the poll is prepared, the host/instructor will select the Launch Poll button and the
participants/students will have the opportunity to respond to the poll.
• The participants/students will have the poll appear on their screen.14
• After the poll is completed, the host/instructor can share the results or relaunch the poll.
• The instructor can stop the poll by selected End Poll.
• Results will not be associated with individual participants. Votes will remain anonymous.
• The host/instructor can share the results of the poll by selecting Share Results.
Record – Meetings/class sessions can be recorded by the host.
Cloud recording is NOT recommended because the cloud servers are based in the US. Storing our
files there would violate our FOIP Protocols.
• Local Recording:
o When you record locally, the video is saved in a Zoom sub-folder in your Documents
folder.
• WSE Guideline: Sharing Recordings in an Online Course:
o Go into to the Documents folder, double-click on the file. It will automatically convert
the file to mp4 format. The conversion will create four documents including one mp4,
usually titled “zoom_0”. Retitle this file. Our suggestion is to title with the date of the
session, title of the course and other key information.
o You will need to upload the mp4 file of the recording to the D2L Zoom. If the video of
the session is less than 1 GB in size go to the Content area for your course and click
New to get a drop down menu that includes Video and Audio then select Upload to
drag and drop your video. If your video is larger than 1GB, you can use the YuJa tab in
the D2L shell to upload your video to YuJa and then link it to D2L. Bear in mind that
screen sharing and multiple video streams for participants will increase file size so limit
video to only the participants who are sharing or speaking.
Breakout – The
Breakout icon will
facilitate the creation
of small group
breakout sessions.
• You can form
groups randomly
(select
Automatically) or
assign groups
(select Manual or automatic set up
Manually). Set
the number of
groups that you
need and then
choose your
preferred
method for
forming the
groups.
• At the bottom of15
the breakout
rooms window is
an Option link
that will allow
you to determine
the maximum
length of
breakout session,
the length of the
countdown after
closing rooms
and other
features for the
breakout.
• When creating
groups Manually, Breakout room reset option
you assign
members to
rooms by
selecting them
from a list of
available
participants.
• After groups have
been configured,
the open all
rooms button will
invite people into
their rooms for
the breakout
session.
Participants will
need to select
Join. You do
have the option
to send
participants to
their rooms
automatically.
• After starting
breakout
sessions, you
have the option
of joining the16
breakouts. There
is a Leave
Breakout Room
button in the
bottom right
corner of the
meeting window
to allow the
Instructor to exit.
This would bring
you back to the
list of all groups
to join other
breakout groups.
• You will also have
the option of
forming breakout
groups when
scheduling a
meeting. You
would create a
CSV sheet in
Excel with
Meeting Room
Name, Student
email and
Student Name.
However,
students must
sign in with the
same email
address that you
use to create the
groups. If not you
would have to
assign them
manually and
synchronously
before launching
the breakout
session.
Features in the breakout room include:
o Share – Students can share their desktop, documents or the Zoom whiteboard just as they
would in the main room.17
! Sharing accommodates small group discussion and allows recording of notes, saving of
whiteboard and other artifacts from the break-out session, etc.
! Participants/students can access their desktops to use any application they choose.
This can be saved. When they return to the main room, and have share screen
privileges, they can Share Screen to debrief to the rest of the group with the files they
have collaborated on.
! They can save the whiteboard content or share it from a folder.
o While in the breakout room, the More link gives participants/students access to:
! Chat
! Ask for Help
! Disable Participant Annotation
! Hide Video Panel
! Audio Options
! Video Settings
! Leave Breakout Room.
o Participants/students can select End Meeting in the breakout session, which will return
them to the main room. Or, the host/instructor can Close All Rooms to reconvene the
groups in the main room. This will give participants 30 seconds to leave their break-outs
before they are “forced” into the main room.
When the host/instructor wants each group to report back, the documents created in the
breakout room and saved (Word, PowerPoint, Whiteboard etc.) can be shared.
End Meeting – Select Leave Meeting to leave or end the meeting.
• You will receive another window asking “Do you want to leave this meeting?” for which you
can select Leave Meeting or Cancel.
• If you want to allow the meeting to continue without you, designate a participant as host
before you exit.
Customizing Your Zoom Session Environment
Current Zoom settings require very little customization to adapt the Zoom environment
to the specification you would require to teach. On the Profile page there is a link to a
Settings page. This will allow you to include features that you wish to have during your
sessions. The items that you would most likely modify are:
• Screen Sharing – the default for this is Host Only being allowed to share. If you
wish to allow All Participants to share, please ensure that Host Only is allowed to
share when someone else is sharing.
• Email Notifications when participants join before host. Deactivating this would
prevent you from getting an email every time a participant joins your session
before you.
• Schedule Privilege – if you want to assign scheduling privileges to another
individual you can add their @ucalgary.ca email address.18
Other settings you may modify:
• Audio Type – although you set this when scheduling meetings, it is good to leave
it set it on Telephone and Computer Audio.
• Join Before Host – it is good to allow this on the settings page as well as with
each meeting you schedule.
• Use Personal Meeting ID when starting an instant meeting - this allows you to
use a consistent ID for instant meetings. You can communicate this to meeting
participants more quickly and regular meeting participants can become familiar
with or bookmark this ID or the URL.
• Mute participants upon entry – this minimizes disruption as participants join
after the session has started.
• Chat – this will allow messages to be posted to the entire group
• Private Chat – this will allow 1:1 chat to occur
• Co-host – this allows the Host to confer co-host privileges to participants during
a session
• Polling – this allows the host to build polls prior to or during a Zoom session to
survey opinions during the session (see below)
• Allow host to put attendees on hold – this would allow a host interrupt two-way
video and audio for part of the session. This is commonly used in exam situations
so that a panel can deliberate on an exam candidate’s performance
confidentially.
• Annotation – allows participants to annotate on the screen during screen
sharing sessions
• Whiteboard – allows use of the whiteboard and annotation tools
• Remote control – allow others to control a presenter’s screen while screen
sharing
• Nonverbal feedback – provide additional response icons for non-verbal response
in the chat window
• Virtual Background – this allows participants to use an image on their device as
a backdrop to cover a more distracting background.
View Options
There is a button that will appear in the top right corner of the video feed, when you
bring your cursor there. This will allow you to modify the screen view during the session
and during sharing sessions.
Gallery View or Speaker View –This will change the view of the video on your screen.
o Gallery view will give video “tiles” across the top of the main screen.
o Speaker view will give the video of participants tiled at the top and the
person who is speaking will appear in the main screen.
Full Screen – This will provide a full screen.19
o To exit, select Exit Full Screen in the top right corner, or select Escape on
your keyboard.
When the screen is being shared, the shared content will fill the screen but there will be the
option of having a small inset video of the main speaker and/or other participants.
First Steps – Smart Device
The Zoom app is available for free for smart devices. Search through the
respective app store for your device to locate and download. Once it is
downloaded, review the settings on your device to allow Zoom access to
your microphone and camera.
If you are joining the meeting from a smart device, you only have to launch the app and
type in the code for the meeting. Signing up or signing into an account is not required
for joining a meeting. Meeting invites can be received via text message and you would
only have to launch the app from the invite.
Technical Support
Program Support Level
UPE GPE
UPE Online Help DistHelp
Email: jane.hanson2@ucalgary.ca Email: DistHelp@ucalgary.ca
Office of Teaching and Learning
Email: tandl@ucalgary.ca
phanlon@ucalgary.ca
Phone: 403-220-5761
Further Resources
• Zoom website – Getting Started will introduce you to the fundamentals whether in
documents or with videos.
o Types of Zoom Support Resources: Video tutorials, blog and FAQ.
• University of Calgary eLearn
• On the bottom right-hand corner of the Zoom screen, you will see a blue Help
button. Type in your issue and information will be provided, somethings with a
video response.
• Support Center – provides various resources to help with using Zoom -
https://support.zoom.us/hc/en-usYou can also read