Getting Started with Microsoft Office Live Meeting
←
→
Page content transcription
If your browser does not render page correctly, please read the page content below

Getting Started with
Microsoft Office Live
Meeting
  Published October 2007
Information in this document, including URL and other Internet Web site references, is subject to change without notice. Unless otherwise
noted, the companies, organizations, products, domain names, e-mail addresses, logos, people, places, and events depicted in examples
herein are fictitious. No association with any real company, organization, product, domain name, e-mail address, logo, person, place, or
event is intended or should be inferred. Complying with all applicable copyright laws is the responsibility of the user. Without limiting the
rights under copyright, no part of this document may be reproduced, stored in or introduced into a retrieval system, or transmitted in any
form or by any means (electronic, mechanical, photocopying, recording, or otherwise), or for any purpose, without the express written
permission of Microsoft Corporation.

Microsoft may have patents, patent applications, trademarks, copyrights, or other intellectual property rights covering subject matter in this
document. Except as expressly provided in any written license agreement from Microsoft, the furnishing of this document does not give
you any license to these patents, trademarks, copyrights, or other intellectual property.

© 2007 Microsoft Corporation. All rights reserved.

Microsoft, MS-DOS, Windows, Windows Mobile, Windows Server, Windows Vista, Excel, PowerPoint, and RoundTable are either
registered trademarks or trademarks of Microsoft Corporation in the United States and/or other countries.

All other trademarks are property of their respective owners.
Contents
    Introduction .................................................................................................................. 1
          Who Should Use This Guide .................................................................................. 1
          Frequently Asked Questions ................................................................................. 1
          What’s New in Microsoft Office Live Meeting? .................................................... 2
    Attending a Meeting ..................................................................................................... 2
          Joining a Meeting................................................................................................... 3
          Starting Audio and Video ....................................................................................... 4
          Using the Microsoft Office Live Meeting Client .................................................... 5
          Interacting with Other Meeting Participants ........................................................ 7
    Creating a Meeting....................................................................................................... 8
          Scheduling a Meeting in Advance ........................................................................ 9
    Presenting in a Meeting ............................................................................................ 11
          Presenting Content During the Meeting ............................................................ 11
          Using Shared Notes ............................................................................................ 12
          Distributing Handouts ........................................................................................ 13
          Managing Questions and Answers .................................................................... 13
          Using Breakout Rooms ....................................................................................... 14
          Starting an Instant Meet Now Meeting ............................................................. 15
    Recording a Meeting ................................................................................................. 16
    Appendix A. Features Not Available in the Web-Based Client ................................ 18
    Appendix B. Microsoft Office Live Meeting Web Access Software Requirements 19
    Appendix C. Connecting Computer Audio and Telephone Conferencing ............... 20
Introduction
This guide is written for people who use the Microsoft® Office Live Meeting 2007 service. It
tells you how to join meetings quickly, and provides instructions on how to schedule meetings,
present meetings, and share presentations and other information. It also introduces you to the new
features of the meeting client, including meeting client improvements, breakout rooms, and video
and voice enhancements.
Who Should Use This Guide
This guide is for people who are new to Live Meeting or who have used Live Meeting but have
not used the latest version. This guide gets you started on Microsoft Office Live Meeting 2007.
For details and advanced topics, see the online Help, which is accessible from within the
Microsoft Office Live Meeting client.
Frequently Asked Questions
If you are new to Live Meeting or you have not used the latest version, you may have the
following questions.
What is Microsoft Office Live Meeting?
Microsoft Office Live Meeting is an online meeting space to which your organization subscribes.
With Microsoft Office Live Meeting, you can meet with your colleagues online, which allows
you to collaborate in real time, even over long distances.
What do I need to do before I start?
If you simply want to join a meeting that someone else scheduled, you can click the Join the
meeting link in the e-mail invitation. Live Meeting will prompt you if any software installation is
needed. If you want to schedule meetings or start a Meet Now meeting on demand, you first need
to configure your account information. See the procedure “To Configure your Account” in
“Starting an Instant Meet Now Meeting,” later in this guide.
Why do I see a section for “Server” in the account configuration dialog box?
Some organizations host meetings on their internal servers, and others subscribe to the Office
Live Meeting service. Your administrator will give you the information you need to configure
Live Meeting for the service. You can leave the Server section blank if it does not apply to you.
How do I know if I have the meeting client installed?
You can determine if the Microsoft Office Live Meeting client is installed on your computer by
clicking Start, clicking All Programs, and then looking in the program list for Microsoft Office
Live Meeting 2007.
What if I cannot install the meeting client?
With the Microsoft Office Live Meeting service, you can join a meeting even if you are unable to
install the meeting client on your computer. If you do not have the meeting client installed and
you try to join the meeting, Microsoft Office Live Meeting will display an option for connecting2 Getting Started with Microsoft Office Live Meeting
to the meeting using a Web browser. There are some limitations to connecting this way (see
Appendix A), but most of the meeting features are available to you.
I want to schedule a Live Meeting, but some of the people I want to include will not have
access to a computer. Can they still participate in the meeting?
Although people without a computer won’t be able to see the meeting, they can still participate in
the audio portion of the meeting. With the Microsoft Office Live Meeting service, you can set up
a meeting to use both computer audio and telephone conferencing. The meeting organizer must
choose both of these audio options when scheduling the meeting. Then, when the meeting starts,
any presenter can connect the audio, so that computer users and telephone conferencing users can
hear each other. For more details, see “Creating a Meeting” later in this guide.
What’s New in Microsoft Office Live Meeting?
If you have used Microsoft Office Live Meeting before, you will notice the following new or
improved features:
Start menu. From the Start menu, you can open the Live Meeting client in pre-meeting
mode to initiate a Meet Now meeting, change your Meet Now meeting options, or join a
scheduled meeting.
Audio and video options. Enhancements to both computer audio and phone conferencing
let you use one or both during a meeting. You can use webcams to show video of one or
multiple presenters. In meetings that use computer audio, the video actively switches to the
current speaker. You can also use the Microsoft RoundTable™ communications and archival
system to show a panoramic video of a conference room to remote participants, or you can
connect two conference rooms for meetings between workgroups at different locations.
Handouts. As the presenter, you can distribute content that attendees can download either
before or during the meeting. Files are automatically scanned for viruses when they are
added to the meeting.
Breakout rooms. Breakout rooms are a feature of the Microsoft Office Live Meeting
service. You can create breakout rooms to allow subgroups of attendees to meet separately.
Shared Notes. You can create and save notes that all attendees can see.
Recording to your computer. Meeting organizers and presenters can enable recording for
their meetings and allow you to save the recording to your computer.
Attending a Meeting
When you receive an e-mail invitation to Microsoft Office Live Meeting, you can easily join the
meeting by clicking the link in the invitation. The e-mail invitation also contains information
about installing the meeting client on your computer.
Note
Office Live Meeting automatically determines whether you need to install the
meeting client and provides installation links if necessary.Getting Started with Microsoft Office Live Meeting 3
When you are connected to a meeting, you have several ways that you can view the meeting and
participate. This section talks about the following tasks:
Joining a meeting
Starting audio and video
Using the Microsoft Office Live Meeting client
Joining a Meeting
You can join a meeting directly from the e-mail invitation. The invitation contains a Join the
meeting link that automatically starts the Microsoft Office Live Meeting client and connects you
to the meeting. If this is the first time you are joining a meeting, you may need to install the
Microsoft Office Live Meeting client before you can join.
Tip
Before you join a meeting for the first time, you can check whether the
Microsoft Office Live Meeting client is installed on your computer by clicking
Start, clicking All Programs, and then looking in the program list for Microsoft
Office Live Meeting 2007. If this program appears in the list, the meeting
client is installed. If the program does not appear, use the links listed under
First-Time Users in the e-mail invitation to install the meeting client.
If you are unable to install the Microsoft Office Live Meeting client on your computer, you can
still join the meeting if the Use Web Console link appears on the client installation page. The
Live Meeting Web-based client connects you to the meeting using your Web browser. You can
still attend the meeting, but there are some limitations (see Appendix A). The Use Web Console
option is only available in meetings scheduled with the Microsoft Office Live Meeting service.
To join a meeting
Do one of the following:
In your e-mail inbox, open the meeting invitation.
Or, in your calendar, open the meeting item.
In the e-mail invitation or the calendar item, click the Join the meeting link, as shown in Figure
1 below. Microsoft Office Live Meeting automatically opens and joins you to the meeting. If you
do not have the client installed on your computer, the invitation will contain instructions on how
to install it.
Figure 1. Link for joining the meeting4 Getting Started with Microsoft Office Live Meeting
If you are unable to connect to the meeting, open the Microsoft Office Live Meeting client by
clicking Start, clicking All Programs, clicking Microsoft Office Live Meeting 2007, and then
clicking Microsoft Office Live Meeting 2007. Enter the Meeting ID, Entry Code (if provided),
and Location listed in the e-mail invitation or calendar item.
Starting Audio and Video
Depending on how the meeting organizer has set up the meeting, you can communicate with the
other attendees either through your computer or through a telephone conference call. You can
also connect a webcam to your computer so that other attendees can see you. In the e-mail
invitation, read the Audio Information section to find out whether the meeting uses computer
audio or telephone conferencing.
If the meeting uses Computer Audio, you can connect to the meeting and use your
computer’s speakers and a microphone, or you can use a headset with a microphone.
If the meeting uses Telephone Conferencing, you can have the conferencing service call
you, or you can use your telephone to dial into the conferencing service.
Depending on the type of audio used in the meeting, take the appropriate action below.
Tip
To ensure that your speakers and webcam work properly, use Set Up Audio
and Video after you first connect to the meeting. Press CTRL + T. (You can
also access the setup options in the Voice & Video pane by clicking Options,
and then clicking Set Up Audio and Video.) Follow the instructions in the
wizard to specify and test your speakers, microphone, and webcam.
To connect to computer audio
1. Connect speakers to your computer to listen to the meeting. If you plan to talk in the
meeting, connect a microphone. Alternatively, you can use a headset with built-in earphones
and microphone.
2. Audio should be on by default. If audio is not on, click Voice & Video to open the Voice &
Video pane, and then click Join Audio.
Note
When you first join a meeting, you can hear the meeting audio, but your
microphone is muted. If you want to speak in the meeting, unmute your
microphone first.
To connect to telephone conferencing by having the conferencing service call youGetting Started with Microsoft Office Live Meeting 5
Note
The first time you join a meeting that uses only telephone conferencing, a
dialog box appears allowing you to enter a phone number that the
conferencing service should use to call you.
1. To open the Voice & Video pane, click Voice & Video.
2. If you are not connected to audio, click the Down arrow next to the Join Audio button, and
then click Call Me.
3. If this is the first time you have joined a telephone conference, the New Phone Number
dialog box will appear. Type your area code and your phone number, and then click OK.
4. In the Enable Call Controls dialog box, if you are a participant, click Join. If you are the
conference leader, select the Leader radio button, type the leader or PIN code, and then click
Join.
To connect to telephone conferencing by dialing into the service
1. Click Voice & Video to open the Voice & Video pane.
2. Click the down arrow next to Join Audio.
3. Click View Dial-In Details, and then use your telephone to dial the numbers listed.
To receive video from the meeting
1. If the main video is not visible, click Voice & Video to open the Voice & Video pane, click
the down arrow next to the webcam icon, and then click Show Main Video.
2. If the meeting uses Microsoft RoundTable for panoramic video, in the Voice & Video pane,
click the down arrow next to the webcam icon, and then click Show Video Panorama.
To send your video
If you want to use a webcam to send your video, follow the instructions provided with your
webcam for connecting it to your computer and installing the drivers. Then click Voice &
Video. In the Voice & Video pane, click the webcam icon, and then click Start My Video.
Note
During the meeting, the video automatically switches to the active speaker.
However, when you speak, others will see you, but you will not see yourself.
Using the Microsoft Office Live Meeting Client
During the meeting, you can adjust the volume of your speakers and microphone. You can also
interact with others during the meeting through chat, or you can ask the presenter a question.
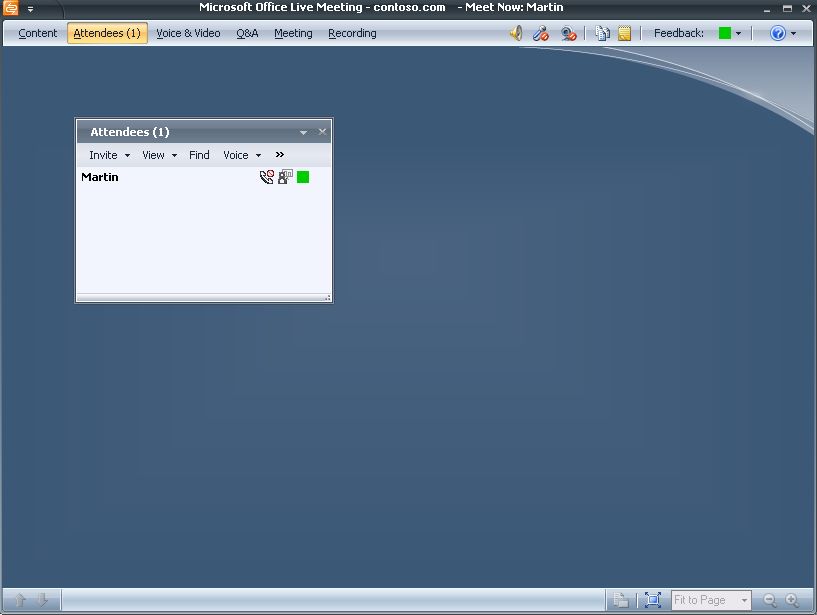
The topmost element in the Office Live Meeting client window is the Menu Bar, which contains
menu items. The menu items in the meeting client are moveable panes. You can click a menu
item, and then drag the title bar anywhere on your screen. For example, to open the Voice &6 Getting Started with Microsoft Office Live Meeting
Video pane, click Voice & Video, and then drag the title bar to the middle of the Live Meeting
client window, as shown in Figure 2 below. You can also resize a pane or dock the pane along
the left, right, or bottom edge of the window.
Figure 2. Microsoft Office Live Meeting client
Figure 3 below shows the Menu Bar menu items and icons.
Note
Depending on how the meeting is set up and whether you have permissions
to use certain features, some of these menu items may not be available.
A Menu button. You can configure your account information and set your contact card options.
B Content. Presenters can share documents, applications, or their desktop with attendees.Getting Started with Microsoft Office Live Meeting 7
C Attendees. You can view the list of attendees or the seating chart. Presenters can invite other
attendees, mute the other attendees, or set attendee permissions.
D Voice & Video. You can start and stop your audio and video, mute your speakers or microphone,
or adjust the volume of your speakers or microphone.
E Q&A. You can type questions for the presenter and presenters can type answers.
F Meeting. Shows meeting details, including meeting ID and entry code.
G Recording. Presenters can start, pause, or stop a recording of the meeting, including audio.
H Microphone mute icon. Click to mute or unmute your microphone.
I Speaker mute icon. Click to mute or unmute your speakers.
J Webcam icon. Click to start or stop sending your video.
K Handouts. You can download handouts that the presenter has added to the meeting.
L Shared Notes. You can create and save notes that all attendees can see.
M Feedback. You can change your feedback status; for example, to signal to the presenter to slow
down.
Figure 3. Menu Bar Menu items and icons
Note
The menu bar may also contain an item titled More if a custom streaming
media pane has been set up for the meeting.
To adjust the volume of your speakers or microphone
To mute the speakers or microphone, in the menu bar, click the Mute Microphone button or
the Mute Speakers button.
Note
You can also mute the microphone or speakers in the Voice & Video pane by
clicking the Mute Microphone icon or the Mute Speakers icon in the pane.
To modify the speaker or microphone volume, in the Voice & Video pane, click the down
arrow next to the microphone or speaker button and move the volume slider up or down.
Interacting with Other Meeting Participants
The Microsoft Office Live Meeting client provides a number of ways that meeting participants
can interact with each other. If you want to communicate privately with another meeting
participant, you can use the chat feature. Or, if you want to ask the presenter a question, you can
use the Question and Answer feature.8 Getting Started with Microsoft Office Live Meeting
Using Chat
You can chat with other attendees or presenters during a meeting, such as when a presenter
suggests a break-out session to discuss a specific issue.
Note
You cannot chat if the presenter has disabled or blocked chat.
To chat with an attendee or presenter
1. In the Attendees pane, right-click the name of the attendee or presenter with whom you want
to chat, and then click Chat.
2. Type your comment or question in the text box, and then click Send. The chat between you
and the attendee appears in the box at the top.
Asking Questions
Use the Questions and Answers menu to communicate with the presenter during a presentation.
You might want to clarify an issue in the presentation, or raise your hand to get the presenter’s
attention to take the floor and address all attendees.
To ask a question
1. In the meeting client, click the Q&A menu.
2. Type your question in the Q&A text box, and then click Ask.
3. After you click Ask, the button name changes to Edit. When you receive a response, it will
appear in the large box in the Questions and Answers box.
To raise your hand
1. In the meeting client, click the Q&A menu.
2. In the Q&A box, click the Raise your hand icon.
Creating a Meeting
There are two methods for scheduling meetings in advance. You can use the Conferencing Add-
in for Microsoft® Office Outlook® messaging and collaboration client, or you can use the online
Microsoft Office Live Meeting Manager. You can also start instant, ad-hoc meetings using the
Meet Now option. This section talks about the following tasks:
Scheduling a meeting in advance
Starting an instant Meet Now meeting
Note
To create meetings, you must have a Live Meeting service account. Your
administrator will give you the account information you need to configure
Live Meeting.Getting Started with Microsoft Office Live Meeting 9
Scheduling a Meeting in Advance
With the Microsoft Office Live Meeting service, you can schedule meetings using the
Conferencing Add-in for Microsoft® Office Outlook® messaging and collaboration client or the
online Microsoft Office Live Meeting Manager.
To configure the Conferencing Add-in for Outlook
1. Install the Conferencing Add-in for Outlook on your computer according to your
administrator’s instructions.
2. In your Outlook Calendar, click Conferencing, and then click User Accounts.
3. In the User Accounts dialog box, under Live Meeting Service, do one of the following:
In the URL text box, type the URL of your Internet portal.
or
In the URL text box, type the URL of your Live Meeting conference center. Then select
the I enter a user name and password to access my account check box and, in the text
boxes provided, type your logon information.
4. To verify your login information, click Test Connection.
5. Click OK.
To schedule a meeting using the Conferencing Add-in for Outlook
1. In your Outlook calendar, click Schedule a Live Meeting.
Note
Some organizations subscribe to the Live Meeting service as well as host
Live Meeting on Office Communications Server internally. If your account is
configured to use both the Live Meeting service and Office Communications
Server, a drop-down list will appear and you can select Live Meeting service.
2. On the Appointment tab, in the Subject text box, type a description of your meeting. In the
To text box, enter the e-mail addresses for your invitees, separating each address with a
semi-colon.
3. To designate presenters, click Attendees/Presenters. In the Attendees list, click a name,
and then click Add. Click OK.
4. To choose the type of audio for your meeting, click Meeting Options, and then click Audio.
Do one of the following:
To allow participants to connect using a computer with a headset or microphone and
speakers, click Include computer audio conferencing.
If the meeting will involve many attendees and you want everyone to be muted for the
duration of the meeting, except the presenter, click Enable one-way Internet Audio
Broadcasting.
To allow participants to dial in to a conference call, click Include telephone
conferencing, and then fill in the remaining audio information.10 Getting Started with Microsoft Office Live Meeting
Note
If you want to give attendees the option of using either a computer or a
telephone to participate in the meeting, you can select both the Include
computer audio conferencing and the Include telephone conferencing check
boxes. When the meeting starts, one of the meeting presenters can connect
the computer audio with the telephone conferencing audio so that all
participants can hear one another; for instructions, see “Appendix C.
Connecting Computer Audio and Telephone Conferencing.”
To use Microsoft Office Live Meeting service to schedule a meeting
1. Open a Web browser and type the URL for your Microsoft Office Live Meeting service.
2. If necessary, enter your user ID and password.
3. Click Login to Live Meeting.
4. Under Meet, click Schedule Meeting.
5. In the Attendees text box, enter the e-mail addresses for your invitees, separating each
address with a semi-colon.
6. In the Presenters text box, enter the e-mail addresses for people whom you want to be able
to present in the meeting.
7. In the Subject text box, type a description of your meeting.
8. Adjust the Start and End dates and times as appropriate.
9. In the Audio drop-down box, choose the type of audio for your meeting. If you intend to use
a telephone conferencing service, click Meeting Options, click Audio, and then enter the
conferencing provider information. Click OK.
10. To set other meeting options, click Meeting Options. For details about each setting, at the
top of the page, click Help.
11. When you are finished entering meeting details, do one of the following:
Click Send Invitations to save the meeting and send invitations to attendees.
Note
You can select Send Invitations using your email client so that you can copy
and paste the meeting information into your own e-mail program, or you can
select Send Invitations using Live Meeting to allow Live Meeting to
automatically send the e-mails to invitees.
Click Save to save the meeting so you can send invitations later.Getting Started with Microsoft Office Live Meeting 11
Presenting in a Meeting
The Microsoft Office Live Meeting client has a streamlined design that puts the focus on the
content you are presenting. There are many ways you can present content and several options that
allow you to customize the meeting as needed. This section talks about the following tasks:
Presenting content during the meeting
Distributing handouts
Using breakout rooms
Presenting Content During the Meeting
During meetings, presenters can show a prepared presentation, or they can create new pages from
within the Microsoft Office Live Meeting client. You can import Microsoft Office PowerPoint®
presentation graphics program documents (.ppt).You can also upload Microsoft Office
documents, including Microsoft Office Word (.doc, .docx) and Microsoft Office Excel® (.xls,
.xlsx) documents.
To display a presentation or a document to attendees
1. Click Content, click Share, and then click Upload File (View Only).
2. Navigate to the file you want to add.
3. Click Open. The Upload File (View Only) dialog box appears, stating that files may be
scanned for viruses. Click Continue.
4. Microsoft Office Live Meeting converts the file to the Live Meeting format and adds it to the
Content list. The first file you upload automatically displays to the other meeting
participants.
Note
After you add additional files to the Content list, you can display them in the
meeting by clicking Content, and then clicking the file name. To navigate
through a file, use the arrows at the bottom of the window, as shown in
Figure 4 below. You can also use CTRL + up arrow and CTRL down arrow to
navigate through the file.
Figure 4. Page up and page down arrows
To insert a page into a presentation that has already been added to the meeting
1. Click Content, click the presentation into which you want to add a page, and then click
Thumbnails.12 Getting Started with Microsoft Office Live Meeting
2. In the Thumbnails pane, right-click the thumbnail directly above the point where you want
to insert the page, click Insert New Page, and then click the type of page you want to add
(Whiteboard, Web Page, Text Page, Poll, or Screen Snapshot.) The page is added below
the insertion point you specified in the existing presentation.
To create a whiteboard
1. Click Content, click Share, and then click Whiteboard.
2. When the Whiteboard opens, click the drawing and text tools at the bottom of the window
to create content.
To create a text page
1. Click Content, click Share, and then click Text Page.
2. When the text page opens, type your text.
To create a poll
1. Click Content, click Share, and then click Poll Page.
2. In the Create Poll dialog box, type a question, and then type labels for each choice.
3. Click OK.
To share a Web page
1. Click Content, click Share, and then click Web Page.
2. In the New Web Page dialog box, type the URL for the Web page to which you want to
point attendees.
3. Click Verify Web Page. The Web Page Check dialog box appears. If the Web page displays
correctly, click Create Web Page.
To share a snapshot of a portion of your screen
1. Click Content, click Share, and then click Screen Snapshot.
2. Position the frame over the area of your screen that you want to share, and then click the
camera icon. You can resize the frame as necessary.
Using Shared Notes
With the shared notes feature, you can take and save notes that you can also share with attendees
during the meeting. You can also give attendees permission to add and save notes.
To add notes
1. In the command bar, click the Shared Notes icon.
2. In the text box, type your notes.
To save notes
1. In the command bar, click the Shared Notes icon.
2. Click the save icon.
3. In the Save As dialog box, choose the location in which you would like to save the notes.Getting Started with Microsoft Office Live Meeting 13
4. Click Save.
To view shared notes
In the command bar, click the Shared Notes icon.
To give attendee permission a view, add, and save notes
1. On the command bar, click Attendees to display the Attendees pane.
2. On the Attendees pane, click the More icon, and select Permissions.
3. On the Attendee Permissions dialog box, under the Share Notes area, select the appropriate
permissions you want to give to attendees.
Distributing Handouts
As the presenter, you can upload handouts to the meeting for attendees to download. You can
upload the handouts either before the meeting (recommended) or during the meeting. Live
Meeting scans the file for viruses as the file is being uploaded.
To upload handouts to the meeting
1. In the menu bar, click the Handouts icon.
2. Click Upload. If you do not see the file you are looking for, use the Files of Type drop-down
list to select the file type you want to add.
3. Navigate to the file on your computer, and then click Open.
4. Repeat the above steps for each file you want to add. When you are finished, close the
Handouts dialog box.
To download handouts
1. Click the Handouts icon.
2. Click the file you want to download, and then click Download.
3. Navigate to the location on your computer where you want to save the file.
4. Click OK.
Managing Questions and Answers
Presenters can use the Q&A pane to review and respond to attendee questions. The Q&A pane
identifies the person who asked the question and the time that the question was posted. You can
view, print, and save a log of all questions that have been asked during the meeting, along with
any answers provided.
To display the Q&A pane
In the command bar, click Q&A. The Q&A pane appears with a list of all questions received
from attendees.
To answer a question for all attendees
1. In the Q&A pane, click the Manage tab.14 Getting Started with Microsoft Office Live Meeting
2. Click the question that you want to answer.
3. In the answer box, enter your response, and then click Reply to All. The question appears
with your answer in the Q&A pane of every meeting participant.
To answer a question privately
1. In Q&A pane, click the Manage tab.
2. Click the question that you want to answer.
3. In the answer box, enter your response, and then click Reply Privately. The question
appears with your answer in the Q&A pane of the person who asked the question.
Note
The question and answer also appear in the Q&A pane of any other
presenters in the meeting
To give the floor to the person who asked the question
1. In the Q&A pane, click the Manage tab.
2. Click the question that you want to answer.
3. On the menu bar, click Give the Floor to give the floor to the person who asked the
question. The questions and answers will appear in the Q&A pane of every meeting
participant.
To respond to someone who raised their hand
1. In the Q&A pane, click the Manage tab.
2. If a hand icon is displayed next to the person’s name, you can respond to the person by
chatting with them or giving them the floor.
To view and save a log of question and answer activity
1. In the Q&A pane, click the Manage tab, and then click the View the Q&A Log icon.
2. The meeting text log of all questions and answers will be displayed in a browser window.
Using your browser commands, print or save the log.
Using Breakout Rooms
Breakout rooms are a feature of the Microsoft Office Live Meeting service. During a meeting,
presenters can use breakout rooms to create separate meeting spaces. You can divide attendees
among the rooms, either manually or automatically, and allow each group to meet separately.
After the breakout sessions are over, you can bring everyone back to the main meeting.
To set up breakout rooms
1. During the meeting, click Attendees, and then click Rooms.
Note
You may need to click the More button (>>) to see Rooms.Getting Started with Microsoft Office Live Meeting 15
2. Specify the number of rooms you want to create.
3. If you chose Manually Assign, you can drag attendees to specific rooms. In the Attendees
pane, click an attendee’s name, and then drag the attendee’s name to a room.
4. To activate the breakout rooms, in the Attendees pane, click Start. All attendees will see a
transition page, and then they will move to their assigned rooms. Within the breakout room,
attendees and presenters can perform the usual meeting tasks.
5. To send everyone back to the main room, you must first stop the breakout rooms. In the
Attendees pane, click Stop.
Note
Optionally, you can clean up the breakout rooms and any content that was
created by clicking Options, and then clicking Delete Contents of All
Breakout Rooms or Delete All Breakout Rooms.
Starting an Instant Meet Now Meeting
You can start a meeting at any time without scheduling it in advance by using the Meet Now
option. After you start the meeting, you can invite the other attendees.
Your account must be configured before you use the Meet Now feature for the first time. If you
have not already configured your account, follow the steps below.
To configure your account
1. Click Start.
2. Click All Programs, click Microsoft Office Live Meeting 2007, and then click Microsoft
Office Live Meeting 2007.
3. On the Welcome to Microsoft Office Live Meeting page, if this is the first time you opened
Office Live Meeting, the User Accounts dialog box will appear.
Note
If the User Accounts dialog box does not appear, you can open it by clicking
the Menu button in the upper left, and then clicking Open User Accounts.
4. In the User Accounts dialog box, under Live Meeting Service, do one of the following:
In the URL text box, type the URL of your Internet portal.
or
In the URL text box, type the URL of your Live Meeting conference center. Then select
the I enter a user name and password to access my account check box and, in the text
boxes provided, type your logon information.
5. Click Test Connection.
6. Click OK.16 Getting Started with Microsoft Office Live Meeting
To start an instant Meet Now meeting
1. Click Start.
2. Click All Programs, click Microsoft Office Live Meeting 2007, and then click Microsoft
Office Live Meeting 2007.
Note
Depending on your organization, you may be able to choose whether to host
your meeting on Office Communications Server 2007 or the Office Live
Meeting service. To select your preference, click the Menu button, click Meet
Now Account, and then click Office Communications Server 2007 or Office
Live Meeting 2007 service.
3. On the Welcome to Microsoft Office Live Meeting page, click Meet Now. The meeting
starts.
4. To invite participants to your Meet Now meeting, click Attendees.
5. In the Attendees pane, click Invite, and then click By E-mail.
6. In the To box of the e-mail invitation, type the e-mail addresses for your participants,
separating each address by a semi-colon.
7. To send the invitation, click Send.
Recording a Meeting
Meeting organizers and presenters can enable recording for their meetings and allow you to save
the recording to your Live Meeting service conference center or your computer.
To set your recording options
1. Click Recording. If the recording pane contains both a To My Computer tab and a To
Service tab, click one to specify where you want to save the recording.
2. Click Options.
3. In the Personal Recording Options dialog box, select all of the meeting options you want to
record (including Data, Voice, Video, and Panoramic Video).
4. If you want to change the location where the recorded meeting is saved, next to the Save To
text box, click Change, and then navigate to the folder where you want to save your
recording.
To record a meeting
1. In the Recording pane, click Record.
2. If the meeting uses computer audio, no further configuration is necessary. If the meeting uses
telephone conferencing and you want to record audio but you have not yet joined the
conference call, an Audio Not Configured dialog box appears. Select the Configure audio
radio button, and then click OK. In the Telephone Audio Recording Configuration dialog
box, in the Dialing keys text box, type the appropriate information, and then clickGetting Started with Microsoft Office Live Meeting 17
Configure. When the message Your meeting is now ready to record audio from (phone
number) message appears, click Done.
Note
When you use this method to connect to the conference call, there is an
approximately one-minute delay before the meeting audio connects to the
conference call and the audio begins recording.
3. To save your recording, click the Stop icon, select Save Recording, and then click OK.
4. To check the status of your recording, click Start, click All Programs, click Microsoft
Office Live Meeting 2007, and then click Microsoft Office Live Meeting Recording
Manager.
To view a recording that is saved to your computer
1. Click the Start menu on your computer, click All Programs, click Microsoft Office Live
Meeting 2007, and then click Microsoft Office Live Meeting Recording Manager.
2. In the Live Meeting Recording Manager dialog box, under Recent Recording, right-click
the recording name, and then click Play.
To view a recording that is saved to your Live Meeting conference center (To Service)
1. Log on to Live Meeting Manager.
2. On the My Home page, under View, click Recordings.
3. Under View recording, in the ID and Recording Key boxes, enter the recording ID and the
recording key, respectively. By default, the recording key is the same as the meeting key. If
the meeting did not require a meeting key, then by default no recording key is required.18 Getting Started with Microsoft Office Live Meeting
Appendix A. Features Not Available in the Web-
Based Client
When you are using the Web-based client in Microsoft Office Live Meeting Service, there are
some limitations. The features that are available in the Windows-based client, but not the Web-
based client, are listed below.
Computer audio
Webcam and Microsoft RoundTable video
Viewing audio status for attendees
Docking menu panes
Keyboard navigation and shortcuts
Sharing a single application
Using desktop sharing and frame sharing when running on Windows® (these features are
available when running on Sun® Solaris™ or Apple® Macintosh®)
Creating and sharing a screen snapshot
Saving Shared Notes by using the Save icon
High fidelity PowerPoint rendering and slide animation
Controlling synchronized playback of multimedia content
Uploading and deleting handouts (the Web-based client supports downloading handouts)
Breakout room setup and management (breakout rooms are supported, but setup and
management must be done using a Windows-based client)
Personal recording
Localized user interface (only English is available)Getting Started with Microsoft Office Live Meeting 19
Appendix B. Microsoft Office Live Meeting Web
Access Software Requirements
To run Live Meeting Web Access, your computer must meet the minimum requirements listed in
the table below. These are minimum system requirements that have been tested and are
supported. Live Meeting Web Access requires a Java™ Virtual Machine (JVM™) to be installed
and running. Live Meeting Web Access may load and run correctly on other operating system,
browser, and Java™ Virtual Machine combinations, but other combinations are not supported.
Browser Operating System Java Virtual Machines
Internet Explorer® 6.0 with SP2 Windows XP SP2 Microsoft Java Virtual
Machine (JVM) 1.1,
Sun® 1.5.11, 1.6.x
Internet Explorer 7 Windows XP SP2 Sun® 1.5.11, 1.6.x
Internet Explorer® 6.0 with SP1 Windows XP SP1a Microsoft® JVM 1.1,
Sun® 1.5.11, 1.6.x
Internet Explorer 6.0 with SP1 Windows 2000 SP4 Microsoft JVM 1.1,
Sun® 1.5.11, 1.6.x
Internet Explorer 6.0 with SP1 Windows 98 SE Microsoft JVM 1.1,
Sun® 1.5.11, 1.6.x
Internet Explorer 7 Windows Vista Sun® 1.6.x
Firefox 2.0 Windows XP SP2 Sun® 1.5.11, 1.6.x
Safari 2.0™ MAC OS® X V10.4 Apple® Java™ 1.4.2
Safari 1.3™ MAC OS® X V10.3 Apple® Java™ 1.4.2
Mozilla 1.7 Solaris 10™ Sun® 1.5.11, 1.6.x
The following additional software is required:
Microsoft Office PowerPoint® 2000 presentation graphics program or later, or Microsoft
Office Standard Edition or Professional Edition (which includes PowerPoint software) to
upload presentations.
Adobe® Flash® Player version 9 or higher to view multi-media data content slides.
To view slides with audio or video content in the meeting:
Windows Media® technologies player, version 9 or 10 (version is checked when the
meeting client starts) to view Windows Media content in the meeting.
Apple® QuickTime® player and the Windows and the Windows Media Components for
QuickTime by Flip4Mac™ on the Apple® Macintosh® platform.
Windows Media Player Firefox Plugin when using Firefox on Windows XP.20 Getting Started with Microsoft Office Live Meeting
Appendix C. Connecting Computer Audio and
Telephone Conferencing
With the Microsoft Office Live Meeting service, the meeting organizer can set up a meeting to
use both computer audio and telephone conferencing. The meeting organizer must choose both
Include computer audio conferencing and Include telephone conferencing when scheduling
the meeting. Then, when the meeting starts, any presenter can connect the audio so that computer
users and telephone conferencing users can hear one another.
After the meeting starts, any presenter can perform the following steps to connect the audio.
To connect computer audio and telephone conferencing during a meeting
1. Join the meeting.
2. If you are automatically connected to computer audio, click Voice & Video. In the Voice &
Video pane, click the down arrow next to the phone icon, and then click End computer call
and connect with my phone.
Note
If this is the first time you have joined a telephone conference, the New
Phone Number dialog box will appear. Type your area code and your phone
number, and then click OK.
3. In the Enable Call Controls dialog box, if you want to activate the telephone conference,
select the Leader button, type the leader code, and then click Join. If the telephone
conference is already activated, select the Participant button, and then click Join. The
conferencing service will call you.
4. In the Voice & Video pane, click the More (>>) button if necessary, click Options, and then
click Connect Telephone and Computer Audio.
5. In the Dialing keys text box, type the participant code, along with any necessary pauses and
additional characters. A one-second pause is represented by a “p.” For example, entering
ppppp123456#ppppp# does the following:
Pauses for 5 seconds after the conference center telephone number is dialed.
Sends the participant code 123456 and a pound sign (#).
Pauses 5 more seconds (for example to allow a user to speak his or her name) and then
sends another pound sign (#).
6. Click Connect.You can also read