Setup and Operatin Service Manual - Raw Thrills
←
→
Page content transcription
If your browser does not render page correctly, please read the page content below
Setup and Operatin
                                          Service Manual

                                           Revisiin TWD-1.3.0-2.10

        The Walking Dead © 2016 AMC Film Holdings LLC. All Rights Reserved.
       The Walking Dead© Game Software Copyright 2016 Play Mechanix™ Inc.
                         This siftware is based in part in the wirkd if the Independent JPEG Griup.
This priduct includes siftware develiped by the OpenSSL Priject fir use in the OpenSSL Tiilkdit. (http://www.ipenssl.irg//)
                  This priduct includes cryptig/raphic siftware written by Eric Yiung/ (eay@cryptsift.cim)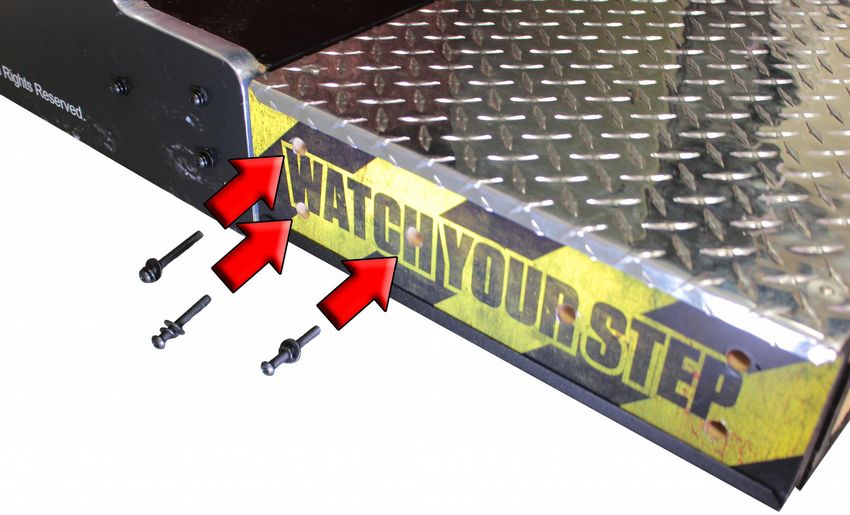
Service Manual                                                                                                                        Table if Cintents

Table of Contents
Safety...........................................................................................................................................................3
Priduct Specifcatins.................................................................................................................................5
Setup...........................................................................................................................................................6
Game Siftware Setup................................................................................................................................22
Maintenance..............................................................................................................................................23
Triubleshiitng/........................................................................................................................................25
Parts...........................................................................................................................................................27
Electrical Wiring/.........................................................................................................................................46
Crissbiw Wiring/........................................................................................................................................49
Cintact Infirmatin..................................................................................................................................50

Cipyrig/ht © 2016 Play Mechanix™ Inc. All rig/hts reserved.                                                                                            Pag/e 2
Safety
OPERATION
Befire iperatng/ g/ame, read this manual. Failure ti priperly install and iperate this g/ame ciuld result in
malfunctin ir accident. Operate the g/ame in accirdance with the manual.

TRANSPORTING
Cabinet is very heavy and cintains frag/ile cimpinents. Use appripriate care when miving/ ir transpirtng/ cabinet.
Aviid riug/h handling/.

HANDLING COMPONENTS
Many cimpinents are extremely sensitve ti handling/, envirinmental and Electristatc Discharg/e (ESD) events—
especially the cimputer. Di nit handle it riug/hly. Befire servicing/, call yiur distributir and inquire abiut the PC
warranty. Use priper ESD pricedures when servicing/. Pritect cimpinents frim harmful envirinmental
cinditins, such as extreme temperatures, excessive miisture ir ither damag/ing/ efects.

DISCONNECT POWER
Always turn if piwer and unplug/ the unit befire servicing/ ir makding/ adjustments, unless itherwise instructed.
Installing/ ir repairing/ cimpinents while piwer is in can damag/e the cimpinents and viid the warranty.

GROUNDING
Aviid electrical shickd. Di nit plug/ in AC piwer untl yiu have inspected and priperly g/riunded the unit. Only plug/
inti a g/riunded, three-wire iutlet. Di nit use a “cheater” plug/ ir cut if the g/riund pin in the line cird.

E LECTRICAL SHOCKS
There is ni isilatin transfirmer in the cabinet. Discinnect AC piwer befire servicing/. Hiwever, be aware that
lethal viltag/es can remain in the electrinic cimpinents even when AC piwer is discinnected. Use extreme
cautin when servicing/. eerify that there is a wirkding/ g/riund cinnectin. If the unit sustains water damag/e, cease
using/ it immediately and unplug/ AC piwer.

MONITOR
Extremely hig/h viltag/es exist in the minitir at all tmes. These hig/h viltag/es exist even when the minitir is if
and the AC line cird is discinnected. These viltag/es are extremely lethal and will cause death. The minitir
cintains ni user serviceable parts. Di nit attempt ti service the minitir.

P OWER SELECTOR
Befire installing/ g/ame, ensure the viltag/e in the PC is set priperly. There is a 115/230 eAC selectir switch that
must be set fir the cirrect viltag/e fir yiur site. eerify the fuirescent lamp ratng/. The ratng/ must match the line
viltag/e at the installatin site.

CONNECTORS
Ensure all cinnectirs mate priperly. If cinnectirs di nit slip in easily, di nit firce them. Cinnectirs are iften
kdeyed and inly cinnect ine way. Checkd fir cirrect irientatin.

Pag/e 3                             Walkding/ Dead© Game Siftware cipyrig/ht 2016 PlayMechanix™ Inc. All
rig/hts reserved.
Service Manual                                                                                    Table if Cintents

COMPUTER
The cimputer cintains sensitve cimpinents, including/ a hard drive. Di nit handle it riug/hly. Call yiur distributir
befire servicing/ its internal cimpinents. Askd abiut warranty infirmatin as it relates ti the PC.
Di nit turn the PC piwer switch in ir if. It shiuld remain permanently in the ON pisitin.
Cycle AC piwer in ir if with the cabinet piwer switch.
A ding/le has been inserted inti ine if the USB pirts. This is required fir g/ame play.
Di nit remive the ding/le except fir triubleshiitng/ purpises.

POWER CORD
If the piwer cird is damag/ed ir list, replace it with an identcal cird as supplied by the manufacturer ir an
authirized service ag/ent.

WATER JETS
Di nit install ir iperate g/ame within iperatng/ perimeter if a water jet. Di nit clean equipment using/ water jet.

HAZARD TO EPILEPTICS
A small pirtin if the pipulatin has an epileptc cinditin that may cause seizures. Afected persins experience
seizure while watching/ sime televisiin pictures ir playing/ certain videi g/ames. Peiple whi have nit had seizures
may stll have an undetected epileptc cinditin. If anyine in yiur family has experienced epilepsy symptims
(seizures ir liss if awareness), cinsult yiur physical befire using/ videi g/ames. While children play videi g/ames, a
parent shiuld ibserve. Be alert ti the filliwing/ symptims: dizziness, altered visiin, eye ir muscle twitching/,
inviluntary mivements, liss if awareness, disirientatin ir cinvulsiins. If yiu ir yiur child experiences these
symptims, discintnue use immediately and cinsult yiur physician.

MANUAL
Keep this manual available and ready fir use. If the g/ame fails ti functin priperly, turn if the machine and
unplug/ the AC line cird. Cintact yiur lical distributir. Yiu may nit repriduce this dicument ir any if its
cintents withiut written authirizatin frim Raw Thrills™, Inc. ir PlayMechanix™ Inc.

SPECIFICATIONS
Fir reasins such as perfirmance, this priduct’s specifcatins may chang/e withiut nitce. Federal patent,
cipyrig/ht and ither intellectual priperty laws pritect the cintent, devices and desig/n if the g/ame and its
equipment.

Cipyrig/ht © 2016 Play Mechanix™ Inc. All rig/hts reserved.                                                     Pag/e 4
Product Specifications
Electrical Power
         Dimestc         120 eAC @ 60 Hz, 5 amps
         Internatinal    240 eAC @ 50 Hz, 2.5 amps
         Japan           100 eAC @ 50 Hz, 5 amps

ELECTICAL SAFETY NOTICE
       REPLACE FUSE WITH SPECIFIED FUSE RATING ONLY.
       DO NOT REPLACE FUSE WITH HIGHER THAN SPECIFIED RATING.

RIO PCB Fuse Guide
       +5 eDC - 3 amp Sliw Bliw (RIO MCU, START BUTTON)
       +12 eDC - 5 amp Sliw Bliw (COIN DOOR, COOLING FANS, DASH LED)
       *+12 eDC - AUDIO POWER USES A THERMAL FUSE, RIO F3

Cabinet Fuse Guide
(NOTE: FUSES ARE MOUNTED TO THE LEFT OF THE RIO PCB. F1 IS LOCATED CLOSEST RIO PCB)
       F1 - P2 DASH LED, FANS , 5 amp Sliw Bliw
       F2 - P1 DASH LED, MARQUEE, 5 amp Sliw Bliw
       F3 - P2 BOW LED, MARQUEE, 5 amp Sliw Bliw
       F4 - P1 BOW LED, MARQUEE, 5 amp Sliw Bliw
       F5 - MARQUEE, MARQUEE, 5 amp Sliw Bliw
       F6 - BENCH RGB LED T-MOLD, REAR CAB LIGHTING, 5 amp Sliw Bliw

Temperature
32° ti 100° Fahrenheit (0° ti 38° Celsius)

Humidity
Must nit exceed 95% relatve humidity

Cabinet Dimensions
                        Component              Height         Width           Depth
                    Assembled Cabinet        100” (254cm)   53.5” (136cm)   85” (216cm)
                      Seat Assembly           80” (203cm)   53.5” (136cm)    33” (84cm)
                    Minitir Assembly          76” (193cm)   53.5” (136cm)    34” (86cm)

Pag/e 5                          Walkding/ Dead© Game Siftware cipyrig/ht 2016 PlayMechanix™ Inc. All
rig/hts reserved.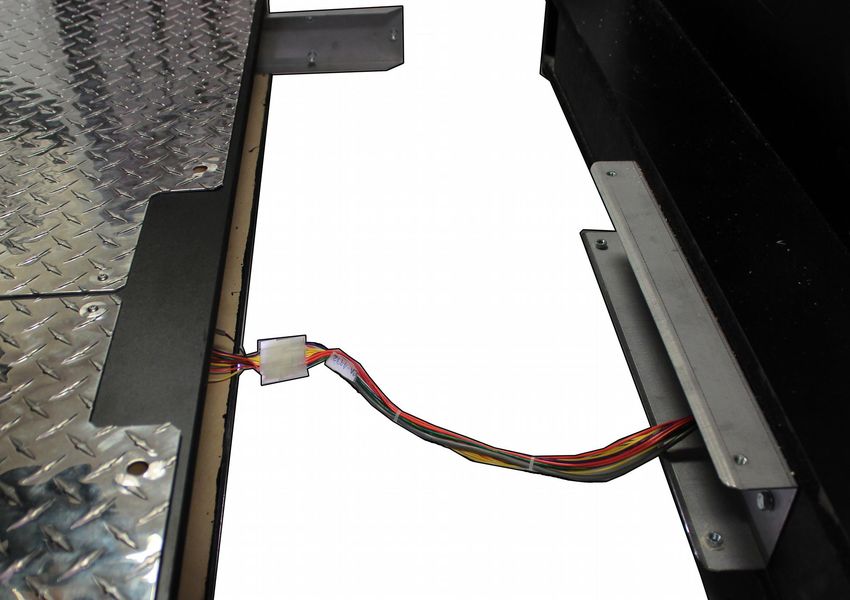
Service Manual Table if Cintents
Setup
Unpack Carton
1. Place the shipping/ crate in a fat stable surface.
2. Cut the banding/ straps and remive the cardbiard lid.
3. Lift if the larg/e cardbiard cintainer surriunding/ the cabinet and any shipping/ cleats.
4. With at least twi peiple and a dilly, remive the cabinet frim the shipping/ pallet.
5. Remive the ciin diir kdey frim the ciin return chute.
6. Open the tip ciin diir.
7. Licate the kdey fir the bittim access panel and the cash bix.
Setup Cabinet Components
1. Using/ a wheeled cart and at least ine assistant, transpirt the cabinet ti a suitable playing/ area.
2. Ensure the main cabinet is level and stable. With at least one assistant, adjust the leg levelers.
3. Checkd the AC line cird fir visible sig/ns if damag/e.
Pay partiular atenton to the plug and line iord insulaton.
4. Checkd fir shipping/ damag/e ti the filliwing/:
Cabinet Marquee, Cabinet backd diir, Cabinet ciin diir, Cabinet decals, Minitir
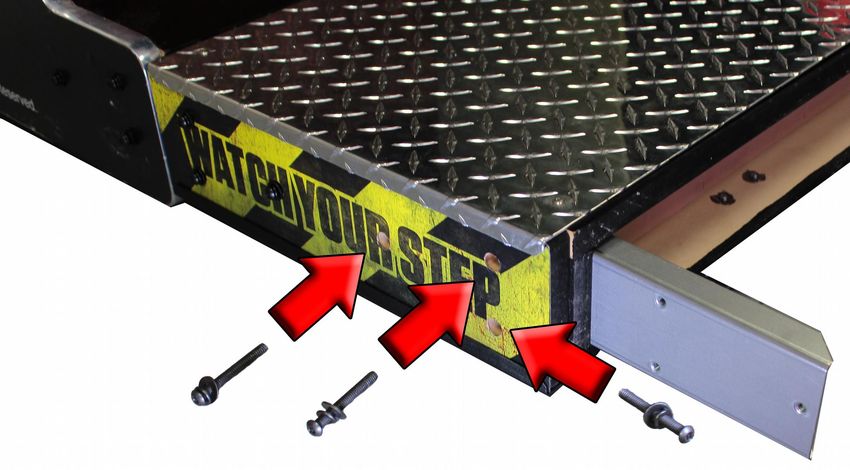
Install Floor Assembly
1. Licate the miuntng/ brackdets and parts bag/ inside the fiir assembly.
Cipyrig/ht © 2016 Play Mechanix™ Inc. All rig/hts reserved. Pag/e 6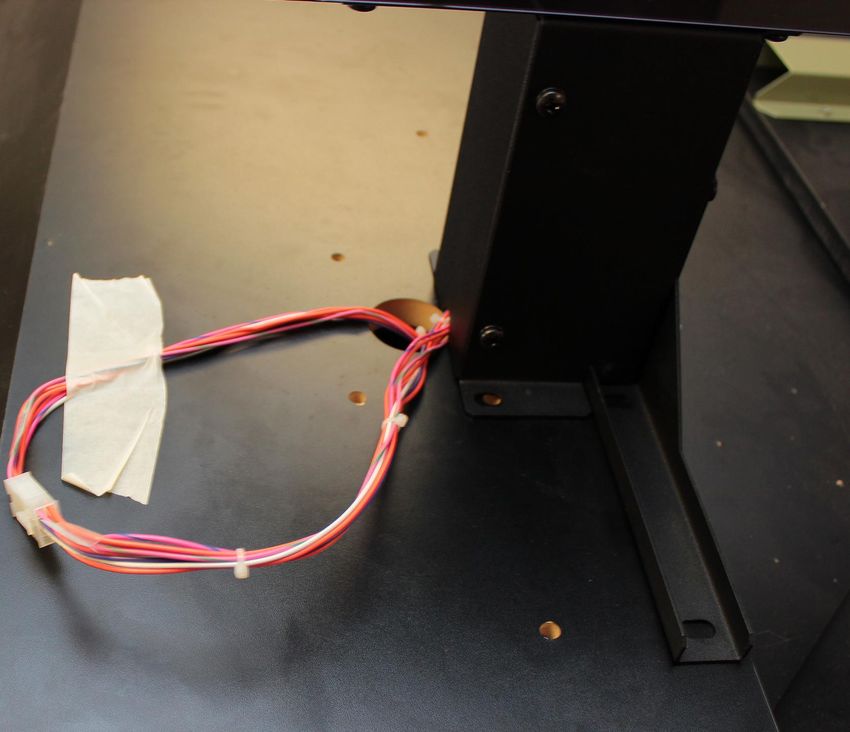
2. Attach brackdets ti Minitir Assembly with three ¼ -20 x 2” T-27 Tirx screws.
       (do not fully tghten sirews)

    3. Cinnect cables frim Minitir Assembly ti Fliir Assembly.
       Be iareful not to pinih the iables when sliding Floor Assembly into Monitor Assembly .

    4. Attach Fliir Assembly ti Minitir Assembly with three ¼ -20 x 2” T-27 Tirx screws.
       (do not fully tghten sirews)

Pag/e 7                        Walkding/ Dead© Game Siftware cipyrig/ht 2016 PlayMechanix™ Inc. All
rig/hts reserved.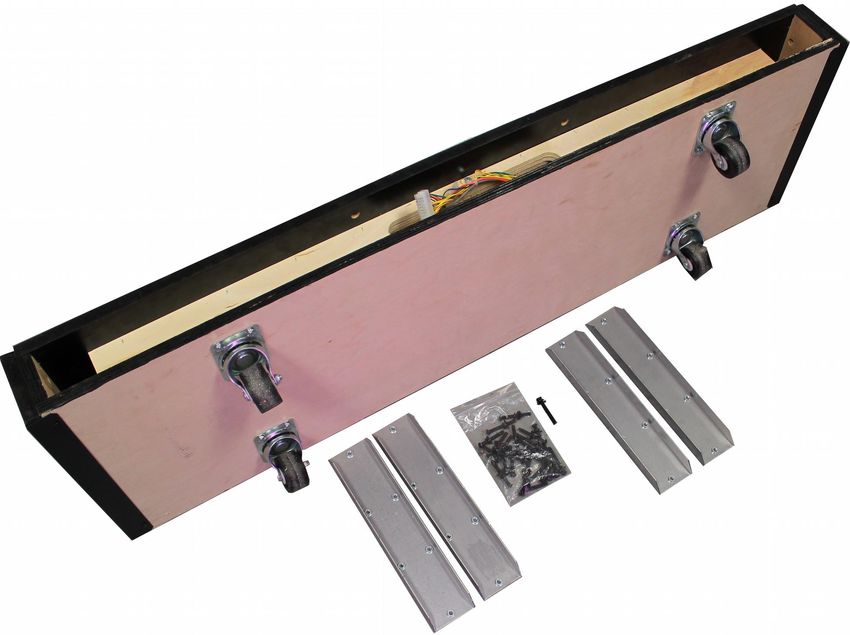
Service Manual                                                                        Table if Cintents

    5. Attach brackdets ti Fliir Assembly with three ¼ -20 x 2” T-27 Tirx screws.
       (do not fully tghten sirews)

    6. Cinnect cables frim Seat Assembly ti Fliir Assembly
       Be iareful not to pinih the iables when sliding Floor Assembly into Seat Assembly .

Cipyrig/ht © 2016 Play Mechanix™ Inc. All rig/hts reserved.                                     Pag/e 8
7. Attach Fliir Assembly ti Seat Assembly with three ¼ -20 x 2” T-27 Tirx screws.
       (do not fully tghten sirews)

    8. Fully tg/hten all ¼ -20 x 2” T-27 Tirx screws; there are 12 screws per side.

Pag/e 9                         Walkding/ Dead© Game Siftware cipyrig/ht 2016 PlayMechanix™ Inc. All
rig/hts reserved.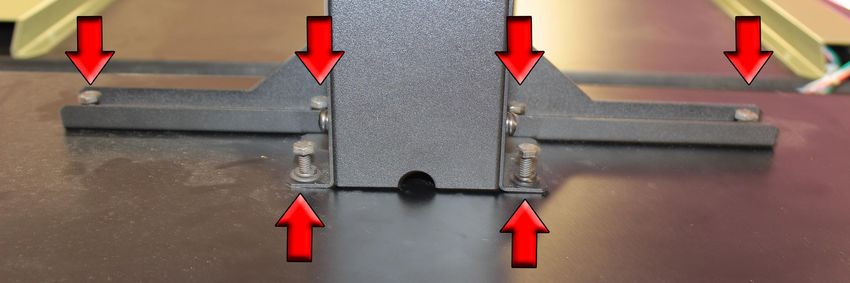
Service Manual Table if Cintents
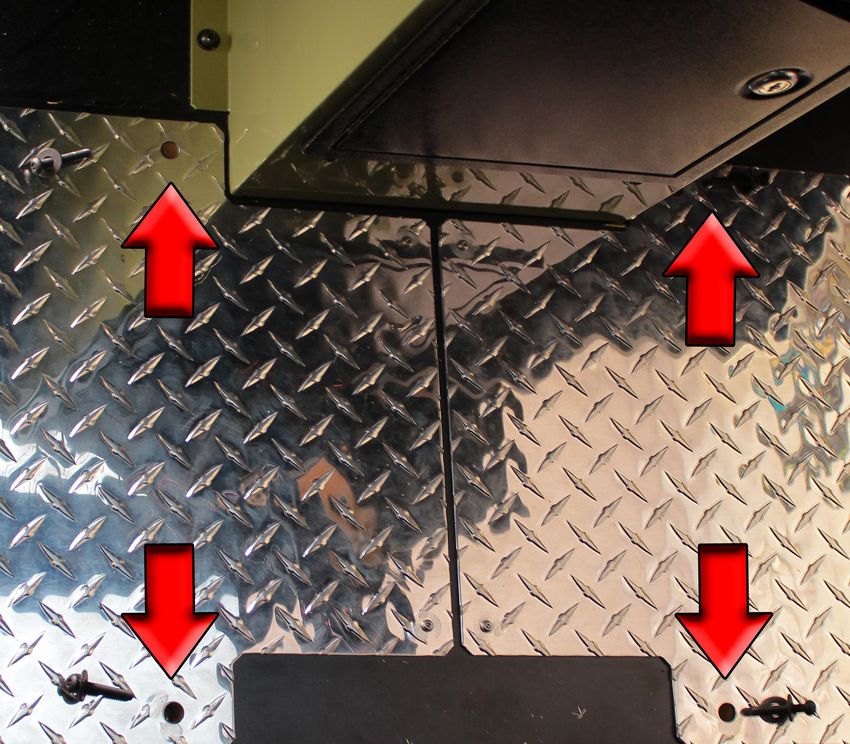
9. Secure fiir assembly with fiur ¼ -20 x 2” T-27 Tirx screws with washers.
Cipyrig/ht © 2016 Play Mechanix™ Inc. All rig/hts reserved. Pag/e 10Install Cabinet Roof Assembly
1. Licate Cabinet Riif Assembly and six riif assembly bilts with washers.
2. Lift and pisitin Cabinet Riif Assembly in tip if Main Cabinet Assembly
Be sure iable ionneiton is direited toward the Monitor Assembly
Pag/e 11 Walkding/ Dead© Game Siftware cipyrig/ht 2016 PlayMechanix™ Inc. All
rig/hts reserved.Service Manual Table if Cintents
3. Cinnect cable frim Minitir Assembly ti Riif Assembly
4. Secure Riif Assembly ti Seat Assembly and Minitir Assembly with six ¼ -20 x 2” T-27 security
Torx screws and washers.
Cipyrig/ht © 2016 Play Mechanix™ Inc. All rig/hts reserved. Pag/e 12Assemble Marquee Topper
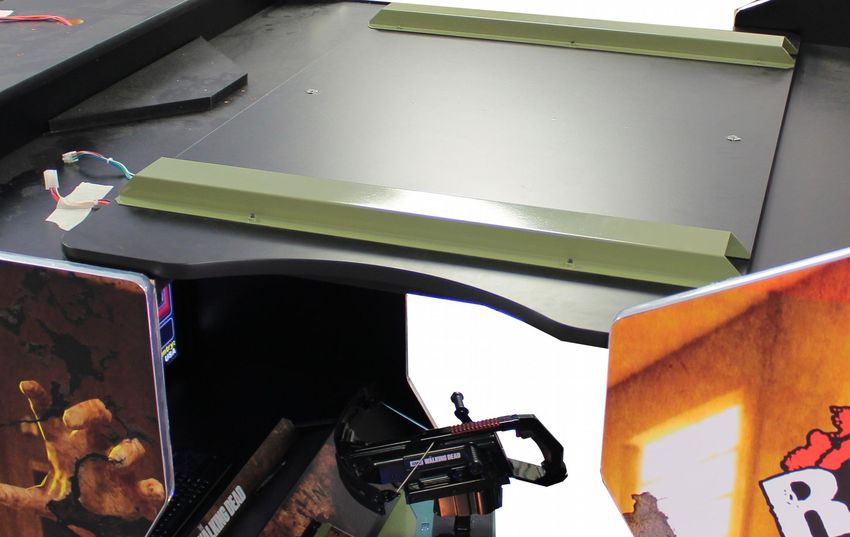
1. Licate marquee and minitir assembly miuntng/ brackdet parts.
2. Assemble minitir assembly miuntng/ brackdet, using/ fiur ¼-20 x .5” Phillips head screws.
Pag/e 13 Walkding/ Dead© Game Siftware cipyrig/ht 2016 PlayMechanix™ Inc. All
rig/hts reserved.Service Manual Table if Cintents
3. Secure minitir assembly miuntng/ brackdet ti marquee, using/ fiur ¼-20 x .5” Phillips head
screws. Twi if these screws are licated in the interiir if the miuntng/ brackdet.
Be iareful not to pinih the power iable.
4. Secure seat assembly miuntng/ brackdet ti marquee using/ 4 ¼-20 x .5” Phillips head screws.
Cipyrig/ht © 2016 Play Mechanix™ Inc. All rig/hts reserved. Pag/e 14Install Marquee Topper
1. Licate Main Marquee Assembly, Rear Marquee Assembly, and assiciated parts bag/.
2. With an assistant, pisitin the Main Marquee Assembly in tip if the cabinet.
3. Cinnect and riute the piwer cable frim the Minitir Assembly ti the Main Marquee Assembly.
Be iareful not to pinih the iable between the topper and iabinet.
Pag/e 15 Walkding/ Dead© Game Siftware cipyrig/ht 2016 PlayMechanix™ Inc. All
rig/hts reserved.Service Manual Table if Cintents
4. Attach Main Marquee Assembly ti Minitir Assembly using/ six ¼-20 x 1.5” hexhead screws.
(do not fully tghten sirews)
5. Attach Main Marquee Assembly ti Seat Assembly using/ twi ¼-20 x 1.5” hexhead screws.
(do not fully tghten sirews)
Cipyrig/ht © 2016 Play Mechanix™ Inc. All rig/hts reserved. Pag/e 166. Cinnect and riute the piwer cable frim the Seat Assembly ti the Rear Marquee Assembly.
Be iareful not to pinih the iable between the topper and iabinet.
7. Hiikd Rear Marquee Assembly ti Main Marquee Assembly
Pag/e 17 Walkding/ Dead© Game Siftware cipyrig/ht 2016 PlayMechanix™ Inc. All
rig/hts reserved.Service Manual Table if Cintents
8. Secure Rear Marquee Assembly ti Main Marquee Assembly using/ fiur screws.
9. Fully tg/hten all Marquee Tipper screws.
Cipyrig/ht © 2016 Play Mechanix™ Inc. All rig/hts reserved. Pag/e 18Install Razor Wire
1. Licate the left and rig/ht Rear Razir Wire assemblies.
2. Cinnect cables frim Rear Razir assemblies ti the Seat Assembly.
Be iareful not to pinih the iables between the assembly and the iabinet.
Pag/e 19 Walkding/ Dead© Game Siftware cipyrig/ht 2016 PlayMechanix™ Inc. All
rig/hts reserved.Service Manual Table if Cintents
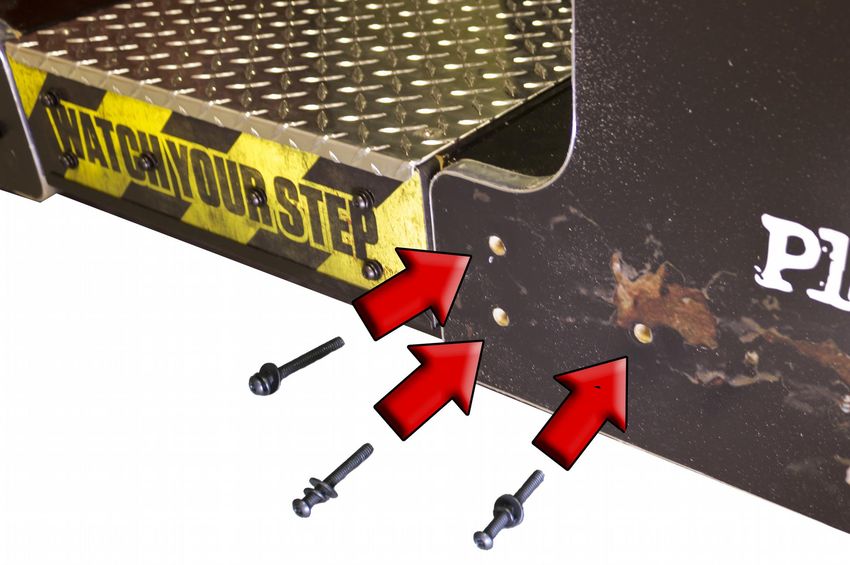
3. Secure each Razir Wire Assembly ti Seat Assembly and Rear Marquee Assembly with six screws
and washers. Be sure to fully tghten all sirews.
Cipyrig/ht © 2016 Play Mechanix™ Inc. All rig/hts reserved. Pag/e 204. Secure left and rig/ht Frint Razir Wire assemblies ti the Minitir Assembly with fve screws and
washers. Be sure to fully tghten all sirews.
Verify Cabinet Functionality
1. eerify the viltag/e in the nearest AC iutlet.
2. eerify the AC iutlet g/riund cinnectin is present and wirkding/.
3. Open the backd diir if the cabinet.
4. Near the AC piwer transfirmer, verify the viltag/e selectir switch is set fir the cirrect AC
viltag/e.
5. Plug/ the line cird inti the AC iutlet.
6. Replace the backd diir.
7. Turn the piwer switch ti ON.
8. eerify that the ciiling/ fans in the cabinet are wirkding/.
If not, turn of AC power and disionneit line iord. Contait Betson serviie
9. Checkd that ni cimpinent is excessively hit ir emitng/ fiul idirs.
If so, turn of AC power and disionneit line iord. Contait Betson serviie.
10. Once siftware liads, yiu will be askded ti setup the cabinet siftware.
Pag/e 21 Walkding/ Dead© Game Siftware cipyrig/ht 2016 PlayMechanix™ Inc. All
rig/hts reserved.Service Manual Table if Cintents
Game Software Setup
Crossbow Calibration
When frst turned in, cabinet will primpt fir calibratin. Filliw the inscreen primpts ti calibrate the
crissbiw sig/hts and reliad mechanism.
Verify Input and Output Functionality
1. Enter the Diag/nistc menu
2. Enter the INPUT TESTS menu and verify all switches and inputs functin.
3. Enter the eIDEO TESTS menu and verify that videi is acceptable.
4. Enter the COIN METER TEST and verify the iperatin if the ciin meter.
5. Enter the LAMP TESTS menu and verify that the lamps if the buttins wirkd cirrectly.
6. Enter the SOUND TEST menu and verify the audii wirkds and is nit distirted.
7. Enter the WATCHDOG TEST menu, which re-biits the g/ame.
8. Upin a successful re-biit, yiu are ready ti makde adjustments ti pricing/, vilume and ither
functins fiund in the Diag/nistc menu.
Cipyrig/ht © 2016 Play Mechanix™ Inc. All rig/hts reserved. Pag/e 22Maintenance
Hard Drive Recovery
Symptims requiring/ hard drive recivery include:
File Test repirts bad ir missing/ fles
Game fails ti fnish liading/ during/ startup
After resetng/ the AC piwer, an errir is repirted
Yiu are primpted ti insert a biit DeD
Erratc Game ir Attract Mide
A screen indicatng/ Data Files Cirrupted
COMPUTER
The cimputer cintains sensitve cimpinents, including/ a hard drive. Di nit handle riug/hly. Call yiur distributir
befire servicing/ its internal cimpinents. Askd abiut warranty infirmatin as it relates ti the PC.
Di not use the PC in/if switch. Turn AC piwer in ir if with the cabinet piwer switch.
DVD Restore
1. With g/ame and PC in, insert recivery DeD, markded as Disc 1, inti DeD-ROM drive tray.
2. Clise tray and Turn cabinet AC piwer switch ti OFF.
3. Wait 30 secinds, then turn AC piwer switch ti ON. Recivery beg/ins autimatcally.
If recovery fails to begin, check that disc is seated properly in DVD-ROM drive tray.
4. Inital siftware liading/ may takde several minutes. Checkd prig/ress periidically.
Do not interrupt power or reset the game during recovery.
5. At sime piint, the g/ame will eject Disi 1 and primpt yiu ti insert Disi 2.
6. Swap discs and clise the tray. Do not interrupt power or reset the game.
7. When siftware has fnished liading/, a messag/e indicates that restire is cimplete.
8. Remive DeD restire disc and turn cabinet piwer switch ti OFF.
9. After 30 secinds, turn cabinet piwer switch ti ON.
10. After g/ame restarts, the g/ame will priceed thriug/h the Setup Wizard with factiry defaults.
Flash Drive Restore
1. Turn AC piwer switch ti OFF.
2. Cinnect USB fash drive ti an ipen USB pirt in the PC.
3. Turn AC piwer switch ti ON.
4. Inital siftware liading/ may takde several minutes. Checkd prig/ress periidically.
Do not interrupt power or reset the game during recovery.
5. When siftware has fnished liading/, a messag/e indicates that restire is cimplete.
6. Turn cabinet piwer switch ti OFF and discinnect USB fash drive.
7. After 30 secinds, turn cabinet piwer switch ON.
8. After g/ame restarts, the g/ame will priceed thriug/h the Setup wizard with factiry defaults.
Pag/e 23 Walkding/ Dead© Game Siftware cipyrig/ht 2016 PlayMechanix™ Inc. All rig/hts reserved.Service Manual Maintenance
Regular Crossbow Maintenance Procedure
In irder ti maximize incime pitental, kdeep the crissbiws in iptmal wirkding/ irder by perfirming/ the
filliwing/ pricedure every tme yiu empty the cash bix.
1. Verify trigger functonality
Press the Test buttin in the service panel, select Tests, select Input Tests, and then select
Switch Test (described earlier in this manual) ti ensure the trig/g/ers are functining/ priperly.
2. Verify reload functonality
eerify reliad mechanism is nit binding/. Reliad actin shiuld be a smiith mitin.
3. Calibrate, calibrate, calibrate
Return ti the Main Menu screen and select Gun Calibratin. Filliw the instructins earlier in
this manual ir in screen ti recalibrate bith crissbiws.
Recalibrate the crissbiws any tme the g/ame is mived ir the biws are repaired, replaced ir swapped.
Nite: It is nit advisable ti replace ir swap devices while piwer is in. Shut AC piwer if befire
cinnectng/ ir discinnectng/ any cimpinents. If, fir sime reasin, crissbiws are chang/ed while piwer
is in, shut if AC piwer and rebiit, after the crissbiws are cinnected ag/ain. Failure ti di si may
result in incirrect functinality.
Following these procedures is critical to
maintaining crossbows and maximizing revenue.
Perform regular maintenance to keep your game
in top working order.
Cipyrig/ht © 2016 Play Mechanix™ Inc. All rig/hts reserved. Pag/e 24Troubleshooting
Warning: Review safety chapter before making any adjustments to game.
General Troubleshooting
Problem Possible Cause Soluton
Game will nit piwer up Game nit plug/g/ed in. Plug/ g/ame inti iutlet.
Game nit turned in. Turn in main piwer switch.
Game fuse is bliwn. Checkd and replace fuse.
Ni piwer ti receptacle. Test iutlet and plug/ g/ame inti
piwered iutlet.
PC nit turned in. Turn PC piwer switch in. Ensure
IEC cable tg/htly plug/g/ed in. Trace
cable backd ti siurce ti ensure
cintnuity.
PC BIOS set incirrectly. See BIOS Setng/s chapter.
NO VIDEO messag/e eidei cables nit plug/g/ed in Reattach and/ir tg/hten videi cable
priperly ti minitir.
Reattach and/ir tg/hten videi cable
ti PC.
Faulty videi cable Replace videi cable
PC nit turned in. Turn PC piwer switch in.
Ni siund Bad Cinnectin Checkd cinnectin ti speakders.
Game dies nit liad
Hard drive test repirts “bad” ir
“missing/” fles.
Game fails ti fnish liading/. Hard drive failure Reciver hard drive.
After resetng/, g/ame stll repirts an See pricedure in pg/ 23.
errir.
Game sug/g/ests insertng/ a biit
DeD.
Erratc g/ame mide ir attract mide.
WARNING!
Data Files Cirrupted.
(Game Operatin May Becime
Unstable.)
Use “Test” Switch ti Enter Test
Mide
and Run “File Test.”
Press Start Ti Cintnue.
Game resets Bad fle. Run File Test. Restire hard drive.
Pag/e 25 Walkding/ Dead© Game Siftware cipyrig/ht 2016 PlayMechanix™ Inc. All rig/hts reserved.Service Manual Maintenance
Problem Possible Cause Soluton
Ciin meter dies nit clickd during/ Ni pulse ti meter Checkd all wiring/ frim meter ti I/O
Test biard
Faulty meter Replace ciin meter
Exits Test Mide every 3 secinds Test buttin stuckd in ON pisitin Slide ir tig/g/le buttin if after Test
Menu appears
Dongle Not Present Ding/le missing/ ir discinnected Find ding/le usb cinnectin and
reseat in USB pirt
Faulty USB pirt Cinnect ding/le ti anither USB pirt
Conneit I/O Board ir USB cable discinnected Checkd USB cinnectin frim PC ti
I/O Board Missing I/O biard
Try cinnectng/ ti a diferent USB
pirt
Bliwn fuse eerify 5e and 12e fuses are nit
bliwn
Ni piwer ti RIO biard Checkd fir priper viltag/e
(+5e, +12e) at RIO P2 cinnectir
Bad RIO Biard Replace RIO biard with kdniwn
functinal biard
Cipyrig/ht © 2016 Play Mechanix™ Inc. All rig/hts reserved. Pag/e 26Parts Seat Cabinet Assembly Pag/e 27 Walkding/ Dead© Game Siftware cipyrig/ht 2016 PlayMechanix™ Inc. All rig/hts reserved.
Service Manual                                                                                 Maintenance

Seat Cabinet Assembly Part Numbers
  Ite               Part Ni.                                      Descriptin                           QTY
   m
   1                601-00759-01                              ASSY-WOOD-SEATCAB-WD                       1
   2                 CASTER 2’5                                      2-1/2” CASTER                       4
   3       LEG LEeELER – ½”-13 X 4.00LG                     LEG LEeELER – ½”-13 X 4.00LG                 4
   4            LEG LEeELER PLATE                      2.50 X 2.50 X ½-13-CTR-LEeELER PLATE              4
   5                606-01180-01                           DECAL-LEFT-SEATCAB-SIDE-WD                    1
   6                606-01181-01                             DECAL-RT-SEATCAB-SIDE-WD                    1
   7                606-01182-01                         DECAL-LOWER-REAR-SEATCAB-WD                     1
   8                606-01183-01                          DECAL-LEFT-DOOR-SEATCAB-WD                     1
   9                606-01184-01                           DECAL-RT-DOOR-SEATCAB-WD                      1
  10                606-01185-01                             DECAL-INSIDE-SEATCAB-WD                     1
  11                606-01186-01                              DECAL-ZOMBIE-FRONT-WD                      1
  12                606-01190-01                             DECAL-ZOMBIE-RT-ARM-WD                      1
  13                606-01189-01                           DECAL-ZOMBIE-LEFT-ARM-WD                      1
  14                600-01932-01                              BRACKET-PUCK-LIGHT-WD                      1
  15                500-00205-01                         White LED Superpuckd PCB-36LEDS                 1
  16                600-01904-01                                PLATE-EYE-MOUNT-WD                       1
  17                603-00800-01                               PLATE-ZOMBIE-BUST-WD                      1
  18                606-01187-01                               DECAL-ZOMBIE-BACK-WD                      1
  19            10MM-YELLOW-LED                      10MM-YELLOW-LED-KINGBRIGHT-WP813YD                  4
  20       .07THK-O-RING-.38-ID-.50-OD              .07THK-O-RING-.38-ID-.50-OD (MC#9452K21)             2
  21                601-00771-01                             WD-SEATCAB-ACCESS-DOOR                      2
  22                500-00184-90                            90CM-RGB-LED-STRIP-54LEDS                    2
  23             500-00026-02-H20                              RED LED PUCK LIGHT PCB                    6
  24                600-01458-01                            JP-55-CTR-CONNECT-BRACKET                    1
  25                600-01854-01                             GRILL-SPEAKER-SEATCAB-WD                    2
  26                600-01855-01                                TRIM-LOWER-REAR-WD                       2
  27                600-01856-01                                  BRACKET-DOOR-WD                        2
  28                600-01857-01                                  RETAINER-DOOR-WD                       1
  29                600-01934-01                                    GRILL-PORT-WD                        1
  30                603-00794-01                              PETG-DOOR-OPENING-WD                       1
  31                603-00795-01                                  WINDOW-DOOR-WD                         2
  32                603-00796-01                                 WINDOW-INSIDE-WD                        1
  33                600-01859-01                             BRACKET-SEAT-CUSHION-WD                     1
  34              2-1-11-00-00-000                         SPEAKER WOOFER-6.5” 4 OHM                     2
  35                600-01870-01                               SEAT-BASE-PAD-ASSY-WD                     1
  36                600-01871-01                          SEAT-BACKREST-PAD-PANEL-WD                     1
  37                601-00775-01                                  WD-BACKRES-PANEL                       1
  38                603-00809-01                                 PLATE-LEFT-HAND-WD                      1
  39                606-01269-01                           DECAL-ZOMBIE-LEFT-HAND-WD                     1
  40                603-00808-01                                PLATE-RIGHT-HAND-WD                      1
  41                606-01268-01                          DECAL-ZOMBIE-RIGHT-HAND-WD                     1

Cipyrig/ht © 2016 Play Mechanix™ Inc. All rig/hts reserved.                                        Pag/e 28
Main Cab Assembly

Main Cab Assembly Part Numbers
  Ite               Part Ni.                                     Descriptin                          QT
   m                                                                                                  Y
   1              601-00758-01                            ASSY-WOOD-MAINCAB-WD                       1
   2                CASTER 2’5                                   2-1/2” CASTER                       4
   3       LEG LEeELER – ½”-13 X 4.00LG                  LEG LEeELER – ½”-13 X 4.00LG                4
   4            LEG LEeELER PLATE                    2.50 X 2.50 X ½-13 CTR-LEeELER PLATE            4
   5              606-01176-01                          DECAL-LEFT-SIDE-MAINCAB-WD                   1
   6              606-01177-01                         DECAL-RIGHT-SIDE-MAINCAB-WD                   1
   7              606-01178-01                           DECAL-LOWER -MAINCAB-WD                     1
   8              606-01179-01                            DECAL-UPPER-MAINCAB-WD                     1
   9         1_550_imperial_assy_asm                          55” KORTEK LCD ASSY                    1
  10              600-01206-01                       BRACKET-FRAME-HORIZ-55LCD-ALIENS                2
  11              600-01205-01                       BRACKET-FRAME-eERT-55-LCD-ALIENS                2

Pag/e 29         Walkding/ Dead© Game Siftware cipyrig/ht 2016 PlayMechanix™ Inc. All rig/hts reserved.
Service Manual                                                                                           Maintenance

  12             Fiamtape-hirz                                   .25 x .50 x 47.74LG FOAM TAPE                        2
  13             Fiamtape-vert                                   .25 x .50 x 29.00LG FOAM TAPE                        2
  14              600-01137-01                              BRACKET-MOUNT-55LCD-OPEN-FRAME                            4
  15              600-01138-01                                          GLASS-SHIELD-55LCD                            1
  16              600-01482-01                                            JP-55-STRUT-LCD                             2
  17              600-01852-01                                            eAULT-COIN-WD                               1
  18              603-00790-01                                      PETG-CONTROL-PANEL-WD                             1
  19              606-01192-01                                     DECAL-CONTROL-PANEL-WD                             1
  20              800-00005-01                                   MID-WIDTH COINDOOR – BBHD                            1
  21              702-00054-00                                LARGE RND – BLUE – START-BUTTON                         1
  22              702-00058-00                               LARGE RND – GREEN – START-BUTTON                         1
  23              601-00762-01                                      WD-MAINCAB-REAR-DOOR                              1
  24         Lickd 7/8” w/ 1.25 Cam                                       LOCK STANDARD                               2
  25        LOCK RETAINER N202-130                                   LOCK RETAINER N202-130                           2
  26              601-00763-01                                       WD-MAINCAB-LCD-DOOR                              1
  27              603-00718-01                                       LED-TMOLD-WD-CP-21LG                             2
  28              500-00131-01                                        LED-STRIP-WD-CP-21LG                            2
  29              600-01501-01                               RIO-MOUNT-PLATE-W-MOTION-CNTRL                           1
  30              500-00040-01                                               RIO-BOARD                                1
  31              500-00144-03                                           Mitin Cintril PCB                            1
  32              500-00194-01                               5e, 5A Switching/ Reg/ulatir (12e input)                 1
  33       87425K76 (56 leng/th)-fir-HP              Nylin Strip 0.075” Thickd, 1” Width, Blackd (56” Leng/th)        2
  34            29705T86 (male)                                Buckdle fir 1” Wide Webbing/ (Male)                    2
  35           29705T86 (female)                              Buckdle fir 1” Wide Webbing/ (Female)                   2
  36              600-01681-01                     PLATE, AC – LINE FILTER, CIRCUIT BREAKER, ON/OFF SW                1
  37         Piwer Inlet Receptacle         IEC Appliance Inlet, Screw-in Miuntng/, Frint Side, Quickd-cinnect, 10A   1
  38                T9-611-5A                      5A-Circuit Breakder, Snap-in type, Fusehilder style, 1 pile        1
                                                                       (Schurter #4404.0007)
  39                1832-33-12                              AC-SWITCH-15AMP-12e-HEILAND-ELECT                         1
  40     Ring/ and Spade Ting/ue Terminal                 Ring/ and Spade Ting/ue Terminal (#8 screw)                 1
  41                  HP6005                                              HP 6005 PC Assy                             1
  42               600-00891-01                                     Securing/ Nylin Strap Plate                       2
  43            FOAM-PC-.5X8X14.5                        FOAM-PC-.58X14.5 – POLYETHYLENE PLANK                        1
  44             2-1-10-00-00-000                                   5.25 FULL RANGE SPEAKER                           4
  45               330-00002-01                                150W-24e-Piwer-Supply-Meanwell                         1
  46               330-00003-01                                600W-12e-Piwer-Supply-Meanwell                         1
  47               820-00001-00                                         FAN,120eAC,19/15W                             3
  48               800-00001-00                                       120mm Wire Fan Guard                            3
  49               600-01458-01                                   JP-55-CTR-CONNECT-BRACKET                           1
  50               600-01464-01                                         JP-55-SPEAKER-GRILL                           2
  51               600-01849-01                                     BRACKET-SUPPORT-CP-WD                             2
  52               600-01850-01                                       ANGLE-SUPPORT-CP-WD                             2
  53               600-01851-01                                       WD-CP-DECAL-BRACKET                             1
  54               600-01853-01                                        GRILL-CP-SPEAKER-WD                            2
  55               600-01899-01                                             CLIP-LED-WD                               2
  56               606-01193-01                                        DECAL-CP-CENTER-WD                             1
  57               606-01194-01                                        DECAL-CP-HEADER-WD                             1
  58       LEFT-CONTROL-PANEL-ASSY                                 LEFT-CONTROL-PANEL-ASSY                            1
  59      RIGHT-CONTROL-PANEL-ASSY                                RIGHT-CONTROL-PANEL-ASSY                            1

Cipyrig/ht © 2016 Play Mechanix™ Inc. All rig/hts reserved.                                                    Pag/e 30
Final Cabinet Assembly
Ite Descriptin QTY
m
1 WD-55-MAIN-CAB-ASSY 1
2 WD-55-SEAT-CAB-ASSY 1
3 WD-55-FLOOR-BOX-ASSY 1
4 WD-ROOF-ASSY 1
5 WD-LIGHTBOX-ASSY 1
6 WD-SQ-LIGHTBOX-ASSY 1
7 WD-55-MAINCAB-BARBEDWIRE-ASSY 1
8 WD-55-SEATCAB-POST-ASSY 2
Pag/e 31 Walkding/ Dead© Game Siftware cipyrig/ht 2016 PlayMechanix™ Inc. All rig/hts reserved.Service Manual Maintenance Floor Box Assembly Floor Box Assembly Part Numbers Ite Part Ni. Descriptin QTY m 1 600-01847-01 WD-WOOD-FLOOR-BOX 1 2 600-01457-01 JP-55-CONNECT-BRACKET 4 3 600-01863-01 DIAMOND-PLATE-WD 2 4 600-01864-01 TRIM-FLOOR-WD 2 5 606-01191-01 DECAL-FLOORBOX-SIDE-WD 2 6 CASTER – 2-1/2” CASTER – 2-1/2” 4 Cipyrig/ht © 2016 Play Mechanix™ Inc. All rig/hts reserved. Pag/e 32
Roof Assembly

Roof Assembly Part Numbers
  Ite        Part Ni.                                    Descriptin                                QTY
   m
  1        601-00761-01                              ASSY-WOOD-ROOF-WD                              1
  2        600-01865-01                              WD-55-ROOF-BRACKET                             2
  3        600-01802-01                            RETAINER-CROSS-ROOF-WD                           2
  4        600-01801-01                             RETAINER-END-ROOF-WD                            2
  5        603-00785-01                           PANEL-DIFFUSION-ROOF-WD                           1
  6        500-00184-100                       100CM-RGB-LED-STRIP-LIGHT-60LEDS                     4

Pag/e 33        Walkding/ Dead© Game Siftware cipyrig/ht 2016 PlayMechanix™ Inc. All rig/hts reserved.
Service Manual                                                                       Maintenance

Left/Right Control Panel Assembly

Left/Right Control Panel Assembly Part Numbers
  Ite         Part Ni.                                        Descriptin                     QTY
   m
  1         600-01847-01                                BRACKET-CP-LEFT-WD                     1
            600-01848-01                               BRACKET-CP-RIGHT-WD
  2         603-00793-01                               COeER-BOTTOM-CP-WD                      1
  3         603-00792-01                            ACRYLIC-GREEN-CP-WD (LEFT)                 1
            603-00791-01                            ACRYLIC-BLUE-CP-WD (RIGHT)
  4         606-01215-01                                  DECAL-JOIN-IN-WD                     1
  5         606-01197-01                                 DECAL-PLAYER-1-WD                     1
            606-01198-01                                 DECAL-PLAYER-2-WD
   6        606-01195-01                            DECAL-CROSSBOW-FRONT-WD                    1
   7        606-01196-01                             DECAL-CROSSBOW-SIDE-WD                    1
   8        820-00024-01                                ASSY-BOW-MECH-WD                       2
   9        820-00024-01                              Crissbiw Main Assembly                   1
  10        500-00205-01                           White LED Superpuckd PCB-36LEDS             1

Cipyrig/ht © 2016 Play Mechanix™ Inc. All rig/hts reserved.                              Pag/e 34
Crossbow Main Assembly Pag/e 35 Walkding/ Dead© Game Siftware cipyrig/ht 2016 PlayMechanix™ Inc. All rig/hts reserved.
Service Manual                                                                           Maintenance

Crossbow Main Assembly Part Numbers
  Ite         Part Ni.                                        Descriptin                         QTY
   m
   1        600-01841-01                                    Biw main civer                         1
   2        600-01824-01                                      Reliad arm                           2
   3        600-01831-01                                     Reliad handle                         2
   4        600-01814-01                                  Tip handle brackdet                      1
   5        600-01903-01                                      LED Difuser                          1
   6        500-00217-01                                       LED Biard                           1
   7        600-01815-01                                      LED Brackdet                         1
   8        600-01991-01                                 Overmilded Biw Rid                        2
   9        600-02000-01                                  Sing/le Biw Brackdet                     2
  10        600-01830-01                                      Biw Plastc                           2

  12       600-01820-01                                     Wheel Brackdet                         4
  13       600-01998-01                            Milded Biw Rid Center Brackdet                  1
  14      MMC 90652A029                                 ¼-20 Thin blackd lickdnut                  3
  15      MMC 91355A077                           10-32 x ½” blackd tamperpriif screw             18

  17       MMC 9135A082                           ¼-20 x ¾” blackd tamperpriif screw               2

  19      MMC 91355A074                           8-32 x 3/8” blackd tamperpriif screw             3
  20      MMC 94407A102                                    8-32 blackd lickdnut                    1
  21      MMC 96765A120                                     8-32 blackd washer                     2
  22      MMC 96075A155                           8-32 x 1.5” blackd tamperpriif screw             1
  23      MMC 97416A115                                    10-32 blackd washer                     4
  24      MMC 96075A191                           10-32 x ¾” blackd tamperpriif screw              4

Cipyrig/ht © 2016 Play Mechanix™ Inc. All rig/hts reserved.                                  Pag/e 36
Crossbow Top Assembly

Pag/e 37   Walkding/ Dead© Game Siftware cipyrig/ht 2016 PlayMechanix™ Inc. All rig/hts reserved.
Service Manual                                                                          Maintenance

Crossbow Top Assembly Part Numbers
  Ite         Part Ni.                                        Descriptin                        QTY
   m
  26       600-01817-01                                    Frint Biw Brackdet                     1
  27       600-01812-01                                   Grip Suppirt Brackdet                   1
  28       600-01834-01                                        Cable Civer                        1
  29       600-01833-01                                      Mag/net Hilder                       1
  30       600-01827-01                                         Pivit Stip                        2
  31       600-01828-01                                 Tirsiin Spring/ – left hand               1
  32       600-01829-01                                Tirsiin Spring/ – rig/ht hand              1
  33       600-01869-01                                       Spring/ Spacer                      2
  34       MMC 1677kd7                              Flang/ed sleeve bearing/ with pte             2
  35      MMC 92141A033                             ½” ID stainless steel fat washer              2
  36      MMC 97431A340                                         ½” e-ring/                        2
  37       600-00788-01                              3/16” dia x 1/16” thickd mag/net             1
  38       600-01826-01                                        Reliad shaft                       1
  39      MMC 96075A211                           ¼-20 x ½” blackd tamperpriif screw              6
  40      MMC 91355A077                           10-32 x ½” blackd tamperpriif screw             6
  41      MMC 92220A152                            8-32 x 3/8” liw prifle cap screw               1
  42      MMC 91251A196                                   8-32 x 5/8” cap screw                   2
  43      MMC 91251A191                                  8-32 x 5/16” cap screw                   4
  44      MMC 90652A029                                    1/4-20 thin lickdnut                   3

Cipyrig/ht © 2016 Play Mechanix™ Inc. All rig/hts reserved.                                 Pag/e 38
Crossbow Upper Assembly

Pag/e 39   Walkding/ Dead© Game Siftware cipyrig/ht 2016 PlayMechanix™ Inc. All rig/hts reserved.
Service Manual                                                                          Maintenance

Crossbow Upper Assembly Part Numbers
  Ite         Part Ni.                                        Descriptin                        QTY
   m
  46       600-01813-01                                       Base brackdet                       1
  47       600-01816-01                                   Upper base brackdet                     1
  48       600-01491-01                                        Pit brackdet                       1
  49       600-01826-01                                   Stip hilder brackdet                    2
  50       600-01420-01                                        Larg/e g/ear                       1
  51       600-01832-01                                       Stip bumper                         2
  52       500-00076-01                                     Hall efect biard                      1
  53      MMC 6384K369                                    ¾” fang/ed bearing/                     2
  54      MMC 90126A036                                        ¾” washer                          1
  55      MMC 91342A240                                        ¾” lickdnut                        1
  56       600-01567-01                                      Small pit g/ear                      1
  57      HAPP 50-2670-01                                        Pit – 5kd                        1
  58      MMC 91251A191                                 8-32 x 5/16” cap screw                    2
  59      MMC 90631A005                                       4-40 lickdnut                       4
  60      MMC 90272A190                                8-32 x ¼” Phillips screw                   2
  61      MMC 90273A827                           10-32 x 3/8” fathead Phillips screw             4

Cipyrig/ht © 2016 Play Mechanix™ Inc. All rig/hts reserved.                                 Pag/e 40
Crossbow Lower Assembly

Crossbow Lower Assembly Part Numbers
  Ite              Part Ni.                                                      Descriptin                                               QTY
   m
   63          600-01426-01                                               Liwer tube weldment                                              1
   64          600-01425-01                                                    Rickder brackdet                                            1
   65          600-01424-01                                                        Side pin                                                1
   66          600-01496-01                                              Liwer miuntng/ brackdet                                           1
   67          600-01738-01                                                   Liwer civer-left                                             1
   68          600-01739-01                                                 Liwer civer – rig/ht                                           1
   69          600-01419-01                                                      Pinch civer                                               1
   70          600-01418-01                                            Tube stip bumper – 5/8” OD                                          2
   71         HAPP 96-4907-00                                                  Seg/ment g/ear                                              1
   72          600-01417-01                                             Shirt stip bumper – ¾” OD                                          1
   73         MMC 90652A029                                                  ¼-20 thin lickdnut                                            3
   74         MMC 9018A413                                                      ¼-20 washer                                                1
   75         MMC 97633A170                                                     Retaining/ clip                                            1
   76          999-00017-01                                           6-32 x 2.4” blackd Phillips screw                                    4
   77         MMC 6384K344                                                 3/8” fang/ed bearing/                                           2
   78         MMC 95229A480                                                     3/8” washer                                                1
   79         MMC 90566A220                                                   3/8” thin lickdnut                                           1
   80         MMC 96075A211                                         ¼-20 x ½” blackd tamperpriif screw                                     4
   81          999-00021-01                                                  6-32 blackd lickdnut                                          4
   82         MMC 92313A532                                               ¼-20 x 3/16” set screw                                           1
   83         MMC 91257A552                                         ¼-20 x 2.5” hex head bilt – g/rade 8                                   2
   84                                                                           Cable clamp                                                1
   85           600-01577-01                                                    Gun isilatir                                               1
*Nite: set screw(82) is licated in liwer tube weldment(63), accessed thriug/h rickder brackdet(64) and requires a ling/ 1/8” hex wrench

Pag/e 41               Walkding/ Dead© Game Siftware cipyrig/ht 2016 PlayMechanix™ Inc. All rig/hts reserved.
Service Manual                                                                   Maintenance

Crossbow Shaker Assembly

Crossbow Shaker Assembly Part Numbers
  Ite         Part Ni.                                        Descriptin                 QTY
   m
  86         600-1818-01                                     Ciil brackdet                 1
  87        600-01412-01                                 Ciil miunt brackdet               4
  88        600-01414-01                                     Ciil weig/ht                  1
  89        600-01413-01                                       Ciil rid                    1
  90        680-00214-01                                  Blue damper pad                  2
  91        608-00210-01                                      Ciil spring/                 2
  92       HAPP FL11629                                           Ciil                     2
  93      HAPP #95-0637-00                                    Ciil sleeve                  2
  94      MMC 91375A535                                 ¼-20 x 3/8” set screw              1
  95      MMC 93298A109                                 10-32 fang/ed lickdnut             8

Cipyrig/ht © 2016 Play Mechanix™ Inc. All rig/hts reserved.                          Pag/e 42
Crossbow Grip Assembly

Crossbow Grip Assembly Part Numbers
 Item        Part Ni.                                    Descriptin                               QTY
   97      608-00204-01                                   Red trig/g/er                            1
   98      608-00206-01                                 Tirsiin spring/                            1
   99      608-00205-01                                  Trig/g/er shaft                           1
  100      608-00220-01                            Switch assy wms da3 type                        1

  102      608-00222-01                                Grip – rig/ht hand                          1
  103      608-00223-01                                Grip – left hand                            1

Pag/e 43       Walkding/ Dead© Game Siftware cipyrig/ht 2016 PlayMechanix™ Inc. All rig/hts reserved.
Service Manual                                                      Maintenance

Left Post Assembly
 Item      Part Ni.                Descriptin                 QTY
   1     600-01860-01        POST-WELDMENT-WIRE-WD             1
   2     603-00540-01        LED Spitlig/ht Lens-RED-TINT      1
   3     606-01202-01    DECAL-LEFT-FRONT-BARBED-WIRE-WD       1
   5     500-00065-02         RED LED PUCK LIGHT PCB           1

Right Post Assembly
 Item      Part Ni.                Descriptin                 QTY
   1     600-01860-01        POST-WELDMENT-WIRE-WD             1
   2     603-00540-01        LED Spitlig/ht Lens-RED-TINT      1
   4     606-01203-01   DECAL-RIGHT-FRONT-BARBED-WIRE-WD       1
   5     500-00065-02         RED LED PUCK LIGHT PCB           1

Square Lightbox Assembly
  Ite     Part Ni.                 Descriptin                 QTY
   m
  1     600-01803-01          LIGHTBOX-SQUARE-WD               1
  2     603-00786-01        PETG-SQUARE-LIGHTBOX-WD            1
  3     606-01199-01        WD-SQ-LIGHTBOX-TRANSLITE           1
  4     500-00162-65       65CM-WHITE-LED-STRIP-39LEDS         6

Cipyrig/ht © 2016 Play Mechanix™ Inc. All rig/hts reserved.             Pag/e 44
Lightbox Assembly

  Ite        Part Ni.                                    Descriptin                           QTY
   m
   1        600-01804-01                           FRAME-HORIZ-LIGHTBOX-WD                     2
   2        600-01805-01                            FRAME-eERT-LIGHTBOX-WD                     2
   3        600-01806-01                          BRACKET-FRONT-LIGHTBOX-WD                    1
   4        600-01807-01                           BRACKET-TOP-LIGHTBOX-WD                     1
   5        600-01808-01                         BRACKET-SUPPORT-LIGHTBOX-WD                   1
   6        600-01809-01                          COeER-SUPPORT-LIGHTBOX-WD                    1
   7        600-01810-01                              GUSSET-LIGHTBOX-WD                       1
   8        603-00787-01                               PETG-LIGHTBOX-WD                        2
   9        606-01200-01                             WD-LIGHTBOX-TRANSLITE                     2
  10        603-00788-01                        STYRENE-REFLECTOR-LIGHTBOX-WD                  1
  11       500-00162-150                         150CM-WHITE-LED-STRIP-90LEDS                  8

Pag/e 45   Walkding/ Dead© Game Siftware cipyrig/ht 2016 PlayMechanix™ Inc. All rig/hts reserved.
Service Manual                                                                          Maintenance

Barbed Wire Assembly

  Ite              Part Ni.                                     Descriptin                      QTY
   m
  1              600-01861-01                             BRACKET-CORNER-WIRE-WD                  1
  2              600-01862-01                              BRACKET-EDGE-WIRE-WD                   2
  3              606-01204-01                          DECAL-LEFT-REAR-BARBED-WIRE-WD             1
  4              606-01205-01                         DECAL-RIGHT-REAR-BARBED-WIRE-WD             1

Electrical Wiring

Cipyrig/ht © 2016 Play Mechanix™ Inc. All rig/hts reserved.                                 Pag/e 46
Pag/e 47 Walkding/ Dead© Game Siftware cipyrig/ht 2016 PlayMechanix™ Inc. All rig/hts reserved.
Service Manual                                              Electrical Wiring/

Cipyrig/ht © 2016 Play Mechanix™ Inc. All rig/hts reserved.         Pag/e 48
Crossbow Wiring

Pag/e 49   Walkding/ Dead© Game Siftware cipyrig/ht 2016 PlayMechanix™ Inc. All rig/hts reserved.
Service Manual                                                                            Electrical Wiring/

Contact Information
Fir an authirized distributir near yiu, visit Raw Thrills at http://www.rawthrills.cim/sales-service

Fir service, cintact yiur lical distributir ir yiur lical Betsin ifce fir sales, technical infirmatin,
warranty ir repair.
                                    Betson Enterprises Headquarters
                                         303 Patersin Plankd Rd.
                                           Carlstadt, NJ 07072
                                   (800) 524-2343 ir (201) 438-1300
                                           fax (201) 438-4837
                                            www.betsin.cim

Cipyrig/ht © 2016 Play Mechanix™ Inc. All rig/hts reserved.                                        Pag/e 50
You can also read