IN/INS/IDS 3-WIRE POLARA FS ANDROID APPLICATION MANUAL - POLARA
←
→
Page content transcription
If your browser does not render page correctly, please read the page content below
iN/iNS/iDS 3-Wire Polara FS Android Application Manual
                                                                          350-075
                                                               Revision C - 1/20/2021

Polara

iN/iNS/iDS 3-Wire Polara FS Android Application
Manual
350-075 Rev. C
1/20/2021

Page 1 of 26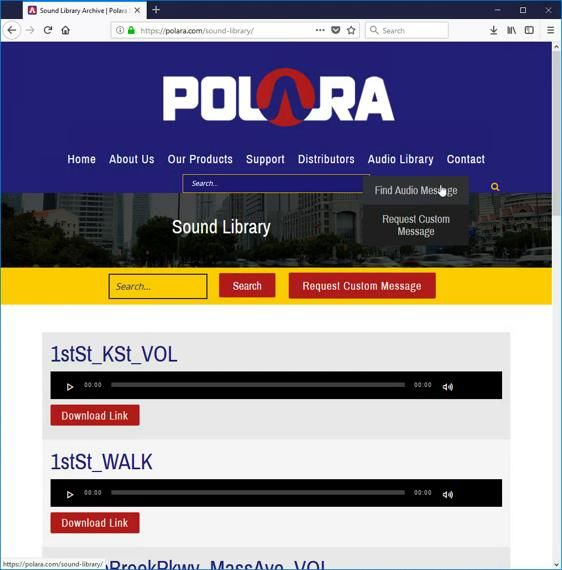
iN/iNS/iDS 3-Wire Polara FS Android Application Manual
                                                                                                                                             350-075
                                                                                                                                                  Revision C - 1/20/2021

Contents
1.          Using the Polara Field Service App for Android .................................................................................. 3
     1.1 Bluetooth Connection ...................................................................................................................................3
       1.1.1 Connection Example: Samsung S7 running Android 7.0 ..................................................................................... 4
       1.1.2 Connection Example: Google Pixel running Android 9.0 .................................................................................... 5
       1.1.3 Connection Example: Nvidia Shield K1 Tablet running Android 7.0 ................................................................... 6
     1.2 PBS Status ....................................................................................................................................................7
     1.3 Changing the PBS Password ..........................................................................................................................8
     1.4 Assigning a Name to a PBS ............................................................................................................................9
     1.5 Setting the PBS Time and Date ......................................................................................................................9
     1.6 PBS Configuration Options .......................................................................................................................... 10
     1.7 Quiet Time ................................................................................................................................................. 13
     1.8 Wireless Sync ............................................................................................................................................. 14
     1.9 iDetect Settings .......................................................................................................................................... 15
     1.10 PedApp Settings ......................................................................................................................................... 16
     1.11 Preparing Audio Files .................................................................................................................................. 16
       1.11.1   Opening .ogg files as an e-mail attachment.................................................................................................. 17
       1.11.2   Opening .ogg files via Android File System ................................................................................................... 18
       1.11.3   Browsing for .ogg files via Polara FS App ...................................................................................................... 19
     1.12 Updating Audio Files ................................................................................................................................... 20
     1.13 Extract Audio Files ...................................................................................................................................... 22

2.          Using the Polara Field Service App to Access the Health Log ............................................................. 23
     2.1      Accessing the Health Log............................................................................................................................. 23

3.          Getting Button Info and Diagnostics ................................................................................................ 24
4.          Using the Polara Field Service App for Firmware Updates ................................................................ 25
     4.1      Checking for the Latest Firmware ................................................................................................................ 25
     4.2      Performing a Firmware Update ................................................................................................................... 26

Page 2 of 26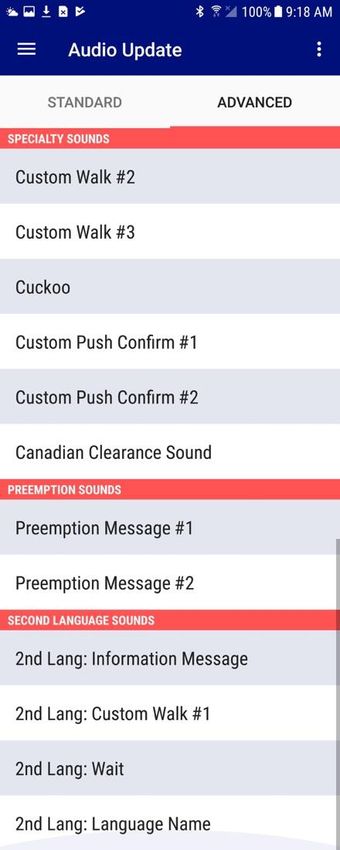
iN/iNS/iDS 3-Wire Polara FS Android Application Manual
                                                                                                                   350-075
                                                                                                           Revision C - 1/20/2021

1. Using the Polara Field Service App for Android
All of the available setup and maintenance procedures may be performed using a compatible Android device. The device
must have Android version 5.0 (Lollipop) or higher.

We have tested the Polara FS app on a number of Android devices, but we cannot guarantee that it will function properly
on all devices. We have tested the app on a number of Samsung phones including the Galaxy S5, Galaxy S7 and Galaxy
S8, Galaxy Note 4, Google Pixel (1), LG K20+, LG V20. A small number of devices we have tested have unsupported
Bluetooth capability and are unable to connect via BLE: Motorola Moto E4, Kyocera Duraforce XD.

We have also tested the app on a few Tablet devices such as the NVidia Shield K1 and Asus ZenPad S.

The app is not compatible with any Amazon Fire devices.

The Polara Field Service application is available free in the Google Play Store. Search for Polara and locate the app, then
tap the install button.

1.1 Bluetooth Connection
Before starting the Polara FS App, make sure your Android device has Bluetooth turned on in Settings. Then, start the
app. This will display a list of all available devices. Tap a name to select the device to connect to. When the password
prompt appears, type in the password (factory default is 1234) and tap connect. Once logged in, the main menu will
appear.

The connection procedure differs slightly depending on which Android device is in use. The below has three examples of
typical connection behavior.

Page 3 of 26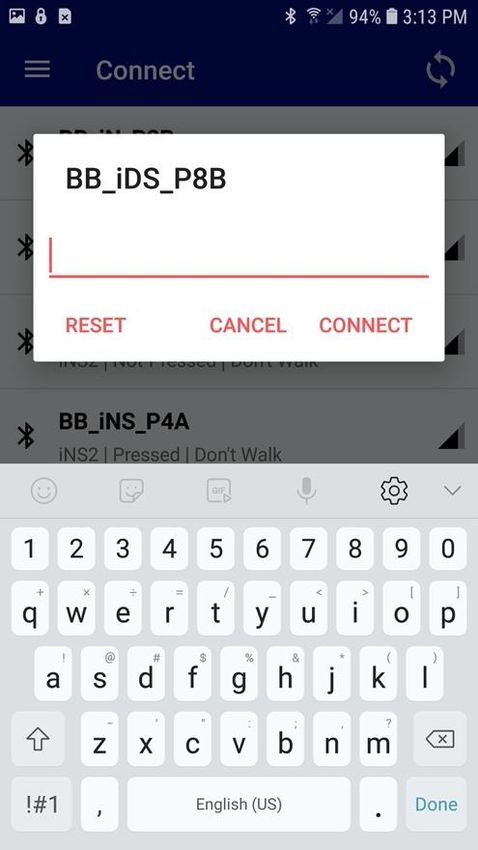
iN/iNS/iDS 3-Wire Polara FS Android Application Manual
                                                                                                               350-075
                                                                                                      Revision C - 1/20/2021

1.1.1   Connection Example: Samsung S7 running Android 7.0

The most straight forward behavior shown below:

Tap on the BTLE device upon which to connect. After a few seconds, the password prompt will appear.

Page 4 of 26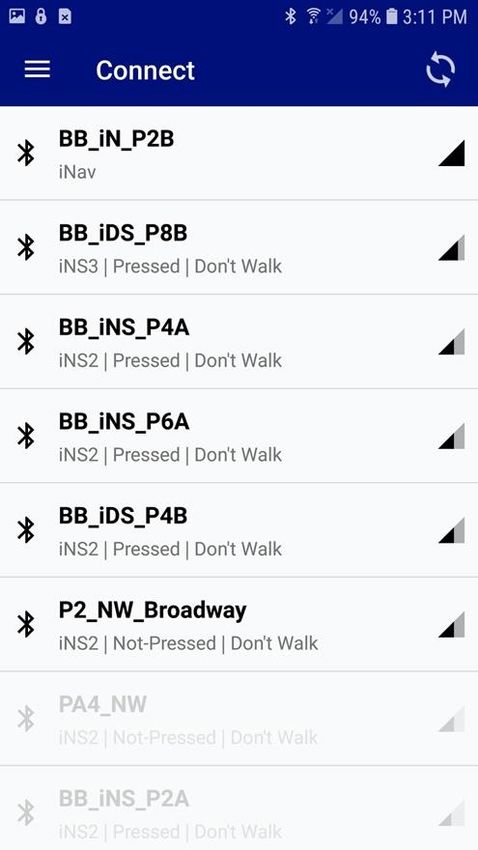
iN/iNS/iDS 3-Wire Polara FS Android Application Manual
                                                                                                                350-075
                                                                                                       Revision C - 1/20/2021

1.1.2   Connection Example: Google Pixel running Android 9.0

On some of the newer devices running the latest Android versions, once you tap on the BTLE device for connection, a
Pairing request will appear. Tap on Pair & Connect, and then another confirmation box may appear. Tap pair on the
confirmation box and then after a few seconds, the password box should appear.

Page 5 of 26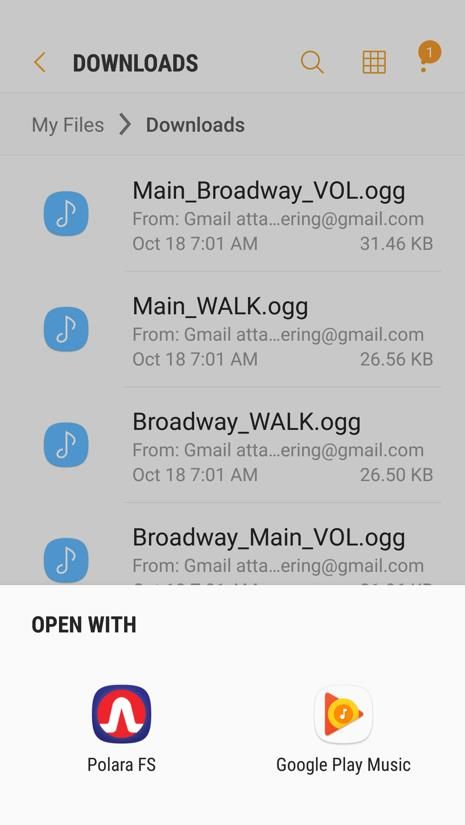
iN/iNS/iDS 3-Wire Polara FS Android Application Manual
                                                                                                                         350-075
                                                                                                              Revision C - 1/20/2021

1.1.3   Connection Example: Nvidia Shield K1 Tablet running Android 7.0

On some devices such as tablets, the busy indicator will appear in the center of the screen, but it will not appear to pair.
In order to connect, you must swipe down to view the notification center and see if there is an item listed as a Pairing
request. Tap the pairing request and then a pairing confirmation dialog should appear. Tap the Pair button and then the
password prompt should appear.

Page 6 of 26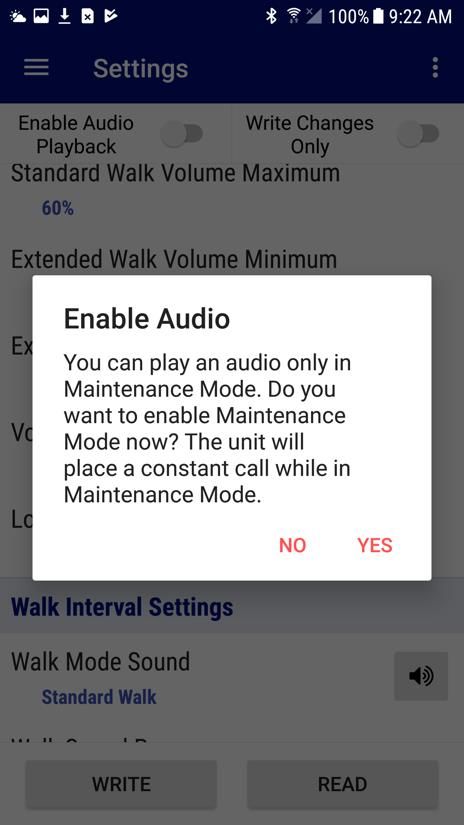
iN/iNS/iDS 3-Wire Polara FS Android Application Manual
                                                                                  350-075
                                                                         Revision C - 1/20/2021

1.2 PBS Status

                 On this PBS Status screen, the information is shown live from
                 what is occurring in the PBS.

                 Tapping on the Flash LED button will flash the pilot LED on
                 the PBS for a few seconds.

Page 7 of 26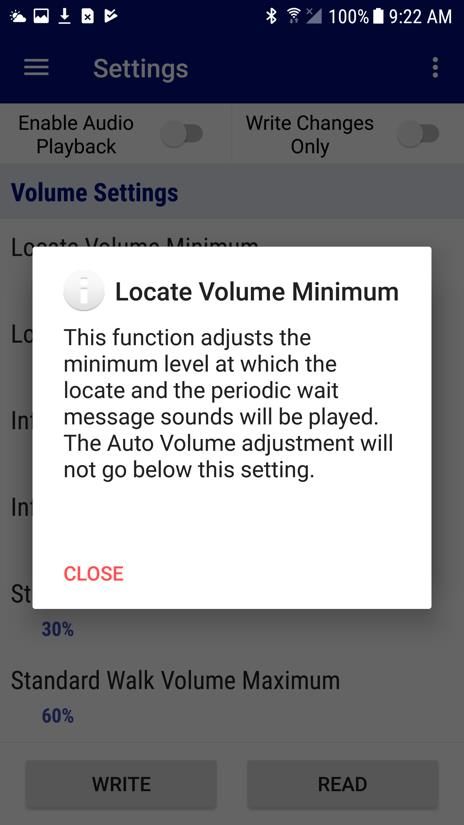
iN/iNS/iDS 3-Wire Polara FS Android Application Manual
                                                                                                                  350-075
                                                                                                          Revision C - 1/20/2021

1.3 Changing the PBS Password
Each unit will require that the password be changed from default in order to avoid the repeating “Change Password” voice
message. To change the password, scroll down on the menu under the PBS Configuration category and choose
Password. Enter in the appropriate fields: the current password, new password, and retype new password. Then tap the
Save button in the upper right corner of the screen. This will update the password in the unit. Once the password has
been updated, the screen will clear. Open the main menu (via the three lines in the upper left corner or swipe your finger
in from the left of the screen), then choose another task to exit the password screen.

Page 8 of 26
iN/iNS/iDS 3-Wire Polara FS Android Application Manual
                                                                                                                  350-075
                                                                                                          Revision C - 1/20/2021

1.4 Assigning a Name to a PBS
Each PBS may be given a name to help identify it while performing configuration and updates. You may want to use a
name that will include the location. From the main menu, select the Button Info/Diagnostics option on the bottom of the
menu. Then tap the Rename button to rename the unit.

1.5 Setting the PBS Time and Date
                                          While viewing the main menu, tap on Date/Time option. Tap to choose a
                                          method of obtaining the time, then tap on the three dots on the upper right
                                          corner of the screen and tap “Save” to update the PBS clock.

Page 9 of 26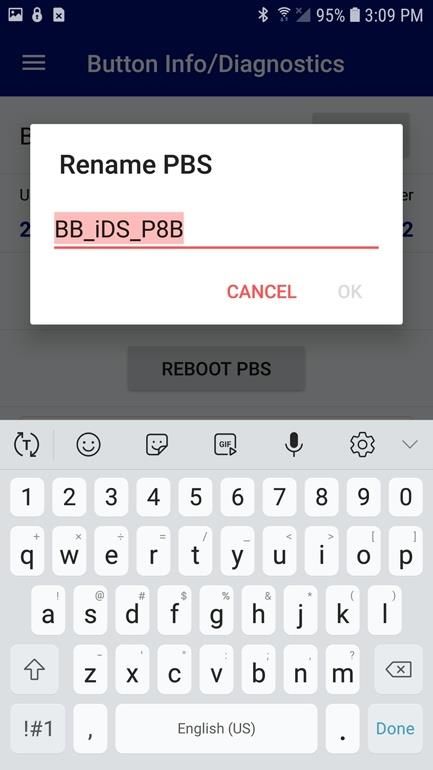
iN/iNS/iDS 3-Wire Polara FS Android Application Manual
                                                                                                                  350-075
                                                                                                          Revision C - 1/20/2021

1.6 PBS Configuration Options
From the main menu, tap the Settings item under the PBS Configuration category. This presents an extensive list of
operational settings that may be adjusted according to desired operation. You can swipe the list up and down to find the
setting to be changed.

Tap the setting to access the options for that setting. Make your value changes and tap OK to confirm the new value or
CANCEL to proceed without any change. Tap the INFO button for more information regarding the setting.

Page 10 of 26
iN/iNS/iDS 3-Wire Polara FS Android Application Manual
350-075
Revision C - 1/20/2021
Options for selecting sounds have a button with a speaker symbol. To listen to sounds, use the slider to Enable Audio
Playback or press the icon next to the sound you wish to hear. For safety, the unit will need to go into Maintenance Mode
and the LED will perform a three-flash pattern. Press Yes to enable Maintenance Mode. In this mode, the unit’s main
button will not operate or respond to interval changes so a pedestrian cannot use it. This will only be done on the iN2 unit
you are directly connected to, so a remote button cannot be made to play a walk sound and confuse a pedestrian.
Tap the speaker symbol to listen to the selected sound. Sounds will play out of the PBS’s speaker. Turn off the Enable
Audio Playback switch to resume the unit’s normal operation.
When you are finished selecting desired settings, tap the Write button to write the settings to the connected button.
Alternatively, tap the menu symbol at the top right to access additional options.
After saving new settings to buttons, walk the entire intersection to test each PBS for proper operation to verify that the
new settings work as intended.
Page 11 of 26iN/iNS/iDS 3-Wire Polara FS Android Application Manual
350-075
Revision C - 1/20/2021
The currently displayed settings may be saved to a file and recalled for later uploading to other PBSs. Tap the three dots
in the upper right corner to display the action menu and tap “Save As File” and enter a file name to create a file.
Tap “Load From File” to browse previously saved configuration files. Tap a file name and then tap OK to load the settings
into the settings list. Then tap WRITE to save settings to the PBS.
Note: The configuration files only save the PBS Settings listed on this screen and does not apply to additional parameters
on other screens such as Quiet Time or Wireless Sync and also does not save audio files. Audio files must be extracted
and uploaded separately.
While in the File Browser, you can delete files, if necessary. To delete files, swipe from the right to the left. You can also
export the file for use in other apps by tapping the E-MAIL button. The configuration files are the same between all apps
(iOS, Android, & PC) and can be used interchangeably.
Save Dialog File Options
Page 12 of 26iN/iNS/iDS 3-Wire Polara FS Android Application Manual
350-075
Revision C - 1/20/2021
1.7 Quiet Time
The iN3 PBS has a feature to easily allow the button to become quieter at a specified time of day. This is useful, for
example, when a residential street experiences a lot of traffic during the day, but very little in the evening. In this scenario,
it may be useful to have the iN2 PBS set loud enough to be heard over traffic during the day, but be nearly inaudible in the
evening hours, as not to disturb residents living nearby. Quiet Time allows for a reduction in volume between a specified
time interval, within a 24-hour day. The details of the feature’s operation are such that if the current time of day falls
between the selected start and end time of the Quiet Time period, then all Minimum and Maximum volume settings will be
reduced by the specified reduction amount.
Note: The “Minimum” volume setting can be reduced down to 0%, but the “Maximum” volume setting will only be reduced
down to 25%. This follows what is settable in the configuration parameters or settings screen.
The table below shows what the effective volume settings would be with the Quiet Time set to reduce the volume by 30%.
With the values set as shown in the screenshots, between the hours of 9:00am and 7:59pm, the volume will be as set
configured in settings (shown in the “set value” column). At 8:00pm to 8:59am the following morning, the volumes will be
reduced as shown in the “reduced value” column:
Setting Name Set Value Reduced Value
Locate Volume Minimum 0% 0%
Locate Volume Maximum 50% 25%
Information Message Minimum 65% 35%
Information Message Maximum 100% 70%
Std Walk Minimum 30% 0%
Std Walk Maximum 60% 30%
Ext Walk Minimum 60% 30%
Ext Walk Maximum 80% 50%
From the PBS Configuration section of the Main Menu, select Quiet Time. Turn the Quiet Time switch On, then enter the
desired settings, then tap the Save button.
Page 13 of 26iN/iNS/iDS 3-Wire Polara FS Android Application Manual
350-075
Revision C - 1/20/2021
1.8 Wireless Sync
Use this feature to configure PBS to PBS wireless links for units that do not have PED call wiring to the traffic signal
controller. This function provides a link between PBSs on the same PED phase such that a button press on one unit
enables the Walk and Clearance sound on the other units. Both standard and extended push status is transmitted.
When the Wireless Sync feature is active, the PBS will not accept Bluetooth connections via an iOS device or PC.
However, 5 seconds after an Extended Push, the PBS will accept connections until the start of the next Clearance cycle.
Tap on the Wireless Sync option in the main menu.
Enable this function by tapping the ‘Wireless Sync’ switch at the top of the screen.
The Intersection ID is used to prevent any possible interference between nearby intersections which are also using this
feature. Tap the ‘Intersection ID’ box and enter a number between 0 and 65535 and tap ‘OK. Any number is acceptable as
long as it is different from that used on any nearby intersection. In the same manner, enter the PED phase number for this
PBS. Each PBS should be configured using the same procedure. PBS units with the same Intersection ID and Phase
numbers will exchange button push information.
When the Remote Ped Call option is enabled, if that unit receives a button push indication from a Wireless Sync
transmission, then it will also cause a Ped Call indication in the form of a contact closure on the terminal block wires to the
traffic cabinet. This can be useful if one side of intersection has button wires to the traffic cabinet but the other side does
not. Then any button pushed form the unit without wires can transmit the button press status wirelessly to the other unit
causing a Ped Call to be asserted. In this situation, only the units with button wires going to the traffic cabinet should have
this option enabled.
Page 14 of 26iN/iNS/iDS 3-Wire Polara FS Android Application Manual
350-075
Revision C - 1/20/2021
1.9 iDetect Settings
iDetect brings touchless actuation to APS and is an added feature in all iDS APS
buttons. There are many technologies that can facilitate touchless actuation, but each
has strengths and weaknesses. Polara has chosen to use radar technology because of
its performance, reliability, and resistance to vandalism. The intent of iDetect is to
provide touchless actuation within a sensing range of 2” to 6”. A basic configuration of
iDetect is necessary after installation is complete (e.g., the APS is mounted to the pole
properly, the button cover is installed, and the sign is installed).
Settings for the performance of iDetect functionality can be modified in the iDetect
Settings screen. This screen can be found from the Main Menu by selecting PBS
Configuration and then iDetect Settings.
The iDetect function can be completely disabled by turning off the Enable iDetect switch.
This switch must be enabled in order for iDetect to be operational.
The Detection Profile selects sensitivity and detection schemes.
• Profile 0 (zero) uses a basic wave detection scheme. It is not recommended for
use in new installations and only remains for backward compatibility. It is
recommended to update the iDS unit to the latest firmware and use Profile 1 for
greater sensitivity.
• Profile 1 (one) has increased system sensitivity and includes a Minimum Wave Time setting.
The Range setting adjusts how close or far away the iDetect feature will detect movement. This setting may need to be
modified based on which size sign is installed in order to optimize the detection range. A lower setting will limit the user’s
hand to a very close proximity (~2”) to the unit before detection occurs, whereas a higher number will open detection to a
slightly further distance (~6”) before detection occurs. The settable range goes from a setting of 0 to 24. The factory
default value is 9.
The Extended Push setting will change how Extended Pushes are handled by iDetect. The settable options include
disabling the detection of Extended Pushes (Off), Override Short Push, and detection times of 1 second to 3 seconds in ½
second increments. The factory default value is 1 second. When this option is set, the user must continuously move their
hand near the unit for the set time. When the user’s hand first approaches the unit, the “Wait” (or configured Button Push
Confirmation sound) will play. Then as they continue to move their hand (e.g., in a circular pattern near the unit), after 1
second the configured Information Message sound will play. If Override Short Push is selected, then instead of the “Wait”
sound, the Information Message will be heard and the Extended Push volumes will take effect for the Walk and Clearance
intervals.
Minimum Wave Time (Profile 1 only) sets the amount of time that a wave must be performed before the call is activated.
The settings are in milliseconds and the available options are 0ms, 50ms, 250ms and 500ms. The factory default is
50ms. This setting can be adjusted if false activations are common. Note: The Minimum Wave Time does not increase
the timing of the Extended Push, so if the Minimum Wave Time is set to 500ms (which is ½ second), the user must wave
for ½ second to hear the “Wait” sound. Then, if the Extended Push setting is set to 1 sec, the user must continue waving
for another ½ second to hear the Extended Push sound. If the Extended push setting is set to 1.5 sec, then the user will
wave for ½ second to hear “Wait” and then continue waving for another full second to hear the Extended Push sound.
Tap the Save button in the upper right corner of the screen to store the changes onto the unit.
Page 15 of 26iN/iNS/iDS 3-Wire Polara FS Android Application Manual
350-075
Revision C - 1/20/2021
1.10 PedApp Settings
The iNS can be configured to work with the Polara PedApp, which is available for iOS via the App Store and for Android
via Google Play. When the buttons at an intersection are configured for use with the PedApp, they allow pedestrians to
place calls for the desired crossing, without touching the buttons. Additional features to help the visually impaired include
text-to-speech to speak the street names of the intersection and increased locate tones for the target button, to help find
the button associated with the desired crossing.
To configure the iNS for use with the PedApp, please refer to the PedApp Configuration Guide available in the Help menu
of each Field Service application and also on the Polara website.
1.11 Preparing Audio Files
The audio files which are played in the iNav units are encoded using the open-source Ogg Vorbis codec. Polara provides
professionally recorded custom audio files on the website. Go to Polara.com and click on the Audio Library option. You
can search for audio files which have already been recorded if the streets on the desired intersection are common.
However, you can also request to have messages recorded for you by clicking on the Request Custom Message option
and filing out the form on the website.
If you wish to record your own messages or already have messages in another format (such as .wav or .mp3), these
messages can be converted to the specific Ogg Vorbis format needed by the iNav devices by downloading the Intelligent
Config application (also available on the Polara.com website) and using the Convert Audio option.
Once you have your .ogg files prepared, they must be transferred onto your Android device. There are multiple ways to
accomplish this. The below are a few ways of transferring the files.
• Send the files as an e-mail attachment to an account on your Android device.
• Use the USB cable connected from the Android device to your PC and transfer the files directly to the device’s file
system.
• Copy the files to the microSD card of the Android device.
• Download the Polara.com files using the web browser on the Android device.
Any of these methods can be used as long as the .ogg files appear in the file browser of the Android device. An easy
location would be to copy these to the Downloads directory on the Android device for easy retrieval.
Page 16 of 26iN/iNS/iDS 3-Wire Polara FS Android Application Manual
350-075
Revision C - 1/20/2021
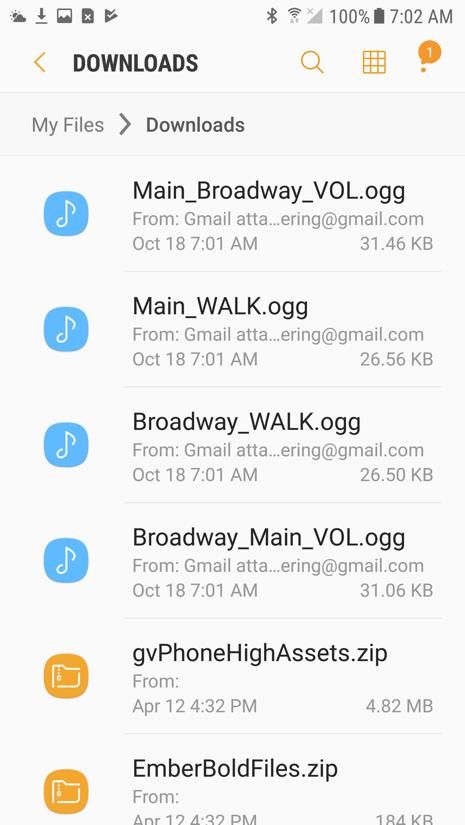
1.11.1 Opening .ogg files as an e-mail attachment
If you have sent the files to an e-mail account that is associated with your Android device, open the e-mail to view the
attachments.
Tap on the main part of the attachment (not the download arrow or the Google Drive icon). You should be presented with
the Open With popup. Tap on Polara FS to import the file into the Polara Field Service app.
Page 17 of 26iN/iNS/iDS 3-Wire Polara FS Android Application Manual
350-075
Revision C - 1/20/2021
1.11.2 Opening .ogg files via Android File System
If you have downloaded the .ogg file into the Android device’s file system, open a file browsing application. The
application will vary depending on the device. On Samsung devices, this is the My Files application.
Example: Samsung Galaxy S7
Using the Samsung My Files
application to import .ogg files
into the Polara FS app.
Example: Google Pixel
Using the ES File Explorer
application to import .ogg files
into the Polara FS app.
Page 18 of 26iN/iNS/iDS 3-Wire Polara FS Android Application Manual
350-075
Revision C - 1/20/2021
1.11.3 Browsing for .ogg files via Polara FS App
If you have .ogg files stored in your Android device’s internal or SD card memory, you can import it directly using the
Polara FS app file manager. Open the Polara FS app and select the File Manager option from the main menu.
Tap the three dots in the upper right corner of the screen and select Browse to Import Files.
You will be presented with a file browser. Browse to the location with your saved .ogg files, and then tap on one of the
files to import it. Repeat the process for each file to import.
Page 19 of 26iN/iNS/iDS 3-Wire Polara FS Android Application Manual
350-075
Revision C - 1/20/2021
1.12 Updating Audio Files
From the main menu, tap on the Audio Update option.
To add a new Information Message file, tap on “Information Message”. This displays a list of available voice files loaded
into the Polara App. Tap on the name of the file you wish to load as the Information Message sound in the PBS. Then tap
the OK button.
Note: Files ending with the suffix VOL should be loaded as an Information Message and files with the suffix WALK should
be loaded as Custom Walk.
Tap OK on the confirmation box and the file will begin uploading. Once the file has completed uploading, you will be
returned to the Audio Update screen.
Page 20 of 26iN/iNS/iDS 3-Wire Polara FS Android Application Manual
350-075
Revision C - 1/20/2021
Repeat this process for each file to be uploaded. Typically, a custom set will include two files, one for Information
Message and one for Custom Walk #1. To enable these new custom files, go to PBS Configuration Settings and set the
Information Message option to “Custom”, and set the Walk Mode Sound option to “Custom Walk #1”.
Finish by walking the intersection to confirm the system is both operating properly and playing correct
messages.
Additional sounds can be modified for specific circumstances. The following view shows the additional sounds that can
be uploaded using the Android app.
If additional audio sound customization is required beyond what is listed in the Audio Update screen, use the Intelligent
Config PC Application for more audio upload options, including adding additional second language audio files or replacing
Countdown files. An iN-DGL dongle is required for connection to an iNav unit using the PC. Contact your distributor to
obtain an iN-DGL if you do not already have one.
Page 21 of 26iN/iNS/iDS 3-Wire Polara FS Android Application Manual
350-075
Revision C - 1/20/2021
1.13 Extract Audio Files
The same messages that are available to be changed via Audio Update can be extracted from the PBS. This feature
requires firmware version v3.199 or greater in the iNx unit.
While in the Audio Update screen, tap the three dots in the upper right corner and select Extract Audio.
All options on screen should change to add the word “Extract” to the front to indicate that you will be extracting the
selected message from the unit.
It is recommended that you listen to the message on the unit prior to extracting it so you know how the message should
be named. Perform an extended push on the unit to hear the Information Message and then wait to hear the Walk
message, or use the sound play feature in the Settings screen.
To extract the Information Message, tap the Extract Information Message option.
You will be prompted to add a filename for the extracted file. Name the file
appropriately for the intersection streets. For example, the intersection of
Broadway and Main would have an information message named
“Broadway_Main_VOL” and the corresponding walk message would be
“Broadway_WALK”.
Tap OK to begin extraction.
Once extraction is complete, you can extract additional messages from the unit
or tap the three dots in the upper right corner and select the Upload Audio
button to switch back to upload mode.
You can view the extracted messages by selecting the File Manager from the
Main Menu. Tap on one of the .ogg files to bring up the action menu. From
there you can play the sound and hear it from the Android device’s speaker or
e-mail/export the file.
Page 22 of 26iN/iNS/iDS 3-Wire Polara FS Android Application Manual
350-075
Revision C - 1/20/2021
2. Using the Polara Field Service App to Access the Health Log
2.1 Accessing the Health Log
The Health Log contains a list of events, including both normal conditions and error conditions. Each PBS maintains a
separate log. These can be very useful for troubleshooting.
Tap the box for “Health Log” at the Polara App main menu. Tap the “Read” button to begin retrieving the health log from
the connected iN3 unit. The log is downloaded and displayed. Swipe the screen to browse through the log. Tap the menu
symbol at the top right to access a list of actions. The menu symbol is shown as three dots. You can choose to clear the
log, export the log to an email address, or view the log file as text in another external application. For help with a particular
issue, or a message of concern, email the log to support@polara.com.
Page 23 of 26iN/iNS/iDS 3-Wire Polara FS Android Application Manual
350-075
Revision C - 1/20/2021
3. Getting Button Info and Diagnostics
The Button Info/Diagnostics page in the PBS Configuration section of the main menu shows additional details about the
iNav unit.
• Press the Rename button to change the units name that appears when searching for devices during connection.
• To view a list of all information and settings configured for a unit, tap the View All Unit Information button. This
will display detailed information about all factory and user-settable settings. Note: This information is also
prepended to the health log when exported to file.
• The Reboot PBS button will cause a soft-reset of the unit.
• Pressing the Run Diagnostic button will perform a self-test of each of the listed items and return a Pass/Fail result.
This does not absolutely mean that the unit is functioning perfectly, but that the software does not detect any
abnormalities in the data or responses from the specified test.
Page 24 of 26iN/iNS/iDS 3-Wire Polara FS Android Application Manual
350-075
Revision C - 1/20/2021
4. Using the Polara Field Service App for Firmware Updates
4.1 Checking for the Latest Firmware
Firmware files are automatically bundled with the Polara Field Service App. The latest firmware at the time of App release
is ready and pre-installed for updating.
The Android App also has the ability to connect to polara.com to check for new updates directly from within the App. Your
device must be connected to the internet in order to perform the check. This can be done while connected to a unit or
while working without a Bluetooth connection. Tap on the File Manager option in the main menu to browse all files on
your Android device. Tap the three dots in the upper right corner of the File Manager screen. Tap the Check For Updates
button. The device will connect to the internet and check for the latest firmware files from polara.com and provide them for
download. You can tap on View Release Notes to see what the changes are from the previous version or tap the
Download button to download the file to your device.
Firmware files to be uploaded can also be received using the same methods used to transfer .ogg files to the Polara FS
App. Follow the same instructions as in section Error! Reference source not found. to import the files.
Page 25 of 26iN/iNS/iDS 3-Wire Polara FS Android Application Manual
350-075
Revision C - 1/20/2021
4.2 Performing a Firmware Update
To perform a firmware update, tap Firmware Update from the main menu. On the firmware update page, you can view the
current firmware device you are connected to. Tap the Update Firmware button. The list of available firmware update files
will appear. Tap the file you wish to upload and tap OK to begin the select the file. Tap OK on the confirmation dialog to
start the update process. When the process is complete, a message is displayed confirming update success.
Page 26 of 26You can also read