ONEView Book A Shipment User Guide - CEVA Logistics
←
→
Page content transcription
If your browser does not render page correctly, please read the page content below
ONEView Book A Shipment
User Guide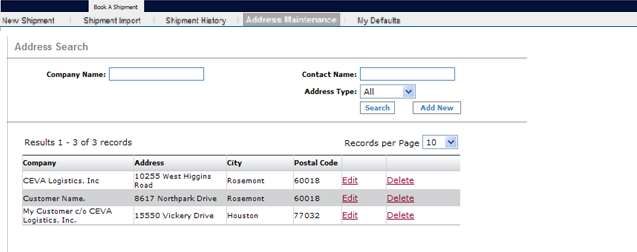
Contents
Overview .................................................................................................................................................. 3
       1.1 BOOK A SHIPMENT – NEW SHIPMENT....................................................................................... 3
       1.2 BOOK A SHIPMENT – SHIPMENT IMPORT................................................................................ 15
       1.3 BOOK A SHIPMENT – SHIPMENT HISTORY ............................................................................... 18
       1.4 BOOK A SHIPMENT – ADDRESS MAINTENANCE ...................................................................... 20
       1.5 BOOK A SHIPMENT – MY DEFAULTS ........................................................................................ 21

ONEView User Guide                                                                                                                         Version 2.0
As of Jan 2021                                                                                                                                 Page 2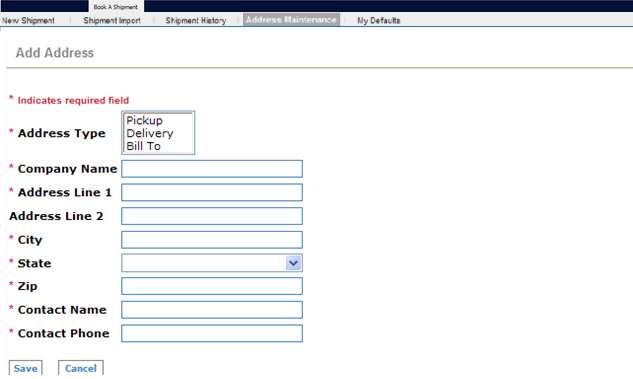
Overview
Book A Shipment is a web-based application and online pickup tool in the ONEView suite of
applications. Its capabilities are used to request US domestic transport; including
international land borders – Canada and Mexico. This section of the user guide provides the
essential information to help you use Book A Shipment most effectively. When the user
first selects the Tab the page opens to the full application. The user can navigate from this
page to other any application page.

1.1 BOOK A SHIPMENT – NEW SHIPMENT
New Shipment enables the user to request a new booking request to their local CEVA
station and confirm a booking with a CEVA House Bill. The user is able to entering customer
name and addresses for Pickup, Delivery, and Billing. In addition, it allows the data entry of
shipping details and instructions. Each section of New Shipment will be discussed in detail.

           Parameter                                   Description
                             Pickup name and address always reflect the location where
  Pickup Information
                             freight will be physically retrieved from.
                             Delivery name and address always reflect the location where
  Delivery Information
                             freight will be delivered.
                             Bill to name and address always reflect the location where
  Bill Information
                             freight should be billed.
                             Shipment details that always include pieces, weight, and
  Shipment Detail
                             dims shipment details by line item.
                             Shipment instruction can include service level, special
  Shipment Instruction       services, or notification instructions; as needed at pickup or
                             delivery.
  Terms & Conditions         Terms and conditions of service
                             Submit will always default to accept the user’s data entry
  Submit
                             upon clicking on this button.
                             Cancel will always default to remove the user’s selection of
  Cancel
                             search parameters upon clicking on this button.

1.1.1 Pickup Information
To create a booking request, begin by entering the data for the Pickup address section.

ONEView User Guide                                                                 Version 2.0
As of Jan 2021                                                                         Page 3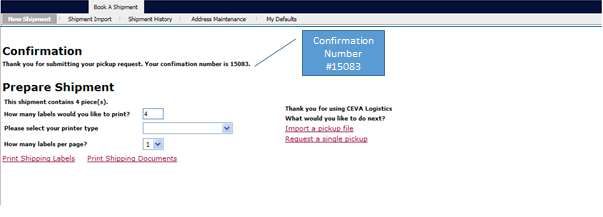
Within this section, there are some required data fields. The table below outlines Data Field
Name, Required (Y or N), and Description as it applies to the Pickup Information section.

           Field Name      Req’d                            Description
   Company Name               Y      Company name
   Address Line 1             Y      Company first address line
   Address Line 2             N      Company second address line, optional
   City                       Y      Company city
   State                      Y      Company state
   Zip                        Y      Company zip code
                                     Contact name for questions about where freight will be
   Contact Name               Y
                                     physically retrieved for shipment
   Contact Phone              Y      Contact phone for Contact Name
   Pickup Account Code        N      Account Code to be assigned for Pickup
                                     Date pickup is needed

                                     Note: Book A Shipment will not accept a New Shipment
   Pickup Date                Y
                                     request that has expired (validated by shipment’s
                                     Pickup Date – Ready Time – Pickup By); based on your
                                     local system time.
   Ready Time                 Y      Earliest time freight will be ready for pickup
   Pickup By                  Y      Latest time freight will be ready for pickup

ONEView User Guide                                                                    Version 2.0
As of Jan 2021                                                                            Page 4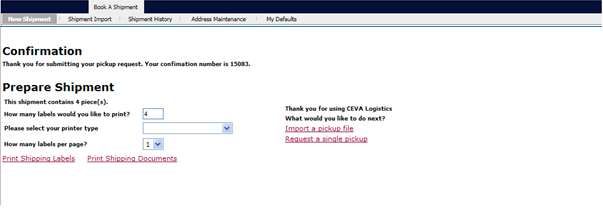
Icon / Image           Name                       Description / Function
                        Save as New      Customer name and addresses can be saved as a
                        Favorite         new favorite, by clicking the check-box field.
                                         Customer name and addresses can be retrieved
                        Lookup           from Address Maintenance, if they already exist
                                         by customer name.

If you choose the Lookup feature in the Pickup Information section, a window will pop up.
The Address Search window allows you to enter or select your parameters.

Search by Company Name or Contact Name. In addition, Search by a Favorite or Past
Shipment; or by an Address Type. If you search by Address Type, click the drop-down box
and select any Type.

Click the Search button to receive the search results. The search results page helps you sort
and select your record. The table below outlines the functions of the search results page:

     Icon / Image / Link            Name                     Description / Function
                                                    Reflects the record of the total search
                               Record Results
                                                    results
                                                    Users to select the number of
                                                    incremental records to be displayed on a
                               Records per Page
                                                    single search results page (10, 25,
                                                    50,100 pages)
            Select             Record Select        Select a record from search results page

Select your customer record from search results page to fill-in this Information section (see
screenshot below).

ONEView User Guide                                                                 Version 2.0
As of Jan 2021                                                                         Page 5
1.1.2 Delivery Information
To continue the next information section, enter the data for the Delivery address.
Within this section, there are some required data fields. The table below outlines Data Field
Name, Required (Y or N), and Description as it applies to the Delivery Information section.
Field Name Req’d Description
Company Name Y Company name
Address Line 1 Y Company first address line
Address Line 2 N Company second address line, optional
City Y Company city
State Y Company state
Zip Y Company zip code
Y Contact name for questions about freight transport
Contact Name
for delivery
Contact Phone Y Contact phone for Contact Name
Delivery Account Code N Account Code to be assigned for Delivery
Deliver by Date Y Delivery date requested
Deliver by Time Y Delivery time requested
Icon / Image Name Description / Function
Customer name and addresses can be saved
Save as New
as a Favorite, if customer name does not
Favorite
already exist.
ONEView User Guide Version 2.0
As of Jan 2021 Page 6Icon / Image Name Description / Function
Customer name and addresses can be
Lookup retrieved from Address Maintenance, if they
already exist by customer name.
If you choose the feature in the Delivery Information section, a window will pop up.
The Address Search window allows you to enter or select your parameters.
Search by Company Name or Contact Name. In addition, Search by a Favorite or Past
Shipment; or by an Address Type. If you search by Address Type, click the drop-down box
and select any Type.
Click the button to receive the search results. The search results page helps you sort
and select your record. The table below outlines the functions of the search results page:
Icon / Image / Link Name Description / Function
Record Reflects the record of the total search
Results results
Users to select the number of incremental
Records per
records to be displayed on a single search
Page
results page (10, 25, 50,100 pages)
Record
Select Select a record from search results page
Select
Select your customer record from search results page to fill-in this Information section (see
screenshot below).
1.1.3 Billing Information
To finish the last information section, enter the data for billing address (see screenshot
below).
ONEView User Guide Version 2.0
As of Jan 2021 Page 7Within this section, there are some required data fields. The table below outlines Data Field
Name, Required (Y or N), and Description as it applies to the Billing Information section.
Field Name Req’d Description
Company Name Y Company name
Address Line 1 Y Company first address line
Address Line 2 N Company second address line, optional
City Y Company city
State Y Company state
Zip Y Company zip code
Y Contact name for questions about freight transport
Contact Name
billing
Contact Phone Y Contact phone for Contact Name
Billing Account Code N Account Code to be assigned for Billing
Y Company payment term by collect, prepaid, or third
Payment Terms
party with a CEVA account number
New Shipment allows the user to store frequently used billing company name and
addresses, using one of four features.
ONEView User Guide Version 2.0
As of Jan 2021 Page 8Feature Actions / Results Screenshot
Save As New The Save As New Favorite feature
Favorite allows you to type a new company
name and address; then save this
Favorite by selecting the Save as
New Favorite check-box field;
located below the data field -
Contact Phone of the Billing
Information section. This Favorite
customer will now be available as a
Lookup.
Same As As an alternative, you can select the
same company name and address
for the pickup or the delivery. To
use this feature, click the Same as
drop-down box and select the Pickup
option, or Delivery option. This
feature is only available in the Billing
Information section.
Lookup Another alternative is Lookup
feature. If you click the
button, the Address Search window
will pop up. This window allows you
to enter or select your parameters.
Search by Company Name or Contact
Name. In addition, Search by a
Favorite or Past Shipment; or by an
Address Type. If you search by
Address Type, click the drop-down
box and select any Type. Click the
button to receive the search
results. The search results page
helps you sort and select your
record. Select your record from
search results page to fill-in this
Information section.
ONEView User Guide Version 2.0
As of Jan 2021 Page 9Feature Actions / Results Screenshot
Update The last alternative is the Update.
To use this feature, look up an
existing customer name and address
(see alternate Lookup above), then
enter new changes and click on the
Update check-box field.
1.1.4 Shipment Details
To start this shipment section, enter the data for Shipment Details (see screenshot below).
In addition, the user will be able to enter multiple references.
ONEView User Guide Version 2.0
As of Jan 2021 Page 10Within this shipment section there are some required data fields. The table below outlines
the data Field Title, Name, Required (Y or N), and Description as it applies to the Shipment
Detail section.
Label Name Req’d Description
Pcs Pieces Y Number of pieces per line item
Wt Weight Y Weight (pounds) per line item
L Length Y Length (inches) per line item
W Width Y Width (inches) per line item
H Height Y Height (inches) per line item
The description of the freight being
Commodity Commodity Y
transported
If a shipment’s commodity (description) is
subject to hazmat regulations.
Haz? Hazmat Y
Note: Hazmat is also known as hazardous
materials or dangerous goods.
This field is conditional. If the Haz? check-
box field is selected; then this assigned
number must be entered, beginning with
“UN”.
UN# UN Number N/Y
Note: UN numbers are recognized as
industry standard for the transport of
hazardous materials - for all modes of
transport.
New Shipment allows the user to maintain shipment details by adding or deleting
multiple line items.
1.1.5 Shipment Instructions
Continue to next shipment section; enter the data for Shipment Instructions (see
screenshot below). Shipment instruction allows the user to include service level, special
services, or notification instructions; as needed at pickup or delivery.
ONEView User Guide Version 2.0
As of Jan 2021 Page 11Within this shipment section there are some required data fields. The table below outlines
the data field Name, Required (Y or N), and Description as it applies to the Shipment Detail
section.
Field Name Req’d Description
A description of the service delivery levels or
conditions, some normally accepted in the market
Service Level Y others specific CEVA service delivery level; such as
Next Day Local, Next Day by 5:00pm, Ceva Value, Ceva
Premium.
Quote number as assigned by CEVA account
Quote # N
representative.
Declared Value N Total value of the shipment; if insurance is needed
N Insurance coverage is needed for the shipment; if
Insured
check-box field is selected
N If any of the shipment detail lines are checked as
hazardous, then you are required to provide a 24-hour
24 Hour Contact contact phone number.
Number
For more information see section 1.1.4 Shipping
Details
N Special instructions can be indicated for the pickup or
Special Instructions
delivery transport of the shipment.
N A description of the special service levels or
conditions, some normally accepted in the market
Special Services others specific CEVA service delivery level; such as
Hold for Pickup at Airport, Two Man Delivery Team, By
Appointment Only.
ONEView User Guide Version 2.0
As of Jan 2021 Page 12Field Name Req’d Description
N Means of automatically pre-alerting notification
parties of a booking request via e-mail, when a New
Shipment is accepted by Book A Shipment. The user
Notification must enter e-mail addresses.
Note: This feature is available only with New
Shipment processing.
New Shipment allows the user to maintain shipment instructions by adding or deleting
multiple services and notifications.
1.1.6 Submitting Your Request
Prior to accepting a booking request, CEVA requires acceptance of the Book A Shipment
terms and conditions. To read the terms and conditions click the link Terms and Conditions,
located above the button at the bottom right corner of New Shipment page. If you
have not entered all the required data, New Shipment will not accept your booking request
and reflect the exception errors in different ways throughout the application page.
For example, if a customer information or shipment details field has not been entered you
will receive an exception alert with a brief description of the exception. You may also
receive an exception alert text message - highlighted/bolded in red (ie; Shipment Detail
Information required). All exception messages will need to be corrected to submit a booking
request successfully.
After correcting your exception message, submit your booking request by clicking the
button. If other exception messages exist, New Shipment will alert you. Continue to submit
your booking request, as needed.
1.1.7 Confirming and Preparing Shipment
New Shipment also enables the user to receive a booking confirmation and prepare their
shipment. This section is discussed in detail.
ONEView User Guide Version 2.0
As of Jan 2021 Page 13Book A Shipment assigns a confirmation number to any booking request submitted and
accepted. This number can be used later, as a search parameter to track your booking
request (see section 1.3 Book A Shipment – Shipment History).
Continue to prepare your shipment by printing labels and shipping documents. This step-
by-step process allows you to print to an inkjet / laser printer, or your zebra label printer.
Screenshot / Image / Link /
Step Options / Choices
Parameter
How many labels would
you like to print?
Enter number of labels
equal to total number of
shipment pieces
Select your printer type
Use standard 8x11 paper or
Select drop-down to view InkJet / Laser Avery 5168 Mailing Labels as
options the paper source
Use rolls that contain labels
Label Printer (Zebra)
measuring at least 4x5 inches
ONEView User Guide Version 2.0
As of Jan 2021 Page 14How many labels per
page? InkJet / Laser
Your selection designates Label Printer (Zebra)
your page layout, based
on number of labels per For Zebra, this option
page. defaults to 1
Print Shipping Labels
Print InkJet Labels
Print shipping labels are stored as default Bulk Upload Inkjet
.pdf format file Label.pdf
Click on the link
Print Zebra Labels are
stored as default .pdf Bulk Upload Zebra
format file Label.pdf
Print Shipping Documents
Print shipping documents Shipping documents
are stored as default
Click on the link .pdf format file Bulk Upload Shipping
Document.pdf
Import a pickup file
Request a single pickup
Import a pickup file
What would you like to Import multiple new
do next? bookings (shipments) See Section 1.2 Book A
in a single transaction Shipment – Shipment Import
Click a link to select your for more information
option Request a single pickup
Request a new
See Section 1.1 Book A
booking manually
Shipment – New Shipment for
more information
1.2 BOOK A SHIPMENT – SHIPMENT IMPORT
This next page is a user interface to load and import multiple booking requests in one single
transaction file. The user is able to submit new booking requests by importing customer
name and address information, as well as shipping details and instructions. Each step of
Shipment Import process is discussed in detail.
ONEView User Guide Version 2.0
As of Jan 2021 Page 15Shipment Import allows the user to load import booking requests in a single transaction file.
Book A Shipment accepts a pre-formatted Excel file. A Microsoft Excel template and user
instructions are available for download. This step-by-step process allows you to submit
your import file:
Download Excel Fill Out Template Import Completed Excel
Template & Instructions Spreadsheet
Template: MS Excel - Office Enter data in required Click on to retrieve and
http://oneview.cevalogistics.com/ load your import file.
BAS/BookaShipmentTemplate.xls fields of the Book A
Shipment template, to Confirm your file path, and click on
Download Shipment Upload create your booking .
Instructions, for these data field
attributes and requirements.
requests. Save your data
http://oneview.cevalogistics.com/ as an import file.
BAS/ImportInstuctions.pdf
Upon submitting your import file, Shipment Import returns an Import Results page. If you
have not entered and formatted all the required data, Shipment Import will not accept your
import booking request.
For example, if you import a booking request for pickup date prior to Today, your import file
will be rejected due to expired booking request. Booking requests are validated based on
the pickup date, earliest pickup time, and latest pickup time. Another example is, if data is
entered to indicate an optional Service Level, but was not entered with a recognized service
level code; your import file will be rejected (see screenshot below).
In addition, prior to accepting your import booking request, CEVA requires acceptance of
the Book A Shipment terms and conditions. To read the Terms and Conditions click the link
Terms and Conditions, located at the bottom left corner of import results page of Shipment
Import. Submit your import booking request by clicking the button, as needed.
Upon submitting your agreement to terms and conditions, and submitting your request,
Shipment Import returns a Print Shipping Documents page (the Notification function is not
featured in this section). It assigns a confirmation number to any booking request
submitted, which can be used later as a search parameter to track your booking request
(see Section 1.3 Book A Shipment – Shipment History).
ONEView User Guide Version 2.0
As of Jan 2021 Page 16Continue to prepare your shipment by printing labels and shipping documents. This step-
by-step process allows you to print to an inkjet / laser printer, or your zebra label printer.
Screenshot / Image / Link /
Step Options / Choices
Parameter
Select your printer type
Use standard 8x11 paper or
Select drop-down to view InkJet / Laser Avery 5168 Mailing Labels as
options the paper source
Use rolls that contain labels
Label Printer (Zebra)
measuring at least 4x5 inches
How many labels per
page? InkJet / Laser
Your selection designates Label Printer (Zebra)
your page layout, based
on number of labels per For Zebra, this option
page. defaults to 1
Print Shipping Labels
Print InkJet Labels
Print shipping labels are stored as default Bulk Upload Inkjet
.pdf format file Label.pdf
Click on the link
Print Zebra Labels are
stored as default .pdf Bulk Upload Zebra
format file Label.pdf
Print Shipping Documents
Print shipping documents Shipping documents
are stored as default
Click on the link .pdf format file Bulk Upload Shipping
Document.pdf
What would you like to Import a pickup file
do next? Request a single pickup
ONEView User Guide Version 2.0
As of Jan 2021 Page 17Screenshot / Image / Link /
Step Options / Choices
Parameter
Import a pickup file
Click a link to select your Import multiple new
option bookings (shipments) See Section 1.2 Book A
in a single transaction Shipment – Shipment Import
for more information
Request a single pickup
Request a new
See Section 1.1 Book A
booking manually
Shipment – New Shipment for
more information
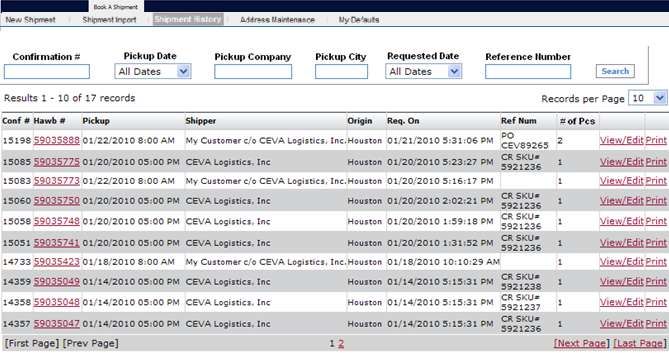
1.3 BOOK A SHIPMENT – SHIPMENT HISTORY
This next page enables the user to search, view, and maintain their historical booking
requests, as submitted in ONEView Book A Shipment. This page offers parameter driven
search capabilities to track, edit, or print a booking request. The shipment history will only
include the requests submitted through ONEView Book A Shipment. Each section of
Shipment History is also discussed in detail.
Within this section, there are six parameters that can be defined for shipment history
search criteria, they are:
Search Criteria Description / Function
Confirmation # An assigned number confirming booking request
Pickup Date Requested pickup date
Pickup Company Pickup customer name
Pickup City Pickup customer city
ONEView User Guide Version 2.0
As of Jan 2021 Page 18Search Criteria Description / Function
Requested Date Date of booking request
A unique identification number, as submitted through
Reference Numbers
ONEView – Book A Shipment
Whenever you perform a search, the Shipment History application page will display the
results of your search. Within the search results page are additional capabilities to help you
sort and select the function.
Icon / Image / Link Name Description / Function
Reflects the record of the total search
Record Results
results
Users to select the number of
Records per incremental records to be displayed on
Page a single search results page (10, 25,
50,100 pages)
Select a record from search results
Select Record Select
page
Select by assigned Hawb# to your
shipment record, to track your
shipment
Note: This shipment can only be
Hawb # Hawb Number
tracked if your shipment details are
available in the CEVA US/Domestic
source system (World Port). If you
have questions, contact your local
CEVA Account Representative.
View – provides you visibility to the
shipment details.
Edit – the shipment details may be
edited; up to the combined period of
View / Edit View / Edit
Pickup Date and Ready Time. After this
period, you may only view the
shipment details without editing
capabilities in ONEView Book A
Shipment.
Print your shipment through the
multiple methods available. See
Print Print
Section 1.1.6 Submitting Your Request
for more information
ONEView User Guide Version 2.0
As of Jan 2021 Page 191.4 BOOK A SHIPMENT – ADDRESS MAINTENANCE
This page enable the user to sort, view, or maintain customer name and addresses as
created by using the Favorite, Update, or Add functions. Each section of Address
Maintenance is discussed in detail.
Complete an address search by entering Company Name, Contact Name, or Address Type.
Customer Address Types are categorized as Pickup, Delivery, or Billing. To search, click
button.
Within the Address Maintenance search results page are some functions to help you sort
and select your record. The table below outlines the function and capabilities of the search
results page:
Icon / Image / Link Name Description / Function
Record Reflects the record of the total search
Results results
Users to select the number of
Records per incremental records to be displayed on
Page a single search results page (10, 25,
50,100 pages)
Edit your address. For more
information about the data
requirements for the address types,
refer to:
Edit Edit Record • Pickup Information (see Section
1.1.1)
• Delivery Information (see Section
1.1.2)
• Billing Information (see Section 1.1.3)
Delete Delete Record Delete your address record
ONEView User Guide Version 2.0
As of Jan 2021 Page 20It also enables the user to add new company name and addresses. To add, click . For more information about the data requirements for the address types, refer to. • Pickup Information (see Section 1.1.1) • Delivery Information (see Section 1.1.2) • Billing Information (see Section 1.1.3) 1.5 BOOK A SHIPMENT – MY DEFAULTS This last application page enables the user to pre-set defaults to any section of My Defaults application page, which mirrors the New Shipment application page. For more information about the data requirements for the address types, refer to. • Pickup Information (see Section 1.1.1) • Delivery Information (see Section 1.1.2) • Billing Information (see Section 1.1.3) As a result of My Defaults application page, the time needed to initiate a New Shipment is lessened. Data entry does not have to be duplicated. If you have questions about using ONEView – Book A Shipment, contact your local CEVA Account Representative. ONEView User Guide Version 2.0 As of Jan 2021 Page 21
You can also read


