LICO 6.2.0 KUBERNETES USER GUIDE - LENOVO
←
→
Page content transcription
If your browser does not render page correctly, please read the page content below
LiCO 6.2.0
Kubernetes User Guide
Fifth Edition (June 2021)

© Copyright Lenovo 2019, 2021.
LIMITED AND RESTRICTED RIGHTS NOTICE: If data or software is delivered pursuant to a General Services
Administration (GSA) contract, use, reproduction, or disclosure is subject to restrictions set forth in Contract No. GS-35F-
05925.

Contents

Chapter 1. Overview . . . . . . . . . . . 1                                           Submit an Instance Segmentation – Train
Introduction to LiCO .   .   .   .   .   .   .   .   .   .   .   .   .   .    1       job . . . . . . . . . . . . . . . . .                   .   14
Features of LiCO . .     .   .   .   .   .   .   .   .   .   .   .   .   .    1       Submit a Medical Image Segmentation – Train
                                                                                      job . . . . . . . . . . . . . . . . .                   .   14
Terminology . . . .      .   .   .   .   .   .   .   .   .   .   .   .   .    1
                                                                                      Submit a Text Classification – Train job . . .          .   14
Prerequisite . . . .     .   .   .   .   .   .   .   .   .   .   .   .   .    1
                                                                                      Submit a Seq2seq – Train job . . . . . .                .   15
Operating environment    .   .   .   .   .   .   .   .   .   .   .   .   .    2
                                                                                      Submit a Memory Network – Train job . . .               .   15
Chapter 2. Basic operations. . . . . . . 3                                            Submit an Image GAN – Train job . . . . .               .   15
Log in. . . . . . . . . . . . . .                    .   .   .   .   .   .    3   Job submission – Predict . . . . . . . . . .                .   16
Update Kube settings . . . . . . .                   .   .   .   .   .   .    3       Submit an Image Classification – Predict
                                                                                      job . . . . . . . . . . . . . . . . .                   .   16
Log out . . . . . . . . . . . . .                    .   .   .   .   .   .    4
                                                                                      Submit an Object Detection – Predict job . .            .   16
Get current version information . . . .              .   .   .   .   .   .    4
                                                                                      Submit an Instance Segmentation – Predict
Change the password . . . . . . .                    .   .   .   .   .   .    4       job . . . . . . . . . . . . . . . . .                   .   16
Change the user information . . . . .                .   .   .   .   .   .    4       Submit a Medical Image Segmentation –
View cluster resources and job status .              .   .   .   .   .   .    4       Predict job . . . . . . . . . . . . . .                 .   16
Elements on the cluster overview page .              .   .   .   .   .   .    5       Submit a Text Classification – Predict job . .          .   17
Manage files . . . . . . . . . . .                   .   .   .   .   .   .    5       Submit a Seq2seq – Predict job . . . . . .              .   17
    Create a folder . . . . . . . .                  .   .   .   .   .   .    6       Submit a Memory Network – Predict job . .               .   17
    Rename a folder . . . . . . . .                  .   .   .   .   .   .    6       Submit an Image GAN – Predict job . . . .               .   18
    Preview an image . . . . . . .                   .   .   .   .   .   .    6
    Archive files . . . . . . . . .                  .   .   .   .   .   .    6   Chapter 4. AI Studio . . . . . . . . . . 19
    Extract an archived file . . . . .               .   .   .   .   .   .    6   Datasets . . . . . . . . . . . .            .   .   .   .   .   19
    Upload files . . . . . . . . .                   .   .   .   .   .   .    6        Dataset information . . . . . .        .   .   .   .   .   19
    Copy and paste files . . . . . .                 .   .   .   .   .   .    7        Dataset operations . . . . . . .       .   .   .   .   .   20
    Move files . . . . . . . . . .                   .   .   .   .   .   .    7        Dataset details . . . . . . . .        .   .   .   .   .   20
    Duplicate files . . . . . . . . .                .   .   .   .   .   .    7        Create a dataset . . . . . . . .       .   .   .   .   .   20
    Download files . . . . . . . .                   .   .   .   .   .   .    7        Edit an image classification dataset   .   .   .   .   .   21
    Edit files . . . . . . . . . . .                 .   .   .   .   .   .    7        Edit an object detection or instance
                                                                                       segmentation dataset. . . . . .        .   .   .   .   .   22
API key . . . . . . . . . . . . .                    .   .   .   .   .   .    8
                                                                                  Training tasks . . . . . . . . . .          .   .   .   .   .   24
    Create a permanent API key . . .                 .   .   .   .   .   .    8
                                                                                       Submit a task . . . . . . . . .        .   .   .   .   .   25
    Create a temporary API key . . .                 .   .   .   .   .   .    8
                                                                                       View job information of a task . .     .   .   .   .   .   27
    View an API key . . . . . . . .                  .   .   .   .   .   .    8
                                                                                  Trained models . . . . . . . . . .          .   .   .   .   .   29
    Delete an API key . . . . . . .                  .   .   .   .   .   .    9
                                                                                       View models . . . . . . . . .          .   .   .   .   .   29
    Change a permanent API key. . .                  .   .   .   .   .   .    9
                                                                                       Delete a model . . . . . . . .         .   .   .   .   .   30
    Change a temporary key . . . .                   .   .   .   .   .   .    9
                                                                                       Publish a model . . . . . . . .        .   .   .   .   .   30
Publishing . . . . . . . . . . . .                   .   .   .   .   .   .    9
                                                                                       Republish a model . . . . . . .        .   .   .   .   .   30
    Create a Git publishing task . . .               .   .   .   .   .       10
                                                                                       Stop a publishing model. . . . .       .   .   .   .   .   31
    Create a Docker publishing task .                .   .   .   .   .       10
                                                                                       Deploy a model . . . . . . . .         .   .   .   .   .   31
    Republish a task. . . . . . . .                  .   .   .   .   .       11
                                                                                       Test a model . . . . . . . . .         .   .   .   .   .   31
    Delete a publishing task . . . . .               .   .   .   .   .       11
                                                                                  Deployed services . . . . . . . . .         .   .   .   .   .   31
    Stop a publishing task . . . . .                 .   .   .   .   .       11
                                                                                       View services . . . . . . . . .        .   .   .   .   .   31
Chapter 3. Lenovo-accelerated AI . . 13                                                Inactivate an activated service . .    .   .   .   .   .   32
Job submission – Train . . . . . . . . . . . .                               13        Activate an inactivated service . .    .   .   .   .   .   32
    Submit an Image Classification – Train job . .                           13        Use an activated service . . . .       .   .   .   .   .   32
    Submit an Object Detection – Train job . . . .                           14
                                                                                  Chapter 5. Dev Tools . . . . . . . . . 33

© Copyright Lenovo 2019, 2021                                                                                                                      i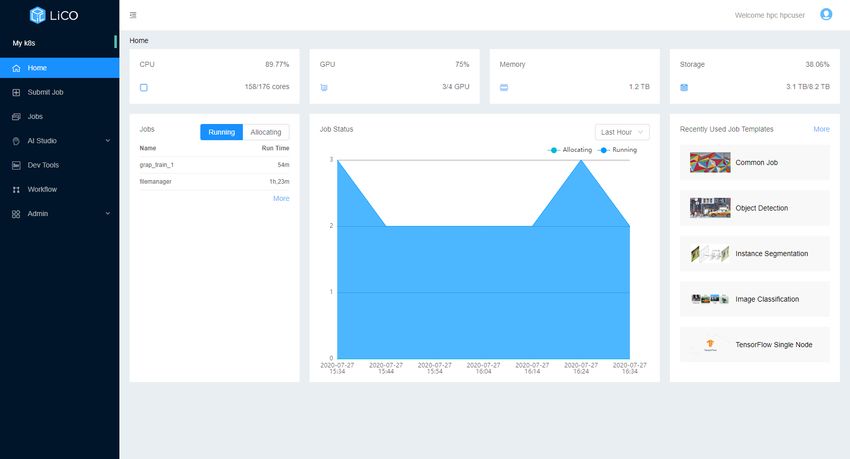
Create a Jupyter Python/R instance . . .      .   .   .   .   33      View comments of a job .           .   .   .   .   .   .   .   .   .   45
Create a Jupyter Custom instance . . .        .   .   .   .   33      Edit comments of a job .           .   .   .   .   .   .   .   .   .   45
Access the log page of a Jupyter instance     .   .   .   .   34   Resource monitoring . . . .           .   .   .   .   .   .   .   .   .   46
View a Jupyter instance. . . . . . . .        .   .   .   .   34      CPU resource monitoring            .   .   .   .   .   .   .   .   .   46
Stop a Jupyter instance. . . . . . . .        .   .   .   .   34      GPU resource monitoring            .   .   .   .   .   .   .   .   .   47
Start a Jupyter instance. . . . . . . .       .   .   .   .   34
Delete a Jupyter instance . . . . . . .       .   .   .   .   34   Chapter 8. Custom templates . . . . . 49
Filter and search for Jupyter instances . .   .   .   .   .   35   Create a custom template .        .   .   .   .   .   .   .   .   .   .   49
     Filter Jupyter instances . . . . . .     .   .   .   .   35   Edit a custom template . .        .   .   .   .   .   .   .   .   .   .   49
     Search for Jupyter instances . . . .     .   .   .   .   35   Copy a custom template .          .   .   .   .   .   .   .   .   .   .   49
                                                                   Delete a custom template .        .   .   .   .   .   .   .   .   .   .   50
Chapter 6. Job submission . . . . . . 37
Submit an industry standard AI job . . . .        .   .   .   37   Chapter 9. Workflow. . . . . . . . . . 51
   Submit a TensorFlow Single Node job .          .   .   .   37   Create a workflow .   .   .   .   .   .   .   .   .   .   .   .   .   .   51
   Submit a TensorFlow Multinode job . .          .   .   .   37   Edit a workflow . .   .   .   .   .   .   .   .   .   .   .   .   .   .   52
   Submit a TensorFlow2 Single Node job .         .   .   .   38   Copy a workflow .     .   .   .   .   .   .   .   .   .   .   .   .   .   52
   Submit a TensorFlow2 Multinode job. .          .   .   .   38   Run a workflow . .    .   .   .   .   .   .   .   .   .   .   .   .   .   53
   Submit a Caffe job . . . . . . . . .           .   .   .   39   Rerun a workflow .    .   .   .   .   .   .   .   .   .   .   .   .   .   53
   Submit an Intel Caffe job . . . . . .          .   .   .   39   Cancel a workflow .   .   .   .   .   .   .   .   .   .   .   .   .   .   53
   Submit a MXNet Single Node job . . .           .   .   .   39   Delete a workflow .   .   .   .   .   .   .   .   .   .   .   .   .   .   53
   Submit a MXNet MultiNode job . . . .           .   .   .   39
                                                                   Chapter 10. How to run a
   Submit a Neon job . . . . . . . . .            .   .   .   40
                                                                   TensorFlow program on LiCO . . . . . 55
   Submit a Chainer Single Node Job . .           .   .   .   40
                                                                   Prepare a workspace. . . . . . . . . . . . .                              55
   Submit a Chainer Multinode job . . . .         .   .   .   40
                                                                   Submit a job . . . . . . . . . . . . . . . .                              55
   Submit a PyTorch Single Node job . .           .   .   .   40
                                                                   Monitor the job and obtain output files . . . . . .                       55
   Submit a scikit-learn job. . . . . . .         .   .   .   40
Submit a common job . . . . . . . . .             .   .   .   41   Chapter 11. How to run a Caffe
                                                                   program on LiCO. . . . . . . . . . . . 57
Chapter 7. Manage the job
                                                                   Prepare a workspace. . . . . . . . . . . . .                              57
lifecycle . . . . . . . . . . . . . . . . 43
                                                                   Submit a job . . . . . . . . . . . . . . . .                              57
Cancel a job . . . . . . . . . . .        .   .   .   .   .   43
                                                                   Monitor the job and obtain output files . . . . . .                       57
Copy a job . . . . . . . . . . . .        .   .   .   .   .   43
Delete a job . . . . . . . . . . .        .   .   .   .   .   44   Chapter 12. Additional information . . 59
Job tag . . . . . . . . . . . . .         .   .   .   .   .   44   Check Kubernetes. . . . . . .                 .   .   .   .   .   .   .   59
    Add tags to a job . . . . . . .       .   .   .   .   .   44   LiCO Kubernetes limitations . . .             .   .   .   .   .   .   .   59
    Clear tags for a job . . . . . . .    .   .   .   .   .   44   Troubleshooting publishing issues             .   .   .   .   .   .   .   59
    Add the same tags to multiple jobs    .   .   .   .   .   44   Known issues . . . . . . . .                  .   .   .   .   .   .   .   60
    Clear tags for multiple jobs. . . .   .   .   .   .   .   45   Notices and trademarks . . . .                .   .   .   .   .   .   .   60
    Filter jobs by tag. . . . . . . .     .   .   .   .   .   45
Job comment . . . . . . . . . .           .   .   .   .   .   45

ii   LiCO 6.2.0 Kubernetes User Guide
Chapter 1. Overview Introduction to LiCO Lenovo Intelligent Computing Orchestration (LiCO) is an infrastructure management software for high- performance computing (HPC) and artificial intelligence (AI). It provides features like cluster management and monitoring, job scheduling and management, cluster user management, account management, and file system management. With LiCO, users can centralize resource allocation in one supercomputing cluster and carry out HPC and AI jobs simultaneously. Users can perform operations by logging in to the management system interface with a browser, or by using command lines after logging in to a cluster login node with another Linux shell. Features of LiCO • Cluster resource monitoring: LiCO provides a dashboard to monitor the usage of cluster resources, including CPU, memory, storage, and network. • Job management and monitoring: Users can directly view and manage the status and results of jobs. Various common schedulers and a wide range of job types are supported (including AI jobs such as TensorFlow and Caffe). • E2E training: Users can train image classification models without coding. LiCO also provides E2E support for training, such as dataset management, topology management, and pre-trained model management. • User management and billing: LiCO manages both local and domain users through the same interface. It supports user top-ups and chargebacks, and offers the ability to set billing groups and fees. • Customizations: A range of customizations are available, such as enterprise job template customization, report customization, and 3D server visualization. • Container image management: LiCO provides system container images for every supported AI framework. Users can upload private container images and run AI or HPC jobs on them. • Expert mode: LiCO provides command line tools to submit and manage jobs. Expert users can log in to the login node via another shell and execute commands. Terminology • Job: a series of commands in sequence intended to accomplish a particular task • Job status: the status of a job in the scheduling system, such as waiting, in queue, on hold, running, suspended, or completed • LiCO node: the node where LiCO is deployed • Kubernetes cluster: the cluster to which LiCO schedules AI jobs • NGC Image: NVIDIA Container Runtime for Docker, also known as nvidia-docker. It supports GPU-based applications that are portable across multiple machines. This is achieved through the use of Docker containers. Prerequisite The paths for jobs involved in this Guide do not support spaces or other special characters. © Copyright Lenovo 2019, 2021 1
Operating environment
Cluster server:

Lenovo ThinkSystem servers

Operating system
• CentOS / Red Hat Enterprise Linux (RHEL) 8.2
• SUSE Linux Enterprise server (SLES) 15 SP2

Client requirements:
• Hardware: CPU of 2.0 GHz or above, memory of 8 GB or above
• Browser: Chrome (V 62.0 or higher) or Firefox (V 56.0 or higher) recommended
• Display resolution: 1280 x 800 or above

2   LiCO 6.2.0 Kubernetes User Guide
Chapter 2. Basic operations
Note: Instructions in this chapter are primarily based on the management system interface.

Log in
Step 1.   Open a browser.
Step 2.   Type the IP address for the cluster’s login node, such as https://10.220.112.21.
Step 3.   Type your username and password.
Step 4.   Click Log in.
          Upon initial login, the following page is displayed:

Step 5.   Select a cluster, and specify Token, Namespace, PVC, and Other PVC.
          • Token: the token of the service account created for LiCO in the namespace you specified
          • Namespace: the namespace in the Kubernetes cluster you specified
          • PVC: the PVC in the Kubernetes cluster you specified
          • Other PVC: the shared PVC you specified

          Attention: Check your Kubernetes system by referring to “Check Kubernetes” on page 59 before
          filling in the parameters.
Step 6.   Click Continue.
          The home page of the LiCO system is displayed.

Update Kube settings

Step 1.   Place your cursor over        in the upper-right corner of the page.
Step 2.   Click Kube Settings.

© Copyright Lenovo 2019, 2021                                                                            3
Step 3. Fill in the required information, and click Update.
Log out
Step 1. Place your cursor over in the upper-right corner of the page.
Step 2. Click .
Step 3. Click Confirm.
You have logged out from LiCO.
Get current version information
Step 1. Place your cursor over in the upper-right corner of the home page.
A list is displayed for you to choose a user operation.
Step 2. Click .
A page that shows the current version information is displayed.
Step 3. Click a menu item to get required information.
Click User Agreement to get the user agreement.
Click Third party licenses to obtain the third party licenses.
Change the password
Step 1. Place your cursor over in the upper-right corner.
Step 2. Click .
Step 3. Type the current password, and then type the new password twice.
Step 4. Click OK.
Change the user information
Step 1. Place your cursor over in the upper-right corner.
Step 2. Click Name: .
Step 3. Edit the user information as required.
Step 4. Click Update.
View cluster resources and job status
Select Home from the left navigation pane.
The cluster overview page is displayed.
4 LiCO 6.2.0 Kubernetes User GuideMy k8s: name of the Kubernetes cluster. When the icon following it is in red, the system functions
abnormally. In this case, move your cursor over the icon and locate the abnormality. You can try to restart the
service to see whether the abnormality persists.
Elements on the cluster overview page
• CPU: Shows the CPU usage in the cluster, with the number of occupied CPU cores and the total number
of CPU cores in the cluster.
• GPU: Shows the GPU usage in the cluster, with the number of occupied GPU cores and the total number
of GPU cores in the cluster.
• Memory: Shows the memory usage in the cluster, with the used memory and the total memory in the
cluster.
• Storage: Shows the storage usage in the cluster, with the used storage and total storage.
• Jobs: Shows the information about jobs that the current user has submitted to the Running or Waiting
queue. Switch between Running and Waiting to view the names of current jobs and their running or
waiting time. Click More to go to the task details page to view more detailed information about the
execution of the jobs.
• Job Status: Shows the status of all jobs submitted by the current user. Jobs can be viewed by queue or
time period. When sorted by queue, the names of all queues in a cluster are listed. Time period options
include Last hour, Last 1 day, Last 7 days, and Last 30 days. In the figure, the user can choose
historical jobs that are running or waiting, and view the number of jobs in the running status at a specific
point in time.
• Recently Used Job Templates: Shows the job templates that were recently used by the user and can be
leveraged.
Manage files
Select Admin ➙ Manage Files from the left navigation pane.
The Manage Files page is displayed.
Chapter 2. Basic operations 5Create a folder
Step 1. Select Admin ➙ Manage Files from the left navigation pane.
Step 2. Right-click in the blank area of the Manage Files page, and select New folder from the shortcut
menu.
A new folder is created, with “untitled_folder” as its default name.
Rename a folder
Step 1. Select Admin ➙ Manage Files from the left navigation pane.
Step 2. Right-click a folder you want to rename, and then select Rename.
Step 3. Type the new folder name in the text box.
The folder is renamed.
Preview an image
Step 1. Select Admin ➙ Manage Files from the left navigation pane.
Step 2. Right-click an image, and then select Preview from the shortcut menu.
The image is displayed in preview mode.
Archive files
Step 1. Select Admin ➙ Manage Files from the left navigation pane.
Step 2. Right-click a file or folder, place the cursor over Create archive from the shortcut menu, and then
select the compression format.
The selected file or folder is archived in your designated format.
Extract an archived file
Step 1. Select Admin ➙ Manage Files from the left navigation pane.
Step 2. Right-click an archived file (compressed in TAR, ZIP, or GZIP format) you want to extract, and then
select Extract files from archive from the shortcut menu.
Upload files
Step 1. Select Admin ➙ Manage Files from the left navigation pane.
Step 2. Double-click a folder to open it.
6 LiCO 6.2.0 Kubernetes User GuideStep 3. Right-click in the blank area, and select Upload files from the shortcut menu.
Step 4. Select one or more local files to upload using either of the following methods:
• Drag and drop a file or files into the dotted dialog.
• Click Select files to upload at the bottom of the Upload files window.
Successfully uploaded files are available on the Manage Files page.
Copy and paste files
Step 1. Select Admin ➙ Manage Files from the left navigation pane.
Step 2. Right-click a file or folder, and then select Copy.
The selected file or folder has been copied.
Step 3. Right-click in the blank area, and then select Paste from the shortcut menu.
The copied file or folder has been pasted in the same folder.
Notes:
• Shortcut keys Ctrl+C and Ctrl+V are also applicable as copy and paste operations.
• You can copy a file or folder from one folder to a different folder.
• If the destination folder has a file or folder with the same name as the one being copied, a pop-
up dialog will be displayed. You may then determine whether to overwrite the existing file or
folder with the new one.
Move files
Step 1. Select Admin ➙ Manage Files from the left navigation pane.
Step 2. Right-click a file or folder, and then select Cut.
Step 3. Select a destination folder, right-click in the blank area, and then select Paste from the shortcut
menu.
The selected file or folder has been moved to the destination folder.
Note: If the destination folder has a file or folder with the same name as the one being copied, a
pop-up dialog will be displayed. You may then determine whether to overwrite the existing file or
folder with the new one.
Duplicate files
Step 1. Select Admin ➙ Manage Files from the left navigation pane.
Step 2. Right-click a file or folder, and then select Duplicate.
The selected file or folder has been duplicated.
Download files
Step 1. Select Admin ➙ Manage Files from the left navigation pane.
Step 2. Right-click a file, and then select Download.
Edit files
Step 1. Select Admin ➙ Manage Files from the left navigation pane.
Step 2. Right-click a file, and then select Edit.
Step 3. After editing the file, do any of the following:
• Save: Save the changes.
Chapter 2. Basic operations 7• Save & Close: Save the changes and exit from the edit page.
• Save As: Save the current file as another, without changing the original file.
• Cancel: Exit from the edit page. You can click Save to save the changes before clicking Cancel
to exit, or directly exit without saving the changes.
API key
To learn how to use these APIs, refer to the LiCO 6.2.0 OpenAPI Guide. To use these APIs, obtain an API key
first.
Create a permanent API key
Step 1. Select Admin ➙ API Key from the left navigation pane.
The API Key page is displayed.
Step 2. Click Create API Key.
Step 3. Click Save.
Create a temporary API key
Step 1. Select Admin ➙ API Key from the left navigation pane.
The API Key page is displayed.
Step 2. Click Create API Key.
Step 3. Clear the Unlimited check box, and click the box below with the prompt of Please choose a date.
Step 4. Select a date and click Save.
View an API key
Select Admin ➙ API Key from the left navigation pane.
The API Key page is displayed.
8 LiCO 6.2.0 Kubernetes User GuideDelete an API key
Step 1. Select Admin ➙ API Key from the left navigation pane.
Step 2. Click Delete.
Step 3. Click OK.
Change a permanent API key
To change a permanent API key to a temporary one, complete the following steps:
Step 1. Select Admin ➙ API Key from the left navigation pane.
Step 2. Click Change.
Step 3. Click the box with a calendar icon, and then select a date on the displayed date selector.
Step 4. Click OK.
Change a temporary key
You can change a temporary API key to a permanent one or change its expiration time.
• “Change a temporary API key to a permanent one” on page 9
• “Change the expiration time of a temporary API key” on page 9
Change a temporary API key to a permanent one
Step 1. Select Admin ➙ API Key from the left navigation pane.
Step 2. Click Change.
Step 3. Click OK.
Change the expiration time of a temporary API key
Step 1. Select Admin ➙ API Key from the left navigation pane.
Step 2. Click Change.
Step 3. Clear the Unlimited check box, click the box with a calendar icon, and then select a date on the
displayed date selector.
Step 4. Click OK.
Publishing
Select Admin ➙ Publishing from the left navigation pane.
The Publishing page is displayed.
Chapter 2. Basic operations 9This page lists all the publishing tasks and shows the publishing history of the current user.
• Publishing tasks can be sorted by ID, Method, Target, Status, Submit Time, or End Time.
• You can search for specific tasks by ID, Method, or Target in the search box.
• The status of a publishing task can be any of the following:
– Running: The publishing task is submitted successfully and being executed.
– Error: The publishing task failed to be submitted with an error in execution.
– Stopped: The publishing task is actively stopped by the user.
– Completed: The publishing task is normally executed and completed.
Create a Git publishing task
Step 1. Select Admin ➙ Publishing from the left navigation pane.
Step 2. Select Publish ➙ Git.
Step 3. Fill in the required information.
• Local Path: Click Browse and select the folder that stores the files to be published.
• Repository: Enter the address of a remote Git repository in SSH or HTTP/HTTPS format.
• Authentication: Authenticate the transport protocol.
– SSH authentication is used if the repository name starts with git@.
– HTTP authentication is used if the repository name starts with http or https.
• Branch Name: Enter a remote branch name. This parameter is optional and its default value is
master.
• Target Folder: Specify a remote target folder to save the published files. This parameter is
optional and can be left blank.
Step 4. Click Submit.
To view the logs and information of the task, select Action ➙ View.
Create a Docker publishing task
Step 1. Select Admin ➙ Publishing from the left navigation pane.
Step 2. Select Publish ➙ Docker.
Step 3. Fill in the required information.
• Repository: Enter the address of a repository to publish a Docker image.
10 LiCO 6.2.0 Kubernetes User Guide• Tag: Specify a tag for the Docker image in the repository.
• Workspace: Specify the directory that contains the content required to produce the Docker
image.
• Dockerfile: Specify the file used to produce the Docker image.
• Pull/Push settings: Configure authentication for Pull (from the source repository for the base
image) and Push (to the destination repository). You can specify the username and password of
the remote repository, and determine whether to use HTTPS.
Step 4. Click Submit.
To view the logs and information of the task, select Action ➙ View.
Note: If unexpected issues are found when you create a Docker publishing task, refer to
“Troubleshooting publishing issues” on page 59.
Republish a task
Step 1. Select Admin ➙ Publishing from the left navigation pane.
Step 2. Find the task you want to republish, and then select Action ➙ Republish.
Step 3. Click OK.
Delete a publishing task
Step 1. Select Admin ➙ Publishing from the left navigation pane.
Step 2. Find the task you want to delete, and then select Action ➙ Delete.
Step 3. Click OK.
Stop a publishing task
Step 1. Select Admin ➙ Publishing from the left navigation pane.
Step 2. Find the publishing task you want to stop, and then select Action ➙ Stop.
Step 3. Click OK.
Chapter 2. Basic operations 1112 LiCO 6.2.0 Kubernetes User Guide
Chapter 3. Lenovo-accelerated AI
Lenovo-accelerated AI is based on the LeTrain project. LeTrain is a distributed training engine based on
TensorFlow and optimized by Lenovo. Its goal is to make distributed training as easy as single GPU training
and achieve linear scaling performance. Many popular models have been built into LeTrain. You can use
them directly without coding. To learn how to use the APIs, refer to the LiCO 6.2.0 OpenAPI Guide.

Select Submit Job from the left navigation pane, and then select the Lenovo Accelerated AI tab. The
Lenovo Accelerated AI tab page is displayed. All the job submission tasks are performed on this page.

Job submission – Train

Submit an Image Classification – Train job
Step 1.   In the Image Classification area, click Train.
Step 2.   Fill in the required information.

          • Job Name (required): job name. For LiCO 6.1.0 and later versions, the initial job name will be
            automatically created in the format of "template name + time".
          • Workspace (required): working directory of the job. Job output files will be saved in this
            directory.
          • Topology (required): neural network model.
              The following network models are currently supported: alexnet_v2, cifarnet, inception_v1,
              inception_v2, inception_v3, inception_v4, inception_resnet_v2, lenet, resnet_v1_50, resnet_v1_
              101, resnet_v1_152, resnet_v1_200, resnet_v2_50, resnet_v2_101, resnet_v2_152, resnet_v2_
              200, vgg_a, vgg_16, vgg_19, mobilenet_v1, mobilenet_v1_025, mobilenet_v1_050, mobilenet_
              v1_075, nasnet_cifar, nasnet_mobile, nasnet_large
          • Dataset Directory (required): training dataset path. The dataset example can be downloaded
            from the link next to this field.
          • Dataset Example: link for downloading a dataset example.
          • Train Directory (required): directory that includes the output directory for TensorFlow, summary
            information, and checkpoints.
          • Batch Size (required): size of each batch of data imported for training or validation.
          • Learning Rate (required): The learning rate can be changed due to different learning rate
            policies. You can change the learning rate policy.
          • Epoch (required): how many times the data set has been traversed.
              – Log Cycle: log output frequency, that is, after how many times of traversal logs will be output
                for once.
              – Snapshot Cycle: snapshot output frequency, that is, after how many times of traversal
                snapshots will be output for once.
          • Nodes (required): number of nodes for training.
          • CPU Cores Per Node (required): number of CPU cores per node for training.
          • GPU Per Node (required): number of GPUs per node for training.
          • Optimizer (required): Different optimizers have different settings.
          • Weight Decay (required): weight decay ratio.

© Copyright Lenovo 2019, 2021                                                                                13
• Notify Job Completion: determines whether to send a notification when the job is completed
and the notification method.
If Email is selected, an email will be sent by LiCO once a job is completed.
Step 3. Click Submit.
Submit an Object Detection – Train job
Step 1. In the Object Detection area, click Train.
Step 2. Fill in the required information.
• Topology (required): Neural network models currently supported include Faster R-CNN and
YOLO v3.
Note: If the YOLO v3 network model is used, you are advised to set the learning rate to 1e-5
instead of the default value.
• Pre-trained Model: A pre-trained model is used to help users improve training performance.
• Use Random Seed: indicates whether to shuffle the training data set with random seeds. The
default value is no.
For the description of other parameters, see “Submit an Image Classification – Train job” on page
13.
Step 3. Click Submit.
Submit an Instance Segmentation – Train job
Step 1. In the Instance Segmentation area, click Train.
Step 2. Fill in the required information.
Topology (required): The mask-rcnn neural network model is currently supported.
For the description of other parameters, see “Submit an Image Classification – Train job” on page
13.
Step 3. Click Submit.
Submit a Medical Image Segmentation – Train job
Step 1. In the Medical Image Segmentation area, click Train.
Step 2. Fill in the required information.
Topology (required): The unet neural network model is currently supported.
For the description of other parameters, see “Submit an Image Classification – Train job” on page
13.
Note: Medical image segmentation training is available only for datasets of color images.
Step 3. Click Submit.
Submit a Text Classification – Train job
Text classification, also known as text tagging or text categorization, is the process of categorizing text into
organized groups. By using Natural Language Processing (NLP), text classifiers can automatically analyze
text and then assign a set of pre-defined tags or categories based on its content.
14 LiCO 6.2.0 Kubernetes User GuideStep 1. In the Text Classification area, click Train.
Step 2. Fill in the required information.
• Topology (required): The Bert neural network model is currently supported.
• Language (required): text language used.
• Max Sequence Length (required): maximum length of text for training.
• Lower Case: determines whether to convert text to the lower case.
For the description of other parameters, see “Submit an Image Classification – Train job” on page
13.
Step 3. Click Submit.
Submit a Seq2seq – Train job
Step 1. In the Seq2seq area, click Train.
Step 2. Fill in the required information.
• Layer Number (required): indicates how many layers you want
• Size of Each Layer (required): the size of each layer
• Vocabulary Size (required): total vocabulary size you want to translate
For the description of other parameters, see “Submit an Image Classification – Train job” on page
13.
Step 3. Click Submit.
Submit a Memory Network – Train job
Step 1. In the Memory Network area, click Train.
Step 2. Fill in the required information.
• Feature Size (required): size of feature in the memory network
• Number of Hops (required): number of hops in the memory network
• Embedding Size (required): size of embedding matrices
• Memory Size (required): maximum size of memory
For the description of other parameters, see “Submit an Image Classification – Train job” on page
13.
Step 3. Click Submit.
Submit an Image GAN – Train job
Step 1. In the Image GAN area, click Train.
Step 2. Fill in the required information.
• Input Image Height (required): height of each input image
• Input Image Width (required): width of each input image
• Output Image Height (required): height of each output image
• Output Image Width (required): width of each output image
• Samples Output Directory: the directory which stores the sample pictures for training
Chapter 3. Lenovo-accelerated AI 15For the description of other parameters, see “Submit an Image Classification – Train job” on page
13.
Step 3. Click Submit.
Job submission – Predict
Submit an Image Classification – Predict job
Step 1. In the Image Classification area, click Predict.
Step 2. Fill in the required information.
• Job Name (required): job name. For LiCO 6.1.0 and later versions, the initial job name will be
automatically created in the format of "template name + time".
• Workspace (required): working directory of the job. Job output files will be saved in this
directory.
• Topology (required): the prediction model. It should have exactly the same value as that in the
Train job you submitted.
• Input Directory (required): the directory contains the images that need to be predicted.
• Train Directory (required): the directory contains training checkpoints.
• Output Directory (required): the output directory. The prediction result will be saved in this
directory.
• CPU Cores Per Node (required): number of CPU cores per node for prediction.
• GPU Per Node (required): number of GPUs per node for prediction.
• Notify Job Completion: determines whether to send a notification when the job is completed
and the notification method.
Step 3. Click Submit.
Submit an Object Detection – Predict job
Step 1. In the Object Detection area, click Predict.
Step 2. Fill in the required information.
For the parameter description, see “Submit an Image Classification – Predict job” on page 16.
Step 3. Click Submit.
Submit an Instance Segmentation – Predict job
Step 1. In the Instance Segmentation area, click Predict.
Step 2. Fill in the required information.
For the parameter description, see “Submit an Image Classification – Predict job” on page 16.
Step 3. Click Submit.
Submit a Medical Image Segmentation – Predict job
Step 1. In the Medical Image Segmentation area, click Predict.
Step 2. Fill in the required information.
16 LiCO 6.2.0 Kubernetes User GuideFor the parameter description, see “Submit an Image Classification – Predict job” on page 16.
Note: Medical image segmentation prediction is available only for color images.
Step 3. Click Submit.
Submit a Text Classification – Predict job
Step 1. In the Text Classification area, click Predict.
Step 2. Fill in the required information.
• Topology (required): The Bert neural network model is currently supported.
• Language (required): text language used.
• Max Sequence Length (required): maximum length of text for training.
• Lower Case: determines whether to convert text to the lower case.
• Input File (required): the TSV file that needs to be translated.
For the description of other parameters, see “Submit an Image Classification – Predict job” on page
16.
Step 3. Click Submit.
Submit a Seq2seq – Predict job
Step 1. In the Seq2seq area, click Predict.
Step 2. Fill in the required information.
• Input File (required): the TXT file that needs to be translated. Its format must be the same as the
provided TXT file in the Train job you submitted.
• Layer Number (required): specifies how many layers you want.
• Size of Each Layer (required): specifies the size of each layer.
• Vocabulary Size (required): total vocabulary size you want to translate.
For the description of other parameters, see “Submit an Image Classification – Predict job” on page
16.
Note: Apart from Input File, the parameter values must be exactly the same as those in the Train
job.
Step 3. Click Submit.
Submit a Memory Network – Predict job
Step 1. In the Memory Network area, click Predict.
Step 2. Fill in the required information.
Input File (required): the TXT file that needs Q&A. Its format must be the same as the provided TXT
file in the Train job you submitted. In addition, the question must end with two separate tabs.
For the description of other parameters, see “Submit an Image Classification – Predict job” on page
16.
Step 3. Click Submit.
Chapter 3. Lenovo-accelerated AI 17Submit an Image GAN – Predict job
Step 1. In the Image GAN area, click Predict.
Step 2. Fill in the required information.
• Input Image Height (required): height of each input image.
• Input Image Width (required): width of each input image.
• Output Image Height (required): height of each output image.
• Output Image Width (required): width of each output image.
• Batch Size (required): number of the final generated images. This number must have a square
root.
• Output Directory: the directory which stores the result pictures of prediction.
For the description of other parameters, see “Submit an Image Classification – Predict job” on page
16.
Note: The parameters listed above must have exactly the same values as those in the Train job
you submitted.
Step 3. Click Submit.
18 LiCO 6.2.0 Kubernetes User GuideChapter 4. AI Studio
AI Studio is an E2E feature that delivers Data Scientist abilities from creating datasets to deploying trained
models as services. It is integrated with not only improved multi-node scheduling methods but also the well-
refined models from Lenovo Research.
By using AI Studio ➙ Datasets, users can create a new dataset or a reference to an existing dataset, as well
as add labels, select new objects, and make new segmentation on images within a dataset.
By using AI Studio ➙ Training Tasks, users can start training easily with the datasets created before and
control the training process in a fine granularity. Users can also start a tuning task, perform a quick test on
the output, and find out the best model.
By using AI Studio ➙ Trained Models, users can easily test multiple models from the training process, find
out the best to be published to a remote repository, and quickly deploy the models for public usage or
testing.
Besides all of the functions above, AI Studio provides public APIs for users to integrate all its functions into
their automated workflows, such as Jenkins and Blue Ocean.
Datasets
Select AI Studio ➙ Datasets from the left navigation pane.
The Datasets page is displayed.
Dataset information
The dataset information is described as follows:
• Name: dataset name
– Without the Ref flag: The dataset is created as a new dataset.
– With the Ref flag: The dataset is created as a reference dataset. A reference dataset is just a reference
to a local dataset.
© Copyright Lenovo 2019, 2021 19Note: Reference datasets are set to the published state by default, and Edit and Duplicate operations
are unavailable.
• Scenario: dataset type, which can be Image Classification, Object Detection, or Instance
Segmentation.
• Published: Only unpublished datasets can be edited and deleted, and only published datasets can be
used for creating training tasks.
Dataset operations
The following dataset operations are available:
Action
• Edit: Edit the dataset information. This action is available only for a new and unpublished dataset.
• View: View the dataset information. This action is available only for a new and published dataset.
• Duplicate: Copy all the data from the current dataset to a new one. This action is available only for a new
dataset.
• Delete: Delete the dataset.
Dataset details
Click the name of the dataset for which you want to view its details.
The dataset details page is displayed.
Action: Available actions on the dataset are the same as those on the Datasets page.
Notes:
• Different color blocks represent different kinds of labels, and the size of a color block depends on the
proportion of images with the corresponding label.
• When you hover over a color block, the number of images with the corresponding label will be displayed.
• For reference datasets, the Folder Path information will be displayed.
Create a dataset
LiCO allows you to create a new dataset or a reference dataset.
Create a new dataset
Step 1. Click Create in the upper left corner and select Create a New Dataset.
Step 2. Fill in the required information.
• Dataset Name (required): Enter 3 to 50 characters not beginning or ending with special
characters. Only letters, digits, underscores (_), and Chinese characters are allowed.
• Scenario (required): Select a type for the dataset to be created.
Step 3. Click OK.
Create a reference dataset
Step 1. Click Create in the upper left corner and select Create a Reference Dataset.
Step 2. Fill in the required information.
20 LiCO 6.2.0 Kubernetes User Guide• Dataset Name (required): Enter 3 to 50 characters not beginning or ending with special
characters. Only letters, digits, underscores (_), and Chinese characters are allowed.
• Scenario (required): Select a type for the dataset to be created.
• Folder Path (required): Select the folder where the dataset to be referenced is located.
• Dataset Analysis: Dataset analysis takes several minutes, depending on the size of the dataset.
Step 3. Click OK.
Notes:
• After you click OK, the dataset formation will be validated to get metadata of this dataset. This may take a
while when the size of the existing dataset is very large. You can select a scenario and click Dataset
Example for formation details about the selected scenario.
• A reference dataset successfully created is set to the published state by default.
Edit an image classification dataset
Step 1. On the Datasets page, find the unpublished image classification dataset you want to edit, and then
select Action ➙ Edit.
Step 2. Perform the required operation on the dataset.
The following operations are supported on this page:
• Create Category: Create a new category for the dataset.
• Action: Perform an action on the selected category.
– Rename: Rename the category.
– Delete: Delete the category.
– Edit: Switch to the category image management page.
Category image operations
On the category image management page, the following operations are available for images:
Upload
Upload images to the current dataset.
• Upload File: Upload a single image or a ZIP, TAR, or GZIP package.
1. Click Upload ➙ Upload File in the upper left corner.
The Select File dialog is displayed.
2. Select a single image or a package.
3. Click Select File.
The selected image or package is uploaded to the current category.
• Upload Folder: Upload a folder.
1. Click Upload ➙ Upload Folder in the upper left corner.
The Select Folder dialog is displayed.
2. Select a folder.
3. Click Select Folder.
The selected images are uploaded to the current category.
Chapter 4. AI Studio 21Operations in the thumbnail pane and preview pane • : Zoom in the current image. • : Zoom out the current image. • : Scroll up to see the thumbnail. • : Scroll down to see the thumbnail. • : Get help information. Delete: Delete the current image. Move Image: Move the current image to another category. Back: Return to the page for editing the image classification dataset. Edit an object detection or instance segmentation dataset On the Datasets page, find the unpublished object detection or unpublished instance segmentation dataset you want to edit, and then select Action ➙ Edit. An annotation page is displayed. This page is similar to the category image management page but provides more functions. Image operations On the annotation page, the following operations are available for images: Upload: Upload images to the current dataset. Refer to “Upload” on page 21. All: All images are displayed. Unlabeled: Only the unannotated images are displayed. Labeled: Only the annotated images are displayed. Delete: Delete the current image and its annotation information. Operations in the thumbnail pane and preview pane: Refer to “Operations in the thumbnail pane and preview pane” on page 22. Annotation operations On the annotation page, the following operations are available for annotations: Operations in the preview pane • : Return to the previous annotation operation. • : Restore the cancelled annotation operation. Note: The preceding two functions are available only when the annotation information has not been saved. • x: Delete the current annotation. x is in the upper left corner of the annotation box. 22 LiCO 6.2.0 Kubernetes User Guide
• Save: Save the annotation information for the current image.
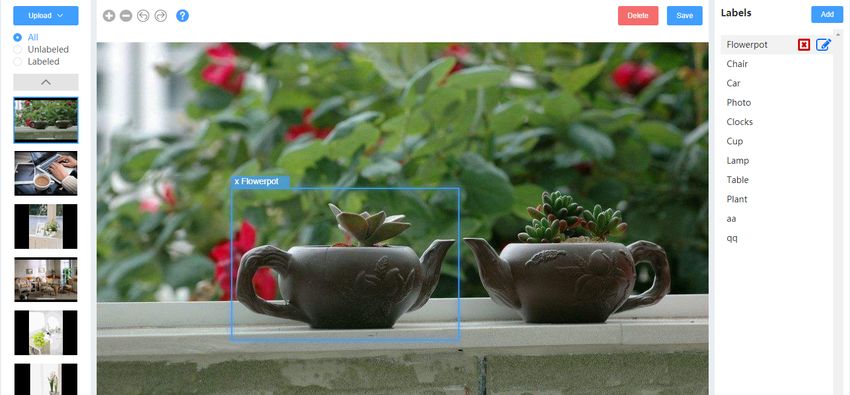
Add an annotation (for object detection datasets)
1. Select the desired label.
2. Select the image to which the annotation is to be added.
3. Hold down the left mouse button and drag.
The label is added successfully, as shown below.
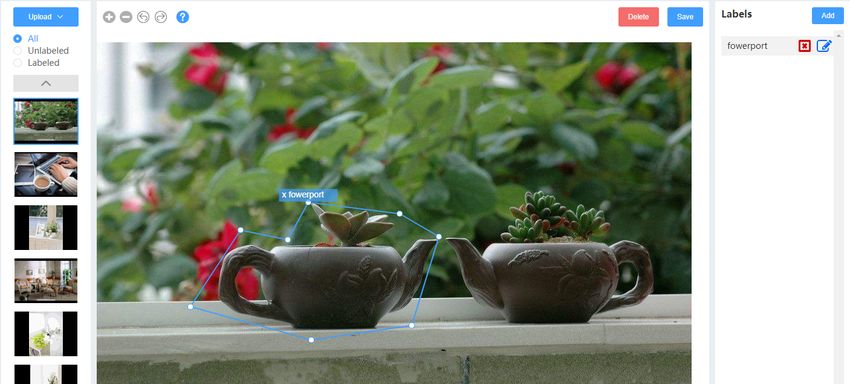
Add an annotation (for instance segmentation datasets)
1. Select the desired label.
2. Select the image to which the annotation is to be added.
3. Hold down the Alt key and left mouse button to draw a closed shape.
The label is added successfully, as shown below.
Notes:
• The annotation must be a closed graph. Otherwise, the annotation cannot be completed.
• When drawing a closed shape, you can right-click to undo the last drawn line.
• Firefox is not recommended, because of its shortcut conflicts with Alt. Google Chrome is recommended.
Chapter 4. AI Studio 23Label operations
On the annotation page, the following operations are available for labels:
• Add: Add a new label.
• : Rename the selected label.
• : Delete the selected label.
Note: When a label is deleted, the annotation on the image will also be deleted.
Training tasks
Training tasks are divided into training and tuning tasks. To create multi-node tasks for high-speed training,
choose training tasks. To create multiple single-node tasks at a time, choose tuning tasks. It is
recommended that you use one or more tuning tasks to find a better combination of hyper-parameters
before starting a full training task. This is one of the best practices when you are faced with a training task in
an unknown area.
Select AI Studio ➙ Training Tasks from the left navigation pane.
The Training Tasks page is displayed.
The parameters on the Training Tasks page are described as follows:
• Task: task name
• Dataset: dataset used
• Scenario: dataset type
• Jobs: number of jobs in a task
• Status: task status, which is defined according to the following rules:
– Running: At least one job in the task is running.
– Cancelled: All the jobs in the task are cancelled, or the task is cancelled by the user.
– Completed: All the jobs in the task are completed.
– Waiting: All the jobs in the task are waiting to run.
– Failed: All the jobs in the task are failed.
24 LiCO 6.2.0 Kubernetes User Guide• Action: action on the task, which can be:
– Cancel: Only running and waiting tasks can be cancelled. Once a task is cancelled, all of its jobs will be
cancelled.
– Delete: Only cancelled, completed, and failed tasks can be deleted. Once a task is deleted, all of its
jobs will also be deleted.
You can also perform the following operations on the Training Tasks page:
• Sort tasks: Sort tasks by ID, Task, Dataset, Scenario, Jobs, and Create Time through clicking the
corresponding column name in the task list.
• Search for tasks: Enter a task name or dataset name in the search bar and click Enter. The search result
will be displayed.
Submit a task
Submit a training task
Step 1. Click Create Training Task in the upper left corner.
Step 2. Fill in the required information on the Dataset tab.
The parameters on the Dataset tab are described as follows:
• Task Name: task name. For LiCO 6.1.0 and later versions, the initial task name will be
automatically created in the format of "template name + time".
• Dataset: Select a dataset for the task. Only published datasets can be chosen, and unpublished
datasets will be shown in grey.
• Training Ratio: ratio of training data in the selected dataset. The remaining data will be used for
validation. For reference datasets, the value of Training Ratio cannot be changed.
Step 3. Click Next.
The Hyperparameters tab is displayed.
Fill in the required information.
• Topology: neural network model. Topologies supported for image classification, object
detection, and instance segmentation scenarios are listed in the following table.
Table 1. Topologies applicable for different scenarios
Scenario Available Topologies
Image classification alexnet_v2, cifarnet, inception_v1, inception_v2, inception_
v3, inception_v4, inception_resnet_v2, lenet, resnet_v1_50,
resnet_v1_101, resnet_v1_152, resnet_v1_200, resnet_v2_
50, resnet_v2_101, resnet_v2_152, resnet_v2_200, vgg_a,
vgg_16, vgg_19, mobilenet_v1, mobilenet_v1_025,
mobilenet_v1_050, mobilenet_v1_075, nasnet_cifar,
nasnet_mobile, nasnet_large
Object detection Faster R-CNN, YOLO v3
Instance segmentation mask-rcnn
• Batch Size: size of each batch of data imported for training or validation.
• Learning Rate: Click the value box, and then set the learning rate policy as required in the
displayed Learning Rate Settings dialog.
Chapter 4. AI Studio 25• Optimizer: Click the value box, and then specify the optimizer settings in the displayed
Optimizer Setting dialog.
• Weight Decay: weight decay ratio.
Step 4. Click Next.
The Running tab is displayed.
Fill in the required information.
• Epoch (required): how many times the data set has been traversed.
– Log Cycle: log output frequency, that is, after how many times of traversal logs will be output
for once.
– Snapshot Cycle: snapshot output frequency, that is, after how many times of traversal
snapshots will be output for once.
• Nodes: number of nodes for training.
• CPU Cores Per Node: number of CPU cores per node for training.
• GPU Per Node: number of GPUs per node for training. At least one GPU should be configured
for each node.
Step 5. Click Next.
The Confirm tab is displayed, which lists some important information about this task. You can set
the method to send a notification once the job is completed.
Note: To change the parameter settings, click Previous to return to the previous tab.
Step 6. Click Submit to submit the training task.
Submit a tuning task
A tuning task is similar to a training task, except that a tuning task supports multiple jobs.
Step 1. Click Create Tuning Task in the upper left corner.
Step 2. Fill in the required information on the Dataset tab.
The parameters on the Dataset tab are described as follows:
• Task Name: task name. For LiCO 6.1.0 and later versions, the initial task name will be
automatically created in the format of "template name + time".
• Dataset: Select a dataset for the task. Only published datasets can be chosen, and unpublished
datasets will be shown in grey.
• Training Ratio: ratio of training data in the selected dataset. The remaining data will be used for
validation. For reference datasets, the value of Training Ratio cannot be changed.
Step 3. Click Next.
The Hyperparameters tab is displayed.
Fill in the required information.
• Topology: neural network model. Available scenarios and topologies are the same as those for
the training task. Refer to Table 1 “Topologies applicable for different scenarios” on page 25.
• Pre-trained Model: A pre-trained model is used to help users improve training performance.
• Batch Size: size of each batch of data imported for training or validation
• Learning Rate: learning rate policy
• Optimizer: optimizer settings
• Weight Decay: weight decay ratio
26 LiCO 6.2.0 Kubernetes User GuideNotes: Except for Topology and Pre-trained Model, all the other parameters support particular
settings and multiple values.
• To configure the particular settings for a parameter, click the value box of the parameter.
• To add a value for a parameter, click in the same line as the parameter.
• The number of parameter values determines the number of jobs created for the tuning task. For
example, if Batch Size has two values, Learning Rate has two values, Optimizer has three
values, Weight Decay has two values, the number of jobs created for the tuning task will be 2 x
2 x 3 x 2 = 24, with each job configured with different parameter values.
Step 4. Click Next.
The Running tab is displayed.
Step 5. Fill in the required information.
For the parameter description, see “Submit a training task” on page 25.
All these resource settings on the Running tab are configured for a single job, not for the whole
task. Each job runs only on one node while the whole task runs on multiple nodes.
Step 6. Click Next.
The Confirm tab is displayed, which lists some important information about this task.
Note: To change the parameter settings, click Previous to return to the previous tab.
Step 7. Click Submit to submit the tuning task.
Note: A maximum of 99 jobs can be created for a tuning task. If there are more than 99 jobs, the
task will fail to be submitted.
View job information of a task
Job comparison
Step 1. Click the name of a task with multiple jobs.
The Job Comparison tab is displayed.
Step 2. In the job list in the left pane, select required jobs to make comparison.
Available dimensions for comparison are as follows:
• Step: Compare the job loss values with step being the X-axis.
• Duration: Compare the job loss values with time being the X-axis.
The loss values of the selected jobs are displayed in the line charts on the right.
Notes: Tips for you to perform job comparison are as follows:
• Click the blue arrow on the right side of the job list to show or hide the job list.
• Click the black arrow in the same line as a job to show or hide its parameters.
Job list
Click Job List next to Job Comparison.
The Job List tab is displayed.
Chapter 4. AI Studio 27The parameters on the Job List tab are described as follows:
• Name: job name
• Topology: neural network model. (You can decide whether to display this parameter by using the Adjust
Parameters function above the job list.)
• Batch Size: size of each batch of data imported for training or validation. (You can decide whether to
display this parameter by using the Adjust Parameters function above the job list.)
• Training Loss: training loss value
• Validation Loss: validation loss value
• Progress: training progress of the job, which is obtained by dividing the current step by the largest step.
• Status: job status
• Action: action on the job
– Cancel: This operation is available only for running and queuing jobs.
– Copy: After you click Copy, a page for creating a training task is displayed. All the parameters have
been already configured in the same way as the selected job. Follow the steps to finish the submission.
– Save Model: This operation is available only for cancelled and completed jobs. Click Save Model,
enter the model name, and then click OK to save the last checkpoint in the training result of the
selected job as a model. You can get details of this model on the Trained Models page.
Adjust parameters
The third and fourth parameters in the job list are default parameters to be displayed. To change the
parameters to be displayed, use the Adjust Parameters function.
Step 1. Click Adjust Parameters above the job list.
Step 2. Select two parameters to be displayed.
Step 3. Click OK.
The selected two parameters are displayed in the third and fourth columns of the job list.
View details of a single job
For a task with only one job, click the task name; for a task with multiple jobs, click the task name and then
click a job name on the Job List tab.
The Job details page is displayed.
The parameters and tabs on the job details page are described as follows:
• Action
– Browse: After you click Browse, the File Manager window is displayed. The path located is the job
workspace.
– Cancel: This operation is available only for running, queuing, and waiting jobs.
28 LiCO 6.2.0 Kubernetes User Guide– Copy: Copy the current job to create a training task.
– Save Model: Save the training result of the current job as a model.
• Monitor
– Step: number of steps performed by a task
– Training Loss chart: depicts training loss, with step being the X-axis
– Validation Loss chart: depicts training loss, with step being the X-axis
– Duration: task execution duration
– Training Loss chart: depicts training loss, with task running duration being the X-axis
– Validation Loss chart: depicts training loss, with task running duration being the X-axis
• Log
Provides the output file for this job, including the file path and file content.
• Job File
Provides the slurm file for this job, including the file path and file content.
• Information
Provides the information about this job.
• TensorBoard
LiCO has built-in TensorBoard features for TensorFlow programs, helping users monitor the running
process of TensorFlow programs on the graphical interface. On the TensorBoard tab, you can do the
following:
– Click View: Launch TensorBoard.
– Click Refresh: Refresh TensorBoard.
– Click New Window to display a complete view.
Trained models
This section describes how to publish a trained model or deploy it as a service.
View models
Select AI Studio ➙ Trained Models from the left navigation pane.
The Trained Models page is displayed.
Chapter 4. AI Studio 29This page shows details of all the trained models, and provides some convenient functions such as sorting
models by field and searching for models by keyword. It also supports multiple actions on the trained
models. Different states of trained models are described as follows:
• Unpublished: The trained model is unpublished.
• Publishing: The trained model is being published.
• Published: The trained model is published successfully.
• Publish Failed: The trained model failed to be published.
Delete a model
Step 1. Select AI Studio ➙ Trained Models from the left navigation pane.
Step 2. Find the model you want to delete, and then select Action ➙ Delete.
Step 3. Click OK.
Publish a model
Step 1. Select AI Studio ➙ Trained Models from the left navigation pane.
Step 2. Find the model you want to publish, and then select Action ➙ Publish. Select Git or Docker as
required.
Step 3. Fill in the required information. Refer to “Create a Git publishing task” on page 10 or “Create a
Docker publishing task” on page 10.
Step 4. Optional: After the model is published, click Action ➙ View Publishing in the same row as the
model on the Trained Models page.
Logs and information of the publishing process are displayed.
Republish a model
Note: Republish action is available only for models in Published state.
Step 1. Select AI Studio ➙ Trained Models from the left navigation pane.
Step 2. Find the model you want to republish, and then select Action ➙ Republish.
Step 3. Click OK.
30 LiCO 6.2.0 Kubernetes User GuideStop a publishing model
Step 1. Select AI Studio ➙ Trained Models from the left navigation pane.
Step 2. Find the publishing model you want to stop, and then select Action ➙ Stop.
Step 3. Click OK.
Deploy a model
Step 1. Select AI Studio ➙ Trained Models from the left navigation pane.
Step 2. Find the model you want to deploy, and then select Action ➙ Deploy.
Step 3. Fill in the required information.
Step 4. Click OK to deploy the model as a service.
Test a model
Step 1. Select AI Studio ➙ Trained Models from the left navigation pane.
Step 2. Click the name of the model you want to test.
Step 3. Fill in the required information.
• Test Image: Click Browse and select the image you want to test.
• CPU Cores: number of CPU cores
Step 4. Click Test.
Deployed services
This section describes how to publish a trained model or deploy it as a service.
View services
Select AI Studio ➙ Deployed Services from the left navigation pane.
The Deployed Services page is displayed.
This page shows details of all the deployed services, and provides some convenient functions such as
sorting services by field and searching for services by keyword. It also supports multiple actions on the
deployed services, including Activate, Inactivate, Delete and Detail. Different states of deployed services
are described as follows:
• Inactivated: The service is inactivated.
• Activated: The service is activated. An activated service is running as a job with the same name as the
service name. To ensure that the service is active, the job cannot be stopped.
• Deploying: The service is being deployed.
Chapter 4. AI Studio 31You can also read


