Snort 3.0.1 on Ubuntu 18 & 20 - With Splunk as the SIEM Noah Dietrich 2020-05-07 - Amazon AWS
←
→
Page content transcription
If your browser does not render page correctly, please read the page content below
Snort 3.0.1 on Ubuntu 18 & 20
With Splunk as the SIEM

Noah Dietrich

2020-05-07
Snort 3.0.1 on Ubuntu 18 & 20                                2020-05-07

Contents

Introduction                                                         3

Installing Snort                                                     4

Configuring Network Cards                                            9

Installing OpenAppID                                                 11

Installing Snort Rulesets                                            15

Enabling Built-in Rules                                             18

Passing PCAP files into Snort and Output Alerts to .csv              21

JSON Alerts Output Plugin                                           25

Snort Startup Script                                                27

Splunk                                                              29

Using Splunk                                                        32

Cleaning up your install                                            33

Conclusion                                                          34

Appendix A: Installing Example Plugins                              35

Appendix B: Changing the Install Location                           37

Appendix C: Building the Developers Guide                           39

Appendix D: Installing BATS: Bash Automated Testing System          39

Noah Dietrich                                                        2
Snort 3.0.1 on Ubuntu 18 & 20                                                                 2020-05-07

This work is licensed under a Creative Commons Attribution-NonCommercial-ShareAlike 4.0 Interna-
tional License (CC BY-NC-SA 4.0)

Introduction

This guide shows you how to setup Snort 3 with Splunk as a Network Intrusion Detection System (NIDS)
and security information and event management (SIEM) system on Ubuntu. The purpose of this guide
is to teach you about the components and options that make up Snort and Splunk based NIDS and
SIEM so that you can modify Snort and Splunk to meet your specific needs. You can install Snort and
Splunk by copying and pasting the individual steps in this guide without taking the time to understand
what you are doing, and that will work fine. If however you take the time to understand why you are
performing each step, you should have a much deeper understanding of how both Snort and Splunk
work.

About Snort 3: Snort 3 is rule-based network intrusion detection and prevention software (NIDS/NIPS).
It is highly flexible and configurable to suit many different situations, and has a new plugin architecture
which allows developers to create their own plugins for use within Snort’s processing pipeline. This
guide will focus on the most common use of Snort: as a stand-alone server that compares network
traffic against a set of rules (called a ruleset) to detect suspicious and possibly malicious traffic and
generate alerts on that suspicious traffic.

About Splunk: Splunk is a security information and event management (SIEM) system that collects,
stores, and allows you to easily analyze and visualize machine generated data, including the alerts
created by Snort. This guide will use Splunk to graphically display the Snort alerts, provide filter
and search capabilities, and help you get a basic understanding of how Splunk is a powerful tool for
understanding machine generated data.

OpenAppID: Snort OpenAppID allows Snort to identify, control, and measure the applications in use
on the network. OpenAppID consists of a set of packages (signatures) that match specific types of
network data, including layer 7 applications, such as Facebook, DNS, netflix, discus, google, as well as
the applications that use these services (chrome, http, https, etc.). You can create rules based on these
OpenAppID signatures, allowing you to block traffic that matches certain applications (for example,
block all Facebook traffic).

Snort 2 vs Snort 3: Snort 3 is a complete re-design of the Snort product to address a number of limita-
tions with Snort 2.9.x. Some of the major points are multi-threading, extensible plugin architecture,
lua-based configuration files, a command line shell, and many other features. More information can be
found here.

Software Requirements: This guide has been tested on the 64-bit LTS versions of Ubuntu server 18

Noah Dietrich                                                                                            3
Snort 3.0.1 on Ubuntu 18 & 20                                                                2020-05-07

and 20. This guide has not been tested on the 32-bit version of Ubuntu servers, because the Splunk
server can not be installed on 32-bit platforms. Splunk requires at least 5 GB of free space on the drive
it’s installed on (usually /opt/splunk) in order to start.

I have not tested this guide on other Debian-based systems including the Raspberry Pi, although
I have received reports that very few changes need to be made when installing and compiling the
pre-requisites to make it work.

If you must install Snort on a 32-bit system, you have a few options: installing the lightweight 32-bit
Splunk Universal Forwarder (UF) on that server to pass logs back to your Splunk server, copying your
Snort json logs to another server for indexing, or using NFS to share the log directory (securely) in a
way your Splunk server can see and index it.

The only software necessary for a full-stack Snort 3.0 NIDS/NIPS that is not yet avaliable is Pulled-
Pork, which does ruleset management (downloading newest rulesets automatically along with other
housekeeping). Once PulledPork is updated to work with Snort 3.0, I will update this guide.

Older Versions of Ubuntu: Snort 3 can not be easily installed on earlier versions of Ubuntu, as the
required versions of supporting software aren’t available in the default repositories, so you’d need to
manually compile those required libraries (such as GCC) when errors were encountered.

Warning: Snort 3 is Beta software. It should not be use in production systems. Since Snort 3 is currently
in development: The version of Snort 3 you download may have undergone modifications since this
guide was written that cause problems with compilation or configuration.

Support: Please ask for help on one of the Snort distribution lists:

       • Snort Users

       • Snort OpenAppID

       • Snort Developers

Most requests should be sent to the Snort Users list, unless specifically related to OpenAppID or issues
with the codebase. Please read how to ask a good question and understand the mailing list etiquette.

Feedback: Please provide all feedback for this guide, including problems and recommendations to
Noah@SublimeRobots.com.

Installing Snort

First, ensure your system is up to date and has the latest list of packages:
   1    sudo apt-get update && sudo apt-get dist-upgrade -y

Noah Dietrich                                                                                          4
Snort 3.0.1 on Ubuntu 18 & 20 2020-05-07
Make sure your system has the correct time and the correct time zone. This will be important later
when we start processing alerts with Splunk. The command below will allow you to choose your time
zone. After selecting your region then time zone, it will display the current time. Please make sure this
all is correct:
1 sudo dpkg-reconfigure tzdata
We will be downloading a number of source tarballs and other source files, we want to store them in
one folder:
1 mkdir ~/snort_src
2 cd ~/snort_src
Install the Snort 3 prerequisites. Details of these packages can be found in the requirements section of
the Snort3 Manual:
1 sudo apt-get install -y build-essential autotools-dev libdumbnet-dev \
libluajit-5.1-dev libpcap-dev zlib1g-dev pkg-config libhwloc-dev \
cmake
Next install the optional (but highly recommended software):
1 sudo apt-get install -y liblzma-dev openssl libssl-dev cpputest \
libsqlite3-dev uuid-dev
If you want to build the latest documentation from the source tree including the Snort++ Developers
Guide, install the following (purely optional) packages. These packages are nearly 800 MB in size and
can be skipped unless you specifically want the dev guide:
1 sudo apt-get install -y asciidoc dblatex source-highlight w3m
Since we will install Snort from the github repository, we need a few tools (this step is not necessary on
Ubuntu 20 since these libraries are already installed):
1 sudo apt-get install -y libtool git autoconf
The Snort DAQ (Data Acquisition library) has a few pre-requisites that need to be installed:
1 sudo apt-get install -y bison flex libcmocka-dev
If you want to run Snort in inline mode using NFQ (IPS mode): install the required packages (these
Noah Dietrich 5Snort 3.0.1 on Ubuntu 18 & 20 2020-05-07
packages are not required for IDS mode or inline mode using afpacket). If you’re unsure, you should
install these packages:
1 sudo apt-get install -y libnetfilter-queue-dev libmnl-dev
Download and install safec for runtime bounds checks on certain legacy C-library calls (this is optional
but recommended):
1 cd ~/snort_src
2 wget https://github.com/rurban/safeclib/releases/download/v08112019/libsafec-08112019.0-gad76c7.tar.gz
3 tar -xzvf libsafec-08112019.0-gad76c7.tar.gz
4 cd libsafec-08112019.0-gad76c7/
5 ./configure
6 make
7 sudo make install
Install PCRE: Perl Compatible Regular Expressions. We don’t use the Ubuntu repository because it has
an older version. We aren’t using pcre2 because hyperscan isn’t compatable with that version.
1 cd ~/snort_src/
2 wget https://ftp.pcre.org/pub/pcre/pcre-8.43.tar.gz
3 tar -xzvf pcre-8.43.tar.gz
4 cd pcre-8.43
5 ./configure
6 make
7 sudo make install
Download and install gperftools 2.7, google’s thread-caching malloc (used in chrome). Tcmalloc is a
memory allocator that’s optimized for high concurrency situations which will provide better speed
for the trade-off of higher memory usage. We don’t want the version of tcmalloc from the Ubuntu
repository (version 2.5) as it is not compatible with Snort. Tcmalloc is optional but recommended:
1 sudo apt-get install -y libunwind-dev
2
3 cd ~/snort_src
4 wget https://github.com/gperftools/gperftools/releases/download/gperftools-2.7.90/gperftools-2.7.90.tar.gz
5 tar xzvf gperftools-2.7.90.tar.gz
6 cd gperftools-2.7.90
7 ./configure
8 make
9 sudo make install
Snort 3 uses Hyperscan for fast pattern matching. Hyperscan requires Ragel and the Boost headers:
Noah Dietrich 6Snort 3.0.1 on Ubuntu 18 & 20 2020-05-07
1 cd ~/snort_src
2 wget http://www.colm.net/files/ragel/ragel-6.10.tar.gz
3 tar -xzvf ragel-6.10.tar.gz
4 cd ragel-6.10
5 ./configure
6 make
7 sudo make install
Hyperscan requires the Boost C++ Libraries. Note that we are not using the Ubuntu repository version
of the boost headers (libboost-all-dev) because Hyperscan requires boost libraries at or above version
number 1.58, and the Ubuntu repository version is too old. Download the Boost 1.72.0 libraries, but do
not install:
1 cd ~/snort_src
2 wget https://dl.bintray.com/boostorg/release/1.72.0/source/boost_1_72_0.tar.gz
3 tar -xvzf boost_1_72_0.tar.gz
Install Hyperscan 5.2.1 from source, referencing the location of the Boost headers source directory:
1 cd ~/snort_src
2 wget https://github.com/intel/hyperscan/archive/v5.2.1.tar.gz
3 tar -xvzf v5.2.1.tar.gz
4
5 mkdir ~/snort_src/hyperscan-5.2.1-build
6 cd hyperscan-5.2.1-build/
7
8 cmake -DCMAKE_INSTALL_PREFIX=/usr/local -DBOOST_ROOT=~/snort_src/boost_1_72_0/ ../hyperscan-5.2.1
9
10 make
11 sudo make install
If you want to test that Hyperscan works, from the build directory, run:
1 cd ~/snort_src/hyperscan-5.2.1-build/
2 ./bin/unit-hyperscan
Snort has an optional requirement for flatbuffers, A memory efficient serialization library (you can
ignore the error during cmake for “not a git repository”):
Noah Dietrich 7Snort 3.0.1 on Ubuntu 18 & 20 2020-05-07 1 cd ~/snort_src 2 wget https://github.com/google/flatbuffers/archive/v1.12.0.tar.gz \ 3 -O flatbuffers-v1.12.0.tar.gz 4 tar -xzvf flatbuffers-v1.12.0.tar.gz 5 mkdir flatbuffers-build 6 cd flatbuffers-build 7 cmake ../flatbuffers-1.12.0 8 make 9 sudo make install Next, download and install Data AcQuisition library (DAQ) from the Snort website. Note that Snort 3 uses a different DAQ than the Snort 2.9.x.x series: 1 cd ~/snort_src 2 git clone https://github.com/snort3/libdaq.git 3 cd libdaq 4 ./bootstrap 5 ./configure 6 make 7 sudo make install Update shared libraries: 1 sudo ldconfig Now we are ready to download, compile, and install Snort 3 from the github repository. If you are interested in enabling additional compile-time functionality, such as the ability to process large (over 2 GB) PCAP files, or the new command line shell, you should run ./configure cmake.sh --help to list all possible options. If you want to install to a different location, please see Appendix B. Download and install, with default settings: 1 cd ~/snort_src 2 git clone git://github.com/snortadmin/snort3.git 3 cd snort3 4 5 ./configure_cmake.sh --prefix=/usr/local --enable-tcmalloc 6 cd build 7 make 8 sudo make install The last step ins the installation is to verify that the Snort installed and can run. To do this, we pass the snort executable the -V flag: Noah Dietrich 8
Snort 3.0.1 on Ubuntu 18 & 20                                                                2020-05-07

   1   /usr/local/bin/snort -V

You should see output similar to the following:
  1 noah@snort3:~$ /usr/local/bin/snort -V
  2
  3    ,,_     -*> Snort++
Snort 3.0.1 on Ubuntu 18 & 20                                                             2020-05-07

We need to create a systemD service to change these settings. First determine the name(s) of the
interfaces you will have snort listen on using ifconfig.

NOTE: If you are using Ubuntu 20: ifconfig has been replaced by the ip command (run ip address
show to see the interfaces and their ip addresses).

Once you know the name of your network interfaces, check the status of large-receive-offload (LRO)
and generic-receive-offload (GRO) for those interfaces. In the example below, my interface name is
ens3 (you’ll commonly see eth0 or ens160 as interface names as well, depending on the system type).
We use ethtool to check the status:
  1 noah@snort3:~$ sudo ethtool -k ens3 | grep receive-offload
  2 generic-receive-offload: on
  3 large-receive-offload: off [fixed]

from this output, you can see that GRO is enabled, and LRO is disabled (the ’fixed’ means it can not
be changed). We need to ensure that both are set to ’off’ (or ’off [fixed]’). We could use the ethtool
command to disable LRO and GRO, but the setting would not persist across reboots. The solution is to
create a systemD script to set this every boot.

create the systemD script:
   1   sudo vi /lib/systemd/system/ethtool.service

Enter the following information, replacing ens3 with your interface name:
  1    [Unit]
  2    Description=Ethtool Configration for Network Interface
  3
  4    [Service]
  5    Requires=network.target
  6    Type=oneshot
  7    ExecStart=/sbin/ethtool -K ens3 gro off
  8    ExecStart=/sbin/ethtool -K ens3 lro off
  9
 10    [Install]
 11    WantedBy=multi-user.target

Once the file is created, enable the service:
  1    sudo systemctl enable ethtool
  2    sudo service ethtool start

Noah Dietrich                                                                                      10
Snort 3.0.1 on Ubuntu 18 & 20                                                                  2020-05-07

these settings will now persist across reboots. you can verify the setting using ethtool and the interface
(off or off [fixed] are the setting you need to see):
  1 noah@snort3:~$ sudo ethtool -k ens3 | grep receive-offload
  2 generic-receive-offload: off
  3 large-receive-offload: off [fixed]

Installing OpenAppID

OpenAppID allows for the identification of application layer (layer 7) traffic. You can create rules that
operate on application-layer traffic (say to block facebook), and to log traffic statistics for each type of
traffic detected.

The Snort team has put together a package of detectors with assistance from the community that you
can download and install, called the Application Detector Package. First download the OpenAppID
detector package and extract the files:
  1    cd ~/snort_src/
  2    wget https://snort.org/downloads/openappid/12159 -O OpenAppId-12159.tgz
  3    tar -xzvf OpenAppId-12159.tgz
  4    sudo cp -R odp /usr/local/lib/

If you get an error that the file does not exist, it is possible that the Snort team updated the ruleset.
Browse to https://snort.org/downloads#openappid, and download the snort-openappid.tar.gz. Once
the rules are downloaded and extracted as above, we need to edit our Snort configuration file to point
to this odp directory:
   1   sudo vi /usr/local/etc/snort/snort.lua

At line 89 (yours line number may be slightly different) you will see the appid = entry. You will want to
add the app_detector_dir option here, pointing to the parent folder of the odf folder we extracted
above. It should look like this:
104 appid =
105 {
106     −− appid requires this to use appids in rules
107     app_detector_dir = '/usr/local/lib',
108 }

Noah Dietrich                                                                                             11
Snort 3.0.1 on Ubuntu 18 & 20 2020-05-07
note that you must have four spaces (not a tab) for the indented line. Now we want to test that the
configuration file loads correctly:
1 snort -c /usr/local/etc/snort/snort.lua --warn-all
This command will validate that Snort can correctly read the snort.lua file and that it contains no
errors. After running this command, you should see output that ends with:
1 ...
2 Finished /usr/local/etc/snort/snort.lua:
3 WARNING: appid: no lua detectors found in directory '/usr/local/lib/
custom/lua/*'
4 --------------------------------------------------
5 pcap DAQ configured to passive.
6
7 Snort successfully validated the configuration (with 1 warnings).
8 o")~ Snort exiting
You might see one warning (non-fatal): WARNING: appid: no lua detectors found in directory “/us-
r/local/lib/custom/lua/”. This warning can be ignored as long as the output ends with “Snort success-
fully validated the configuration”. This warning just means you don’t have any locally-developed
openAppID lua scripts.
Next we we will create a simple rule to test that OpenAppID is working correctly:
1 sudo mkdir /usr/local/etc/rules
2 sudo touch /usr/local/etc/rules/local.rules
3 sudo vi /usr/local/etc/rules/local.rules
We will generate two rules in the local.rules file. The first rule uses OpenAppID to check for Facebook
traffic, and the second rule will detect ICMP traffic, and is really good for testing that alerts are being
generated correctly. These two rules are good for testing your setup. Paste the following two lines into
the local.rules file you created above:
1 alert tcp any any -> any any ( msg:"Facebook Detected"; appids:"Facebook";sid:10000001; )
2 alert icmp any any -> any any (msg:"ICMP Traffic Detected";sid:10000002;)
Now run Snort and have it load the local.rules file to make sure it loads these rules correctly (verifying
the rules are correctly formatted):
1 snort -c /usr/local/etc/snort/snort.lua \
2 -R /usr/local/etc/rules/local.rules
Noah Dietrich 12Snort 3.0.1 on Ubuntu 18 & 20 2020-05-07
The output should end with “Snort successfully validated the configuration”. You should not have any
warnings or errors.
If you scroll up through the output, you should see these two text rules loaded successfully (under the
rule counts section). Now let’s run snort in detection mode on an interface (change eth0 below to
match your interface name),and print all alerts to the console:
1 sudo snort -c /usr/local/etc/snort/snort.lua -R /usr/local/etc/rules/local.rules \
2 -i eth0 -A alert_fast -s 65535 -k none
the -k none flag tells Snort to ignore bad checksums, and the -s 65535 flag prevents snort from truncat-
ing over-sized packets. The Stream and Frag decoders will drop packets that have bad checksums, and
the packets will not get processed by the OpenAppID detectors. By including these flags, we ensure
that a packet with a bad checksum still gets processed for alerts.
snort will load the configuration, then display:
1 Commencing packet processing
2 ++ [0] eth0
This means that snort is currently listening to all traffic on that interface, and comparing it to the two
rules it loaded. When traffic matches a rule, snort will write an alert to the console. Now from another
window on that computer (open a new terminal window or a second ssh session), use wget to connect
to facebook. This will trigger the first rule:
1 wget facebook.com
from the first console window you will see alerts output similar to the following:
1 05/30−21:26:48.482231 [**] [1:10000001:0] "Facebook Detected" [**] [Priority: 0] [AppID: Facebook] {TCP} 10.10.10.170:59632 −>
185.60.216.35:80
2 05/30−21:26:48.506197 [**] [1:10000001:0] "Facebook Detected" [**] [Priority: 0] [AppID: Facebook] {TCP} 185.60.216.35:80 −>
10.10.10.170:59632
3 ...
Use ctrl-c to stop Snort. You can also ping to or from this machine to generate alerts when snort is
listening (triggering the the second rule in the local.rules file). This is a good rule for testing Snort, but
can be a little noisy during actual production usage.
If you do not see the alerts being generated, make sure that for this test you are runing wget face-
book.com from the computer running snort and the request is going out the interface you had snort
listen on. You can ping from another computer to the snort comptuer (to the ip address of the interface
you are having snort listen on).
Noah Dietrich 13Snort 3.0.1 on Ubuntu 18 & 20 2020-05-07
If you want to collect OpenAppID statistics (how much traffic was detected by each detector), you will
need to enable it in the snort.lua file, and run Snort with the -l flag (log directory).
First create a log directory
1 sudo mkdir /var/log/snort
now modify /usr/local/etc/snort/snort.lua to enable the appid detector to log statistics (line 89):
89 appid =
90 {
91 app_detector_dir = '/usr/local/lib',
92 log_stats = true,
93 }
Now run snort, listening to an interface, logging data to the /var/log/snort folder (this is the same
command as before, we’re just adding the -l flag with the log folder path):
1 sudo snort -c /usr/local/etc/snort/snort.lua -R /usr/local/etc/rules/local.rules \
2 -i eth0 -A alert_fast -s 65535 -k none -l /var/log/snort
after collecting some data and stopping Snort (generate data by using ping and wget facebook.com as
before, and then stop with Ctrl-C), you will see appid_stats.log in /var/log/snort. This file is owned
by root, so make it readable by all (we will change the permissions on files written automatically by
Snort in a later section):
1 sudo chmod a+r /var/log/snort/appid_stats.log
now you can look at the protocol statistics that snort collected:
1 noah@snort3:~/snort_src$ cat /var/log/snort/appid_stats.log
2 1549218716,DNS,1576,1778
3 1549218716,Facebook,8727,630912
4 1549218716,OpenSSH,19523,2344
5 1549218716,SSH,19523,23445
6 1549218716,HTTPS,8727,630912
7 1549218716,SSL client,8727,630912
8 1549218716,ICMP,392,392
9 1549218716,__unknown,11028,139100
This is a comma-separated file that shows the time (unixtime), detector, sent bytes (tx), and received
bytes (rx), in that order. if you don’t want this data collected, you can disable the log stats option in
Noah Dietrich 14Snort 3.0.1 on Ubuntu 18 & 20 2020-05-07 the appid module in your snort.lua configuration file. Note that this data is different from the alerts generated by the rules in your local.rules file. For more information on detectors, please see the OpenAppID detector Guide. Installing Snort Rulesets Snort 3 rules have more options than Snort 2 rules, and while the v2 rules downloaded manually or with PulledPork (a script that downloads updated rulesets automatically) will work with snort 3, you should be using the rules specifically created for Snort 3. PulledPork does not work with Snort 3 at this time, so there is no way to automatically update rulesets. I expect that to change in the near future, and I will release an updated guide including those instructions once that hapens. There are three different sets of Snort rules to choose from (called rulesets). The community ruleset is free and does not require a login; the Registered ruleset contains the community ruleset as well as other rules, and requires a free account on snort.org. The subscriber ruleset is a paid service. The rules from the subscriber ruleset are added to the registered ruleset after 30 days. More info here. This guide will assume you’re using the Registered ruleset. You’ll need to create an account on Snort.org, where you can also choose to sign up for the various snort mailing lists (the email vol- ume is moderate, and often has interesting questions). After you have registerd and signed in, navigate to the rule download page, and download the latest 3.0 rules (called snortrules-snapshot3xxx.tar.gz or something similar, depnding if a newer version has been released). Save the ruleset to your snort-src folder. We need to create some folders to store the rules from the rulesets. Here we create four folders in /usr/local/etc/snort/ (the first folder may already exist if you created it above for the local.rules file): Folder Name Purpose rules All our basic rule files from the registered ruleset builtin_rules Rule file that contains references and info for the built-in rules so_rules These are compiled rules. Snort 3 doesn’t have these yet but will soon lists whitelists and blacklists. we don’t set these up in this guide Create these folders: Noah Dietrich 15
Snort 3.0.1 on Ubuntu 18 & 20                                                                      2020-05-07

  1    sudo mkdir /usr/local/etc/rules
  2    sudo mkdir /usr/local/etc/builtin_rules
  3
  4    sudo mkdir /usr/local/etc/so_rules
  5    sudo mkdir /usr/local/etc/lists

The archived ruleset contains three folders: a rules folder holding all the individual rule files, a builtins
folder that contains information about rules that are builtin to snort, and an etc folder that contains
updated configuration files for snort that the ruleset requires.
Extract the files from the archive, copy all the rule files to your snort rules folder, copy the builtin rules
to the builtin folder, and the snort configuration files to snort’s program folder:
   1   cd ~/snort_src/
   2   mkdir snortrules-3000
   3   tar -xvzf snortrules-snapshot-3000.tar.gz -C ./snortrules-3000
   4   cd snortrules-3000
   5
   6   # copy the individual rule files
   7   sudo cp ./rules/*.rules /usr/local/etc/rules/
   8
   9   # copy the builtin rules file
  10   sudo cp ./builtins/builtins.rules /usr/local/etc/builtin_rules/
  11
  12   # copy the new configuration files
  13   # (we'll overwrite the current configurations)
  14   sudo cp ./etc/* /usr/local/etc/snort/

The three files we copied from the etc folder are file_magic.lua, which tells snort how to identify
file types, snort_defaults.lua which is how you configure snort’s global settings (system wide), and
snort.lua which is the configuration file for a specific instance of snort. Every time you run Snort, you
will pass it a snort.lua file that describes how you want snort to run. That file will load the defaults file,
which describe the system-wide configuration that applies for each different way you run snort. You
can have multiple differetn version of snort.lua, but commonly only one default configuration.
We will edit these files now. We dont’t need to make any changes to /usr/local/etc/snort/s-
nort_defaults.lua, but if you look at the section starting at line 23, you’ll note the folders we created
above. This is how snort knows to look in those folders for the rule files.
Next let’s edit the snort.lua file. This file is the configuration file we pass to snort at startup, and it also
loads he snort_defaults.lua file.
   1   sudo vi /usr/local/etc/snort/snort.lua

Noah Dietrich                                                                                                16
Snort 3.0.1 on Ubuntu 18 & 20                                                                   2020-05-07

First let’s configure our HOME_NET variable. This refers to the local subnet we are defending (rules
use this information to determine if an alert matches). Set your local subnet information here to match
your subnet. My subnet below is the 10.0.0.0 network with a 24-bit subnet mask:
 24    HOME_NET = '10.0.0.0/24'

Leave the EXTERNAL_NET as ’any’ (some guides have you set this to all subnets except the HOME_NET,
but that will make you miss a number of important alerts).

At line 91 you’ll see that the appid plugin is doesn’t have any options (meaning the detector is loaded,
but not configured). You can configure it like we did in the section above if you like.

down at line 169 you’ll see the ips detector. If you look through the IPS settings, you’ll see all the rule
files we copied over, starting at line 180:
180       rules = [[
 181
182              include     $RULE_PATH/snort3-app-detect.rules
183              include     $RULE_PATH/snort3-browser-chrome.rules
184              include     $RULE_PATH/snort3-browser-firefox.rules
185              include     $RULE_PATH/snort3-browser-ie.rules
186              ...

$RULE_PATH is defined in snort_defaults.lua and refers to /usr/local/etc/rules. You may see the
builtin ips option at line 172; we will enable those rules later. For now, let’s test that snort can success-
fully load these rules. Let’s test the configuration file by running snort, and passing it the path to this
modified snort.lua file, just like we did before:
   1   snort -c /usr/local/etc/snort/snort.lua

If you don’t have any errors, if you scroll up through the output, you can see the rules are loaded:

Noah Dietrich                                                                                             17
Snort 3.0.1 on Ubuntu 18 & 20                                                               2020-05-07

  1    ...
  2
  3    --------------------------------------------------
  4    rule counts
  5           total rules loaded: 12581
  6                   text rules: 12581
  7                option chains: 12581
  8                chain headers: 458
  9    --------------------------------------------------
 10
 11    (lines ommited from output)...
 12
 13    Snort successfully validated the configuration (with 0 warnings).
 14    o")~   Snort exiting

Note: many of the rules in the ruleset are commented out. This is explained here, but basically the
reason is that some of the rules could generate false positives, so the Snort team has commented out
those rules, since they can flood your logs or lead to excessive traffic interruptions if you’re running
Snort in NIPS mode.
You may want to run Snort with the following flags to detect issues during testing and setup: the
warn-all and pedantic flags. From the Snort 3 manual:

   Warnings are not emitted unless –warn-* is specified. –warn-all enables all warnings, and –
   pedantic makes such warnings fatal

you will not want to use the –pedantic flag when running Snort, as simple flowbit warnings (flowbits
set but not used in a rule, a common issue) will generate warnings and cause Snort to error out. It is a
good flag for testing your configuration though.

Enabling Built-in Rules

To enable the enable decoder and inspector alerts (these detect on malicious traffic that can’t be easily
detected with regular rules), we need to enable this option in our snort configuration file: snort.lua,
located in the /usr/local/etc/snort/ directory. Additionally we need to load the builtins.rules rules
which contain detailed info about each alert that will be written to the console. Edit snort.lua:
   1   sudo vi /usr/local/etc/snort/snort.lua

At line 172, set enable_builtin_rules to true by removing the two hyphens from the begining of the
line. Lines that start with two hyphens are comments (disabled commands are commonly commented

Noah Dietrich                                                                                         18
Snort 3.0.1 on Ubuntu 18 & 20                                                                  2020-05-07

out), and are not parsed by snort when loaded. Remove the two hyphens before enable_builtin_rules
to enable this option.

At line 181 we want to include the builtin rule file, so we add it as an include in the rules array. We need
to reference this file in the builtin folder as follows:
   1   include $BUILTIN_RULE_PATH/builtins.rules

Remember that each indent in your snort.lua must be four spaces (not a tab) or the configuration will
not load. The ips module in snort.lua should look like this:
169 ips =
170 {
 171    -- use this to enable decoder and inspector alerts
172     enable_builtin_rules = true,
173
174     -- use include for rules files; be sure to set your path
175     -- note that rules files can include other rules files
176     --include = 'snort3-community.rules',
177
178     -- The following include syntax is only valid for ...
179     -- RULE_PATH is typically set in snort_defaults.lua
180     rules = [[
 181        include $BUILTIN_RULE_PATH/builtins.rules
182
183         include $RULE_PATH/snort3-app-detect.rules
184         include $RULE_PATH/snort3-browser-chrome.rules
185
186 }

Now test that the changes you made to the snort.lua configuration file has no errors:
   1   snort -c /usr/local/etc/snort/snort.lua

If you scroll up through the output from the previous command, you should see the builtin rules loaded
in addition to the other rules. You can also keep scrolling up to see all the rule files loaded by the IPS
module. Here you see some of the rule files loaded, as well as 525 bultin rules loaded that were not
loaded before:

Noah Dietrich                                                                                            19
Snort 3.0.1 on Ubuntu 18 & 20 2020-05-07 1 Loading ips.rules: 2 Loading ../builtin_rules/builtins.rules: 3 Finished ../builtin_rules/builtins.rules: 4 Loading ../rules/snort3-app-detect.rules: 5 ... 6 7 -------------------------------------------------- 8 rule counts 9 total rules loaded: 13106 10 duplicate rules: 448 11 text rules: 12581 12 builtin rules: 525 13 option chains: 13106 14 chain headers: 458 15 -------------------------------------------------- Now let’s also load our local.rules file that we created earlier with the facebook and icmp rule. We’ll load this rule file from the command line rather than in the configuration file using the -R flag. Load the rules file and test the configuration: 1 snort -c /usr/local/etc/snort/snort.lua \ 2 -R /usr/local/etc/rules/local.rules Scroll back through the output and you’ll see the local.rules file loaded and two more rules added to the count: 1 Finished ips.rules: 2 Loading rule args: 3 Loading /usr/local/etc/rules/local.rules: 4 Finished /usr/local/etc/rules/local.rules: 5 Finished rule args: 6 -------------------------------------------------- 7 rule counts 8 total rules loaded: 13108 remember that the facebook rule won’t work since we copied the snort.lua file from the rules download, which does not have OpenAppID enabled by default. We can simple re-enabled that file by editing /usr/local/etc/snort/snort.lua, starting at line 92: Noah Dietrich 20
Snort 3.0.1 on Ubuntu 18 & 20                                                                    2020-05-07

 92 appid =
 93 {
 94     app_detector_dir = '/usr/local/lib',
 95     log_stats = true,
 96 }

Test as before, and you will probably see a lot more alerts logged to your console
  1   sudo snort -c /usr/local/etc/snort/snort.lua \
  2      -R /usr/local/etc/rules/local.rules \
  3      -i eth0 -A alert_fast -s 65535 -k none -l /var/log/snort

Note: there is currently a bug when the registered ruleset is loaded, the Facebook rule will not trigger.
The Snort development team is aware of this and is working on it.

Passing PCAP files into Snort and Output Alerts to .csv

This section isn’t required for your setup, but it will introduce you to a number of flags that we require
later, it will give you some pcap files that can generate alerts for testing, and will help you understand
Snort 3 better.

If you are looking for PCAP files that can be used to generate alerts from your builtin and community
rules for testing purposes, I have found that MACCDC 2012 dataset is good. Start by downloading two
of the pcap files:
  1   cd ~
  2   mkdir pcaps
  3   cd pcaps
  4
  5   wget https://download.netresec.com/pcap/maccdc-2012/maccdc2012_00000.pcap.gz
  6   gunzip maccdc2012_00000.pcap.gz
  7
  8   wget https://download.netresec.com/pcap/maccdc-2012/maccdc2012_00001.pcap.gz
  9   gunzip maccdc2012_00001.pcap.gz

Now we run snort, telling it load the first pcap file that we downloaded, load all rules (from our snort.lua),
and print alerts to the console (I break down all the flags used here if you scroll down). I won’t load our
local.rules file since that’s really only useful for testing that snort is working correctly. Note that this
may take some time to run, and a lot of alerts will scroll across the screen. You can use ctrl-c to stop if
if you’re impatient (this took about 3.5 minutes to run on my system, generating 42,392 alerts):

Noah Dietrich                                                                                              21
Snort 3.0.1 on Ubuntu 18 & 20 2020-05-07
1 snort -c /usr/local/etc/snort/snort.lua \
2 -r ~/pcaps/maccdc2012_00000.pcap -A alert_fast -s 65535 -k none
A breakdown of what each of these flags do:
Flag Explanation
sudo snort This is the snort binary we are calling.
-c /usr/local/etc/snort/snort.lua The snort.lua configuration file.
r ~/pcaps/maccdc2012_00000.pcap The path to the pcap file.
-A alert_fast Output to the console using the alert_fast plugin.
-s 65535 Set the snaplen so Snort doesn’t truncate and drop
over-sized packets.
-k none Ignore bad checksums, otherwise snort will drop
packets with bad checksums, and they won’t be
evaluated.
To process multiple pcap files at once, modify the last command to scan through all pcap files in that
same directory as follows:
1 snort -c /usr/local/etc/snort/snort.lua --pcap-filter \*.pcap \
2 --pcap-dir ~/pcaps -A alert_fast -s 65535 -k none
We’re doing a lot here, let’s break down this command:
flag Explanation
sudo snort The Snort binary.
-c /usr/local/etc/snort/snort.lua The snort.lua configuration file.
–pcap-filter *.pcap This tells snort how to identify pcap files located in
the pcap-dir.
–pcap-dir ~/pcaps This tells Snort the directory where the pcap files
are located.
-A alert_fast Output to the console using the alert_fast output
plugin.
Noah Dietrich 22Snort 3.0.1 on Ubuntu 18 & 20 2020-05-07
flag Explanation
-s 65535 Set the snaplen so Snort doesn’t truncate and drop
over-sized packets.
-k none Ignore bad checksums, otherwise snort will drop
packets with bad checksums, and they won’t be
evaluated.
When I ran this command, snort generated 137538 alerts (look in the output at the end for Module
Statistics: Detection: total alerts) in two minutes thirty seconds (look in the output for Summary
Statistics: timing: seconds).
1 --------------------------------------------------
2 Module Statistics
3 --------------------------------------------------
4 detection
5 analyzed: 8635943
6 hard_evals: 554185
7 raw_searches: 177185
8 cooked_searches: 306618
9 pkt_searches: 483803
10 alt_searches: 39
11 key_searches: 77449
12 header_searches: 221406
13 body_searches: 768
14 file_searches: 71801
15 total_alerts: 42392
16 logged: 42392
17 --------------------------------------------------
18
19 ...
20
21 --------------------------------------------------
22 Summary Statistics
23 --------------------------------------------------
24 timing
25 runtime: 00:03:41
26 seconds: 221.654928
27 pkts/sec: 39076
28 Mbits/sec: 32
Noah Dietrich 23Snort 3.0.1 on Ubuntu 18 & 20 2020-05-07
You can modify this last command to use any output plugin (we have been using the alert_fast plugin
to print events to the console), either by specifying it at the command line as we did above with the
-A flag, or alternately by enabling the plugin in your snort.lua file (line 320). For example, to use the
alert_csv plugin to save alert data to a csv file, you would modify your snort.lua to look like this (line
232):
232 alert_csv =
233 {
234 file = true,
235 }
then run snort as follows:
1 sudo snort -c /usr/local/etc/snort/snort.lua -r ~/pcaps/maccdc2012_00000.pcap \
2 -s 65535 -k none -l /var/log/snort -q -m 0x1b
First you will note that there is nothing output to the screen while Snort is processing the PCAP files.
You won’t see any output printed to the console when you run the above command, since we are
writing alerts to the csv file, and suppressing all other output with the -q flag. You may notice a few
errors relating to the lua detector odp service, these can be ignored.
You’ll note that we don’t specify the output plugin on the command line as we did before, that’s because
we have enabled the alert_csv plugin in our snort.lua, and specifying one on the command line would
take precedence over any output plugins configured in our snort.lua. The new flags we are using are
described below:
New Flags Explanation
-l /var/log/snort The folder where our output files (csv files in this
case) should be saved.
-q Quiet mode - Don’t show banner and status report
-m 0x1b This sets the umask for written files to 033.
umask: Snort by default uses a umask of 077, which prevents anyone from the owner from reading
the log files. This causes problems when trying to ingest logs with other tools unless they are running
under the same user account (this is a security risk). To solve this, we use the -m flag to pass a new
umask of 033 (000 011 011 in binary, 0x1b in hexadecimal), which means your log files will have the
permissions: rwxr–r–, allowing everyone the ability to read these files. If you have specific security
needs, change this setting to be more restrictive. These files will be owned by the root user when Snort
Noah Dietrich 24Snort 3.0.1 on Ubuntu 18 & 20 2020-05-07 is run as above (we’ll use a non-root user to run Snort later on in this guide). When you are returned to a command prompt, that means that Snort is done processing the pcap file. You should see alert_csv.txt in your /var/log/snort/ directory. Using the wc -l (word count) command, we can see how many alerts were generated from these pcap files. Here you can see that there are 42299 lines in the file, and since each line is an individual alert, you know that Snort generated that many events: 1 noah@snort3:~$ wc -l /var/log/snort/alert_csv.txt 2 42299 /var/log/snort/alert_csv.txt There are more options that this plugin (and other plugins) have. All this information and more is available in the Snort 3 manual. JSON Alerts Output Plugin Snort 3 has a number of output plugins. Earlier in this guide, We used the alert_fast plugin to send alerts to the console, and we used the alert_csv plugin to write alerts to a csv-formatted log file. There are a number of plugins available, each with many options In order to easily import the Snort 3 alert log files into your SIEM of choice (like Splunk), you will want to use the alert_json output plugin to write all alerts to a json-formatted text file. Enabling the json output plugin is easy, just modify your snort.lua file (around line number 262): 1 sudo vi /usr/local/etc/snort/snort.lua First, disable the alert_csv plugin by placing two dashes in front of each line in the plugin, and enable the alert_json plugin as shown below. You could keep both plugins enabled and you’d get both csv and json files representing the same alerts, but you probably don’t want that. Also remember that indents use 4 spaces instead of a tab: Noah Dietrich 25
Snort 3.0.1 on Ubuntu 18 & 20                                                                  2020-05-07

262     --alert_csv =
263     --{
264         --file = true,
265     --}
266
267     alert_json =
268     {
269         file = true,
270         limit = 10,
271         fields = 'seconds action class b64_data dir dst_addr \
272         dst_ap dst_port eth_dst eth_len eth_src eth_type gid icmp_code \
273         icmp_id icmp_seq icmp_type iface ip_id ip_len msg mpls pkt_gen \
274         pkt_len pkt_num priority proto rev rule service sid src_addr \
275         src_ap src_port target tcp_ack tcp_flags tcp_len tcp_seq \
276         tcp_win tos ttl udp_len vlan timestamp',
277     }

In the alert_json plugin, we are specifying three options:

      1. First we use the file option to enable outputting alerts to the json-formatted file (instead of to
         the console).

   2. Next we specify the limit option to tell Snort when to roll over to a new file. When the output file
      reaches 10 MB, a new file will be created, using the current unixtime in the filename. We set this
      to 10 MB for testing, but on a production system you probably want to increase this number to
      100 MB or greater.

   3. Finally we specify the fields option, which identifies which specific fields from the alert should
      be included in the json output. In this example we have chosen every possible field to be output.

Note: After testing, you can choose to remove some of these fields (the vlan and mpls fields are often
not necessary, and the b64_data contains the entire packet payload, which can be removed to save
space). Do not remove the seconds field, and make sure it is always the first field listed. This will allow
Splunk to correctly process the events.

If you run Snort as we did before when scanning pcap files and outputting to a csv file (but now with
the alert_json output plugin enabled, you’ll again see nothing output to the console:
  1     sudo snort -c /usr/local/etc/snort/snort.lua --pcap-filter \*.pcap \
  2        --pcap-dir ~/pcaps -l /var/log/snort -s 65535 -k none -m 0x1b

Once Snort has finished processing your pcap files, you can look in your log folder (specified above by
-l /var/log/snort), you’ll see the json files that contain all the alerts:

Noah Dietrich                                                                                           26
Snort 3.0.1 on Ubuntu 18 & 20 2020-05-07 1 noah@snort3:~$ ls -lh /var/log/snort 2 total 59M 3 -rw-r--r-- 1 root root 4.4M Apr 26 17:26 alert_csv.txt 4 -rw-r--r-- 1 root root 4.1M Apr 26 17:38 alert_json.txt 5 -rw-r--r-- 1 root root 10M Apr 26 17:33 alert_json.txt.1587915232 6 -rw-r--r-- 1 root root 10M Apr 26 17:34 alert_json.txt.1587915252 7 -rw-r--r-- 1 root root 10M Apr 26 17:35 alert_json.txt.1587915314 8 -rw-r--r-- 1 root root 10M Apr 26 17:36 alert_json.txt.1587915397 9 -rw-r--r-- 1 root root 10M Apr 26 17:37 alert_json.txt.1587915473 10 -rw-r--r-- 1 root root 37K Apr 26 17:38 appid_stats.log you will notice that there are a number of alert_json.txt.nnnnnnnnnn files. the numbers indicate the unixtime the file was created, and each file is 10 MB as we specified in the snort.lua. Snort Startup Script We create a systemD script to run snort automatically on startup. We will also have snort run as a regular (non-root) user after startup for security reasons. First create the snort user and group: 1 sudo groupadd snort 2 sudo useradd snort -r -s /sbin/nologin -c SNORT_IDS -g snort remove old log files (move them if you want to keep them): 1 sudo rm /var/log/snort/* We need to grant the ’snort’ user rights to the log directory: 1 sudo chmod -R 5775 /var/log/snort 2 sudo chown -R snort:snort /var/log/snort create the systemD service file: 1 sudo vi /lib/systemd/system/snort3.service with the following content (change the ethernet adapter eth0 to match your adapter): Noah Dietrich 27
Snort 3.0.1 on Ubuntu 18 & 20                                                                2020-05-07

  1   [Unit]
  2   Description=Snort3 NIDS Daemon
  3   After=syslog.target network.target
  4
  5   [Service]
  6   Type=simple
  7   ExecStart=/usr/local/bin/snort -c /usr/local/etc/snort/snort.lua -s 65535 \
  8      -k none -l /var/log/snort -D -u snort -g snort -i eth0 -m 0x1b
  9
 10   [Install]
 11   WantedBy=multi-user.target

You should be familiar with all the flags we are passing to Snort, as they are the same ones we’ve been
using in previous examples. We are adding the -D flag that enables Snort to run as a Daemon. If you
wanted to run different options, you could add them here. Here’s a breakdown of all the flags we are
using:

 Flag                                             Explanation

 /usr/local/bin/snort                             This is the path to the snort binary. We don’t use
                                                  sudo here since the script will be started with
                                                  elevated (root) privileges.
-c /usr/local/etc/snort/snort.lua                 The snort.lua configuration file.
-s 65535                                          Set the snaplen so Snort doesn’t truncate and drop
                                                  oversized packets.
-k none                                           Ignore bad checksums, otherwise snort will drop
                                                  packets with bad checksums, and they won’t be
                                                  evaluated.
-l /var/log/snort                                 the path to the folder where Snort will store all the
                                                  log files it outputs.
-D                                                Run as a Daemon.
-u snort                                          After startup (and after doing anything that
                                                  requires elevated privileges), switch to run as the
                                                  “snort” user.
-g snort                                          After startup, run as the “snort” group.
-i eth0                                           The interface to listen on.
-m 0x1b                                           Umask of 033 for file permissions.

Noah Dietrich                                                                                          28
Snort 3.0.1 on Ubuntu 18 & 20 2020-05-07
Enable the Snort systemD service and start it:
1 sudo systemctl enable snort3
2 sudo service snort3 start
check the status of the service:
1 service snort3 status
your output should be similar to the following, showing ’active (running)’:
1 noah@snort3:~/pcaps$ service snort3 status
2 * snort3.service - Snort3 NIDS Daemon
3 Loaded: loaded (/lib/systemd/system/snort3.service; enabled; vendor preset: enabled)
4 Active: active (running) since Tue 2018-12-11 16:48:44 EST; 2min 57s ago
you can check the full output of the service with the following command if there are any problems:
1 sudo journalctl -u snort3.service
Splunk
Splunk is the software we will use as our SIEM (Security information and event management) solution,
which will display graphically (through a web interface) all the alerts Snort has generated, and will give
us some powerful tools to search and understand those alerts, as well as draw deeper information
from them. Splunk is free (as in cost) software for the way we are using it (although you can purchase a
license for additional functionality relating mostly to managing large Splunk installations). Alternative
software would be Elasticstack’s ELK stack (which I don’t use here because the configuration is more
complex).
Installing Splunk:
You will need to create a free account on Splunk’s website to download the software and Add-ons.
Navigate to Splunk’s Homepage, click on the green Free Splunk button in the upper right, create a
new account (or login if you already have an account). Under Splunk Free you will click the link titled
Download.
On the download page, click the Linux tab, and then click the Download Now button next to .deb
(since we’re running Ubuntu, a Debian-based system). Agree to the license, and click the start your
download now button. The download page will automatically open up a window to save the download
to your local system. If you want to use wget to download the installer instead, you can cancel this
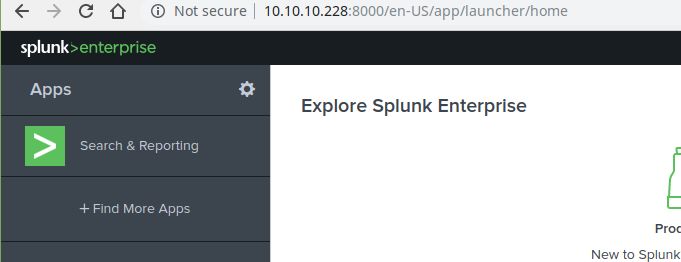
Noah Dietrich 29Snort 3.0.1 on Ubuntu 18 & 20 2020-05-07 download, then click Download via Command Line (wget) to copy the wget string for your download. The download is approximately 375 MB. Once you have the Splunk installer on your system, you need to install it. From the directory where you saved the installer: 1 sudo dpkg -i splunk-8.*.deb This will install Splunk to /opt/splunk. Note that the volume Splunk is installed to must have 5 GB of free space or Splunk will not start. The indexes where Splunk stores all the collected log data reside in a sub-folder of the install location, so make sure there’s enough space on this volume for all the data you expect to collect. Now we want to start Splunk for the first time (accepting the license and taking all default options), You will be prompted to create a new admin user and password for Splunk. Save these credentials, as we will use them later to log into the web interface: 1 sudo /opt/splunk/bin/splunk start --answer-yes --accept-license then we want to configure Splunk to start automatically at boot time. We will also enable systemD for Splunk and start the service (not the uppercase “S” in the Splunk systemD service). 1 sudo /opt/splunk/bin/splunk stop 2 sudo /opt/splunk/bin/splunk enable boot-start -systemd-managed 1 3 sudo service Splunkd start The Splunk server is now listening on port 8000 of this server (http://localhost:8000 if you’re connecting from the local machine, or via the IP address of this system from another computer). The username and the password are the ones you setup when installing Splunk. Splunk is running with the free Enterprise Trial license at this time, giving all Enterprise features for 60 days, and allowing you to index 5 GB of log data per day. The only feature that we will loose once the trial license expires that will affect this installation is the removal of authenticated logins. Once you convert to the free license, you will not be prompted to log into the Splunk web interface, Splunk Enterprise offers a number of features, including a deployment server to automatically update Splunk instances and the Splunk apps they run automatically, multiple user accounts with configurable permissions, load balancing, and other features. Configuring Splunk: Now log onto your Splunk instance, using the username and password you created during the install. The Splunk server is listening on port 8000 (http://localhost:8000). Noah Dietrich 30
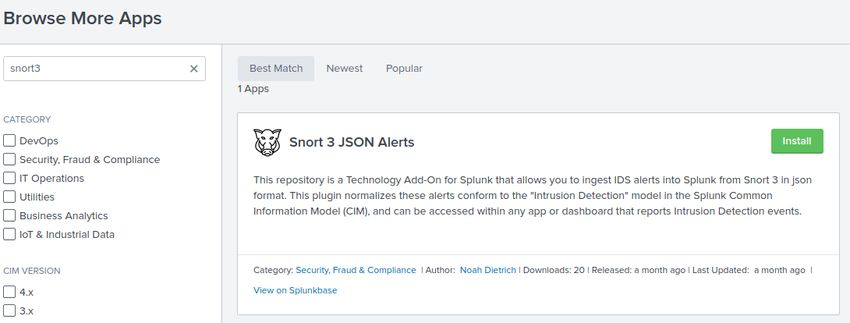
Snort 3.0.1 on Ubuntu 18 & 20                                                               2020-05-07

We need to install a Splunk Plugin (called an Add-on) that will allow us to easily ingest (collect) logs
created by Snort 3 and normalize them (make sure field naming is consistent with NIDS data so that
Splunk apps can display our data easily).

To install this app, from the main web page of your Splunk instance, click the link titled +Find More
Apps on the left side of the Splunk Web Interface:

This will take you to Splunkbase, an on line repository for Splunk Add-ons that extend and enhance
the functionality of your Splunk installation. Search Splunkbase for Snort3 and you’ll be presented
with one result: Snort 3 JSON Alerts. Click the green install button, next to this Add-on:

enter the username and password your created with Splunk when you registered to download Splunk
(not the username and password you created for your local Splunk server instance). Accept the terms
& conditions, and click Login and Install. click done once the install is completed.

This Add-on has now been installed on your Splunk server. Next,we need to configure this add-on to
tell Splunk where the log files are stored that Snort 3 generated so Splunk can ingest them. We do this
from the command line with a configuration file:
  1 sudo mkdir /opt/splunk/etc/apps/TA_Snort3_json/local
  2 sudo touch /opt/splunk/etc/apps/TA_Snort3_json/local/inputs.conf
  3 sudo vi /opt/splunk/etc/apps/TA_Snort3_json/local/inputs.conf

Enter the following text into this inputs.conf file:

Noah Dietrich                                                                                        31
Snort 3.0.1 on Ubuntu 18 & 20                                                                 2020-05-07

  1    [monitor:///var/log/snort/*alert_json.txt*]
  2    sourcetype = snort3:alert:json

restart Splunk:
   1   sudo service Splunkd restart

now when Splunk starts, it will scan the /var/log/snort directory for json files, assign them sourcetype
of snort3:alert:json, and ingest them so we can search them.

from your Splunk instance, log in (since you rebooted the server), and click the Search and Reporting
app link on the left side. In the search field, enter the following text:
   1   sourcetype="snort3:alert:json"

and then click the green magnifying glass icon to start the search.

This will show all events that our server is collecting. you may not see many events, especially if you
deleted the old json files we created from our pcap files. You can create a few new alerts using ping
and wget facebook.com if you want (remember we created those rules before) if you don’t see any
alerts. There is a slight lag between an event being generated and shown in Splunk. If you continue to
not see any alerts, change the time range (the drop-down set to the past 24 hours next to the search
icon) to all time and re-run the search. If you still don’t see any events, check that there are json files
in your /var/log/snort folder.

Using Splunk

This guide does not go in-depth with using Splunk. There are excellent free resources available from
Splunk which I mention below.

Below are some simple searches you may find helpful in starting out. To show all events in a table with
the time, source, destination, and message, run the following search:
  1    sourcetype="snort3:alert:json"
  2    | table _time src_ap dst_ap msg

Noah Dietrich                                                                                           32
Snort 3.0.1 on Ubuntu 18 & 20                                                                2020-05-07

To show the count of all events by destination:
  1    sourcetype="snort3:alert:json"
  2    | stats count by dest

to show all events sources on a map:
  1    sourcetype="snort3:alert:json"
  2    | iplocation src_addr
  3    | stats count by Country
  4    | geom geo_countries featureIdField="Country"

(you may need to click on the “Visualization” tab, and then “line chart” and change it to Choropleth
Map)

Some excellent free resources for using Splunk are:

EBook: Exploring Splunk: Search Processing Language (SPL) Primer and Cookbook

Free Online Training:

      • Free Splunk Fundamentals 1

      • Splunk Infrastructure Overview

Cleaning up your install

Splunk is currently running in Free Enterprise Trial Mode, which is only good for 60 days. We want
to convert this license into the free mode, which is similar to Enterprise mode, with a few features
removed. The feature you will notice missing are the ability to log onto the server with a username and
password (allowing anyone to log on). You also loose some features related to clustering, as well as the
ability to deploy Splunk apps to other servers (useful when you have more than one server or system
to collect logs from).

To change the license: Click Settings along the upper right bar, and then click Licensing:

Noah Dietrich                                                                                        33
Snort 3.0.1 on Ubuntu 18 & 20 2020-05-07 Click change license group. Select Free License and click Save. click Restart Now, and click OK. if you were logged in from a remote computer, you should notice that you are not prompted to log in. this is by design, but can be a security risk (since anyone can now log onto your server). If you were logged into the local machine when you converted the license, only local logons will be allowed. Conclusion See the Snort 3 manual for more information about running Snort 3 and compilation options. Snort 3 is much different from the Snort 2.9.9.x series, and reading the manual is highly recommended. Both configuration and rule files are different, and not compatible between the two versions. Old Snort 2 configuration and rule files can be converted to the Snort 3 format using the included snort2lua command. Feedback: Please send me feedback with issues you encountered and recommendations for changes to this guide: mailto:Noah@SublimeRobots.com. Feedback helps me to update these guides, and Noah Dietrich 34
You can also read