Cisco Crosswork Change Automation and Health Insights 4.0 User Guide
←
→
Page content transcription
If your browser does not render page correctly, please read the page content below
Cisco Crosswork Change Automation and Health Insights 4.0 User
Guide
First Published: 2021-04-19

Americas Headquarters
Cisco Systems, Inc.
170 West Tasman Drive
San Jose, CA 95134-1706
USA
http://www.cisco.com
Tel: 408 526-4000
     800 553-NETS (6387)
Fax: 408 527-0883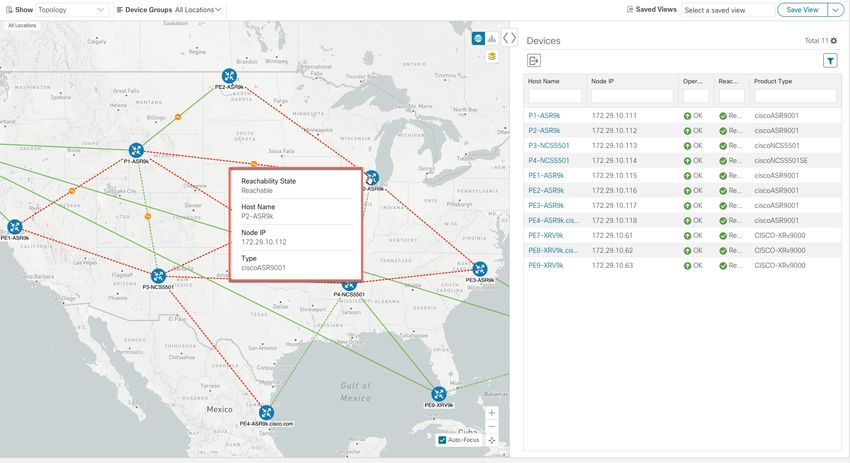
THE SPECIFICATIONS AND INFORMATION REGARDING THE PRODUCTS IN THIS MANUAL ARE SUBJECT TO CHANGE WITHOUT NOTICE. ALL STATEMENTS,
INFORMATION, AND RECOMMENDATIONS IN THIS MANUAL ARE BELIEVED TO BE ACCURATE BUT ARE PRESENTED WITHOUT WARRANTY OF ANY KIND,
EXPRESS OR IMPLIED. USERS MUST TAKE FULL RESPONSIBILITY FOR THEIR APPLICATION OF ANY PRODUCTS.

THE SOFTWARE LICENSE AND LIMITED WARRANTY FOR THE ACCOMPANYING PRODUCT ARE SET FORTH IN THE INFORMATION PACKET THAT SHIPPED WITH
THE PRODUCT AND ARE INCORPORATED HEREIN BY THIS REFERENCE. IF YOU ARE UNABLE TO LOCATE THE SOFTWARE LICENSE OR LIMITED WARRANTY,
CONTACT YOUR CISCO REPRESENTATIVE FOR A COPY.

The Cisco implementation of TCP header compression is an adaptation of a program developed by the University of California, Berkeley (UCB) as part of UCB's public domain version of
the UNIX operating system. All rights reserved. Copyright © 1981, Regents of the University of California.

NOTWITHSTANDING ANY OTHER WARRANTY HEREIN, ALL DOCUMENT FILES AND SOFTWARE OF THESE SUPPLIERS ARE PROVIDED “AS IS" WITH ALL FAULTS.
CISCO AND THE ABOVE-NAMED SUPPLIERS DISCLAIM ALL WARRANTIES, EXPRESSED OR IMPLIED, INCLUDING, WITHOUT LIMITATION, THOSE OF
MERCHANTABILITY, FITNESS FOR A PARTICULAR PURPOSE AND NONINFRINGEMENT OR ARISING FROM A COURSE OF DEALING, USAGE, OR TRADE PRACTICE.

IN NO EVENT SHALL CISCO OR ITS SUPPLIERS BE LIABLE FOR ANY INDIRECT, SPECIAL, CONSEQUENTIAL, OR INCIDENTAL DAMAGES, INCLUDING, WITHOUT
LIMITATION, LOST PROFITS OR LOSS OR DAMAGE TO DATA ARISING OUT OF THE USE OR INABILITY TO USE THIS MANUAL, EVEN IF CISCO OR ITS SUPPLIERS
HAVE BEEN ADVISED OF THE POSSIBILITY OF SUCH DAMAGES.

Any Internet Protocol (IP) addresses and phone numbers used in this document are not intended to be actual addresses and phone numbers. Any examples, command display output, network
topology diagrams, and other figures included in the document are shown for illustrative purposes only. Any use of actual IP addresses or phone numbers in illustrative content is unintentional
and coincidental.

All printed copies and duplicate soft copies of this document are considered uncontrolled. See the current online version for the latest version.

Cisco has more than 200 offices worldwide. Addresses and phone numbers are listed on the Cisco website at www.cisco.com/go/offices.

Cisco and the Cisco logo are trademarks or registered trademarks of Cisco and/or its affiliates in the U.S. and other countries. To view a list of Cisco trademarks, go to this URL:
https://www.cisco.com/c/en/us/about/legal/trademarks.html. Third-party trademarks mentioned are the property of their respective owners. The use of the word partner does not imply a
partnership relationship between Cisco and any other company. (1721R)
© 2021–2021   Cisco Systems, Inc. All rights reserved.

CONTENTS

CHAPTER 1   Overview      1

                 Audience 1
                 Overview of Cisco Crosswork Change Automation and Health Insights 1
                 Integration with other Cisco and non-Cisco products 2
                 Licensing 2

CHAPTER 2   Get Started       3

                 Getting Started 3
                 Workflow 1: Configure Network View 4
                 Workflow 2: Monitor Key Performance Indicators 4
                 Workflow 3: Respond to KPI Data 4
                 Workflow 4: Schedule Playbooks 5
                 Workflow 5: Develop Custom KPIs 6
                 Workflow 6: Develop Custom Playbooks 7

CHAPTER 3   Set Up and Monitor Your Network View 9
                 Get a Quick View in the Dashboard 9
                 View Devices and Links on the Topology Map 11
                   View Device and Link Details 12
                 Use Device Groups to Filter Your Topology View 16
                   Create and Modify Device Groups 19
                   Enable Dynamic Device Grouping 20
                 Customize Map Display Settings 21
                   Customize the Display of Links and Devices 21
                 Save Topology Views for Easy Access 21

                                          Cisco Crosswork Change Automation and Health Insights 4.0 User Guide
                                                                                                                 iii
Contents

CHAPTER 4        Automate Network Changes 23
                         Change Automation Overview 23
                            Configure Change Automation Settings 24
                            Use the Change Automation Dashboard 25
                            View the Play list 26
                            View the Playbook List 27
                         About Custom Plays 28
                            Create a Custom Play 28
                            Export Plays 31
                            Import Plays 32
                            Delete Custom Plays 32
                         About Customizing Playbooks 33
                            Playbook Components and Files 33
                            Create a Custom Playbook 35
                            Export Playbooks 38
                            Import Playbooks 39
                            Delete Custom Playbooks 40
                         About Running Playbooks 40
                            Playbook Execution Order 41
                            Perform a Dry Run of a Playbook 41
                            Run Playbooks In Single Stepping Mode 43
                            Run Playbooks In Continuous Mode 46
                            Schedule Playbook Runs 49
                            View or Abort Playbook Jobs 50
                         Troubleshoot Change Automation 51

CHAPTER 5        Monitor Network Health and KPIs                53

                         Health Insights Overview 53
                            Health Insights Alert Dashboard 54
                            View Alerts for Network Devices 56
                               Telemetry Data Retention 58
                         Manage KPIs 59
                            Create a New KPI 60

              Cisco Crosswork Change Automation and Health Insights 4.0 User Guide
       iv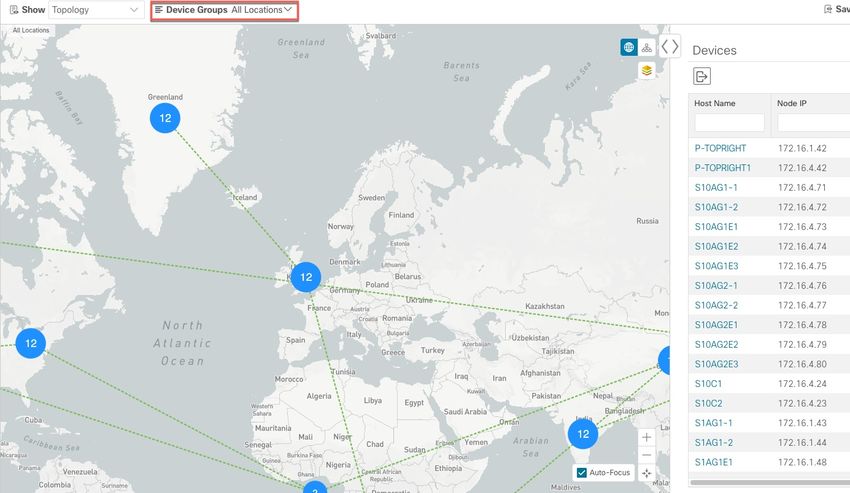
Contents

                    Link KPIs to Playbooks 62
                    Verify the Deployment Status of Enabled KPIs 63
                    List of Health Insights KPIs 64
                  Manage KPI Profiles 69
                    Create a New KPI Profile 70
                    Enable KPI Profile on Devices 73
                    Disable KPI Profile on Devices or Device Groups 75
                  Troubleshoot Health Insights 76

APPENDIX A   Telemetry-Traffic Collector (TM-TC) Troubleshooting Procedures              77
                  Handling Zombies 77
                  Handling Device Cleanup Errors 79

                                           Cisco Crosswork Change Automation and Health Insights 4.0 User Guide
                                                                                                                       v
Contents

           Cisco Crosswork Change Automation and Health Insights 4.0 User Guide
    vi
CHAPTER                1
           Overview
           This section contains the following topics:
              • Audience, on page 1
              • Overview of Cisco Crosswork Change Automation and Health Insights, on page 1
              • Integration with other Cisco and non-Cisco products, on page 2
              • Licensing, on page 2

Audience
           This guide is for experienced network administrators who want to use Cisco Crosswork Change Automation
           and Health Insights in their network. This guide assumes that you are familiar with the following topics:
              • Networking technologies and protocols (IS-IS, BGP, and so on)
              • Network monitoring and troubleshooting
              • Familiarity with the Cisco Crosswork Infrastructure 4.0 and how the applications are installed. For more
                information, see Cisco Crosswork Infrastructure 4.0 and Applications Installation Guide.

Overview of Cisco Crosswork Change Automation and Health
Insights
           Cisco Crosswork Change Automation and Health Insights is part of the Cisco Crosswork Network Automation
           suite of products. Cisco Crosswork Change Automation and Health Insights retrieves real-time information
           from the network, analyzes the data, and uses APIs to apply network changes. The Cisco Crosswork Change
           Automation and Health Insights platform brings together streaming telemetry and model-driven application
           programming interfaces (APIs) to redefine service provider network operations.
           Cisco Crosswork Change Automation and Health Insights enables service providers to quickly deploy
           intent-driven, closed-loop operations. The platform provides a ready-to-use solution supporting the following
           use cases:
              • Monitor Key Performance Indicators (KPIs) and notify of any anomalies.
              • Prepare network changes triggered by changes in KPIs and roll out these changes.

                                            Cisco Crosswork Change Automation and Health Insights 4.0 User Guide
                                                                                                                   1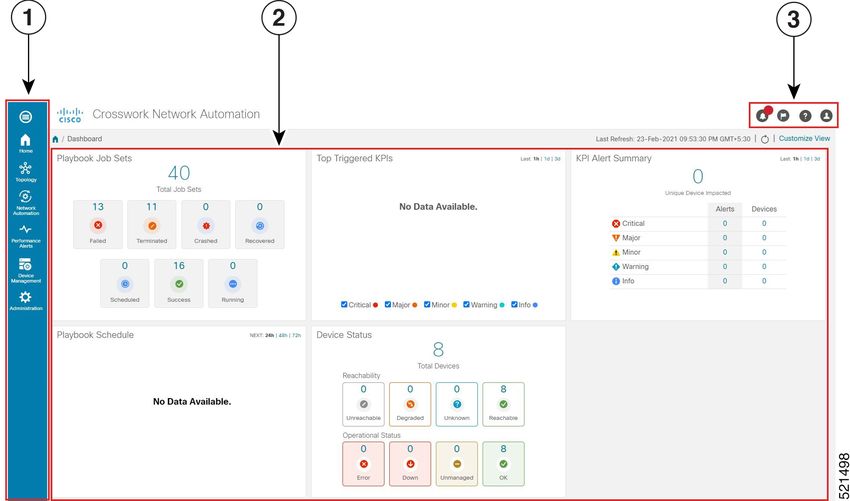
Overview
  Integration with other Cisco and non-Cisco products

                            • Automate change-impact and remediation.

                        This guide explains how to use Cisco Crosswork Change Automation and Health Insights.
                        For more information about the Cisco Crosswork Network Automation platform, see the Cisco Crosswork
                        Network Automation Product page on Cisco.com.

Integration with other Cisco and non-Cisco products
                        Crosswork API: Cisco Crosswork Change Automation and Health Insights provides a robust set of APIs that
                        allow it to be integrated with other tools you use to manage and configure your network. For more details on
                        the product APIs, see the Cisco Crosswork Network Automation API Documentation on Cisco DevNet.
                        Cisco WAE: Cisco WAN Automation Engine (Cisco WAE) providers supply traffic and topology analysis
                        to Cisco Crosswork Change Automation and Health Insights. The foundation software is Cisco WAE Planning,
                        which provides a cross-sectional view of traffic, topology, and equipment state.
                        Cisco NSO: Cisco Crosswork Change Automation and Health Insights uses Cisco Network Services
                        Orchestrator (Cisco NSO) as the default provider to configure the devices according to their expected functions,
                        including configuring any required model-driven telemetry (MDT) sensor paths for data collection. Cisco
                        NSO is vital in supplying device management and configuration-maintenance services.
                        Crosswork Active Topology: Cisco Crosswork Active Topology enables visualization of topology and
                        services on logical and geographical maps.
                        Crosswork Optimization Engine: Cisco Crosswork Change Automation and Health Insights uses instances
                        of Cisco Crosswork Optimization Engine to provide real-time network optimization allowing operators to
                        effectively maximize network utilization as well as increase service velocity.
                        Crosswork Zero Touch Provisioning: Cisco Crosswork Change Automation and Health Insights works with
                        Crosswork Zero Touch Provisioning (ZTP) to allow users to bring up devices quickly and easily using a
                        Cisco-certified software image and a day-zero software configuration of the customer's choice. Once provisioned
                        in this way, the new device is onboarded to the Crosswork device inventory (and, if it is configured as a
                        Crosswork Provider, to Cisco NSO), where it can be monitored and managed like other devices.
                        Syslog Server: Cisco Crosswork Change Automation and Health Insights interacts with syslog server to parse
                        the syslog events from devices in recognized formats (RFC5424 and RFC3164).

Licensing
                        Change Automation and Health Insights are separately licensed applications. Change Automation license
                        count is incremented for each new playbook. Health Insights is licensed based on the number of KPIs you
                        have enabled (via a KPI Profile), with the license count incrementing for each enabled KPI.
                        To purchase a Cisco Crosswork Change Automation and Health Insights license, contact your Cisco account
                        representative.
                        For more about licensing, see the Cisco Crosswork Network Automation Product Data Sheet on Cisco.com.

               Note     For demonstrations and field trials, Cisco Crosswork Change Automation and Health Insights can be used
                        without a license for up to 90 days.

                    Cisco Crosswork Change Automation and Health Insights 4.0 User Guide
       2
CHAPTER                2
          Get Started
          This section contains the key workflows of Cisco Crosswork Change Automation and Health Insights:
             • Getting Started, on page 3
             • Workflow 1: Configure Network View, on page 4
             • Workflow 2: Monitor Key Performance Indicators, on page 4
             • Workflow 3: Respond to KPI Data, on page 4
             • Workflow 4: Schedule Playbooks, on page 5
             • Workflow 5: Develop Custom KPIs, on page 6
             • Workflow 6: Develop Custom Playbooks, on page 7

Getting Started
           Step                                                                     For details, see...
           1. Populate the Cisco Crosswork Change Automation and Health             Refer the Cisco Crosswork
           Insights environment and set up Cisco Crosswork Data Gateway.            Infrastructure 4.0 and Applications
                                                                                    Administration Guide

           2. Configure the Change Automation settings.                             Configure Change Automation Settings,
                                                                                    on page 24

           3. (Optional) Setup and configure your map settings.                     Workflow 1: Configure Network View,
                                                                                    on page 4

           4. Create KPI Profiles to monitor device Key Performance Indicators Workflow 2: Monitor Key Performance
           (KPIs) for issues and anomalies.                                    Indicators, on page 4

           5. Link KPIs to playbooks.                                               Workflow 3: Respond to KPI Data, on
                                                                                    page 4

           6. Schedule Playbooks to perform routine maintenance.                    Workflow 4: Schedule Playbooks, on
                                                                                    page 5

           7. Expand telemetry insight with custom KPIs.                            Workflow 5: Develop Custom KPIs,
                                                                                    on page 6

           8. Remediate common scenarios and automate routine tasks with            Workflow 6: Develop Custom
           custom playbooks.                                                        Playbooks, on page 7

                                           Cisco Crosswork Change Automation and Health Insights 4.0 User Guide
                                                                                                                    3
Get Started
 Workflow 1: Configure Network View

Workflow 1: Configure Network View
                      The following workflow describes the steps to configure the map display settings in Cisco Crosswork Change
                      Automation and Health Insights:

                       Step                                                                Action
                       1. Group your devices logically as per your requirement.            Follow the instructions in Create and
                                                                                           Modify Device Groups, on page 19 and
                                                                                           Enable Dynamic Device Grouping, on
                                                                                           page 20.

                       2. Set display preferences for your topology.                       Follow the instructions in Customize
                                                                                           Map Display Settings, on page 21.

                       3. Manage your custom topology views.                               Follow the instructions in Save
                                                                                           Topology Views for Easy Access, on
                                                                                           page 21.

Workflow 2: Monitor Key Performance Indicators
                      Once you have completed initial setup, use Cisco Crosswork Change Automation and Health Insights to begin
                      device performance monitoring using KPI Profiles.

                       Step                                                                Action
                       1. (Optional) Tag all of the devices whose KPIs you plan to monitor Refer the Cisco Crosswork Change
                       with a tag indicating the function they perform, per your plan.     Automation and Health Insights 4.0
                                                                                           Administration Guide for the procedure.

                       2. Plan which Cisco-supplied KPIs you want to begin using, based Review the Cisco-supplied KPIs
                       on each device's function and the device performance characteristics documented in List of Health Insights
                       you want to monitor.                                                 KPIs, on page 64.
                                                                                           To create a new KPI that fits your
                                                                                           requirement, see Create a New KPI, on
                                                                                           page 60.

                       3. Based on your experience or by using the recommendation engine, Follow the instructions in Create a New
                       group the KPIs to form KPI Profiles.                               KPI Profile, on page 70.

                       4. Enable the appropriate KPI Profiles on the devices you want to   Review and follow the instructions in
                       monitor.                                                            Monitor Network Health and KPIs, on
                                                                                           page 53

Workflow 3: Respond to KPI Data
                      The following workflow describes the steps to follow when using Cisco Crosswork Change Automation and
                      Health Insights Playbook to reconfigure the network in response to KPI alerts detected by Health Insights:

                  Cisco Crosswork Change Automation and Health Insights 4.0 User Guide
      4
Get Started
Workflow 4: Schedule Playbooks
Step Action
1. Research the KPIs that are triggering alerts, and determine the Follow the instructions in Monitor
best corrective action to take for the situation your network has Network Health and KPIs, on page 53,
experienced. using the View Alerts for Network
Devices, on page 56 to research the
alerts and their possible causes.
2. Review the Cisco-supplied Playbooks and determine which ones Review the list of Plays, Playbooks,
will allow you to address the situation. and generic parameters in the
"Playbooks" and "Verbs" references in
the Change Automation Developer
Guide on Cisco Devnet.
3. Try out the selected Playbooks and see if they are applicable to See:
your purposes. As you experiment, adjust the Playbook parameters
Perform a Dry Run of a Playbook, on
as needed.
page 41
Run Playbooks In Single Stepping
Mode, on page 43
Run Playbooks In Continuous Mode,
on page 46
4. If the Playbooks are appropriate for your purposes, and the Follow the steps in Link KPIs to
situation occurs often, link the selected Playbooks and KPIs, so Playbooks, on page 62. Use the
alerts triggered by a KPI will always display the linked Playbook Remediation icon shown in View Alerts
for selection by operators. for Network Devices, on page 56 to
trigger a run of a linked Playbook from
Once the KPI and Playbook are linked, operators can click on the
a device or KPI alert.
Remediation icon, modify the Playbook parameters as needed, and
execute the selected Playbook.
Workflow 4: Schedule Playbooks
The workflow below describes the steps to follow when using Cisco Crosswork Change Automation and
Health Insights to automate routine network upkeep, and to verify that each routine change completed correctly.
Note This workflow is applicable only if scheduling is enabled in the Change Automation settings. For more
information, see Configure Change Automation Settings, on page 24.
Step Action
1. Identify routine maintenance tasks (such as throughput checks, See About Running Playbooks, on page
software upgrades, SMU installs, and so on) that you perform on a 40 and View the Playbook List, on
regular schedule and that may be suitable for automation using one page 27
or more Cisco Crosswork Change Automation and Health Insights
Playbooks.
Cisco Crosswork Change Automation and Health Insights 4.0 User Guide
5Get Started
Workflow 5: Develop Custom KPIs
Step Action
2. Configure Playbooks to perform these tasks at the desired time. See About Running Playbooks, on page
40 and Schedule Playbook Runs, on
page 49
3. Review the Change Automation Job History to review the current See Use the Change Automation
status of the Playbook and confirm that it ran successfully. Dashboard, on page 25 and View or
Abort Playbook Jobs, on page 50
Workflow 5: Develop Custom KPIs
The following workflow describes the steps to follow when considering whether or not to develop Cisco
Crosswork Change Automation and Health Insights custom KPIs for your special needs, and how to proceed
if you decide you do.
Step Action
1. Review the existing KPIs to make sure the telemetry you want to Follow the instructions in Monitor
monitor is not already available. Network Health and KPIs, on page 53,
using the View Alerts for Network
Devices, on page 56 to research the
alerts and their possible causes.
2. Review the data available from the devices you want to monitor Review the KPIs in List of Health
to see if they can supply the needed information: Insights KPIs, on page 64.
• If they can, proceed with building a custom KPI.
• If they cannot: Contact Cisco to see if we can include the
required data in a future version of the device code.
The latest information on the data your devices can provide is always
available at the Cisco Telemetry Data Mapper
(https://tdm.cisco.com).
3. Build the custom KPI and add it to a KPI Profile. See Create a New KPI, on page 60 and
Create a New KPI Profile, on page 70
4. Enable the new KPI Profile on a test device and confirm that the See Enable KPI Profile on Devices, on
data reported matches your expectations. Be aware that KPIs that page 73 and View Alerts for Network
depend on data over time to establish baseline performance will Devices, on page 56
need some time to "calibrate" before they provide meaningful data.
5. If the KPI Profile is meeting expectations, enable it on all devices Follow the steps in Enable KPI Profile
where you consider it applicable. on Devices, on page 73.
6. Review the Health Insights Job History to make sure the KPI See Verify the Deployment Status of
Profile was deployed to all targeted devices Enabled KPIs, on page 63
Cisco Crosswork Change Automation and Health Insights 4.0 User Guide
6Get Started
Workflow 6: Develop Custom Playbooks
Workflow 6: Develop Custom Playbooks
The following workflow describes the steps to follow when deciding to develop a Change Automation custom
Playbook.
Step Action
1. Review the existing Playbook to see if any of them meet your Review the Plays, Playbooks, and
needs fully or partially. parameters in the "Playbooks" and
"Verbs" references in the Change
Automation Developer Guide on Cisco
Devnet.
2. Find the Playbook that most closely matches your requirements See Export Playbooks, on page 38
and export that Playbook. Once you get good at modifying Playbook,
you may choose to build them from scratch and skip this step.
3. Modify the exported Playbook or create a new Playbook as Review the "Custom Playbooks"
necessary to meet your requirements. tutorial in the Change Automation
Developer Guide on Cisco DevNet.
4. Import the new Playbook and then perform a dry run, or run it in First, follow the instructions in Import
single-stepping or continuous mode against a test device or devices, Playbooks, on page 39. Then:
to confirm that it performs as expected.
Perform a Dry Run of a Playbook, on
page 41
Run Playbooks In Single Stepping
Mode, on page 43
Run Playbooks In Continuous Mode,
on page 46
5. For a Playbook you have developed that meets your needs: See:
• In response to KPI alerts: If the Playbook is meeting Link KPIs to Playbooks, on page 62
expectations, link it to the KPI that indicates the need for the
Schedule Playbook Runs, on page 49
Playbook to be run, so that it is easy for operators to trigger the
Playbook in response.
• For planned maintenance or configuration changes: Schedule
the Playbook to run, or run it, at the planned time.
Cisco Crosswork Change Automation and Health Insights 4.0 User Guide
7Get Started
Workflow 6: Develop Custom Playbooks
Cisco Crosswork Change Automation and Health Insights 4.0 User Guide
8CHAPTER 3
Set Up and Monitor Your Network View
Familiarize yourself with the UI and set up your network view before managing SR policies and RSVP-TE
tunnels. This section contains the following topics:
• Get a Quick View in the Dashboard, on page 9
• View Devices and Links on the Topology Map, on page 11
• Use Device Groups to Filter Your Topology View, on page 16
• Customize Map Display Settings, on page 21
• Save Topology Views for Easy Access, on page 21
Get a Quick View in the Dashboard
The Home page displays the dashboard which provides an at-a-glance operational summary of the network
being managed, including reachability and operational status of devices. Each dashlet represents different
types of data belonging to the same category.
Cisco Crosswork Change Automation and Health Insights 4.0 User Guide
9Set Up and Monitor Your Network View
Get a Quick View in the Dashboard
Figure 1: Crosswork Home page
Callout Description
No.
1 Main Menu: The main menu allows you to navigate to installed Cisco Crosswork applications
and device management and administrative tasks. Menu options may look slightly different
depending on what Cisco Crosswork applications are installed.
2 Dashlets: Information varies depending on what Cisco Crosswork applications are installed.
• To drill down for more information within a dashlet, click on a value. A window appears
displaying only the filtered data you clicked on.
• To add or change the layout of dashlets, click Customize View. Move the dashlets to your
desired layout and click Save.
3 Settings icons:
The Alerts icon notifies you of any current error conditions related to the system operations
which require attention, and provides a link to detailed information about those conditions.
The Events icon notifies you of new events related to system operation, and also provides
access to the history of all system events.
The About icon displays the current version of the Cisco Crosswork product.
The User Account icon lets you view your username, change your password, and log out.
Cisco Crosswork Change Automation and Health Insights 4.0 User Guide
10Set Up and Monitor Your Network View
View Devices and Links on the Topology Map
View Devices and Links on the Topology Map
To view the network topology map, from the main menu choose Topology.
Figure 2: Cisco Crosswork UI and Topology Map
Callout Description
No.
1 Topology Map View: From the Show drop-down list, click the option that displays the data that
you would like to see on the map.
If Topology is selected, devices and links in the network are displayed.
2 Device Groups: From the drop-down list, click the group of devices that you want to focus on
the topology map. All other device groups will be hidden.
Cisco Crosswork Change Automation and Health Insights 4.0 User Guide
11Set Up and Monitor Your Network View
View Device and Link Details
Callout Description
No.
3 Topology Map: The network topology can be displayed on a logical map or a geographical map,
where the devices and links are shown in their geographic context. From the map, you can drill
down to get detailed information about devices and links.
Devices:
• To view a device configuration summary, hover the mouse cursor over the device icon. A
pop up window displaying the host name, state, node ID, and device type appears.
• To view device details, click on the device icon.
• If devices are in close physical proximity, the geographical map shows them as a cluster.
The number in a blue circle ( ) indicates the number of devices in the cluster. Displaying
devices in this manner helps prevent overlap and clutter on the map.
Links:
• A solid line indicates a single link between two devices. If there is more than one link between
two devices, or between a device and a cluster of devices, the line is shown dashed instead.
A dashed line indicates an aggregated link that represents more than one link, or the use of
multiple protocols (for example, IPv4 and IPv6) on the same physical link.
• To view link information details, click on the link.
4
: The logical map shows devices and their links, positioned according to an automatic layout
algorithm, ignoring their geographical location. You can change the layout algorithm.
: The geographical map shows single devices, device clusters, links, and tunnels, superimposed
on a map of the world. Each device location on the map reflects the device's GPS coordinates
(longitude and latitude) as defined in the device inventory.
: The Display Preferences window allows you to change display settings for devices, links,
and utilization.
5 Expand/Collapse/Hide Side Panel: Expand or collapse the contents of the side panel. Close the
side panel to get a larger view of the topology map.
6 The content of this window changes depending on what Show is set to for the Topology Map
and if you have selected to view more information on a device or link.
7 Saved Custom Map Views: Lets you create a named custom view using the settings and layout
for your current map, settings of the tables saved in the saved views, or display a custom view
you have created previously.
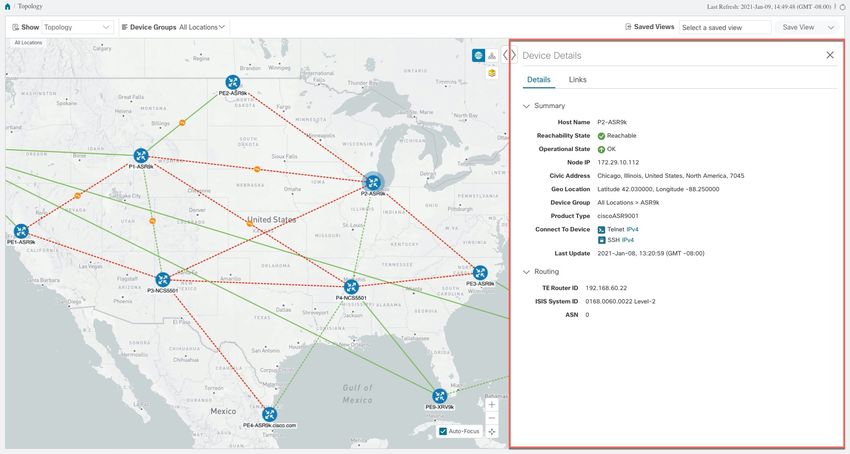
View Device and Link Details
This example shows how you can view device and link details using the topology map.
Cisco Crosswork Change Automation and Health Insights 4.0 User Guide
12Set Up and Monitor Your Network View
View Device and Link Details
Step 1 From the main menu choose Topology.
Step 2 To quickly view the host name, reachability state, IP address and type of device, hover the mouse over the device icon.
Step 3 To view more device details, click on the device icon.
Cisco Crosswork Change Automation and Health Insights 4.0 User Guide
13Set Up and Monitor Your Network View
View Device and Link Details
In a multiple IGP setup, you can also view all the IGP, IS-IS, and OSPF processes. See the following examples:
Figure 3: Multiple IGP: OSPF Processes
Cisco Crosswork Change Automation and Health Insights 4.0 User Guide
14Set Up and Monitor Your Network View
View Device and Link Details
Figure 4: Multiple IGP: ISIS Processes
Figure 5: Multiple IGP: OSPF and ISIS Processes
Step 4 To view links on the device, click the Links tab and expand the right panel to see all the link details.
Cisco Crosswork Change Automation and Health Insights 4.0 User Guide
15Set Up and Monitor Your Network View
Use Device Groups to Filter Your Topology View
Step 5 Collapse the side panel and close the Device Details window.
Step 6 Click on a dashed line. A dashed line indicates an aggregated link that represents more than one link, or the use of multiple
protocols (for example, IPv4 and IPv6) on the same physical link.. The links are displayed.
Use Device Groups to Filter Your Topology View
To help you identify, find, and group devices for a variety of purposes, you can create Device Groups. The
Device Group window (Device Management > Groups) displays all devices and device groups they belong
to. By default, all devices initially appear in the Unassigned Devices group.
This example walks you through how Device Grouping works in the geographical and logical maps.
Cisco Crosswork Change Automation and Health Insights 4.0 User Guide
16Set Up and Monitor Your Network View
Use Device Groups to Filter Your Topology View
Step 1 From the main menu, choose Topology. By default, only devices that have Geo Location set will appear on the geographical
map.
Step 2 From the Device Group drop-down list select a group (US West). Only the devices in that group and related links are
displayed on the geographical map. Note that the Devices table has also been filtered to list only those devices in the
group.
Step 3 Click .
Cisco Crosswork Change Automation and Health Insights 4.0 User Guide
17Set Up and Monitor Your Network View
Use Device Groups to Filter Your Topology View
Step 4 From the Device Group drop-down list, select All Locations and check Show Groups if it is not already checked. Note
that you can see all device groups in this view. Device groups can be seen in this way only within the logical map.
Note If Show Groups checkbox is de-selected, all the device groups are expanded , and could lead to a a cluttered
map.
Step 5 Click the US West group. Again, only devices that belong to this group are shown in the topology map and the Devices
table.
Cisco Crosswork Change Automation and Health Insights 4.0 User Guide
18Set Up and Monitor Your Network View
Create and Modify Device Groups
Step 6 Filter devices in the Device table by entering S7C in the hostname. The Device table displays only devices that match
the filtering criteria. However, filtering the Device table does not filter the devices visually on the topology map. The
only way to visually filter devices on the geographical or logical maps is to use device groups.
Create and Modify Device Groups
Step 1 From the main menu choose Device Management > Groups.
Step 2 From the Device Groups tree, click next to a group.
Cisco Crosswork Change Automation and Health Insights 4.0 User Guide
19Set Up and Monitor Your Network View
Enable Dynamic Device Grouping
Step 3 Choose to add, delete, or edit (rename or move) a group. If you delete a group, all devices that belong to that group are
moved to the Unassigned Devices group.
Note Devices can belong to only one device group.
Step 4 Click Save.
Enable Dynamic Device Grouping
You can create a rule to dynamically create device groups and automatically add unassigned devices to these
groups using a Regular Expression (regex) on the device hostname. Any newly added or discovered devices
that matches the rule will be placed in the group.
Note Dynamic rules do not apply to devices that already belong in groups. You must move them to Unassigned
Devices if you want to include them as part of the devices that the dynamic rule will consider.
Before you begin
While you can follow examples given in the Dynamic Groups dialog, it is helpful to be familiar with Regular
Expressions.
Step 1 From the main menu choose Device Management > Groups.
Step 2 Click .
Step 3 Click Show more details and examples to help you fill out the required Host Name and Group Name fields.
Step 4 If there are any existing devices in the Unassigned Devices group, click Test Rule to view a sampling of what type of
group names will be created.
Step 5 Check the Enable Rule checkbox. After the rule is enabled, the system checks devices every minute and will either create
or assign them into groups.
Cisco Crosswork Change Automation and Health Insights 4.0 User Guide
20Set Up and Monitor Your Network View
Customize Map Display Settings
Step 6 Click Save.
Step 7 Groups that are created this way initially appear under Unassigned Groups (created when a rule is enabled for the first
time). Move newly created groups to the corresponding group hierarchy.
Step 8 To move newly created Unassigned groups to the correct group, do the following:
a) Select … next to All Locations and click Add a Sub-Group.
b) Enter the New Group details and click Save.
c) Select … next to the unassigned created dynamic group and select Edit Group Properties.
d) Click Change Parent Group and select the appropriate group.
Customize Map Display Settings
You can configure visual settings on the topology map based on your needs and preferences. You can do the
following:
• Customize the Display of Links and Devices, on page 21
Customize the Display of Links and Devices
To set device and link map display preferences, click on the topology map.
• For devices, you can choose whether to show the device state and how the devices should be labeled.
By default, the device state is shown on the map and the host name is used to label devices.
• For links, you can choose whether to show aggregated links and how links should be colored so that you
can easily see their state and utilization status. By default, aggregated links will be differentiated from
single links on the map and links will be colored based on link utilization thresholds. Administrators can
change the utilization thresholds and their corresponding colors.
Save Topology Views for Easy Access
When you rearrange the devices and links on a map, your changes are not normally saved. When you open
the map later, your map settings are lost.
To easily access a useful map layout, you can save it as a named custom view and quickly retrieve it, without
having to rearrange the map each time. This is especially useful when managing large networks with many
devices.
When you save a custom view, the following settings will be saved:
• Whether it is a geographical or logical map.
• Device positions in the logical map layout.
• Device and link display settings
Cisco Crosswork Change Automation and Health Insights 4.0 User Guide
21Set Up and Monitor Your Network View
Save Topology Views for Easy Access
Note All custom views can be seen by all users. However, only users with the admin role or users that created the
custom view can edit (modify, rename, or delete) the view.
Step 1 To create a custom view:
a) Customize the current map view until it contains only the information you want and until the layout meets your needs.
b) When you have the view the way you want it, click Save View.
c) Enter a unique name for the new custom view and click Save.
Step 2 To delete a custom view:
a) Click the Saved Views field.
b) Find the custom view you want to delete and click .
Step 3 To edit a custom view:
a) Click the Saved Views field.
b) Click the custom view you want to edit. The custom view appears.
c) Make any changes to the current view and click Save View. This overwrites the previously saved view.
Step 4 To rename or save a view with another name:
a) Click the Saved Views drop-down list.
b) Select the appropriate option.
Cisco Crosswork Change Automation and Health Insights 4.0 User Guide
22CHAPTER 4
Automate Network Changes
This section contains the following topics:
• Change Automation Overview, on page 23
• About Custom Plays, on page 28
• About Customizing Playbooks, on page 33
• About Running Playbooks, on page 40
• Troubleshoot Change Automation, on page 51
Change Automation Overview
The Change Automation application automates the process of deploying changes to the network. You can
define automation tasks to achieve the intended network states in Change Automation using Playbooks that
consists of plays written using YAML. You can then push configuration changes to Cisco Network Service
Orchestrator (NSO), which deploys these changes to the network devices.
The difference between Change Automation and other existing scripted automation frameworks is that Change
Automation is a closed-loop framework. Changes are deployed to the router or other device using programmable
APIs, and the intent of the change is verified using telemetry that comes back from the router. Change
Automation relies on telemetry to verify the intent of the change, avoiding the need to frequently poll the
device for updates.
The following is a high-level Change Automation workflow:
1. Define your desired network changes in a Change Automation Playbook.
2. Push configuration changes to the network device using Cisco Network Services Orchestrator API, a
configuration services provider.
3. Receive real-time feedback via telemetry from the devices, telling you that the network changes were
made and the impact of the changes. You can also use post-change KPIs to determine if a particular change
should be undone and the devices returned to their previous configuration. In addition to telemetry, Change
Automation also allows for data collection via SNMP and CLI XDE packs.
Change Automation comes with a robust library of Playbooks, each with its own collection of atomic
configuration and check plays. (A Playbook consists of multiple plays.)
Change Automation allows you to customize and generate plays and Playbooks using its API interface. For
more information, see About Custom Plays, on page 28 and About Customizing Playbooks, on page 33.
Cisco Crosswork Change Automation and Health Insights 4.0 User Guide
23Automate Network Changes
Configure Change Automation Settings
Configure Change Automation Settings
This section explains the initial settings that need to be configured before you can start using Change
Automation.
Note Configuring Change Automation settings is a post-installation activity, and can only be performed by a user
with write permissions for the Administration APIs under Change Automation (Go to Administration >
Users and Roles > Roles).
Note The Change Automation settings can only be configured once. If you want to modify the settings, Change
Automation must be re-installed.
After Change Automation is installed in your Crosswork platform, you can access Change Automation from
the main menu (go to Network Automation > Dashboard). The Change Automation window is displayed
prompting you to complete the configuration. Click Start Configuration to review the change Automation
settings. Alternatively, you can navigate to Administration > Settings > Device Override Credentials to
view the settings.
Figure 6: Change Automation settings
Click Save after you configure the following settings:
• Playbook Job Scheduling: Enable or disable the ability the schedule the Playbook jobs.
• Credential Prompt: Device override credentials are an additional level of authentication that can improve
change auditing. If enabled, users will be prompted to enter the credentials (device override credentials)
before each Playbook execution. You need to create the relevant credential profile and provider settings
for the override credentials to work. Follow the prompts on the window to meet each requirement.
Cisco Crosswork Change Automation and Health Insights 4.0 User Guide
24Automate Network Changes
Use the Change Automation Dashboard
Note If Playbook Job Scheduling is disabled, then the Credential Prompt is enabled, by default. You cannot
disable the credential prompt in this case.
Note While executing Device Config plays, entering incorrect device override credentials will cause the playbook
execution to fail. However, for a Check play or Data Collection play, the device override credentials are not
validated and the Playbook will execute successfully irrespective of the accuracy of the override credentials.
Device override credentials are only validated while pushing configuration changes.
Use the Change Automation Dashboard
The Change Automation application's Dashboard window (shown in the following figure) lets you view all
Playbook-related activity and initiate Playbook runs. It displays the total number of Playbooks, the Playbook
Jobs Calendar, the most recently run Playbook jobs, and the same network topology map you see when you
select Topology from the main menu.
To view the Change Automation Dashboard window, select Network Automation > Dashboard.
Figure 7: Change Automation Dashboard Window
The Playbooks tile displays the total number of Playbooks (pre-defined and custom). Clicking on a specific
number displays all the Playbooks that correspond to the selected category.
Note My Playbooks indicate the number of custom Playbooks created by the current user. However, the Total
Playbooks will include the number of custom Playbooks created by all users, apart from the Cisco-supplied
Playbooks.
The Jobs Calendar tile displays a calendar (month, week, day) with the number of job sets executed on a
given day marked in a circle against the corresponding date. Clicking on the number displays a dialog box
with the names of the Playbook job sets and their execution time. Click on the desired job set to view the
execution details.
Cisco Crosswork Change Automation and Health Insights 4.0 User Guide
25Automate Network Changes
View the Play list
Note The color of the circle indicates the overall status of the job sets.
• A red circle indicates at least one job set with Failed status among the day's overall job sets.
• A grey circle indicates that all job sets are either in Scheduled or Running status.
• A blue circle indicates at least one critical job set in Recovered status among the day's overall job sets
The View All Jobs link on the Jobs tile give you direct access to the Change Automation Automation Job
History window.
View the Play list
The Play List window of the Change Automation application gives you a consolidated list of all the Plays in
the system.
From the main menu, select Network Automation > Play List to view the Play List window.
Item Description
1
Click to create a custom Play. See Create a Custom Play, on page 28.
Click to delete a custom Play. See Delete Custom Plays, on page 32.
Click to import custom Play from a gzipped TAR archive file. See Import Plays, on page 32.
Click to export a custom Play as a gzipped TAR archive file. See Export Plays, on page 31.
2
Click to see a popup Play Details window showing the Play's description and schema. When
you are finished viewing these details, click to close the popup window.
3 The Type column indicates the type of the Play. You can click on the column headings (Name,
Description, Type, Labels, and Modified by) to sort the table by that column's data.
Cisco Crosswork Change Automation and Health Insights 4.0 User Guide
26Automate Network Changes
View the Playbook List
Item Description
4
Click to refresh the Plays list.
5
Click to set filter criteria on one or more columns in the table.
Click the Clear Filter link to clear any filter criteria you may have set.
View the Playbook List
The Change Automation application's Playbook List window (in the following figure) gives you a consolidated
list of all the Playbooks in the system. To view the Playbook List window, select Network Automation >
Playbook List.
Item Description
1
Click to create a custom Playbook. See Create a Custom Playbook, on page 35.
Click to delete the currently selected custom Playbook. See Delete Custom Playbooks, on
page 40.
Click to import Playbooks from a gzipped TAR archive file. See Import Playbooks, on page
39.
Click to export the currently selected Playbook(s) as a gzipped TAR archive file. See Export
Playbooks, on page 38.
2
Click to see a popup Playbook Details window showing the Playbook's description, software
compatibility, version number, and its plays. When you are finished viewing these details, click
to close the popup window.
3 Click on the Name, Description, Version, Software Platform, and Last Modified column
headings in the table to sort the table by that column's data. You can also choose which columns
are shown, and set quick or advanced filters on any column.
4
Click to refresh the Playbooks list.
Cisco Crosswork Change Automation and Health Insights 4.0 User Guide
27Automate Network Changes
About Custom Plays
Item Description
5
Click to set filter criteria on one or more columns in the table.
Click the Clear Filter link to clear any filter criteria you may have set.
About Custom Plays
Change Automation allows users to create their own custom Plays, either based on Cisco models or from
scratch. Users can also import, export and delete their custom Plays.
Note Cisco-supplied Plays cannot be edited, exported or deleted by the user.
You can create custom Plays in any of the following types:
• Check Plays: Verifies the data from your devices using a logical expression.
• Data Collection Plays: Collects data from your devices.
• Device Config Plays: Performs configuration changes on your device
• Service Plays: Provisions and manages a service deployed
Note Check Play and Data Collection Play support MDT and SNMP collection.
Create a Custom Play
This section explains the procedure to create a custom Play. The stages of Play creation will vary depending
on the Play type you choose:
• Check Play: Select Play Type > Select Sensor Path > Build Check Expression > Review Play
• Data Collection Play: Select Play Type > Select Sensor Path > Build Filter Expression > Review Play
• Device Config Play or Service Play: Select Play Type > Configure Play (using sample payload in .JSON
format) > Review Play
Note When creating a Service Play, you are not creating a new service for NSO, but creating a Play to manage and
provision an existing service in one or more NSO instances.
Step 1 From the main menu, choose Network Automation > Play List. The Play List window is displayed.
Cisco Crosswork Change Automation and Health Insights 4.0 User Guide
28Automate Network Changes
Create a Custom Play
Step 2 Click to create a custom Play. The Select Play Type window opens displaying the types of Plays supported and a
description for each. The stages of creation is also displayed, and it will vary depending on the Play type you select.
Select the Play type you want to create and click Next.
Step 3 If you are creating a Check Play or Data Collection Play, perform the following:
a) In the Select Sensor Paths window, select the required YANG module, Gather Path, and Sensor Paths. Click Next
to continue.
b) Depending on the Play type you have selected, you need to Build Check (for Check Play) or Build Filter (for Data
Collection Play) to apply in your Play. Click Add Rule to add a logic expression using the keys and fields of the
selected sensor path(s). Click Add Group to add a new logic group. Select the sensor field, operator and value from
the dropdown lists. Select the desired logic operation (AND/OR) between each rule or group.
Click on Runtime checkbox if you prefer to enter the value of the sensor field dynamically during runtime. If you
select this checkbox, the value field is disabled, and you will be prompted to enter the input parameter when this Play
is executed (as part of a Playbook) during runtime.
Cisco Crosswork Change Automation and Health Insights 4.0 User Guide
29Automate Network Changes
Create a Custom Play
Click Next to continue.
Step 4 If you are creating a Device Config Play or Service Play, perform the following:
a) In the Configure Play window, click or the Import link to import your device config (.JSON) file. You can
download and use the sample configuration template. Browse and select your .JSON file, and click Import.
b) In the acknowledgement prompt, click Continue to select the NSO instance for the config you have imported.
c) Select the NSO provider instance from the dialog box, and click Process Payload.
Note The creation workflow of a Service Play is similar to the Device Config Play, except in the template of the
payload file used.
d) The Configure Play window opens displaying information from the payload file. You can edit the value or description
columns with the values that you want to see during a Playbook execution.
Cisco Crosswork Change Automation and Health Insights 4.0 User Guide
30Automate Network Changes
Export Plays
Click Next to continue.
Step 5 In the Review Play window, review the parameters of your Play. Click Dry Run to validate your parameters.
Label your Play with a unique Name and Description. You can also add labels to your Play to group it in the future
(optional).
Step 6 If you are satisfied with your changes, click Create.
The Play List window opens displaying your new custom Play in the Play list.
Export Plays
You can export any custom Play authoured by you or another user, or have imported into Cisco Crosswork
Change Automation and Health Insights.
The exported archive will contain only the user-customizable files listed in Playbook Components and Files,
on page 33. Once you extract them from the archive, you can identify the Play components by their file names
and filename extensions.
Cisco Crosswork Change Automation and Health Insights 4.0 User Guide
31Automate Network Changes
Import Plays
Your user ID must have Change Automation read permission to export Plays.
Step 1 From the main menu, choose Network Automation > Play List.
Step 2 Check the check boxes for the custom Plays you want to export.
Step 3 Click . Your browser will prompt you to select a path and the file name to use when saving the gzipped tar archive.
Follow the prompts to save the file.
Import Plays
You can import any custom Play that meets the following requirements:
• The Play files must be packaged as a gzipped tar archive.
• The archive must contain a .play file (a data spec file for the play), at minimum.
• The archive file must have a unique name.
Note that you can overwrite a custom Play. The system will warn you when you are about to overwrite a
custom Play, but will not prevent you from doing so. Take precautions to ensure that you do not overwrite
your custom Plays accidentally.
Your user ID must have Change Automation write permissions to import Plays.
Step 1 From the main menu, choose Network Automation > Play List.
Step 2 Click . Your browser will prompt you to browse to and select the gzipped archive file containing the Plays you want
to import.
Make sure there is no existing Plays with the same name as the Play you intent to import, unless it is your intent to
overwrite the existing custom Play.
Step 3 Follow the prompts to import the archive file.
Delete Custom Plays
You can delete user-defined Plays only. You cannot delete a Cisco-supplied Play.
Your user ID must have Change Automation delete permission to delete Plays.
Step 1 From the main menu, choose Network Automation > Play List.
Step 2 In the Play List window, select the custom Plays that you want to delete.
Step 3 Click icon.
Step 4 When prompted, click Delete again to confirm.
Cisco Crosswork Change Automation and Health Insights 4.0 User Guide
32Automate Network Changes
About Customizing Playbooks
About Customizing Playbooks
Users can download and customize Cisco-supplied Playbooks, or create their own based on Cisco models or
from scratch. They can also create custom Playbooks using the available Plays.
Creating and modifying Cisco-supplied Playbooks are engineering tasks that take place outside of the user
interface for Cisco Crosswork Change Automation and Health Insights. As such, they are outside the scope
of this User Guide.
Cisco supplies developer-level documentation for Cisco-supplied Playbooks, Cisco verbs used in these
Playbooks, and tutorials on how to create custom plays and Playbooks. For help, see the:
• "Playbooks" and "Verbs" references in the Change Automation Developer Guide on Cisco Devnet
• "Custom Playbooks" tutorial in the Change Automation Developer Guide on Cisco DevNet
Playbook Components and Files
Change Automation Playbooks contain a variety of components, referred to using specialized names. The
components are implemented in the Playbook as files. Some of these components' names are borrowed from
the Ansible specification, but all have their own definitions, and not all of the corresponding files can be
customized by users. Some components are Cisco-proprietary intellectual property; while you can use them
in custom Plays and Playbooks, you cannot customize them directly. The following table explains the function
of each of these components, explains how they are implemented, and shows which of them you can customize.
Table 1: Playbook Components and Files
Component Description File/Format Customizable?
Play A Play is a single task to be executed. A YAML/YML in Yes
task is a list of actions to be performed in the Playbook file
service of that play. A Play is typically a
script that uses one or more verbs.
Playbook A Playbook is an aggregation of one or YAML/YML file Yes
more Plays, and is structured by the plays
it contains. There can be many plays inside
a Playbook. The function of a Playbook is
to map a set of actions onto the features of
a particular host. For example: A query and
configuration change script with abstract
variables that can be mapped to a particular
instance of a device. For more details, see
the "Playbooks" and "Verbs" references in
the Change Automation Developer Guide
on Cisco Devnet.
Cisco Crosswork Change Automation and Health Insights 4.0 User Guide
33Automate Network Changes
Playbook Components and Files
Component Description File/Format Customizable?
Verb A verb is a Cisco-supplied module, and Binary executable No
functions as a granular unit of activity. file
These are Cisco intellectual property,
supplied as object code, used under license
and not modifiable by users. For more on
Cisco verbs and how to use them, see the
"Custom Playbooks" tutorial in the Change
Automation Developer Guide on Cisco
DevNet.
Params Params are simply variables, used in JSON file Yes
Playbooks just as variables are used in any
programming language. A Params file in a
Playbook is an optional file that collects all
the user-defined input variables in one place.
It is optional because all these variables are
also in the plays.
Specs Short for "specifications", specs are Cisco JSON Schema file Yes
verb-specific object files, written in JSON
schema format. They define all the Playbook
input parameters and their constraints.
Tags Tags are predefined phases of execution for Binary Executable No, but you select
plays within a Playbook, and define the files from the predefined
order of execution of all plays: tag set.
• Continuous
• Pre-Maintenance
• Maintenance
• Post-Maintenance
Any play tagged as Continuous or runs in
parallel with other plays with the same tags.
All plays tagged as Maintenance or
Post-Maintenance run serially. Some
Pre-Maintenance plays ( check plays which
use the Crosswork Data Gateway
collections) run in parallel, while other
Pre-Maintenance plays run once the
concurrent plays have run successfully.
These tags are Cisco intellectual property,
used under license and not modifiable by
users.
Role A role is a built-in wrapper for Cisco’s YAML/YML file No
verbs. These files are Cisco intellectual
property, used under license and not
modifiable by users.
Cisco Crosswork Change Automation and Health Insights 4.0 User Guide
34Automate Network Changes
Create a Custom Playbook
Create a Custom Playbook
Change Automation allows users to custom Playbooks using the available Plays.
Note You cannot edit a custom Playbook. If you need to make changes to a custom Playbook, you have to recreate
your Playbook with the relevant changes.
To create a custom Playbook, follow the below procedure:
Step 1 From the main menu, choose Network Automation > Playbook List. The Playbook List window is displayed.
Step 2 Click to create a custom Playbook. The Select Plays window opens displaying the available Plays. The stages of
creation is also displayed, and it will vary depending on the Play type you select.
Select all the Plays you want in your Playbook, and click Next.
Step 3 In the Order Playbook window, arrange the order of the Plays in the Playbook as per the execution phase (Continuous,
Pre-maintenance, Maintenance, Post Maintenance). You can click and drag the play to rearrange them in the sequence
you prefer. You can also duplicate or delete a play by clicking on the icons provided.
Cisco Crosswork Change Automation and Health Insights 4.0 User Guide
35Automate Network Changes
Create a Custom Playbook
Note By default, all the selected plays are displayed within the Maintenance phase. Depending on the type of Play
you have selected, it may be restricted in being used in certain phases. For example, a configuration Play cannot
be used outside of the maintenance phase.
Click Next to continue.
Step 4 The Configure Plays window opens displaying the Plays in each execution phase, and the Play schemas. You can perform
the following:
• Click to specify policy for a Play. In the Specify Policy dialog box, specify relevant values for the fields provided.
Click for more information about each field. Click Save to save your policy values.
Cisco Crosswork Change Automation and Health Insights 4.0 User Guide
36Automate Network Changes
Create a Custom Playbook
Note Policies are mainly applicable to Check Plays. When you specify a custom policy for a Check play, you
must select the Required and Consecutive checkboxes, as shown in the image below. If you fail to do
so, the Change Automation collection jobs may not get deleted at the end of the Playbook execution.
Figure 8: Specify Policy for Check Play
• Click to apply a conditional to a Play. During execution, the play execution will be proceeded only if the condition
is met. In the Specify Conditionals dialog box, click Add Condition to add a conditional. Click Save to save your
conditional values.
• Click to specify a register for a Play. Specifying registers allow you to use the output of a previous Play as the
input for another Play. Click Save to save your registers.
• (Optional) Rename the plays as how you want it to be displayed during the Playbook execution.
Click Next to continue.
Step 5 In the Review Playbook window, review the Plays in your Playbook. Enter relevant values for the Playbook details
fields. You can click for more information about each field.
Cisco Crosswork Change Automation and Health Insights 4.0 User Guide
37You can also read