Integration with Apple Business Manager - VMware Workspace ONE UEM 1907 - VMware ...
←
→
Page content transcription
If your browser does not render page correctly, please read the page content below
Integration with Apple
Business Manager
VMware Workspace ONE UEM 1907
Integration with Apple Business Manager

You can find the most up-to-date technical documentation on the VMware website at:

https://docs.vmware.com/

If you have comments about this documentation, submit your feedback to

docfeedback@vmware.com

VMware, Inc.
3401 Hillview Ave.
Palo Alto, CA 94304
www.vmware.com

               ©
Copyright          2020 VMware, Inc. All rights reserved. Copyright and trademark information.

VMware, Inc.                                                                                     2
Contents
1 Introduction to Apple Business Manager 5
2 Apple Business Manager Services 6
App Security Features for DEP Devices 7
Apple Business Manager Integration Prerequisites 7
Apple Business Manager - Device Enrollment Program 8
Download the Public Key to Integrate with DEP 8
Configure the Apple Business Manager Portal 9
DEP Profile Creation 9
Complete the DEP Enrollment Profile 10
Associate Devices in Apple Business Manager Portal 13
Disassociate Devices From the Apple Business Manager 14
Apple Business Manager Device Enrollment 14
Enroll Apple Devices using Apple Business Manager 14
Enable Registration Tokens for DEP Enrollment 15
Generate a Registered Enrollment Token 16
Alternate Device Enrollment Flows 17
Perform Enrollment with the Registered Enrollment Token 17
View Device Enrollment Status 18
Apple Business Manager DEP Profile Management 18
Edit an Existing DEP Profile 19
Manually Assign or Remove a DEP Profile 19
DEP Device Management 19
Use the DEP Sync Scheduler 20
Renew Your Apple Server Token for DEP Deployments 20
Best Practices for Using Server Tokens 21
Perform Remote Actions on All Devices 21
Delete DEP Device Records 21
Wiping DEP-enrolled Devices 22
3 Apple Business Manager - Volume Purchase Program (VPP) 23
Volume Purchase Program (VPP) 24
Supported Content for Purchased Applications 24
Deploy Volume Purchase Program 25
Redemption Code Method 25
Complete All Tasks to Distribute Redemption Codes 25
Upload a Redemption Code Spreadsheet 26
Assign Content to Users 27
VMware, Inc. 3Integration with Apple Business Manager
Redemption Code Information 29
Managed Distribution by Apple IDs 30
Complete All Tasks For Managed Distribution by Apple IDs 30
Upload VPP sTokens to Retrieve Managed Distribution Licenses and Content 31
Sync Managed Distribution Content 32
Configure Licenses and Assign with Flexible Deployment 33
Methods to Revoke Managed Distribution Licenses 35
Managed Distribution Information 36
Staging Users and Managed Distribution for VPP 37
Custom B2B Applications and VPP 39
VPP, Custom B2B Applications, and Push Mode 39
Activate Management of Custom B2B Applications 39
Managed Distribution by Device Serial Number 40
Deploy Device-Based VPP 42
Update Device-Based VPP Applications Manually or Automatically 42
Update Challenge for Device-Based VPP Applications 43
VMware, Inc. 41
Introduction to Apple Business
Manager
Apple Business Manager is a portal for administrators to manage the Device Enrollment program (DEP),
Volume Purchase Program (VPP), Apple IDs, and content distribution in their organizations. Apple
Business Manager with Workspace ONE UEM powered by AirWatch Mobile Device Management (MDM)
solution makes it easy to enroll devices and deploy content.
Apple Business Manager has consolidated the management features that you have been using through
the DEP and VPP portals. Once your organization upgrades to Apple Business Manager from Apple
Deployment programs, the DEP and VPP portals will no longer be used to manage devices, assignments,
apps purchases, or manage content.
For more information, see Apple Business Manager or contact your Apple representative.
Pre-requisites
n If you are using DEP, upgrade to Apple Business Manager.
Note Once upgraded to new Apple Business Manager portal, you will have no access to the Apple
Deployment programs.
n If you are using only Volume Purchase Program, you need to first enroll in Apple Business Manager
and then invite VPP purchasers to your new Apple Business Manager account.
VMware, Inc. 52
Apple Business Manager
Services
To maximize the benefits of Apple devices enrolled in Mobile Device Management (MDM), Apple has
introduced Apple Business Manager with combined services of the Device Enrollment Program (DEP)
and the Volume Purchase Program (VPP) services.
Apple Business Manager's DEP service
Through Apple Business Manager's DEP service, you can perform the following.
n Install a non-removable MDM profile on a device, preventing end users from being able to delete it.
n Provision devices in Supervised mode (iOS only). Devices in Supervised mode can access additional
security and configuration settings.
n Enforce an enrollment for all end users.
n Meet your organization's needs by customizing and streamline the enrollment process.
n Prevent iCloud back up by disabling users from signing in with their Apple ID when generating a
DEP profile.
n Force OS updates for all end users.
For more information, see the Apple Business Support Portal portal or the Apple Business Manager
Guide, or contact your Apple representative.
Note Integration with any third-party software product is not guaranteed, and is dependent upon the
proper functioning of those third-party solutions.
This chapter includes the following topics:
n App Security Features for DEP Devices
n Apple Business Manager Integration Prerequisites
n Apple Business Manager - Device Enrollment Program
n Apple Business Manager Device Enrollment
n Apple Business Manager DEP Profile Management
n DEP Device Management
VMware, Inc. 6Integration with Apple Business Manager
App Security Features for DEP Devices
Devices managed by Workspace ONE UEM and enrolled through the Apple Device Enrollment Program
can receive security measures to protect corporate data on Workspace ONE productivity applications and
Third-party applications leveraging Workspace ONE SDK.
Maximum App Passcode Attempts
You can configure your Workspace ONE productivity applications and Third-party applications leveraging
Workspace ONE SDK to require the end user to enter a passcode to access app on the device. You can
also set a maximum number of attempts to enter the passcode correctly. If this feature is enabled and a
user exceeds the maximum device passcode attempts, regular Bring Your Own Devices (BYOD) perform
enterprise wipe, while corporate dedicated DEP devices are quarantined and the devices lock into Lost
Mode. A device in Lost Mode can only be unlocked from the UEM console. This way corporate dedicated
DEP assets continue to be managed from the UEM console for tracking purposes while the user is locked
out of the device.
To configure the app passcode settings, navigate to Groups & Settings > All Settings > Apps >
Security Policies in the UEM console.
For more information, see Complete the DEP Enrollment Profile.
Workspace ONE Intelligent Hub Unenroll Protection
If an end user attempts to unenroll a supervised DEP device through the Workspace ONE Intelligent Hub,
the device locks into Lost Mode. A device in Lost Mode can only be unlocked from the UEM console.
For more information, see Perform Remote Actions on All Devices.
Apple Business Manager Integration Prerequisites
To utilize the features of Apple Business Manager, make sure you have the following prerequisites in
place.
n An Apple Business Manager account – Register for a Apple Business Manager account. If needed,
enroll with Apple using the Apple Enrollment Procedure.
n Apple devices – Any macOS, iOS, and tvOS devices that you want to be managed through DEP
service, you must have devices associated with Apple Business Manager account.
n Devices purchased from a Third party or reseller must be associated with your Apple Business
Manager account.
n Starting iOS 11 and tvOS 11, any iOS and tvOS device can be added to device enrollment
program of Apple Business Manager using Apple Configurator.
n When enrolling devices, you must have Internet connectivity.
n When integrating with the Apple Business Manager portal, ensure that the network is set up to
communicate with mdmenrollment.apple.com on port 443, as for some on-premise clients.
VMware, Inc. 7Integration with Apple Business Manager
Apple Business Manager - Device Enrollment Program
Integrating with Apple Business Manager's Device Enrollment Program (DEP) requires completing tasks
in both the UEM console and in Apple Business Manager portal.
Your organization must already be registered with Apple Business Manager Deployment Programs.
During the integration, Workspace ONE UEM suggests you not use Internet Explorer as your browser.
Also, once you begin configuring the Apple Business Manager wizard in the UEM console, keep the
browser session open. You cannot save your activity until you complete the final configuration step, so it
is important to finish the entire configuration in one browser session.
Set Up the Apple Business Manager Portal
Start in the UEM console to begin integrating your Workspace ONE UEM deployment with Apple
Business Manager. Then move to the Apple Business Manager portal to create a virtual MDM server
container for your organization's devices.
For more information, see Download the Public Key to Integrate with DEP .
Configure Devices
Next, configure your devices and the UEM console to create an initial profile.
For more information, see Configure the Apple Business Manager Portal.
Assign and Manage Devices
Finally, assign devices to the virtual MDM container in Apple Business Manager portal, so they can be
managed through the UEM console.
For more information, see Associate Devices in Apple Business Manager Portal.
Download the Public Key to Integrate with DEP
Begin integrating with the Apple Business Manager DEP service by downloading a public key (.pem) that
allows Workspace ONE UEM and Apple to mutually authenticate with each other in order to sync devices.
This key is uploaded to the Apple portal later.
1 Log into the UEM console and navigate to Groups & Settings > All Settings > Devices & Users >
Apple > Device Enrollment Program and select Configure. A Device Enrollment Program
window appears.
2 Download the public key by selecting the MDM_DEP_PublicKey.pem file.
3 Save the public key in a convenient location. This is used to complete the DEP setup process.
Using the public key you have downloaded, you must next enable and configure the Apple Business
Manager Portal so that you can manage your DEP-enrolled devices in the Workspace ONE UEM
console.
VMware, Inc. 8Integration with Apple Business Manager
Configure the Apple Business Manager Portal
Create a virtual MDM server for devices that links to your own MDM servers, so you can manage devices
directly in the UEM console. Workspace ONE UEM does not encourage using Internet Explorer to
complete this process.
Before you begin to configure the Apple Business Manager portal for DEP service, you must have your
downloaded public key. For more information, see Download the Public Key to Integrate with DEP . When
you have you public key, perform the following steps.
1 Select the Apple Deployment Programs link from the Apple's website. Do not close this browser
session. You will navigate back to this window after completing the following the enrollment process.
2 Sign in with your organization's Apple credentials.
3 Select Get Started to automate the MDM enrollment.
4 Confirm your identity by entering the verification code. The Device Enrollment Program portal screen
appears.
5 Select Manage Servers in the left-navigation pane.
6 Select Add MDM Server to create a container that groups devices in the DEP portal for management
in the UEM console. The MDM server name can refer to a server, department, or location.
7 Enter the MDM Server name for your organization. Select Next.
If you select the next option and select Automatically Assign New Devices, then each device
(determined by serial number or purchase number) that is added to your DEP account gets
associated with that MDM server.
8 Select Upload File and Upload your Public Key. Navigate to the MDM_DEP_PublicKey.pem that
you downloaded from the UEM console earlier and upload it. Select Next.
9 Select Your Server Token to receive an encrypted Apple Server Token file (.p7m) and save it in a
convenient location.
10 Select Done.
DEP Profile Creation
After assigning devices to the Apple Business Manger portal, use the Device Enrollment Program wizard
in the Workspace ONE UEM console to create an initial DEP profile to configure authentication,
MDM features and the Setup Assistant to push down to devices.
You must assign this DEP profile prior to configuring the device's Setup Assistant that appears after you
switch on the device for the first time. Devices only reach out to Apple's server once after configuring Wi-
Fi to receive the DEP profile. If the correct DEP profile is not assigned to the device prior to Wi-Fi
configuration, a factory wipe is required (using iTunes or directly on the device).
VMware, Inc. 9Integration with Apple Business Manager
Complete the DEP Enrollment Profile
After you register devices with Apple Business Manager portal, use the DEP Enrollment Program wizard
to create a DEP enrollment profile. An enrollment profile is a collection of DEP settings assigned to your
registered devices. You can create more profiles later if needed.
Create a new DEP enrollment profile or edit an existing profile.
1 In the Workspace ONE UEM console, navigate to Groups & Settings > All Settings > Devices &
Users > Apple > Device Enrollment Program.
2 Select Upload and select Apple Server Token File (.p7m). Select Next. Now Workspace ONE UEM
and Apple can authenticate each other.
For clarity, use only one token at the customer organization group. Only add multiple tokens if your
organization has a complex configuration, or if you are enrolling devices with multiple DEP accounts.
3 Configure the Authentication settings, based on whether you turn authentication On or Off.
Authentication settings are only available for devices running iOS 7.1 and higher. If devices running
iOS 7.0 and lower are assigned an authentication profile, the devices are automatically enrolled using
staging authentication.
n If you turn on Authentication, each user must tie a DEP device to their own user account.
n If you turn off Authentication, you can enable staging of all devices under a single user account,
and extra configuration options appear on the Settings page to accommodate this option.
If you set Authentication to On, then configure:
Setting Description
Device Ownership Determines the ownership type of the device upon enrollment, which can be either Corporate-Dedicated or
Type Employee-Owned.
Device Organization Select the organization group your where your end users authenticate. Only end-user accounts created at
Group this level or a parent above it can authenticate their devices.
End users may authenticate using either their Active Directory credentials or basic Workspace ONE UEM
credentials, depending on which authentication type you have enabled under Enrollment settings.
Custom Prompt Turn On Custom Prompt to enable custom text to appear on the device authentication screen during the
Setup Assistant. Authentication occurs when end users are prompted for their credentials.
Message Template Choose a message template to send as a Custom Prompt. (Supported for English-language only.) This
option is not available when Custom Prompt is Off.
If you turn Authentication Off, then configure:
Setting Description
Default Staging User Select the Enrollment User assigned to the device.
Device Ownership Type Select the ownership type of the device upon enrollment, which can be either Corporate-Dedicated or
Employee-Owned.
Device Organization Group Select the organization group where your devices are enrolled.
VMware, Inc. 10Integration with Apple Business Manager
4 Configure MDM features of the device.
Setting Description
Profile Name Enter the name of the profile as it appears in the UEM console.
Department Enter the name of your department as it appears in the device's About Configuration panel upon setup
and enrollment.
Support Number Enter your organizational support contact phone number as it appears in the device's About
Configuration panel upon setup and enrollment.
Require Select Enable to require end users to enroll into Workspace ONE UEM MDM. Use this setting to ensure
MDM Enrollment end-user devices cannot be activated unless they enroll into Workspace ONE UEM MDM.
Supervision Enable to set the device in Supervised mode, which is an alternative to configuring Supervised devices
using Apple Configurator. Supervision is required for shared devices.
Shared Devices Enable this option to use shared devices with education functionality.
Lock MDM Profile Select Enable to prevent end users from unenrolling from Workspace ONE UEM MDM. This setting
ensures that end users cannot remove the Workspace ONE UEM MDM profile installed on the device.
This option may only be enabled if Supervision is enabled.
Anchor Certificate Enable this option to upload certificates as trusted anchor certificate and push to devices during DEP
enrollment. These certificates are used as trusted anchor certificates when evaluating the trust of the
connection to the MDM server URL. If no certificate is uploaded, the built-in root certificates will be used.
Device pairing Enable to allow the device to sync with any workstation through iTunes, Configurator, and iPCU.
Optionally, set Device Pairing to Disable when deploying education functionality, and Upload a Device
Pairing Certificate for supervised identities.
From Workspace ONE UEM 9.2.2, you can upload Device Pairing Certificates whether Device Pairing is
set to Enabled or Disabled.
Await Configuration Enable this setting if the MDM server is expected to send extra commands before the device can allow
the user to proceed in the Setup Assistant. Await Configuration is required for education functionality.
To override the Await Configuration setting on a device, navigate to Device > Details View and select the
device to override. Select More Actions > Device Configured to note the device as configured and skip
the Awaiting Configuration screen during enrollment.
If you enable Await Configuration, more options appear in the Setup Assistant section.
Auto Advance Setup Enable this setting to automatically apply DEP configuration to an enrolling device. Users can skip all
setup panes, and the device is automatically set to the most restrictive option by default within around 30
seconds after network active. Applies to ethernet-connected tvOS devices only.
5 Choose the items seen by end users during the Apple Setup Assistant workflow that appears after
the device is powered on for the first time.
Setting Description
Passcode Select Don't Skip to require user to set a passcode during setup. If an MDM passcode profile is
already set up through Workspace ONE UEM, select Skip.
Touch ID Select Don't Skip to prompt user to configure Touch ID during setup.
Location Services Select Don't Skip to prompt user to enable or disable Location Services during setup. If you plan on
tracking GPS locations for your devices, select Don't Skip.
Restoring from Backup Select Don't Skip to prompt user to restore from backup during setup. You must select Don't Skip to
allow users to move data from a previous device, including an Android Device.
VMware, Inc. 11Integration with Apple Business Manager
Setting Description
Move from Android If Restoring from Backup is set to Don't Skip, select Don't Skip in this pane to prompt users to move
accounts and data from an Android device during setup.
Sign in with Apple ID and Select Don't Skip to prompt user to sign in with an Apple ID and iCloud account during setup.
iCloud
Terms of Use and Select Don't Skip to prompt users to read and accept the Terms of Use and Conditions during setup.
Conditions
Siri Select Don't Skip to prompt user to configure Siri. If you select Skip, Siri is disabled on enrolled
devices.
Diagnostics Select Don't Skip to prompt user to enable or disable sending diagnostic data to Apple. If you select
Skip, sending diagnostic data is disabled on enrolled devices.
Registration Select Don't Skip to prompt user to register the device with Apple during setup.
Apple Pay Select Don't Skip to prompt user to set up an Apple Pay account during setup. If you select Skip,
Apple Pay is disabled on enrolled devices.
Zoom Select Don't Skip to prompt user to enable zoom functionality during setup.
FileVault 2 Select Don't Skip to prompt user to set up a FileVault account.
Display Tone Select Skip to allow users to skip the display tone setup step for enrolling iOS devices.
Home Button Sensitivity Select Skip to allow users to enroll devices without configuring the Home button sensitivity on enrolling
iOS devices.
Tap to Setup Select Skip to allow enrolling tvOS devices to enroll without an associated iOS device.
Screen Saver Select Skip to allow users to enroll a tvOS device without configuring a screen saer.
Keyboard Select Skip to omit the prompt for users to select a keyboard type during the Setup Assistant process.
Onboarding Select Skip to prevent users from viewing on-boarding informational screens for user education during
the Setup Assistant process.
Watch Migration Set to Skip to prevent users from viewing options for watch migration during the Setup Assistant
process.
iCloud Analytics Set to Skip to omit a user prompt to send analytics to iCloud during setup.
iCloud Documents and Set to Skip to prevent users from viewing iCloud Documents and Desktop screen in macOS.
Desktop
TV Home Screen Sync Set to Skip to prevent users from toggling the TV home screen layout during setup.
TV Provider Sign In Set to Skip to prevent users from signing in to a TV provider during setup.
Where is the TV? Set to Skip to omit the Where is this Apple TV screen on tvOS devices enrolling through DEP.
Privacy Set to Skip to omit the Privacy screen in DEP setup assistant while onboarding.
iMessage And FaceTime Set to Skip to prevent the iMessage and FaceTime prompt during setup.
Software Update Set to Skip to prevent informing users about Software Updates during setup.
Screen Time Set to Skip to prevent informing users about Screen Time during setup.
VMware, Inc. 12Integration with Apple Business Manager
6 For certain configurations detailed in the Setup Assistant configuration, use the Admin Account
Creation section to create an admin account for local and remote macOS device admin actions.
Setting Description
Account Setup This item appears only if Await Configuration is set to Enabled.
Select Don't Skip to require users to create an account during setup. Configure the type of account the user
creates in Account Type.
Select Skip if you have created a Directory Profile for the user and they do not need to create an account.
Configure the admin account for this selection in the Admin Account Creation section.
Account Type This item appears only if Account Setup is set to Don't Skip.
Select Standard to give users access to a standard user account on their macOS device. If you select
Standard, you must create an admin account to manage the Standard account.
Select Administrator to allow users to create an Administrator account on their macOS device.
Password Create a password for the admin account.
Hidden Select Enabled to hide the admin account on the macOS device. Hidden admin accounts can enhance security
and user experience.
Select Disabled to make the admin account visible when a user logs in.
Choose Your Set to Skip to the prompt for users to choose between Light and Dark mode on macOS Mojave 10.14.
Look
Display Tone Set to Skip to prevent the Display Tone screen during Setup Assistant.
7 Select Save to view the Summary page and review the settings you have selected. Assign the
settings to devices registered in the Device Enrollment Program.
Setting Description
Sync Now and Select Yes to save and deploy the DEP profile settings to all devices that are currently registered with the
Assign to All MDM server that you just created in the DEP portal.
Devices Selecting No saves the DEP profile settings but does not deploy them to devices.
Auto Assign Select Yes to push the DEP profile settings to all devices that are currently registered once they are synced
Default Profile with Workspace ONE UEM and any devices from that point on as they are newly registered with Apple and
synced with Workspace ONE UEM.
Selecting No means newly-registered devices do not automatically receive the DEP profile settings. Enable
this setting if you plan to create multiple DEP profiles for different devices.
8 Once the deployment options are configured, select Save. You are now ready to manage profiles on
DEP-enabled devices from the UEM console.
Associate Devices in Apple Business Manager Portal
Associate devices with the MDM server in the Apple Business Manager portal so that they can be synced
and managed with Workspace ONE UEM. You can assign additional devices at a later time using these
same steps, if required.
1 Log into the Apple Business Manager portal and select Apple's Device Enrollment Program.
2 Select Device Enrollment Program > Manage Devices in the left panel to assign DEP-enabled
devices to the MDM Server you already created.
VMware, Inc. 13Integration with Apple Business Manager
3 Select the method for associating devices and Choose Devices By:
n Assign Devices by Serial Number – You can enter a list of device serial numbers.
n Assign Devices by Order Number – You can enter your Apple Purchase Order number and
have devices added automatically.
n Upload a .csv File – Upload a .csv file listing the serial numbers.
4 Choose Assign to Server as the Action and select the MDM server group.
5 Select OK.
Disassociate Devices From the Apple Business Manager
If necessary, you can manually disassociate a device from the Apple Business Manager. Do this if the
device was lost or stolen.
1 Return to the Apple Business Manager portal and manually disassociate it from the MDM server that
you initially created.
2 Delete device records using Delete DEP Device Records.
3 Sync the devices in the UEM console using DEP Device Management.
The device record no longer appears on the Enrollment Status page or in the List View.
Apple Business Manager Device Enrollment
Enroll devices to Apple Business Manager portal to use with the Workspace ONE UEM MDM profile and
settings provisioned onto the device.
Overview
Using a registered device, follow the standard iOS Setup Assistant process, including language, country
or region, and Wi-Fi network. From this point, the Setup Assistant flow is determined by settings in the
DEP profile that was assigned to the device.
The Setup Assistant will not show features that you decided to skip. It only shows screens related to what
you choose not to skip. Once automatic configuration and enrollment is complete, the Setup Assistant
closes and the device is ready for use.
For iOS devices enrolled using Apple Business Manager, enrollment restrictions do not apply. This is
because device information such as OS version, device model, and more are only received after the
device has been enrolled through Apple Business Manager.
Enroll Apple Devices using Apple Business Manager
Since the device is registered with the Apple Business Manager, follow the Setup Assistant on the device
to complete device enrollment using DEP service.
VMware, Inc. 14Integration with Apple Business Manager
The Setup Assistant displays the options that were chosen when the DEP profile was created for that
device. If you require end users to generate their own enrollment tokens in the Self-Service Portal, they
must complete that step before enrolling their devices. For more information about end-user generated
tokens, see Alternate Device Enrollment Flows.
To enroll a device:
1 Log in to the device with the end-user enrollment credentials. You will see the additional Workspace
ONE UEM MDM configuration prompt.
2 Complete the steps in the Setup Assistant.
3 Verify that Supervised status is enabled by navigating to Settings > General > About on the device.
Under the Device Name you will see a notification that the device is Supervised.
4 Verify that the MDM profile is not removable by navigating to Settings > General > Profiles and
selecting the Workspace ONE UEM MDM profile. You will see there is no option in the form of an icon
to remove the profile.
For more information on Enrollment for tvOS devices and macOS devices, see VMware Workspace
ONE UEM Apple tvOS Platform Guide and VMware Workspace ONE UEM macOS Platform Guide.
Enable Registration Tokens for DEP Enrollment
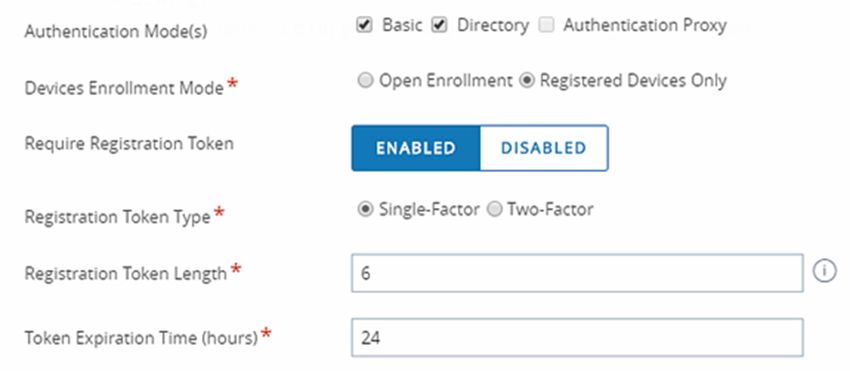
If you restrict enrollment to registered devices only, you have the option of requiring a registration token.
This option increases security by confirming that a particular user is authorized to enroll.
To enable token-based enrollment:
1 Select the appropriate organization group and navigate to Devices > Device Settings > Devices &
Users > General > Enrollment and ensure the Authentication tab is selected.Scroll down past the
Getting Started section and select Registered Devices Only as the Devices Enrollment Mode. A
checkbox labeled Require Registration Token will appear in which you should insert a check mark.
This will restrict enrollment to only registered devices.
VMware, Inc. 15Integration with Apple Business Manager
2 Select a Registration Token Type.
n Single-Factor – The token is all that is needed to enroll.
3 Set the Registration Token Length. This required field denotes how complex the Registration Token
is and must contain a value between 6 to 20 alphanumeric characters in length.
4 While you can set the Token Expiration Time (in hours), note that it does not apply to DEP devices
at this time.
Alternative methods for generating an enrollment token exist. For more information, see Alternate Device
Enrollment Flows.
Specify Enrollment Token Delivery Method
1 Navigate to Accounts > Users > List View and select Edit User for a user. (This process also works
with creating new users.) The Add / Edit User page displays.
2 Scroll down and select a Message Type:Email for directory users and SMS for basic user accounts.
DEP Profile Settings for Token Enrollment
Use a DEP profile with Authentication set to On to prompt the user to enter credentials – a username
and password – during the Setup Assistant process. If Require Registration with a Single-Factor token
is enabled for the organization group which has DEP configured, the user must enter the one-time token
that is sent to them into both the username and password fields.
For better user experience – and to direct users to follow the process – consider creating a custom
message template, which can have a message similar to: "Please enter the one-time token you received
through email or SMS into both the username and password fields."
Generate a Registered Enrollment Token
A DEP token allows your end users to enroll their devices simply and securely.
To generate a DEP token:
1 In the Workspace ONE UEM console, navigate to Add > Batch Import.
2 Select Batch type Users And/Or Devices. You may chose to use a Simple Template or Advanced
Template depending on your need.
3 To generate a Token, map an enrollment user to DEP device serial number. This generates a token
and deliver it to the user according to their preferred method of notification, which is specified under
User Settings.
n For security reasons, the tokens are not accessible through the UEM console.
Note Once the MDM profile is installed on the device, the token is considered "used" and cannot be
used to enroll other devices. If enrollment was not completed, the token can still be used on another
device.
VMware, Inc. 16Integration with Apple Business Manager
Alternate Device Enrollment Flows
Combining the functionalities of the Apple Business Manager's DEP service and the AirWatch Self-
Service Portal, you can enable alternate end-user enrollment flows.
Alternate enrollment flows:
n The end users generate their own enrollment tokens in the AirWatch Self-Service Portal.
n To enable this option, you must have the Self-Service Portal enabled for your end users.
n The generated token is valid for the expiration time set in Token Enrollment settings in the Admin
Portal.
n The admin generates an enrollment token in the UEM console without entering a device serial
number.
n Either the admin or the end user can enroll the device with the generated DEP token, which is
configured and sent in the usual way.
n The generated token is valid for the expiration time set in Token Enrollment settings in the Admin
Portal.
n An advantage of this enrollment flow is that neither admins nor end users are required to enter
the device serial number during enrollment. This function is useful in deployments where devices
are not preassigned to users, such as in a school setting.
n The admin generates an enrollment token using the bulk upload option in the UEM console,
specifying the device serial number.
n Either the admin or the end user enrolls the device using the generated DEP token, which is
configured and sent in the usual way.
n A token generated using the Bulk Upload method has no expiration date.
n For more information about uploading device serial numbers in bulk, see Associate Devices in
Apple Business Manager Portal.
Perform Enrollment with the Registered Enrollment Token
Once you have sent the DEP Registration Token to the end user, perform the enrollment on the device.
To perform the enrollment with a registration token:
1 Turn on the device.
2 Complete the setup screens as part of the Setup Assistant.
For more information on these settings, see Complete the DEP Enrollment Profile
3 On the authentication screen that requires a username and password, the user must enter the token
they received into both the username and password fields. The end user must enter the same token
information under both Username and Password. To keep the end user informed you can define the
message that will be shown on the authentication screen to direct the user to enter the token under
both username and password.
VMware, Inc. 17Integration with Apple Business Manager
For more information, see Enable Registration Tokens for DEP Enrollment.
View Device Enrollment Status
Check the enrollment status of your devices to view DEP-specific information, and generate reports when
needed.
To view:
1 Navigate to Devices > Lifecycle > Enrollment Statusin the UEM console. In addition, DEP-specific
devices can have one of the following Enrollment statuses:
n Discovered – Devices that are synced into Workspace ONE UEM but are not assigned a
DEP Profile. These devices would not receive the MDM enrollment prompt during the Setup
Assistant.
n Registered – Devices are assigned a DEP Profile and you will see the MDM enrollment prompt
during the Setup Assistant.
n Enrolled – Devices are enrolled into Workspace ONE UEM MDM and can now be managed from
the Devices > List View page.
2 Go to Layout and make column selections to view specific information about enrolled devices.
n Serial Number – Device's unique serial tracking number.
n Asset Number – Internally allocated device tracking number.
n Profile – DEP profile assigned to the device.
n Department – Department attached to the DEP profile assigned to the device.
n Source – Designates whether the device is associated with the Device Enrollment Program.
Apple Business Manager DEP Profile Management
After the first DEP profile is initially created, create profiles quickly without having to return to the DEP
wizard. This allows you to create multiple profiles to use for different deployments.
To create and push DEP profile:
1 Navigate to Groups & Settings > All Settings > Devices & Users > Apple > Device Enrollment
Program. Since you already configured a DEP profile using the Workspace ONE UEM Setup Wizard,
a new screen displays.
2 Select Add Profile.
3 Configure the settings for a new DEP profile, as described when using when using the profile wizard
earlier.
4 Save the profile. This profile is added to the list of other profiles.
5 From the Default Profile Assigned for Newly Synced Devices menu, select the DEP profile you
want to automatically assign to all devices upon being synced into Workspace ONE UEM. If you do
not wish to push a DEP profile to new devices, select None.
VMware, Inc. 18Integration with Apple Business Manager
Edit an Existing DEP Profile
Modify existing DEP profiles to more closely meet the needs of your organization or deployment.
To edit an existing DEP profile:
1 Navigate to Groups & Settings > All Settings > Devices & Users > Apple > Device Enrollment
Program. The DEP profiles you have already created appear.
2 Select the pencil icon to edit the profile. The Edit Profile window appears.
3 Edit the DEP profile settings from this window. Settings are not applied until the changes register
during the Setup Assistant.
4 Select Save.
Manually Assign or Remove a DEP Profile
For Apple School Manager deployments, you must assign profiles to the appropriate devices after
creating them for both Shared iPad and one-to-one configurations.
1 Navigate to Devices > Lifecycle > Enrollment Status.
2 Select the devices needed for the action.
3 Select the More Actions > DEP Profile and select one of the following options:
n Assign Profile – Assign new or additional DEP profiles to selected devices. The DEP profile is
not updated on a device until the device is factory wiped or re-connected to Wi-Fi.
n Remove Profile – Removes existing DEP profiles from selected devices.
DEP Device Management
Before you can manage any DEP-enabled devices you must sync them from the UEM console after you
register them with Apple.
Sync Apple DEP Devices Manually
If you selected Sync Now and Assign to All Devices, then the registered devices are automatically
synced when you save your DEP Profile. If you decide to add more devices later, perform a manual sync
using the instructions below or wait for the DEP sync scheduler to run
1 Navigate to Devices > Lifecycle > Enrollment Status.
2 Select the devices to sync.
3 Navigate to Add > Sync Devices and follow the prompt to complete the process.
n Sync Devices – This option is available only after DEP is setup for the device. Selecting this
option populates the UEM console with any newly registered devices from Apple Business
Manager. It also automatically assigns the current Auto Assign Default Profile to devices, if the
feature was configured earlier.
VMware, Inc. 19Integration with Apple Business Manager
Use the DEP Sync Scheduler
While a manual sync can be issued at any time, Workspace ONE UEM syncs with devices every 24
hours. Configure the sync schedule by accessing the DEP Scheduler in the UEM console. The schedule
setting is only available to System Administrators at the Global organization group level.
To use the DEP Sync Scheduler:
1 Navigate to Groups & Settings > All Settings > Admin > Scheduler.
2 Select Add Schedule > Device Enrollment Program Updates.
3 Create a name and description for the task.
4 Determine the recurrence type.
5 Determine the range for the schedule.
6 Select Save to add this schedule to the list.
Renew Your Apple Server Token for DEP Deployments
Your Apple server token file is valid for one year, after which time you must renew it.
Procedure
1 Log into the Apple Deployment Programs site and select Get Started for the Device Enrollment
Program.
2 Confirm your identity with a verification code by selecting the phone number to receive the four-digit
code and select Send. When received, enter the code. Select Continue.
3 Select Manage Servers from the left panel.
4 Select the Server Name of your MDM server with the token file you want to renew.
5 Select Generate New Token > Generate and Download Server Token.
6 Select Done > OK.
7 Navigate to the DEP settings page in the UEM console.
8 Go to Groups & Settings > All Settings > Devices & Users > Apple > Device Enrollment
Program.
9 Select the Renew button
VMware, Inc. 20Integration with Apple Business Manager
10 Upload your newly generated server token.
Note Fetch All Devices syncs all the Apple Business Manager enrolled devices with the UEM
console, including devices that were already synced. It should only be used when devices are not
syncing. Workspace ONE UEM suggests to use Fetch as a final alternative to sync devices.
Best Practices for Using Server Tokens
Follow the best practices for uploading tokens to any organization group in the UEM console.
Administrators can add DEP profiles or upload tokens at any organization group, even in a child
organization group.
n Add DEP profiles to all devices that are registered to that organization group by specifying the token
name when adding the profile.
n Administrators can override permissions in a child organization group and add multiple tokens to any
group inheriting the DEP configuration.
Perform Remote Actions on All Devices
You can perform various remote actions on devices that are enrolled to Apple Business Manager using
DEP.
Procedure
1 Navigate to Devices > List View > Select Device.
The Details View appears.
2 Select More Actions and choose from the following education-specific actions.
Option Description
User Lists (Query) Send a query command to the device to return a list of cached users.
Device Configured (Admin) Send this command if a device is stuck in an Awaiting Configuration state.
Log out user (Admin) Log out the current user of the device if needed.
iOS updates (Admin) Select individual devices or devices in bulk to update devices.
Enable/Disable Lost Mode Lock a device and send a message, phone number, or text to the lock screen. Lost
Mode is disabled by administrators only. When Lost Mode is disabled, the device
returns to normal functionality. Users are sent a message that tells them that the
location of the device was shared.
Request Device Location Query a device in Lost Mode, and then access the Location tab to find the device.
(iOS 9.3 + Supervised)
Delete DEP Device Records
You can remove DEP-enabled device records from the Device List View in the UEM console for enrolled
devices while the device remains registered with the Device Enrollment Program in the Apple Business
Manager portal.
VMware, Inc. 21Integration with Apple Business Manager Once this device record is deleted, the device status changes from enrolled to unenrolled. Simply factory wipe the device and re-enroll it. 1 Navigate to Devices > List View. 2 Select the device(s) to delete. 3 Navigate to the More drop-down menu. 4 Select Admin > Delete. Note The UEM console only allows you to delete a device record. You will be prevented from manually deleting a DEP-enabled device here. See Disassociate Devices From the Apple Business Manager to manually delete a device. Wiping DEP-enrolled Devices You should not perform an enterprise wipe through Workspace ONE UEM on an enrolled device. Instead, perform a device wipe, so the user is forced to re-enroll when it is reactivated. To discourage an enterprise wipe on DEP enrolled devices, Workspace ONE UEM displays an additional warning in the UEM console when performing the command. VMware, Inc. 22
3
Apple Business Manager -
Volume Purchase Program (VPP)

To distribute App Store applications and custom business to business (B2B) applications to large
deployments of Apple iOS and macOS devices, integrate Apple Business Manager and Workspace ONE
UEM.

The Apple Business Manager's VPP service enables organizations to purchase publicly available
applications for distribution. Any paid application from the App Store is available for purchase, in volume,
at the existing App Store price. Custom B2B applications can be free or purchased at a price set by the
developer.

Basics of Purchased Applications
For a general overview of the steps to buy applications from Apple and to add and deploy Apple Business
Manager VPP applications to the console, see Deploy Volume Purchase Program.

Apple offers several methods to deploy applications. The operating system, the type of content, and the
method of deployment are related. For a matrix outlining which deployment methods are available by
content type and operating system version, see Supported Content for Purchased Applications.

Apple Business Manager Application Deployment
Methods
n    Managed Distribution by Device Serial Number - If your deployment consists of iOS 9+ or macOS
     10.11+ devices, you can assign applications by device serial number. This method offers
     management benefits including not having to manage Apple IDs and the ability to reuse licenses. See
     Managed Distribution by Device Serial Number for more information. For information on enabling
     automatic updates for device-based VPP applications, see Update Device-Based VPP Applications
     Manually or Automatically and Update Challenge for Device-Based VPP Applications.

n    Managed Distribution by Apple IDs - The managed distribution model by Apple IDs uses service
     tokens (also called sTokens) to retrieve your VPP contents and to distribute them to devices using the
     Workspace ONE UEM console. This method enables the reuse of licenses. See Complete All Tasks
     For Managed Distribution by Apple IDs for an outline of the steps to use this deployment method.

VMware, Inc.                                                                                               23
Integration with Apple Business Manager
n Redemption Code Deployment Method - The redemption code deployment method uses codes from
a spreadsheet to retrieve your VPP contents and to distribute them to devices using the UEM
console. Use this method if your deployment consists of devices running iOS 6 or earlier. For an
outline of the steps to upload the redemption codes spreadsheet and deploy VPP applications to
devices, see Complete All Tasks to Distribute Redemption Codes.
Deploy Custom B2B Applications with Apple Business
Manager
You can deploy custom B2B applications bought through the Apple Business Manager's VPP service, but
the ability to manage these applications depends on whether you deploy with redemption codes or
managed distribution. See Custom B2B Applications and VPP for details.
This chapter includes the following topics:
n Volume Purchase Program (VPP)
n Supported Content for Purchased Applications
n Deploy Volume Purchase Program
n Redemption Code Method
n Managed Distribution by Apple IDs
n Custom B2B Applications and VPP
n Managed Distribution by Device Serial Number
Volume Purchase Program (VPP)
To distribute App Store applications and custom business to business (B2B) applications to Apple iOS
and macOS devices, utilize Volume Purchase Program by integrating Apple Business Manager and
Workspace ONE UEM.
The Apple Business Manager enables organizations to purchase publicly available applications for
distribution. Any paid application from the App Store is available for purchase, in volume, at the existing
App Store price. Custom B2B applications can be free or purchased at a price set by the developer.
See Apple's website for the availability by country and for other details.
Supported Content for Purchased Applications
Workspace ONE UEM supports various content types in the purchased section. The level of management
varies according to the method used to get the content and the platform.
View support by operating system, application type, acquirement method, Managed Distribution (MD), or
Redemption Codes (RC). The letters DB༔ represents systems that can retrieve applications without an
Apple ID, and an X represents no support.
VMware, Inc. 24Integration with Apple Business Manager
Table 3-1. Supported Purchased Content by Platform and OS Version
Free Purchased
Operating Free Public Purchased Public Custom B2B Custom B2B
System Apps Apps Apps Apps
Apple iOS 7.x – 8.x MD & RC MD & RC MD & RC MD & RC
Apple iOS 9+ MD, RC, & DB MD, RC, & DB MD & RC MD & RC
macOS 10.9 – 10.10 MD MD X X
macOS 10.11+ MD & DB MD & DB X X
Deploy Volume Purchase Program
To purchase and deploy content with Apple Business Manager's Volume Purchase Program (VPP), enroll
and acquire content on the Apple Business Manager site and then use Workspace ONE UEM to distribute
content.
Procedure
1 Content Purchase – Purchase content in the bulk through the App & Books in Apple Business
Manager.
2 Application Deployment – Distribute the assets throughout your device fleet using redemption codes
or managed distribution service token files (sTokens).
n Redemption Code Method
n Managed Distribution by Apple IDs
n Custom B2B Applications
n Managed Distribution by Device Serial Number
Redemption Code Method
This method uses redemption codes to allocate the content to devices, and it does not support revoking
the codes from Apple iOS devices. Once the redemption code is redeemed, it cannot be recycled. Also,
Workspace ONE UEM cannot delete content bought using redemption codes off devices.
Devices older than Apple iOS 7 must use this method for purchasing VPP content because the managed
distribution is not available for older systems.
You cannot use redemption codes for macOS systems.
Complete All Tasks to Distribute Redemption Codes
For the successful distribution of the VPP content to end users, perform all steps of the deployment
process. In return, end users must complete all steps on their devices to receive the VPP content.
VMware, Inc. 25Integration with Apple Business Manager
Procedure
1 Admins send VPP content to end users.
a Purchase you applications and download your redemption code spreadsheet from the Apple
iTunes Store.
b Upload the spreadsheet to Workspace ONE UEM.
c Allocate redemption codes to organization groups and smart groups in the Workspace ONE UEM
console and save the settings.
2 End-Users receive content.
a Obtain a redemption code from Workspace ONE UEM.
This step occurs automatically when admins publish the content.
b Install the content from the catalog.
Upload a Redemption Code Spreadsheet
You can use Workspace ONE UEM to manage and distribute applications and books purchased through
the VPP to your Apple iOS devices. Apple uses Web services to manage redemption codes. For the
Workspace ONE UEM console to access Apple's Web services, you must first upload the redemption
code spreadsheet.
iTunes uses Adam IDs, which are item identifiers, to automate connections to content. If your
spreadsheet contains an Adam ID, then you do not have to locate applications and books in the app
store. For custom B2B applications, the Adam ID enables Workspace ONE UEM to update application
IDs in the UEM console.
Procedure
1 Navigate to either Apps & Books > Applications > Orders or Apps & Books > Books > Orders.
2 Select Add or Order to add a redemption code spreadsheet.
3 Select Purchased Public App or Purchased Custom App (Custom B2B), for applications.
This option is not available for books.
4 Select Choose File to upload the CSV or XLS file that you downloaded from the Apple portal.
This action creates the order.
5 Select Save to continue to the Product Selection Form.
6 Locate the appropriate product and choose Select to finish uploading the spreadsheet. If your
spreadsheet contains an Adam ID, Workspace ONE UEM does not display this step.
n If your spreadsheet contains an Adam ID, you do not have to locate the product. Workspace ONE
UEM automatically adds applications and books from the app store when the spreadsheet
contains the Adam ID. Adam IDs are specific to iTunes, are components of the Apple Search API,
and are unique for each application.
VMware, Inc. 26Integration with Apple Business Manager
n If the Apple VPP redemption code spreadsheet contains codes for multiple applications or books,
Workspace ONE UEM lists several products on this form. You can select only one per order.
Assign Content to Users
You must enable the Workspace ONE UEM console to assign redemption codes to users and devices.
Select the applicable organization groups and smart groups to which to assign redemption codes.
1 Navigate to the organization group where you uploaded the redemption code spreadsheet.
2 Go to Apps & Books > Applications > Native > Purchased.
3 Select the application you want to assign.
VMware, Inc. 27Integration with Apple Business Manager
4 On the Orders Assignment tab, complete the following options.
Table 3-2. Orders Assignment Tab Options - General
Setting Description
Redemption Codes On Hold Enter the number of redemption codes that you want to place on
hold. Use this option to save the redemption codes for later use.
SDK Profile If you use AirWatch SDK functionality, assign an SDK profile to
the application.
Add Assignment By Assign redemption codes to organization groups or smart
groups.
n Organization Group – Allocate redemption codes to an
organization group. Select All Users to include all users in
that organization group, or choose Selected Users to
display a list of users in the organization group. Use the
Add and Remove buttons to choose the specific users to
receive the application.
n Smart Group – Allocate redemption codes to a smart group
by typing the name of the group. Options display and you
can select the appropriate smart group from the list. You can
create a new smart group, if necessary.
n You can apply redemption codes to organization groups
and to smart groups simultaneously. However, you can
only specify the users for organization groups of the
Customer type.
n You cannot specify users for smart groups. However,
you can edit the smart group so that it contains the
necessary users.
n Verify the information in the following columns for each
assignment rule:
n Users – View the number of users for the order.
n Allocated – Enter the number of licenses to allocate to
the selected users. Do not exceed the total number in
the order.
n Redeemed – View the number of licenses that have
already been redeemed, if any.
Table 3-3. Orders Assignment Tab Options - Deployment
Setting Description
Assignment Type n On Demand – Deploys content to a catalog or other
deployment agent and lets the device user decide if and
when to install the content.
This option is the best choice for content that is not critical
to the organization. Allowing users to download the content
when they want helps conserve bandwidth and limits
unnecessary traffic.
n Automatic – Deploys content to a catalog or other
deployment Hub on a device upon enrollment. After the
device enrolls, the system prompts users to install the
content on their devices.
VMware, Inc. 28Integration with Apple Business Manager
Table 3-3. Orders Assignment Tab Options - Deployment (continued)
Setting Description
This option is the best choice for content that is critical to
your organization and its mobile users.
You can only use On-Demand for custom B2B applications
acquired using redemption codes.
When the Assignment Type is Auto, only eligible Apple iOS 7+
devices receive the application or book automatically.
Remove On Unenroll Set the removal of the application from a device when the
device unenrolls from Workspace ONE UEM. Workspace ONE
UEM enables this option by default.
If you choose to enable this option, supervised devices are
restricted from silent app installation because the device is
locked and the provisioning profile installation is in the command
queue which requires a device to be unlocked to complete the
installation.
If you choose to disable this option, provisioning profiles are not
pushed along with the installed application. That is, if the
provisioning profile is updated, the new provisioning profile is
not automatically deployed to devices. In such cases, a new
version of the application with the new provisioning profile is
required.
Removing an application when a device is unenrolled does not
recover the redeemed code. When installed, the application is
associated to the app store account of the user.
Prevent Application Backup Disable backing up the application data to iCloud. However, the
application can still back up to iCloud.
Make App MDM Managed if User Installed Assume management of applications previously installed by
users on their devices, supervised and unsupervised.
Enable this feature so that users do not have to delete the
application version installed on the device. Workspace ONE
UEM manages the application without having to install the
AirWatch Catalog version on the device.
Use VPN Configure a VPN at the application level, and select the Per-
App VPN Profile. Users access the application using a VPN,
which helps ensure that application access and use is trusted
and secure.
Send Application Configuration Send application configurations to Apple iOS devices, so users
do not have to configure these specified values themselves.
5 Select Save when you finish allocating codes.
Application configurations are vendor-specific key-value pairs you can deploy with an application to
preconfigure the application for users.
Redemption Code Information
Access information about your redemption codes so that you can manage and track your VPP
deployments.
VMware, Inc. 29You can also read