Technical Guide Adding video call access to your services - Healthdirect
←
→
Page content transcription
If your browser does not render page correctly, please read the page content below

Adding video call access to your services

Technical Guide
Technical Guide
Copyright ©2019 Attend Anywhere Pty Ltd
All rights reserved.
Publication date: April 2019
Build: HDA190405.1411

Audience - People who: ensure that network environments are Video Call-ready; set up video
calling equipment; provide Video Call troubleshooting advice.

If you need assistance relating to the content of this book,
contact videocallsupport@healthdirect.org.au

 PDF note: For best results when printing this document, use your printer's
 double-sided setting if available.

                                                 -2-
Table of contents

 Overview                                                            7
  Introduction                                                        7
  Online resources                                                    7

 Integration                                                         9
  Technical responsibilities                                         10
    Clinical and administration applications management              10
      General responsibilities                                       10
    Communications                                                   11
      General responsibilities                                       11
      Video Call platform responsibilities                           11
    Network                                                          11
      General responsibilities                                       11
      Video Call platform responsibilities                           12
    IT Support                                                       12
      General responsibilities                                       12
      Video Call platform responsibilities                           12
    Training                                                         13
      General responsibilities                                       13
      Video Call platform responsibilities                           13
  Implement video call access on your website                        14
    'Start video call' buttons                                       14
      Features                                                       14
      How do I use the button scripts?                               14
      Embed a 'Start video call' button for a single Waiting Area    15
      Embed a 'Start video call' button for multiple Waiting Areas   16
      Customise the 'Start video call' button images                 18
      Link your website to a default entry page                      21
    'Test call' button                                               24
      How do I use the button script?                                24
      Add the 'Test call' button to a web page                       24
      Customise the 'Test call' button image                         26
  Configure clinic applications                                      28
    Integrate video consultations into a service                     29
    Direct-entry URL to a Waiting Area                               30
      Before you begin                                               30
      Create a direct call access URL                                31
  Network requirements                                               34
    Network basics                                                   34
      Port access                                                    34
      Signalling access                                              34

                                               -3-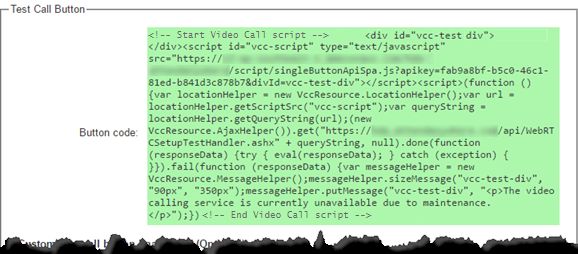
Technical Guide

         Video Call relay servers                               34
         Network readiness                                      35
       Media pathways                                           36
         Achieving the best-quality connection                  37
       Bandwidth                                                38
         Bandwidth per remote party in a call                   38
       Testing WebRTC network readiness                         39
         Understanding the test results                         39
         Running the test                                       39
         Examples                                               40
     User requirements                                          42
       Hardware requirements                                    42
         Device and operating system                            42
         Additional equipment                                   43
       Web browser requirements                                 45
       Bandwidth and data requirements                          46
         Download speed, upload speed, and latency              46
         How much data does a call use?                         46
     Testing video calling equipment                            47
     Audiovisual setup                                          48
       Important                                                48
       Supporting materials                                     48
     Equipment                                                  49
     Desktop shortcuts                                          54
         Shortcut types                                         54
       Shortcuts                                                54
         Video Call Management Console                          54
         Call Screen to a specific Waiting Area                 57
     Conference rooms and group meetings                        59
       Wide-angle web camera, and echo-cancelling microphones   59
       Large monitor or TV                                      59
       Sample setup                                             60

   Support                                                      61
     Support resources                                          62
         Troubleshooting and Known Issues                       62
         Where to go for support and advice                     62
         Support resources                                      63
         Fault Tree                                             63
     Support activities                                         64
       Activities for....                                       64

   Troubleshooting                                              67
     Network testing and troubleshooting                        69
       Check WebRTC network readiness                           69

                                                  -4-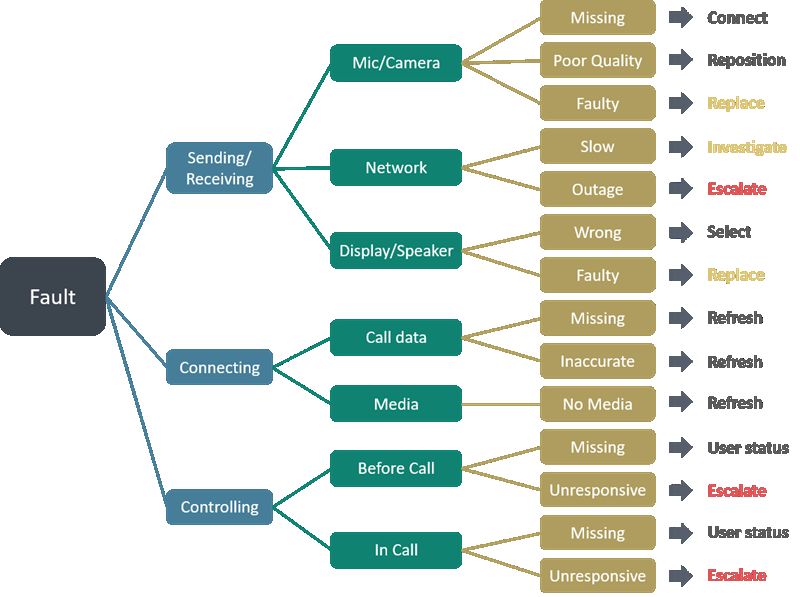
Collect network statistics during live calls         69
 Troubleshoot video calling setup                       70
   Connection speed test                                70
   Speaker test (desktop/laptop computers)              71
   Microphone test (desktop/laptop computers)           72
   Video test (desktop/laptop computers)                73
 Troubleshoot video calling                             75
   General issues                                       75
   Video performance issues                             77
   Video calls and call quality                         78
   Create a diagnostic report for connection issues     79
        Introduction                                    79
        Instructions                                    79
   Resolving web proxy-based webRTC connection issues   82
        Solution                                        82
 Troubleshoot screen sharing                            84
   Issues                                               84

Index                                                   89

                                                  -5-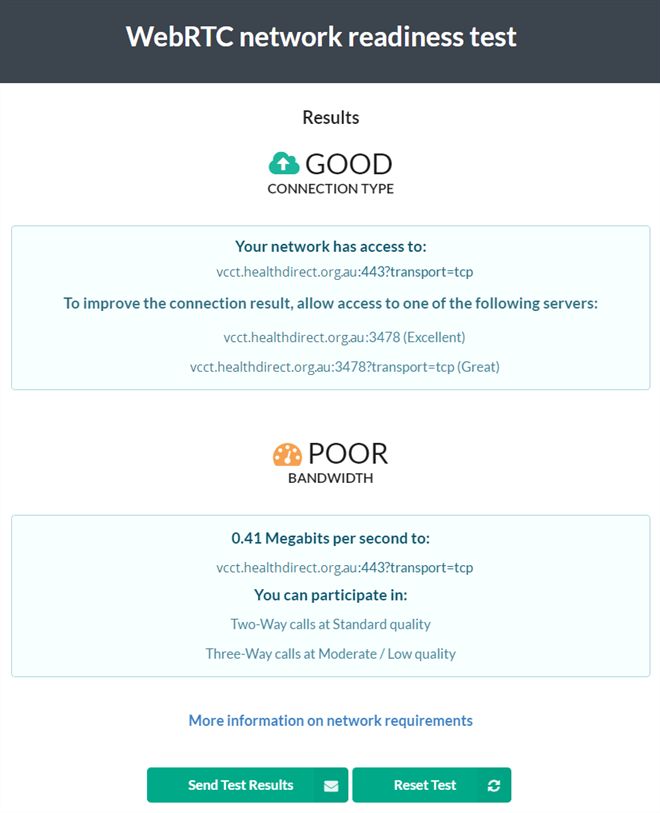
Technical Guide

                  -6-
Introduction

Overview

Introduction
The Technical Guide contains information and advice for both Video Call and IT administrators,
who oversee the successful operation of consultations and meetings via video.
This book includes topics on:

l   Preparing networks for WebRTC-based video calling
l   Hardware, web browser, and internet requirements
l   Integrating video calling into websites and third-party application software
l   Improving the user experience for people making video calls, and users of the Video Call
    Management Console
l   Troubleshooting

Online resources
l   Making Video Calls poster set: https://vcc.healthdirect.org.au/makingcalls
l   Video Call Resource Centre: https://vcc.healthdirect.org.au/resourcecentre
l   Technical implementation guide: https://vcc.healthdirect.org.au/techguide
l   Video Call Management Console help topics: https://vcc.healthdirect.org.au/help

                                                 -7-
Technical Guide

                  -8-
Integration

              -9-
Technical Guide

Technical responsibilities
Clinical and administration applications management

         Example roles: Applications services manager; IT Department

General responsibilities
Modify local systems and applications to support patients attending via a video call, ensuring that:

l    Clinic staff can select an option such as ‘patient will be attending via a video call’, in the patient
     administration system
l    Appointment letters include the service's web page address (instead of the 'bricks-and-mortar'
     equivalent) to attend the appointment
l    Patient flow systems recognise when patients arrive via a video call
l    Administration systems indicate when an upcoming appointment will be attended via a video
     call
l    There is a shortcut to the online waiting area within commonly-used administration or clinical
     applications
l    Clinicians are reminded within applications that video call attendance is an option
l    Activity reporting and billing systems have been configured

    Related Video Call platform roles

    l   Organisation Administrator

                                                    - 10 -
Technical responsibilities
Communications
Example roles: Communications Manager; Webmaster
General responsibilities
l Create and disseminate a stakeholder communication plan
l Create marketing and communications material in line with patient and clinician feedback
l Work with the webmaster to ensure that patients are informed about video consulting /
telehealth
l Work with the webmaster to ensure that patients can easily attend their appointment, or access
the service they need via a video call
Video Call platform responsibilities
l Be familiar with the content of the Video Call Resource Centre
l Customise and distribute adoption resources and materials (for example, Patient information
leaflets, Troubleshooting and Quickstart posters)
Related Video Call platform roles
l Organisation Administrator
l Organisation Editor
Network
Example roles: Technical services; Networking engineer
General responsibilities
l Ensure that video call access works as expected, and is supported by the related infrastructure
l Ensure that data networks and devices/equipment are optimised for video calling
l Resolve connectivity issues and optimise connectivity settings to achieve the best user
experience
- 11 -Technical Guide
Video Call platform responsibilities
l Be familiar with the content of the Technical Guide
l Ensure data networks and devices/equipment are optimised for in-browser (WebRTC) video
calling
l Run the WebRTC connectivity test
IT Support
Example role: IT helpdesk
General responsibilities
l Provide technical and application support to staff
l Administer platform access and permissions, based on established approval process
Video Call platform responsibilities
l Be familiar with the content of the Technical Guide
l Attend training sessions
l (As required) Produce activity reports
l (If issues cannot be resolved locally) Contact the Video Call project team
Related Video Call platform roles
l Organisation Administrator
l Organisation Editor
l Organisation Reporter
l Primary Support Contact
- 12 -Technical responsibilities
Training
Example role: Staff educator; Administration support
General responsibilities
l Ensure staff are trained in the use of Video Call
Video Call platform responsibilities
l Attend training sessions and webinars
- 13 -Technical Guide
Implement video call access on your website
'Start video call' buttons
For each Organisational Unit and Waiting Area, the Video Call Management Console generates
a button script that website authors can embed in one or more of their website's pages.
When set up, the script displays a Start video call button, which
provides the public with access to either:
l A specific Waiting Area
l All publicly-accessible Waiting Areas associated with an Organisational Unit
When a caller clicks the Start video call button, the Video Call Setup wizard walks them through
a simple connection and device test and, if specified by the related Waiting Area's settings,
prompts them for basic information before placing them in the Waiting Area's call queue.
Button scripts only work with websites that have an SSL Certificate (i.e., the site's URL has an
https: prefix).
What do I do if my service's website is only HTTP?
Each Video Call Waiting Area also has its own default entry page, hosted by Video Call. If your
website is still only HTTP, you can direct people to the default page from your website, with a
simple link. See Link your website to a default entry page on page 21 for more information.
Features
l The patient remains within your website before and after the call; the video call setup sequence
appears as an overlay on the button's web page
l Waiting Area-specific buttons can dynamically display the current availability of the Waiting
Area (available, temporarily suspended, or closed)
l Multi-Waiting Area buttons provide call access to multiple Waiting Areas from a single button:
callers select the Waiting Area they want during the call setup process
l You can customise the way the button appears on your website
Note: Custom button images are configured in the Video Call Management Console;
only a person with the role of Organisation Administrator or Service Administrator
can make the necessary changes.
How do I use the button scripts?
For a detailed description and instructions, see the following topics:
- 14 -Implement video call access on your website
l Embed a 'Start video call' button for a single Waiting Area below
l Embed a 'Start video call' button for multiple Waiting Areas on the next page
l Customise the 'Start video call' button images on page 18
Embed a 'Start video call' button for a single Waiting Area
To embed a Start video call button on one or more of your web pages, insert a piece of HTML
script provided by the Video Call Management Console. The page displays the button image, and
launches the call setup wizard when a user clicks the button.
In addition to providing video call access to a specific Waiting Area, this type of button dynamically
changes to reflect the Waiting Area's current access status.
Waiting Area-specific buttons have four states: available, available (mouse-over), temporarily
unavailable, and closed.
Tasks
To add Waiting Area-specific 'Start video call' button code to a web page
Video Call Management Console
Service Administrator permissions required
1. From the main menu, click Waiting Areas.
The Waiting Area activity summary opens.
2. Select the relevant Waiting Area's tile.
The Waiting Area's page opens.
3. Click the configure button and select URL to Give People.
The URL to Give People dialog opens.
4. Click Email me the instructions.
5. Click Cancel to close the dialog.
Email client
6. Open the email message containing the instructions just sent to you.
The message contains the button's unique script to embed on a web page, along with
step-by-step instructions.
7. Forward the instructions to your webmaster or equivalent.
The design of the default 'Start video call button' doesn't work with our website. Can I
- 15 -Technical Guide
change its appearance?
Yes. For detailed instructions, see Customise the 'Start video call' button images on page 18.
Embed a 'Start video call' button for multiple Waiting Areas
A multi-Waiting Area Start video call button provides access to all publicly-accessible Waiting
Areas associated with a single Organisational Unit. Patients select the Waiting Area they want to
visit during the call setup sequence.
To embed a Start video call button on one or more of your web pages, insert a piece of HTML
script provided by the Video Call Management Console. The page displays the button image, and
launches the call setup wizard when a user clicks the button.
Tasks
To specify the web location of the entry page for consumers
Video Call Management Console
Organisation Administrator permissions required
1. From the menu, click Open original Management Console.
The original Management Console opens in a new tab, at its Sign in page. Sign in
again.
2. From the Admin menu, select Website Buttons.
The Website Buttons page opens.
3. Click the Organisational Unit (All Waiting Areas) tab.
4. Click the relevant Organisational Unit.
5. From the drop-down list, select I want to put 'Start video call' buttons on my
website.
6. The Entry page for consumers field displays the URL of the Organisational Unit's
default entry page by default.
l If you intend to use only Waiting Area-specific buttons, leave this unchanged.
l If you intend to use a single Start video call button for all of your Waiting Areas,
- 16 -Implement video call access on your website
To specify the web location of the entry page for consumers
enter the web address of the page on your website that will display the button.
Important: Make sure that the URL uses the https: prefix.
7. Click Save Changes.
8. Close the tab containing the original Management Console.
To embed the 'Start video call' button code into a web page (multiple Waiting Areas)
Video Call Management Console
Organisation Administrator permissions required
1. From the menu, click Open original Management Console.
The original Management Console opens in a new tab, at its Sign in page. Sign in
again.
2. From the Admin menu, select Website Buttons.
The Website Buttons page opens.
3. Click the Organisational Unit (All Waiting Areas) tab.
4. Click the relevant Organisational Unit.
5. From the Org. Unit Start Video Call Button section's Button code field, select all of
the text inside the coloured box, from the start of
to the end of
6. Copy the code fragment to the clipboard.
(Windows shortcut: Ctrl+C | Mac shortcut: ⌘-C)
7. Close the tab containing the original Management Console.
Email client
- 17 -Technical Guide
To embed the 'Start video call' button code into a web page (multiple Waiting Areas)
8. Create a new email message addressed to either your webmaster, or the person
who updates the related service's web pages.
9. Paste the code fragment into the message, along with instructions as to where it
should be placed on the service's website.
10. Click Send.
The design of the default 'Start video call button' doesn't work with our website. Can I
change its appearance?
Yes. For detailed instructions, see Customise the 'Start video call' button images below.
Customise the 'Start video call' button images
If you would prefer to use a Start video call button that better suits the look and feel of your
website, you can specify a custom button image that displays when the associated button code is
embedded on a web page. The size, shape, and content of the button can be anything you like.
l Buttons related to a single Waiting Area can be set up with images to indicate four distinct
states (available, available (mouse-over), temporarily unavailable, and closed).
If you don't want the button to change state, you can just use a single button image;
however, you must make sure that you specify that image for all four states, so that the
button behaves correctly on the web page.
l Buttons that support multiple Waiting Areas use only a single image.
Example button designs
You can change the custom image associated with the button at any time, without the
need to make any changes to the inserted script.
Before you begin
l Make sure that your custom button images are ready for use, and approved
l Have your webmaster (or equivalent) upload the custom images to your preferred web server
- 18 -Implement video call access on your website
l Make sure that you know the URLs of the image locations
l Make sure that the URLs to the images uses secure HTTP (https:)
Custom image recommendations
l Use .png or .jpg format image files, with transparent backgrounds
l (If using .jpg files) Set image compression to between 90 and 100 if possible, to minimise
image artefacts
l (Single Waiting Area buttons only) Make sure that the dimensions of all four button variants
are the same
Tasks
To specify a custom 'Start video call' button image (single Waiting Area)
Video Call Management Console
Organisation Administrator or Service Administrator permissions required
1. From the menu, click Open original Management Console.
The original Management Console opens in a new tab, at its Sign in page. Sign in
again.
2. From the Admin menu, select Website Buttons.
The Website Buttons page opens.
3. Click the Organisational Unit (All Waiting Areas) tab.
4. Click the Organisational Unit to which your Waiting Areas belong.
5. In the Waiting Area Start Video Call Button section, enter the locations of the four
button images:
l Start Video Call: Normal view of the Start video call button. Displays when the
Waiting Area is open and accessible to the public. Example:
- 19 -Technical Guide
To specify a custom 'Start video call' button image (single Waiting Area)
l Start (mouse-over): Displays when the user mouses over the Start video call
button. Typically a darker or lighter shade version of that button. Example:
l Temp. unavailable: Displays when the Waiting Area is temporarily unavailable
due to an outage or similar event. Suggested button text: 'Temporarily
unavailable'. Example:
l Access closed: Displays when the Waiting Area is closed to public access, for
example, when outside of operating or business hours. Example:
Important: The URLs that point to the location of the custom button images must be
https, and use no more than 256 characters.
6. Click Save Changes.
The new button images take effect immediately. Any web page that currently uses
the related button script will display the new images.
7. Close the tab containing the original Management Console.
To specify a custom 'Start video call' button image (multi-Waiting Area)
Video Call Management Console
Organisation Administrator permissions required
1. From the menu, click Open original Management Console.
The original Management Console opens in a new tab, at its Sign in page. Sign in
again.
2. From the Settings menu, select My Settings.
3. Click the Website Content tab.
- 20 -Implement video call access on your website
To specify a custom 'Start video call' button image (multi-Waiting Area)
4. Click the relevant Organisational Unit.
5. Go to the Start Video Call Button section.
6. In the Custom 'single button' image URL (Optional) subsection, enter the URL of
the custom button image in the Start Video Call field.
Important: The URL that points to the location of the custom button image must be
https, and use no more than 256 characters.
7. Click Save Changes.
The new button image takes effect immediately. Any web page that currently uses
the related button script will display the new image.
8. Close the tab containing the original Management Console.
Link your website to a default entry page
When your service's website has an http (and not a secure https)
address, you can only use the Video Call supplied default entry page
for video calling.
However, you can still provide a link to this page (and its Start video
call button) from your website.
The simplest way to do this is to add a simple text link to your web
page. However, this will not be very visible to your clients:
A more effective method is to create a graphical button image that matches the visual style of
your website, and then link that image to the location of the default entry page:
- 21 -Technical Guide
Tasks
To find the URL of the Default Entry Page (single Waiting Area)
Video Call Management Console
Service Administrator permissions required
1. From the main menu, click Waiting Areas.
The Waiting Area activity summary opens.
2. Select the relevant Waiting Area's tile.
The Waiting Area's page opens.
3. Click the configure button and select URL to Give People.
The URL to Give People dialog opens.
4. Click Email me the instructions.
5. Click Cancel to close the dialog.
Email client
6. Open the email message containing the instructions just sent to you.
The message contains the long ('unfriendly') version of the default entry page's URL -
it will look something like this:
https://vcc.healthdirect.org.au/service/?apikey=1e0ba666-3f3e-
41de-8bbb-a7b0066888f6&nid=jelFst6B
7. Copy the URL, and provide it to whomever will be adding the link to your website.
- 22 -Implement video call access on your website
To find the URL of the Default Entry Page (multiple Waiting Areas)
Video Call Management Console
Organisation Administrator permissions required
1. From the menu, click Open original Management Console.
The original Management Console opens in a new tab, at its Sign in page. Sign in
again.
2. From the Admin menu, select View Organisational Units.
The Organisational Units page opens.
3. From the displayed list, click the Organisational Unit's View Profile link.
The Organisational Unit's profile page opens.
4. Right-click the Entry page for consumers link, and select Copy link address.
The URL is copied to the clipboard.
5. Close the tab containing the original Management Console.
6. Provide the copied URL to whomever will be adding the link to your website.
- 23 -Technical Guide
'Test call' button
It is often useful for people making video calls to be able to run the setup test sequence without
actually connecting to a Waiting Area or a Meeting Room.
Video Call provides a 'Test call' script that webmasters can embed in one or more of their
website's pages. When set up, the script displays the following button:
Adding the button to a web page follows the same general procedure as adding a Start video call
button. Similarly, you can customise the button image to bring its look and feel into alignment with
your website's visual style.
See Add the 'Test call' button to a web page below and Customise the 'Test call' button image on
page 26 for more information.
How do I use the button script?
For a detailed description and instructions, see the following topics:
l Add the 'Test call' button to a web page below
l Customise the 'Test call' button image on page 26
Add the 'Test call' button to a web page
To add the Test call button to one of your web pages, you insert a piece of HTML code that
contains a script. The script displays the button, and launches the consumer version of the Video
Call Setup wizard when a user clicks the button.
By default, the button uses the standard image. If you prefer, you can provide a custom button
design that matches the look and feel of your website. See Customise the 'Test call' button image
on page 26 for details.
Tasks
To embed the 'Test call' button script into a web page
Video Call Management Console
1. From the menu, click Open original Management Console.
The original Management Console opens in a new tab, at its Sign in page. Sign in
again.
- 24 -Implement video call access on your website
To embed the 'Test call' button script into a web page
2. From the Admin menu, select Website Buttons.
The Website Buttons page opens.
3. Click the Organisational Unit (All Waiting Areas) tab.
4. Click the relevant Organisational Unit.
5. From the Test Call Button section's Button code field, select all of the text inside the
coloured box, from the start of
to the end of
.
6. Copy the code fragment to the clipboard.
(Windows shortcut: Ctrl+C | Mac shortcut: ⌘-C)
7. Close the tab containing the original Management Console.
Email client
8. Create a new email message addressed to either your webmaster, or the person
who updates the related service's web pages.
9. Paste the code fragment into the message, along with instructions as to where it
should be placed on the service's website.
10. Click Send.
Notes
You can change the button image at any time, without any need to change the inserted script.
- 25 -Technical Guide
Customise the 'Test call' button image
If you would prefer to use a Test call button image that better suits your website, you can specify
a custom button image for Video Call to use when the associated button code is embedded on
your web pages.
The image that you specify will be used by all of the Test call buttons that you embed.
Before you begin
l Make sure that you have a custom button image
l Have your webmaster (or equivalent) upload the custom image to your preferred web server
l Make sure that you know the URL at which the image is located
l Make sure that the URL to the image uses secure HTTP (https:)
Custom image recommendations
If you plan to use a custom image for your Test call button, remember the following:
l Use a .png or .jpg format image file, with transparent background
l (If using .jpg files) Set image compression to between 90 and 100 if possible, to minimise
image artefacts
Tasks
To specify a custom Test call button design
Video Call Management Console
1. From the menu, click Open original Management Console .
The original Management Console opens in a new tab, at its Sign in page. Sign in
again.
2. From the Admin menu, select Website Buttons.
The Website Buttons page opens.
3. Click the Organisational Unit (All Waiting Areas) tab.
4. Click the relevant Organisational Unit.
5. In the Custom Test call button image URL (Optional) field, enter the URL of your
custom button image.
- 26 -Implement video call access on your website
To specify a custom Test call button design
Important: The custom button image's URL must use no more than 256 characters.
6. Click Save Changes.
The new button image takes effect immediately. Any web page that currently uses
the related button script will display the new image.
7. Close the tab containing the original Management Console.
- 27 -Technical Guide
Configure clinic applications
After the main elements of your website and patient navigation have been implemented, integrate
any applicable, existing clinic applications with Video Call.
l A Waiting Area entry point has been placed on the clinician's website
l The web page's address (URL) is easy to communicate verbally
l The related Waiting Area has been configured appropriately in the Video Call Management
Console
Examples: video call access availability, on-screen messages, alerts.
l The Patient information leaflet has been customised
l The clinic's equipment can make browser-based video calls
To make WebRTC video calls, Video Call requires the use of one of the following web-
browsers:
l (Windows, Android, MacOS) Google Chrome version 68 or later
l (MacOS, iOS) Apple Safari version 11.4 or later
- 28 -Configure clinic applications
Integrate video consultations into a service
l In your administration system and processes, set up the clinic to provide the option of attending
consultations via a video call. This includes the following:
l Creating an appointment confirmation template for video consultations, with directions to
the clinic's online Waiting Area entry point.
l Ensuring clinicians and staff can select the option of a video consultation, when
appropriate, for an upcoming appointment.
l Indicating which patients will be attending their appointment via a video call.
l Let eligible patients know that they do not have to travel to attend their next appointment
l Ensure clinicians and staff have their own Video Call account, and required permissions. All
clinicians from the clinic use the same Waiting Area.
l Add a shortcut on the clinician's desktop (or a bookmark in their browser) that opens the Video
Call Management Console at the clinic's online Waiting Area.
l Ensure clinicians and staff offer eligible patients the option of attending via video call, and select
this option as part of the scheduling process.
l When confirming video call appointments, give patients and any other participants, the clinic's
online Waiting Area entry point address (whether they are attending the consultation by
appointment, or as a drop-in clinic).
l Include the Patient information leaflet with any appointment confirmation letter or email.
- 29 -Technical Guide
Direct-entry URL to a Waiting Area
To provide patients with simpler, more direct access to a specific Waiting Area from a known
device, set up a direct-entry URL.
What is a 'known device'?
A device for which you can guarantee (or have very high confidence in) the quality of
audiovisual components and network connection. As a result, you do not require a caller using
the device, to run through the setup and test sequence when they visit your Waiting Area.
When set up correctly on a suitable device, callers experience a simplified 'one-click' entry into the
Waiting Area. There are no connection or setup tests, and the caller is not prompted for either
name or phone number.
Using the URL
You can use the direct-entry URL in any of the following scenarios:
l Accessed and triggered via third-party software on dedicated devices
l Accessed through a Windows desktop shortcut or a MacOS Desktop or Dock shortcut
l Saved as a Google Chrome bookmark or Safari bookmark
Before you begin
Gather the following information:
l (Optional) The name of the caller
l The Network ID (nid) of the Waiting Area to which you want the caller to connect
Where can I find the Waiting Area's Network ID (nid)?
Management console
1. From the Waiting Area's page, open the settings menu.
2. Select Edit Settings > URL to Give People.
3. From the URL to Give People dialog, click Email me the instructions.
Email software
4. Open the instructions in your email software, and look for the long URL that begins with:
If a short URL prefix has been specified: https://videocall.direct/
If a typical URL has been specified: https://vcc.healthdirect.org.au
- 30 -Configure clinic applications
5. Find the nid section at the end of the URL, and copy the string of numbers and letters
following the = sign.
l The API key of the Waiting Area's parent Organisational Unit
Where can I find the Organisational Unit's API key (apikey)?
Management console
1. From the Waiting Area's page, open the configure panel.
2. Select URL to Give People.
3. From the URL to Give People dialog, click Email me the instructions.
Email software
4. Open the instructions in your email software, and look for the long URL that begins with
https://vcc.healthdirect.org.au
5. Find the apikey section in the middle of the URL, and copy the string of numbers and
letters following the = sign.
For direct-entry operation to work correctly via third-party software, the device on which it is used
must have either Google Chrome (Windows, Android, MacOS) or Apple Safari (MacOS, iOS) set
as its default web browser.
Create a direct call access URL
Replace the parameters found in the URL or script from the Add a Waiting Area entry point to
your website email. Parameters include details such as the patient's name and Network ID (nid).
Example
I want to create direct-access URL for a patient named Jean Citizen (phone number 5555
5555).
The GoodHealth 24/7 Waiting Area has a Network ID (nid) of 8765, and the GoodHealth
Organisational Unit's apikey value is 1e0ba071-3e3f-41ad-8cbc-a8b0303059f7. The URL I
will need is:
https://vcc.healthdirect.org.au/kiosk/videocall.aspx?PatientName=
Jean%20Citizen&patientphone=5555%205555&nid=8765&apikey=1e0ba071-3e3f-
41ad-8cbc-a8b0303059f7
- 31 -Technical Guide
URL format
Direct call access - URL format
https://vcc.healthdirect.org.au/kiosk/videocall.aspx?PatientName=
&patientphone=&apikey=&nid=
Replace the parameters
When replacing parameters, make sure you replace the entire parameter, including the
'greater than' and 'less than symbols' < >.
Example: Replace with Jean%20Citizen.
PatientName Replace with the following:
(If the link will be used by a single, specific person) The person's name
Important: Substitute %20 for each space in the name. For example,
Jean%20Citizen. Video Call treats the person's first name as everything
before the first space character, and their last name as everything after it.
patientphone Replace with one of the following:
l (If the link will be used by a single, specific person) The person's
telephone number
Important: Substitute %20 for each space in the number. For
example,5555%205555.
The number will be displayed beneath the person's name in the Call
Screen.
l Leave empty
Only the person's name (or Caller label) will appear in the Call Screen
apikey Replace with the parent Organisational Unit's apikey value.
Warning: If apikey is not specified, or the specified value is invalid, the page
will return an error.
nid Replace with the Waiting Area’s network ID value.
Warning: If nid is not specified, or the specified value is invalid, the page
will return an error.
- 32 -Configure clinic applications
Notes
Post-call survey or information pages
If the Waiting Area you intend to access via a special-purpose device has a post-call survey or
information page, and you are launching the URL from third-party software, Video Call will not be
able to close the post-call page automatically.
The third-party software must be able to close the browser tab that contains the completed survey
or the acknowledgement of the information page.
- 33 -Technical Guide
Network requirements
The Video Call system is designed to work in as many different corporate or institutional networks
as possible, with little to no special network configuration required.
Network basics
Port access
Each Video Call Management Console user's desktop or laptop computer must have access to
the Internet via secure port 443. This is the same access requirement as for other secure internet
websites.
Signalling access
All Video Call Management Console web pages use the Hypertext Transfer Protocol Secure
(HTTPS) communications protocol.
The Video Call Management Console's background real-time signalling uses HTTPS in Long-
Polling mode. This holds web connections open for up to a minute, to allow messages to be sent
to the user side as they occur.
Video Call relay servers
Video Call relay servers - technically, Traversal Using Relays around NAT (TURN) servers -
have several important functions:
- 34 -Network requirements
l Provide a common, well-known internet address that web browsers can connect to if they are
unable to establish a valid peer-to-peer connection
l Act as a protocol converter from TCP to UDP, should a web browser not be able to obtain
network egress via UDP
l Act as an endpoint for a web proxy tunnelling connection, should a web browser not be able to
route to the relay server on the required UDP or TCP port
The relay process cannot inspect the encrypted media data; it only forwards the data to
the negotiated endpoint.
Is latency an issue with Video Call relay servers?
Relay servers are deployed in several regions, and the closest to participants is automatically
used. Variable latency can occur, depending on the location of call participants in relation to
the relay server being used for that call.
Network readiness
The Video Call WebRTC Network Readiness Test evaluates how the network setup connects
to the outside world, and whether the available bandwidth is sufficient to make video calls.
Although this test is targeted at IT administrators, anyone can use it. It takes less than a minute,
and can be run from a Google Chrome web browser.
Important: This test only evaluates the network connection from the device on which it is run. It
does not test the device's equipment setup.
What is WebRTC?
Web Real Time Communications (WebRTC) is web browser technology that enables secure,
real-time communications from websites or web-based applications.
The Video Call Management Console uses WebRTC to facilitate secure video calling between
Callers and Video Call Users. It allows users to access Video Call's calling features without
having to download and install software or plug-ins.
As of publication, Google Chrome has the highest level of support for WebRTC. Other up-to-date
browsers, such as recent versions of Microsoft Edge and Apple Safari, have introduced WebRTC
support, but are not yet usable with Attend Anywhere.
For more information, see Testing WebRTC network readiness on page 39.
- 35 -Technical Guide
Media pathways
Video Call will attempt to use the best network path that it can find.
The following table lists the network paths it will look for, in order of preference:
STUN/Relay
Network path
server port
1: Direct peer-to-peer UDP, with STUN server-assisted NAT traversal 3478
Each endpoint will discover its external Internet address using the provided (UDP)
STUN Server. This address is provided to the other endpoint and used to set
up the connection through Network Address Translation.
Media flows over randomly selected ports over large range of UDP ports
49152 - 65535.
2: Via Video Call relay server, using UDP-routed egress 3478
If a connection cannot be established using the above direct peer to peer, (UDP)
then the configured TURN server UDP port 3478 will be tried to establish a
relay to the remote endpoint. This relay address is provided to the other
endpoint and used to set up the connection through the relay, back through
the local endpoint's connection to the TURN server.
Media flows to UDP Port 3478 on the TURN server.
- 36 -Network requirements
STUN/Relay
Network path
server port
3: Via Video Call relay server, using TCP-routed egress 3478
If a connection cannot be established using UDP to the TURN Server, the (TCP)
connection to the TURN Server is established via TCP 443 not UDP 3478.
Media flows outwards to TCP port 443 on the TURN Server.
4: Via Video Call relay server, using TCP tunnelling through a local web proxy 443 (TCP)
server
If a routed connection via NAT cannot be established to the TURN Server, a
tunnelled connection to TCP port 443 will be attempted via the browsers
configured web proxy server.
Media flows outwards through the web proxy, to TCP Port 443 on the TURN
Server.
5a, 5b: Via Video Call relay server, using Secure TCP 443
As for 3 or 4 above, but using a TLS TCP connection to the TURN Server. (TCP/TLS)
For more information, see Video Call relay servers on page 34.
Video Call relay server address: vcct.healthdirect.org.au
Achieving the best-quality connection
For most network paths, the negotiation will likely result in a valid media connection.
l Direct peer-to-peer via UDP provides the best connection, but will often be unavailable
across institutional networks, due to the security constraints of their network policies.
l A secure tunnelled TCP connection is the least-desirable option for media transfer, but
most likely to be supported with no network security changes.
Recommended option: For many networks, allowing NAT egress to UDP port 3478 on the
relay server (network path 2, above) will provide low latency with little overhead. This should
require only a minor, low-risk change to your network configuration.
- 37 -Technical Guide
Bandwidth
WebRTC video connections can be configured, per Waiting Area or Group, for a variety of
resolutions and bandwidth caps. The default is Standard Wide resolution (640 x 320) at 30 fps.
In all cases, the specified quality level will degrade gracefully based on each participant's available
CPU and network capacity. Video calls can be sustained with bandwidth as low as 192 Kbps per
remote party, but with a reduced quality experience.
Bandwidth per remote party in a call
l Minimum: 384 Kbps
l Recommended: 768 Kbps
l Optimal: 1 Mbps and above
WebRTC Peer connections can use up to 4 Mbps under unrestricted conditions. If necessary,
constraints can be configured to reduce this maximum.
How does the peer-to-peer model impact bandwidth for multi-party calls?
As Video Call is a peer-to-peer system, bandwidth is specified per remote party. Multiple parties
in the call will increase the bandwidth required at each endpoint.
If the bandwidth is not available for a particular endpoint, the video to or from each party will
degrade to fit within that endpoint's available bandwidth. As connections are established
independently, this may only impact a particular party and possibly only in one direction.
- 38 -Network requirements
Testing WebRTC network readiness
The Video Call WebRTC Network Readiness Test evaluates how the network setup connects
to the outside world, and whether the available bandwidth is sufficient to make video calls.
Although this test is targeted at IT administrators, anyone can use it. It takes less than a minute,
and can be run from a Google Chrome web browser.
Important: This test only evaluates the network connection from the device on which it is run. It
does not test the device's equipment setup.
Understanding the test results
There are five possible connection results. In decreasing order of quality, they are:
When the test is complete, the page displays information about the best connection type currently
available between your organisation's network, and aVideo Call Relay Server.
l Any result except for No Connection means that you can make successful video calls.
However, the better the result, the more reliable and higher quality the connections will be.
l If the result is other than Excellent, the page also displays information to help you improve it.
l The page also displays a Send Test Results button that makes it easy to email the results to
your network administrator.
Running the test
The WebRTC Network Readiness Test is located at https://vcc.healthdirect.org.au/webrtctest
Technical note: To provide a known location, the test uses aVideo Call relay server to
determine how well you will be able to make successful peer-to-peer video calls. Under
normal circumstances, a relay server is not required when making calls, unless specific
restrictions have been applied to your network.
- 39 -Technical Guide
Examples
Good connection
The test returns results that indicate good connection to the Video Call relay server, with
suggestions for improving connection quality.
No connection
The test cannot find any possible connection to the Video Call relay server. The results list the
various connection methods and the resulting quality of those connections.
Good connection; low bandwidth
The test returns results that indicate good connection to the Video Call relay server, with
suggestions for improving connection quality. However, the test also determines that the available
bandwidth for making calls is low, so the results also indicate the type and quality of call that users
can realistically participate in from this connection.
- 40 -Network requirements - 41 -
Technical Guide

User requirements
Ensure that all users have the minimum requirements for using Video Call, from device and
operating systems, to additional equipment and data use.

Hardware requirements
Device and operating system
When making calls with Video Call, user devices must meet the following requirements:

           Device type                Minimum requirement                 Operating system

             Windows computer    2GHz dual-core, i5 processor         Microsoft Windows 7 or later
                                 3GB of RAM

                                 See also Additional equipment,
                                 below.

            Apple computer       Intel 2GHz dual-core, i5 processor   MacOS 10.12 (Sierra) or later

   (iMac, Mac Pro, Mac Mini,     3GB of RAM

   MacBook, MacBook Air, or      See also Additional equipment,
   MacBook Pro)                  below.

         Android tablet or       Less than two years old, with a           Android 5.1 or later

   smartphone                    front-facing camera

         Apple iPhone or iPad    iPhone 5S or later, iPad Air or            iOS 11.4 or later
                                 later, iPad (2017) or later, iPad
                                 Mini 2 or later, iPad Pro

  Compatibility with Citrix, and other virtual desktop environments

  Although WebRTC-based video calling has been successfully lab-tested in a virtual desktop
  environment by both Citrix and Dell, results are very dependent on the specifications of the
  client hardware used. Healthdirect Australia advises caution when attempting this. The
  architecture, network, and equipment standards typically applied to Citrix desktop
  implementations are not always suitable for the high-performance, peer-to-peer video required
  for a quality call experience.

                                               - 42 -
User requirements
Video Call is suitable for use with certain versions of Citrix, with appropriate client
hardware. Contact videocallsupport@healthdirect.org.au to find out more.
Requirements
l Google Chrome installed, and run on, the Citrix Xen App server
l Webcam drivers installed on the Citrix XenApp server
l The HDX Real Time Media Engine extension (RTME) installed on each client and the
Citrix XenApp server
l External web camera for each client (most cameras built into thin client hardware have low
resolution and poor optics)
Important: For a quality call experience, it is very likely that you will require higher-than-normal
specification thin clients, or computers running Citrix Receiver.
Typical issues
l Media quality is very dependent on the thin client's hardware and operating system
l Typical thin client hardware is low-powered and may not be sufficient to handle the audio
and video throughput
l Not all thin client types can take full advantage of the HDX RTME
l There are implications for the number of concurrent video sessions per server, and server
process capacity
Additional equipment
Desktop and laptop computers
Speakers/headphones
Video Call's Call Screen uses the device's default audio output (such as its speakers, or
headphone port/jack)
Plugging in a headset (which combines a microphone and headphones) can help reduce
background noise, and prevent others from over-hearing your conversation.
For conference room or group meetings, use a USB echo-cancelling microphone/speaker
unit wherever possible. This will provide better sound for all participants.
For a range of example speaker units and headsets, see Equipment on page 49.
Microphone
- 43 -Technical Guide
l On tablets, smartphones, and notebook/laptop PCs, Video Call's Call Screen uses the built-in
microphone
l For PCs without a microphone, any currently-available USB microphone is suitable.
Note: Many USB web cameras also have built-in microphones. Depending on the level
of ambient noise where users make video calls, this may prove sufficient.
l Microphones integrated into combined USB speaker/microphone devices
l A headset (combines headphones and microphone - includes earbud/microphone sets used
with smartphones and tablets).
Note: A headset is especially useful where background noise may be a problem.
For a range of example speaker units and headsets, see Equipment on page 49.
Web camera
l On tablets, smartphones, and notebook/laptop PCs, Video Call's Call Screen uses the built-in
camera.
l For PCs without a camera, any currently available USB web camera is suitable.
For a range of example web cameras, see Equipment on page 49.
Where more than one participant will be in the same room during the video call, use a web
camera with a wide-angle lens.
Make sure that users have the most current software drivers installed for their web
cameras.
- 44 -User requirements
Web browser requirements
Users require one of the following web browsers to use Video Call:
l (Windows, Android, MacOS) Google Chrome: Version 68 or later
Important: If your workplace's policies do not permit Google Chrome to update automatically,
Video Call recommends that the IT department schedule a manual update at least twice a
year.
l (MacOS, iOS) Apple Safari: Version 11.4 or later
Video Call always recommends using the latest version of Chrome or Safari for best video calling
performance.
I'm using Google Chrome. How do I know if I have the latest version?
In the Address Bar, type: chrome://help/ and then press the Enter key.
This opens Chrome's About page. Text below the version number information tells you if you
have the current version:
When the page first opens, Chrome checks to see if a new version is available. If there is, it
updates automatically.
- 45 -Technical Guide
Bandwidth and data requirements
Download speed, upload speed, and latency
When making video calls with Video Call, make sure that users' internet connections meets the
following requirements:
l Minimum download speed: 0.8 Megabits per second (Mbps) - provides lower-quality video
Recommended: 1.1 Mbps or better
l Minimum upload speed: 0.25 Mbps - provides lower-quality video to other participants
Recommended: 0.7 Mbps or better
l Recommended latency: Less than 150 milliseconds (ms)
Testing speed and latency
You can test a device's speed and latency at http://www.speedtest.net.
When the test completes, the results will look something like this:
Compare the results to the minimum and recommended values above.
A wired internet connection will provide best video quality, but you can also use a fixed-
wireless or mobile (3.5/4G) data service.
How much data does a call use?
l Patients don’t use any data while waiting for a clinician to join them.
l A video consultation uses about 230 MB on a mobile device, and 450 MB on a PC for a 20
minute call.
l Data use is less on lower-speed internet connections, or on a less powerful computer, tablet, or
smartphone. These factors can also reduce the overall quality of the call.
l Data use increases when there are more than two participants in the call.
Smartphone & tablet users
Video Call recommends connecting to a Wi-Fi network to avoid using the device's mobile data
allowance.
- 46 -Testing video calling equipment
Testing video calling equipment
Desktop/laptop computers Android tablets/smartphones
The Video Call Setup test checks the device's web browser, the speed of the internet
connection, and whether the device's microphone, speakers, and web camera are working as
expected.
Users can run this test from the Video Call Management Console, or from any web page that
displays the following button:
On desktops, the test runs through four stages: connection, speakers, microphone, and video.
On mobile devices, only connection is tested.
If all four stages of the test are successful, then users should be able to make a successful call
with Video Call.
If the test results indicate issues with the device's current setup, refer to the topic Troubleshoot
video calling setup on page 70 for possible solutions.
- 47 -Technical Guide
Audiovisual setup
Audiovisual devices include the following:
l Displays/Monitors
l Web cameras
l Headsets (or separate microphones and speakers)
l Unsuitable or inadequate audiovisual devices can have a major impact on the success of a
consultation or a team meeting.
l Service providers may need external web cameras and headsets.
l Ideally, supply providers with dual monitors - this allows them to share information, or
reference/enter details of a consultation during a video call.
Important
Confirm that service providers have the necessary computer peripherals (such as cameras, a
second monitor, and speakers), and that they have been installed and set up correctly.
Supporting materials
l Equipment on the facing page
- 48 -Equipment
Equipment
Desktop and laptop computers
Disclaimer
The presence of any particular product on this page should not be considered as an
endorsement of that product by Video Call. The items described here are provided solely as
a guide to the current range of suitable equipment to successfully hold video calls; there are
many alternatives to those listed. Always evaluate products for suitability in your own
environment before purchasing.
Cameras
For personal or small group use
Auto-focus USB camera and microphone for small groups (one to six
people). ($80)
https://www.logitech.com/en-au/product/hd-webcam-c525
HD 720p; noise reduction
You can select this device as both camera and microphone.
Auto-focus USB camera and microphone for small groups (one to six
people). ($169)
https://www.logitech.com/en-au/product/c922-pro-stream-webcam
HD 1080p or HD 720p
You can select this device as both camera and microphone.
Premium auto-focus, USB, pan/tilt/zoom, video conferencing camera for ten
to fifteen people ($950).
https://www.logitech.com/en-au/product/conferencecam-ptz-pro2
- 49 -Technical Guide
Full HD 1080p; superior optics; pan, tilt, and zoom controls
Important: Using this camera will require a separate microphone, or microphone/speaker
(or speakerphone) combination.
Microphones & Speakers
Microphone/speaker combinations (speakerphones)
USB speakerphone for small groups (two to six people) sitting in front of the
speaker. ($270)
http://www.clearone.com/products_chat50
If you already have a camera, the Chat 50 is good for small groups sitting up to 2.5 metres
away from, and in front of, the speaker. This model's microphone's only has a 120 degree
arc to the front of the unit, which will not clearly pick up people sitting to the side of, or
behind, the speaker.
Make sure that you select the Chat 50 as both your microphone and speaker to
ensure the best quality audio.
USB speakerphone for larger groups (six to eight people) sitting around the
speaker. ($750)
http://www.clearone.com/products_chat150
If you already have a camera, the Chat 150 is good for slightly larger groups sitting up to 2.5
metres away from the speaker. The microphone's 360 degree arc ensures that people can
be heard regardless of their position around the unit.
Make sure that you select the Chat 150 as both your microphone and speaker to
ensure the best quality audio.
USB speakerphone array for larger groups (ten to fifteen people) sitting
around a large conference table. (approx. $1650)
http://www.clearone.com/products_chatattach150
The ChatAttach 150 is two Chat 150 speakerphones daisy-chained together for wider
reach.
- 50 -Equipment
Make sure that you select the Chat 150 as both your microphone and speaker to
ensure the best quality audio.
Headsets
Headsets typically provide an better desktop alternative to built-in microphones and speakers.
They provide increased privacy for the call, and in open-plan environments, reduce both
distractions for others in the area, and ambient feedback heard by call participants.
If you already use headsets that connect to a computer in your existing work environment, you
should be able to continue using them, regardless of the video calling technology adopted.
Microphone noise-cancelling or noise-reduction features can be very useful, especially in busy
surroundings.
Wireless headsets can help to reduce cable clutter, although they are more expensive - make
sure that they have a recharging cradle.
Microsoft's LifeChat range of USB headsets provide good quality audio, and
range between $40 and $50.
https://www.microsoft.com/accessories/en-au/headsets
Logitech make a range of quality headsets that vary in price from $30 for
simple USB models to $190 for high-end wireless/Bluetooth sets.
https://www.logitech.com/en-au/headsets
Camera/microphone/speaker all-in-one units
Powered, USB, pan/tilt/zoom 'stalk' camera with in-built speaker and
microphone for four to six people sitting in-front of the device. ($380)
https://www.logitech.com/en-au/product/conferencecam-bcc950
Great all-in-one pan, tilt zoom camera, noise-cancelling microphone and
speaker for small groups. Requires power.
- 51 -Technical Guide
USB camera and speakerphone bundle for medium size conference rooms
($1600)
https://www.logitech.com/en-au/product/conferencecam-group
Monitors
Video consultations
Video Call strongly recommends that clinicians have two monitors when conducting video
consultations. This allows them to display the patient and other call participants on one monitor,
while using the other to display notes and data.
Monitors range considerably in size, price, and quality.
When using a second monitor, it's a good idea to use the better monitor to display video.
Alternatives as a second monitor
If you have an Android or iOS tablet/smartphone, you can use the Splashtop Wired
XDisplay app to turn that device into a second monitor for your Windows or MacOS
computer. This is potentially a great option for providers who use laptop or notebook
computers and don't necessarily have the desk space for a permanent second monitor.
l Splashtop Wired XDisplay: https://www.splashtop.com/wiredxdisplay
If you have an iOS device (iPhone or iPad running iOS7 or later) you can alternatively use
the Duet Display app ($38) to connect it to your Windows or MacOS computer.
l Duet display: https://www.duetdisplay.com/
Group meetings
When holding video meetings with medium to large groups of people sharing a conference room,
it's a good idea to use a larger monitor (27" to 30" widescreen works well) or digital projector to
display the video participants.
A good quality monitor costs between $300 and $500, while projectors typically range in price
between $500 and $1500. Projectors also require a screen or suitable wall space on which to
display the image.
Modern TVs usually have extra HDMI ports and in some cases older-style video ports, all
- 52 -You can also read