THINKPAD X12 DETACHABLE GEN 1 USER GUIDE - LENOVO
←
→
Page content transcription
If your browser does not render page correctly, please read the page content below
ThinkPad X12 Detachable Gen 1
User Guide
Read this first

Before using this documentation and the product it supports, ensure that you read and understand the
following:
• Safety and Warranty Guide
• Setup Guide
• Generic Safety and Compliance Notices

Second Edition (February 2021)

© Copyright Lenovo 2021.
LIMITED AND RESTRICTED RIGHTS NOTICE: If data or software is delivered pursuant to a General Services
Administration “GSA” contract, use, reproduction, or disclosure is subject to restrictions set forth in Contract No. GS-
35F-05925.
Contents

Discover your Lenovo computer . . . . iii                                Protect data against power loss (for selected
                                                                         models) . . . . . . . . . . . . . . .              .   .   .   28
Chapter 1. Meet your computer . . . . . 1                                UEFI BIOS passwords . . . . . . . . .              .   .   .   28
Overview . . . . . . . . . . . . . . . . . . 1                               Password types . . . . . . . . . .             .   .   .   28
Specifications . . . . . . . . . . . . . . . . 3                             Set, change, and remove a password .           .   .   .   29
    USB specifications . . . . . . . . . . . . . 3
                                                                         Chapter 5. Configure advanced
Chapter 2. Get started with your                                         settings. . . . . . . . . . . . . . . . . 31
computer . . . . . . . . . . . . . . . . . 5                             UEFI BIOS . . . . . . . . . . . . . . . .                  .   31
Access networks . . . . . . . . . . . . .                   . . 5             Enter the UEFI BIOS menu . . . . . . . .              .   31
     Connect to Wi-Fi networks. . . . . . . .               . . 5             Navigate in the UEFI BIOS interface . . . .           .   31
     Connect to a cellular network (for selected                              Set the system date and time. . . . . . .             .   31
     models) . . . . . . . . . . . . . . .                  .   .    5        Change the startup sequence . . . . . .               .   31
     Turn on the Airplane mode . . . . . . . .              .   .    6        Update UEFI BIOS . . . . . . . . . . .                .   32
Interact with your computer . . . . . . . . .               .   .    6   Recovery . . . . . . . . . . . . . . . .                   .   32
     Use the touch screen . . . . . . . . . .               .   .    6        Restore system files and settings to an earlier
     Connect to an external display . . . . . .             .   .    7        point . . . . . . . . . . . . . . . .                 .   32
     Use the kickstand . . . . . . . . . . .                .   .    9        Restore your files from a backup . . . . .            .   32
Accessories . . . . . . . . . . . . . . .                   .   .    9        Reset your computer . . . . . . . . . .               .   32
     Purchase accessories . . . . . . . . .                 .   .    9        Windows automatic recovery. . . . . . .               .   32
     ThinkPad X12 Detachable Folio Keyboard (for                         Install Windows 10 and drivers . . . . . . . .             .   33
     selected models) . . . . . . . . . . .                 . . 9
     Use Lenovo Precision Pen (for selected                              Chapter 6. Help and support . . . . . 35
     models) . . . . . . . . . . . . . . .                  .       16   What are CRUs . . . . . . . . . .          .   .   .   .   .   35
     Use Lenovo Digital Pen (for selected                                Frequently asked questions . . . . .       .   .   .   .   .   35
     models) . . . . . . . . . . . . . . .                  .       19
                                                                         Error messages . . . . . . . . . .         .   .   .   .   .   37
Chapter 3. Explore your computer . . 21                                  Beep errors . . . . . . . . . . .          .   .   .   .   .   38
Lenovo apps . . . . . . . . . . .           .   .   .   .   .       21   Self-help resources . . . . . . . .        .   .   .   .   .   39
Intelligent Cooling (for selected models)   .   .   .   .   .       21   Windows label . . . . . . . . . .          .   .   .   .   .   39
Manage power . . . . . . . . . .            .   .   .   .   .       22   Call Lenovo . . . . . . . . . . .          .   .   .   .   .   40
     Check the battery status . . . .       .   .   .   .   .       22        Before you contact Lenovo . . .       .   .   .   .   .   40
     Charge the computer . . . . . .        .   .   .   .   .       23        Lenovo Customer Support Center .      .   .   .   .   .   41
     Change the power settings . . .        .   .   .   .   .       24   Purchase additional services. . . . .      .   .   .   .   .   42
Transfer data . . . . . . . . . . .         .   .   .   .   .       24
                                                                         Appendix A. Accessibility and
     Set up a Bluetooth connection . .      .   .   .   .   .       24
                                                                         ergonomic information . . . . . . . . 43
     Set up an NFC connection . . . .       .   .   .   .   .       24
                                                                         Appendix B. Compliance
Chapter 4. Secure your computer                                          information . . . . . . . . . . . . . . . 47
and information . . . . . . . . . . . . 27
Lock the computer . . . . . . . . . . . . .                         27   Appendix C. Notices and
Log in with your fingerprint (for selected models) . .              27   trademarks . . . . . . . . . . . . . . . 51
Log in with your face ID (for selected models) . . .                28

© Copyright Lenovo 2021                                                                                                                  i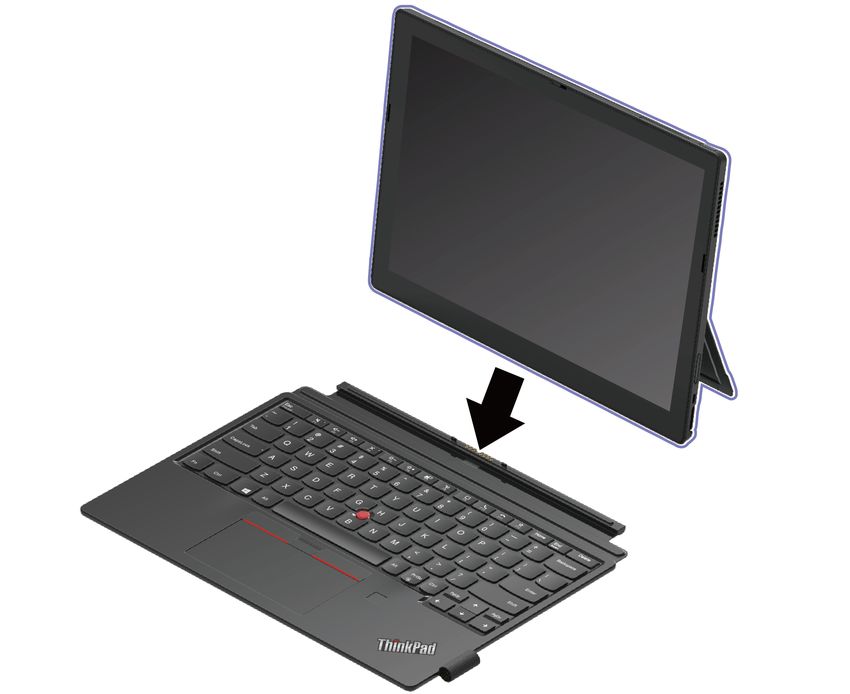
ii ThinkPad X12 Detachable Gen 1 User Guide
Discover your Lenovo computer
Thank you for choosing a Lenovo computer! We are dedicated to delivering the best solution to you.

Before starting your tour, please read the following information:
• Illustrations in this documentation might look different from your product.
• Depending on the model, some optional accessories, features, software programs, and user interface
  instructions might not be applicable to your computer.
• Documentation content is subject to change without notice. To get the latest documentation, go to https://
  pcsupport.lenovo.com.

© Copyright Lenovo 2021                                                                                   iii

iv ThinkPad X12 Detachable Gen 1 User Guide
Chapter 1. Meet your computer
Overview
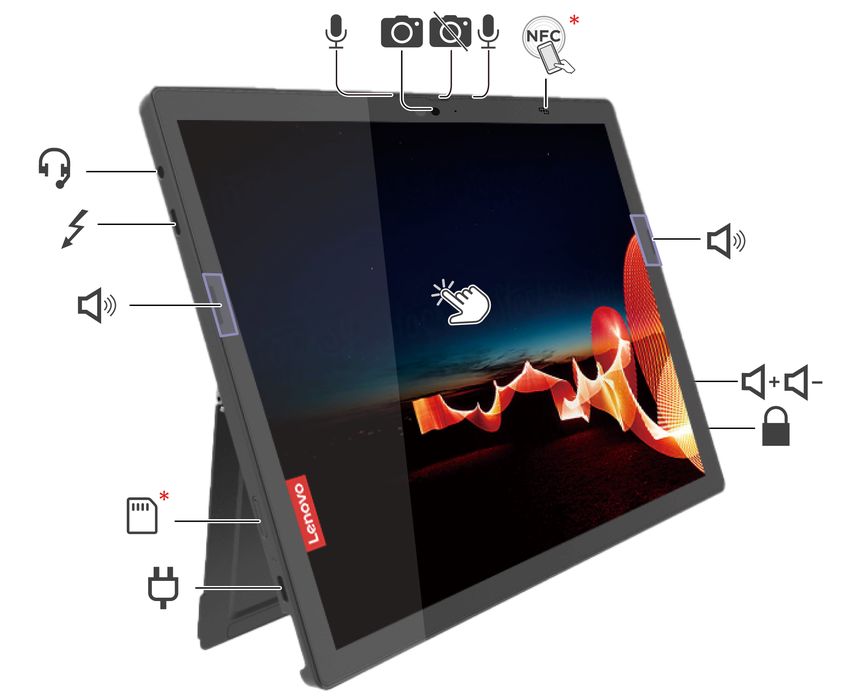
Webcam privacy shutter (Camera
Infrared (IR) Camera* / Camera*
cover)
Microphone NFC mark*
Speaker Volume up button
Volume down button Security-lock slot
Power connector (USB-C®) Nano-SIM-card tray /eSIM-card tray*
Thunderbolt™ 4 connector (USB-C) Audio connector
Touch screen
* for selected models
© Copyright Lenovo 2021 1
Note: Keep other magnetic objects such as the credit card away from the magnetic area of your computer
and ThinkPad X12 Detachable Folio Keyboard which might come with your computer. See “Attach your
computer to the keyboard” on page 12.

     IR Camera / Camera
• Log in to your computer with your face ID (for IR camera).
• Take pictures or record videos by tapping Camera from the Start menu. The indicator next to the camera
  is on when the camera is in use.
• If you use other apps that support photographing, video chatting, and video conference, the camera starts
  automatically when you enable the camera-required feature from the app.

      Webcam privacy shutter (Camera cover)
Slide Webcam privacy shutter to cover or uncover the camera lens. It is designed to protect your privacy.

Related topics
•   “Log in with your face ID (for selected models)” on page 28
•   “Set up an NFC connection” on page 24
•   “Lock the computer” on page 27
•   “Charge the computer” on page 23
•   “Connect to a cellular network (for selected models)” on page 5
•   “USB specifications” on page 3
•   “Use the touch screen” on page 6

                   Power button                                         Rear Camera

                   Emergency-reset hole

2   ThinkPad X12 Detachable Gen 1 User Guide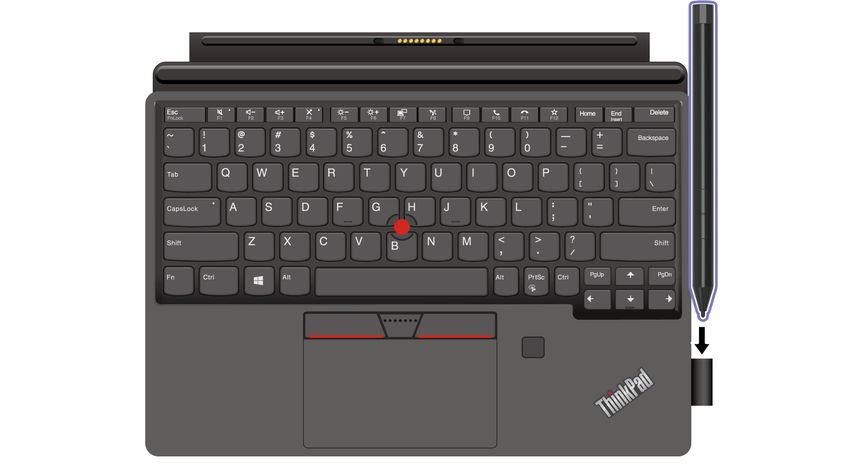
Emergency-reset hole
If the computer stops responding and you cannot turn it off by pressing the power button, reset your
computer:
 1. Disconnect your computer from ac power.
 2. Insert a straightened paper clip into the hole to cut off power supply temporarily.
 3. Connect your computer to ac power and then turn on your computer.

Specifications
For detailed specifications of your computer, go to https://psref.lenovo.com.

USB specifications
Note: Depending on the model, some USB connectors might not be available on your computer.

 Connector name                              Description

                                             Connect USB-compatible devices, such as a USB keyboard, USB
                                             mouse, USB storage device, or USB printer.

 •      USB 2.0 connector
 •       USB 3.2 connector Gen 1
 •      USB 3.2 connector Gen 2

                                             • Charge USB-C compatible devices with the output voltage and
                                               current of 5 V and 3 A.
                                             • Connect to an external display:
                                                – USB-C to VGA: up to 1920 x 1200 pixels, 60 Hz
                                                – USB-C to DP: up to 5120 x 3200 pixels, 60 Hz
                                             • Connect to USB-C accessories to help expand your computer
 • USB-C (3.2 Gen 1) connector
                                               functionality. To purchase USB-C accessories, go to https://
 • USB-C (3.2 Gen 2) connector                 www.lenovo.com/accessories.

 •       Thunderbolt 3 connector (USB-C)

 •       Thunderbolt 4 connector (USB-C)

Statement on USB transfer rate
Depending on many factors such as the processing capability of the host and peripheral devices, file
attributes, and other factors related to system configuration and operating environments, the actual transfer

                                                                                 Chapter 1. Meet your computer   3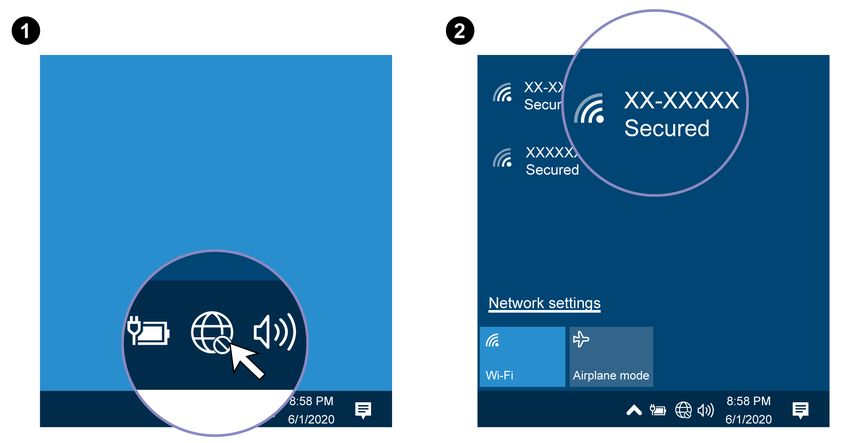
rate using the various USB connectors on this device will vary and will be slower than the data rate listed
below for each corresponding device.

 USB device                                    Data rate (Gbit/s)

 3.2 Gen 1 / 3.1 Gen 1                         5
 3.2 Gen 2 / 3.1 Gen 2                         10
 3.2 Gen 2 × 2                                 20
 Thunderbolt 3 connector (USB-C)               40

 Thunderbolt 4 connector (USB-C)               40

4   ThinkPad X12 Detachable Gen 1 User Guide
Chapter 2. Get started with your computer

Access networks
This section helps you connect to the network.

Connect to Wi-Fi networks
Tap the network icon in the Windows® notification area, and then select a network for connection. Provide
required information, if needed.

Connect to a cellular network (for selected models)
If your computer has a wireless wide area network (WWAN) card and a nano-SIM card installed, you can
connect to a cellular data network and get online everywhere.

Note: The cellular service is provided by authorized mobile service carriers in some countries or regions.
You must have a cellular plan from a service carrier to connect to the cellular network.

To establish a cellular connection:
 1. Turn off the computer.
 2. Locate the card slot and insert the nano-SIM card as shown. Note the orientation of the card and ensure
    that it is seated correctly. If your computer has a nano-SIM card installed, skip this step.

 3. Turn on the computer.
 4. Tap the network icon, and then select the cellular network icon    from the list. Provide required
    information, if needed.

© Copyright Lenovo 2021                                                                                      5
Turn on the Airplane mode
When the Airplane mode is enabled, all wireless features are disabled.
1. Tap the action center icon in the Windows notification area.
2. Tap Airplane mode to turn on the Airplane mode.
Interact with your computer
Your computer provides you various ways to navigate the screen.
Use the touch screen
Your computer display supports the multi-touch function, you can navigate the screen with simple touch
gestures.
Note: Some gestures might not be available when you are using certain apps.
Tap once to single click Tap twice quickly to double-click
Tap and hold to right-click
Slide to scroll through items
Zoom in Zoom out
6 ThinkPad X12 Detachable Gen 1 User GuideSwipe from the right: open action center
Swipe from the left: view all open windows
Drag
Swipe downwards shortly: show title bar
Swipe downwards: close the current app
Maintenance tips:
• Turn off the computer before cleaning the touch screen.
• Use a dry, soft, and lint-free cloth or a piece of absorbent cotton to remove fingerprints or dust from the
touch screen. Do not apply solvents to the cloth.
• The touch screen is a glass panel covered with a plastic film. Do not apply pressure or place any metallic
object on the screen, which might damage the touch panel or cause it to malfunction.
• Do not use fingernails, gloved fingers, or inanimate objects for input on the screen.
• Regularly calibrate the accuracy of the finger input to avoid a discrepancy.
Connect to an external display
Connect your computer to a projector or a monitor to give presentations or expand your workspace.
Connect to a wired display
If your computer cannot detect the external display, tap and hold a blank area on the desktop, and then tap
Display settings ➙ Detect.
Chapter 2. Get started with your computer 7Supported resolution
The following table lists the supported maximum resolution of the external display.
Connect the external display to Supported resolution
Thunderbolt 4 connectors (USB-C) Up to 5120 x 3200 pixels / 60 Hz
Up to 5120 x 3200 pixels / 60 Hz
USB-C connector
Connect to a wireless display
To use a wireless display, ensure that both your computer and the external display support the Miracast®
feature.
• Open the Start menu, and then tap Settings ➙ Devices ➙ Bluetooth & other devices. In the Add a
device window, tap Wireless display or dock. Then, follow the on-screen instructions.
• If your computer comes with a ThinkPad X12 Detachable Folio Keyboard, press + and then select
a wireless display to connect with.
Set the display mode
• Open the Start menu, and then tap Settings ➙ System ➙ Display. Then, follow the on-screen
instructions.
• If your computer comes with a ThinkPad X12 Detachable Folio Keyboard, press or and
then select a display mode of your preference.
Change display settings
1. Tap and hold a blank area on the desktop and select Display settings.
2. Select the display that you want to configure.
3. Change display settings of your preference.
You can change the settings for both the computer display and the external display. For example, you can
define which one is the main display and which one is the secondary display. You also can change the
resolution and orientation.
8 ThinkPad X12 Detachable Gen 1 User GuideUse the kickstand
Your computer has a built-in kickstand. With the kickstand open, you can use the computer in the following
modes.
a Stand mode without keyboard attached
b Stand mode with keyboard attached
c Stylus mode
Accessories
This section provides instructions on how to use hardware accessories to expand your computer
functionalities.
Purchase accessories
Lenovo has a number of hardware accessories and upgrades to help expand the functionalities of your
computer. Options include memory modules, storage devices, network cards, port replicators or docking
stations, batteries, power adapters, keyboards, mice, and more.
To shop at Lenovo, go to https://www.lenovo.com/accessories.
ThinkPad X12 Detachable Folio Keyboard (for selected models)
Attach the ThinkPad X12 Detachable Folio Keyboard (referred to as keyboard) to your computer so that you
can transform your computer into a portable notebook computer.
Note: The keyboard might look different from the illustrations in this topic.
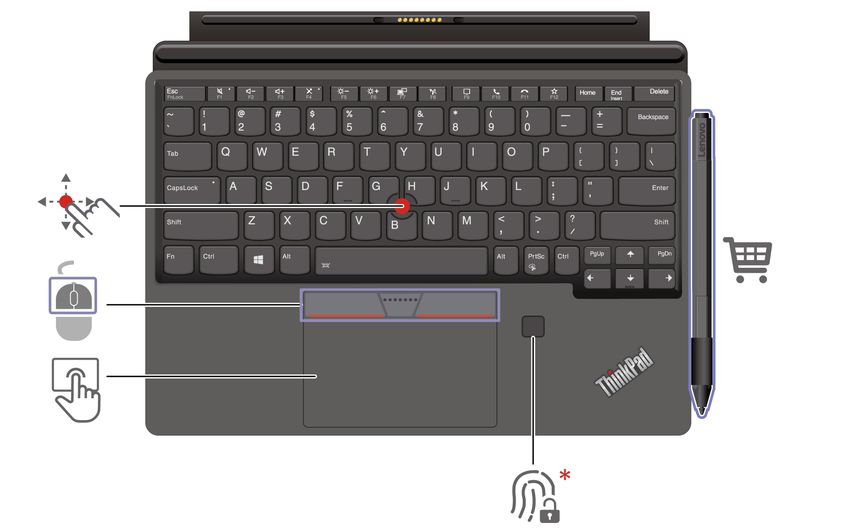
Chapter 2. Get started with your computer 9Overview
Fingerprint reader Touchpad
TrackPoint® pointing stick TrackPoint buttons
* for selected models
Use the keyboard shortcuts
The special keys on the keyboard help you work more effectively.
https://support.lenovo.com/us/en/videos/vid500145
Invoke the special function printed as an icon on each key or standard function of
F1–F12 function keys.
FnLock indicator on: standard function
+
FnLock indicator off: special function
Enable / disable speakers
Decrease volume
Increase volume
Enable / disable microphones
Darken display
Brighten display
10 ThinkPad X12 Detachable Gen 1 User GuideManage external displays
Enable / disable wireless
Open / collapse notification center
Answer incoming calls
This function only works with some apps, such as Skype for Business 2016 and
Microsoft Teams 1.0.
By default, the function works with Skype for Business 2016. You can change the
default setting on Lenovo Vantage.
Decline incoming calls
This function only works with some apps, such as Skype for Business 2016 and
Microsoft Teams 1.0.
By default, the function works with Skype for Business 2016. You can change the
default setting on Lenovo Vantage.
Note: You can also press F11 to hang up ongoing calls on Skype for Business
2016.
Customize the function of this key on Vantage app.
Open Snipping Tool
+
Toggle keyboard backlight
+
Break operation
+
Pause operation
+
Scroll contents
+
Send system request
+
Enter sleep mode
+ To wake up the computer, press Fn or the power button.
Go to beginning
+
Go to end
+
Chapter 2. Get started with your computer 11Attach your computer to the keyboard The keyboard magnetically attaches to your computer as shown. When the keyboard gets close enough, it aligns and snaps into place. You can easily remove the keyboard by pulling it away. Note: Keep other magnetic objects such as the credit card away from the magnetic area a and b . Otherwise, it might have impact on the functionality of the object. Use the keyboard in different modes With the keyboard attached to your computer, you can use the keyboard in the following modes. 12 ThinkPad X12 Detachable Gen 1 User Guide
Lay-flat mode
Keep the keyboard laid flat on the table surface as shown.

Tilt mode
Fold the living hinge as shown. The magnetic bars on the living hinge attach to the computer automatically.
The angle between the thin keyboard and the table surface is about 6.5 degrees to 7.0 degrees.

Cover mode
Close the keyboard as shown to put the computer into sleep mode and protect the touch screen. Open the
cover to wake up the computer from sleep mode.

                                                                     Chapter 2. Get started with your computer   13
Use the TrackPoint pointing device
The TrackPoint pointing device enables you to perform all the functions of a traditional mouse, such as
pointing, clicking, and scrolling.
Use the TrackPoint pointing device
TrackPoint pointing stick
Use your finger to apply pressure to the pointing-stick nonslip cap in any direction parallel to the keyboard.
The pointer on the screen moves accordingly. The higher the pressure applied, the faster the pointer moves.
TrackPoint buttons
The left-click button and right-click button correspond to the left and right buttons on a traditional mouse.
Press and hold the dotted middle button while using your finger to applying pressure to the pointing stick in
the vertical or horizontal direction. Then, you can scroll through the document, Web site, or apps.
Disable the TrackPoint pointing device
The TrackPoint pointing device is active by default. To disable the device:
1. Open the Start menu, and then tap Settings ➙ Devices ➙ Mouse.
2. Follow the on-screen instructions to disable TrackPoint.
14 ThinkPad X12 Detachable Gen 1 User GuideReplace the pointing-stick nonslip cap
Note: Ensure that the new cap has grooves a .
Use the touchpad
You can use the touchpad to perform all the pointing, clicking, and scrolling functions of a traditional mouse.
Use the touchpad
Left-click zone Right-click zone
Chapter 2. Get started with your computer 15Use the touch gestures
Tap once to select or open an item. Tap twice quickly to display a shortcut menu.
Two-finger zoom in or zoom out. Scroll through items.
Open the task view to see all open windows. Show the desktop.
Notes:
• When using two or more fingers, ensure that you position your fingers slightly apart.
• Some gestures are not available if the last action was done from the TrackPoint pointing device.
• Some gestures are only available when you are using certain apps.
• If the touchpad surface is stained with oil, turn off the computer first. Then, gently wipe the touchpad
surface with a soft and lint-free cloth moistened with lukewarm water or computer cleaner.
For more gestures, see the help information of the pointing device.
Disable the touchpad
The touchpad is active by default. To disable the device:
1. Open the Start menu, and then tap Settings ➙ Devices ➙ Touchpad.
2. In the Touchpad section, turn off the Touchpad control.
Use Lenovo Precision Pen (for selected models)
The Lenovo Precision pen enables a more precise and easier way of writing and sketching.
16 ThinkPad X12 Detachable Gen 1 User GuideEraser button Right-click button
LED indicator Bluetooth button
Note: The default function of each button might vary in different applications.
Lenovo Precision pen is not waterproof. Keep the pen away from water and excessive moisture. To purchase
Lenovo Precision pen, go to https://www.lenovo.com/accessories.
Install a battery to power Lenovo Precision Pen
Depending on the model, your pen might not be installed with a battery. To install an AAAA alkaline battery,
do the following:
Pair Lenovo Precision Pen
1. Press and hold the Bluetooth button on the pen for at least 3 seconds until the LED indicator blinks in
white.
Chapter 2. Get started with your computer 172. Place Lenovo Precision Pen close to your computer to establish Bluetooth connection.
3. Follow the on-screen instructions.
Set Lenovo Precision Pen
You can configure the Lenovo Precision Pen settings in Windows Settings and Lenovo Pen Settings.
• Windows Settings: Open the Start menu, and then tap Settings ➙ Devices ➙ Pen & Windows Ink. Then,
you can configure the settings as desired.
• Lenovo Pen Settings: The Lenovo Pen Settings app is preinstalled. Type Lenovo Pen Settings in the search
box, and then select the matched result to set the pen. From Lenovo Pen Settings, you can configure the
settings as desired.
Store Lenovo Precision Pen
• Attach the Lenovo Precision Pen to the magnetic side of the computer.
Note: Detach the pen from the computer when you carry the computer.
• If your computer comes with a ThinkPad X12 Detachable Folio Keyboard, you can insert the pen into the
pen holder.
18 ThinkPad X12 Detachable Gen 1 User GuideUse Lenovo Digital Pen (for selected models)
The Lenovo Digital Pen enables a more precise and easier way of writing and sketching.
Eraser button Right-click button
Note: The default function of each button might vary in different applications.
Lenovo Digital Pen is not waterproof. Keep the pen away from water and excessive moisture. To purchase
Lenovo Digital Pen, go to https://www.lenovo.com/accessories.
Install a battery to power Lenovo Digital Pen
Depending on the model, your pen might not be installed with a battery. To install an AAAA alkaline battery,
do the following:
Set Lenovo Digital Pen
You can configure the Lenovo Digital Pen settings in Windows Settings and Lenovo Pen Settings.
• Windows Settings: Open the Start menu, and then tap Settings ➙ Devices ➙ Pen & Windows Ink. Then,
you can configure the settings as desired.
• Lenovo Pen Settings: The Lenovo Pen Settings app is preinstalled. Type Lenovo Pen Settings in the search
box, and then select the matched result to set the pen. From Lenovo Pen Settings, you can configure the
settings as desired.
Chapter 2. Get started with your computer 19Store Lenovo Digital Pen If your computer comes with a ThinkPad X12 Detachable Keyboard, you can insert the pen into the pen holder. 20 ThinkPad X12 Detachable Gen 1 User Guide
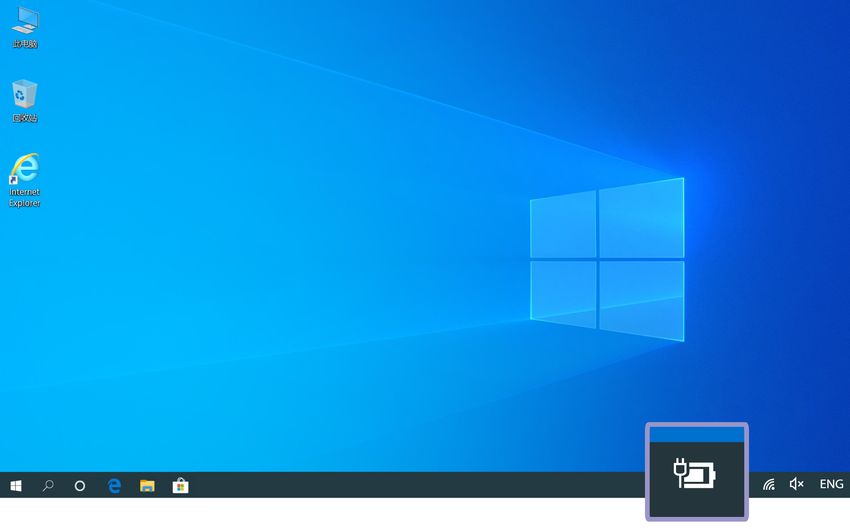
Chapter 3. Explore your computer

Lenovo apps
This section provides introduction to the Vantage and Lenovo Quick Clean apps.

The Vantage app
The preinstalled Vantage app is a customized one-stop solution to help you maintain your computer with
automated updates and fixes, configure hardware settings, and get personalized support.

To access the Vantage app, type Vantage in the search box.

Key features
The Vantage app enables you to:
• Know the device status easily and customize device settings.
• Download and install UEFI BIOS, firmware, and driver updates to keep your computer up-to-date.
• Monitor your computer health, and secure your computer against outside threats.
• Scan your computer hardware and diagnose hardware problems.
• Look up warranty status (online).
• Access User Guide and helpful articles.

Notes:
• The available features vary depending on the computer model.
• The Vantage app makes periodic updates of the features to keep improving your experience with your
  computer. The description of features might be different from that on your actual user interface.

Lenovo Quick Clean

Depending on the model, your computer might support the Lenovo Quick Clean feature. The preinstalled
Lenovo Quick Clean enables you to temporarily disable the keyboard, screen, trackpad, and TrackPoint
pointing device for cleaning.

To access Lenovo Quick Clean, do one of the following:
• Open the Start menu and tap Lenovo Quick Clean.
• Type Lenovo Quick Clean in the search box.
• If your computer comes with a ThinkPad X12 Detachable Folio Keyboard, press Fn and the right Shift key
  at the same time.
To download the latest version of Lenovo Quick Clean, go to https://pcsupport.lenovo.com.

Intelligent Cooling (for selected models)
The Intelligent Cooling feature enables your computer to work in the following three modes:

© Copyright Lenovo 2021                                                                                  21
•        Quiet mode: the quietest fan noise
•        Balanced mode: balanced performance and fan noise
•        Performance mode: the highest performance and normal fan noise

                         on ac power                                         on battery power

Do the following to select the preferred mode:
    1. Tap the battery status icon in the Windows notification area.
    2. Move the slider to the left or right to select your preferred mode.

Manage power
Use the information in this section to achieve the best balance between performance and power efficiency.

Check the battery status
Tap the battery icon in the Windows notification area to check the battery status, view the current power
plan, change the power mode, and access battery settings quickly. For more details about your battery, refer
to the Vantage app.

22     ThinkPad X12 Detachable Gen 1 User Guide
Charge the computer
Use ac power
Note: To maximize the life of the battery, use the battery until the charge is depleted and recharge the
battery completely before using it. Once the battery is fully charged, it must discharge to 94% or lower
before it will be allowed to recharge again.
Use P-to-P 2.0 (Peer to Peer 2.0) charging function
Both Thunderbolt 4 connector (USB-C) and USB-C (3.2 Gen 2) connector on the computer feature the
Lenovo-unique P-to-P 2.0 charging function. To use the function, ensure that Charge in Battery Mode is
enabled in UEFI BIOS of your computers, so that the function works even when the computers are off or in
hibernation mode.
To enable Charge in Battery Mode:
1. Enter the UEFI BIOS menu. See “Enter the UEFI BIOS menu” on page 31.
2. Tap Config ➙ USB, and then to enable Charge in Battery Mode.
• When no ac power is available:
Note: The remaining battery power of computer A should be at least 30% and be 3% higher than that of
computer B.
• When ac power is available:
Note: The actual charging speed of your computer depends on many factors, such as the remaining battery
power of the computers, the wattage of the ac power adapter, and whether you are using the computers.
Chapter 3. Explore your computer 23Change the power settings
For ENERGY STAR® compliant computers, the following power plan takes effect when your computer has
been idle for a specified duration:
• Turn off the display: After 10 minutes
• Put the computer to sleep: After 10 minutes
To reset the power plan:
1. Tap and hold the battery status icon and select Power Options.
2. Choose or customize a power plan of your preference.
To reset the power button function:
1. Tap and hold the battery status icon and select Power Options ➙ Change what the power buttons
do.
2. Change the settings as you prefer.
Transfer data
Quickly share your files using the built-in Bluetooth or NFC technology among devices with the same
features.
Set up a Bluetooth connection
You can connect all types of Bluetooth-enabled devices to your computer, such as a keyboard, a mouse, a
smartphone, or speakers. To ensure successful connection, place the devices at most 10 meters (33 feet)
from the computer.
1. Tap the action center icon in the Windows notification area, and enable the Bluetooth feature.
2. Tap Add Bluetooth or other device ➙ Bluetooth.
3. Select a Bluetooth device, and then follow the on-screen instructions.
Set up an NFC connection
If your computer supports NFC, you will see an NFC mark or label around the camera area.
To turn on NFC:
1. Open the Start menu and tap Settings ➙ Network & Internet ➙ Airplane mode.
2. Ensure that the Airplane mode is off and turn on the NFC function.
24 ThinkPad X12 Detachable Gen 1 User GuideBy using NFC, you can simply tap and connect your computer and another NFC-enabled device over a few
centimeters or inches. To pair with an NFC card or smartphone:
Note: Ensure that the NFC card is in NFC Data Exchange Format (NDEF), otherwise the card cannot be
detected.
Chapter 3. Explore your computer 2526 ThinkPad X12 Detachable Gen 1 User Guide
Chapter 4. Secure your computer and information
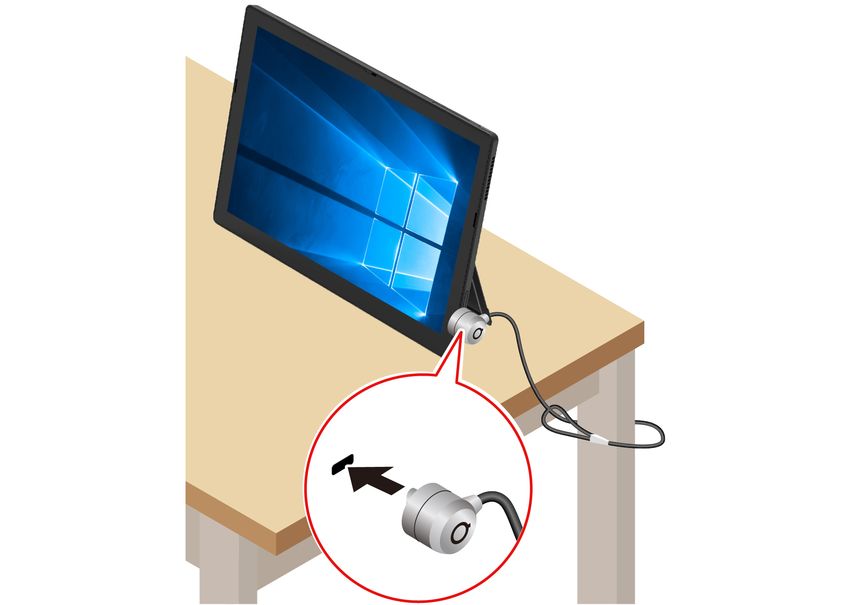
Lock the computer
Lock your computer to a desk, table, or other fixtures through a compatible security cable lock.
Note: The slot supports cable locks that conform to the Kensington NanoSaver® lock standards (using
Cleat™ locking technology). You are responsible for evaluating, selecting, and implementing the locking
device and security feature. Lenovo is not responsible for the locking device and security feature. You can
purchase the cable locks at https://smartfind.lenovo.com/.
Log in with your fingerprint (for selected models)
If your computer comes with a ThinkPad X12 Detachable Folio Keyboard, you can enroll your fingerprints
and unlock computer by scanning your fingerprints on the fingerprint reader.
1. Open the Start menu and then click Settings ➙ Accounts ➙ Sign-in options.
2. Follow the on-screen instructions to finish the enrollment.
Note: It is recommended that you put your finger at the middle of the fingerprint reader during
enrollment and enroll more than one fingerprint in case of any injuries to your fingers. After the
enrollment, the fingerprints are associated with the Windows password automatically.
3. Log in with your fingerprint.
© Copyright Lenovo 2021 27Maintenance tips:
• Do not scratch the surface of the reader with anything hard.
• Do not use or touch the reader with a wet, dirty, wrinkled, or injured finger.
Log in with your face ID (for selected models)
Create your face ID and unlock your computer by scanning your face:
1. Open the Start menu and tap Settings ➙ Accounts ➙ Sign-in options.
2. Locate the Password section and tap Add to create a password.
3. Locate the Windows Hello Face section and tap Set up under Face Recognition. Then, tap Get
Started. The camera preview starts.
4. Follow the on-screen instructions to create a Personal Identification Number (PIN) and complete the
setup.
5. Tap Improve Recognition to improve the image so that Windows Hello can recognize you in different
light conditions or when your appearance changes.
6. Look straight at the camera to log in with your face ID.
Protect data against power loss (for selected models)
NVMe (Non-Volatile Memory express) M.2 solid-state drive features the Lenovo-unique PLP (Power Loss
Protection) function to avoid data loss or damage. If your computer is not responding and you might have to
shut down your computer by pressing and holding the power button for several seconds. In this case, the
PLP function enables your computer data to be saved timely. However, there is no guarantee that all data is
saved in any situation. To check the type of your M.2 solid-state drive:
1. Restart the computer. When the logo screen is displayed, tap the prompt. The Startup Interrupt Menu
window is displayed.
2. In the Startup Interrupt Menu window, tap F10 to diagnose hardware to enter the Lenovo diagnostics
window.
3. On the TOOLS tab, select SYSTEM INFORMATION ➙ STORAGE.
Note: You need to connect an external keyboard to finish the above operation.
4. Locate the Device Type section to check the information
UEFI BIOS passwords
You can set passwords in UEFI (Unified Extensible Firmware Interface) BIOS (Basic Input/Output System) to
strengthen the security of your computer.
Password types
You can set a power-on password, supervisor password, system management password, or hard disk
password in UEFI BIOS to prevent unauthorized access to your computer. However, you are not prompted to
enter any UEFI BIOS password when your computer resumes from sleep mode.
Power-on password
If you set a power-on password, a window is displayed on the screen when you turn on the computer. Enter
the correct password to use the computer.
28 ThinkPad X12 Detachable Gen 1 User GuideSupervisor password
The supervisor password protects the system information stored in UEFI BIOS. When entering the UEFI
BIOS menu, enter the correct supervisor password in the window prompted. You also can tap Enter to skip
the password prompt. However, you cannot change most of the system configuration options in UEFI BIOS.
If you have set both the supervisor password and power-on password, you can use the supervisor password
to access your computer when you turn it on. The supervisor password overrides the power-on password.
System management password
The system management password can also protect the system information stored in UEFI BIOS like a
supervisor password, but it has lower authority by default. The system management password can be set
through the UEFI BIOS menu or through Windows Management Instrumentation (WMI) with the Lenovo
client-management interface.
You can enable the system management password to have the same authority as the supervisor password
to control security-related features. To customize the authority of the system management password through
the UEFI BIOS menu:
1. Enter the UEFI BIOS menu. See “Enter the UEFI BIOS menu” on page 31.
2. Select Security ➙ Password ➙ System Management Password Access Control.
3. Follow the on-screen instructions.
If you have set both the supervisor password and the system management password, the supervisor
password overrides the system management password. If you have set both the system management
password and the power-on password, the system management password overrides the power-on
password.
Hard disk passwords
The hard disk password prevents unauthorized access to the data on the storage drive. When a hard disk
password is set, you are prompted to type a correct password each time you try to access the storage drive.
• User hard disk password only
When a user hard disk password is set without a master hard disk password, the user must enter the user
hard disk password to access files and applications on the storage drive.
• Master hard disk password + User hard disk password
The master hard disk password is set and used by a system administrator. It enables the administrator to
access any storage drive in a system or any computer connected in the same network. The administrator
can also assign a user hard disk password for each computer in the network. The user of the computer
can change the user hard disk password as desired, but only the administrator can remove the user hard
disk password.
When prompted to enter a hard disk password, follow the on-screen instructions to switch between the
master hard disk password and user hard disk password.
Notes: The hard disk password is not available in the following situations:
• A Trusted Computing Group (TCG) Opal-compliant storage drive and a TCG Opal management software
program are installed in the computer, and the TCG Opal management software program is activated.
• An eDrive storage drive is installed in the computer preinstalled with the Windows 10 operating system.
Set, change, and remove a password
Before you start, print these instructions.
Chapter 4. Secure your computer and information 291. Enter the UEFI BIOS menu. See “Enter the UEFI BIOS menu” on page 31.
2. Select Security ➙ Password.
3. Select the password type. Then, follow the on-screen instructions to set, change, or remove a
password.
You should record all your passwords and store them in a safe place. If you forget any of your passwords,
any potential repair actions required are not covered under warranty.
What to do if you forget your power-on password
If you forget your power-on password, do the following to remove the power-on password:
• If you have set a supervisor password or a system management password and remember it:
1. Enter the UEFI BIOS menu. See “Enter the UEFI BIOS menu” on page 31. Enter the supervisor
password or the system management password when prompted.
2. Select Security ➙ Password ➙ Power-On Password.
3. Type the current supervisor password or the system management password in the Enter Current
Password field. Then, leave the Enter New Password field blank, and tap Save.
4. In the Changes have been saved window, tap Continue.
5. Tap F10 to save changes and exit the UEFI BIOS menu.
• If you have not set a supervisor password or a system management password, contact a Lenovo
authorized service provider to have the power-on password removed.
What to do if you forget your system management password
If you forget your system management password, do the following to remove the system management
password:
• If you have set a supervisor password and remember it:
1. Enter the UEFI BIOS menu. See “Enter the UEFI BIOS menu” on page 31. Enter the supervisor
password when prompted.
2. Select Security ➙ Password ➙ System Management Password.
3. Enter the current supervisor password in the Enter Current Password field. Then, leave the Enter
New Password field blank, and tap Save.
4. In the Changes have been saved window, tap Continue.
5. Tap F10 to save changes and exit the UEFI BIOS menu.
• If you have not set a supervisor password, contact a Lenovo authorized service provider to have the
system management password removed.
What to do if you forget your hard disk password
If you forget your user hard disk password or both user and master hard disk passwords, there is no service
procedure to remove the password or recover data from the storage drive. You can contact a Lenovo
authorized service provider to have the storage drive replaced. A fee will be charged for parts and service. If
the storage drive is a CRU (Customer Replaceable Unit), you can also contact Lenovo to purchase a new
storage drive to replace the old one by yourself. To check whether the storage drive is a CRU and the
relevant replacement procedure, see “What are CRUs” on page 35.
What to do if you forget your supervisor password
If you forget your supervisor password, there is no service procedure to remove the password. You can
contact a Lenovo authorized service provider to have the system board replaced. A fee will be charged for
parts and service.
30 ThinkPad X12 Detachable Gen 1 User GuideChapter 5. Configure advanced settings
UEFI BIOS
UEFI BIOS is the first program that the computer runs. When the computer turns on, UEFI BIOS performs a
self test to make sure that various devices in the computer are functioning.
Enter the UEFI BIOS menu
To enter the UEFI BIOS menu, do the following:
1. Restart the computer. When the logo screen is displayed, tap the prompt. The Startup Interrupt Menu
window is displayed.
2. In the Startup Interrupt Menu window, tap F1 to enter the UEFI BIOS menu.
Navigate in the UEFI BIOS interface
You can navigate in the UEFI BIOS interface by using the following keys:
• F1: General Help
• F9: Setup Defaults
• F10: Save and Exit
• F5 / F6: Change boot priority order
• Page Up / Page Down: Select / Scroll page
• Up / Down Arrows: Move keyboard focus
• Esc: Back / Close dialog
• Enter: Select / Open submenu
Set the system date and time
1. Enter the UEFI BIOS menu. See “Enter the UEFI BIOS menu” on page 31.
2. Select Date/Time and set the system date and time as desired.
3. Tap F10 to save changes and exit.
Change the startup sequence
1. Enter the UEFI BIOS menu. See “Enter the UEFI BIOS menu” on page 31.
2. Select Startup ➙ Boot. Then, the default device order list is displayed.
Note: No bootable device is displayed if the computer cannot start from any devices or the operating
system cannot be found.
3. Set the startup sequence as desired.
4. Tap F10 to save the changes and exit.
To change the startup sequence temporarily:
1. Restart the computer. When the logo screen is displayed, tap the prompt. The Startup Interrupt Menu
window is displayed.
2. In the Startup Interrupt Menu window, tap F12 to choose a temporary startup device.
3. Select the device that you want the computer to start from and tap Enter.
© Copyright Lenovo 2021 31Update UEFI BIOS When you install a new program, device driver, or hardware component, you might need to update UEFI BIOS. Download and install the latest UEFI BIOS update package by one of the following methods: • Open the Vantage app to check the available update packages. If the latest UEFI BIOS update package is available, follow the on-screen instructions to download and install the package. • Go to https://pcsupport.lenovo.com and select the entry for your computer. Then, follow the on-screen instructions to download and install the latest UEFI BIOS update package. To know more about UEFI BIOS, visit Knowledge Base of your computer at https://pcsupport.lenovo.com. Recovery This section introduces the recovery information of the Windows 10 operating system. Ensure that you read and follow the on-screen recovery instructions. The data on your computer might be deleted during the recovery process. To avoid data loss, make a backup copy of all the data that you want to keep. Restore system files and settings to an earlier point 1. Go to Control Panel and view by Large icons or Small icons. 2. Tap Recovery ➙ Open System Restore. Then, follow the on-screen instructions. Restore your files from a backup Note: If you use the File History tool to restore your files from a backup, ensure that you backed up your data earlier with the tool. 1. Go to Control Panel and view by Large icons or Small icons. 2. Tap File History ➙ Restore personal files. Then, follow the on-screen instructions. Reset your computer In the resetting process, you can choose to keep your files or remove them when you reinstall the operating system. Note: The items in the graphical user interface (GUI) might change without notice. 1. Open the Start menu, and then tap Settings ➙ Update & Security ➙ Recovery. 2. In the Reset this PC section, tap Get started. 3. Follow the on-screen instructions to reset your computer. Windows automatic recovery Note: Ensure that your computer is connected to ac power during the recovery process. The Windows recovery environment on your computer operates independently from the Windows 10 operating system. It enables you to recover or repair the operating system even if the Windows 10 operating system fails to start. After two consecutive failed boot attempts, the Windows recovery environment starts automatically. Then you can choose repair and recovery options by following the on-screen instructions. To know more about recovery information, visit Knowledge Base of your computer at https:// pcsupport.lenovo.com. 32 ThinkPad X12 Detachable Gen 1 User Guide
Install Windows 10 and drivers
This section provides instructions on installing a Windows 10 operating system and device drivers.

Install a Windows 10 operating system
Microsoft constantly makes updates to the Windows 10 operating system. Before installing a particular
Windows 10 version, check the compatibility list for the Windows version. For details, go to https://
support.lenovo.com/us/en/solutions/windows-support.

Attention:
• It is recommended that you update your operating system through official channels. Any unofficial update
  might cause security risks.
• The process of installing a new operating system deletes all the data on your internal storage drive,
  including the data stored in a hidden folder.

 1. If you are using the Windows BitLocker Drive Encryption feature and your computer has a Trusted
    Platform Module, ensure that you have disabled the feature.
 2. Ensure that the security chip is set to Active.
    a. Enter the UEFI BIOS menu. See “Enter the UEFI BIOS menu” on page 31.
    b. Select Security ➙ Security Chip. The Security Chip submenu opens.
    c. Ensure that the security chip for TPM 2.0 is set to Active.
    d. Tap F10 to save the settings and exit.
 3. Connect the drive that contains the operating system installation program to the computer.
 4. Enter the UEFI BIOS menu. See “Enter the UEFI BIOS menu” on page 31.
 5. Select Startup ➙ Boot to display the Boot Priority Order submenu.
 6. Select the drive that contains the operating system installation program, for example, USB HDD. Then,
    tap Esc.

    Attention: After you change the startup sequence, ensure that you select the correct device during a
    copy, a save, or a format operation. If you select the wrong device, the data on that device might be
    erased or overwritten.
 7. Select Restart and ensure that OS Optimized Defaults is enabled. Then, tap F10 to save the settings
    and exit.
 8. Follow the on-screen instructions to install the device drivers and necessary programs.
 9. After installing the device drivers, apply Windows Update to get the latest updates, for example the
    security patches.

Install device drivers
You should download the latest driver for a component when you notice poor performance from that
component or when you added a component. This action might eliminate the driver as the potential cause of
a problem. Download and install the latest driver by one of the following methods:
• Open the Vantage app to check the available update packages. Select the update packages you want,
  and then follow the on-screen instructions to download and install the packages.
• Go to https://pcsupport.lenovo.com and select the entry for your computer. Then, follow the on-screen
  instructions to download and install necessary drivers and software.

                                                                        Chapter 5. Configure advanced settings   33
34 ThinkPad X12 Detachable Gen 1 User Guide
Chapter 6. Help and support

What are CRUs
Customer Replaceable Units (CRUs) are parts that can be upgraded or replaced by the customer. The
computers contain the following types of CRUs:
• Self-service CRUs: Refer to parts that can be installed or replaced easily by customer themselves or by
  trained service technicians at an additional cost.
• Optional-service CRUs: Refer to parts that can be installed or replaced by customers with a greater skill
  level. Trained service technicians can also provide service to install or replace the parts under the type of
  warranty designated for the customer’s machine.

If you intend on installing a CRU, Lenovo will ship the CRU to you. CRU information and replacement
instructions are shipped with your product and are available from Lenovo at any time upon request. You
might be required to return the defective part that is replaced by the CRU. When return is required: (1) return
instructions, a prepaid shipping label, and a container will be included with the replacement CRU; and (2) you
might be charged for the replacement CRU if Lenovo does not receive the defective CRU within thirty (30)
days of your receipt of the replacement CRU. For full details, see the Lenovo Limited Warranty
documentation at https://www.lenovo.com/warranty/llw_02.

The following is a list of CRUs of your computer.

Self-service CRUs
• ac power adapter
• Lenovo Precision Pen*
• Lenovo Digital Pen*
• Nano-SIM-card tray/eSIM-card tray*
• Power cord
• ThinkPad X12 Detachable Folio Keyboard*

* for selected models

Frequently asked questions
                                  • Open the Start menu and tap Windows System ➙ Control Panel.
 How do I access Control Panel?
                                  • Use Windows Search.

 How do I turn off mycomputer?    Open the Start menu and tap     Power. Then, tap Shut down.

 How do I partition my storage    https://support.lenovo.com/solutions/ht503851
 drive?

© Copyright Lenovo 2021                                                                                      35
1. Press and hold the power button until thecomputer turns off. Then, restart
thecomputer.
2. If step 1 does not work:
• For models with an emergency reset hole: Insert a straightened paper clip
into the emergency reset hole to cut off power supply temporarily. Then,
restart thecomputer with ac power connected.
What do I do if mycomputer
stops responding. • For models without an emergency reset hole:
– For models with the removable battery, remove the removable battery
and disconnect all power sources. Then, reconnect to ac power and
restart thecomputer.
– For models with the built-in battery, disconnect all power sources.
Press and hold the power button for about seven seconds. Then,
reconnect to ac power and restart thecomputer.
1. Carefully unplug the ac power adapter and turn off thecomputer immediately.
The more quickly you stop the current from passing through thecomputer the
more likely you will reduce damage from short circuits.
Attention: Although you might lose some data or work by turning off
What do I do if I spill liquid on thecomputer immediately, leaving thecomputer on might make yourcomputer
thecomputer? unusable.
2. Do not try to drain out the liquid by turning over thecomputer. If yourcomputer
has keyboard drainage holes on the bottom, the liquid will be drained out
through the holes.
3. Wait until you are certain that all the liquid is dry before turning on
yourcomputer.
How do I enter the UEFI BIOS Restart thecomputer. When the logo screen is displayed, tap F1 to enter the UEFI
menu? BIOS menu.
1. Open the Start menu, and then tap Settings ➙ Devices ➙ Touchpad.
How do I disable my touchpad?
2. In the Touchpad section, turn off the Touchpad control.
• From the Vantage app. See “Install Windows 10 and drivers” on page 33 and
Where can I get the latest device
“Update UEFI BIOS” on page 32.
drivers and UEFI BIOS?
• Download from Lenovo Support Web site at https://pcsupport.lenovo.com.
36 ThinkPad X12 Detachable Gen 1 User GuideError messages
If you see a message that is not included in the following table, record the error message first, then shut
down the computer and call Lenovo for help. See “Lenovo Customer Support Center” on page 41.
Message Solution
The computer turned off because the battery power is low. Connect the ac power
0190: Critical low-battery error
adapter to the computer and charge the batteries.
0191: System Security - Invalid
The system configuration change has failed. Confirm the operation and try again.
remote change requested
0199: System Security - Security This message is displayed when you enter a wrong supervisor password more
password retry count exceeded. than three times. Confirm the supervisor password and try again.
0271: Check Date and Time The date or the time is not set in the computer. Enter the UEFI BIOS menu and set
settings. the date and time.
210x/211x: Detection/Read error The storage drive is not working. Reinstall the storage drive. If the problem still
on HDDx/SSDx exists, replace the storage drive.
Note:
This error indicates that the operating system or programs cannot create, modify,
or delete data in the non-volatile system UEFI variable storage due to insufficient
storage space after POST.
The non-volatile system UEFI variable storage is used by the UEFI BIOS and by
the operating system or programs. This error occurs when the operating system
or programs store large amounts of data in the variable storage. All data needed
for POST, such as UEFI BIOS setup settings, chipset, or platform configuration
Error: The non-volatile system data, are stored in a separate UEFI variable storage.
UEFI variable storage is nearly Tap F1 after the error message is displayed to enter the UEFI BIOS menu. A dialog
full. asks for confirmation to clean up the storage. If you select “Yes”, all data that
were created by the operating system or programs will be deleted except global
variables defined by the Unified Extensible Firmware Interface Specification. If you
select “No”, all data will be kept, but the operating system or programs will not be
able to create, modify, or delete data in the storage.
If this error happens at a service center, Lenovo authorized service personnel will
clean up the non-volatile system UEFI variable storage using the preceding
solution.
The thermal fan might not work correctly. After the error message is displayed, tap
Fan error. Tap ESC to startup ESC within five seconds to start up the computer with limited performance.
with limited performance. Otherwise, the computer will shut down immediately. If the problem still exists
when you starts up next time, have your computer serviced.
Chapter 6. Help and support 37Beep errors
Lenovo SmartBeep technology enables you to decode beep errors with your smartphone when a black
screen occurs with beeps from your computer. To decode the beep error with Lenovo SmartBeep
technology:
1. Go to https://support.lenovo.com/smartbeep or scan the following QR Code.
2. Download the proper diagnostic app and install it on your smartphone.
3. Run the diagnostic app and place the smartphone near the computer.
4. Tap Fn on your computer to emit the beep again. The diagnostic app decodes the beep error and shows
possible solutions on the smartphone.
Note: Do not attempt to service a product yourself unless instructed to do so by the Customer Support
Center or product documentation. Only use a Lenovo-authorized service provider to repair your product.
38 ThinkPad X12 Detachable Gen 1 User GuideSelf-help resources
Use the following self-help resources to learn more about the computer and troubleshoot problems.
Resources How to access?
Use the Vantage app to:
• Configure device settings.
• Download and install UEFI BIOS, drivers, and firmware
updates.
• Secure your computer from outside threats.
Type Vantage in the search box.
• Diagnose hardware problems.
• Check the computer warranty status.
• Access User Guide and helpful articles.
Note: The available features vary depending on the
computer model.
Product documentation:
• Safety and Warranty Guide
• Generic Safety and Compliance Notices Go to https://pcsupport.lenovo.com. Then, follow the on-
screen instructions to filter out the documentation you
• Setup Guide want.
• This User Guide
• Regulatory Notice
Lenovo Support Web site with the latest support
information of the following:
• Drivers and software
• Diagnostic solutions https://pcsupport.lenovo.com
• Product and service warranty
• Product and parts details
• Knowledge base and frequently asked questions
• Open the Start menu and tap Get Help or Tips.
• Use Windows Search or the Cortana® personal
Windows help information assistant.
• Microsoft support Web site: https://
support.microsoft.com
Windows label
Your computer might have a Windows 10 Genuine Microsoft label affixed to its cover depending on the
following factors:
• Your geographic location
• Edition of Windows 10 that is preinstalled
Go to https://www.microsoft.com/en-us/howtotell/Hardware.aspx for illustrations of the various types of
Genuine Microsoft labels.
Chapter 6. Help and support 39• In the People’s Republic of China, the Genuine Microsoft label is required on all computer models
preinstalled with any version of Windows 10.
• In other countries and regions, the Genuine Microsoft label is required only on computer models licensed
for Windows 10 Pro.
The absence of a Genuine Microsoft label does not indicate that the preinstalled Windows version is not
genuine. For details on how to tell whether your preinstalled Windows product is genuine, refer to the
information provided by Microsoft at https://www.microsoft.com/en-us/howtotell/default.aspx.
There are no external, visual indicators of the Product ID or Windows version for which the computer is
licensed. Instead, the Product ID is recorded in the computer firmware. Whenever a Windows 10 product is
installed, the installation program checks the computer firmware for a valid, matching Product ID to complete
the activation.
In some cases, an earlier Windows version might be preinstalled under the terms of the Windows 10 Pro
license downgrade rights.
Call Lenovo
If you have tried to correct the problem yourself and still need help, you can call Lenovo Customer Support
Center.
Before you contact Lenovo
Prepare the following before you contact Lenovo:
1. Record the problem symptoms and details:
• What is the problem? Is it continuous or intermittent?
• Any error message or error code?
• What operating system are you using? Which version?
• Which software applications were running at the time of the problem?
• Can the problem be reproduced? If so, how?
2. Record the system information:
• Product name
• Machine type and serial number
The following illustration shows where to find the machine type and serial number of your computer.
40 ThinkPad X12 Detachable Gen 1 User GuideLenovo Customer Support Center
During the warranty period, you can call Lenovo Customer Support Center for help.
Telephone numbers
For a list of the Lenovo Support phone numbers for your country or region, go to https://
pcsupport.lenovo.com/supportphonelist for the latest phone numbers.
Note: Phone numbers are subject to change without notice. If the number for your country or region is not
provided, contact your Lenovo reseller or Lenovo marketing representative.
Services available during the warranty period
• Problem determination - Trained personnel are available to assist you with determining if you have a
hardware problem and deciding what action is necessary to fix the problem.
• Lenovo hardware repair - If the problem is determined to be caused by Lenovo hardware under warranty,
trained service personnel are available to provide the applicable level of service.
• Engineering change management - Occasionally, there might be changes that are required after a product
has been sold. Lenovo or your reseller, if authorized by Lenovo, will make selected Engineering Changes
(ECs) that apply to your hardware available.
Services not covered
• Replacement or use of parts not manufactured for or by Lenovo or nonwarranted parts
• Identification of software problem sources
• Configuration of UEFI BIOS as part of an installation or upgrade
• Changes, modifications, or upgrades to device drivers
• Installation and maintenance of network operating systems (NOS)
• Installation and maintenance of programs
For the terms and conditions of the Lenovo Limited Warranty that apply to your Lenovo hardware product,
go to:
• https://www.lenovo.com/warranty/llw_02
• https://pcsupport.lenovo.com/warrantylookup
Chapter 6. Help and support 41You can also read