USING WAVES MULTIRACK SOUNDGRID WITH YAMAHA DIGITAL MIXERS
←
→
Page content transcription
If your browser does not render page correctly, please read the page content below
Using Waves MultiRack SoundGrid
    with Yamaha Digital Mixers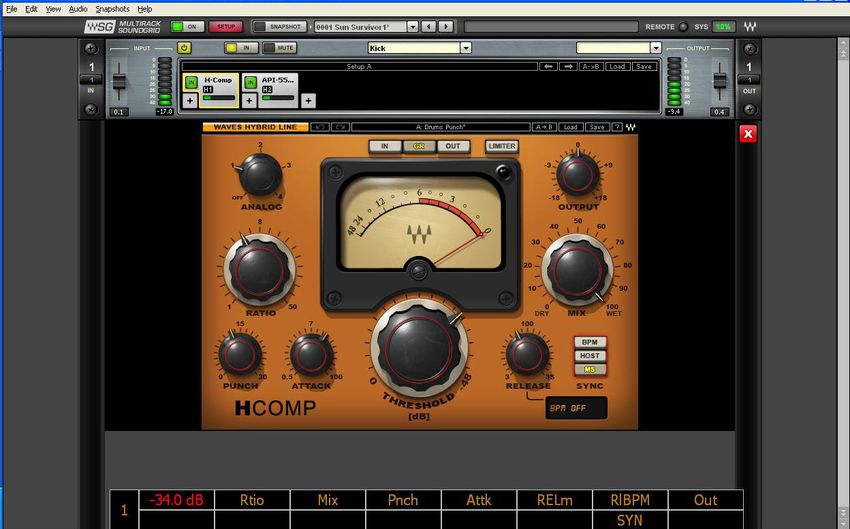
Yamaha Commercial Audio
                               Waves MultiRack SoundGrid with Yamaha Mixers

Contents
                                                               Page
     1.0   The Possibilities                                   4

     2.0   Equipment List                                      5
     2.1        Hardware                                       5
     2.2        Software and Licenses                          5
     2.3        Software Authorization and Installation        5

     3.0   Hardware Setup                                      6
     3.1        USB / MIDI Connection                          7

     4.0   MultiRack SoundGrid Setup                            9
     4.1         Preferences                                    9
     4.2         Plugin Manager                                 9
     4.3         System Inventory                              10
     4.4         System Parameters                             11
     4.5         SoundGrid Connections Window                  11
     4.6         SG Driver                                     12
     4.7         SG MultiRack                                  13

     5.0   Console Setup & Patching                            14
     5.1        MIDI Setup on the Mixer                        15

     6.0   Using PM5D, DM2000, DM1000, 02R96, 01V96            16
     6.1         MIDI Port Setup                               16
     6.2         PM5D MIDI Port                                16
     6.3         DM/0 MIDI Port                                17
     6.4         Program Change: Snapshot Recall               17
     6.5         MIDI Remote Layer                             19
     6.6         MultiRack Remote Controller Editor            21
     6.7         User Defined Keys                             24

     7.0   Using M7CL and LS9                                  27
     7.1         MIDI Setup                                    27
     7.2         Program Change                                27
     7.3         MIDI Control Change                           28
     7.4         MultiRack Preferences                         30
     7.5         Control from M7CL                             31
     7.6         Control from LS9                              32
     7.7         Control Map                                   33

     8.0   Using CL-series Consoles                            34
     8.1         MIDI & User Setup                             34

2                                                 www.yamahaproaudio.com
                                                       www.waveslive.com
Yamaha Commercial Audio
                          Waves MultiRack SoundGrid with Yamaha Mixers

Contents (continued)
     APPENDIX
     a.  Remote Layer control assignments of              36
         PM5D, DM2000, DM1000
     b.  User Defined Key assignments of                  37
         PM5D, DM2000, DM1000

3                                              www.yamahaproaudio.com
                                                    www.waveslive.com
Yamaha Commercial Audio
Waves MultiRack SoundGrid with Yamaha Mixers
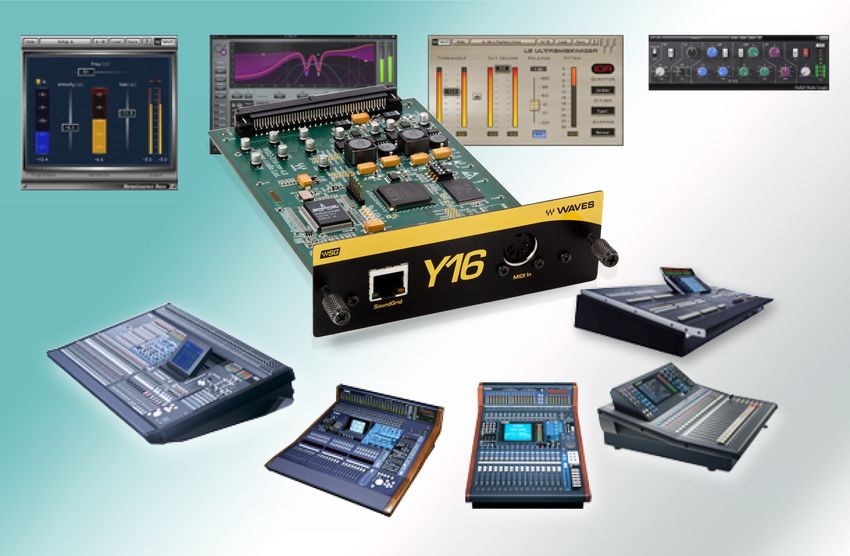
1.0 The Possibilities
The following range of Yamaha digital mixers have the ability to interface with the
Waves WSG-Y16 card and to remotely control the plug-ins of Waves MultiRack
SoundGrid:
• CL5, CL3, CL1
• PM5D
• M7CL
• LS9
• DM2000, DM1000
• 02R96, 01V96, 01V96i
MultiRack SoundGrid enables a large range of interesting and innovative,
creative and classic plug-ins to be used along side the full range of Yamaha’s
professional digital mixers. The SoundGrid system provides the type of reliability,
high performance and low latency processing that Yamaha users are already
familiar with, while the Waves plug-ins bring industry standard and familiar studio
production tools to tours, festivals and other live events around the world.
The plug-ins are processed by a
dedicated server to ensure low latency
and reliable processing, while the control
software is run on a separate PC
(Windows or Mac). The Yamaha Mixer,
however, is able to host the audio
interface and provide some useful
remote control functions: using either a
simple MIDI connection or a USB cable,
the faders, encoders and switches of the
mixers can be used to navigate between
plug-ins, edit parameters (as shown on
the left) and recall MultiRack Snapshots.
Please refer to the Yamaha product manuals for specific details about the mixers,
and the Waves manuals for specific details about MultiRack SoundGrid.
4 www.yamahaproaudio.com
www.waveslive.com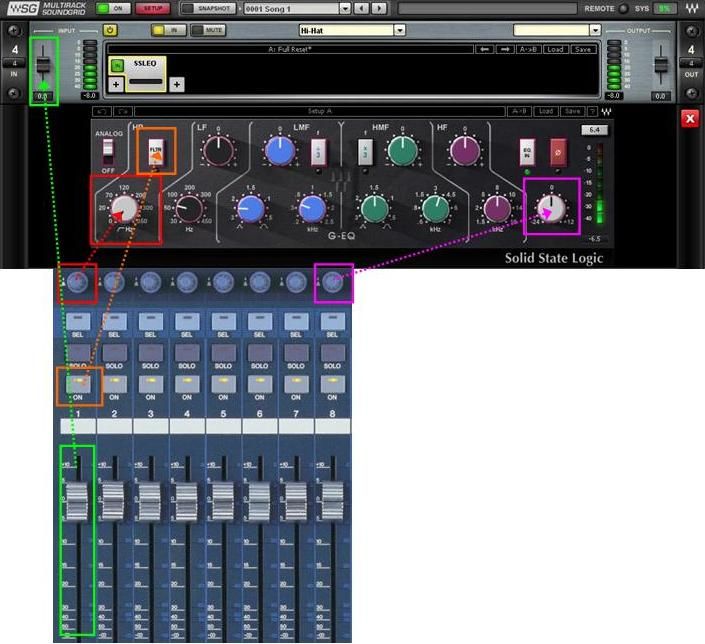
Yamaha Commercial Audio
                                Waves MultiRack SoundGrid with Yamaha Mixers
Meanwhile, this guide suggests how best to integrate the two, focusing on the
available MIDI remote control functions. It assumes the reader has already
gained a basic level of knowledge and experience with each individual product.

2.0 Equipment List
2.1   Hardware
      1. Waves WSG-Y16 card: The WSG-Y16 mini-YGDAI card will stream
         Audio in and out of a Yamaha console: 16 channels at 44.1/48 kHz or
         8 channels at 88.2/96 kHz. Two cards can be used to double the
         channel count.
      2. Waves qualified SoundGrid Server: A multi-core PC used for real-
         time audio processing. See a list of Waves-qualified servers at
         http://www.waveslive.com/html/soundgrid-server.aspx
      3. Want redundancy? Get a second server…
      4. Network switch: standard off-the-shelf Gigabit switch. See a list of
         Waves-qualified switches at http://www.waveslive.com/html/soundgrid-
         switches.aspx
      5. Desktop/Laptop host computer: A computer used for running the
         MultiRack SoundGrid software. Use any PC or Mac Dual Core 2GHz
         or higher.
      6. USB Flash Drive (optional): The USB key holds the licenses for the
         Waves V9 plugins and provides activated licenses on-the-go.
         Alternatively the host computer’s hard drive can be authorized through
         the Waves License Center.
      7. CAT6/CAT5e network cables: Used to connect all SoundGrid units.
         Between 3 and 5 cables are required, depending upon the system size.
         Available at a local computer store.
      8. (MIDI Controller + MIDI cable – optional if direct control from the
         console is not used).

2.2   Software and Licenses
      1. MutiRack SoundGrid: Free with WSG-Y16 Card.
      2. SoundGrid Server Software: Free and Pre-installed with Waves
         SoundGrid Server One, or available for purchase if an off-the-shelf
         server is used.
      3. Sound Grid enabler: (license) either supplied with WSG-Y16, or
         available from http://www.waveslive.com/html/soundgrid-for-yamaha.aspx .
      4. Waves Plug-ins: see a list of SoundGrid-compatible plug-ins at
         http://www.waveslive.com/html/all-plugins.aspx .

2.3   Software Authorization and Installation
      Insert the Waves installation DVD to the host computer, and start the
      installation by double-clicking the Waves icon. Select the following
      options from the installation menu:

5                                                       www.yamahaproaudio.com
                                                             www.waveslive.com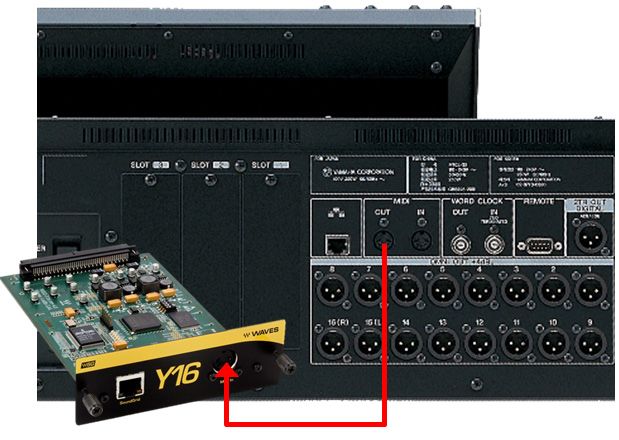
Yamaha Commercial Audio
                                Waves MultiRack SoundGrid with Yamaha Mixers
           •MultiRack SoundGrid Application: this is the Waves host software
            required to run Waves plugins.
         • SoundGrid Driver: an ASIO/Core Audio driver for PC/Mac. This
            driver is required for recording and playback with DAW software on
            the hose computer. Installation is optional.
         • All SoundGrid compatible plugins.
         • WLC (Waves License Center): this will manage the licenses for the
            Waves plugins. The licenses can be authorized on a USB flash
            drive or on the host computer’s hard drive.
       When installation is complete, restart the computer.

       To authorize the plugins, launch Waves License Center with the host
       computer connected to the internet. Activation instructions are available
       here: http://www.wavesupport.net/content.aspx?id=4074. For more
       information about Waves License Center, visit
       http://www.wavesupport.net/content.aspx?id=4219.

       Note:
       V9 licenses can be activated on a USB flash drive or the host computer’s
       hard drive, while V8 licenses can only be activated on an iLok key.

3.0 Hardware Setup
    1. Before installing the WSG-Y16 into the Yamaha mixer, check the DIP
       switches on the card:

       All Off: 44.1/48 kHz                     DIP Switch 1 On: 88.2/96 kHz

    2. While the mixer is powered off, insert the WSG-Y16 card into any
       available mini-YGDAI slot.
    3. Power on the mixer, and set its Word Clock to the required sample-rate.
       Note that the Yamaha mixer will provide Word Clock to the SoundGrid
       network.
          a. If 44.1 or 48kHz is used, make sure the input and output format of
              the slot is either set to “SINGLE” or is blank.
          b. If 88.2 or 96kHz is used, set the input and output format of the slot
              to “DOUBLE SPEED”.
    4. Connect the WSG-Y16 card(s) and SG Server(s) to the network switch
       using CAT5e or CAT6 cables.

6                                                       www.yamahaproaudio.com
                                                             www.waveslive.com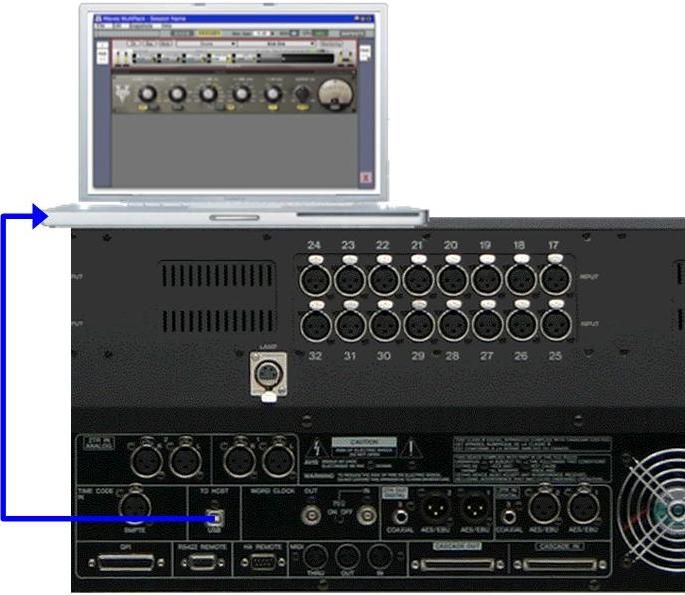
Yamaha Commercial Audio
                                  Waves MultiRack SoundGrid with Yamaha Mixers
      5. Connect the host computer (with MultiRack SG for Yamaha installed) to
         the network switch using CAT5e or CAT6 cables.

                   Standard MultiRack SoundGrid setup, shown with 02R96

      6. Connect the USB flash drive or iLok key (which holds the necessary
         licenses) to one of the host computer’s USB ports.

3.1      USB / MIDI Connection
         In addition to the standard MultiRack SoundGrid setup, one additional
         cable can be used to provide extra control from the console.

         In the case of CL-series, M7CL and LS9, this is a standard MIDI cable to
         connect the mixer’s MIDI OUT port to the MIDI IN port of the WSG-Y16
         card. Though the MIDI cable is connected to the card, the MIDI data is
         actually transferred through the network to the host computer of MultiRack
         SoundGrid.

                          MIDI link between M7CL and WSG-Y16

7                                                          www.yamahaproaudio.com
                                                                www.waveslive.com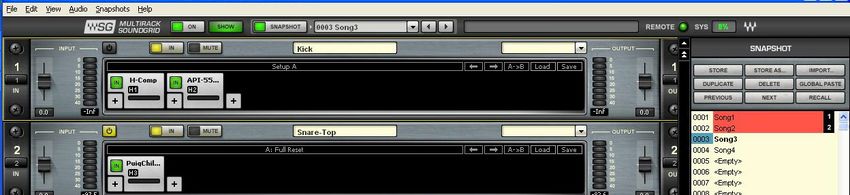
Yamaha Commercial Audio
                             Waves MultiRack SoundGrid with Yamaha Mixers

     In the case of PM5D, DM2000, DM1000, 02R96 and 01V96, a MIDI cable
     could be used as above, but there are advantages to using a USB cable
     instead, between the mixer and the host computer of the MultiRack
     SoundGrid program. This USB cable can carry multiple channels of MIDI
     data, so offers some extended functionality and can be used for Yamaha
     Studio Manager software at the same time.

                    USB link from PM5D-RH to Host computer

     The correct Yamaha USB-MIDI driver will be needed for the computer.
     This can be downloaded from
     http://www.yamahaproaudio.com/downloads/firm_soft/index.html .

8                                                    www.yamahaproaudio.com
                                                          www.waveslive.com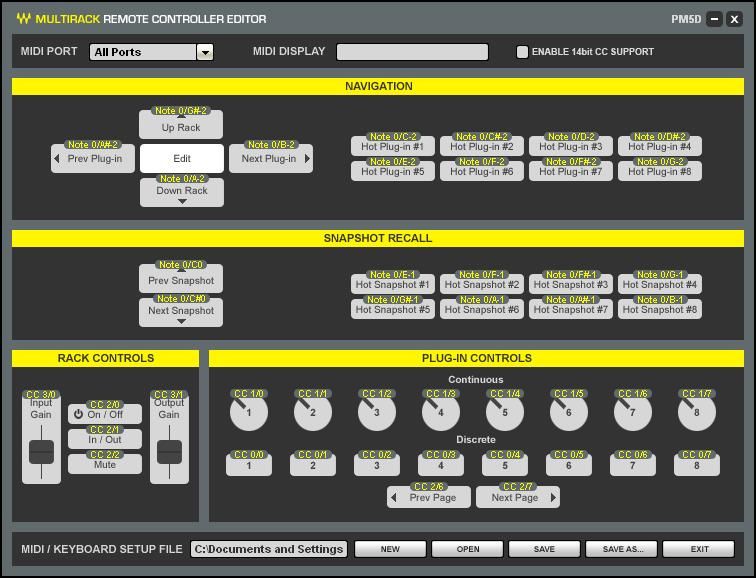
Yamaha Commercial Audio
                               Waves MultiRack SoundGrid with Yamaha Mixers

4.0 MultiRack SoundGrid Setup
4.1   Preferences
      Start the MultiRack application and open the Preferences window (via the
      Edit menu on a PC, via the MultiRack menu on a Mac).

                                              In the Local LAN Port field,
                                              select the correct LAN/network
                                              adaptor.
                                              Then the message “SoundGrid
                                              network found” will appear, as
                                              shown on the left.

            MultiRack Preferences

4.2   Plugin Manager
      Click the Plugin Manager tab in the Preferences window.
                                            Depending on which version of
                                            plugins are intended for use,
                                            select either V8, V9 or both. In
                                            this example, both versions are
                                            installed.
                                            Whichever version(s) are
                                            checked here will be scanned
                                            when MultiRack loads. The
                                            Plugin Manager will scan any
                                            connected USB drive, internal
                                            hard drive, and/or iLok key for
                                            any plugin licenses, and will
                                            update the plugin list.

      Now the Preferences can be closed by clicking [OK].

9                                                   www.yamahaproaudio.com
                                                         www.waveslive.com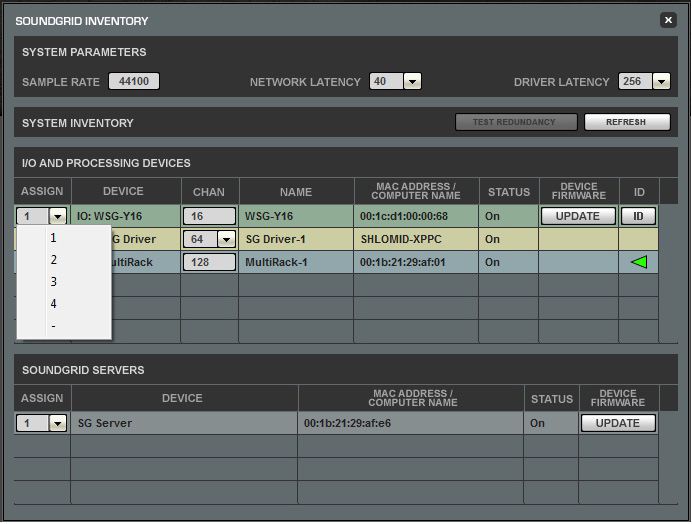
Yamaha Commercial Audio
                               Waves MultiRack SoundGrid with Yamaha Mixers
4.3   System Inventory
      From the Edit menu, select the SoundGrid Inventory, or press [F2].

      This window lists all the SoundGrid components in the network, and
      allows them to be selected, assigned and updated.

      First check if any device needs to have its firmware updated: click on the
      [Update] button in the Device Firmware column. During the update
      process a progress bar and status message will be displayed. Follow
      these messages and instructions carefully. In some cases the device will
      need to be rebooted at the end of the process. Once that is completed,
      click the [Refresh] button towards the top-right of this window.

      The Device column lists all available components: I/O cards, MultiRack,
      SG Drivers and SG Servers. Use the Assign column to select which
      devices to use:

         •   I/O Devices: up to 4 I/O devices can be used. Assign number “1”
             for the first device, “2” for the second, and so on. This assignment
             will affect the order of I/O listing in MultiRack’s I/O routing menus.
             It is not related to which slot the card is inserted in the console,
             though it makes sense to follow the same order.
         •   MultiRack: only one MultiRack device can be used, so is
             automatically assigned number “1”.
         •   SG Server: it is possible to use up to 2 servers in the network, so
             set the first server to number “1” and the second (redundant) server
             to number “2”.

10                                                     www.yamahaproaudio.com
                                                            www.waveslive.com
Yamaha Commercial Audio
Waves MultiRack SoundGrid with Yamaha Mixers
• SG Driver: the inventory will see all installed drivers on the network,
though only one can be assigned at a time. This is used for
recording and playback with DAW software: it is not essential for
using the plugins. Assign number “1” to the required driver, and set
the number of channels to use for rec/play in the Chan column.
4.4 System Parameters
Still in the SoundGrid Inventory window, set the “Driver Latency” and
“Network Latency”. A lower setting will result in lower latency, but may
increase the CPU load of the computer. A Driver Latency of 256 samples
will work well on most systems (that’s around 5.3ms at 48kHz).
The settings are applied as the window is closed.
4.5 SoundGrid Connections Window
Open the SoundGrid Connections window from the Edit menu (or press
the [F3] key. This window shows a table where virtual connections and
audio routing can be made between the devices on the network.
Each row in this table represents an audio connection between a source
device (the audio transmitter) and a destination device (the audio receiver).
A device first needs to be assigned in the SoundGrid Inventory before it
will appear in the SoundGrid Connections table.
Double-click where indicated to create a new connection. Then select a
Source Device, and choose the range of channels to transmit. Then
select the destination device, and its range of input channels. Enable or
disable the connection in the leftmost column (labeled “ON”).
11 www.yamahaproaudio.com
www.waveslive.comYamaha Commercial Audio
Waves MultiRack SoundGrid with Yamaha Mixers
Note that it is possible to send audio from one source to multiple
destinations. And it is possible for a destination device to receive different
audio channels from different source devices.
The most usual case, as shown in the picture above, is of one Waves IO
transmitting 16 channels to the MultiRack (the effect/insert sends) and to
the SG Driver (for recording). Then for MultiRack to transmit 16 channels
back to the Waves IO (the effect/insert returns).
4.6 SG Driver
The SG Driver is an ASIO (PC) and CoreAudio (Mac) driver for audio
playback and recording, using any compatible DAW software. It is not
necessary for using MultiRack SoundGrid, but is a useful additional
feature. It can be installed either on the same computer that is running
MultiRack SoundGrid, or a separate computer.
1 Connect the computer to the network, and switch on all the devices.
2 Open the SoundGrid Driver Control Panel.
3 Open the Main tab and set Driver Mode to Networked (as it is being
used on the same network as SG MultiRack).
4 Select the correct LAN port for the computer in the LOCAL LAN PORT
setting. The driver will scan the network, and display “SoundGrid
Network found” to indicate success.
5 Turn the driver ON, and it will be ready to use.
12 www.yamahaproaudio.com
www.waveslive.comYamaha Commercial Audio
Waves MultiRack SoundGrid with Yamaha Mixers
4.7 SG MultiRack
Now some Racks can be added to the system by double-clicking in the
indicated area:
5. This will open a dialogue
box where the number and
type of Racks can be
specified.
6. Now one or more empty
Racks will be visible, and the
input and output channels must
be assigned, according to the
Slot inputs and outputs from the
mixing console. Click on the left
(input) and right (output) side
rails of the Racks, where it
shows “None”. The Audio I/O
pull-down menu will open, and
the channel number can be
chosen.
7. Click on the [+] button in the
Racks to add the required Plug-
ins.
See the MultiRack SoundGrid
manual for more detailed
information.
13 www.yamahaproaudio.com
www.waveslive.comYamaha Commercial Audio
Waves MultiRack SoundGrid with Yamaha Mixers
5.0 Console Setup & Patching
There are several steps to preparing the mixer for use with the Waves system.
MultiRack SoundGrid can be thought of as an external multi-effects unit. So it
can be patched in a conventional way, either inserted (in Input, Mix, Matrix or
Master channels), or as a “Send-&-Return”: sending from a Mix bus (mono or
stereo), and returning to an input channel (again, mono or stereo).
Each WSG-Y16 card can provide 16 inputs and outputs, meaning that up to 16
channels of inserts can be patched for example. An example of insert patching
on PM5D is shown below, where WSG-Y16 is positioned in Slot 4.
PM5D Input Insert Patch
Remember to set the required insert position, and to switch it on:
PM5D Input Insert Point
14 www.yamahaproaudio.com
www.waveslive.comYamaha Commercial Audio
Waves MultiRack SoundGrid with Yamaha Mixers
5.1 MIDI Setup on the Mixer
To allow control of the MultiRack SoundGrid software from the mixer,
some MIDI setup is required. This process varies depending on the model
of mixer, so each type will be described in turn.
15 www.yamahaproaudio.com
www.waveslive.comYamaha Commercial Audio
Waves MultiRack SoundGrid with Yamaha Mixers
6.0 Using PM5D, DM2000, DM1000, 02R96, 01V96
On these consoles, the MIDI REMOTE layer allows the input channel faders, ON
switches and encoders to be used as controllers for the Waves plug-ins.
Additionally, their USER DEFINED keys can be used to quickly view specific
plug-ins and to recall specific Snapshots in the MultiRack SoundGrid software.
6.1 MIDI Port Setup
Firstly, in the MIDI SETUP page (found in the MIDI/REMOTE menu of
PM5D, or the MIDI menu of DM/0 consoles) switch on the Tx for
PROGRAM CHANGE. This will allow a console Scene Recall to trigger a
Snapshot Recall in MultiRack SoundGrid.
PM5D MIDI SETUP DM2000 MIDI SETUP
Other Tx and Rx settings are not needed in this case. PM5D’s MODE for
PROGRAM CHANGE can be set to SINGLE for simplicity, when no more
than the first 128 Scene Memories are used (because SINGLE mode
handles MIDI values [0-127] for Program Change). On DM/0 consoles
mode selection is not available, because they don’t have more than 100
Scenes anyway. Keep the MIDI channel set to “1” unless there is good
reason to change it (to avoid conflict with other connected MIDI
equipment).
6.2 PM5D MIDI Port
For PM5D, the MIDI PORTS are also set in this page. The required
selection will depend on whether a MIDI or a USB cable is used:
a) If MIDI is used, set the Tx MIDI PORT to MIDI, and set MIDI REMOTE
port for BANK A also to MIDI (as shown above).
b) If USB is used, set PM5D EDITOR to USB-1, set MIDI REMOTE port
for BANK A to USB-2, and set Tx MIDI PORT to USB-3 (as shown
below).
16 www.yamahaproaudio.com
www.waveslive.comYamaha Commercial Audio
Waves MultiRack SoundGrid with Yamaha Mixers
PM5D MIDI SETUP when using a USB cable.
6.3 DM/0 MIDI Port
On the DM/0 consoles, the MIDI/HOST page is found in the SETUP menu.
Select USB-1 ID1 for Studio Manager, USB-2 for a REMOTE LAYER (it
doesn’t matter which layer), and USB-3 for the GENERAL Tx PORT, as
shown below.
DM1000 MIDI/HOST SETUP DM2000 MIDI/HOST SETUP
6.4 Program Change: Snapshot Recall
All these consoles can use their initial settings for the MIDI Program
Change table. So recalling Scene 1 on the console recalls Snapshot 1 in
MultiRack SoundGrid. It can be edited of course, to change the mapping
if required.
17 www.yamahaproaudio.com
www.waveslive.comYamaha Commercial Audio
Waves MultiRack SoundGrid with Yamaha Mixers
PM5D MIDI Program Change table.
In the MultiRack software, open the Preferences window (from the Edit
menu in Windows, or MultiRack SoundGrid menu in Mac OSX).
MultiRack Control Preferences
In the Control tab, check the required MIDI In port:
a) The MAC address of the WSG-Y16 card is shown, and should be
selected if a MIDI cable is used. (00:1c:d1:00:00:66 is the MAC
address of this example).
18 www.yamahaproaudio.com
www.waveslive.comYamaha Commercial Audio
Waves MultiRack SoundGrid with Yamaha Mixers
b) Select “Yamaha PM5D-2” and “Yamaha PM5D-3” if a USB connection
is used (or the equivalent selection for DM2000 or DM1000 etc.):
The selection box for “Set MIDI channel for snapshot recall” should match
the number used for MIDI Tx on the console. Number 1 is the default
choice. There is no need to check the “Use Control Change” box.
Click [OK], and a console Scene recall will now be able to trigger a
Snapshot recall in the software. Note that MIDI communication is one-
way only: from Console to MultiRack. So a Snapshot recall in MultiRack
cannot cause a console Scene to recall.
When MultiRack SoundGrid receives a MIDI message, the REMOTE
indicator on the status bar will flash green. The recalled Snapshot will be
highlighted.
MultiRack SoundGrid during Snapshot Recall
6.5 MIDI Remote Layer
PM5D, DM2000, DM1000, 02R96 and 01V96 all have MIDI Remote Layer
options which can be used to edit the parameters of the Waves plug-ins
from the console’s faders, ON switches and encoders. With PM5D, the
Remote Layer is dedicated to MIDI functions, while the other consoles
19 www.yamahaproaudio.com
www.waveslive.comYamaha Commercial Audio
Waves MultiRack SoundGrid with Yamaha Mixers
offer more options: select “USER DEFINED” as the target for one of the
Remote Layers in the REMOTE menu. (With 01V96, the REMOTE page
is located in the DIO/SETUP menu).
DM2000 Remote Layer
With PM5D, the MIDI REMOTE page is (naturally) found in the
MIDI/REMOTE menu. Press the ASSIGN TO CH STRIP SECTION
[INPUT CH] switch to convert the console’s faders, on switches and
encoders to MIDI REMOTE mode.
PM5D MIDI REMOTE page
For all the consoles, the MIDI Remote Layer should be setup to transmit
Control Change messages in the format as shown above: B0-00-SW-END
for example. The DM/0 consoles conveniently have a perfect setup in
their initial settings for BANK 4. So no MIDI programming is needed!
20 www.yamahaproaudio.com
www.waveslive.comYamaha Commercial Audio
Waves MultiRack SoundGrid with Yamaha Mixers
DM2000 Remote Layer: BANK 4.
Note that each channel has a slightly different message number for each
control.
The initial settings for the PM5D MIDI Remote are not suitable for
controlling MultiRack, so they must be edited. Each control that is
required should be converted into the format as shown below. To save
programming time, the WAVES-RM.PM5 file (download from
http://www.yamahaproaudio.com/training/self_training/index.html) could
be loaded via the memory card slot. This contains all the necessary
settings for the MIDI Remote Layer, as summarized in the table below:
Channel 1 Channel 2 … Channel 24
ENCODER ON B0-00-SW-END B0-01-SW-END B0-17-SW-END
ENCODER B1-00-ENC-END B1-01-ENC-END B1-17-ENC-END
CH ON B2-00-SW-END B2-01-SW-END B2-17-SW-END
FADER B3-00-FAD-END B3-01-FAD-END B3-17-FAD-END
Additionally, ensure that [LATCH] is enabled for the ON switches of the
Remote Layer.
6.6 MultiRack Remote Controller Editor
To prepare the MultiRack software, open the Preferences window again,
and select the Control tab. Then set the MIDI Pickup Mode to “Takeover”.
21 www.yamahaproaudio.com
www.waveslive.comYamaha Commercial Audio
Waves MultiRack SoundGrid with Yamaha Mixers
This will protect the plug-in parameter values from jumping to a new
position unexpectedly. Instead, the values will only change once the
controller has passed through the current value of the parameter.
Next, click [Open Editor].
This will open the MultiRack Remote Controller Editor window, where
incoming MIDI messages can be mapped to the software functions.
MultiRack Remote Controller Editor
The mapping can either be done manually, or a setup file (*.mrrc) can be
loaded. Template files are available for PM5D, M7CL (also use for LS9),
DM2000 (also use for 02R96) and DM1000. Download these files from
http://www.yamahaproaudio.com/training/self_training/index.html. The
above picture shows the settings for PM5D. To use one of the example
22 www.yamahaproaudio.com
www.waveslive.comYamaha Commercial Audio
Waves MultiRack SoundGrid with Yamaha Mixers
files, click [OPEN] at the bottom of the window, then browse for the file on
the computer. This file can then be modified if required, and saved again.
To modify a setting, click on the control so it is highlighted yellow, and
then move the required encoder or switch on the console. The MIDI
DISPLAY at the top of the window will show the message that is received
(such as CC 1/0), and will assign it to the selected control. Do this for as
many controls as required.
Once a MIDI message is mapped to a control, it is displayed as shown
below.
When editing is completed, save the remote controller setup file and exit
the editor window. Now this file needs to be loaded into the MultiRack
Preferences:
In the “Control” tab of the preferences window, click [Load…] and browse
for the setup file that has just been saved.
Then click [OK] to close the Preferences window.
The 8 Plug-in Control encoders and switches edit the plug-in that is visible
on MultiRack SoundGrid. Only one plug-in is visible at any time, so it is
always clear which plug-in is being controlled.
23 www.yamahaproaudio.com
www.waveslive.comYamaha Commercial Audio
Waves MultiRack SoundGrid with Yamaha Mixers
MultiRack SoundGrid: Rack View, with Controller Strip
By selecting the “Show Controller Strip” option in the “View” menu, the
mapping of the Plug-In parameters to the 8 control encoders and switches
can be seen at the bottom of the screen. As a parameter is adjusted, its
value is displayed. Use the “Next Page” and “Prev Page” controls to
access extra functions when the plug-in has more than 8 continuous and
discrete parameters available.
The mapping of console controls to the MutliRack Plug-In controls for the
provided template files of PM5D, DM2000 and DM1000 is shown in the
Appendix.
6.7 User Defined Keys
MIDI functions can be assigned to the User Defined Keys of PM5D and
the DM/0 consoles (and also CL-series). These can be used for the
following functions:
1) Recall specific Snapshots (the 8 Hot Snapshots of MultiRack).
2) Recall the Next or Previous Snapshot.
3) Navigate around the plug-ins.
4) View the 8 Hot Plug-ins of MultiRack.
The simplest method is to assign a different MIDI Note On message to
each User Defined Key, as seen in the examples below.
24 www.yamahaproaudio.com
www.waveslive.comYamaha Commercial Audio
Waves MultiRack SoundGrid with Yamaha Mixers
DM2000 User Defined Key assignments.
PM5D User Defined Key assignments.
To save programming time, templates are available. The
“WAVESUDK.PM5” file (download from
http://www.yamahaproaudio.com/training/self_training/index.html) can be
loaded into PM5D from the memory card slot, and this assigns layers A
and B of User Defined Keys. For DM2000 and DM1000, MIDI Bulk Dump
files (syx files) are available for User Defined Key layers A and B.
25 www.yamahaproaudio.com
www.waveslive.comYamaha Commercial Audio
Waves MultiRack SoundGrid with Yamaha Mixers
The Hot Plug-In and Hot Snapshot settings for the MultiRack Remote
Controller Editor are included in the example setup files mentioned
previously, so once they are opened, the system is ready to use.
The control assignments for User Defined Keys on PM5D, DM2000 and
DM1000 are shown in the Appendix.
Basically the first bank of keys will access the 8 Hot Plug-ins, and the
second bank will access the Hot Snapshots. Note that one User Defined
key on each bank is assigned to change the bank of User Defined keys,
making it easier to access all the functions. And on PM5D, key 23 is used
as a “Bookmark” shortcut to access the MIDI Remote Layer of PM5D.
26 www.yamahaproaudio.com
www.waveslive.comYamaha Commercial Audio
Waves MultiRack SoundGrid with Yamaha Mixers
7.0 Using M7CL and LS9
M7CL and LS9 consoles do not have the MIDI REMOTE functionality of the other
consoles, but they do have MIDI Program Change and Control Change tables.
Some parameters that are not needed for audio can be mapped to MIDI Control
Change messages and used to control the Plug-ins. For example, use some
spare Mix Sends or Matrix Sends. In this example, the sends to Mix 16 from
Input Channels 1-8 are used, but a different Mix or even Matrix send could be
used.
7.1 MIDI Setup
In the MIDI SETUP menu of M7CL (or LS9), make the following settings:
1) Set the Tx port to MIDI CH1.
2) Switch on Tx for PROGRAM CHANGE and CONTROL CHANGE.
3) Set PROGRAM CHANGE MODE to SINGLE.
4) Set the CONTROL CHANGE MODE to TABLE.
M7CL MIDI SETUP
7.2 Program Change
Both M7CL and LS9 can use their initial settings for the MIDI Program
Change table. So recalling Scene 1 on the console recalls Snapshot 1 in
MultiRack SoundGrid. It can be edited of course, to change the mapping
if required.
27 www.yamahaproaudio.com
www.waveslive.comYamaha Commercial Audio
Waves MultiRack SoundGrid with Yamaha Mixers
M7CL MIDI PROGRAM CHANGE
7.3 MIDI Control Change
In the MIDI CONTROL CHANGE table, assign the chosen parameters for
controlling the plug-ins to some Control Change numbers. In this example,
to fit with the supplied MultiRack templates, Control Change numbers 103
to 110 are used for the Discrete switches and numbers 111 to 118 are
used for the Continuous controls.
To edit a Control Change assignment, scroll through the list, select
number 103 on the screen, and a green edit window will appear.
1) Select “MIX/MATRIX SEND” as the MODE.
2) For PARAMETER 1 select:
a. “MIX 16 ON” for Control Change numbers 103 to 110.
b. “MIX16 H” for numbers 111 to 118 (don’t choose “MIX16 L”,
which is low value data).
3) Then choose from “CH 1” to “CH 8” for PARAMETER 2.
28 www.yamahaproaudio.com
www.waveslive.comYamaha Commercial Audio
Waves MultiRack SoundGrid with Yamaha Mixers
M7CL MIDI Control Change Edit
When all the parameters are assigned, the Control Change table will look
like this:
M7CL MIDI Control Change assignments.
29 www.yamahaproaudio.com
www.waveslive.comYamaha Commercial Audio
Waves MultiRack SoundGrid with Yamaha Mixers
LS9 MIDI Control Change assignments
In addition, Control Change messages 102 and 119 can be assigned to
Mix16 ON for channels 9 and 10 respectively. These will then control the
“Prev Page” and “Next Page” functions of MultiRack.
7.4 MultiRack Preferences
Open the Preferences window of MultiRack SoundGrid (in the Edit menu
in Windows, or MultiRack SoundGrid menu in Mac OSX), and select the
“Control” tab.
MultiRack SoundGrid Preferences
30 www.yamahaproaudio.com
www.waveslive.comYamaha Commercial Audio
Waves MultiRack SoundGrid with Yamaha Mixers
Make the following settings:
1) Select the MAC address shown in the MIDI In list. This is the Mac
address of the WSG-Y16 card used in the mixer.
2) Set MIDI Channel “1” for snapshot recall.
3) Set MIDI Pickup Mode to “Takeover”.
4) Click the [Load…] button and browse for the M7CL.mrrc template
file that accompanies this document (download from
http://www.yamahaproaudio.com/training/self_training/index.html).
5) Click [OK] to save the preferences.
Now the system is ready for remote control!
If the MultiRack Remote Control Editor window is opened, the Plug-in
Controls for M7CL/LS9 will look like this:
Plug-in Controls for M7CL / LS9.
7.5 Control from M7CL
The controls for channels 1-8 sending to Mix 16 have been selected in this
example. On the M7CL, they can be accessed in a couple of ways.
1) Firstly, from the Centralogic section of the console:
a. Select to view channels 1-8 on the central faders.
b. Press one of the Mix16 Send controls on the screen to assign
them to the row of 8 encoders below the screen.
c. Now these encoders will edit the Waves Plug-ins.
31 www.yamahaproaudio.com
www.waveslive.comYamaha Commercial Audio
Waves MultiRack SoundGrid with Yamaha Mixers
M7CL Centralogic view for channels 1-8
d. Press a Mix16 control again to open the MIX SEND window.
This gives access to the ON switches which can be used to
control other Plug-in functions.
2) Alternatively, use SENDS ON FADERS to assign MIX16 to the faders.
Then the faders and the ON switches of channel 1-8 will control the
plug-in parameters.
7.6 Control from LS9
Once again, the controls for channels 1-8 sending to Mix16 are the ones
chosen to control the Waves Plug-ins. Because of the reduced number of
encoders on this console, SENDS ON FADERS mode should be used, so
the faders and ON switches control the Plug-ins when MIX16 is selected.
LS9 SENDS ON FADER
32 www.yamahaproaudio.com
www.waveslive.comYamaha Commercial Audio
Waves MultiRack SoundGrid with Yamaha Mixers
When there are more than 8 parameters for a Plug-in, the extra
parameters can be accessed by using the “Prev Page” and “Next Page”
controls. In this example, they are mapped to the MIX16 ON switch for
channels 9 and 10 respectively. So they are easily accessed during
SENDS ON FADER mode.
7.7 Control Map
To conclude, below is the control map for this example of using M7CL or
LS9 to control the MultiRack Plug-ins. Note that there are no controls on
the console for the Hot Plug-in and Hot Snapshot selections this time. As
an alternative, some keys on the host computer keyboard can be assigned
to Hot Plug-ins and Hot Snapshots (see the MultiRack SoundGrid manual
for further details).
Discrete Plug-in Controls 1 2 3 4 5 6 7 8
Control Change Number 103 104 105 106 107 108 109 110
M7CL Send On to Mix16 Ch1 Ch2 Ch3 Ch4 Ch5 Ch6 Ch7 Ch8
LS9 Send On to Mix16 Ch1 Ch2 Ch3 Ch4 Ch5 Ch6 Ch7 Ch8
Continuous Plug-in 1 2 3 4 5 6 7 8
Controls
Control Change Number 111 112 113 114 115 116 117 118
M7CL Send Level to Mix16 Ch1 Ch2 Ch3 Ch4 Ch5 Ch6 Ch7 Ch8
LS9 Send Level to Mix16 Ch1 Ch2 Ch3 Ch4 Ch5 Ch6 Ch7 Ch8
Other Plug-in Controls Prev Page Next Page
Control Change Number 102 119
M7CL Send On to Mix16 Ch9 Ch10
LS9 Send On to Mix16 Ch9 Ch10
Now the control and creative freedom that the mixers and the plug-ins
provide can be enjoyed more fully.
33 www.yamahaproaudio.com
www.waveslive.comYamaha Commercial Audio
Waves MultiRack SoundGrid with Yamaha Mixers
8.0 Using CL-series Consoles
CL5, CL3 and CL1 consoles all have 4 User Defined Knobs that can be used for
MIDI Control Change. Also the 16 User Defined Keys can be used to transmit
MIDI Control, Program and Note messages. These can be used to control
various parameters in MultiRack SoundGrid.
8.1 MIDI & User Setup
As shown in section 7.1 for M7CL, enable the MIDI TX for Control Change
and Program Change.
Assign some MIDI Control Change functions to the User Defined Knobs,
as found in the User Setup menu. These can be used to control certain
plug-in parameters.
For the same Ctrl numbers, it is best to un-assign them in the MIDI Control
Change table, to stop the plug-ins being edited from other console
parameters by accident.
In addition, assign some MIDI Note parameters to the User Defined Keys.
These could be used for “Hot Plug-in Keys”, Navigation or Snapshot
Recall for example.
34 www.yamahaproaudio.com
www.waveslive.comYamaha Commercial Audio
Waves MultiRack SoundGrid with Yamaha Mixers
Next, follow the instructions in section 6.6 to assign the keys and knobs to
specific functions in MultiRack.
Now enjoy the creativity that these convenient controls can bring!
35 www.yamahaproaudio.com
www.waveslive.comYamaha Commercial Audio
Waves MultiRack SoundGrid with Yamaha Mixers
APPENDIX
a. Remote Layer control assignments of PM5D, DM2000, DM1000
Continuous Plug-In Control 1 2 3 4 5 6 7 8
PM5D MIDI Remote Encoders Ch1 Ch2 Ch3 Ch4 Ch5 Ch6 Ch7 Ch8
DM2000 Remote Layer Bank 4 Ch1 Ch2 Ch3 Ch4 Ch5 Ch6 Ch7 Ch8
Encoders
DM1000 Remote Layer Bank 4 Ch1 Ch2 Ch3 Ch4 Ch5 Ch6 Ch7 Ch8
Encoders
Discrete Plug-In Control 1 2 3 4 5 6 7 8
PM5D MIDI Remote Encoder Ch1 Ch2 Ch3 Ch4 Ch5 Ch6 Ch7 Ch8
On Switches
DM2000 Remote Layer Bank 4 Ch1 Ch2 Ch3 Ch4 Ch5 Ch6 Ch7 Ch8
On Switches
DM1000 Remote Layer Bank 4 Ch1 Ch2 Ch3 Ch4 Ch5 Ch6 Ch7 Ch8
On Switches
Other Plug-In Controls Prev Page Next Page
PM5D MIDI Remote Channel On Switches Ch7 Ch8
DM2000 Remote Layer Bank 4 On Switches Ch9 Ch10
DM1000 Remote Layer Bank 4 On Switches Ch9 Ch10
Rack Controls Input Gain Output Gain On / Off In / Out Mute
PM5D MIDI Remote Ch1 Ch2 Ch1 Ch2 Ch3
Fader Fader Ch On Ch On Ch On
DM2000 Remote Layer Ch15 Ch16 Ch14 Ch15 Ch16
Bank 4 Fader Fader On On On
DM1000 Remote Layer Ch15 Ch16 Ch14 Ch15 Ch16
Bank 4 Fader Fader On On On
36 www.yamahaproaudio.com
www.waveslive.comYamaha Commercial Audio
Waves MultiRack SoundGrid with Yamaha Mixers
APPENDIX
b. User Defined Key assignments of PM5D, DM2000, DM1000
Hot Plug-Ins #1 #2 #3 #4 #5 #6 #7 #8
PM5D User Defined Bank A 1 2 3 4 5 6 7 8
DM2000 User Defined Bank A 1 2 3 4 5 6 7 8
DM1000 User Defined Bank A 1 2 3 4 5 6 7 8
Plug-In Navigation Console function
Up Down Prev Next Bookmark Access Next
Rack Rack Plug-in Plug-in MIDI User Defined
REMOTE Bank
PM5D User Defined 9 10 11 12 23 24
Bank A
DM2000 User Defined 9 10 11 12 - 16
Bank A
DM1000 User Defined 9 10 - 11 - 12
Bank A
Hot Snapshots #1 #2 #3 #4 #5 #6 #7 #8
PM5D User Defined Bank B 1 2 3 4 5 6 7 8
DM2000 User Defined Bank B 1 2 3 4 5 6 7 8
DM1000 User Defined Bank B 1 2 3 4 5 6 7 8
Snapshot Console function
Recall
Prev Next Bookmark MIDI Access Prev User
REMOTE Defined Bank
PM5D User Defined Bank B 9 10 23 24
DM2000 User Defined Bank B 9 10 - 16
DM1000 User Defined Bank B 9 10 - 12
37 www.yamahaproaudio.com
www.waveslive.comYou can also read