Lab 9: Exploring the World with Google Earth
←
→
Page content transcription
If your browser does not render page correctly, please read the page content below
Geography 387 – Fall 2011                     Lab 9        Exploring the World with Google Earth

Lab 9: Exploring the World with
Google Earth
1.0 Purpose
In this lab we will take a tour of several locations on the earth as a way to explore the
functionality of a geobrowswer, Google Earth. Along the way, you may also learn some
interesting aspects of current social, political and environmental Geography!

2.0 Preliminary steps
Step 1. If you are working off-campus, then install Google Earth v6.0 if needed. This lab was
designed with Google Earth 6.1.0.5001, Build Date: October 17, 2011.

Step 2. Open Google Earth. Here is a general overview of the application.

                                                1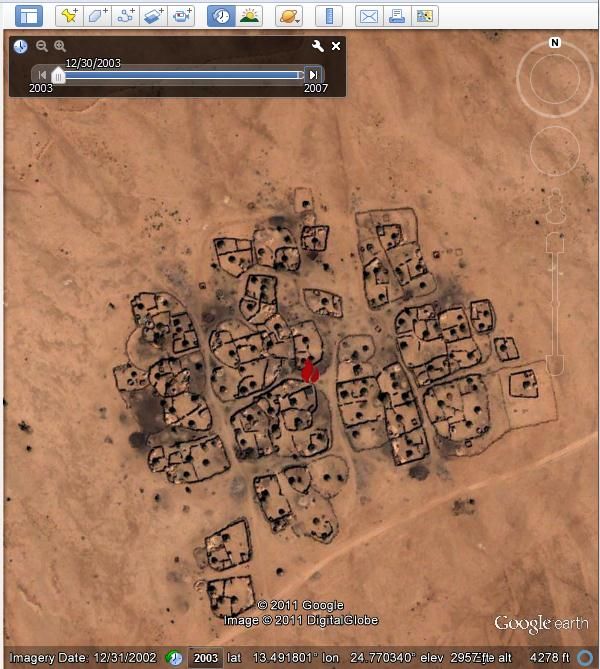
Geography 387 – Fall 2011                    Lab 9        Exploring the World with Google Earth

   1. Search panel - Use this to find places and directions and manage search
      results. Google Earth EC may display additional tabs here.

   2. 3D Viewer - View the globe and its terrain in this window.

   3. Toolbar buttons - See below.

   4. Navigation controls - Use these to zoom, look and move around (see below).

   5. Layers panel - Use this to display points of interest.

   6. Places panel - Use this to locate, save, organize and revisit placemarks.

   7. Add Content - Click this to import exciting content from the KML Gallery

                                               2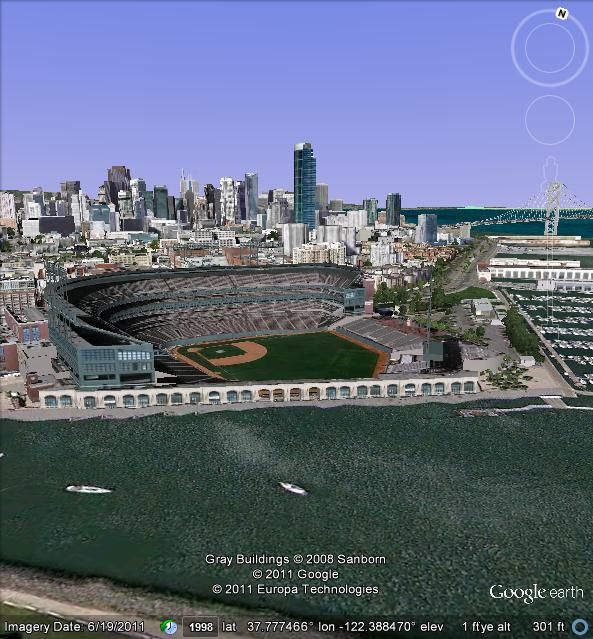
Geography 387 – Fall 2011                      Lab 9        Exploring the World with Google Earth

   8. Status bar - View coordinate, elevation, imagery date and streaming status here.

   9. Overview map - Use this for an additional perspective of the Earth.

Click the following toolbar buttons to...

                                                     Display sunlight across the
         Conceal or the display the side bar
                                                landscape

         Add a placemark for a location                View the sky, moon and planets

         Add a polygon                                 Measure a distance or area size

         Add a path (line or lines)                    Email a view or image.

         Add an image overlay on the Earth             Print the current view of the Earth

                                                    Show the current view in Google
         Record a tour
                                                Maps

         Display historical imagery

Step 3. In depth information on the application can be found in the Google Earth User Guide.
Start by reading the section in the user guide on Navigating in Google Earth . Spend some time
learning how to zoom in and out, move the view in different directions, swivel the view aspect,
and tilt the view angle.

The basics of the Navigation controls are listed below...

                                                3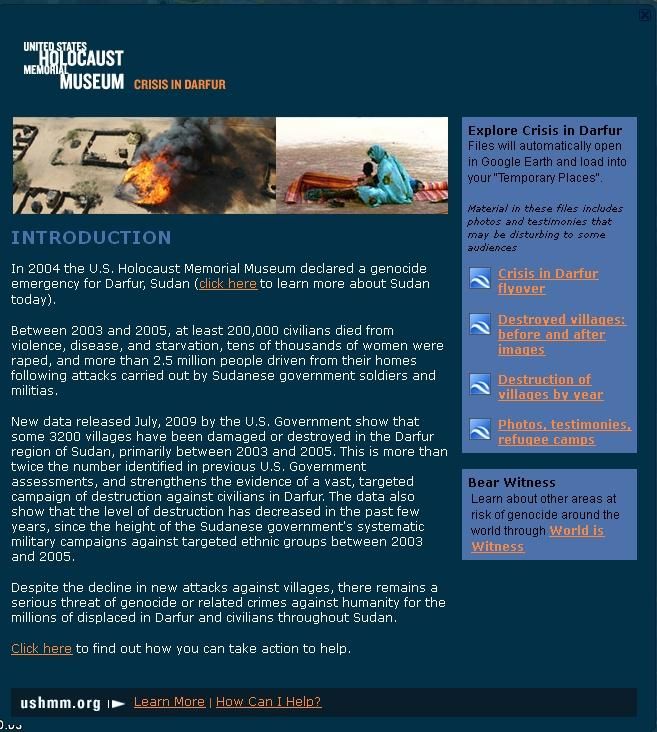
Geography 387 – Fall 2011                    Lab 9        Exploring the World with Google Earth

                        1. Clicking this button resets the view so that north is at the top of the screen.
                           Click and drag the ring to rotate your view.

                        2. Use the Look joystick to look around from a single vantage point, as if you
                           were turning your head. Click an arrow to look in that direction or continue to
                           press down on the mouse button to change your view. After clicking an
                           arrow, move the mouse around on the joystick to change the direction of
                           motion.

                        3. Use the Move joystick to move your position from one place to another. Click
                           an arrow to look in that direction or continue to press down on the mouse
                           button to change your view. After clicking an arrow, move the mouse around
                           on the joystick to change the direction of motion.

                        4. Use the zoom slider to zoom in or out (+ to zoom in, - to zoom out) or click
                           the icons at the end of the slider. As you move closer to the ground, Google
                           Earth swoops (tilts) to change your viewing angle to be parallel to the Earth's
                           surface. You can turn off this automatic tilt (Tools > Options > Navigation >
                           Navigation controls; Mac: Google Earth > Preferences > Navigation >
                           Navigation controls).

There is also a good summary video on the navigation controls on You Tube.

Step 4. In the Layers window, turn off all layers except Borders and Labels by clicking the
check box next to each folder. In the Borders and Labels layer, countries are labeled and have
yellow borders and major cities have a clickable red dot icon and a label. Clicking the icon
brings up additional information for the city in a pop-up window.

Your Layers window should look like this:

You are now ready to begin exploring the earth!

                                               4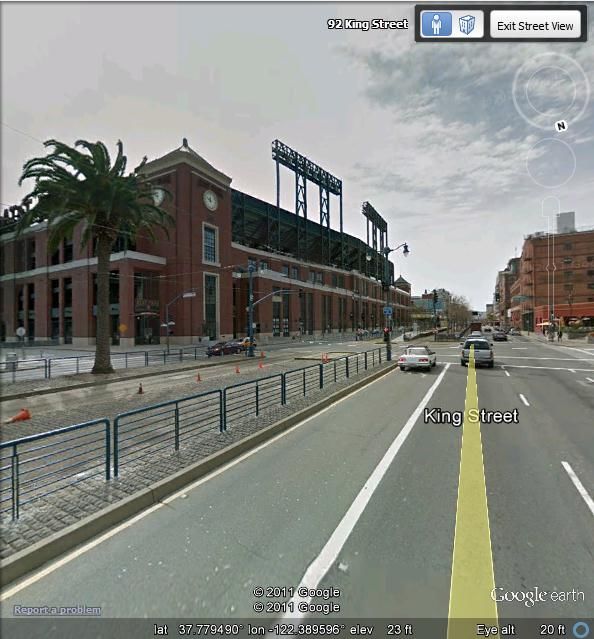
Geography 387 – Fall 2011                    Lab 9        Exploring the World with Google Earth

3.0 A tour of the world with Google Earth

Location 1 . Place a place mark with the placemark button.         You should see a yellow
pushpin appear somewhere in Google Earth.

In the Placemark properties window, click on the View tab. Enter the following information for
name, latitude, longitude and range. You can just copy and paste this information from this lab
webpage into the corresponding boxes in the properties window. (Remember: CTRL-C is copy
and CTRL-V is paste).

Name: Location #1

Latitude: 8°51'35.34"N

Longitude: 79°30'38.13"W

Range: 5000m

Click the "Center in View" checkbox. Your window should look like this:

                                               5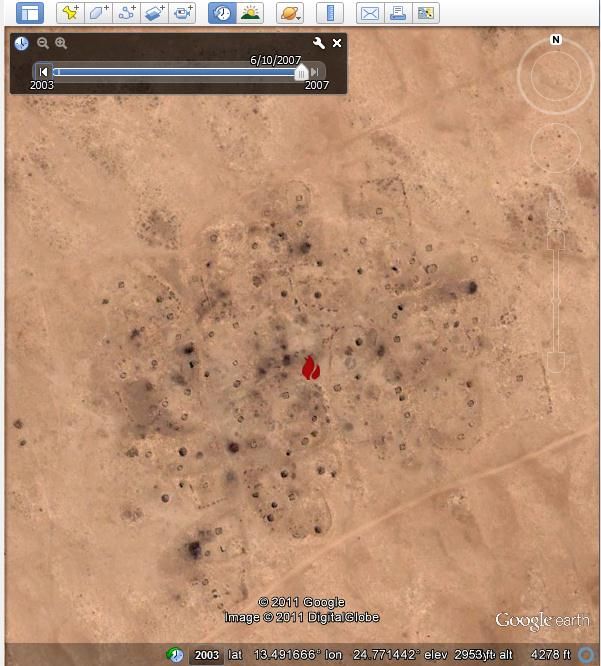
Geography 387 – Fall 2011                   Lab 9        Exploring the World with Google Earth

Click OK when you are done. The placemark will appear in the Places window on the left.
Notice that it is in the Temporary Places folder.

Drag and drop the Location #1 placemark into the My Places folder. This is preferable as your
locations will be automatically saved when in the My Places folder.

                                              6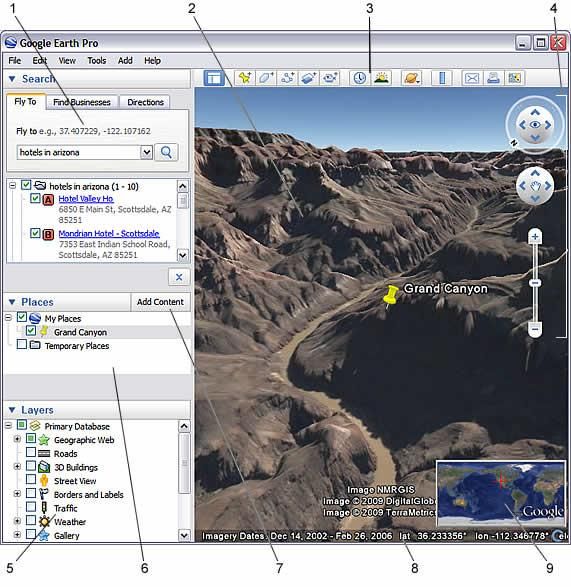
Geography 387 – Fall 2011                    Lab 9       Exploring the World with Google Earth

If your view has not already shifted to the new coordinates and view height at 5000m (range),
then double-click the placemark in the Places window. You should now have a view focused on
a boats in the ocean, similar to that below.

Turn on the Photos layer in the Layers window. This will allow you to see georeferenced
photographs uploaded by people all over the world through a service called Panoramio. Click on
the icons to see these pictures.

Use a combination of your zoom and pan tools to observe the mainland of this region. Answer
the following question.

 Question 1:   (4)

 Why are all these large boats concentrated in this part of the ocean? Where do you think they
 are going?

                                               7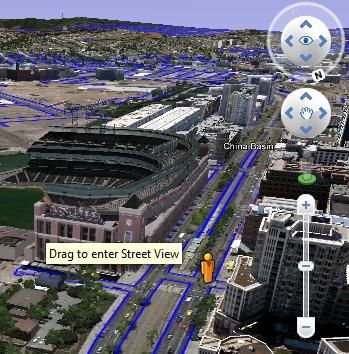
Geography 387 – Fall 2011                     Lab 9        Exploring the World with Google Earth

Click on the My Places folder in the Places window. This will make sure that the next placemark
that you make is placed in the My Places folder, rather than the Temporary Places folder. You
can also click and drag a placemark from Temporary Places to My Places.

Location 2. Now we will visit another location. Make a placemark once again, anywhere in the
view is fine, and this time enter the following information. Remember to enter the information in
the View tab, not in the latitude/longitude boxes below the placemark name.

Name: Location #2

Latitude: 3°56'45.29"S

Longitude: 63° 4'41.63"W

Range: 500m

Your view should now swing to a now location covered by forest. In the Layers window, turn on
the WWF Conservation Projects layer in the Global Awareness category. WWF is a global
conservation non-profit organization.

Zoom out a bit and pan south to find a WWF icon with a panda bear, located in a small island in
the river. Click on the icon. You should see a description of the WWF project with a "Find out
more" button.

                                                8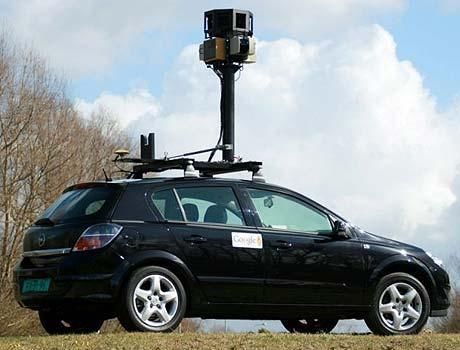
Geography 387 – Fall 2011                    Lab 9         Exploring the World with Google Earth

 Question 2:    (4)

 What is this forest type? What region are we in? How much of this forest was deforested in
 2003? What is WWF doing to help slow deforestation in the region? In the area south of the
 large river that has the WWF icon, how is the deforestation pattern related to human activity?

Turn off the WWF Conservation Projects layer by unchecking the box next to the layer.

Location 3. Make a placemark for the following location.

Name: Location #3

Latitude: 19°54'8.97"N

Longitude: 75° 6'5.42"W

Range: 500m

In the Layers window, turn on the National Geographic Magazine layer in
the Gallery category.

                                                9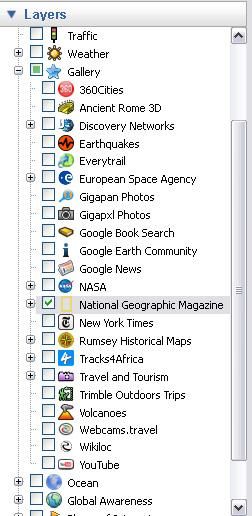
Geography 387 – Fall 2011                     Lab 9       Exploring the World with Google Earth

In the view near the placemark, look for the National Geographic placemark (see legend for the

symbology) to find more information about this location. You will need the Ruler tool   to
answer part of the following question.

                                               10
Geography 387 – Fall 2011 Lab 9 Exploring the World with Google Earth
Question 3: (4)
What is the name of this camp? Who manages it? What is the human rights controversy
surrounding this camp? What is the straight-line distance (in kilometers) between this site and
the capital of the country that occupies the majority of this island.
Close the ruler and turn off the National Geographic layer.
Location 4. Make a placemark for the following location.
Name: Location #4
Latitude: 37°46'42.13"N
Longitude: 122°23'22.89"W
Range: 500m
In the Layers window, turn on the 3D Buildings category. Pop the layer open and see that
there are several sublayers: Photorealistic, Gray, and Trees. These sub-layers allow you to
visualize buildings with a color photo façade, gray outline when color is not available, and
modeled trees. All of these 3D layers are contributed by the Google Earth user community, who
use Google’s SketchUp tool. This is a volunteer, “crowd sourcing” endeavor and to date you will
find 3D objects mostly in large cities of the world.
Be sure to use the zoom, tilt and view aspect controls to get a good view of this 3D model! If
you want a blue sky, you need to turn on the “atmosphere”, under View on the top menu.
11Geography 387 – Fall 2011 Lab 9 Exploring the World with Google Earth
This is a good place to explore “Street View” in Google Earth. Google has sent out a car in
major cities and routes of the world to acquire hemispherical photographs from the ground. The
car has a GPS and camera mounted on the roof and records a point and photo at regular
intervals.
12Geography 387 – Fall 2011 Lab 9 Exploring the World with Google Earth
You can venture into Street View by left-clicking the yellow person icon in the navigation tools
and dragging and dropping it into areas of Google Earth that have a blue highlight. Only linear
features (roads) with Street View are highlighted in blue. In San Francisco, most of the city has
been captured. Try looking at a view on King Street in front of the stadium.
13Geography 387 – Fall 2011 Lab 9 Exploring the World with Google Earth
When you “dive” into Street View, you can then click and drag the view to look around the point
in 180 degrees (hemisphere). You can toggle between the virtual 3D view and Street View with
the icons in the top right corder. This is where you can Exit Street View as well.
Go ahead and exit Street View. Press the “R” key to swivel the view with a north orientation and
viewing down.
14Geography 387 – Fall 2011 Lab 9 Exploring the World with Google Earth
In the Layers window, check the Map Finder layer in the Rumsey Historical Maps folder,
within the Gallery category.
Pan north from the stadium near Alcatraz island and North Beach, and click on the San
Francisco 1853 historical map icon.
A window will pop open. Click the link to "To Overlay the Map on Google Earth" or the thumbnail
of the map. The map should overlay over the Google Earth base image. Close the information
window for the map. Also, notice that a network link is created in the Places window called
"North_America/US_Cities/San_Francisco_1853". The maps are not physically loaded on your
computer, but rather "streamed" as needed from the Rumsey server.
You can use the transparency slider in the Places window to change the transparency of the
map image overlay. Click on the "North_America/US_Cities/San_Francisco_1853" layer, then
click the Adjust Opacity button to activate the opacity slider.
Pan back to Location #4 to answer the following question.
Question 4: (4)
Judging from the archival map of San Francisco, what was beneath the park back in 1853?
How do you think this area was developed?
Turn off the Rumsey maps. Turn off the 3D buildings.
15Geography 387 – Fall 2011 Lab 9 Exploring the World with Google Earth
Location 5. Make a placemark for the following location.
Name: Location #5
Latitude: 31°14'13.94"N
Longitude: 121°30'5.01"E
Range: 1000m
Tilt:0.000000°
Explore the buildings at this location, then do a "Fly" to these coordinates
31°14'30 N, 121°29'42 E by using the Search window. For fun, turn on the Photorealstic 3D
layer for this area.
Question 5: (4)
What city and country have we flown to?
Click the main building at this location to open a pop-up window. Click the link to the
Wikipedia page for this building. What is the height of the building? What is the object used
for?
Location 6. Make a placemark for the following location.
Name: Location #6
Latitude: 38° 2'22.3"N
Longitude: 140° 55'6.6"E
Range: 1000m
Turn on the Roads layer.
16Geography 387 – Fall 2011 Lab 9 Exploring the World with Google Earth
We will explore Google Earth’s historical high-resolution imagery at this location. Click on the
clock icon at the top of the tool bar so that you see the historic imagery time slider. See
screen shot below. Slide the slider to get to the oldest available image. Then click on the
forward button or use the slider to step forward in time. You should see dramatic changes
in the urban environment through time.
Explore this area by stepping through the historical imagery. Also try flying into Street View to
see ground-level views of the area before the drastic change occurred. You can also turn on
the 3D buildings layer to see buildings in their historic locations.
Question 6: (4)
What country and nearest major city have we flown to? What is this town’s sister city?
What was the major event that caused the drastic change here? When did this occur and
does that date make sense relative to the historical imagery?
Location 7. Make a placemark for the following location.
Name: Location #7
Latitude: 6°53'53.07"S
Longitude: 31°11'15.34"E
Range: 50m
In the Layers window, turn on the Africa Megaflyover layer in the National Geographic
Magazine Folder, Gallery category.
17Geography 387 – Fall 2011 Lab 9 Exploring the World with Google Earth
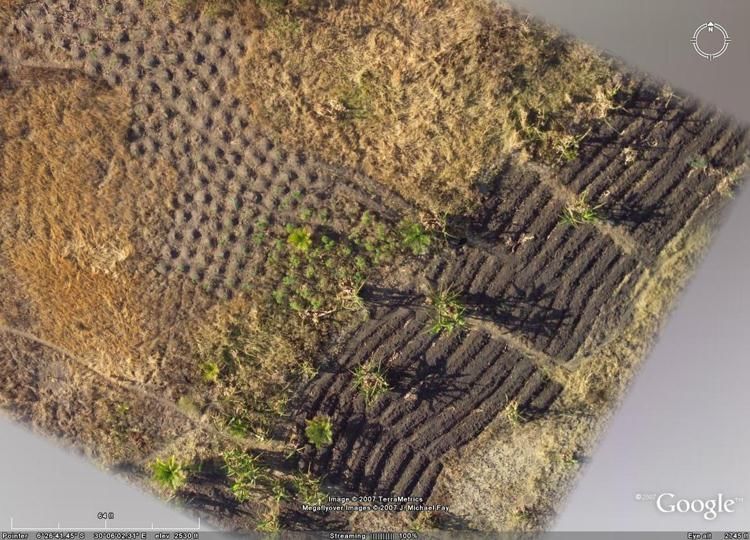
This shows a picture taken by biologist and explorer J. Michael Fay during his "Megaflyover" of
Africa in a small airplane.
Question 7: (4)
What are we looking at in this aerial photograph? The imagery in Google Earth around this
area of Africa is from the SPOT satellite, with 2.5 m spatial resolution. Why is the image > 1
km from your placemark blurry? Does it seem feasible to cover all of Africa with aerial
photographs from a small airplane? Why or why not.
Click on one of the small red airplane icons to read field dispatches from the Megaflyover
campaign. Zoom out and find another red airplane Megaflyover icon somewhere else in Africa.
Click the icon to zoom in to the placemark. When you find one that you like, right-click the icon
and select "Save to My Places”. The Megaflyover placemark should appear in your My Places
folder.
You will probably want to turn off the automatic tilting of the view as you zoom in. You can do
this under ToolsOptionsNavigation tab.
Zoom in to get a nice view of your Megaflyover location, and then save the image to a JPG file
by selecting, FileSaveSave Image... You will email your image at the end of the lab. Here is
my choice of agricultural fields along a lake edge in a sheltered bay.
18Geography 387 – Fall 2011 Lab 9 Exploring the World with Google Earth
Turn off the Megaflyover layer.
Crisis in Darfur.
In the Layers window, turn on the USHMM: Crisis in Darfur layer in the Global
Awareness category. Also be sure the Borders and Labels category is turned on.
19Geography 387 – Fall 2011 Lab 9 Exploring the World with Google Earth
Double click the USHMM: Crisis in Darfur in the Layers window to zoom to the full extent of this
tour. Click the Crisis in Darfur icon (black and white picture) to open the tour's introductory
placemark. Click the "Destroyed villages: before and after images" link to load in more content
into Google Earth.
20Geography 387 – Fall 2011 Lab 9 Exploring the World with Google Earth
This link will load a layer in Places called "Before and After Satellite Imagery". Click on the little
arrow next to this layer and a list of villages will appear below the layer. When you click a
village name, Google Earth will zoom in. These are locations where you can use Google Earth's
historic imagery to see changes in the landscape. In this case, you can see villages that have
been completely or partially destroyed. Click on the clock icon at the top of the tool bar so that
you see the historic imagery time slider. See screen shot below. Click the left-most button on
21Geography 387 – Fall 2011 Lab 9 Exploring the World with Google Earth
the slider to get to the oldest available image. Notice the extent of the village, with huts and
walls. Then click on on the forward button to step forward in time. You should see changes in
the village, typically destroyed buildings and leveled walls. Explore a few villages with this layer
and historical image tool.
December 30, 2003 imagery - Village Tina
22Geography 387 – Fall 2011 Lab 9 Exploring the World with Google Earth
June 10, 2007 Imagery - Village Tini
Zoom out and click on the main Crisis in Darfur icon, and this time load the "Photos,
testimonies, refugee camps" layer. This loads a legend. Explore destroyed village, testimonial
and photo placemarks in this region to get an idea of the full geographic and human scale of the
genocide in Darfur.
Save and open the darfur.kml layer from the lab webpage to see a few locations that I found
particularly interesting. You download the zip file to your local drive, then unzip the darful.kml
file, and then open the file through FileOpen.
23Geography 387 – Fall 2011 Lab 9 Exploring the World with Google Earth
Question 8: (4)
In what part of Sudan is Darfur located? How many people have been driven homes and how
many have been killed to date? Who being killed/displacing and by whom? Besides internal
displacement within Sudan, where are the refugees going? Why is this crisis in Darfur
considered genocide?
Turn off the Crisis in Darfur layers.
Location 8.
Choose a location that you find interesting anywhere on the globe. Do not choose a site that we
have already toured in the lab so far. You are welcome to include a site with a SketchUp 3d
model(s). Create a placemark for your location (Location #8), including a 3d perspective using
the tilt control. Include in the description box of the placemark a description of your location. You
can automatically acquire all the tilt, orientation, elevation and image time parameters of your
view into the placemark's view parameters from the View tab, Snapshot Current View button.
For example, below I collected the parameters for a view of Aconcagua mountain, Argentina. I
chose an image from June, 2007 as it had a better view of the mountain than the most up-to-
date image.
24Geography 387 – Fall 2011 Lab 9 Exploring the World with Google Earth
Save an image of your view as a JPG file to turn in. Be sure your placemark is in the My Places
folder with your other Location 1-7 placemarks. Delete any other placemarks that may be in
your My Places folder so that just Locations 1 through 8 and your additional Megaflyover
placemark remain. Right-click on the My Places folder and select Save Place As...Save your
folder as a KML file to turn in.
25Geography 387 – Fall 2011 Lab 9 Exploring the World with Google Earth
4.0 To turn in
The question sheet, with typed answers (Word document)
Megaflyover JPG image file (for your chosen location)
KML of placemarks in My Places folder (locations 1-8 and your Megaflyover location
only)
JPG image of your Location #8
Submit electronic files via email to your instructor, with the subject "G387, Lab 9, [your last
name]".
Credits: This lab was created by Matthew Clark for instruction at Sonoma State University.
Last update: November 27, 2011.
26You can also read