Learn to Program with Minecraft Plugins - Create Flying Creepers and Flaming Cows in Java
←
→
Page content transcription
If your browser does not render page correctly, please read the page content below
Extracted from:

                          Learn to Program with
                              Minecraft Plugins
         Create Flying Creepers and Flaming Cows in Java

This PDF file contains pages extracted from Learn to Program with Minecraft Plugins,
  published by the Pragmatic Bookshelf. For more information or to purchase a
                  paperback or PDF copy, please visit http://www.pragprog.com.
 Note: This extract contains some colored text (particularly in code listing). This
 is available only in online versions of the books. The printed versions are black
  and white. Pagination might vary between the online and printed versions; the
                                                    content is otherwise identical.
                                     Copyright © 2014 The Pragmatic Programmers, LLC.

                                                                          All rights reserved.

No part of this publication may be reproduced, stored in a retrieval system, or transmitted,
in any form, or by any means, electronic, mechanical, photocopying, recording, or otherwise,
                                               without the prior consent of the publisher.

                                                  The Pragmatic Bookshelf
                                                           Dallas, Texas • Raleigh, North Carolina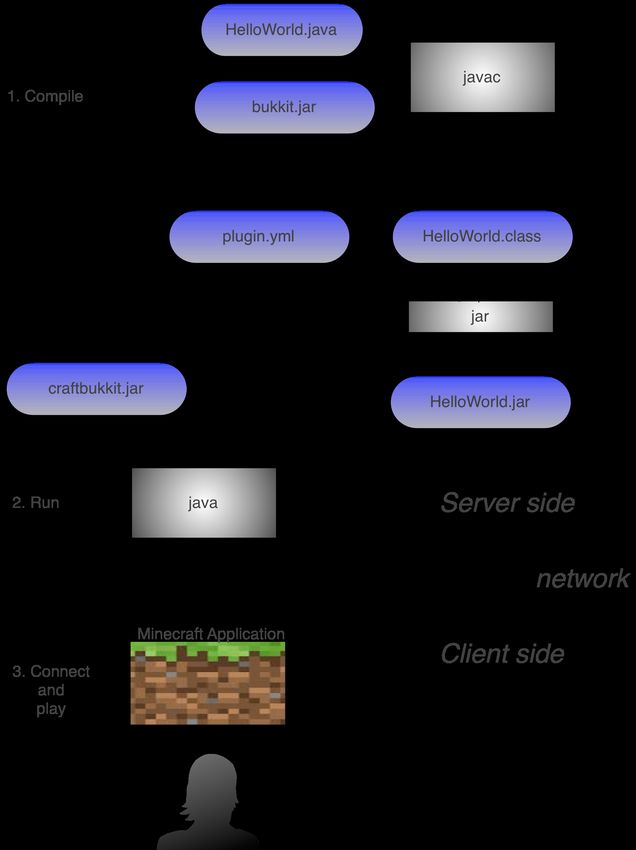
Learn to Program with
             Minecraft Plugins
Create Flying Creepers and Flaming Cows in Java

                                               Andy Hunt

                       The Pragmatic Bookshelf
                            Dallas, Texas • Raleigh, North Carolina
Many of the designations used by manufacturers and sellers to distinguish their products are claimed as trademarks. Where those designations appear in this book, and The Pragmatic Programmers, LLC was aware of a trademark claim, the designations have been printed in initial capital letters or in all capitals. The Pragmatic Starter Kit, The Pragmatic Programmer, Pragmatic Programming, Pragmatic Bookshelf, PragProg and the linking g device are trade- marks of The Pragmatic Programmers, LLC. Every precaution was taken in the preparation of this book. However, the publisher assumes no responsibility for errors or omissions, or for damages that may result from the use of information (including program listings) contained herein. Our Pragmatic courses, workshops, and other products can help you and your team create better software and have more fun. For more information, as well as the latest Pragmatic titles, please visit us at http://pragprog.com. Minecraft is ®, ™, and © 2009–2014 Mojang/Notch. The team that produced this book includes: Brian Hogan (editor) Potomac Indexing, LLC (indexer) Candace Cunningham (copyeditor) David J Kelly (typesetter) Janet Furlow (producer) Ellie Callahan (support) For international rights, please contact rights@pragprog.com. Copyright © 2014 The Pragmatic Programmers, LLC. All rights reserved. No part of this publication may be reproduced, stored in a retrieval system, or transmitted, in any form, or by any means, electronic, mechanical, photocopying, recording, or otherwise, without the prior consent of the publisher. Printed in the United States of America. ISBN-13: 978-1-937785-78-9 Encoded using the finest acid-free high-entropy binary digits. Book version: P1.0—May 2014
CHAPTER 3

                                     Build and Install a Plugin
  Your Toolbox
  After completing this chapter you’ll know how to

     • Compile Java source code to .class files, pack them in a JAR, and install them on
       a Minecraft server
     • Run your local server with a new plugin
     • Connect to your local server

Now that you have the tools installed, we’ll build a simple, basic plugin. It
won’t do much as plugins go, but it will make sure you can build and run
your own plugins, and it will act as starting point (or skeleton) for all the
plugins we’ll write in this book.

So how do your typed-in instructions end up running on a Minecraft server?
Here’s how the whole process works.

You type Java language instructions (we call that “source code”) and save
them into a text file, and then the Java compiler, javac, reads your text file
and converts it into something the computer can run.

You went through this process already with the simple CreeperTest.java program
you typed in previously.

For the source code you type into a file named CreeperTest.java you’ll get a
binary (not text) file named CreeperTest.class. A binary file is just a file of numbers
—it makes sense to the computer, but not to humans.

Because a typical program might use lots and lots of class files, you usually
archive a bunch of class files into a JAR file, and Java runs the code from
the JAR.

                                                                          • Click HERE to purchase this book now. discuss
Chapter 3. Build and Install a Plugin •6
Java (the java program itself) will read class files and JAR files to create a
running process on the computer. With Minecraft, this will be the server
process that your Minecraft clients connect to. For now, the only client will
be you.
The following figure shows how these parts all fit together.
Figure 2—Compile a plugin and run it on the server.
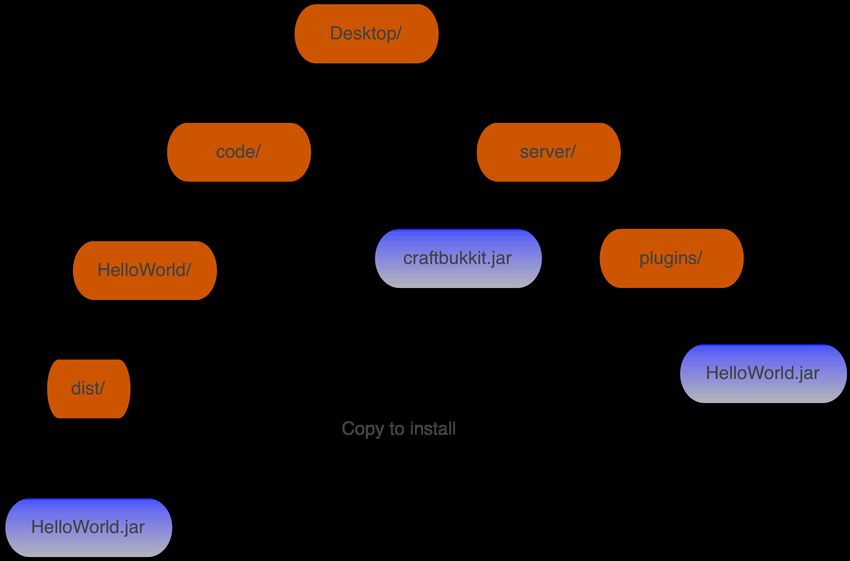
In the Java world, you have to place all these files in specific places for this
all to work. We made a directory structure like that earlier, all ready for your
version of the HelloWorld plugin. I’ve also got a complete plugin all set up for
you in the HelloWorld directory in the code for this book, which you downloaded
to Desktop/code/HelloWorld.
• Click HERE to purchase this book now. discussChapter 3. Build and Install a Plugin •7
So in Desktop/code/HelloWorld, you’ll find a directory tree for the source code,
under src. You’ll also see a bin directory where the compiled class files are
created, and a dist directory where the class file and configuration files are
packed together into a jar file. When you’re ready to share your plugin with
others, you’ll give them the JAR.
HelloWorld is one development directory. You’ll probably have one of these for
each plugin you develop, each with its own src, bin, dist, and so on.
Then over in your server directory at Desktop/server, you have the Minecraft
server files, including the craftbukkit.jar, which contains all the bits you need to
run the game, as well as the bukkit.jar we’re using to develop code in the
Minecraft worlds. Also in server, there’s a directory for plugins that the Minecraft
server will use when it runs.
When working on code in the development directory, the last step when you’re
ready to test it out in a server is to copy the jar file up to the server’s plugin
directory (see the following figure). We’ll see how to do that automatically in
just a second.
Figure 3—Installing a plugin
Java tends to use paths and configuration files to specify where all these files
and directories live. It can get a little tricky at times, as there are a lot of
moving parts, and it’s frustrating when Java can’t find some critical file that
• Click HERE to purchase this book now. discussChapter 3. Build and Install a Plugin •8
is sitting right there in front of you. Just because you know where a file is
doesn’t mean Java knows.
Now let’s look at the source code, then cover how to build and install it.
Plugin: HelloWorld
It’s a long-held tradition in the programming world to start off with a simple
test program that prints out the message “Hello, World.” So we’ll start off by
building and running an existing plugin that does that in Minecraft—except
we’ll send out a slightly more interesting message.
Here is the Java source code for our HelloWorld plugin, which is already typed
in for you in the file ~/Desktop/code/HelloWorld/src/helloworld/HelloWorld.java.1 There’s a
lot of weird stuff in here.
HelloWorld/src/helloworld/HelloWorld.java
❶ package helloworld;
❷ import java.util.logging.Logger;
import org.bukkit.ChatColor;
import org.bukkit.command.Command;
import org.bukkit.command.CommandSender;
import org.bukkit.plugin.Plugin;
import org.bukkit.plugin.java.JavaPlugin;
❸ public class HelloWorld extends JavaPlugin {
public static Logger log = Logger.getLogger("Minecraft");
public void onLoad() {
log.info("[HelloWorld] Loaded.");
}
public void onEnable() {
log.info("[HelloWorld] Starting up.");
}
public void onDisable() {
log.info("[HelloWorld] Stopping.");
}
public boolean onCommand(CommandSender sender, Command command,
String commandLabel, String[] args) {
if (commandLabel.equalsIgnoreCase("hello")) {
String msg = "[Server] That'sss a very niccce EVERYTHING you have there...";
getServer().broadcastMessage(msg);
return true;
}
return false;
}
}
1. If you haven’t downloaded the code for this book to your Desktop yet, grab it now from
http://media.pragprog.com/titles/ahmine/code/ahmine-code.zip. You can use unzip from the command
line to unpack the archive and create all the files.
• Click HERE to purchase this book now. discussConfigure with plugin.yml •9
Don’t be discouraged if this looks like space-alien speech or Elvish right now.
We’ll make sense out of it over the next several chapters. Instead focus on
what is familiar: there are some English words in there, like “import” and
“public” and “return,” and what might be sentences or statements of some
kind, which all end with semicolons (“;”). There are also some strange charac-
ters like “{” and “}” that seem to be important.
What does it all mean? Well, this plugin implements a user command, /hello,
which will broadcast the traditional creeper greeting, “That’sss a very niccce
EVERYTHING you have there…” to all online players in Minecraft.
Notice that the name of this plugin is declared as public class HelloWorld on the
line at ❸. That’s the same name as the file name that contains this code:
HelloWorld.java. This piece of code is also set up to be in a package—that is, a
group of related files—using the same name on the line at ❶. The package
name is all lowercase, and it’s also the directory name where our Java source
code file lives, under src/ in helloworld/HelloWorld.java. It’s important that the names
in all of these places match; a typo on one of them can lead to strange errors.
You use import statements (you’ll see these beginning on the line at ❷) to get
access to other things that you need in your plugin, like parts of the Bukkit
library and other Java libraries. If you forget to include an import for something
you need, you’ll get an error that says “cannot find symbol” because Java
doesn’t know what you mean. For your convenience, I’ve included a list of all
the imports we’re using in Appendix 7, Common Imports, on page ?.
Configure with plugin.yml
But this source code alone isn’t enough; you also need a configuration file so
that Minecraft can find and launch your plugin. The configuration file is
named plugin.yml and looks like this:
HelloWorld/plugin.yml
name: HelloWorld
author: AndyHunt, Learn to Program with Minecraft Plugins
website: http://pragprog.com/book/ahmine
main: helloworld.HelloWorld
commands:
hello:
description: Say Hello to everyone!
usage: /hello [optional message]
version: 0.1
• Click HERE to purchase this book now. discussChapter 3. Build and Install a Plugin • 10
Here’s a description of what this file needs. Don’t worry much about the details
yet—it will make more sense as we get farther into the book.
name
Name of the plugin—in this case, HelloWorld.
author
Name of the author (that’s you).
main
Name of the package and class that Java will run to start this plugin
(package.classname).
version
Version number of your plugin. Start low, and increment the number
each time you release a new version to the world.
commands
A list of the user commands this plugin supports.
For each command, you have to specify three things:
• command: The command a user can type in
• description: A simple description of what the command does
• usage: A description of the command usage and any options
The format is important: the white space that’s used to indent some lines
needs to be there, using spaces, not tab characters. It all needs to line up,
and the tags (names followed by a colon—“:”) need to be spelled just as shown
here. You can find more details on the YAML format in Appendix 5, Cheat
Sheets, on page ?.
Build and Install with build.sh
The commands you’ve been typing in your terminal window can also be saved
into a file; that way you can run them over and over again without having to
retype them each time. We call this a shell script, and it’s another way to
program the computer.
Building a plugin is only a little more complicated than compiling a single
Java file as we did last chapter, but even so, it involves a lot of commands
we don’t want to have to type out every time.
• Click HERE to purchase this book now. discussBuild and Install with build.sh • 11
To make it easier, I’ve made a shell script for you named build.sh that will do
the three main steps:2
1. Use javac to compile the .java source to .class files.
2. Use jar to archive the class files and configuration file.
3. Copy the JAR file to the server.
After that, you’ll need to stop and restart the server so it can pick up the
changes.
The build script needs to know where your server directory is located. At the
very top of the script, it says this:
MCSERVER=$HOME/Desktop/server
For most people that should just work if your server directory is located on
your Desktop. If that doesn’t work, you’ll need to edit the build.sh file and
change that directory so that the MCSERVER= points to your local Minecraft
server directory. That MCSERVER= setting is how the script knows where to find
the server.
Let’s try it out and see what happens.
At your command line, change your current directory to the HelloWorld directory.
From there, run the build.sh script. So for me, I can start anywhere and go to
my home directory, then I can cd down into Desktop, then code, then HelloWorld:
$ cd
$ cd Desktop
$ cd code/HelloWorld
$ ./build.sh
(Remember, no matter how you actually get to your Desktop, I’ll just show it
as cd Desktop from now on for reference. You may need to do a cd ~/Desktop or start
at your home directory and go down, depending on your particular system.)
You should see results that look a lot like this:
Compiling with javac...
Creating jar file...
Deploying jar to /Users/andy/Desktop/server/plugins...
Completed Successfully.
Check to see that the file really was installed in the server directory:
2. For larger projects, folks use tools like Ant, Maven, or Gradle when the build becomes
more complex and has to manage dependencies among many parts. But that’s overkill
for our needs here.
• Click HERE to purchase this book now. discussChapter 3. Build and Install a Plugin • 12
$ cd Desktop
$ cd server/plugins
$ ls
HelloWorld.jar
Yup, the JAR file is in the server directory. Success!
If you get errors, here are a few things to check:
• If you see warning: [options] bootstrap class path not set in conjunction with -source 1.6,
ignore it. It’s just Java being picky. We’ll cover how to take care of that
later in the book.
• If you get the error ./build.sh: Permission denied you might need to type chmod
+x build.sh to give the script executable permission.
• If you get the error package org.bukkit does not exist followed by a ton of other
errors, it’s not finding the server directory (see below).
• If you’re seeing syntax errors, make sure you are using a fresh copy of
the files downloaded from this book’s website, with no local modifications.
• If everything compiles okay but you get an error trying to copy the JAR
file, make sure the server directory is correct.
If the script is having trouble finding the server directory, edit build.sh and change
the MCSERVER= directory name to the correct location of your Minecraft server.3
Once it compiles and installs, you are excellent! Now you have a compiled
plugin, ready for the Minecraft server to use.
If your server is still running, it won’t know about this new plugin. You have
to either stop it and then restart it, like this:
$ cd ~/Desktop/server
$ ./start_minecraft
or use the reload command at the server console if it’s already running:
>reload
08:47:32 [INFO] [HelloWorld] Loading HelloWorld v0.1
08:47:32 [INFO] [HelloWorld] Loaded.
08:47:32 [INFO] [HelloWorld] Enabling HelloWorld v0.1
08:47:32 [INFO] [HelloWorld] Starting up.
08:47:32 [INFO] Server permissions file permissions.yml is empty, ignoring it
08:47:32 [INFO] CONSOLE: Reload complete.
>
3. Make sure it’s spelled correctly and starts with a “/” character so that you have the full
path to your server starting at the root directory.
• Click HERE to purchase this book now. discussNext Up • 13
And there’s the startup message from our new HelloWorld plugin. If you don’t
see any message from HelloWorld starting up, then your minecraft server can’t
find it. Make sure the HelloWorld.jar file is in the server’s plugins directory, stop
the server, and try starting it up again.
Once you’re connected and in the Minecraft world, you can test out your fine
new command from the client chat window. In the Minecraft game, just start
typing /hello and see what happens. As soon as you type the “/” character,
you’ll see that you’re typing in a chat window at the bottom of the screen.
Press Return and…
…you should see our message appear in the server log console and in the
game window. This is what it looks like in the server console:
14:47:58 [INFO] AndyHunt issued sever command: /hello
14:47:58 [INFO] [Server] That'sss a very niccce EVERYTHING you have there...
Getting around in Minecraft
In case you aren’t familiar with the Minecraft graphical user interface (GUI), here are
a couple of quick tips. You can check out some of the many YouTube tutorials or
official docs for more.
The keys W , A , S , and D move you forward, backward, left, and right, respectively.
Use the Spacebar to jump.
Use the mouse to control the direction you are facing.
You “hit” things with your left mouse button—for example, to strike with a sword or
dig with a pickaxe or shovel.
You “use” items with your right mouse button—for example, placing an item or
opening a door.
You type commands to Minecraft with a leading “/” character. You can change the
game to creative mode with /gamemode c, and back to survival mode with /gamemode s.
Next Up
Congratulations! You just compiled and installed a plugin from source code,
installed it on your local server, connected, and tested it out!
With that out of the way, we’ll spend the next few chapters taking a deeper
look at all the source code that makes a plugin, and see what makes Java
tick so you can make your own plugins.
• Click HERE to purchase this book now. discussChapter 3. Build and Install a Plugin • 14
Your Growing Toolbox
Your toolbox is 13% full. You can now do the following:
• Use the command-line shell
• Build with Java, javac
• Run a Minecraft server
• Deploy a plugin
• Connect to a local server
• Click HERE to purchase this book now. discussYou can also read