Osteopathic Self-Treatment to Promote Health and The Body's Ability to Fight COVID-19
←
→
Page content transcription
If your browser does not render page correctly, please read the page content below
Osteopathic Self-Treatment to Promote Health and The Body’s
Ability to Fight COVID-19
Jose S. Figueroa, DO; Drew D. Lewis, DO; Ryan D. McMunn, OMS IV

 Preface
 In the growing pandemic of COVID-19, the reality many face includes limited access to
 testing, limited personal protective equipment for health care workers and the general
 public, and high risk of infection to those on the front lines of providing essential care. With a
 lack of effective treatment or vaccine in the immediate future, the importance of public
 health efforts to decrease the burden the current pandemic places on the health care system
 is important for the well-being of all. In this situation, the usefulness of self-administered
 measures that can be performed at home to support the body to maintain health are
 increased.

 Osteopathic Manipulative Treatment (OMT) has been shown in numerous studies to support
 the body’s own healing mechanisms, including beneficial effects on respiratory infections.

 Based on well-established osteopathic principles, this osteopathic self-treatment (OST) aims
 to promote optimal breathing and circulation to support the function of the immune and
 nervous systems while helping reduce stress and maintain balance in the body.

 This OST provides exercises designed to remove obstacles to the body’s own functions and
 therefore promote health. It is useful for those at risk of infection or those already testing
 positive for COVID-19. There is utility in these approaches for patients that must self-isolate
 and socially distance such as during the 2020 COVID-19 pandemic.

© 2020 Des Moines University                   Osteopathic Self-Treatment COVID-19                 1
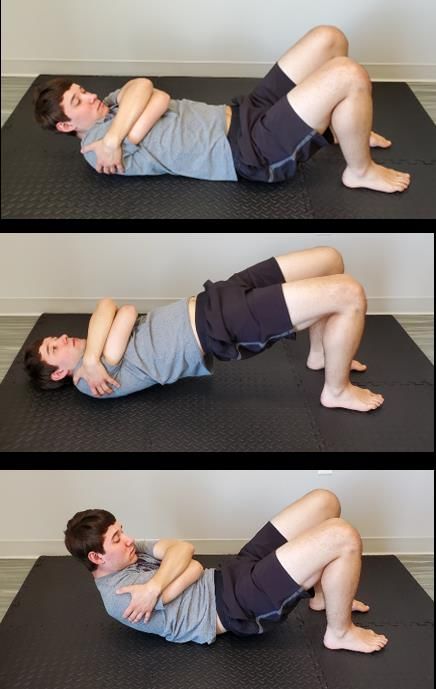
Table of Contents
    Introduction and Key Concepts.................................................................................. 3

    I.    Standing ............................................................................................................ 3
          A. First rib and collarbone - base of neck region (Thoracic Inlet) ........................... 3

   II.    Seated ................................................................................................................ 4
          A. First thoracic vertebra - base of neck region (Thoracic Inlet) ............................ 4
          B. Ribs to Pelvis (Quadratus Lumborum) muscle stretch ....................................... 5
          C. Self-correction of occiput – atlas joint (OA) ....................................................... 6
          D. Self-correction of atlas – axis joint (AA) ............................................................. 7
          E. Front of Neck (Sternocleidomastoid, or SCM) muscle stretch........................... 8
          F. Upper Back (Levator Scapula) muscle stretch .................................................... 9
          G. Upper Shoulder (Upper Trapezius) muscle stretch .......................................... 10
          H. Head–Neck Posture Training (by strengthening the deep neck flexor muscles) .11
          I.   Gentle Self-Massage of the Neck and Upper Shoulder ................................... 12

   III.   Kneeling ............................................................................................................ 13
          A. Latissimus Dorsi muscle (or “Prayer Position”) stretch .................................... 13
          B. Front of hip (Psoas) muscle stretch .................................................................. 14

   IV. Prone ................................................................................................................ 15
       A. Face Down (Prone) Press-up ............................................................................ 15

   V.     Supine .............................................................................................................. 16
          A. Spinal Stimulation – Thoracic and Rib areas .................................................... 16
          B. Bottom of the Spine (Lumbosacral Junction) ................................................... 17
          C. Bottom or Rib cage (Thoracolumbar junction) stretch .................................... 18
          D. Knee to chest ................................................................................................... 19
          E. Spine to Hip (Piriformis) muscle stretch........................................................... 20
          F. Self-Pedal Pumps .............................................................................................. 21

   VI. Breathing ......................................................................................................... 22
       A. Box Breathing.................................................................................................... 22

Osteopathic Self-Treatment COVID-19                                                      © 2020 Des Moines University 2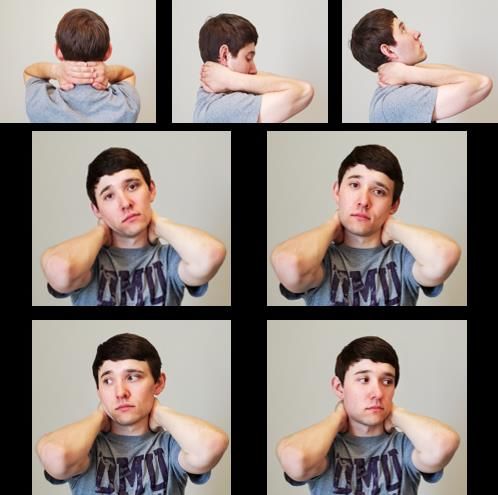
Introduction and Key Concepts
Some Keys to the Osteopathic Self Treatment protocol:
●    Goals: promote the following: optimal respiration; circulation - venous, arterial, and lymphatic; immune
     function; balance of the autonomic nervous system; reduced stress; and improved homeostasis.
●    All exercises/stretches should be performed in a pain-free manner. If there is pain at any time, the
     stretch/exercise should be backed-off to a pain-free position.
●    This Osteopathic Self-Treatment is meant to be performed in addition to all other medical advice.
●    All exercises/stretches should be performed within any medical or activity restrictions recommended to
     you by your health care providers.

     I.      Standing
    A. 1st Rib and Collarbone - Base of the Neck (Thoracic Inlet)
Body Parts Exercised:
Rib 1 (left and right upper most ribs) and the left and right
collarbones (clavicles).
Reasons for Exercise:
These bones along with the top spinal bone in the upper
back form a ring-like structure at the top of the chest called
the thoracic inlet. Many major blood and lymphatic vessels
and nerves run through the thoracic inlet. These vessels
allow for movement of lymphatic fluid and blood to and
from the heart. When these bones at the top of the back
are misaligned, the flow of fluid throughout the body can
be restricted and nerves can be pinched. When the bones
and soft tissues in this area are free to move properly this
area allows the body to rid itself of congestion in all areas
of the body.

How to perform:
Rib 1 and the collarbone are at the base of the neck on the
left and right sides. To make sure these bones move
properly we will use arm and shoulder movements.
1. Begin seated or standing.
2. Perform arm circles slowly while inhaling as you raise
     the arms up and exhaling as the arms are lowered
     down.
3. Perform arm circles in both directions, one arm at a
     time:
         a. Arms forward and up to start the circle
         b. Arms backward and up to start the circle
4. Repeat 3-5 times in one direction and reverse. Repeat
     steps 1 and 2 moving only the shoulder blade. Perform
     3-5 times in each direction for each shoulder.

    © 2020 Des Moines University                     Osteopathic Self-Treatment COVID-19                3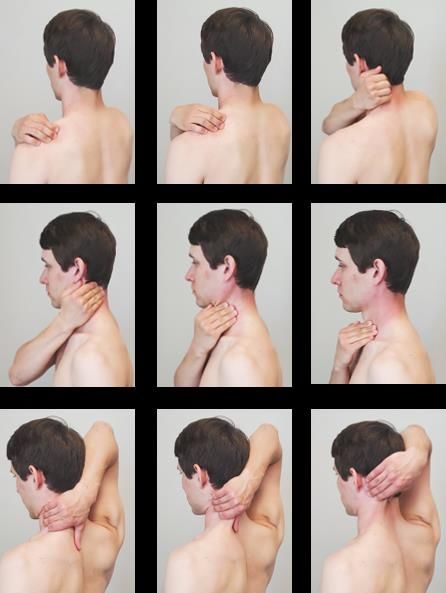
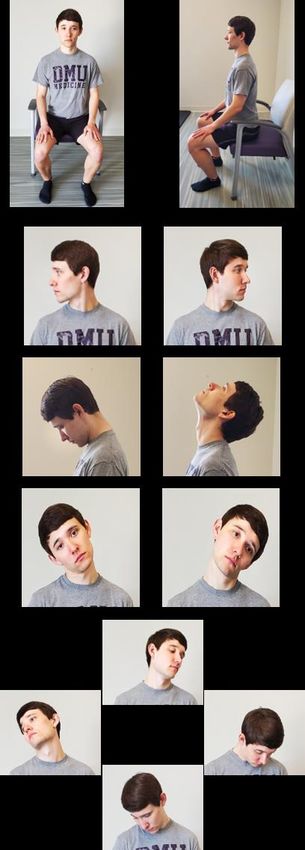
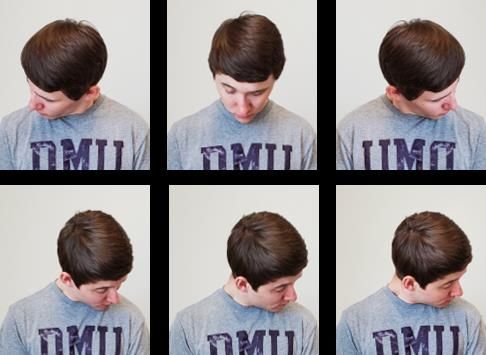
II.     Seated
  A. First Thoracic Vertebra - Base of the Neck (Thoracic Inlet)
Body Parts Exercised:
The uppermost bone in the upper back, called T1.

Reasons for Exercise:
Same as the above section.

How to perform:
The T1 vertebra (or spinal bone) is at the bottom of the
neck. We will use neck and head movements to move this
bone.
Note: Do not perform these exercises if moving the neck in
certain directions makes you dizzy.

1. Begin seated.
2. With a straight back and shoulders, look to the left as
    far as possible without tilting the head and without
    causing pain or dizziness. Repeat to the right.
3. Look back to the front.
4. Look down bending the head forward as far as it goes
    without causing pain or dizziness.
5. Look back to the front.
6. Look up bending the head backwards as far as it goes
    without causing pain or dizziness.
7. Look back to the front.
8. Without turning the head to the left or right or up or
    down, tilt the head to the left as far as it goes without
    causing pain or dizziness by bringing the left ear toward
    the left shoulder. Repeat slowly to the right.
9. Look back to the front.
10. Combine these motions by moving the neck in a circular
    fashion, again without causing pain or dizziness.
11. Look back to the front. Do not stand up immediately if
    you experience any dizziness. Sit in the chair until you
    are no longer dizzy before standing.

 Osteopathic Self-Treatment COVID-19                            © 2020 Des Moines University 4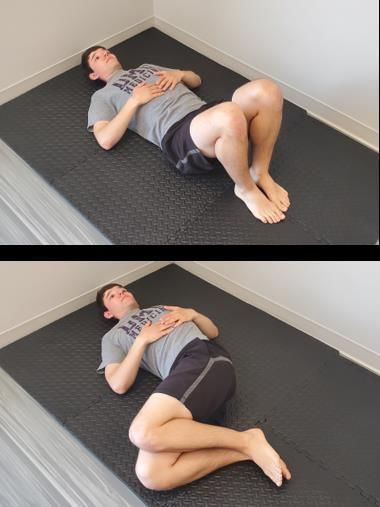
B. Ribs to Pelvis (Quadratus Lumborum) Muscle Stretch
Body Part Exercised:
This treatment targets the quadratus lumborum (QL), a
major muscle located on the backside of the trunk of the
body. This muscle is attached to the top of the pelvis, the
low back, and the bottom of the rib cage.

Reason for Exercise:
Many major blood and lymphatic vessels run to and from
the abdomen to and from the pelvis and to and from the
legs. Tightness of the QL muscle can tilt the pelvis and the
low back spine abnormally leading to restriction of the
bones and tissues in those areas which can restrict fluid
flow and pinch nerves, then limiting the ability of the
immune system to function properly. Stretching the QL
muscle decreases tension in the abdomen, low back and
pelvis, encourages the alignment of the low back and
pelvis, thus encouraging the free movement of fluid and
flow of nerves.

How to perform:
1. Sit on a chair with feet flat on the ground, and the
   weight of the body distributed evenly on both sitting
   bones.
2. Without lifting the hips, lean to the right as far as you
   can.
3. Lift the left arm to the side and up until you feel a
   stretch on the lower body from the lower ribcage to
   the pelvis (hip).
4. Slump your back to increase the stretch feeling. Hold
   for 10-20 seconds.
5. Repeat on the opposite side to stretch the right side.

  © 2020 Des Moines University                       Osteopathic Self-Treatment COVID-19   5

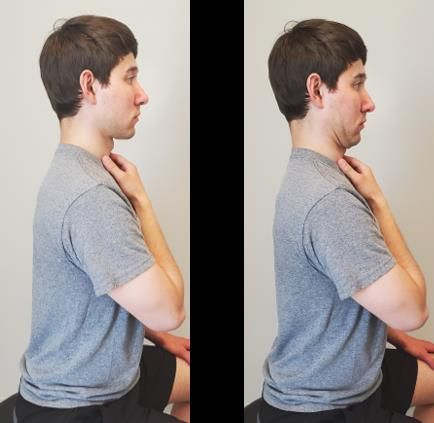
C. Self-correction of occiput – atlas joint (OA)
Body Part Exercised:
The occipital-atlantal joint is uppermost joint in the neck
immediately below the skull.

Reason for Exercise:
Tension in this area can pinch on major blood vessels that
drain blood from the head and neck region. Tension in this
region can also pinch on the vagus nerve, which plays a
major role in breathing, heart function and functioning of
the stomach and intestines, as it exits the skull. This
exercise aims at removing tension in the top of the neck to
encourage mobilization of the occipital-atlantal joint.

How to perform:
1. Person is seated.
2. Place both hands on the back of the neck, just under
   the skull. Fingers may or may not overlap.
3. Apply gentle but firm pressure to the neck to stabilize
   the neck and limit motion of the neck.
4. Move the head on the hands by turning to turning to
   the right and left, tilting the head to the right and left,
   and bringing the head down and up. The aim is to free
   up the head connection to the top of the neck. Move
   slowly to stretch the tightest areas of the neck.
5. Repeat each direction of motion (rotation, tilting side
   to side, flexing, and extending) 3-5 times in each
   direction until even motion is felt.
6. Discontinue this exercise if you experience any
   dizziness or pain.

 Osteopathic Self-Treatment COVID-19                             © 2020 Des Moines University 6
D. Self-correction of atlas – axis (AA) Joint
Body Part Exercised:
The atlantal-axial joint is the second uppermost joint in the
neck below the occipital-atlantal joint. Tension in this area
can pinch on major blood vessels that drain blood from the
head and neck region.

Reason for Exercise:
Tension in this region can also pinch on the vagus nerve,
which plays a major role in breathing, heart function and
functioning of the stomach and intestines, as it exits the
skull. This exercise aims at removing tension in the top of
the neck to encourage mobilization of the atlantal-axial
joint.

How to perform:
1. Begin seated in a chair with the head bent forward as
   far as it goes. Test the rotation of the neck to the left
   and then to the right to find out which side turns less
   than the other side.
2. To make the movements symmetric, keep the neck
   bent forward and turn the head towards the tightest
   side, the side that does not go as far as the other side.
3. Keep the head turned that way for 3 seconds.
4. Turn the head a little farther in the same direction and
   wait another 3 seconds.
5. Turn the head a little farther in the same direction and
   wait another 3 seconds.
6. With the head bent forward, repeat step 1 by turning
   the head in both directions to test if the head moves
   equally on both sides.

  © 2020 Des Moines University                       Osteopathic Self-Treatment COVID-19   7
E. Front of Neck (SCM) Muscle Stretch
Body Part Exercised:
The sternocleidomastoid (SCM) muscle is a muscle in the
front of the neck that runs from the base of the head across
the front of the neck to the upper part of the sternum
(breastbone) and the clavicle (collarbone).

Reason for Exercise:
Tension in this muscle can increase tension in the base of
the skull, the neck, and the top of the back (the thoracic
inlet, discussed previously). Stretching this muscle
decreases tension in these regions and helps to encourage
circulation to and from the head and neck to the rest of the
body and encourages proper function of the vagus nerve,
as discussed above.

How to perform:
1. Sit on a chair with your back and neck straight.
2. Grasp the chair (or an unmovable object) with your left
   hand and gently pull down on your left collarbone with
   your right hand.
3. Lean your whole trunk to the right and bend the neck
   to the right bringing the ear toward the right shoulder.
4. Turn the head (rotate) to the left.
5. Position the head back (chin up) and slowly tuck your
   chin until a stretch is felt on the front of the neck on
   the left side.
6. Hold for 10-20 seconds.
7. Repeat the above steps by reversing the direction of
   motions to stretch the right side of the front of the
   neck.

 Osteopathic Self-Treatment COVID-19                           © 2020 Des Moines University 8
F. Upper Back (Levator Scapula) Stretch
Body Part Exercised:
The levator scapula muscle is a muscle in the upper back
that runs between the middle part of the shoulder blade
to the mid-neck.

Reason for Exercise:
Stretching this muscle decreases tension in neck and
helps encourage circulation to and from the head and
neck to the rest of the body.

How to perform:
1. With the left hand, securely grasp a chair (or an
   unmovable object) and slowly lean the upper body
   toward the right and a little forward until a stretch is
   felt.
2. To stretch the left upper back muscle, position the
   head in a forward position (chin down), lean to the
   right and turn to the right.
3. To intensify the stretch, gently place the right hand
   on top of the head and add gently pressure to the
   right.
4. Hold for 10-20 seconds.
5. Repeat the above steps by reversing the direction of
   motions to stretch the left side of the front of the
   neck.

  © 2020 Des Moines University                       Osteopathic Self-Treatment COVID-19   9
G. Upper Shoulder (Upper Trapezius) Stretch
Body Part Exercised:
The upper trapezius is a large muscle that runs between the
base of the skull and shoulders with connections to the
spine in the neck and middle back.

Reason for Exercise:
Tension in this muscle can increase tension in the base of
the skull, the neck, and the upper back (the thoracic inlet,
discussed previously). Stretching this muscle decreases
tension in neck and helps in encouraging circulation to and
from the head and neck to the rest of the body.

How to perform:
1. Sit with your back and neck straight.
2. Grasp the chair (or an unmovable object) with your left
   hand.
3. Lean to the right.
4. Position the head forward (bend the neck and tuck your
   chin).
5. Turn the head to the left.
6. With the right hand, slowly and gently encourage
   further stretching to the right for a gentle stretch.
7. Emphasis on the stretch can be added by nodding (or
   tucking) the chin toward the chest.
8. Hold for 10-20 seconds.
9. Repeat the above steps by reversing the direction of
   motions to stretch the left side of the upper back.

 Osteopathic Self-Treatment COVID-19                           © 2020 Des Moines University 10
H. Head – Neck Posture Training (by Strengthening the Deep Neck Flexor Muscles)
Body Part Exercised:
The deep flexors muscle of the neck lie in front of the
neck bones and help maintain a straight neck and head
posture.

Reason for Exercise:
These muscles can be over-stretched and become
weak from a forward head posture. This poor posture
is adopted for a variety of reasons, including illness
and stress. Poor posture can lead to decreased
circulation of blood to and from the head and neck and
increased nerve pressure in the back of the head.
Strengthening the deep flexor muscles of the neck can
help improve posture, decrease nerve pressure in the
back of the head and encourage adequate circulation
in the head and neck.

How to perform:
1. Place your hand on the superficial front neck
   muscles – these muscles should not tighten during
   this exercise.
2. While seated, nod the head forward slowly.
3. Tuck the chin toward the chest rather than
   bending the head forward.
4. Hold for 5-10 seconds.
5. Relax.
6. Repeat the above steps two more times.
7. Concentrate on keeping good head and neck
   posture throughout your day.

 © 2020 Des Moines University                      Osteopathic Self-Treatment COVID-19   11
I. Gentle Self-Massage of the Neck and Upper Shoulder
Body Part Exercised:
Neck and upper shoulder

Reason for Exercise:
Tight muscles and connective tissue (fascia) in this area can
lead to a decreased drainage of blood and lymphatic fluid
from the head and neck leading to congestion and other
problems. Soft tissue massage techniques to the head and
neck reduce tension in this area to encourage adequate
fluid flow.

How to perform:
1. Person is seated with the left arm relaxed.
2. Take the right hand, cross it over the front of the body
   and reach the upper shoulder muscles.
3. Pull the upper shoulder muscles forward rhythmically
   from the shoulder to the left side of the neck and back
   to the shoulder gently but firmly. You can also pinch
   that muscle for a few seconds between the thumb and
   fingers to relax it more.
4. With the right arm still in front of the body, place the
   fingers on the left side of the back of the neck and pull
   forward rhythmically in sections from the base of the
   neck to the top and reverse. The head and neck may
   stay still or move as it is comfortable.
5. Change the hand positions by moving the right hand to
   behind the neck on the left side. Place the fingers on
   the left side of the neck and pull up and back by
   sections, rhythmically from the bottom of the neck to
   the top and back down.
6. Repeat steps 1-5 on the other side.

 Osteopathic Self-Treatment COVID-19                            © 2020 Des Moines University 12
III. Kneeling
    A. Under Arm/Back (Latissimus Dorsi) Muscle (or “Prayer Position”) Stretch
Body Part Exercised:
This exercise targets the latissimus dorsi (the “lat” or the
“pull-up muscle”), a major muscle located on the backside
of the trunk of the body. This muscle is attached to the top
of the pelvis, the spine, and reaches up to the arm.

Reason for Exercise:
Tightness of the latissimus dorsi muscle can tilt the pelvis
and the low back spine abnormally as well as decreasing
shoulder range of motion. This all leads to restriction of the
bones and tissues in those areas which can restrict fluid
flow and pinch nerves, then limiting the ability of the
immune system to function properly. Stretching the
latissimus dorsi muscle decreases tension in the abdomen,
low back, pelvis and shoulder, encouraging the alignment
of the low back and pelvis, thus encouraging the free
movement of fluid and flow of nerves.

How to perform:
1. Kneel in front of a chair.
2. Place the elbows on top of the chair with the hands and       Note: If you don’t feel the stretch in the lower
   forearms together.                                            back it is because the knees may be too far away
3. Make sure the elbows stay together the whole time,            from the chair. If that is the case, reposition
   since this will serve to separate the shoulder blades.        yourself by bringing the knees a little closer to
4. Slowly press the chest forward toward the floor as you        the chair and start all over again.
   sit back on your heels.
5. Once the shoulders are on a stretch, tighten your
   abdominal muscles and hunch your whole back to
   increase the stretch.
6. Hold for 10-20 seconds.

 © 2020 Des Moines University                        Osteopathic Self-Treatment COVID-19                  13
B. Front of Hip (Psoas) Muscle Stretch Body Part Exercised: This exercise targets the psoas muscle (a hip flexor). This muscle is attached to the upper leg and the inside surface of the abdomen along the low back. This muscle is also attached to the abdominal diaphragm (the major breathing muscle in the abdomen). Reason for Exercise: Many major blood and lymphatic vessels run through the hip between the psoas muscle and the pelvis and in the abdomen in relation to the abdominal diaphragm. Tightness of the psoas muscle may lead to restriction of the bones and tissues in the abdomen which can restrict fluid flow through the body which can limit the ability of the immune system to function. Additionally, tightness in the psoas can limit the motion of the diaphragm which can make breathing more difficult. This exercise stretches the psoas muscle to decrease tension in the pelvis and the abdomen to then encourage the free movement of fluid in the body. How to perform: 1. To stretch the right front of the hip muscle (hip flexor), kneel with the right knee on the floor with the left hip bent to 90 degrees and the left knee bent to a little less than 90 degrees. 2. Rest the left hand on the left thigh or hold on to a chair with the left hand for balance if needed. Position the right leg so the right foot is turned out and the upper leg (thigh) is rotated (facing) inward. 3. Pull in the stomach and tighten the right buttocks hard. Keep the right hand on the buttocks to feel the contraction. 4. You should start to feel a stretch in the front of the right hip/thigh area. 5. For a bigger stretch add the following: Keep the shoulders positioned over the hips and use the left leg to pull the body and the right hip forward, feeling a stretch in the front of the right hip and thigh. 6. Hold for 10-20 seconds. 7. Switch sides and repeat on the left side. Osteopathic Self-Treatment COVID-19 © 2020 Des Moines University 14
IV.     Prone
    A. Face Down (Prone) Press-up
Body Part Exercised:
This treatment targets the hip flexor muscles, one of which
is the psoas (see explanation above)

Reason for Exercise:
This treatment stretches hip flexors thereby decreasing
tension in the pelvis and the abdomen and encouraging
easier breathing & the free movement of fluid in the body.

How to perform:
1. Lie on the floor with your chest and stomach facing
   down.
2. Using your arms, push the upper body off the floor
   keeping the front of the hips on the floor to create a
   stretch from the chin to the belly.
3. To intensify the stretch, you may tilt your head back to
   look up as long as this does not cause pain in the back
   or neck or dizziness.
4. Hold for 10-20 seconds.

 © 2020 Des Moines University                      Osteopathic Self-Treatment COVID-19   15
V. Supine A. Spinal Stimulation – Thoracic and Rib Areas Body Part Exercised: Upper back spine and ribs, at the point where they join the spine on the back. The rib cage houses the lungs and the heart and provides structure and protection for these important organs. Reason for Exercise: When the ribs and their spinal attachments don’t move properly the lungs will have a difficult time inflating and deflating fully during breathing. A large section of the nerves that control automatic organ function (sympathetic nervous system) are located close to where the ribs attach to the bones of the spine. Lack of movement of the ribs &/or their spinal bones can restrict these nerves and change the way the sympathetic nervous system sends signals to the body, affecting breathing, stomach function and heart function. Careful pressure on this area can help ribs and spinal bones move better, thus improving sympathetic nervous system function, the ability of the lungs to fully inflate during deep breathing, and for the heart to pump blood and lymphatic fluid throughout the entire body. How to perform: 1. Lie on the back with your feet on the ground and knees up, hands folded in front of your chest and head off the floor. 2. Lift the buttocks rounding your back starting at the hips and moving up the spine until reaching the base of the neck. The back has the shape of the foot of a rocking chair. 3. Keeping the head off the floor and the back bent forward, lower the hips feeling each segment of the spine contact the floor. Do this movement back and forth in a rocking motion. This should be a smooth motion. 4. Emphasis can be placed on the middle of the spine, then on one side and then the other. 5. Repeat 5-10 times. Osteopathic Self-Treatment COVID-19 © 2020 Des Moines University 16
B. Bottom of the Spine (Lumbosacral Junction)
Body Part Exercised:
Muscles and connective tissues of the pelvic bones and hip
bones that attach to the bottom of the spine (the sacrum)
and the coccyx (the tailbone) which form the bottom of the
“pelvic bowl” (the urogenital and pelvic diaphragms).

Reason for Exercise:
Tightness of the muscles and connective tissues in this
region can limit the flow of blood and lymphatic fluid
through the many major blood and lymphatic vessels that
run through the pelvic bowl. Stretching of the junction
between the bottom of the spine and the top of the pelvis
helps reduce tension in the pelvic bowl to encourage
proper flow of lymphatic fluid and blood throughout the
body to support the immune system.

How to perform:
1. Lie on the back.
2. Bring both knees up keeping the feet on the floor.
3. Twist the bottom of the spine by bringing both knees to
   the right as far as they go while keeping the shoulders
   flat against the floor.
4. Hold for 10-20 seconds.
5. Repeat the same motion for the other side by bringing
   the knees to the left.
6. Hold for 10-20 seconds.

 © 2020 Des Moines University                     Osteopathic Self-Treatment COVID-19   17
C. Bottom of Rib Cage (Thoracolumbar Junction) Stretch
Body Part Exercised:
The many muscles and connective tissues of the abdomen
and low back attach to the bones of the thoracic spine
(mid-back) and lumbar spine (low back). These tissues,
including the abdominal diaphragm (the main muscle
responsible for breathing), form the thoracoabdominal
diaphragm.

Reason for Exercise:
Tightness of the muscles and connective tissues in this
region can limit the flow of blood and lymphatic fluid
throughout the many major blood and lymphatic vessels
run through the thoracoabdominal diaphragm and the
abdomen. Stretching of the junction between the bottom
of the thoracic spine and lumbar spine helps reduce tension
in the thoracoabdominal diaphragm to encourage proper
flow of lymphatic fluid and blood throughout the body to
support the immune system. This also decreases tightness
in the abdominal diaphragm to encourage deeper
breathing and greater inflation of the lungs.

How to perform:
1. Lie on the back.
2. Bring both knees up, bending the hips to 90 degrees
   with both feet off the floor.
3. Twist the spine by bringing both knees to the right
   while keeping the shoulders flat against the floor.
4. Hold for 10-20 seconds.
5. Repeat the same motion for the other side by bringing
   the knees to the left.
6. Hold for 10-20 seconds.

 Osteopathic Self-Treatment COVID-19                          © 2020 Des Moines University 18
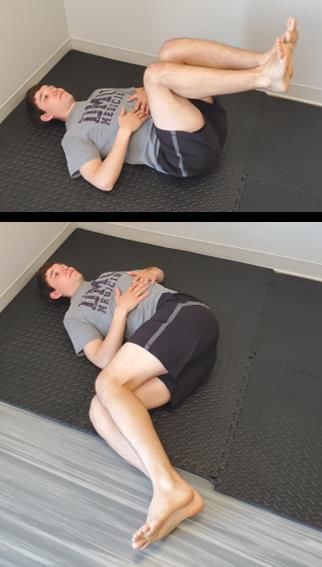
D. Knee to Chest
Body Part Exercised:
Muscles of the lower back, middle back and buttocks.

Reason for Exercise:
Stretching the low back reduces tension in the abdominal
and pelvic diaphragms to encourage adequate circulation
throughout the whole body which supports the immune
system.

How to perform:
1. Lie on your back and bring your left knee to your chest,
   keeping the right leg straight.
2. Hold for 10-20 seconds.
3. Switch legs and repeat the above steps.
4. Bring both knees up to the chest to feel a stretch in the
   lower back. The knees may stay together or separated
   for comfort.
5. Hold for 10-20 seconds.

 © 2020 Des Moines University                       Osteopathic Self-Treatment COVID-19   19
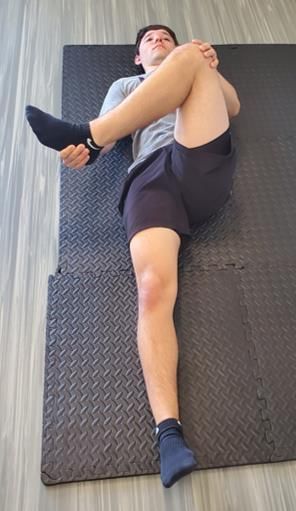
E. Spine to Hip (Piriformis) Muscle Stretch
Body Part Exercised:
Buttock muscles that attach from the spine to the back of
the hips. The main one is called “piriformis” muscle.

Reason for Exercise:
Tightness of the piriformis muscle leads to twisting of the
sacrum (the tailbone) which leads to tension in the
urogenital and pelvic diaphragms limiting the flow of blood
and lymphatic fluid throughout the body. Stretching of the
piriformis leads to more loose and symmetric movement of
the bottom of the spine (sacrum) and helps reduce tension
in the pelvic bowl to encourage proper flow of lymphatic
fluid and blood throughout the body to support the
immune system.
How to perform:
1. Lie on the back.
2. To stretch the left buttocks, grasp the left leg with the
     right hand under or over the ankle or foot and the left
     hand on the knee.
3. Bring the left leg toward the right shoulder until a
     stretch is felt in the left buttocks.
4. Hold for 10-20 seconds.
5. Switch legs and repeat on the opposite side.

 Osteopathic Self-Treatment COVID-19                           © 2020 Des Moines University 20
F. Self-Pedal Pumps Body Part Exercised: The calf muscles, the gastrocnemius and the soleus Reason for Exercise: The calf muscles are important muscles for squeezing the veins of the legs to push blood and lymphatic fluid from the lower body back to the heart. The fluid motion created by the squeezing of the leg veins also contributes to fluid flow in the entire body. Either walking or laying down and stretching and contracting (flexing) the calf muscles squeezes the major lymphatic vessels and veins and encourages adequate blood and lymphatic fluid flow which supports the immune system. How to perform: 1. Lie on the back. 2. Pull toes and foot up towards the head and stretch the calves for one second and then reverse the motion by pointing the feet and toes down fully for one second. 3. Repeat the entire process 5-10 times. 4. Rest for 10 seconds. 5. Repeat steps 1-3 two more times. © 2020 Des Moines University Osteopathic Self-Treatment COVID-19 21
VI. Breathing
    A. Box Breathing
Body Part Exercised:
Abdominal diaphragm (breathing muscle that divides the chest
from the abdomen), spine and ribs.

Reason for Exercise:
The main muscle driving breathing is the abdominal diaphragm
located in the abdomen. Tightness of the abdominal diaphragm
may lead to restriction of the bones and tissues in the abdomen
which can restrict fluid flow through the many vessels that
course through it, which can limit the ability of the immune
system to function. Deep breathing encourages full motion of
the abdominal diaphragm which can help to decrease tension
in this muscle and encourage adequate circulation throughout
the body. Additionally, deep breathing is beneficial for the
reduction of stress and the negative effects stress can have on
the immune system and mental and physical health.

How to perform:                                                       https://www.ethos3.com/2019/06/using-box-breathing-to-reduce-presentation-anxiety/

Find a stress-free, quiet environment where you can focus on
your breathing. Begin seated upright with a straight back and
neck in a comfortable chair with your feet flat on the floor.
Place your hands on your lap. Keep your shoulders and hands
relaxed. Inhale and exhale through your nose as you perform
the exercise below.
Step 1: Slowly inhale
Inhale slowly and deeply through your nose for four seconds,
counting in your head as you breathe. Feel the air fill your
lungs, one section at a time, until your lungs are completely full
and the air moves into your abdomen.
Step 2: Hold your breath
Hold your breath for four seconds, again counting in your head
slowly.
Step 3: Exhale
Exhale through your nose for the same slow count of four,
expelling the air from your lungs and abdomen. Be conscious of
the feeling of the air leaving your lungs.
Step 4: Hold your breath
Hold your breath for four seconds, again counting in your head
slowly.
Step 5: Hold your breath
Repeat the process by inhaling again for a slow four count.
Repeat the above cycle for up to 4 minutes. Discontinue if you
feel lightheaded.

   Osteopathic Self-Treatment COVID-19                               © 2020 Des Moines University 22
You can also read