Configurations, Troubleshooting, and Advanced Secure Browser Installation Guide for Windows
←
→
Page content transcription
If your browser does not render page correctly, please read the page content below
Oregon Statewide Assessment System

                     Configurations,
               Troubleshooting, and
           Advanced Secure Browser
               Installation Guide for
                            Windows
                            For Technology Coordinators
                                                                       2021-2022
                                                                  Published June 16, 2022

                                                     Prepared by Cambium Assessment, Inc.

Descriptions of the operation of Cambium Assessment, Inc. (CAI) systems are property
of Cambium Assessment, Inc. and are used with the permission of CAI.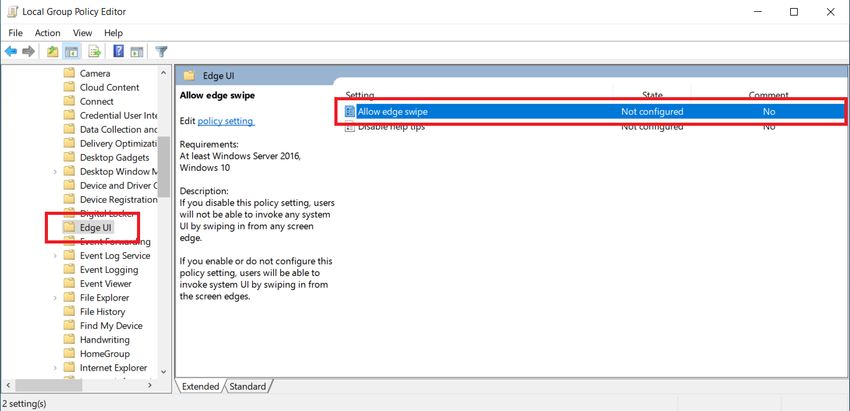
Configurations, Troubleshooting, and Advanced Secure Browser Installation for Windows

Configurations, Troubleshooting, and Advanced Secure Browser Installation
Guide for Windows ................................................................................................................... 1
   Configurations, Troubleshooting, and Advanced Secure Browser Installation for
   Windows ................................................................................................................................. 4
      How to Configure Windows Workstations for Online Testing ............................................... 4
          How to Disable Fast User Switching ................................................................................ 4
             How to Disable Fast User Switching in Windows 8.1 ...................................................4
          How to Disable Screen Edge Swipe on Windows 10 Tablets & Laptops in Tablet Mode.. 7
             How to Disable Screen Edge Swipe Using the Local Group Policy Editor ....................8
      How to Install the Secure Browser for Windows Using Advanced Methods ....................... 10
          How to Install the Secure Browser via the Command Line ............................................. 10
          How to Copy the Secure Browser Installation Directory to Testing Computers .............. 11
          How to Install the Secure Browser on a Terminal Server or Windows Server ................ 12
          How to Install the Secure Browser Without Administrator Rights ................................... 13
          How to Share the Secure Browser over a Network ........................................................ 14
          How to Uninstall the Secure Browser on Windows ........................................................ 14
             How to Uninstall the Secure Browser via the User Interface ......................................14
             How to Uninstall the Secure Browser via the Command Line ....................................14
          How to Install the Secure Browser on Windows Mobile Devices .................................... 14
          How to Create Group Policy Objects ............................................................................. 14
      How to Troubleshoot Windows Workstations ..................................................................... 18
          How to Reset Secure Browser Profiles on Windows ...................................................... 18
          How to Block Device Touch Input Using the Group Policy Editor ................................... 18
          How to Install Windows Media Pack for Windows 8.1 N and KN.................................... 21
          How to Configure ZoomText to Recognize the Secure Browser .................................... 22
          How to Set the Touch Keyboard on Microsoft Surface Pro Tablet to Appear ................. 23
          How to Disable Two-finger Scrolling in HP Notebooks with Synaptics TouchPad .......... 23
          How to Disable Automatic Volume Reduction ................................................................ 24
          How to Run NVDA Screen Reader 2018.1.1 with Take a Test App ............................... 25
          How to View the Windows Taskbar in Permissive Mode ................................................ 25
             How to View the Taskbar in Permissive on Windows 8.1 ...........................................25
             How to View the Taskbar in Permissive Mode on Windows 10 ..................................26
      How to Configure Networks for Online Testing .................................................................. 28
          Resources to Add to your Allowlist for Online Testing .................................................... 28
             URLs for Non-Testing Sites to Add to your Allowlist ..................................................28

© Cambium Assessment, Inc.                            2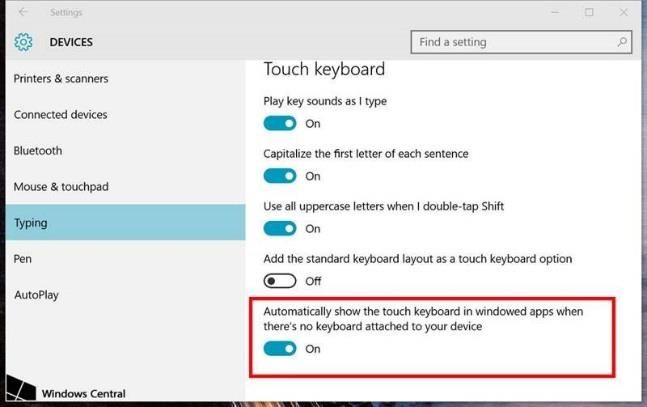
Configurations, Troubleshooting, and Advanced Secure Browser Installation for Windows

            URLs for TA and Student Testing Sites to Add to your Allowlist .................................28
            URLs for Online Dictionary and Thesaurus to Add to your Allowlist ...........................29
            Domains for Email Exchange Server and Single Sign-On System .............................29
         Ports and Protocols Required for Online Testing ........................................................... 29
         How to Configure Filtering Systems ............................................................................... 29
         How to Configure for Domain Name Resolution ............................................................ 29
         How to Configure Network Settings for Online Testing .................................................. 29
         How to Configure the Secure Browser for Proxy Servers............................................... 30
  Change Log .......................................................................................................................... 31

© Cambium Assessment, Inc.                          3
Configurations, Troubleshooting, and Advanced Secure Browser Installation for Windows
How to Configure Windows Workstations for Online Testing
Configurations, Troubleshooting, and Advanced Secure Browser
Installation for Windows
This document contains configurations, troubleshooting, and advanced Secure Browser installation
instructions for your network and Windows workstations.
How to Configure Windows Workstations for Online Testing
This section contains additional configurations for Windows.
How to Disable Fast User Switching
Fast User Switching is a feature in all supported versions of Windows that allows for more than one user
to be logged in at the same time. If Fast User Switching is not disabled and students try to access it
during a test, the Secure Browser will pause the test. The following sections describe how to disable Fast
User Switching for different versions of Windows.
If you plan to use the Take a Test app on a dedicated test account on a Windows 10 device, do not
disable fast user switching, as it causes the machine to enter an infinite loop when rebooted.
How to Disable Fast User Switching in Windows 8.1
The following procedure describes how to disable Fast User Switching under Windows 8.1.
1. In the Search charm, type gpedit.msc. Double-click the gpedit icon in the Apps pane. The Local
Group Policy Editor window opens.
Figure 1. Search Charm
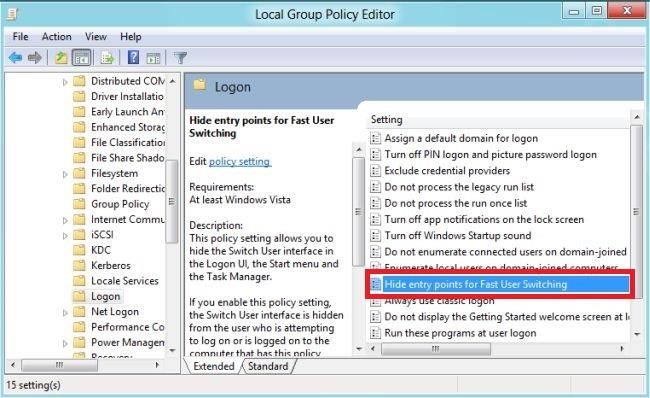
2. Navigate to Computer Configuration > Administrative Templates > System > Logon.
3. In the Setting pane, double-click Hide entry points for Fast User Switching.
© Cambium Assessment, Inc. 4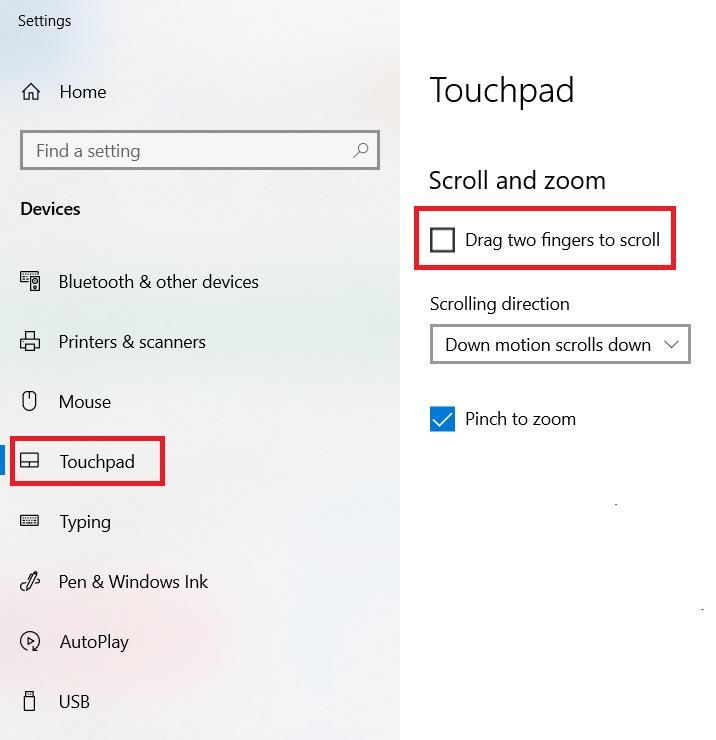
Configurations, Troubleshooting, and Advanced Secure Browser Installation for Windows

                                                                                        How to Configure Windows Workstations for Online Testing
                                 Figure 2. Local Group Policy Editor

4. Select Enabled and then click OK.

© Cambium Assessment, Inc.             5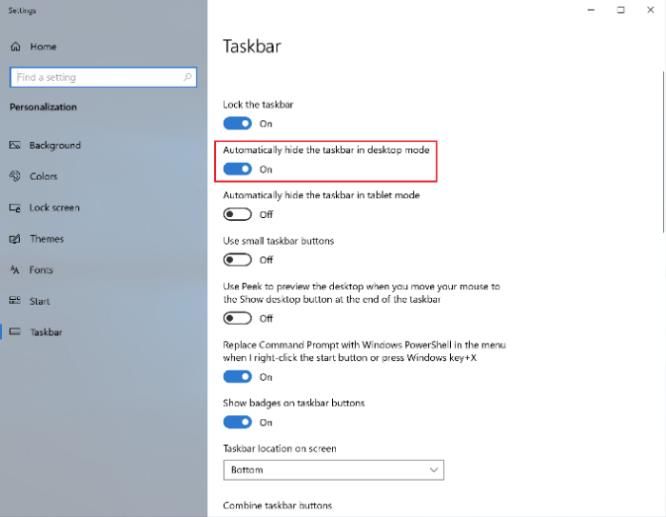
Configurations, Troubleshooting, and Advanced Secure Browser Installation for Windows

                                                                                                   How to Configure Windows Workstations for Online Testing
                          Figure 3. Hide entry points for Fast User Switching

5. In the Search charm, type run. The Run dialog box opens.

6. Enter the command gpupdate /force into the text box and then click OK. (Note the space before
   the forward slash.)

© Cambium Assessment, Inc.             6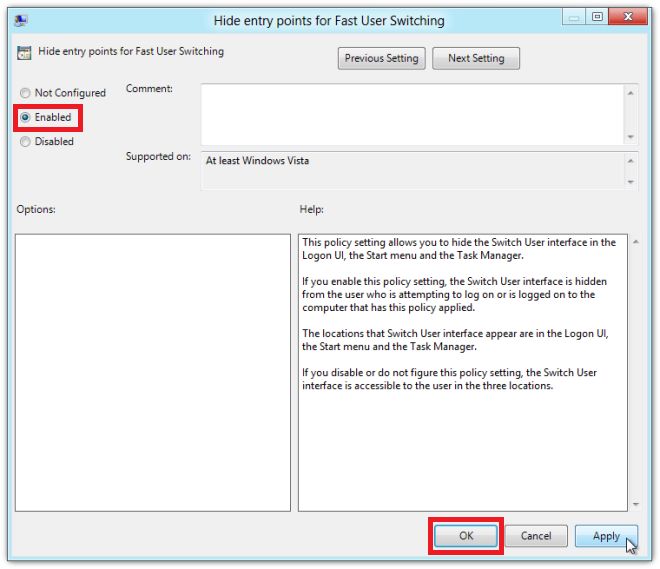
Configurations, Troubleshooting, and Advanced Secure Browser Installation for Windows

                                                                                                            How to Configure Windows Workstations for Online Testing
                                              Figure 4. Run

7. The command window opens. When you see the message Computer Policy update has completed
    successfully, this will be your notification that Windows has successfully disabled Fast User
    Switching.

                                       Figure 5. Command Window

How to Disable Screen Edge Swipe on Windows 10 Touchscreen Devices
Swiping inward from the edge of the display on Windows 10 touchscreen devices opens the Windows
notification center. If this swiping gesture is not disabled and students taking a test in the Secure
Browser on a Windows 10 touchscreen device swipe from the edge of the screen during a test, the
notification center will open, displaying any notifications that might appear there and pausing the test.

© Cambium Assessment, Inc.               7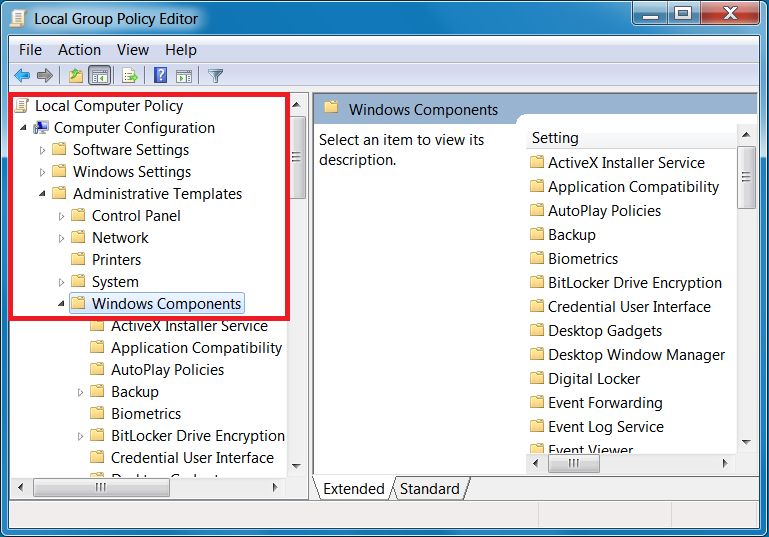
Configurations, Troubleshooting, and Advanced Secure Browser Installation for Windows

                                                                                                         How to Configure Windows Workstations for Online Testing
This affects all Windows 10 touchscreen devices. The following section describes how to disable Screen
Edge Swipe using the Local Group Policy Editor.

You can also roll this change out to multiple devices at once using the Registry Editor. To make this
change via the Registry Editor, you must have administrator privileges on the device.

How to Disable Screen Edge Swipe Using the Local Group Policy Editor
The following procedure describes how to disable Screen Edge Swipe using the Local Group Policy
Editor.

1. In the Search charm, type gpedit.msc. Select the gpedit icon in the Apps pane. The Local Group
    Policy Editor window opens.

                                         Figure 6. Search Charm

2. Navigate to Computer Configuration > Administrative Templates > Windows Components > Edge UI.

                              Figure 7. Local Group Policy Editor – Edge UI

3. In the right pane, double-click/tap Allow edge swipe. The Allow Edge Swipe window opens.

© Cambium Assessment, Inc.               8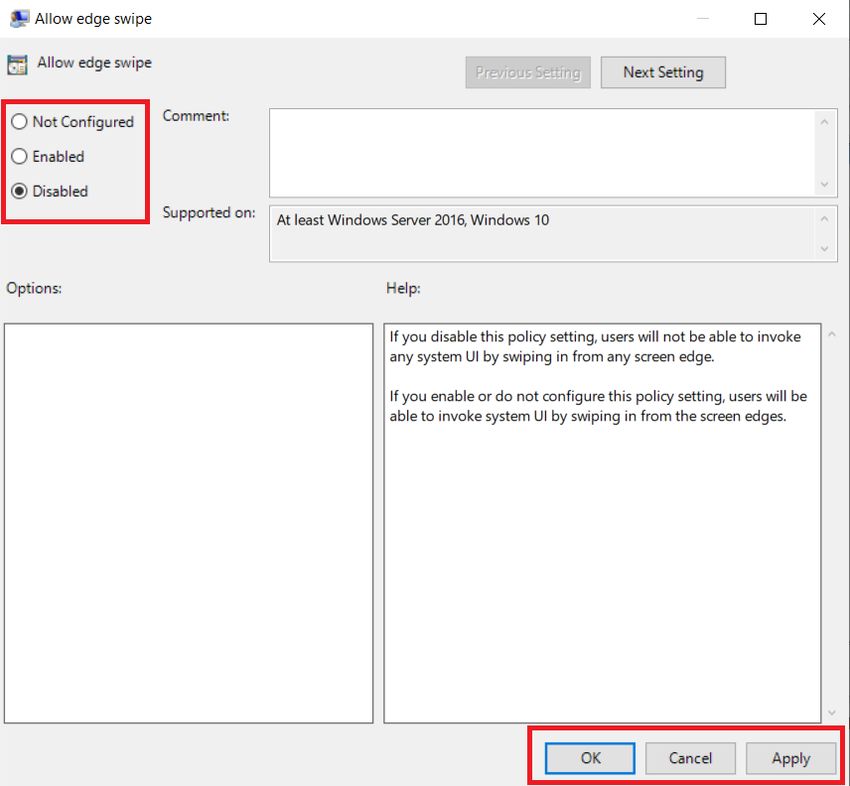
Configurations, Troubleshooting, and Advanced Secure Browser Installation for Windows

                                                                                        How to Configure Windows Workstations for Online Testing
                                  Figure 8. Allow Edge Swipe Window

4. Select Disabled.

5. Select Apply.

6. Select OK.

7. Close the Local Group Policy Editor window.

8. Restart your computer or tablet for the change to take effect.

© Cambium Assessment, Inc.             9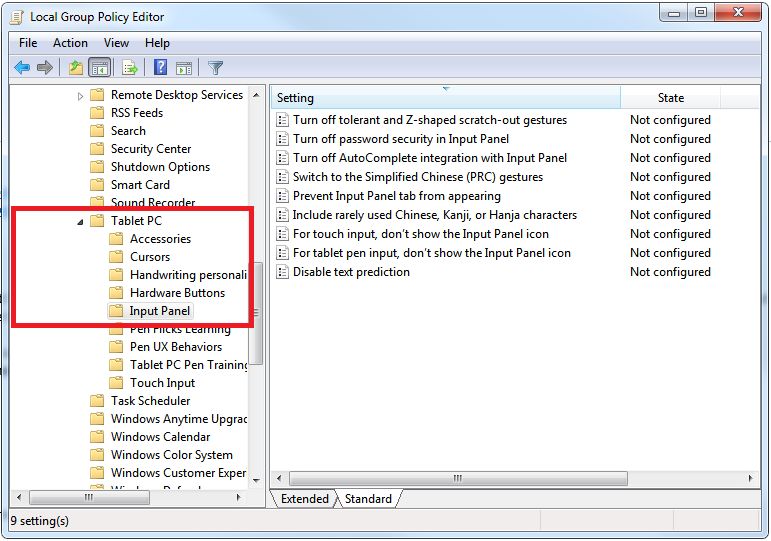
Configurations, Troubleshooting, and Advanced Secure Browser Installation for Windows

                                                                                                           How to Install the Secure Browser Using Advanced Methods
How to Install the Secure Browser for Windows Using Advanced Methods
This document contains additional installation instructions for installing the Secure Browser for
Windows under a variety of deployment scenarios. One scenario describes installing the Secure Browser
on a shared network drive, from which students would then run the Browser. However, there are
significant drawbacks in this method. Running the Secure Browser from a shared network drive creates
contention among the students’ client machines for two resources: LAN bandwidth and shared drive
I/O. This performance impact can be avoided by installing the Secure Browser locally on each machine.
CAI strongly discourages the use of network shared drive installation for the Secure Browser, as this
setup can compromise the stability and performance of the browser, especially during peak testing
times.

How to Install the Secure Browser via the Command Line
In this scenario, a user with administrator rights installs the Secure Browser from the command line. If
you do not have administrator rights, refer to the section How to Install the Secure Browser Without
Administrator Rights.

If you are not signed on to the computer as an administrator, obtain the administrator password.

Previously installed versions of the Secure Browser must be manually uninstalled before installing the
current version.
1. Navigate to the Download Secure Browsers page of the Oregon Statewide Assessment System
    portal at osasportal.org. Click the Windows tab, then click Download Browser. A dialog window
    opens.

2. Save the file on the computer (this step may vary depending on the browser you are using):

        a. If presented with a choice to Run or Save the file, click Save, and save the file to a
           convenient location.

        b. If presented only with the option to Save, save the file to a convenient location.

3. Note the full path and filename of the downloaded file, such as
    c:\temp\OSASSecureBrowser-Win.msi.

4. Open a command prompt as the administrator by doing the following:

        a. Click Start, and locate the Command Prompt application. (In some versions of Windows the
           application is under All Programs > Accessories > Command Prompt.)

        b. Right-click Command Prompt, and select Run as Administrator.

        c. As necessary, type the administrator password for the computer. The command prompt
           opens.

    (You need to do step 4 only once for the current login. The next time you open the command
    prompt, Windows retains the administrator role.)

© Cambium Assessment, Inc.               10
Configurations, Troubleshooting, and Advanced Secure Browser Installation for Windows
How to Install the Secure Browser Using Advanced Methods
5. Run the command msiexec /I [/quiet] [INSTALLDIR=]
Path to the installation file, such as C:\temp\OSASSecureBrowser-Win.msi.
Path to the location where you want to install the Secure Browser. If absent, installs to
the directory described in step 7. The installation program creates the directory if it
does not exist.
/I Perform an install.
[/quiet] Quiet mode, no interaction.
For example, the command
msiexec /I c:\temp\OSASSecureBrowser-Win.msi /quiet
INSTALLDIR=C:\AssessmentTesting\BrowserInstallDirectory
installs the Secure Browser from the installation package at C:\temp\
OSASSecureBrowser-Win.msi into the directory
C:\AssessmentTesting\BrowserInstallDirectory using quiet mode.
6. Follow the instructions in the setup wizard. When prompted for setup type, click Install.
7. Click Finish to exit the setup wizard. The following items are installed:
a. The Secure Browser to the default location C:\Program Files\OSASSecureBrowser\
b. A shortcut OSASSecureBrowser to the desktop.
8. Ensure all background jobs, such as virus scans or software updates, are scheduled outside of test
windows. For example, if your testing takes place between 8:00 a.m. and 3:00 p.m., schedule
background jobs outside of these hours.
9. Run the browser by double-clicking the OSASSecureBrowser shortcut on the desktop. The Secure
Browser opens displaying the student login screen. The browser fills the entire screen and hides the
task bar.
10. To exit the browser, click CLOSE SECURE BROWSER in the upper-right corner of the screen.
How to Copy the Secure Browser Installation Directory to Testing Computers
In this scenario, a network administrator installs the Secure Browser on one machine, and copies the
entire installation directory to testing computers.
11. On the computer from where you will copy the installation directory, install the Secure Browser
following the directions on your portal. Note the path of the installation directory, such as
C:\Program Files\OSASSecureBrowser.
© Cambium Assessment, Inc. 11Configurations, Troubleshooting, and Advanced Secure Browser Installation for Windows
How to Install the Secure Browser Using Advanced Methods
12. Identify the directory on the local testing computers to which you will copy the browser file (it
should be the same directory on all computers). For example, you may want to copy the directory to
c:\AssesssmentTesting\. Ensure you select a directory in which the students can run
executables.
13. On each local testing computer, do the following:
a. Ensure all background jobs, such as virus scans or software updates, are scheduled outside of
test windows. For example, if your testing takes place between 8:00 a.m. and 3:00 p.m.,
schedule background jobs outside of these hours.
b. Copy the installation directory used in step 11 from the remote machine to the directory you
selected in step 12. For example, if the target directory is c:\AssesssmentTesting\, you are
creating a new folder c:\AssesssmentTesting\OSASSecureBrowser.
c. Copy the shortcut
c:\AssesssmentTesting\OSASSecureBrowser\OSASSecureBrowser.exe -
Shortcut.lnk to the desktop.
d. Run the browser by double-clicking the OSASSecureBrowser shortcut on the desktop. The
Secure Browser opens displaying the student login screen. The browser fills the entire screen
and hides the task bar.
e. To exit the browser, click CLOSE SECURE BROWSER in the upper-right corner of the screen.
How to Install the Secure Browser on a Terminal Server or Windows Server
In this scenario, a network administrator installs the Secure Browser on a server—either a terminal
server or a Windows server. Testing machines then connect to the server’s desktop and run the Secure
Browser remotely. This scenario is supported on Windows Server 2012 R2 and 2016 R2.
CAUTION: Testing Quality with Servers Launching a Secure Browser from a terminal or Windows server
is typically not a secure test environment, because students can use their local machines to search for
answers. Therefore, CAI does not recommend this installation scenario for testing.
1. Log in to the server, and install the Secure Browser by following the directions on your portal. Note
the path of the installation directory.
2. Copy and paste the line below into Notepad (no line breaks):
"C:\Program Files\OSASSecureBrowser\OSASSecureBrowser" -CreateProfile
%SESSIONNAME%
If you used a different installation path, use that in the above command.
3. Save the file to the desktop as logon.bat.
4. Create a group policy object that runs the file logon.bat each time a user connects to the server’s
desktop. For details, see How to Create Group Policy Objects.
© Cambium Assessment, Inc. 12Configurations, Troubleshooting, and Advanced Secure Browser Installation for Windows
How to Install the Secure Browser Using Advanced Methods
5. On each client, create a new OSASSecureBrowser desktop shortcut by doing the following (this step
is necessary because the default shortcut created by the installation program has an incorrect
target):
a. Connect from the client to the server.
b. On the desktop provided by the server, delete the Secure Browser’s shortcut.
c. Navigate to the Secure Browser’s installation directory, usually C:\Program Files\
OSASSecureBrowser\.
d. Right-click the file OSASSecureBrowser.exe and select Send To > Desktop (create shortcut).
e. On the desktop, right-click the new shortcut and select Properties. The Shortcut Properties
dialog box appears.
f. Under the Shortcut tab, in the Target field, type the following command:
"C:\Program Files\OSASSecureBrowser\OSASSecureBrowser.exe" -P
%SESSIONNAME%
If you used a different installation path on the server, use that in the above command.
g. Click OK to close the Properties dialog box.
6. Verify the installation by double-clicking the shortcut to start the Secure Browser.
How to Install the Secure Browser Without Administrator Rights
In this scenario, you copy the Secure Browser from one machine where it is installed onto another
machine on which you do not have administrator rights.
1. Log on to a machine on which the Secure Browser is installed.
2. Copy the entire folder where the browser was installed (usually C:\Program Files \
OSASSecureBrowser) to a removable drive or shared network location.
3. Copy the entire directory from the shared location or removable drive to any directory on the target
computer.
4. In the folder where you copied the Secure Browser, right-click OSASSecureBrowser.exe and select
Send To > Desktop (create shortcut).
5. Ensure all background jobs, such as virus scans or software updates, are scheduled outside of test
windows. For example, if your testing takes place between 8:00 a.m. and 3:00 p.m., schedule
background jobs outside of these hours.
6. Double-click the desktop shortcut to run the Secure Browser.
© Cambium Assessment, Inc. 13Configurations, Troubleshooting, and Advanced Secure Browser Installation for Windows
How to Install the Secure Browser Using Advanced Methods
How to Share the Secure Browser over a Network
While the Secure Browser can be installed on a server’s shared drive and then shared to each testing
computer’s desktop via a shortcut, CAI strongly discourages this setup as it can compromise the stability
and performance of the browser, especially during peak testing times.
How to Uninstall the Secure Browser on Windows
The following sections describe how to uninstall the Secure Browser from Windows or from the
command line. Previously installed versions of the Secure Browser must be manually uninstalled before
installing the current version.
How to Uninstall the Secure Browser via the User Interface
The following instructions may vary depending on your version of Windows.
1. Navigate to Settings > System > Apps & features (Windows 10) or Control Panel > Add or Remove
Programs or Uninstall a Program (previous versions of Windows).
2. Select the Secure Browser program OSASSecureBrowser and click Remove or Uninstall.
3. Follow the instructions in the uninstall wizard.
How to Uninstall the Secure Browser via the Command Line
1. Open a command prompt.
2. Run the command msiexec /X /quiet
Path to the executable file, such as C:\MSI\OSASSecureBrowser.exe.
/X Perform an uninstall.
[/quiet] Quiet mode, no interaction.
For example, the command
msiexec /X C:\AssessmentTesting\OSASSecureBrowser.exe /quiet
uninstalls the Secure Browser installed at C:\AssessmentTesting\ using quiet mode.
How to Install the Secure Browser on Windows Mobile Devices
The procedure for installing the Secure Browser on Windows mobile devices is the same for installing it
on desktops. See your portal for details.
How to Create Group Policy Objects
Many of the procedures listed above refer to creating a group policy object. These are objects that
Windows executes upon certain events. The following procedure explains how to create a group policy
object that runs a script when a user logs in. The script itself is saved in a file logon.bat.
© Cambium Assessment, Inc. 14Configurations, Troubleshooting, and Advanced Secure Browser Installation for Windows
How to Install the Secure Browser Using Advanced Methods
For additional information about creating group policy objects, see https://technet.microsoft.com/en-
us/library/cc754740(v=ws.11).aspx.
1. In the task bar (Windows 10), or in Start > Run (previous versions of Windows), enter gpedit.msc.
The Local Group Policy Editor appears.
Figure 9: Local Group Policy Editor
2. Expand Local Computer Policy > User Configuration > Windows Settings > Scripts (Logon/Logoff).
3. Select Logon and click Properties. The Logon Properties dialog box appears.
© Cambium Assessment, Inc. 15Configurations, Troubleshooting, and Advanced Secure Browser Installation for Windows
How to Install the Secure Browser Using Advanced Methods
Figure 10: Logon Properties
4. Click Add. The Add a Script dialog box appears.
© Cambium Assessment, Inc. 16Configurations, Troubleshooting, and Advanced Secure Browser Installation for Windows
How to Install the Secure Browser Using Advanced Methods
Figure 11: Add a Script
5. Click Browse…, and navigate to the logon.bat you want to run.
6. Click OK. You return to the Logon Properties dialog box.
7. Click OK. You return to the Local Group Policy Editor.
8. Close the Local Group Policy Editor.
© Cambium Assessment, Inc. 17Configurations, Troubleshooting, and Advanced Secure Browser Installation for Windows
How to Troubleshoot Windows Workstations
How to Troubleshoot Windows Workstations
This section contains troubleshooting tips for Windows.
How to Reset Secure Browser Profiles on Windows
If the Helpdesk advises you to reset the Secure Browser profile, use the instructions in this section.
1. Log on as an admin user or as the user who installed the Secure Browser, and close any open Secure
Browsers.
2. Delete the contents of the following folders:
C:\Users\username\AppData\Local\CAI\
C:\Users\username\AppData\Roaming\CAI\
where username is the Windows user account where the Secure Browser is installed. (Keep the CAI\
folders, just delete their contents.)
3. Start the Secure Browser.
How to Block Device Touch Input Using the Group Policy Editor
Some tablets and devices have Touch features that may need to be disabled before testing. The
following procedure describes how to disable the Touch feature on these devices using the Group Policy
Editor:
1. Type gpedit.msc in the Search box on the Start menu. The Local Group Policy Editor window
appears.
© Cambium Assessment, Inc. 18Configurations, Troubleshooting, and Advanced Secure Browser Installation for Windows
How to Troubleshoot Windows Workstations
Figure 12: Local Group Policy Editor
2. Navigate to Computer Configuration\Administrator Templates\Windows Components.
Figure 13: Windows Components
© Cambium Assessment, Inc. 19Configurations, Troubleshooting, and Advanced Secure Browser Installation for Windows
How to Troubleshoot Windows Workstations
3. Scroll down to the Tablet PC folder, then select Input Panel. The following screen displays.
Figure 14. Input Panel
4. Enable the following items in the Setting column:
a. Turn off AutoComplete integration with Input Panel
b. Prevent Input Panel tab from appearing
c. For tablet pen input, don’t show the Input Panel icon
d. For touch input, don’t show the Input Panel icon
e. Disable text prediction
5. To enable an item in the Setting column, double-click on that item. The following screen will display
that will allow you to enable or disable your selected item as required.
© Cambium Assessment, Inc. 20Configurations, Troubleshooting, and Advanced Secure Browser Installation for Windows
How to Troubleshoot Windows Workstations
Figure 15. Turn off AutoComplete integration with Input Panel
6. Select Enabled, and click OK.
7. Close the Local Group Policy Editor window.
How to Install Windows Media Pack for Windows 8.1 N and KN
Some versions of Windows 8.1 are not shipped with media software installed. As a result, you may need
to install software to enable students to listen to and record audio as well as watch videos.
© Cambium Assessment, Inc. 21Configurations, Troubleshooting, and Advanced Secure Browser Installation for Windows
How to Troubleshoot Windows Workstations
Microsoft provides additional information as well as a download package for computers with the
following Windows 8.1 versions:
• Windows 8.1 N
• Windows 8.1 N/K with Bing
• Windows 8.1 Enterprise N
• Windows 8.1 Pro N
• Windows 8.1 Pro N/K for EDU
CAI encourages downloading this software and ensuring it works with sample websites and video and
audio files prior to installing the Windows Secure Browser. Installation instructions are provided on
Microsoft’s download page.
Microsoft Resources:
• About the Media Feature Pack for Windows 8.1 N and Windows 8.1 KN Editions: April 2014
(http://support.microsoft.com/kb/2929699/en-us)
• Download Media Feature Pack for N and KN Versions of Windows 8.1
(http://www.microsoft.com/en-us/download/details.aspx?id=42503)
How to Configure ZoomText to Recognize the Secure Browser
When displaying a test with a print-size accommodation above 4× magnification, the Secure Browser
automatically enters streamlined mode. If you want to retain the standard layout of a test but display it
with a print magnification above 4×, then consider using ZoomText—a magnification and screen-reading
software that you can use with the Secure Browser. Use the following procedure to ensure ZoomText
recognizes the Secure Browser.
1. If ZoomText is running, close it.
2. In the Windows Explorer, go to the installation directory for your version of ZoomText. For example,
if you have ZoomText version 10.1:
Go to C:\Program Files\ZoomText 10.1\
3. In a text editor, open the file ZoomTextConfig.xml.
4. Search for line containing the D2DPatch property, similar to the following:
5. In the value attribute, add the prefix for your state’s Secure Browser:
6. Save the file, and restart ZoomText.
© Cambium Assessment, Inc. 22Configurations, Troubleshooting, and Advanced Secure Browser Installation for Windows
How to Troubleshoot Windows Workstations
How to Set the Touch Keyboard on Microsoft Surface Pro Tablet to Appear
Some Surface Pro users accessing the touch keyboard are seeing the touch keyboard disappear when
they click outside a text box or when they type an answer into a text box and then click next. The
keyboard fails to reappear when users click back inside the next text box. To avoid these issues, users
must set the touch keyboard to automatically show up.
1. Go to Settings (keyboard shortcut: Windows + I)
Figure 16: Settings
2. Go to Devices > Typing.
3. Scroll down and toggle on: Automatically show the touch keyboard in windowed apps when there's
no keyboard attached to your device.
Figure 17: Typing
How to Disable Two-finger Scrolling in HP Notebooks with Synaptics TouchPad
The trackpad software on the HP stream notebooks can cause the Secure Browser to close and display
an “environment not secure” error. This can occur when a student tries to use the advanced trackpad
features such as scrolling gesture with the trackpad. The Synaptics Touchpad driver is the driver that
allows full use of all features of the trackpad. To avoid this error and the closing of the Secure Browser,
disable the Touchpad two-finger scrolling Feature.
1. Open the Start menu ( ), and then type mouse settings in the search field.
© Cambium Assessment, Inc. 23Configurations, Troubleshooting, and Advanced Secure Browser Installation for Windows
How to Troubleshoot Windows Workstations
2. Select Mouse settings from the list of options.
3. Select Touchpad.
4. In the Scroll and zoom section, clear the Drag two fingers to scroll checkbox.
Figure 18. Touchpad Settings
How to Disable Automatic Volume Reduction
A feature in Windows automatically lowers or mutes the volume of some apps if Windows detects audio
recording. This section describes how to disable automatic volume reduction.
1. Open the Start Menu.
2. Open the Control Panel.
3. Select Sound. The Sound window will open.
4. Select the Communications tab.
5. By default, the option to “Reduce the volume of other sounds by 80%” is selected. Change this to Do
nothing.
6. Select OK.
© Cambium Assessment, Inc. 24Configurations, Troubleshooting, and Advanced Secure Browser Installation for Windows
How to Troubleshoot Windows Workstations
How to Run NVDA Screen Reader 2018.1.1 with Take a Test App
Users running the Take a Test app and NVDA screen reader version 2018.1.1 at the same time on
Windows 10 and 10 in S Mode with RS v1709 and v1803 are experiencing the Take a Test app crashing
before a test is started. To keep the Take a Test app from crashing while running the NVDA screen
reader 2018.1.1, you should update Windows 10 and 10 in S Mode to at least RS v1809. Windows
Updates can be accessed through the Control Panel.
1. Open the Start Menu.
2. Type Windows Update in the search charm and hit enter. The Windows Update window appears.
3. Select Check for Updates.
4. Select Install Updates to install all available updates.
Figure 19: Windows Update
How to View the Windows Taskbar in Permissive Mode
In Permissive Mode, the Windows taskbar should appear when a user hovers their mouse pointer near
the bottom of the screen. In Windows 8.1 and 10, the taskbar does not appear as intended. The
following sections describe how to view the Windows taskbar in Permissive Mode by turning off the
auto-hide feature in the Taskbar Properties. These instructions differ slightly depending on your version
of Windows. This procedure must be completed before the Secure Browser is launched on the student
workstation.
How to View the Taskbar in Permissive on Windows 8.1
1. Right-click on the taskbar.
2. Click Properties. The Taskbar and Start Menu Properties window appears.
© Cambium Assessment, Inc. 25Configurations, Troubleshooting, and Advanced Secure Browser Installation for Windows
How to Troubleshoot Windows Workstations
3. Uncheck the Auto-hide the taskbar checkbox.
4. Click OK.
Figure 20: Taskbar and Start Menu Properties
How to View the Taskbar in Permissive Mode on Windows 10
1. Right-click on the taskbar.
2. Click Properties. The Taskbar window appears.
© Cambium Assessment, Inc. 26Configurations, Troubleshooting, and Advanced Secure Browser Installation for Windows
How to Troubleshoot Windows Workstations
3. Toggle Automatically hide the taskbar in desktop mode to Off.
4. Close the Taskbar window.
Figure 21: Taskbar
© Cambium Assessment, Inc. 27Configurations, Troubleshooting, and Advanced Secure Browser Installation for Windows
How to Configure Networks for Online Testing
How to Configure Networks for Online Testing
This section contains additional configurations for your network.
Resources to Add to your Allowlist for Online Testing
This section presents information about the URLs that CAI provides. Ensure your network’s firewalls are
open for these URLs. If your testing network includes devices that perform traffic shaping, packet
prioritization, or Quality of Service, ensure these URLs have high priority.
URLs for Non-Testing Sites to Add to your Allowlist
Table 1 lists URLs for non-testing sites, such as Test Information Distribution Engine and Online
Reporting System.
Table 1. CAI URLs for Non-Testing Sites
System URL
Portal and Secure Browser installation osasportal.org
files
Single Sign-On System https://sso2.cambiumast.com/auth/realms/oregon/account
Test Information Distribution Engine https://or.tide.cambiumast.com
Reporting System https://or.reports.cambiumast.com
URLs for TA and Student Testing Sites to Add to your Allowlist
Testing servers and satellites may be added or modified during the school year to ensure an optimal
testing experience. As a result, CAI strongly encourages you to add these URLs to your allowlist at the
root level. This requires using a wildcard. CAI strongly encourages using wildcards when adding these
URLs to your allowlist, as servers may be added or removed from the field without notice.
Table 2. CAI URLs for Testing Sites
System URL
TA and Student Testing Sites *.cambiumtds.com
Assessment Viewing Application *.tds.cambiumtds.com
*.cloud1.tds.cambiumtds.com
For 2021-2022, users should continue to add *.cloud2.tds.cambiumtds.com
both Cambium and AIR URLs listed in this *.cambiumast.com
table to their allowlist.
*.tds.cambiumast.com
*.cloud1.tds.cambiumast.com
*.cloud2.tds.cambiumast.com
© Cambium Assessment, Inc. 28Configurations, Troubleshooting, and Advanced Secure Browser Installation for Windows
How to Configure Networks for Online Testing
URLs for Online Dictionary and Thesaurus to Add to your Allowlist
Some online assessments contain an embedded dictionary and thesaurus provided by Merriam-
Webster. The Merriam-Webster URLs listed in Table 3 should be added to your allowlist to ensure that
students can use them during testing.
Table 3. CAI URLs for Online Dictionaries and Thesauruses
Domain Name IP Address
media.merriam-webster.com 64.124.231.250
www.dictionaryapi.com 64.124.231.250
Domains for Email Exchange Server and Single Sign-On System
CAI systems send emails for password resets and login codes for the single sign-on system from
cambiumast.com and from cambiumassessment.com. Add both domains to your allowlist to ensure you
receive these emails.
Ports and Protocols Required for Online Testing
Table 4 lists the ports and protocols used by the Test Delivery System. Ensure that all content filters,
firewalls, and proxy servers are open accordingly.
Table 4. Ports and Protocols for Test Delivery System
Port/Protocol Purpose
80/TCP HTTP (initial connection only)
443/TCP HTTPS (secure connection)
How to Configure Filtering Systems
If the school’s filtering system has both internal and external filtering, the URLs for the testing sites (see
Table 2) must be added to allowlists in both filters. Ensure your filtering system is not configured to
perform packet inspection on traffic to CAI servers. Please see your vendor’s documentation for specific
instructions. Also, be sure to add these URLs to your allowlist in any multilayer filtering system (such as
local and global layers). Ensure all items that handle traffic to *.tds.cambiumast.com and *.tds.airast.org
have the entire certificate chain and are using the latest TLS 1.2 protocol.
How to Configure for Domain Name Resolution
Table 1 and Table 2 list the domain names for CAI’s testing and non-testing applications. Ensure the
testing machines have access to a server that can resolve those names.
How to Configure Network Settings for Online Testing
Local Area Network (LAN) settings on testing machines should be set to automatically detect network
settings.
1. Open Control Panel.
2. Open Internet Options.
© Cambium Assessment, Inc. 29Configurations, Troubleshooting, and Advanced Secure Browser Installation for Windows
How to Configure Networks for Online Testing
3. Open Connections tab.
4. Open LAN Settings.
5. Mark the Automatically detect settings checkbox.
6. Click OK to close the Local Area Network (LAN) Settings window.
7. Click OK to close the Internet Properties window.
8. Close the Control Panel.
How to Configure the Secure Browser for Proxy Servers
By default, the Secure Browser attempts to detect the settings for your network’s web proxy server.
However, users of web proxies should execute a proxy command once from the command prompt. This
command does not need to be added to the Secure Browser shortcut. Table 5 lists the form of the
command for different settings and operating systems. To execute these commands from the command
line, change to the directory containing the Secure Browser’s executable file.
Note: Domain names in commands The commands in Table 5 use the domain proxy.com. When
configuring for a proxy server, use your actual proxy server hostname.
Table 5. Specifying proxy settings using the command line
Description System Command
Use the browser Windows OSASSecureBrowser.exe -proxy 0
without any aHR0cHM6Ly9vci50ZHMuY2FtYml1bWFzdC5jb20vc3R1ZGVudA==
proxy
Set the proxy for Windows OSASSecureBrowser.exe -proxy 1:http:proxy.com:8080
HTTP requests aHR0cHM6Ly9vci50ZHMuY2FtYml1bWFzdC5jb20vc3R1ZGVudA==
only
Set the proxy for Windows OSASSecureBrowser.exe -proxy 1:*:proxy.com:8080
all protocols to aHR0cHM6Ly9vci50ZHMuY2FtYml1bWFzdC5jb20vc3R1ZGVudA==
mimic the “Use
this proxy server
for all protocols”
of Firefox
Specify the URL Windows OSASSecureBrowser.exe -proxy 2:proxy.com
of the PAC file aHR0cHM6Ly9vci50ZHMuY2FtYml1bWFzdC5jb20vc3R1ZGVudA==
Auto-detect Windows OSASSecureBrowser.exe -proxy 4
proxy settings aHR0cHM6Ly9vci50ZHMuY2FtYml1bWFzdC5jb20vc3R1ZGVudA==
Use the system Windows OSASSecureBrowser.exe -proxy 5
proxy setting aHR0cHM6Ly9vci50ZHMuY2FtYml1bWFzdC5jb20vc3R1ZGVudA==
(default)
© Cambium Assessment, Inc. 30Configurations, Troubleshooting, and Advanced Secure Browser Installation for Windows
Change Log
Change Log
Change Date
Removed all references to Windows 8 and to 32-bit processors, which will no 6/28/21
longer be supported in 2021-2022.
• Added a new "How to Disable Screen Edge Swipe on Windows 10 Tablets & 6/28/21
Laptops in Tablet Mode" section. This configuration is needed for all Windows 10
tablets and laptops in tablet mode.
• Added *.cambiumtds.com to the allowlists in Table 2 (pg. 29). 6/28/21
• Removed references to x86 in file directories. 8/11/21
• Updated instructions and screenshots for How to Disable Two-finger Scrolling in 8/11/21
HP Notebooks with Synaptics TouchPad.
• Updated note in How to Uninstall the Secure Browser on Windows and How to 8/11/21
Install the Secure Browser via the Command Line about previous versions of the
Secure Browser being automatically uninstalled when a new version is installed
using the Windows installer. Previous versions must be manually uninstalled.
• Updated How to Disable Screen Edge Swipe on Windows 10 Touchscreen Devices 10/20/21
topic heading and text to include all Windows 10 touchscreen devices.
• Updated How to Configure Networks for Online Testing section for new TDS 6/16/22
domains.
© Cambium Assessment, Inc. 31You can also read