Configure and Send eDisclosure Packages - For use with Encompass Broker & Banker Editions - Ellie Mae
←
→
Page content transcription
If your browser does not render page correctly, please read the page content below
Configure and Send eDisclosure Packages
                 For use with Encompass Broker & Banker Editions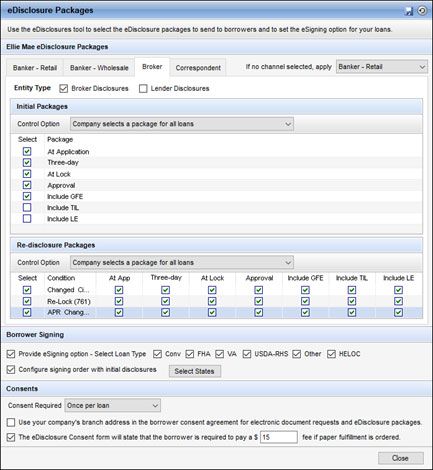
Copyright Statement
© 2019 Ellie Mae, Inc. Ellie Mae®, Encompass®, Encompass360®, Encompass Docs Solution™, Encompass CenterWise™, Encompass Compliance Service™, and the
Ellie Mae Logo are registered trademarks or trademarks of Ellie Mae, Inc. or its subsidiaries. All rights reserved. Other company and product names may be trademarks of
their respective owners. Products, services and programs are subject to change without notice.
Configure and Send eDisclosure Packages - Encompass Broker and Banker Editions
Rev. 11/21/2019
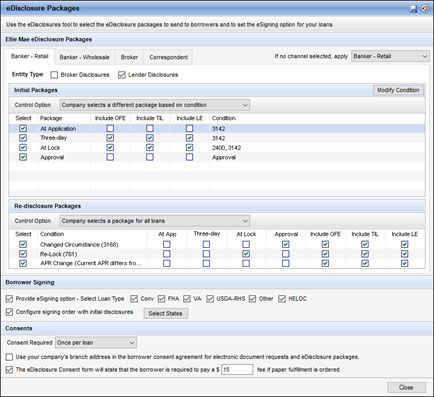
Table of Contents
Chapter 1: Introduction ................................................................ 1

Chapter 2: Configure eDisclosure Packages.......................... 2
         Encompass Docs Solution Prerequisites ................................... 2
         Docs Setup ............................................................................ 2
              Set Up eDisclosure Packages .......................................... 2
                  Set Up eDisclosure Plan Codes        ....................................... 6
                  Set Up eDisclosure Stacking Templates           ............................ 8
         Add Documents to an eDisclosure Package ............................... 9
         Loan Templates .................................................................... 10
              Loan Program Templates Based on Plan Codes .............. 10
         Persona Settings ...................................................................11

Chapter 3: eDisclosure Notifications ...................................... 13
         Alerts     ................................................................................... 13
         Tasks      ................................................................................... 14

Chapter 4: Request eConsent .................................................. 15

Chapter 5: Generate and Send eDisclosure Packages ...... 17
         How Fulfillment Packages Are Triggered ................................. 22
         Loan Log Entry ..................................................................... 23

Appendix A: eDisclosure Setup Scenarios ........................... 24
         Scenario 1: Default Settings ................................................... 24
         Scenario 2: Lender in Retail Banker Channel ........................... 24
              Overview ..................................................................... 24
                  Conditions and Alerts           .................................................... 25
         Scenario 3: Lender in Banker Wholesale Channel .................... 26
         Scenario 4: Broker - User Selects Packages ............................ 26
         Scenario 5: Broker - Company Selects Packages ..................... 27

                                                                                                             i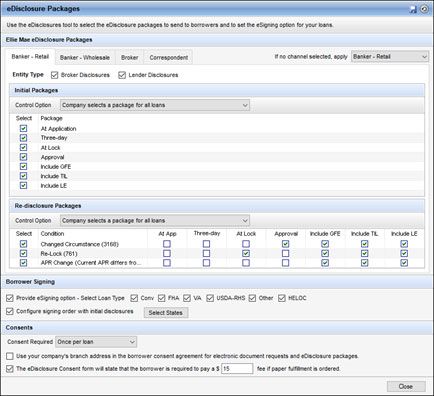
Chapter 1

Introduction
Authorized Encompass users can use the eDisclosures feature to generate an              View the following chapters for detailed information about configuring, generating,
initial disclosure package (i.e., an eDisclosure package) and send it electronically    and sending eDisclosure packages:
it to their borrowers at the required times. The borrowers are notified by email that
                                                                                        • Chapter 2, “Configure eDisclosure Packages”, provides instructions for
eDisclosure documents are available on a secure website. Borrowers can sign
                                                                                         administrators to set up your company’s eDisclosure packages, including how
and return the documents electronically, and their loan originator can retrieve the
                                                                                         to add and remove documents from packages, identifying the packages that will
completed documents from the secure website.
                                                                                         be available for users based on loan type or channel, how to set up initial
eDisclosure packages include forms that are selected based on the plan code and          disclosure plan codes, stacking templates, and persona-based permissions,
stacking templates set up by the administrator, subject property state, loan             and how to specify which application your company uses to generate
channel, and other information selected in the loan file (for example, loan              eDisclosure packages.
program, loan type, lien type), as well as your company's status as a lender or         • Chapter 3, “eDisclosure Notifications”, provides suggestions for administrators
broker. A package can contain standard forms and custom forms from                       to set up notifications to alert users when eDisclosure packages need to be sent
Encompass, as well as additional Ellie Mae disclosure forms that are dynamically         to borrowers.
selected based on the information entered in the loan file.
                                                                                        • Chapter 5, “Generate and Send eDisclosure Packages”, describes the process
Your Encompass administrator sets up the documents that are included in the              for users to send eDisclosure packages to borrowers.
eDisclosure packages that you can select from and send to borrowers. They also
determine whether you can select your own eDisclosure packages or whether the           • Appendix A, “eDisclosure Setup Scenarios”, provides sample scenarios for
packages are automatically selected for you. Authorized users can also                   administrators to configure various types of eDisclosure packages.
reorganize, add, or remove documents from the package.                                  To access all of the features described in the guide, you must be logged in to
                                                                                        Encompass as the admin user. In order for loan originators to access all of the
Your administrator can also configure reminders to notify you when a signed
                                                                                        features described in this guide, the admin user must set up the required
eDisclosure from the borrower is due.
                                                                                        permissions for each user.

Introduction                                                                                                                                                            1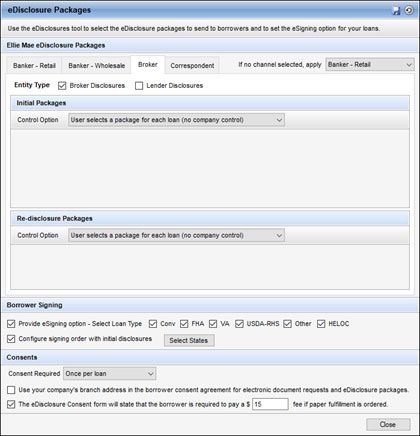
Chapter 2
Configure eDisclosure Packages
Encompass Docs Solution Prerequisites
Prior to using the Encompass Docs Solution, the Ellie Mae team will coordinate
setting up and activating your company’s Encompass Docs Solution account, and
then guide you through the following set up and configuration tasks in
Encompass:
• Docs Setup
• eFolder Setup
• Loan Templates
• Persona Settings
Docs Setup
Use the Docs Setup settings to create and manage the eDisclosures that will be
provided to users when they generate and send eDisclosure packages.
NOTE: The Compliance Audit Settings are for use with closing documents only
and do not need to be configured for eDisclosure packages.
Set Up eDisclosure Packages
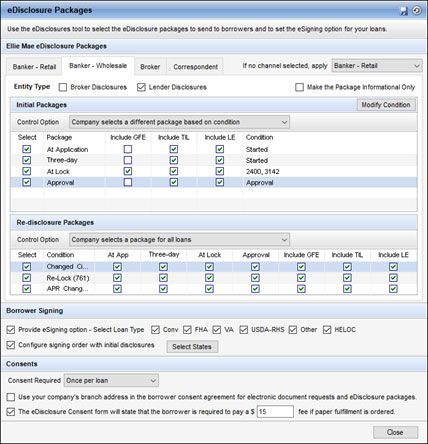
Use the eDisclosure Packages tool to select the eDisclosure packages that will be
sent to borrowers by your users and to enable or disable the eSigning option for
loans.
Configure eDisclosure Packages 2
eDisclosure packages include forms that are selected based on the subject              To Set Up eDisclosure Packages:
property state, loan channel, and other information selected in the loan file (for     1 On the menu bar, click Encompass, and then click Settings.
example, loan program, loan type, lien type, and subject property location), as
well as your company's status as a lender or broker. A package can contain             2 On the left panel, click Docs Setup, and then click eDisclosure Packages.
standard forms and custom forms from Encompass, as well as additional Ellie
Mae disclosure forms that are dynamically selected based on the information
entered in the loan file.
The administrator can select one or more predefined eDisclosure packages to use
for all loans, or set criteria that make different packages available when specified
milestones or fields have been completed. Administrators can also allow
individual users to select their eDisclosure packages, and personas who have
permission can add and remove documents from packages before sending them
to borrowers.
NOTE: Add/remove permission is configured in the Persona settings on the
Loans tab in the Closing Docs section. For more information, refer to “Persona
Settings” on page 11.
The content of the predefined eDisclosure packages is designed to meet the
requirements for the stages in the loan process listed below:
• At Application
• Three-day
• At Lock
• Approval
Three additional options allow you to include the GFE, TIL, or LE in a package:
• Include GFE
• Include TIL
• Include LE
To view the list of forms that are inside the different eDisclosure packages, refer
to the eDisclosure Matrix document, which is available in the Encompass
Resource Center and the Ellie Mae Knowledge Base.
The eSigning option allows borrowers to access the documents online using the          3 On the upper-right, select a default option to use if no channel is selected for a
Loan Center (or WebCenter). After consenting to receive electronic disclosures,          loan file.
the borrower reviews the documents online and then signs the documents                 4 Click a channel tab at the top of the Ellie Mae eDisclosure Packages section.
electronically. Your users will receive an email notification that the signed
                                                                                       5 For the Entity Type, select Broker Disclosures, Lender Disclosures, or both.
documents are available.
                                                                                          NOTE: If you select both entity types, the packages will include all forms used
TIP: If the eSigning option is enabled and the eDisclosure package contains
                                                                                          by brokers and all forms used by lenders. The packages include only one copy
custom forms that require a signature, be sure you have inserted eSigning
                                                                                          of forms that are used by both.
signature points in the forms. For detailed instructions, refer to the Custom Print
Forms topic in the Encompass online help.                                              6 For Banker-Wholesale loans, you can select the Make the Package
                                                                                         Informational Only check box to make all disclosures informational. The
                                                                                         packages will not provide signing options or fax cover sheets.

Configure eDisclosure Packages                                                                                                                                           3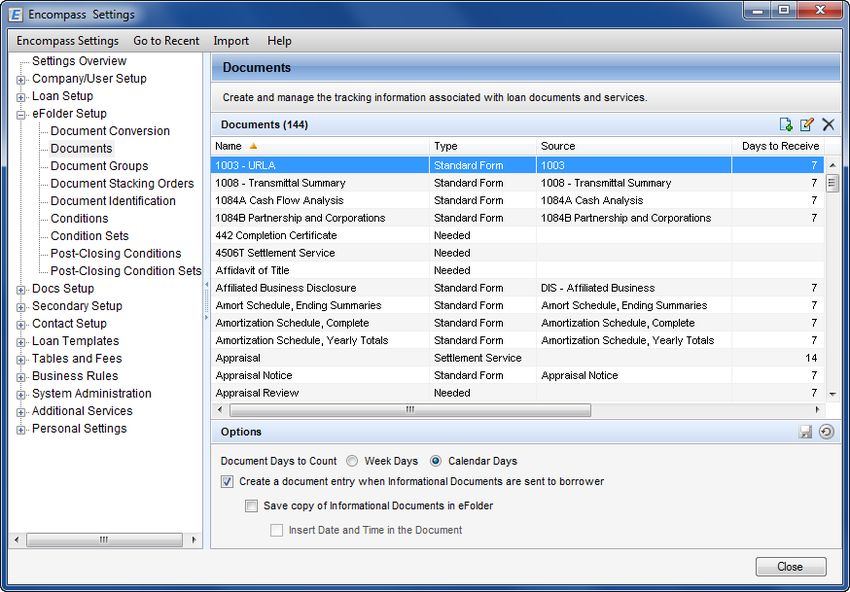
7 On the Initial Packages section, select a Control Option from the list.

   Company selects a package for all loans

   • Select the check box for one or more packages on the list.
    NOTE: If multiple packages are selected, the package contains all the forms
    listed in each package. The package includes only one copy of forms that are   4 If you selected Field Value Entered, click the New icon, enter the Field IDs
    used by multiple packages.                                                       for the fields that must be completed before the condition is met, and then
                                                                                     click Add.
   Company selects a different package based on condition

   1 Click to select a package on the list, and then click Modify Condition.
   2 On the Condition window, in the Select Condition Type field, select
     Milestone Finished or Field Value Entered.
   3 If you selected Milestone Finished, select a milestone from the Finished
     Milestone list, and then click Save.

                                                                                      • Or, to locate a field on a form, click the Find icon, select a field on the left
                                                                                        panel, right-click a field on the form, and then click OK.

Configure eDisclosure Packages                                                                                                                                       4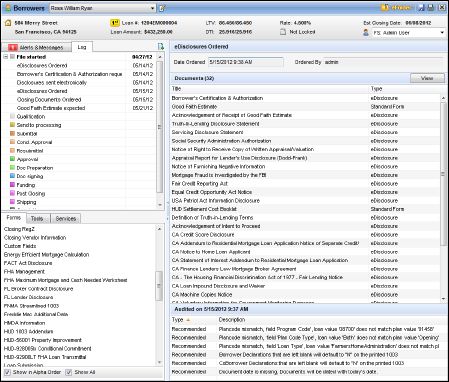
5 After all the fields have been selected, click Save.                            • To configure the eSigning process so that the loan officer must eSign initial
    NOTE: When multiple fields are selected, all the fields must be completed         disclosure before they are sent to other parties, select the Configure signing
    before the eDisclosure package selection is triggered.                            order with initial disclosures check box, click the Select States button, select
                                                                                      the state where you want the loan officer to eSign before initial disclosure are
   6 Repeat steps 1-5 to modify conditions for additional packages.                   sent to other parties, and then click OK.
   7 Select the check box for a package to make it available to users when the
     condition is met.                                                               To Set the Consent Options:
   8 Select the check boxes in the Include LE column (for loans using the 2015       1 Select a Consent Required option:
     RESPA-TILA forms) and the Include GFE and Include TIL columns (for                 • Once per loan - With this option (known as loan-level consent), the borrower
     loans using the 2010 RESPA forms) to include those forms in a package.              is required to consent only once per loan to receive any documents
    NOTE: If a user sends additional disclosures and no loan data has changed,           electronically. This loan-level consent status is applied and tracked on all
    a message asks the user to confirm that the same eDisclosure package will            current and future electronic document packages. When a borrower accept
    be sent again. If changes to the loan data have triggered a new condition, a         consent, all loan documents are accessible electronically. When a borrower
    new eDisclosure package will be sent and a message will not display.                 declines consent, no loan documents are accessible electronically. During
                                                                                         the loan process, borrowers can change their minds and accept or decline
   User selects a package for each loan (no company control)                             the agreement at any time. When the loan-level consent status changes, the
                                                                                         following rules apply:
   • No additional configuration is required when you select this option. The user
    is allowed to select the package when generating an eDisclosure package.               • When a borrower changes the loan-level consent status from decline to
                                                                                             accept, all document packages are accessible electronically, even
8 In the Re-disclosure Package section, select an option from the Control
                                                                                             packages that were sent previously when consent was declined.
  Option list.
                                                                                           • When a borrower changes the loan-level consent status from accept to
   Company selects a package for all loans                                                   decline:
   • Select the check box for one or more conditions that require different                  • Packages where consent was accepted prior to the status change
    eDisclosure packages.                                                                      accepted are still accessible electronically.
   • For each condition you have selected, select the check box for one or more              • Packages sent after the consent status change are not accessible
    preconfigured packages that will be used when the condition exists.                        electronically.
    NOTE: If multiple packages are selected, the package contains all the forms              • Packages sent that were not accessed prior to the consent status
    listed in each package. Duplicate copies of forms should not be included in                change are no longer accessible electronically.
    the final package.                                                                  • For loan and each package - With this option (known as loan-and-package-
                                                                                         level consent), an initial consent agreement is sent to the borrower before
   User selects a package for each loan (no company control)                             any electronic documents are sent. Separate consent agreements are also
   • No additional configuration is required when you select this option. The user       sent with each document package. Borrowers must accept the agreement for
    is allowed to select the package when generating an eDisclosure package.             each document package to receive the documents electronically.
9 For each channel tab, repeat steps 5-8 in the “To Set Up eDisclosure                   NOTE: This option provides an easy way to reaffirm prior loan-level consent
  Packages” instructions starting on page 3.                                             with each package. The package-level consent is not a replacement for the
                                                                                         loan-level consent. It is important to get prior loan-level consent before
10 When finished, click the Save icon.
                                                                                         sending any eDisclosure.

To Set the Borrower Signing Option:                                                      With loan-and-package-level consent, a record is maintained for each
                                                                                         package, regardless of the accept/decline option selected for other
• In the Borrower Signing section, clear or select the Provide eSigning option
                                                                                         packages.
 check box to disable or enable the option, and then clear or select the check
 boxes to disable or enable the option for each loan type.

Configure eDisclosure Packages                                                                                                                                         5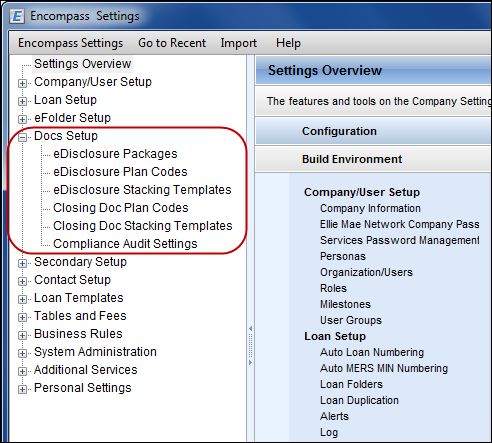
Example: When a borrower accepts packages 1 and 2, declines package 3,           3 Click the New icon.
    and then accepts package 4, packages 1, 2, and 4 are still accessible
    electronically, but package 3 is not.
    The loan-and-package-level consent method also maintains a loan-level
    consent status for the borrower that changes based on whether the borrower
    has accepted or declined the previous disclosure package.
    Example: When a borrower accepts the initial loan-level consent request,
    receives an eDisclosure, and then declines a package-level consent request,
    the borrower’s loan-level consent status is set to Declined.
    The loan-level consent for the borrower is used to ensure compliance with
    RESPA-TILA regulations that require a borrower's eConsent prior to sending
    electronic disclosures. A separate attribute, loan-level consent when
    eDisclosure was sent, tracks this prior loan-level consent. When a borrower’s
    loan-level consent status has been changed to declined, you must send a
    new loan-level eConsent request to the borrower before you send any
    additional packages. This ensures that your packages continue to be
    compliant with 2015 RESPA-TILA regulations.
2 Clear or select the option to use your company's a branch office address in the
  consent agreement that borrowers must accept before they can receive loan          4 At the top of the Select Plan Code window, select Generic from the drop-down
  documents electronically.                                                            list.

   • The agreement uses the address in the Organization Details window                  • A list of loan programs is displayed.
    (Encompass Settings>Company Details>Organization/Users) for the                  5 To view details about the loan program, including the values that will be added
    Organization hierarchy folder that contains the Encompass user who is              to the loan file if selected, select the loan program, and then click the View
    sending the consent.                                                               Plan Code Details icon (magnifying glass).
3 Clear or select the The eDisclosure Consent form will state... check box to        6 To add the program to your company's plan codes list that users can select
  include or exclude a statement on the eDisclosure Agreement stating the              from when generating eDisclosure packages, click to select one or more plans,
  amount of any additional fees that will be charged if the borrower opts to           and then click Add.
  receive printed copies of documents rather than electronic ones.
                                                                                     7 Click Yes to confirm the addition of the plan to your company's plan code list.
4 Enter the dollar amount that will be charged for printed copies in the text box.
                                                                                        • The program is added to the Company Plan Codes list.
5 When finished, click the Save icon.
                                                                                     8 To add additional plans to your company's plan codes list, repeat steps 4
Set Up eDisclosure Plan Codes                                                          through 7.
Use the eDisclosure Plan Codes tool to set up the plan codes your company will
                                                                                     NOTE: To add one or more programs to your company’s plan codes list at the
use when generating eDisclosure packages. When users generate eDisclosure
                                                                                     same time, press Ctrl on your keyboard, and then click to select the programs to
packages, they will select one of these plan codes and apply its loan program data
                                                                                     add.
to the eDisclosure packages. Here you can select from a list of generic plan codes
or create your own custom plan codes.
                                                                                        Creating an Alias for a Plan Code
To Add eDisclosure Plan Codes:                                                          You can add a loan program to your company's plan codes list, but change the
                                                                                        program's plan code ID, description, and investor name beforehand by using
1 On the menu bar, click Encompass, and then click Settings.
                                                                                        the Add as Alias option. The loan program itself does not change, but when
2 On the left panel, click Docs Setup, and then click eDisclosure Plan Codes.

Configure eDisclosure Packages                                                                                                                                      6
the user is selecting a plan code for their initial disclosure (i.e., eDisclosure) 5 Enter a custom plan code ID, Description, and Investor name.
package, the plan code ID, description, and investor name will be displayed to
them according to your settings.
1 Follow steps 1 through 4 in the “To Add eDisclosure Plan Codes”
instructions starting on page 6.
2 To create an alias for a program and then add it to your company's plan
codes list that users can select from when generating eDisclosure
packages, click to select a plan, and then click Add as Alias.
3 In the Add EM Plan Code as Alias window:
• On the Status line, select the Active check box to include the program in
the plan codes list that users select from when generating eDisclosure
packages.
• Enter the desired plan code ID, Description, and Investor name. 6 Select the Active check box to include the program in the plan codes list
• The plan code ID is an investor-specific or company-specific identifier
that users select from when generating eDisclosure packages.
for the program. Users selecting a plan code for their initial disclosure 7 Click Add.
(i.e., eDisclosure) package may find it helpful if you create a plan code NOTE: To include field values in the plan code that populate to the loan file
ID that helps describe the program (for example, C.30YRFIXED) so it's when the plan code is selected for the eDisclosure package, use the Create
easy for them to look at the plan code and know what's being used for a Loan Program button to create a loan program template based on the plan
the loan. code. (See the “To Create a Loan Program Based on a Plan Code”
• Select the Do not import investor name to loan check box to prevent instructions below.) Or, you can use the Loan Programs template setting to
the investor name from being automatically populated to the loan file apply the plan code to a loan program template and enter the desired field
when selected. When selected, the investor name will be blank in the values. (The Loan Programs setting is located under the Loan Templates
plan codes list that users select from when generating eDisclosure folder in Encompass Settings.)
packages.
4 Click Add. To Create a Loan Program Based on a Plan Code:
When working with the Loan Templates setting in Encompass Settings, a “loan
Creating a Custom Plan Code program” is a template of predefined values that display primarily on the Truth-In-
You can create your own custom plan codes to add to your company's plan Lending Disclosure statement and the 1003 application. You can significantly
codes list. reduce data entry time and improve accuracy by setting up loan programs for the
types of loans you process most often.
1 On the menu bar, click Encompass, and then click Settings.
Here you can create a loan program based on the predefined values set up in a
2 On the left panel, click Docs Setup, and then click eDisclosure Plan plan code. When a user selects the plan code to use with a loan, the data from the
Codes. loan program template is copied to the loan forms. The user can leave the data as
3 Click the New icon. is, or change values as needed. The original data on the template is not affected.
4 In the lower-left corner, click Create Custom. 1 On the menu bar, click Encompass, and then click Settings.
2 On the left panel, click Docs Setup, and then click eDisclosure Plan Codes.
3 Select a plan code, and then click the Create Loan Programs button.
4 In the Select Folder window, browse to the folder where you want to store the
loan program, and then click OK.
Configure eDisclosure Packages 7• The loan program template is saved to the location you selected. This loan 2 On the left panel, click Docs Setup, and then click eDisclosure Stacking
program is also added to the Loan Programs list in the Loan Programs Templates.
setting. Use this setting to update field values in the loan program template 3 In the Stacking Templates section, click the New icon.
as needed.
4 To rename the template, double-click the New Stacking Template entry to
NOTE: When added to the Loan Programs template setting, the program’s make the name editable. You can then enter the new template name.
Name and Program Description are based on the plan code’s Description
(i.e., the plan code’s Description matches the loan program’s Name and 5 With the template selected, click the New icon in the Documents section to add
Product Description). documents to the template.
• A link icon displays next to loan programs that are created based on a plan
code.
• When working with the loan program, you cannot change any of the plan
code data that is included in it. (Fields populated with plan code data are not
editable in the loan program.) In order to change plan code properties (plan
code status, description, and investor), you must use the eDisclosure Plan
Code setting. Any changes you make to the plan code properties are
automatically applied to the loan programs that are “linked” to the plan code.
• To create multiple loan programs based on multiple plan codes, press Ctrl on
your keyboard, select one or more plan codes, and then click the Create
Loan Programs button. A new loan program is created for each plan code
selected.
Set Up eDisclosure Stacking Templates
Use the eDisclosure Stacking Templates tool to set up the order in which the
eDisclosures are organized and sent to the borrower. Here you can control which
documents are included in the initial disclosure package, and the order in which
they are organized. When a user generates the eDisclosure packages, they can 6 In the New Documents section, select a Source for the documents.
select the eDisclosure Stacking Template they want to apply to the eDisclosure
• The Ellie Mae eDisclosures (Returned) source option lists only the
package.
documents that have been returned to the user via Encompass at least once.
NOTE: The Default Stacking Template - eDisclosures template is provided by • The Ellie Mae eDisclosures (Default) source option lists all the documents
default with Encompass. Administrators can rename this template and modify the included in the original Default Stacking Template - eDisclosures stacking
documents within the template as needed. template shipped with Encompass.
• The eFolder Documents source option lists all of the documents set up in
To Create an eDisclosure Stacking Template:
the Documents setting under eFolder Setup (in Encompass Settings).
1 On the menu bar, click Encompass, and then click Settings.
Chapter 2: Configure eDisclosure Packages 87 To add documents to the template, click to select a document and then drag it To Indicate When a Document is to be Included in an eDisclosure Package:
to the New Stacking Template section. 1 On the menu bar, click Encompass, and then click Settings.
OR 2 On the left panel, click eFolder Setup, and then click Documents.
Click to select a document and then click the right arrow to add it to the New 3 On the Documents list, select a document with Standard Form or Custom Form
Stacking Template section. displaying in the Type column, and then click the Edit icon.
• To add multiple documents, select a document, press Ctrl on your keyboard,
and then click to select additional documents. Then use one of the methods
described in step 7 to add the documents to the template.
• To change the order in which the documents are organized in the template,
click a document, and then click the up arrow or down arrow to move the
document up or down in the list.
• To remove a document from the template, select the document, and then
click the Delete icon.
NOTE: The documents are returned to the New Documents section.
8 To save the template, click OK, and then click the Save icon.
NOTE: Documents that are returned when the loan originator generates their
eDisclosure package that are not part of the eDisclosure stacking template will be
placed at the bottom of the document list, highlighted in yellow.
Add Documents to an eDisclosure Package
Your Encompass administrator can add Encompass standard forms and custom
forms to a predefined eDisclosure package. The forms are then included by 4 In the Encompass Docs Service section of the Documents window, select the
default when the package is selected by a user. Add this document to eDisclosure packages check box to include the
Additionally, a user can change the content of eDisclosure packages by removing document in all eDisclosure packages.
any form or adding standard and custom Encompass forms. The ability to add or • If the document is a custom form and the eDisclosure package requires
remove forms is enabled by default. In Encompass Banker Edition, permission to eSigning, be sure the form includes the required eSigning signature points.
add and delete forms can be controlled in the Personas settings.
For instructions to grant or deny users the ability to add or remove forms from
eDisclosure Packages based on persona, refer to “Persona Settings” on page 11.
For instructions describing how a user can manage forms in a package, refer to
Chapter 5, “Generate and Send eDisclosure Packages”.
Use the Documents tool (under the eFolder Setup setting) to create and manage
the tracking information associated with loan documents and services, including
standard forms, custom forms, settlement services, verifications (verifs), and
needed documents (documents that are supplied by the borrower). Here you can
specify when the document is to be included in an initial disclosure (i.e.,
eDisclosure) package or closing document package based on specific criteria.
The document is included only when one or more of the criteria are met.
Chapter 2: Configure eDisclosure Packages 96 Select a Package Type or other category check box, and then select one more
options from those categories. If you do not select any categories, this
document will be included for all loans. When finished, click OK.
NOTE: To include the document any time a specific plan code is applied to
the eDisclosure package, select the Plan Code check box, and then select
the specific plan code(s). Only custom plan codes or plan codes created as
an alias are available to select here. (For instructions for creating custom
plan codes or adding a plan code as an alias, refer to “Creating a Custom
Plan Code” and “Creating an Alias for a Plan Code” on page 6.)
7 Click OK.
Loan Templates
Use the Loan Programs setting (under the Loan Templates setting) to create
templates of predefined values that display primarily on the Truth-In-Lending
Disclosure statement and the 1003 application. You can significantly reduce data
entry time and improve accuracy by setting up loan programs for the types of
loans you process most often.
Loan Program Templates Based on Plan Codes
Loan program templates that you created based on eDisclosure or Closing Doc
plan codes are automatically added to the Loan Programs setting. Here you can
update field values in the loan program template as needed.
5 Click the Criteria button to specify criteria for including the document in an
• A link icon displays next to loan program templates that are created based on
eDisclosure package. The document is included only when one or more of the
a plan code.
criteria are met.
• When working with the loan program, you cannot change any of the plan code
data that is included in it. (Fields populated with plan code data are not editable
in the loan program.) In order to change plan code properties (plan code status,
description, and investor), you must use the eDisclosure Plan Codes or Closing
Doc Plan Codes settings. Any changes you make to the plan code properties
are automatically applied to the loan programs that are “linked” to the plan code.
• When you select a loan program to use with a loan, the data from the template
is copied to the loan forms. Users can leave the data as is, or change values as
needed. The original data on the template is not affected.
Chapter 2: Configure eDisclosure Packages 10To Create or Update a Loan Program: HELOC
1 On the menu bar, click Encompass, and then click Settings. Use the HELOC sections to enter HELOC information used to populate
2 In the left panel, click Loan Templates, and then click Loan Programs. example payment data and disclosure terms that display on the dynamically
generated Important Terms Disclosure and HELOC Agreement forms. You can
3 On the Loan Programs screen, select the Public or Personal folder in which apply data from a predefined template, edit the applied template data, or set
to add the template. up data from scratch.
4 Click the New icon, type the name of the program, and then (with the new
template selected) click the Edit icon. Mortgage Insurance
OR Click the Edit icons to calculate the mortgage insurance premiums and terms.
For detailed instructions, refer to Calculating Mortgage Insurance Premiums
To update field values in a loan program template you created when you set up
online help topic.
eDisclosure or Closing Doc plan codes, select the template in the list, and then
click the Edit icon.
Program Requirements
5 On the Loan Program Details window, type a Description. Enter the minimum requirements for the borrower to qualify for this loan
6 If the data in a template conflicts with a business rule, select the Template data program.
will ignore business rules check box to ignore the conflicting business rule
and apply the template data to the loan. Insurance
• If the check box is not selected, the business rule will take precedence over Indicate the types of insurance required and, if purchased from the creditor, the
the template data. annual premium
NOTE: This feature is available only if it has been enabled by your system
administrator (Admin Tools>Settings Manager) and applies only to public Late Charge and Assumption
templates. Use these sections to enter information related to late charges and
assumability.
7 Complete the form as described below, and then click Save.
Heading Fields
• If you want to associate a closing cost program with the loan program, click
Persona Settings
the Find icon to select the appropriate template. Personas represent job functions in your company. Each persona defines access
to functions, forms, and tools. One or more personas are assigned to each user.
• Select a Loan Doc. Type Code.
Use the Personas settings to grant a persona permission to access and work with
Plan Code eDisclosures, eDisclosure plan codes, and eDisclosure Stacking Templates when
generating eDisclosure packages.
To apply plan code data to the template, click Plan Code and select the desired
plan code. The remaining fields in this section are populated with the plan code
data. To Define Persona Access:
1 On the menu bar, click Encompass, and then click Settings.
Type of Mortgage and Terms of Loan 2 On the left panel, click Company/User Setup, and then click Personas.
Enter loan type and property information as needed. Enter any additional terms 3 In the left panel, select a persona.
required for the loan program type. For example, rates for buydown and ARM
mortgages, biweekly payments, potential negative amortization, and
construction mortgage details.
Chapter 2: Configure eDisclosure Packages 114 In the General section of the eFolder tab, select the eDisclosures check box
to enable the persona to generate and send eDisclosures packages. Select the
related check boxes to enable the persona to add, remove, or reorganize
documents in the initial disclosure package.
5 In the Company Settings section of the Settings tab, select check boxes to
enable the persona to access eDisclosure plan codes and eDisclosure
Stacking Templates when generating eDisclosure packages.
• Select eDisclosure Plan Codes to enable the persona to select a plan code
(and update it as needed) to apply to the eDisclosures.
• Select eDisclosure Stacking Templates to enable the persona to select a
stacking template (and update it as needed) to apply to the eDisclosures.
Chapter 2: Configure eDisclosure Packages 12Chapter 3
eDisclosure Notifications
Companies have different policies regarding when disclosure packages should be 5 Click in the Message section and enter the message that will display when the
sent. Your users should be aware of the circumstance that will require sending an alert is triggered.
eDisclosure package to a borrower. However, you may want to set reminders
when eDisclosures are due. Use the suggestions in this chapter as guidelines for
creating your own system for notifying users when eDisclosures are required.
Alerts
Alerts are an efficient way of setting reminders for your users. An alert is a
notification that indicates an event has occurred, is pending, or is due. Alert
information displays on the Pipeline and in the loan file. The alert remains in effect
until the required action is taken.
Banker and Broker editions include default alerts that trigger when a loan file
meets the requirements for initial disclosure and for redisclosures. These alerts
are triggered when entries are made in relevant fields in the loan file.
Banker Edition also lets you create custom alerts that can be set to trigger based
on a date, a field entry, or a milestone. For example, the following procedure
describes how to set a custom alert that triggers when the rate is locked.
To Create a Custom Rate Lock Alert:
1 On the menu bar, click Encompass, and then click Settings.
2 On the left panel, click Loan Setup, and then click Alerts.
3 On the Alerts tool, click the New icon.
6 Select the Provide Clear Alert button option to provide a Clear Alert button
4 Enter the name of the alert. on the alert worksheet.
• The alert worksheet displays when a loan team member clicks the alert entry
on the Alerts & Messages tab in the Loan Log.
• The loan team member can click the Clear Alert button on the worksheet to
remove the alert from the Log and the Pipeline.
7 To enable the alert, select Yes.
Chapter 3: eDisclosure Notifications 138 In the Trigger section, select the Condition option, and then click the New icon. Tasks
Tasks allow your users to track the activities that must be completed before a
milestone is completed. The tasks display on the appropriate milestone worksheet
for a loan, where they can be seen and tracked by your users. If you add tasks to
your loan templates, and then require that all new loans be started with a
template, the eDisclosures will automatically display on the appropriate milestone
worksheets for your users.
To Automatically Add eDisclosure Tasks to Loans:
1 Use the Tasks setting to create individual predefined eDisclosure tasks.
2 Use the Task Sets setting to group individual eDisclosure tasks into task sets
and associate each task with a particular milestone.
3 Use the Loan Template Sets setting to add the task sets to loan templates.
• When users start a loan from a template, the tasks in the task set display on
the appropriate milestone worksheet.
TIP: You can associate only one task with a loan template. If you already have a
task set associated with a loan template, add the individual eDisclosure tasks to
the existing task set.
9 Enter the field ID of the Rate is Locked check box (field ID: 2400).
For detailed instructions on creating tasks, task sets, and loan templates, refer to
10 Select Is Yes as the Operator, and then click OK. the Encompass online help.
11 When finished, click Save.
Chapter 3: eDisclosure Notifications 14Chapter 4 Request eConsent Before borrowers can receive loan documents electronically, they must review and accept the eDisclosures Agreement. Use the eConsent Request feature to send borrowers an email with a link to the eDisclosures Agreement form. There are four ways to send eConsent requests to borrowers: • When enough loan information has been collected to require that an eDisclosure package (initial disclosures) be sent to the borrower, a Send Initial Disclosures alert displays. An eConsent Not Yet Received alert displays in the same alert window. Click the View Details button to open the Send Consent window. NOTE: If your Encompass administrator has configure the eConsent Not Yet Received alert to trigger when the Application Date or File Started Date is entered, the alert displays as soon as the configured date field is completed. • On the eFolder Documents tab, click the eConsent button to open the Send Consent window. • When you send an eDisclosures package, an eConsent button displays on the Disclosure Audit window if all borrowers associated with the loan have not yet provided consent. Click the button to open the Send Consent window. • When you send a Pre-Closing Disclosure package, an eConsent button displays on the Closing Docs Audit window if all borrowers associated with the loan have not yet provided consent. Click the button to open the Send Consent window. Chapter 4: Request eConsent 15
To Send a Request:                                                                   borrower will be required to create log in accounts for each WebCenter site in
1 On the Send Consent window, select the sender from the Sender Type list. You       order to retrieve the documents. Your administrator can use the WebCenter
  choose from the following:                                                         Configuration setting to enable borrowers to use the same WebCenter site to
                                                                                     retrieve, send and return documents regardless of who sends the documents.
   • Current User
                                                                                     Borrowers can then create and use just one log in account to manage their
   • File Starter                                                                    documents.
   • Loan Officer
   The Name and Email fields are populated based on your selection.
2 Select or clear the check boxes to send the emails to the Borrower, Co-
  Borrower, or a Non-Borrowing Owner contact.
   • Dates are automatically populated in the Sent, Accepted, and Rejected
    columns to track the progress of the consent process.
3 In the Subject field, select an email template as needed.
   • Templates control the email content and formatting. Your Encompass
    administrator creates the templates in the eFolder Setup > HTML Email
    Templates setting.
4 Click the Notify Additional Users button to add users to the list of user who
  will receive email notification when the request is sent and when notifications
  or alerts related to the request are generated for the sender.

   To Add Users Who Are Loan Team Members:
   1 Click the Find icon (magnifying glass) in the Add users to be notified
     section.
   2 Select a user from the list and click OK.
   3 Enter a Notify Through date (after the selected date, the user will no longer
     receive notifications) and then click Add.

   To Add Users Who Are Not Loan Team Members:
   1 Enter an address in the Email Address field.
   2 Enter a Notify Through date (after the selected date, the user will no longer
     receive notifications), and then click Add.
5 Select the Notify me when borrower receives the package check box to
  receive an email notification when the borrower receives the request.
6 Click Send.
A standard email containing a link to the Loan Center, WebCenter, or Consumer
Connect website is sent. The email recipients create their own login information,
log in to the website, and then view the documents.
WebCenter users only: By default, in order to retrieve documents, borrowers are
required to log in to the WebCenter site belonging to the Encompass user who
sends the documents to them. If multiple Encompass users send documents, the

Chapter 4: Request eConsent                                                                                                                                       16
Chapter 5
Generate and Send eDisclosure Packages
Use the eDisclosures feature to generate an initial disclosure package
(i.e., eDisclosure package) and send it to your borrowers. Your borrowers are
notified by email that disclosure documents are available on a secure website (the
Ellie Mae Loan Center, WebCenter, or an Encompass Consumer Connect
website). Borrowers can print and then return the documents by fax (using the
provided fax cover sheet) or by mail, or they can provide an electronic signature
and you can then retrieve the documents from the secure website.
Your Encompass administrator determines whether you can select your own
packages or whether packages are automatically selected for you. Authorized
users can also reorganize, add, or remove documents from the package. The
documents in the package are based on the selected plan code, as well as loan-
specific information (for example, the state in which the subject property is
located).
To Generate eDisclosure Packages:
1 Open the loan file, and then click the eFolder icon in the upper-right corner of
the screen.
2 In the eFolder, click the Documents tab, and then click the eDisclosures
button.
3 Select a borrower (or borrowers) from the For Borrower Pair list.
4 If you are allowed to select eDisclosure package types, the Select a Package 5 Click to select a plan code, and then click Order eDisclosures.
Type section displays below the For Borrower Pair list. Select one or more
packages, and select the check box if you need to include the Loan Estimate. • Only plan codes that match the current loan data are listed. To view all plan
Administrators can set this permission in the eDisclosure Packages setting. codes, click the Clear Filter button.
• You can perform a search by typing data into a field above a plan code
column or by selecting an option from a column's drop-down list. Only plan
codes containing the specified data are displayed.
• Click a column header to sort all plan codes in ascending or descending
order based on the information in a column.
• To add a plan code to the list, click the New icon, and then select the plan
code to add. To view a plan code's details, including the values that will be
added to the loan file if selected, select the plan code, and then click the View
Plan Code Details icon (magnifying glass). For detailed instructions about
working with plan codes, view the eDisclosure Plan Codes help topic.
Chapter 5: Generate and Send eDisclosure Packages 17• If the loan file’s LE Date Issued (field ID LE1.X1) is blank (for loans using the 8 Correct the described issue, and then return to the Disclosures Audit window.
2015 RESPA-TILA forms) or if the GFE Date (field ID 3170) is blank (for loans Click Refresh Audit to update the Data Audit Results list.
using the 2010 RESPA forms), a warning message displays. As stated in the • You must resolve all required errors before generating eDisclosure
message, if you click Yes, the date will be auto-populated with the current packages.
date (“today’s date”) and you can proceed to generate the eDisclosure
package. If you click No, the dateis left blank and you will not be able to • After you update a field, the issues that are resolved are highlighted in yellow
generate an eDisclosure package until a date is supplied. in the Disclosures Audit window.
6 If any values in the loan file are different from the corresponding values in the • Select the Always show this window on top check box to always display
selected plan code, the Plan Code Conflict window displays showing the the Disclosure Audit window on top of all other Encompass windows.
affected fields. Conflicting loan data is identified by an alert icon. 9 Repeat steps 7-8 to correct any remaining issues.
10 Click Order eDisclosures.
• A message displays if no packages are available based on the selection
process configured by your administrator.
11 When the Select Documents window displays, the initial disclosures are listed
in the order configured in the stacking template by your administrator.
• Click the Import Plan Data button to overwrite the current loan data with the
selected plan code data. These changes are applied to the loan immediately.
• Click Skip Import to proceed without overwriting the loan file.
• Click Cancel to close the Plan Code Conflict window without making any
changes to the loan data. You can then update the applicable fields in the
loan file to resolve any conflicts that were found.
7 If the Disclosures Audit window opens with a list of required issues, warnings,
or recommended updates (typically due to inconsistent data), click the link in • Documents highlighted in yellow are documents that are not included in the
the Go to Field column to open a form with the field highlighted for data entry. stacking template, but are still intended to be sent in the eDisclosure
package.
NOTE: If a virtual field is included in audit results, a hyperlink will not be
provided.
Chapter 5: Generate and Send eDisclosure Packages 18• When an eDisclosure document package has been ordered and is then • Click Print, and then click Print Checklist to print an eDisclosure Documents
redrawn, the list of returned documents on the Select Documents window Checklist that lists each document in the package for your reference.
displays a Modified since last draw icon next to each document that has 16 To add one or more document to the Documents tab in the eFolder, select the
changed since the initial order. Users can view the list to identify changed documents, and then click Add to eFolder.
documents to print or send instead of printing or sending the entire package.
Additionally, a Removed since last draw icon displays next to documents 17 Click Send to open the Send eDisclosure window.
that were included in the initial draw, but are no longer required.
To Send the eDisclosure Package:
• To use a different template, select an option from the Stacking Template drop-
down list. 1 On the Send eDisclosures window, select a Borrower Signing Option:
• To move a document up or down in the list, click to select the document and • eSign (electronically sign and return) - Borrowers access the documents
then use the up or down arrows to move the document. from a secure website and, after consenting to receive electronic disclosures,
review the documents online, and then sign the documents electronically
OR (known as eSigning). You receive an email notification that the signed
Click to select a document, and then drag it to the desired location in the list. documents are available. Click the Retrieve button in the eFolder to retrieve
the documents. If the eDisclosure package contains documents that can be
• To update the selected template for all loans going forward, click the Update
eSigned and documents that must be wet signed, the eSign option is
Template button, and then add, remove, or reorganize the documents as
replaced with an eSign + Wet Sign (for wet sign documents only) option.
needed. For detailed instructions for updating the stacking template, view the
Borrowers sign and return eSign documents electronically as described
eDisclosure Stacking Templates help topic.
above, and print, sign, and return the wet sign documents as described
NOTE: If your administrator has not given you permission to move below.
documents up or down in the list or to update the template, the up and down
arrows and the Update Template button will not be visible.
• To update the selected template for all loans going forward, click the Update
Template button, and then add, remove, or reorganize the documents as
needed. For detailed instructions for updating the Stacking Template, view
the eDisclosure Stacking Templates topic in the Encompass online help.
12 Clear the check box of any document you do not want to include in the
eDisclosure package.
NOTE: The Signature Type column indicates whether a document is eSignable
(can be signed electronically), Wet Sign Only (a paper copy must be signed
and returned by mail or fax), or Informational (no signature required).
13 Click Add Additional Docs to select additional forms to add to the package.
NOTE: If your administrator has not given you permission to add or remove
forms from the package, the selection check boxes and the Add Additional
Docs button will not be visible.
14 Address any Data Overflow alerts (if applicable).
15 Here you can preview or print the documents in the package:
• Click Preview to view, and optionally print, the selected documents.
• Click Print, and then click Print Selected Documents to print the selected
documents.
Chapter 5: Generate and Send eDisclosure Packages 19• Wet Sign (print, sign, and fax) - Borrowers retrieve the documents from a • What is your Home Phone number?
secure website, print, sign, and then return the documents by fax or by mail. • What is your Cell Phone number?
TIP:If you select eSign (electronically sign and return) and the eDisclosure • Please type in your email address.
package contains custom forms that require a signature, be sure you have
inserted eSigning signature points in the form. • How many years have you been at your present property?
• Please type in the Zip code of your present property address.
• Please type in the Zip code of the subject property address.
• What is the subject property county?
• What is the property type of the subject property?
• What is your current Marital Status?
• How many dependents do you have?
• Please type in the Zip code of your current employer.
• How many years have you been employed at your current job?
• Please select the purchase price of the subject property.
• Is the name of your Mortgage Broker/Lender [Company Name]?
• What is the purpose of loan?
NOTE: If the borrower fails to correctly answer 4 out of the 5 questions three
times, the borrower will not be able to eSign the documents. The system
automatically removes the eSigning signature points from the documents
and informs the borrower that the documents must be printed, signed, and
then returned by fax or by mail.
• Authorization Code - Type the authorization code that the borrower and co-
borrower will use to access the documents.
NOTE: Be sure to provide the authorization code to the borrowers. It is not
automatically sent to them and it is different than the log in password the
borrower creates to log in to the secure website to access the documents.
The borrowers have five chances to enter the correct authorization code. If
they fail to do so, they will not be able to eSign the documents. After the fifth
attempt, the system automatically removes the eSigning signature points
from the documents and informs the borrower that the documents must be
printed, wet signed, and then returned by fax or by mail.
3 Select the Sender type. You can choose from the following:
2 Select a Borrower Authentication Method, if applicable. • Current User
• Answering security questions - When selected, the borrower will need to • File Starter
correctly answer 4 out of 5 of the following questions related to the loan in
• Loan Officer
order to access the documents:
• What are the last 4 digits of your Social Security Number?
• Which year were you born?
Chapter 5: Generate and Send eDisclosure Packages 204 Select or clear the check boxes to send the emails to the various recipients as
needed.The Name and Email fields are populated based on your selection. If
no name or email is listed in the File Contacts tool for the Encompass user
associated with the option selected, the fields are blank and editable. Data
entered in a blank field is then saved back to the File Contacts tool.
NOTE: For Wet Sign packages, additional recipients can be added as needed
by clicking the Add icon at the upper right of the Recipient section.
5 In the Subject field, select an email template as needed.
• Templates control the email content and formatting. Your Encompass
administrator creates the templates in the HTML Email Templates setting.
6 Click the Notify Additional Users button to send notifications to additional
Encompass users.
To Add Users Who Are Loan Team Members:
1 Click the Find icon (magnifying glass) in the Add users to be notified
section.
2 Select a user from the list and click OK.
3 Enter a Notify User Through date (after the selected date, the user will no
longer receive notifications) and then click Add.
To Add Users Who Are Not Loan Team Members:
1 Enter an address in the Email Address field.
2 Enter a Notify Through date (after the selected date, the user will no longer
receive notifications), and then click Add.
7 Select the Notify me when borrower receives the package check box to
receive an email notification and an Encompass notification when the borrower
accesses the package on the Loan Center or WebCenter.
8 To be notified if the borrower does not accept the loan by a specified date,
select the Notify me when the borrower does not accept by check box, and
then click the Calendar icon to set the date.
9 If your company has enabled the eDisclosure Fulfillment service, select the
check box at the top of the Fulfillment section to schedule the service for the 10 Enter your phone number and the phone number of the recipient. The
package. remaining information in the section will be copied from the loan file.
Chapter 5: Generate and Send eDisclosure Packages 2111 When finished, click Send. How Fulfillment Packages Are Triggered
• An email containing a link to the Loan Center (or WebCenter) website is sent. The trigger mechanism for mailing a manual fulfillment package is different for
The email recipients create their own login information, log in to the Loan eSign packages and Wet Sign packages.
Center (or WebCenter), and then view the data on the website.
• eSign packages – With the eSign process, borrowers access electronic copies
NOTE: If you previously sent an eDisclosure package and no loan data has of documents via a secure website and sign them electronically. On the
changed, a message asks you to confirm that the same eDisclosure package Scheduled Fulfillment Date, a fulfillment package is mailed unless all borrowers
will be sent again. If changes to the loan data have triggered a new condition, have accepted the agreement to do business electronically. A fulfillment
a new eDisclosure package is sent and a message does not display. package is not mailed if all borrowers have accepted the agreement.
12 If you are the loan originator and the eDisclosure package includes one or • Wet Sign packages – With the Wet Sign process, borrowers access documents
more forms that require the originator's electronic signature, a message asks via a secure website, and then print and physically sign the documents. On the
you to add your electronic signature to the forms before sending the Scheduled Fulfillment Date, a fulfillment package is mailed if neither borrower
eDisclosure package. has accepted the agreement to do business electronically. A fulfillment package
• Click Yes to access a secure website and electronically sign the documents is not mailed if at least one of the borrowers has accepted the agreement.
before sending the eDisclosure package. Loans with Co-Borrowers or Multiple 1003s
• Click No to electronically sign the documents later. • For loans with co-borrowers, a fulfillment package is mailed to the primary
• If you are the loan originator and you select Yes or No, you will receive an borrower by default.
email with a link to a secure website where you can access the documents • For loans with multiple 1003s:
and electronically sign them if needed.
• Separate Wet Sign or eSign eDisclosure packages must be sent to each
13 If you are not the loan originator and the eDisclosure package includes one or borrower pair when the eDisclosures are ordered.
more forms that require the originator's eSignature, a message informs you
that an email will be sent to the loan originator with a link to a secure website • If a fulfillment package is triggered for one of the borrower pairs, a fulfillment
where the loan originator can electronically sign the disclosures. package is mailed to the primary borrower for that pair by default.
NOTE: Although fulfillment packages are mailed to the primary borrower by
default, the Encompass user who requests the eDisclosure Fulfillment service can
manually change the recipient during the eDisclosure process when ordering the
eDisclosure fulfillment service.
eSign Converted to Wet Sign
An eSign package is converted to a Wet Sign package when a borrower or co-
borrower fails the authentication process by not entering a correct eDisclosure
password/authentication code or by not answering the security questions
correctly. Currently Ellie Mae does not fulfill eSign disclosures that have been
converted to Wet Sign disclosures.
Redisclosures
The rules listed above for eSign, Wet Sign, co-borrowers, multiple 1003s, and
package conversions also apply to redisclosures using the eDisclosure Fulfillment
service.
Chapter 5: Generate and Send eDisclosure Packages 22You can also read