Cyclops-7 miniWIPER USER'S MANUAL
←
→
Page content transcription
If your browser does not render page correctly, please read the page content below

1483 POINSETTIA AVE., STE. #101

                                                          VISTA, CA 92081 USA

                       Cyclops-7 miniWIPER

                               USER’S MANUAL

WWW.PME.COM                           TECHNICAL SUPPORT: INFO@PME.COM | (760) 727-0300                       PG. 1
THIS DOCUMENT IS PROPRIETARY AND CONFIDENTIAL. © 2021 PRECISION MEASUREMENT ENGINEERING, INC. ALL RIGHTS RESERVED.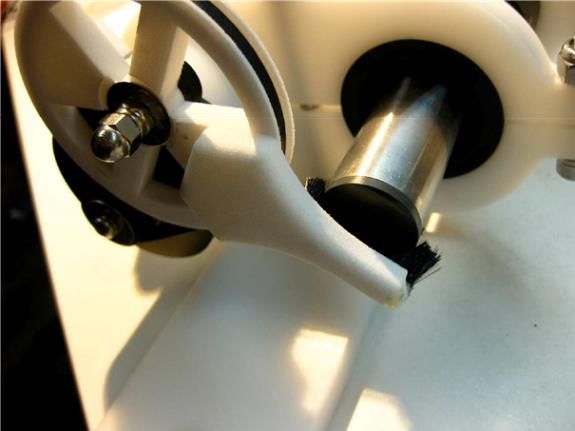
TABLE OF CONTENTS
       WARRANTY..................................................................................................................................... 3
          Limited Warranty ........................................................................................................................................ 3

       SAFETY INFORMATION ................................................................................................................. 5
          Bursting Hazard ......................................................................................................................................... 5

       CHAPTER 1: INSTALLATION .......................................................................................................... 6
          1.1 Overview .............................................................................................................................................. 6
          1.2 Installation Instructions ........................................................................................................................ 7
          1.3 Wipe Considerations ............................................................................................................................ 9

       CHAPTER 2: SOFTWARE ............................................................................................................. 16
          2.1 Overview and Software Installation ................................................................................................... 16
          2.2 miniWIPERControl ............................................................................................................................. 17
          2.3 miniWIPERPlot .................................................................................................................................. 18
          2.4 miniWIPERConcatenate .................................................................................................................... 23

       CHAPTER 3: MINIWIPER .............................................................................................................. 24
          3.1 Overview ............................................................................................................................................ 24
          3.2 Opening and Closing the Wiper ......................................................................................................... 24
          3.3 Electrical Connections and Controls .................................................................................................. 24
          3.4 Battery Replacement ......................................................................................................................... 25
          3.5 Final Mounting Instructions ................................................................................................................ 26

WWW.PME.COM                                            TECHNICAL SUPPORT: INFO@PME.COM | (760) 727-0300                                                                   PG. 2
THIS DOCUMENT IS PROPRIETARY AND CONFIDENTIAL. © 2021 PRECISION MEASUREMENT ENGINEERING, INC. ALL RIGHTS RESERVED.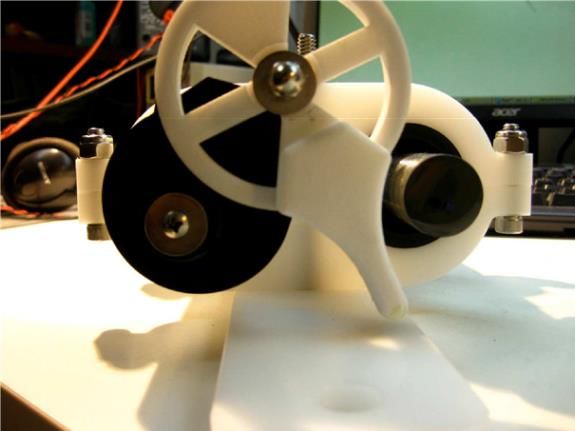
WARRANTY

       Limited Warranty
       Precision Measurement Engineering, Inc. (“PME”) warrants the following products to be, as of the
       time of shipment, free from defects in materials or workmanship under normal use and conditions for
       the period indicated below corresponding to the product. The warranty period commences on the
       original date of purchase of the product.

          Product                                                                      Warranty Period

          Aquasend Beacon                                                              1 year

          miniDOT Logger                                                               1 year

          miniDOT Clear Logger                                                         1 year

          miniWIPER                                                                    1 year

          miniPAR Logger (Logger only)                                                 1 year

          Cyclops-7 Logger (Logger only)                                               1 year

          C-FLUOR Logger (Logger only)                                                 1 year

          T-Chain                                                                      1 year

          MSCTI (excludes CT/C-sensors)                                                1 year

          C-Sense Logger (Logger only)                                                 1 year

       For valid warranty claims made and covered defects existing during the applicable warranty period,
       PME will, at PME’s option, repair, replace (with the same or then most similar product) or
       repurchase (at purchaser’s original purchase price), the defective product. This warranty extends
       solely to the original end-user purchaser of the product. PME’s entire liability and the sole and
       exclusive remedy for product defects is limited to such repair, replacement or repurchase in
       accordance with this warranty. This warranty is provided in lieu of all other warranties express
       or implied, including, but not limited to warranties of fitness for a particular purpose and
       warranties of merchantability. No agent, representative, or other third party has any authority to
       waive or alter this warranty in any way on behalf of PME.

       W ARR ANT Y EXC LUSI O NS

       The warranty does not apply in any of the following circumstances:
           I)   The product has been altered or modified without PME’s written authorization,

WWW.PME.COM                                TECHNICAL SUPPORT: INFO@PME.COM | (760) 727-0300                  PG. 3
THIS DOCUMENT IS PROPRIETARY AND CONFIDENTIAL. © 2021 PRECISION MEASUREMENT ENGINEERING, INC. ALL RIGHTS RESERVED.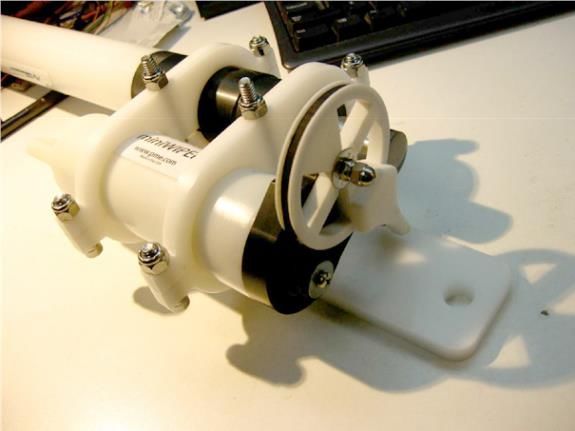
II) the product has not been installed, operated, repaired, or maintained in accordance with PME’s
               instructions, including, where applicable, use of proper grounding to an earth ground source,
           III) the product has been subjected to abnormal physical, thermal, electrical, or other stress, internal liquid
                contact, or misuse, neglect, or accident,
           IV) the product failure occurs as a result of any cause not attributable to PME,
           V) the product is installed with ancillary devices such as flow sensors, rain switches, or solar panels that
              are not listed as compatible with the product,
           VI) the product is installed in a non-PME specified enclosure or with other incompatible equipment,
           VII) to address cosmetic issues such as scratches or surface discoloration,
           VIII) operation of the product in conditions other than that for which the product was designed,
           IX) the product has been damaged due to events or conditions such as caused by lightning strikes, power
               surges, unconditioned power supplies, floods, earthquakes, hurricane, tornados, vermin such as ants
               or slugs or intentional damage, or
           X) products provided by PME, but manufactured by a third-party company, which products are subject to
              the applicable warranty extended by their manufacturer, if any.
       There are no warranties that extend beyond the above limited warranty. In no event is PME
       responsible or liable to purchaser or otherwise for any indirect, incidental, special,
       exemplary, or consequential damages, including, but not limited to, lost profits, loss of data,
       loss of use, business interruption, loss of good will, or cost of procuring substitute products,
       arising out of or in relation to the product, even if advised of the possibility of such damages
       or losses. Some states do not allow the exclusion or limitation of incidental or consequential
       damages, so the above limitation or exclusion may not apply. This warranty gives you
       specific legal rights, and you may also have other rights which vary from state to state.

       W ARR ANT Y CLAI M PRO CE DU RES

       A warranty claim must be initiated within the applicable warranty period by first contacting PME at
       info@pme.com to obtain an RMA number. The purchaser is responsible for proper packaging and
       return shipment of the product to PME (including shipping expense and any related duties or other
       costs). The issued RMA number and purchaser’s contact information must be included with the
       returned product. PME is NOT liable for loss or damage of the product in return transit and
       recommends that the product be insured for its full replacement value.
       All warranty claims are subject to PME’s testing and examination of the product to determine if the
       warranty claim is valid. PME may also require additional documentation or information from the
       purchaser to evaluate the warranty claim. Products repaired or replaced under a valid warranty claim
       will be shipped back to the original purchaser (or its designated distributor) at PME’s expense. If the
       warranty claim is found to be not valid for any reason, as determined by PME in its sole discretion,
       PME will notify the purchaser at the contact information provided by the purchaser.

WWW.PME.COM                               TECHNICAL SUPPORT: INFO@PME.COM | (760) 727-0300                                   PG. 4
THIS DOCUMENT IS PROPRIETARY AND CONFIDENTIAL. © 2021 PRECISION MEASUREMENT ENGINEERING, INC. ALL RIGHTS RESERVED.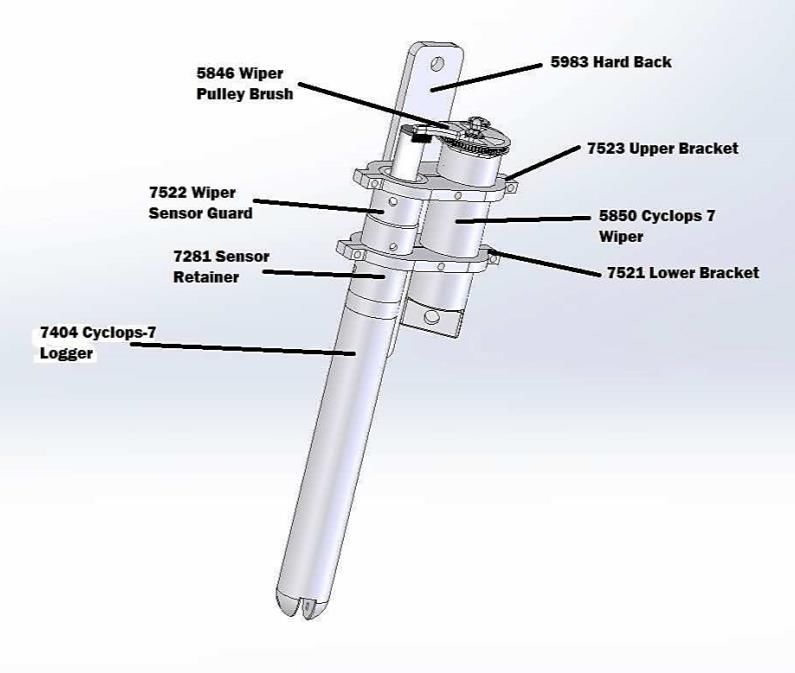
SAFETY INFORMATION

       Bursting Hazard
       Should water enter the miniWIPER and meet the enclosed batteries, the batteries may generate gas
       causing the internal pressure to increase. This gas will likely exit via the same location where the
       water entered, but not necessarily. The miniWIPER is designed to release internal pressure as the
       end cap is unscrewed, prior to the disengagement of the end cap threads. If internal pressure is
       suspected, then treat the miniWIPER with extreme caution.

WWW.PME.COM                           TECHNICAL SUPPORT: INFO@PME.COM | (760) 727-0300                        PG. 5
THIS DOCUMENT IS PROPRIETARY AND CONFIDENTIAL. © 2021 PRECISION MEASUREMENT ENGINEERING, INC. ALL RIGHTS RESERVED.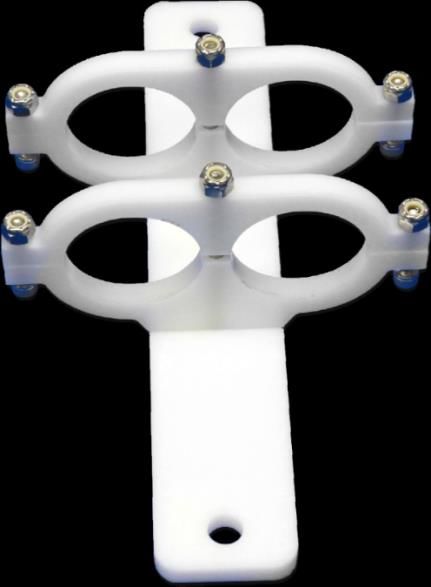
CHAPTER 1: INSTALLATION

       1.1 Overview
                                                       Your miniWIPER will provide a gentle brush action
                                                       across the Cyclops 7 optical surface, which is
                                                       intended to reduce or eliminate fouling organisms.
                                                       This wiper is an accessory for the Cyclops 7 that
                                                       can be added at any time.

                                                       The wiper will wipe at intervals between 1 hour and
                                                       24 hours. At time of shipment the wiper is set to
                                                       wipe every 6 hours. Wipe interval can be selected
                                                       by the customer with intervals as short as 1 hour or
                                                       as long as 24 hours. (Wipe intervals outside this
                                                       range are available. Please contact PME.)

                                                       miniWIPER connects to a Windows HOSTcomputer
       via USB and appears as a Local Disk. This local disk contains software to select wipe intervals and
       perform other tasks. miniWIPER records various parameters each time it performs a wipe. These
       appear as files on this local disk.

       The miniWIPER for Cyclops 7
       product consists of the wiper
       motor, USB communication cable
       (sold separately), wiper sensor
       guard, and bracket (sold
       separately), shown in the picture
       to the right. The Cyclops 7 shown
       is supplied by the customer.

WWW.PME.COM                           TECHNICAL SUPPORT: INFO@PME.COM | (760) 727-0300                        PG. 6
THIS DOCUMENT IS PROPRIETARY AND CONFIDENTIAL. © 2021 PRECISION MEASUREMENT ENGINEERING, INC. ALL RIGHTS RESERVED.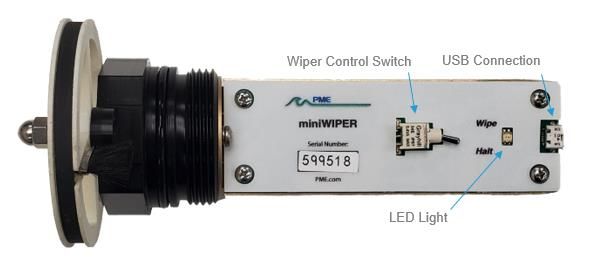
1.2 Installation Instructions
       Begin miniWIPER operation by setting the Wiper Control Switch to "WIPE" as described in Chapter
       3 of this manual. Begin Cyclops 7 Logger operation as described in the Cyclops 7 Logger Manual.
       Operation of both units must begin now since their control switches will not be accessible after they
       are mounted in the bracket.

       The Cyclops 7 Logger comes with a sensor guard (sensor shade) installed. This will need to be
       removed so the Cyclops 7 Logger can be used in conjunction with the miniWIPER. The sensor
       retainer that holds the Cyclops 7 sensor in place must remain installed. Install the included wiper
       sensor guard to replace the sensor shade. The bracket will grip the sensor retainer and the wiper
       sensor guard.

                                                           Construct the bracket from the parts supplied
                                                           by PME as shown in the picture to the left.
                                                           Install bolts and nuts loosely. Please note that
                                                           the wiper and Cyclops 7 have different
                                                           diameters and so will only fit on one side or the
                                                           other of the bracket. Make sure that the paired
                                                           brackets match up to form the correct diameter
                                                           holes. The miniWIPER will be installed in the
                                                           same diameter holes while the Cyclops 7
                                                           Logger needs the smaller sized hole at the top.
                                                           This will allow the Cyclops 7 Logger to slide
                                                           through the larger hole and into the smaller
                                                           hole, which will grip the wiper sensor guard.

                                                           Rotate miniWIPER and Cyclops 7 Logger until
                                                           the Cyclops 7 Logger optical surface and the
                                                           wiper pulley axes are as shown in the pictures.

WWW.PME.COM                           TECHNICAL SUPPORT: INFO@PME.COM | (760) 727-0300                         PG. 7
THIS DOCUMENT IS PROPRIETARY AND CONFIDENTIAL. © 2021 PRECISION MEASUREMENT ENGINEERING, INC. ALL RIGHTS RESERVED.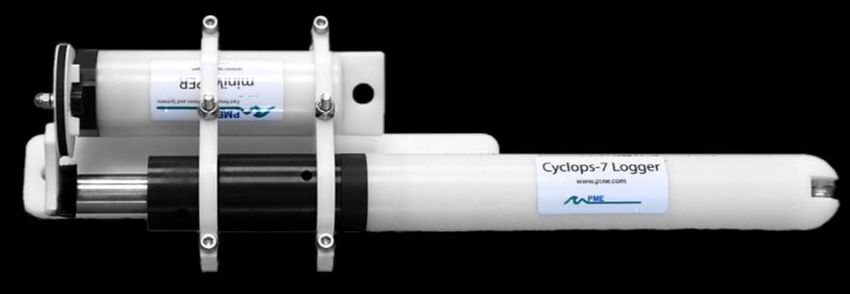
The picture to the left shows the required
                                                          alignment.

                                                          While maintaining the alignment (pictured to the
                                                          left), slide miniWIPER and Cyclops 7 Logger
                                                          relative to each other until the brush engages
                                                          the optical surface as shown below. You may
                                                          rotate the small pulley slowly by hand. This
                                                          causes the internal motor to turn but will not
                                                          damage miniWIPER.

                                                          DO NOT ROTATE THE LARGE PULLEY BUT
                                                          INSTEAD ALLOW THE BELT TO MOVE THIS
                                                          PULLY WHILE ROTATING THE SMALL
                                                          PULLEY BY HAND. ROTATION OF THE
                                                          LARGE PULLEY BY HAND CAN DAMAGE
                                                          miniWIPER.

                                                          We also suggest aligning the miniWIPER by
                                                          using the included magnet. By waving the
                                                          magnet over the miniWIPER, it will
                                                          automatically begin a wipe.

                                                          Tighten the 6 bolts while maintaining the
                                                          miniWIPER and Cyclops 7 positions. First
                                                          tighten the 4 outer bolts until the gap in white
                                                          plastic closes. Next tighten the inner two until
                                                          the miniWIPER and Cyclops 7 Logger are
                                                          securely held. A small gap in white plastic on
                                                          these inner bolts will remain when all is secure.

                                                          Trigger a wipe by passing a strong magnet
                                                          near the miniWIPER. Observe the wipe. The
                                                          wiper will move the brush past the optical
                                                          surface, then back up to the initial position.
                                                          Hopefully, this action will be detrimental to
                                                          whatever fouling organisms are attempting to
                                                          colonize the foil.

                                                          Please note that miniWIPER will not respond to
                                                          the magnet if miniWIPER is not in Wipe mode.

WWW.PME.COM                           TECHNICAL SUPPORT: INFO@PME.COM | (760) 727-0300                        PG. 8
THIS DOCUMENT IS PROPRIETARY AND CONFIDENTIAL. © 2021 PRECISION MEASUREMENT ENGINEERING, INC. ALL RIGHTS RESERVED.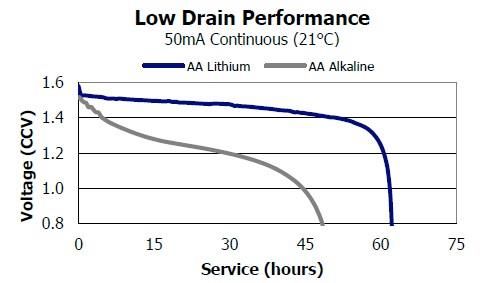
1.3 Wipe Considerations

       BRU SH FO RC E

       The amount of force placed by the brush onto the optical surface depends on how closely the brush
       is positioned against the foil. There is a trade-off here which is selected by adjusting the brush
       against the optical surface. Scrubbing organisms from the surface is hard on the organisms (which is
       a good thing) but also hard on the surface itself. The surface should resist more than a year of
       hourly gentle scrubbing. Brush pressure and wipe interval must ultimately be selected to respond to
       local fouling conditions.

       You may have to adjust the brush position from time to time as the brush wears. The brush will likely
       require replacement from time to time.

       W IPING AND RECORDING I NTERVAL – At each wipe miniWIPER makes various measurements of
       internal features and records these. The default wipe interval is 6 hours. However, it is also possible
       to instruct the miniWIPER to wipe and record at different intervals. This is accomplished by running
       the miniWIPERControl.jar program supplied with the miniWIPER. Recording intervals must be 1 or
       more hours and must be less than or equal to 24 hours. Intervals outside this range will be rejected
       by the miniWIPERControl program. (Contact PME for other recording intervals.)

       Please refer to Chapter 2 for instructions on operating the miniWIPERControl program.

       T IM E

       All miniWIPER times are UTC (formerly known as Greenwich mean time (GMT)). The miniWIPER
       internal clock will drift in the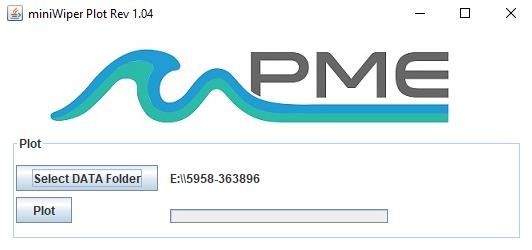
1970. This may be inconvenient in some cases. If so, use the

       miniWIPERConcatenate program which not only concatenates all the files, but also adds more
       readable statements of the time stamp.

       Please refer to Chapter 2 for instructions on operating the miniWIPERConcatenate program.

       The miniWIPER requires time and battery energy to work through the file directory on the SD card to
       allocate new file space. A few hundred files on the SD card is not a problem, but as the number of
       files grows large into the thousands then the miniWIPER may suffer decreased battery life or other
       performance problems. Please, at the earliest convenient time, copy the recorded files to a
       HOSTcomputer and delete them from miniWIPER's SD card. Also, do not use miniWIPER to store
       files unrelated to the miniWIPER’s operation.

       AA AL KALI N E BAT T ERY LI FE

       Alkaline batteries will give somewhat less performance than lithium, especially at low temperatures.
       Alkaline batteries are superior to lithium in one way: you can determine how much battery life
       remains by measuring the battery terminal voltage. For short deployments alkaline batteries will
       provide adequate performance. For longer deployments, or for deployments in cold environments
       substitute lithium batteries.

       AA LI T HI UM BATT ERY LI FE

       The miniWIPER consumes battery energy mostly from operating the wiper motor, but also slightly
       from simply keeping track of time, writing files, sleeping, and other activities. The amount of energy
       consumed at each wipe depends on the friction in the mechanical system, on the hydrostatic loading
       of the wiper shaft, and especially on the environmental temperature. Unfortunately, deep
       deployments also tend to be cold, which is the worst case.

       At the time of this writing it appears that about 10K wipes can be obtained in shallow warm water. At
       25-meter depths we estimate about 8K wipes in warm water. Cold temperatures change battery
       performance substantially. A safety factor of 2 should be applied. At present we recommend
       deployments be for no longer than 3 months or 2K wipes.

       miniWIPER records battery voltage and the number of wipes. It is not possible to accurately tell the
       charge state of a lithium battery by measuring its terminal voltage since this voltage responds to
       battery temperature. If you have a general idea of the number of wipes already obtained on a
       battery, then you can make a guess as to how many more wipes remain.

       Monitor battery terminal voltage. You cannot tell from terminal voltage of a lithium battery how long
       the battery will last, but you can tell if it will die soon. The Low Drain Performance plot below gives
       an estimate of terminal voltage for both lithium and alkaline batteries. Your measured voltage will be
       2X what is shown below since there are two batteries in series within the miniWIPER. You can
       operate batteries down to about 2.8 Volts (for two in series, 1.4 Volts on the graph below). Measure

WWW.PME.COM                            TECHNICAL SUPPORT: INFO@PME.COM | (760) 727-0300                          PG. 10
THIS DOCUMENT IS PROPRIETARY AND CONFIDENTIAL. © 2021 PRECISION MEASUREMENT ENGINEERING, INC. ALL RIGHTS RESERVED.
the series voltage as shown in the picture below. Your batteries are dead if this measurement is less
than 2.8 Volts at room temperature, higher if at low temperature.
You may also use alkaline AA batteries such as Duracell Coppertop. They will not last nearly as
long, especially at low temperatures, but will likely be adequate for several weeks at 1-hour interval.
When replacing batteries use only fresh batteries. Don’t mix battery types. If one battery differs in
type or charge level from the other and the miniWIPER runs them to full discharge, then one battery
may leak.
Err on the side of caution when planning your deployment.
The recommended battery is the Energizer L91 lithium battery. For more information including the
performance at low temperatures, use this link: http://data.energizer.com/PDFs/l91.pdf
The figure (left) gives a general idea
of terminal voltage vs. lifetime.
Service life in hours is incorrect since
miniWIPER draws 50 to 100 mA
depending on various factors, but the
general shape of the voltage vs. time
gives an estimate of life remaining.
This plot is taken from the
manufacturer’s specification. The plot
is for a single battery. The
miniWIPER halts operation at a total
of 2.8 Volts.
BAT T ERY LI FE EXAM PL ES
The several figures below show battery life tests for the very first wiper made. Tests were conducted
of a wiper installed on a miniDOT and so do not completely represent the C7 wiper but should be
similar. Tests were at 3 wipes per minute with 12-hour calibration (a miniDOT wipe feature) wipe
interval. All tests conducted at atmospheric pressure. Different wipers will have different endurance
due to differences in temperature, hydrostatic pressure, and the individual wiper's mechanical
friction. Please use a safety factor of 2 for shallow water and 4 for deep water when planning battery
life.
When evaluating the status of batteries from terminal voltage please remember the voltages
presented below vary with temperature and vary depending on how frequently the wiper is actuated.
The tests below are somewhat artificial since the wiper wipes very frequently in the tests compared
to expected field use.
Energizer L91 Lithium AA at room temperature. 12211 single scrub wipes.
WWW.PME.COM TECHNICAL SUPPORT: INFO@PME.COM | (760) 727-0300 PG. 11
THIS DOCUMENT IS PROPRIETARY AND CONFIDENTIAL. © 2021 PRECISION MEASUREMENT ENGINEERING, INC. ALL RIGHTS RESERVED.Duracell alkaline AA at room temperature. 7533 single scrub wipes.
Energizer L91 Lithium AA at 4 deg C. 12785 single scrub wipes, no pressure.
WWW.PME.COM TECHNICAL SUPPORT: INFO@PME.COM | (760) 727-0300 PG. 12
THIS DOCUMENT IS PROPRIETARY AND CONFIDENTIAL. © 2021 PRECISION MEASUREMENT ENGINEERING, INC. ALL RIGHTS RESERVED.CO I N CELL BAT T ERY LI FE
The miniWIPER uses a coin cell battery for backup of the clock when the power is switched off. This
coin cell battery will supply many years of clock operation. Should the coin cell battery discharge,
then it must be replaced by PME. Contact PME.
M AI NT ENANC E
The miniWIPER will require maintenance from time to time. Parts most likely to need replacement
are the brush and the o-ring sealing the drive shaft. The brush will be replaced by the customer by
replacing the brush+wheel. The o-ring can be replaced by the customer. We do not know the
replacement interval at this time.
HO USI NG O - RI NG AND SEAL
When the white pressure housing is screwed on to the black end cap, then it passes along the o-ring
located in the black end cap several revolutions. Keep this o-ring lightly lubricated with silicone
grease or an oil compatible with buna-N o-ring material.
When the miniWIPER is opened after deployment a small number of water drops are deposited on
the inner surface of the o-ring. When the white pressure housing is screwed back on to the black
end cap, then these drops can become trapped inside the miniWIPER. Be sure to carefully dry the
WWW.PME.COM TECHNICAL SUPPORT: INFO@PME.COM | (760) 727-0300 PG. 13
THIS DOCUMENT IS PROPRIETARY AND CONFIDENTIAL. © 2021 PRECISION MEASUREMENT ENGINEERING, INC. ALL RIGHTS RESERVED.o-ring and adjacent surfaces (especially underneath) prior to closing the miniWIPER. Re-lubricate
the o-ring at this time.
LED I NDI CAT I O NS
The miniWIPER indicates its operation with its LED. The table below presents LED indications:
LED Reason
1 Green Flash Normal. Presented immediately after new batteries are installed. Indicates
that the CPU has started its program.
1 Green Flash Occurs at the time of sampling for sample intervals of 1 minute or less.
5 Green Flashes Normal. Indicates that Cyclops-7 Logger is beginning to record
measurements. This indication appears in response to switching the Logger
Control Switch to “Record.”
5 Red Flashes Normal. Indicates the Cyclops-7 Logger is ending recording of
measurements. This indication appears in response to switching the Logger
Control Switch to “Halt.”
Continuously Green Normal. Indicates the Cyclops-7 Logger is connected to a HOST computer
via the USB connection.
Continuously Flashing Red SD card write error. Try removing/reinstalling batteries. Contact PME.
CLO SI NG AND O PENI NG
Close and open the miniWIPER like you would a flashlight; open by unscrewing the white pressure
housing from the black end cap. Close by screwing the white pressuring housing on to the black end
cap. When closing, do not tighten the white pressure housing. Just screw it on until it contacts the
black end cap. See Chapter 3 for more instructions.
CLEA NI NG
Please refer to the sensor manual for sensor cleaning instructions. Clean the wiper by gentle
scrubbing of attached fouling organisms with a stiff brush. You may immerse the wiper briefly, a few
seconds, in a dilute acid such as vinegar or a mixture of 5% muriatic acid 95% water by volume
between scrubbings to loosen calciferous organisms. Rinse the wiper completely in water after the
cleaning is completed.
WWW.PME.COM TECHNICAL SUPPORT: INFO@PME.COM | (760) 727-0300 PG. 14
THIS DOCUMENT IS PROPRIETARY AND CONFIDENTIAL. © 2021 PRECISION MEASUREMENT ENGINEERING, INC. ALL RIGHTS RESERVED.ST O RAG E W HEN NO T I N USE
Remove the batteries. Keep the black end covered with the cap supplied by PME. If the cap is lost,
then cover the black end cap with aluminum foil. There may be a calibration effect of ambient
lighting so attempt to keep ambient light from reaching the sensing foil as much as possible.
J AVA
miniWIPER programs depend on Java and require Java 1.7 or higher. Update Java at
https://java.com/en/download/index.jsp
Upload Files to an Android device –
It is possible to transfer your measurement files from the miniWIPER to your Android device. This
operation has 3 prerequisites.
1. An Android device equipped with USB On-The-Go (OTG) feature. OTG is a feature for most
modern Android devices that allow them to act as a USB host.
OTG was introduced with Android version 3.1 and should be a useable feature for most
devices. It is still possible that your device does not support OTG. Please test your device
with a miniWIPER prior to attempting to upload while in the field.
2. A USB OTG cable. This is essentially an adapter with a micro USB connector on one end
that connects to your Android device and a standard A type USB plug on the other. The
cable supplied with the miniWIPER connects to this end.
3. A "File Explorer" app should be downloaded on your Android device. These types of apps
assist with being able to view and move files from device to device. "ES File Explorer" is a
free app available on the Google app store and is recommended for use with the
miniWIPER.
If these 3 requirements are met, then connect the miniWIPER to your Android device. You should
see the miniWIPER’s green connection light come on and your Android device will display a
message about "preparing USB storage". When "USB storage ready" is shown, then use your "file
explorer" program to move your data from the miniWIPER onto your Android device.
Again, it is highly recommended that you try this operation at your workstation prior to depending
upon this in the field.
Currently the associated miniWIPER programs miniWIPERPlot and miniWIPERConcatenate are not
supported by the Android devices. Please contact PME for further information.
ENVI RO NM E NT AL USE A ND ST O RAG E CO NDI T I O NS
miniWIPER is over the range of 0 to 35 deg C temperature and may be continuously immersed in
fresh or salt water to a maximum depth of 25 meters. miniWIPER may be stored in environments
ranging from 0 to 100% humidity and temperatures ranging from -20 deg C to +40 deg C.
WWW.PME.COM TECHNICAL SUPPORT: INFO@PME.COM | (760) 727-0300 PG. 15
THIS DOCUMENT IS PROPRIETARY AND CONFIDENTIAL. © 2021 PRECISION MEASUREMENT ENGINEERING, INC. ALL RIGHTS RESERVED.ELECT RI CA L PO W ER SPE CI FI CAT I O NS
miniWIPER is battery powered and requires 2 AA size expendable or rechargable batteries. Voltage
requirement is 3.6 VDC. Maximum current demand is 225 mA.
CHAPTER 2: SOFTWARE
2.1 Overview and Software Installation
Software is supplied on CD or in a .zip file. Copy or unzip to any folder on your computer’s hard
drive. The software will contain these files:
• miniWIPERControl.jar allows you to see the state of the wiper as well as set the wipe
interval.
• miniWIPERPlot.jar allows you to see plots of recorded wipe parameters.
• miniWIPERConcatenate.jar gathers all daily files into one CAT.txt file.
• Manual.pdf is this manual.
These files are located on the root directory of the miniWIPER. This appears as a Local Disk when
miniWIPER is connected to a Windows HOSTcomputer.
PME suggests you leave these programs where they are on the miniWIPER, but you may copy them
to any folder on your HOST computer's hard drive and operate them from this location.
miniWIPERControl, miniWIPERPlot, and miniWIPERConcatenate are Java language programs that
require the HOSTcomputer to have the Java Runtime Engine V1.7 (JRE) or later installed. This
engine is commonly required for internet applications and will likely already be installed on the
HOSTcomputer. The JRE can be downloaded via internet from
http://www.java.com/en/download/windows_xpi.jsp
At this time miniWIPER is supported on Windows operating systems but may also operate on
Macintosh and perhaps Linux.
WWW.PME.COM TECHNICAL SUPPORT: INFO@PME.COM | (760) 727-0300 PG. 16
THIS DOCUMENT IS PROPRIETARY AND CONFIDENTIAL. © 2021 PRECISION MEASUREMENT ENGINEERING, INC. ALL RIGHTS RESERVED.2.2 miniWIPERControl
Begin program operation by clicking on
miniWIPERControl.jar. Software presents the
screen to the left (shown after miniWIPER is
connected):
The miniWIPER must be connected to USB at this
time. When correctly connected the miniWIPER
LED will display a constant green light.
Click the Connect Button. The software will contact
the wiper. If the connection is successful, the button
will turn green and display “Connected” as seen on
the left. The Serial Number and other parameters
will be filled in from information taken from the
miniWIPER.
If the HOSTcomputer is connected to the internet,
the current difference between an internet time
server’s time and the miniWIPER internal clock will
be displayed. And, if more than a week has passed since time was last set, the miniWIPER clock will
be set and a check mark icon will appear. If the HOSTcomputer is not connected to the internet no
time services will occur.
The current miniWIPER wipe interval will be displayed next to the Set Wipe Interval button. If this
interval is acceptable the interval need not be set.
To set the interval, enter an interval not less than 1 hour and not greater than 24 hours. Click the Set
Sample Interval button. Shorter and longer intervals are available. Contact PME.
Click the test wiper button to operate the wiper motor briefly. The wiper will make one complete wipe
over a period of about 30 seconds. (A complete wipe is rotation in one direction only. Note that
miniWIPER occasionally does a calibration wipe in addition to a scrub wipe. A calibration wipe is a
wipe to both rotational endpoints without scrubbing.)
End miniWIPER Control by closing the window. Unplug miniWIPER USB connection.
Upon disconnection of the USB cable the miniWIPER will begin wiping or remain halted as indicated
by the position of the Wiper Control Switch.
WWW.PME.COM TECHNICAL SUPPORT: INFO@PME.COM | (760) 727-0300 PG. 17
THIS DOCUMENT IS PROPRIETARY AND CONFIDENTIAL. © 2021 PRECISION MEASUREMENT ENGINEERING, INC. ALL RIGHTS RESERVED.2.3 miniWIPERPlot
Begin the program operation by clicking “miniWIPERPlot.jar”. The program presents the screen
shown below.
The miniWIPERPlot program plots the files
recorded by the miniWIPER. The program reads
all the miniWIPER files in a folder, except the
CAT.txt file.
Select the folder that contains the files recorded
by the miniWIPER. If the miniWIPERPlot
program is run directly from the miniWIPER,
then the program will suggest the folder that is
located on the miniWIPER’s SD card. You may
accept this by clicking “Plot”, or you may click “Select DATA Folder” to browse to your
HOSTcomputer’s hard drive. If the number of measurements recorded is small, for example a few
thousand, then these can conveniently be plotted directly from the miniWIPER’s storage. However, it
is best to copy large measurement sets to the HOSTcomputer and select them there. The file
access to the miniWIPER is slow.
The miniWIPER’s measurement folders must NOT contain any files besides those the miniWIPER
recorded and the CAT.txt file.
Click “Plot” to begin plotting.
The program reads all the miniWIPER’s data files in the selected folder. It concatenates these and
presents plots that are similar to the plots shown below.
WWW.PME.COM TECHNICAL SUPPORT: INFO@PME.COM | (760) 727-0300 PG. 18
THIS DOCUMENT IS PROPRIETARY AND CONFIDENTIAL. © 2021 PRECISION MEASUREMENT ENGINEERING, INC. ALL RIGHTS RESERVED.WWW.PME.COM TECHNICAL SUPPORT: INFO@PME.COM | (760) 727-0300 PG. 19 THIS DOCUMENT IS PROPRIETARY AND CONFIDENTIAL. © 2021 PRECISION MEASUREMENT ENGINEERING, INC. ALL RIGHTS RESERVED.
WWW.PME.COM                           TECHNICAL SUPPORT: INFO@PME.COM | (760) 727-0300                      PG. 20
THIS DOCUMENT IS PROPRIETARY AND CONFIDENTIAL. © 2021 PRECISION MEASUREMENT ENGINEERING, INC. ALL RIGHTS RESERVED.
You may zoom this plot by drawing a square from upper left to lower right (click and hold left mouse
       button) that defines the zoom region. To zoom completely out, attempt to draw a square from lower
       right to upper left. Right click on the plot for options such as copy and print. The plot can be scrolled
       with the mouse while the Control key is held depressed. Copies of the plot can be obtained by right
       clicking on the plot and selecting Copy from the pop-up menu.

       Different DATA Folders can be selected during one session of the program. In this case the software
       produces multiple plots. Unfortunately, the plots are presented exactly on top of one other and so
       when a new plot appears it is not obvious that the old plot is still there. It is, just move the new plot to
       see previous plots.

       The program can be re-run at any time. If an already processed DATA Folder is selected, then the
       program simply reads the miniWIPER’s measurement files again. End the miniWIPERPlot program
       by closing the window.
       In general, the recorded information will not be useful to customers, save that it shows battery
       voltage and # of wipes. However, it may prove useful should a wiper fail. Here is a list of information
       as well as why it is useful.

       T EM PERAT URE

       The temperature within miniWIPER at the time of the wipe. +/- 5 deg C.

       BAT T ERY

       Battery voltage measured just prior to beginning a wipe. Note that calibration events immediately
       precede wipes and draws the voltage down from its pre-wipe value. Useful to see battery condition
       and useful for calculation of source resistance which rises dramatically at end of life.

       FO RW ARD ST ART CU RRE NT

       The highest current observed during the first 1 second of motor operation as forward wipe begins.
       Useful to identify sticky mechanical systems.

       AVE RAG E CU RR ENT

       The average current after 1 second of operation. Useful to determine average mechanical system
       friction.

       REVE RS E ST ART CURRE NT

       The highest current observed after 1 second of motor operation as the back wipe begins. Useful to
       identify peak mechanical system friction.

WWW.PME.COM                             TECHNICAL SUPPORT: INFO@PME.COM | (760) 727-0300                              PG. 21
THIS DOCUMENT IS PROPRIETARY AND CONFIDENTIAL. © 2021 PRECISION MEASUREMENT ENGINEERING, INC. ALL RIGHTS RESERVED.
FI NAL CU RR ENT
The current at the end of the wipe. Wipe end is identified as either time out or high motor current.
W I PE TI M E
The time to make a complete forward/reverse wipe.
W I PES CO M PLET ED
The total number of wipes the miniWIPER motor has made. Reset to 0 if motor is replaced. Useful
for determining wear on motor and for providing a stamp value for other service events. Like miles
on the odometer!
SO URC E RESI ST AN CE
The average decline in battery terminal voltage from no load value to operating value, divided by
average motor current. Useful in determining health of battery.
ENE RG Y PER W I PE
Please review the Low Drain Performance figure in section 1.3. The lithium batteries can provide
0.050 Amp service for roughly 50 hours at 1.4 Volts. miniWIPER uses two batteries so the
miniWIPER battery can supply about 2 * (0.05 * 1.4 * 50) = 7 Watt-hours total energy. A rough
estimate of number of wipes available can be obtained by dividing the total battery energy by the
amount of energy consumed per wipe.
Please understand that this is just an estimate. Different wipers will have different amounts of
mechanical friction that the batteries must overcome. Battery life will also vary dramatically as the
mechanical friction of the individual wiper responds to hydrostatic pressure and will vary especially
with battery temperature since the amount of energy a battery can provide declines at lower
temperatures.
Once the performance of a wiper is established in a known deployment, the Energy per Wipe plot
can be used to make an informed guess of battery life.
WWW.PME.COM TECHNICAL SUPPORT: INFO@PME.COM | (760) 727-0300 PG. 22
THIS DOCUMENT IS PROPRIETARY AND CONFIDENTIAL. © 2021 PRECISION MEASUREMENT ENGINEERING, INC. ALL RIGHTS RESERVED.2.4 miniWIPERConcatenate
Begin the program operation by clicking “miniWIPERConcatenate.jar”. The program presents the
screen shown below.
The miniWIPERConcatenate program
reads and concatenates the files recorded
by the miniWIPER. This program
produces a CAT.txt file in the same folder
as selected for the data. The CAT.txt file
contains all the original measurements
and contains two additional statements of
time.
Select the folder that contains the files recorded by the miniWIPER. If the miniWIPERPlot program is
run directly from the miniWIPER, then the program will suggest the folder located on the
miniWIPER. You may accept this by clicking “Concatenate”, or you may click “Select DATA Folder”
to browse your HOSTcomputer’s hard drive. If the number of measurements recorded is small, for
example a few thousand, then these can conveniently be plotted directly from the miniWIPER
Logger’s storage. However, it is best to copy large measurement sets to the HOSTcomputer and
select them there. The file access to the miniWIPER is slow.
The miniWIPER measurement folders must NOT contain any files besides those the miniWIPER
recorded and the CAT.txt file.
Click “Concatenate” to begin concatenating files and create the CAT.txt file.
The CAT.txt file will resemble the following:
End the miniWIPERConcatenate program by closing the window.
WWW.PME.COM TECHNICAL SUPPORT: INFO@PME.COM | (760) 727-0300 PG. 23
THIS DOCUMENT IS PROPRIETARY AND CONFIDENTIAL. © 2021 PRECISION MEASUREMENT ENGINEERING, INC. ALL RIGHTS RESERVED.CHAPTER 3: MINIWIPER
3.1 Overview
The miniWIPER is intended to provide a gentle wiping of the Cyclops-7oxygensensitive membrane
at user-programmable intervals. Customers will be required to open the wiper to set the wiper
interval or to exchange the batteries. This chapter describes the wiper internal features.
3.2 Opening and Closing the Wiper
The wiper circuitry is contained in a waterproof housing that must be opened. The housing is opened
by unscrewing the white pressure housing from the black end cap. Turn the pressure housing
counter clockwise relative to black end cap. Close by reversing this procedure after being sure that
the o-ring is free from debris. Lube o-ring occasionally with grease intended for buna-N o-ring
material.
Please attempt to handle the miniWIPER only by the aluminum chassis, without touching the circuit
card.
When closing the miniWIPER just screw the white cylinder onto the black end cap until the cylinder
just touches the end cap. Do not tighten! miniWIPER tends to get a little tighter during deployment.
3.3 Electrical Connections and Controls
Removal of the cover reveals the wiper connections and controls, shown below.
The LED Light is a red or green LED. This is used to indicate different features described elsewhere
in this manual.
WWW.PME.COM TECHNICAL SUPPORT: INFO@PME.COM | (760) 727-0300 PG. 24
THIS DOCUMENT IS PROPRIETARY AND CONFIDENTIAL. © 2021 PRECISION MEASUREMENT ENGINEERING, INC. ALL RIGHTS RESERVED.The Wiper Control Switch controls the wiper mode:
• W IPE : When the switch is in this position wipes occur.
• HALT : When the switch is in this position wipes do not occur.
The USB Connection allows communication between the wiper and an external computer. When
connected, the wiper is in halt mode regardless of the Wiper Control Switch setting. When
disconnected the wiper mode is controlled by the Wiper Control Switch. The switch position may be
changed while the USB is connected.
The Main Batteries (2 X AA on side opposite to picture above) provide main power to the
miniWIPER. Note the positive (+) terminal.
3.4 Battery Replacement
Be sure that the replacement battery is compatible with miniWIPER. PME recommends Energizer
L91 AA size batteries. You may also use AA size alkaline batteries such as Duracell Coppertop.
http://data.energizer.com/PDFs/l91.pdf
http://ww2.duracell.com/media/en-
US/pdf/gtcl/Product_Data_Sheet/NA_DATASHEETS/MN1500_US_CT.pdf
Caution: Improper replacement of the battery will damage the miniWIPER. Installing the batteries backwards will
permanently damage the miniWIPER.
Follow these steps:
1. Move the Wiper Control Switch to the HALT position.
2. Remove the depleted batteries noting the position of the (+) terminal.
3. Use only new, fully charged batteries of the same type.
4. Install fresh batteries with the (+) position the same as the removed battery.
The (+) position is also marked on the inside of the battery holder.
5. The miniWIPER LED Light should flash once to indicate that software is beginning operation
within a second or two after you complete the battery installation. At this time the wiper will
enter the mode selected by the Wiper Control Switch.
Record the number of wipes at battery replacement time. This may be helpful later when
determining battery depletion.
WWW.PME.COM TECHNICAL SUPPORT: INFO@PME.COM | (760) 727-0300 PG. 25
THIS DOCUMENT IS PROPRIETARY AND CONFIDENTIAL. © 2021 PRECISION MEASUREMENT ENGINEERING, INC. ALL RIGHTS RESERVED.3.5 Final Mounting Instructions
Appropriate mounting of the combined wiper and wiped sensor at the deployment site is the
customer's responsibility. PME provides the suggestions below.
Easy Method - The mounting backbone has holes at each end. The easy way to mount the
wiper/sensor is by shackling ropes to each end. In general, one rope will extend vertically downward
to the next sensor/wiper or to an anchor. The rope from the opposite end will extend vertically
upward to the next sensor/wiper or to a surface float. See the sensor manual for help with deciding if
the sensor should face upward or downward.
Hard Method - The wiper is designed to inhibit fouling organisms by mechanically removing them
shortly after they attach to the sensor while they are still small. The wiper is NOT intended to remove
"birds nest" type debris that may accumulate on the sensor if used in moving water. If debris are
anticipated, find some method of screening that keeps anything larger than a small twig from
catching on the wiper wheel.
Enjoy your new Cyclops-7 miniWIPER!
WWW.PME.COM TECHNICAL SUPPORT: INFO@PME.COM | (760) 727-0300 PG. 26
THIS DOCUMENT IS PROPRIETARY AND CONFIDENTIAL. © 2021 PRECISION MEASUREMENT ENGINEERING, INC. ALL RIGHTS RESERVED.You can also read