Detection of Septoria apiicola on Celery and Celeriac seed - FEBRUARY 2019 Developed by ISHI-Veg
←
→
Page content transcription
If your browser does not render page correctly, please read the page content below

Detection of Septoria apiicola on
Celery and Celeriac seed
FEBRUARY 2019

Developed by ISHI-Veg
All rights reserved - ©2019 ISF
Detection of Septoria apiicola in Celery and Celeriac seed
Crop:                 Celery (Apium graveolens) and Celeriac (Apium graveolens var. rapaceum)
Pathogen:             Septoria apiicola (S. apiicola) Speg.
Revision history:     Version 4.1, February 2019
                      NOTE: This test was presented previously as 2 separate protocols

PRINCIPLE
BLOTTER ASSAY: Detection of Septoria apiicola by incubating seeds on a blotter paper under
conditions favorable for fungal growth and colonization. Identifications are made via microscopic
observations of pycnidia and conidia.
PATHOGENICITY ASSAY: Viability and pathogenicity of spores are demonstrated by inoculating
healthy, susceptible celery or celeriac plants with a seed wash solution, incubating under
favourable conditions and inspecting them for disease symptoms.

                                   Figure 1. Method process flow

METHOD VALIDATION
The blotter paper assay has been peer reviewed by ISHI-Veg members and experts outside of
ISHI-Veg. Some aspects of it have been validated by an ISHI-Veg laboratory.
The pathogenicity assay has been validated for reproducibility in two ISHI-Veg comparative tests
using celery seed. As celeriac (Apium graveolens var. rapaceum) is a variety of celery cultivated
for its edible roots, hypocotyl and shoots, the assay is also considered appropriate for detecting
S. apiicola in celeriac seeds.

                                                                                                1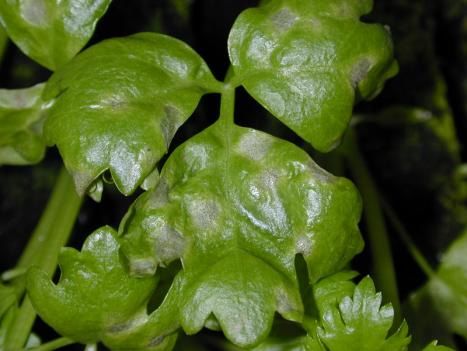
RESTRICTIONS ON USE
Suitable: These tests are suitable for untreated seed and seed that has been disinfected using
physical (hot water) or chemical (e.g. calcium or sodium hypochlorite) processes, provided that
any residue (if present) does not influence the assay.
Unsuitable: These test methods are not suitable for seed that has been treated with protective
chemicals or biological substances. If the user chooses to test such treated seed using these
methods, it is the responsibility of the user to determine empirically (i.e. through analysis, sample
spiking, or experimental comparisons) whether the protective chemicals or biological substances
effect the results.

METHOD EXECUTION
This test adheres to good laboratory practices and other best practices necessary to obtain
reliable results.
To ensure process standardization and obtain valid results, it is recommended following the best
practices developed by ISHI-Veg (see http://www.worldseed.org/ourwork/phytosanitary-
matters/seed-health/ishi-veg-method-development/).

SAMPLE AND SUB-SAMPLE SIZES
          Assay                 Sample size            Sub-sample size
      Blotter paper         minimum 200 seeds              100 seeds
     Pathogenicity             10,000 seeds             maximum 2,500

                                                                                                   2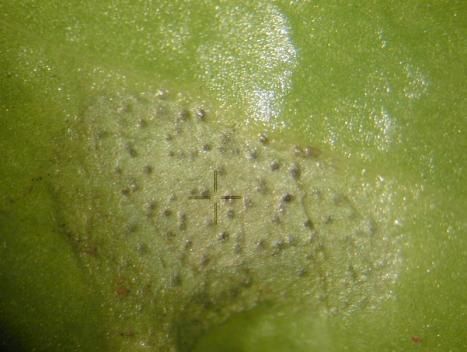
Protocol for detecting Septoria apiicola on Celery and Celeriac seed

  BLOTTER PAPER TEST
  1.     Incubation
  1.1.      Positive Control: The sample size for the positive control reference seed lot used depends
            on the percentage S. apiicola infection of that lot; usually 100 seeds are sufficient. Use
            the same sub-sample size (100 seeds) as the test sample.
  1.2.      Soak three 20 x 14 cm2 blotter papers with distilled water. Place one blotter paper in each
            of the three clean sweat/germination boxes (with lids) of the same size as the blotter
            papers and place the friction tight lids on the boxes.
  1.3.      Aseptically place seeds of one sub-sample (100 seeds) from the suspect seed lot on the
            blotter papers of two prepared boxes (if testing 200 seeds). At the same time aseptically
            place 100 seeds of the positive control on blotter paper in the third prepared box.
  NOTE: If 200 seeds of the Positive control are sown, a fourth box will be needed.
  1.4.      Incubate boxes for 5-7 days at 20 ± 2 °C under 12 hour NUV light and 12 hours darkness
            cycle.
  2.     Identification
  2.1.      Carefully examine each seed for S. apiicola pycnidia at a minimum 25x magnification.
  NOTE: Some of the seeds may have germinated. In which case examine the entire seedling and
        seed coat.
       2.1.1. Septoria apiicola produces characteristic black, flask-shaped pycnidia, 55-200 μm in
              diameter with each pycnidium containing 1,500-5,400 multicellular asexual spores
              called conidia that typically have three or more septa, although young/immature
              aseptate conidia are often observed.
       2.1.2. Suspect pycnidia will need to be removed aseptically and viewed under a compound
              microscope to observe conidia. The conidia are long, about 1.5 x 22-51 μm and
              flexuous or straight, with a blunt-tapered and a long-tapered end.

Image 1: 400x magnification of Septoria apiicola spores       Image 2: 40x magnification of pycnidia

                                                                                                       3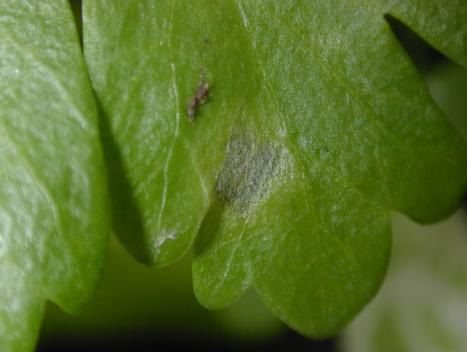
3. Interpretation of results
3.1. No pycnidia: If no S. apiicola pycnidia are observed on any of the seeds tested the seed
lot is considered negative.
3.2. Pycnidia observed: If S. apiicola pycnidia are observed on any seeds, their viability and
pathogenicity should be confirmed by the pathogenicity assay.
NOTE: Despite surface sanitizing seed in 1% NaOCl to minimize saprophytic fungal growth, the
blotter paper may not be possible to read due to an overgrowth of saprophytic fungi.
Fruiting bodies may be discerned but it may not be possible to determine if they are viable
or not. In this case the pathogenicity test is necessary to discriminate between viable and
dead spores as well as to discriminate between virulent and avirulent strains.
PATHOGENICITY TEST
1. Preparation of the seed wash
1.1. Label four 100 ml Erlenmeyer flasks with the sub-sample numbers for the test seed lot.
1.2. Place 2500 seeds for each sub-sample of the test seed lot into the four labeled flasks.
1.3. Add 8 ml demineralized/deionized water to each filled flask and vortex for 5 seconds to
assure good separation and washing of the seeds.
1.4. Controls:
1.4.1. Positive spore suspension: If the Positive control is a spore suspension, add a disc from
a leaf disc puncher or hole punch of an infected celery leaf and 8 ml demineralized
water to a 100 ml Erlenmeyer flask. Label it as the Positive control.
1.4.2. Positive seed sample: If the Positive control is an infected seed sample, add 2500
seeds together with 8 ml demineralized water to a 100 ml Erlenmeyer flask. Label it
as the Positive control.
1.4.3. Negative control: The Negative control is demineralized water and 8 ml should be
added to a 100 ml Erlenmeyer flask labelled Negative Control.
2. Incubation and identification
2.1. Incubate all the flasks (suspects, Positive and Negative) for 2-3 hours at room temperature
on a shaker at 60 rpm.
2.2. Take approximately 10 μl from each sub-sample seed-wash suspension to verify the
presence of S. apiicola.
3. Growing indicator plants
Materials
Open seedling trays (ca. 30 x 45 cm) for germinating seeds that will be used as transplants
in the pathogenicity test.
A seed lot that is S. apiicola susceptible and confirmed negative.
A small sponge (foam rubber) and gloves to prevent cross contamination.
4
3.1. Sow 10 S. apiicola negative celery seeds of a susceptible cultivar (e.g. “Imperial”) per sub-
sample for a total of 60 seeds (40 suspects + 10 Positive control + 10 Negative control) in
clean seedling trays containing well-watered peat cubes or potting soil.
NOTE: Take germination percentage of susceptible cultivar lot into consideration so there are a
sufficient number of plants.
3.2. Cover the sown seeds evenly with thin layer of vermiculite or a Styrofoam sheet, or both,
for 4 days at 15°C so they germinate in the dark. Do not water.
3.3. Grow the seedlings at 15°C with 12-14 hours of daylight in the greenhouse until there are
3-4 expanded leaves (± 4 weeks).
3.4. Transplant the seedlings into clean trays containing potting soil with no more than 10
uniformly healthy celery seedlings per tray.
3.5. Label trays to be used for transplants (e.g. 1 to 4 or A to D) and label the controls (Positive
and Negative).
4. Preparation of suspensions for inoculation
4.1. Using a 500 ml Erlenmeyer flask add 0.1 g agar to 100 ml demineralized water and bring
to a boil briefly in a microwave before cooling the mixture down to room temperature.
4.2. Shake the flask until the agar and demineralized water are mixed thoroughly.
4.3. To each labelled 100 ml flasks (suspects, Positive and Negative) add 1 ml of the 0.1% of
the water-agar that has been freshly boiled and cooled.
5. Inoculation
5.1 Dust all the indicator celery plant leaves (3-4 expanded leaves) with carborundum powder.
5.2. Start by inoculating plants in the trays labelled with the sub-sample numbers with the
corresponding suspect seed sub-sample suspensions. Next inoculate the plants in the
Positive control tray with the Positive control suspension, and finally the plants in the
Negative control tray with the Negative control.
5.3. Inoculate leaves of at least 6 and no more than 10 plants per sub-sample suspension as
follows:
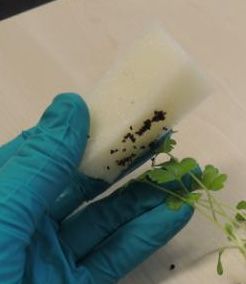
5.3.1. With gloves on, place the sponge on the opening of the Erlenmeyer flask (image 3
below)
5.3.2. Turn the Erlenmeyer flask so that the seed-wash suspension is absorbed by the sponge
(image 4).
5.3.3. Try not to spill any of the seed-wash suspension and do not remove any seeds
remaining on the sponge (image 5).
5.3.4. Rub the leaves smoothly with the seed-wash suspension dampened sponge (image 6).
NOTE: Change the sponge and the gloves between each sub-sample to prevent cross
contamination. Do not water the plants using a spray or sprinkler after inoculation! Do not use
any pesticides until the test is completed.
5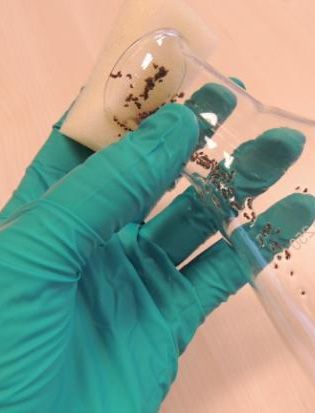
Image 3 Image 4
Image 5 Image 6
5.3.5. Incubate the inoculated plants in a climate controlled chamber/greenhouse for 4 days
at 18°C, 100% humidity and 16/8 hours light/dark. The required 100% humidity can be
achieved by covering the plants with a plastic tent.
5.3.6. On the 5th day after inoculation, reduce the humidity to 70% (e.g. by opening the
plastic tent) but maintain temperature and light at the same levels and continue to
incubate plants.
6. Evaluation of inoculated plants
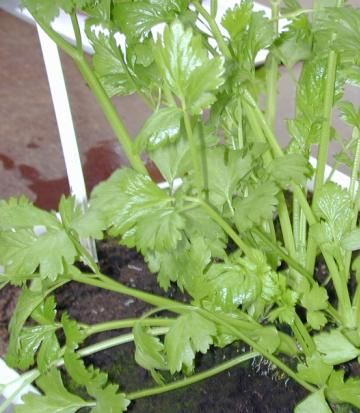
6.1. Evaluate the leaves of all plants 2-3 weeks after inoculation for grey-brownish spots with
black pycnidia, typical symptoms of S. apiicola infection (see images 7 and 8).
Grey-brownish spots with
black pycnidia
Image 7 Image 8 6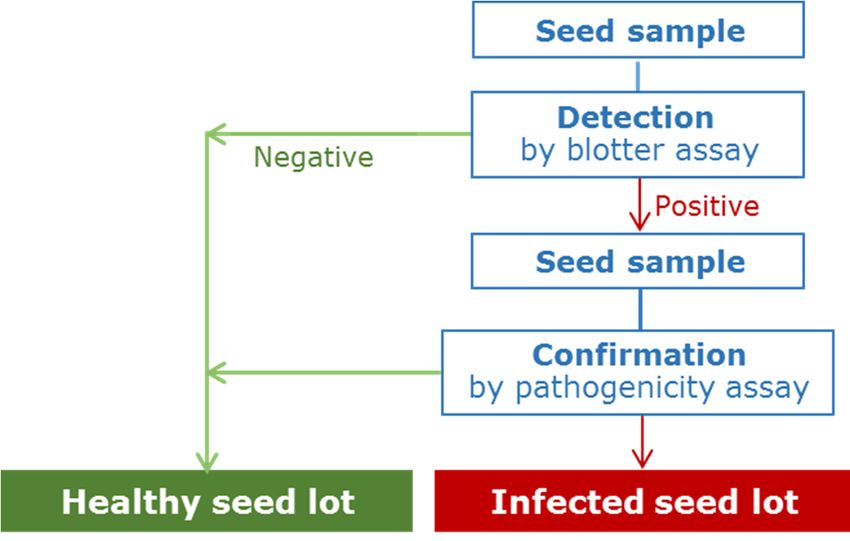
6.2.   Confirm the presence of black pycnidia in the grey-brownish spots using a magnifying
       glass with at least 25x magnification (see image 9). Compare the symptoms to Negative
       and Positive control plants.

                 Image 9: 80x magnification of grey-brownish spot with black pycnidia

6.3.   If infected symptomatic plants are found, the seed lot tested is infected with positive
       viable S. apiicola.

                                                                                            7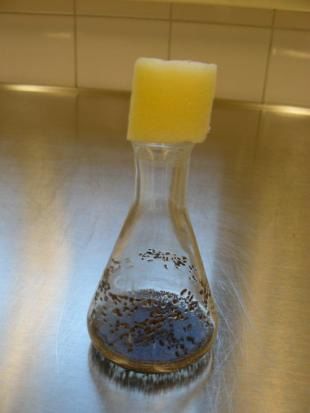
You can also read