DIY Fixed Frame Instructions
←
→
Page content transcription
If your browser does not render page correctly, please read the page content below
DIY Fixed Frame Instructions
It’s simple, inexpensive, and gives up nothing in performance to the high-priced manufactured screens.
Give it a try. Hopefully this is a helpful guide.
1. Size, Planning
First figure out what aspect ratio and screen size you want. Try to shoot for a 36-40 degree viewing
angle. You can go smaller if:
Your top priorities are image dynamics (contrast, “punch”), sharpness, and smooth motion
Your theater is unusually large and would be hard to properly light up an oversized screen
You watch mostly standard definition content
You want your left/ right speakers to be outside the image or towed in for better off-center
imaging.
You typically sit toward the back in a movie theater
You can go for a larger viewing angle if:
Your top priorities are image immersion; that large-screen cinematic feel
Your room is smaller or you otherwise have to sit closer to the screen
You watch mostly high-definition content
You want all the speakers behind the screen (in which case you should fire them straight through
the material)
You typically sit toward the front in a movie theater
With that in mind, I’d still recommend not going above a 50 degree viewing angle. At 45 degrees, the
apparent resolution begins to drop. It’s also too head-turning for most people, typically causing fatigue
and headaches. It’s difficult to properly project onto if you’re sitting at typical viewing distances (10-20
feet), or you’re sitting too close. We recommend a sitting a minimum of 8 feet from Center Stage XD
screen material, or the texture will become too visible for those with perfect vision. At 10 feet, you have
to have acute vision to look for the texture and it’s typically only visible during all-white scenes. At 12
feet, you not only have to have perfect vision but you have to really try hard to see the texture. During
any typical program material, it is functionally invisible to anyone.
Here’s a helpful viewing calculator:
http://myhometheater.homestead.com/viewingdistancecalculator.html
Moiré
While we manufacture all our retractables screens with no tilt, since the Center Stage XD has built in
moire resistance in the weave, we manufacture all of our fixed frame screens with up to a 20 degree
angle cut (or whatever fits on the roll) so the threads are biased at an angle which eliminates the
possibility for moiré. For the DIY fixed frame, it may be worth it to you to figure out if a regular bulk cut
will work. The most sensitive projectors to moiré are LCD, especially Mitsubishi, Epson and to a lesser
extent Sanyo’s models. For other projectors you may be able to use the material straight, but I highly
recommend proving this out first via a free 8.5x11 or inexpensive 24x24 sample. Most other projector
types still exhibit some sizes – especially smaller – that can artifact with the holes. So either prove out
what needs to be done, or just do the 20 degree cut with respect to the roll and don’t worry about it.
Copyright ©2011, Seymour Products LLC, All Rights Reserved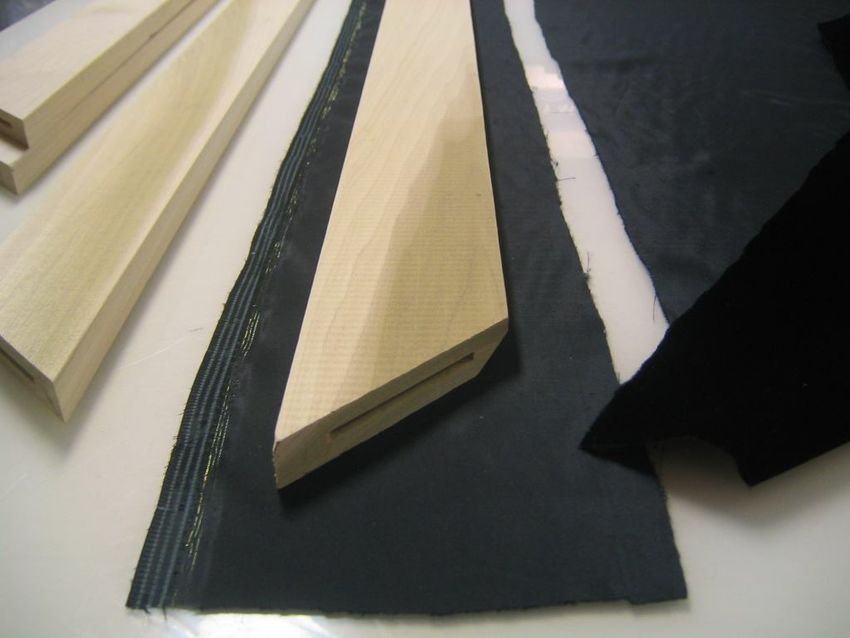
Center Stage XD screen material comes in 63 and 98 inch widths. If you learn that you can use the
material without having to tilt the cut, getting a few linear feet is simple and a great value. If you
otherwise learn you need to use an angled cut or just want to future-proof the screen, you can either
order more material to cut at an angle or you can have us do it. For typical screen sizes, you’ll need to
use the 98 inch width. We can calculate how much material you’d need. If you have us do it for you, it
usually costs an extra $35.
For a wood frame, adding about 2.5” to each side is enough for stapling to the frame. Here’s an example
of a 16:9 ratio, 100” wide, 114.7” diagonal screen cut at a 15 degree angle. With the attachment margin
added, this screen’s cut dimensions would be 105” wide by 61.2”. It fits onto 10 linear feet of 98” wide
material like so:
20 degree angle
61.2”
98” wide
material 105”
10 linear feet (120”)
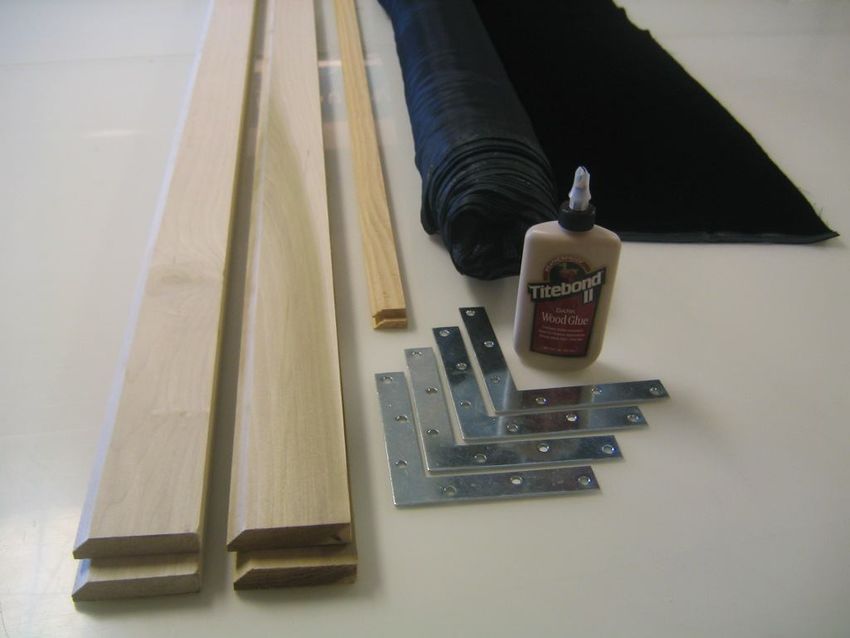
2. Gather Materials
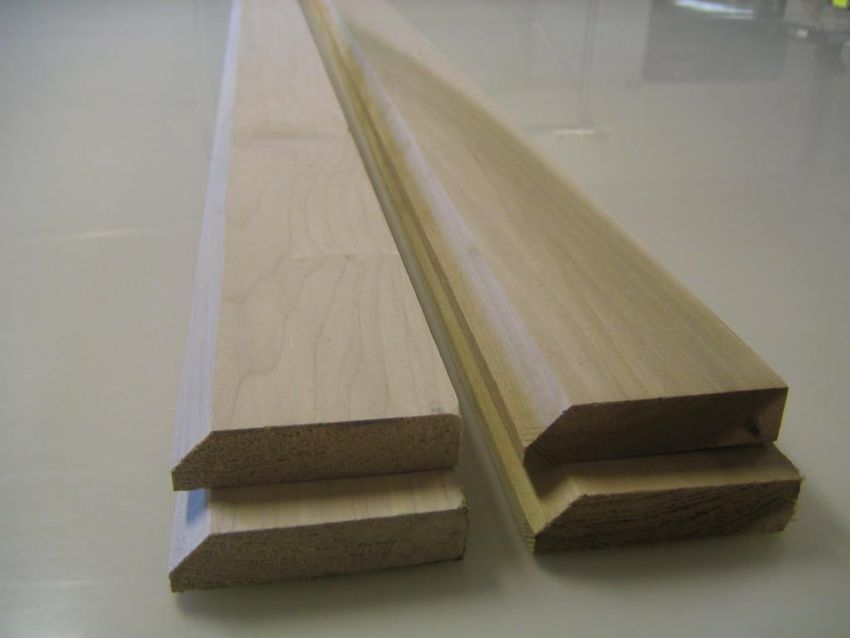
The best framing wood to use is 1x3 or 1x4 poplar, which is available at your local Lowe’s or Home
Depot in up to 10 foot lengths. Poplar is usually nice and straight and has a great stiffness to weight ratio
and cost, unlike oak. If you are doing a smaller screen, perhaps 90” wide or smaller, then you can use
1x3 just fine. For larger screens, you should use 1x4 for rigidity and a better looking border. They
naturally come in at 3.5” wide, so consider if you’ll ever want to put a masking system over it, and if so,
you should rip the 1x4s down to 3-1/8”. We did this just to be safe and put a fancy chamfer on the inside
edge just to show off.
Copyright ©2011, Seymour Products LLC, All Rights Reserved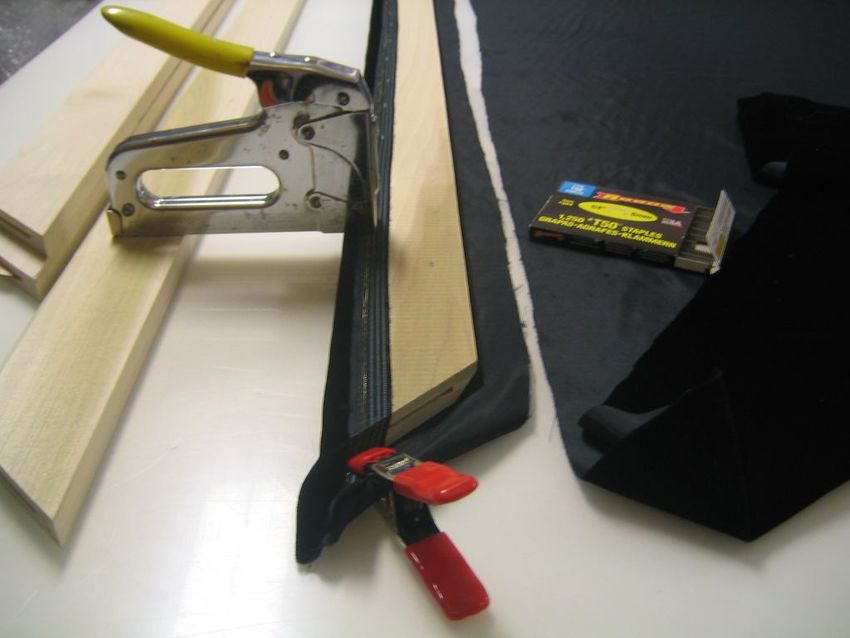
Next, source some black velvet. Most any black velvet material will work better than the flocked border
that large manufacturers use. Here’s a good online source: Sy Fabrics' Black Triple Velvet
Then, the last bits include nice 6” corner brackets, two pieces of trim for a French cleat, and some dark-
colored wood glue. Here’s your total shopping list, assuming you’re working with a screen size smaller
than about 115” wide:
2 – 10ft 1x4 poplar (check for straightness)
2 – 6ft 1x4 poplar
3 linear yards black velvet
4 – 6” metal corner brackets
2 – 6-8ft pieces of small trim with a bevel on one end
Dark wood glue (optional)
If you are building a screen that is around 120” or wider, you may want to add center supports since this
isn’t aluminum frame (hint: we do make those up to 170” wide). If you’re close to this size, consider
tweaking it down so you can use off-the-shelf 10 foot lengths of poplar without having to do a splice. If
you’re clearly breaking past this width, you not only have a splice to contend with but should definitely do
a set of small center supports. In this 2.35 ratio drawing below, you can see to 1) don’t put anything
down the exact center – that’s where your center channel should be, 2) aim for the 1/3 lines, and 3) keep
them small – they won’t be carrying much load. Something like 1x2s would be fine. Paint them dark so
they don’t reflect through.
Copyright ©2011, Seymour Products LLC, All Rights Reserved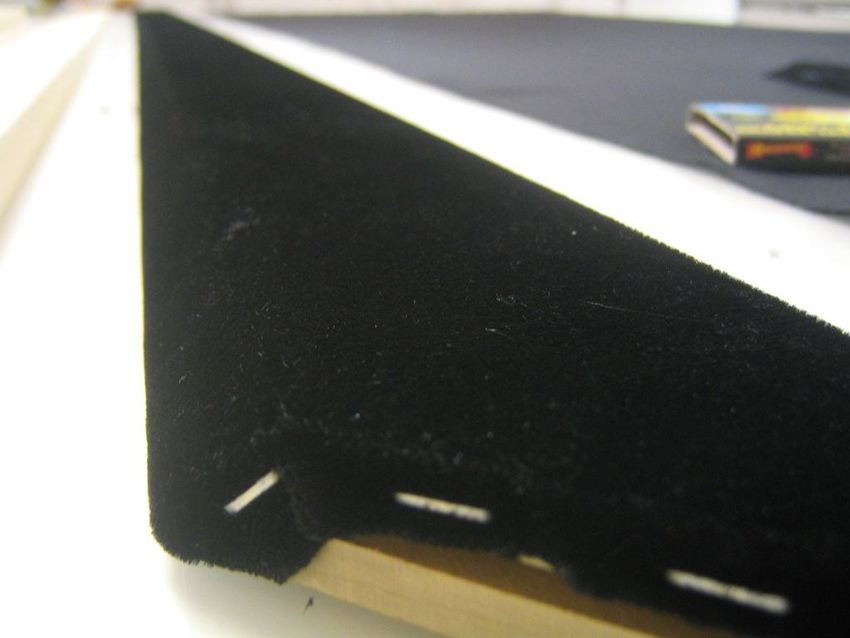
3. Start Cutting
If you can, a 45 degree miter cut looks classy, although after it’s wrapped in velvet the difference
between that and a standard 90 degree joint is subtle. The 45 degree miter cut also allows us to use a
classy chamfer on the inside edge, but feel free to scale this to the easier 90-degree joints if you want.
For this screen, we also put biscuit joints in the corners. You can do other methods, such as pocket
screws or a Kreg jig. The 6” angle brackets do most of the support, so again feel free to scale this to
your skills. Make sure you’re extra careful to be measuring the inside, or screen, dimensions on your
cuts or you’ll find yourself with a nonstandard aspect ratio.

Copyright ©2011, Seymour Products LLC, All Rights Reserved
TIP: If you live in an area with humidity swings that can wreck havoc on wood furniture, you
        may consider shellacking or otherwise sealing the wood pieces so they are less prone to
        dimensional changes with humidity. Definitely start with as dry a wood as you can. It should be
        easy to remember: “shrinkage is not our friend.”

    4. Start Rapping
Or wrapping; your choice. Roughly cut the black velvet so you have enough to wrap around each frame
piece.

Start with one staple in the center, and work your way towards the ends, pulling relatively snugly. I used
this clamp to help, but a helper would have worked better.

Copyright ©2011, Seymour Products LLC, All Rights Reserved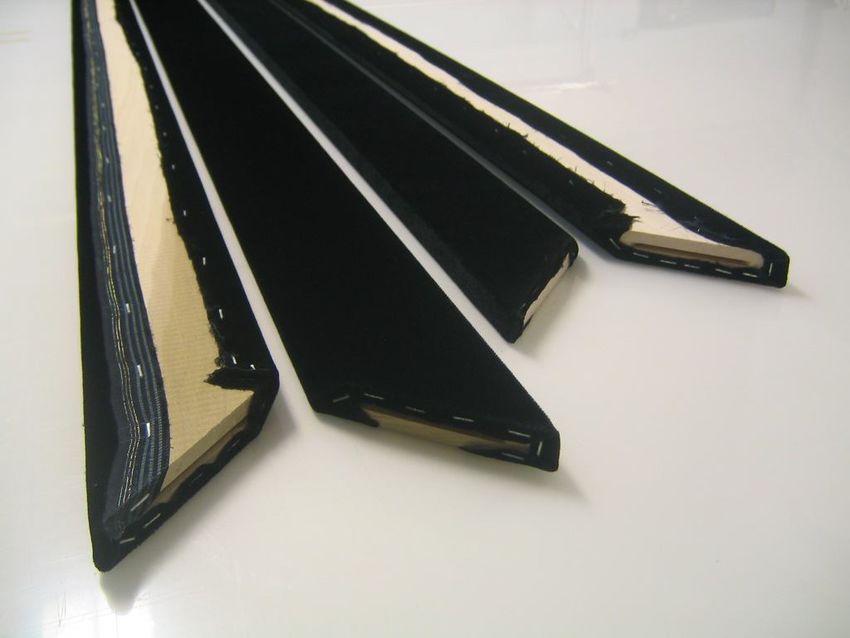
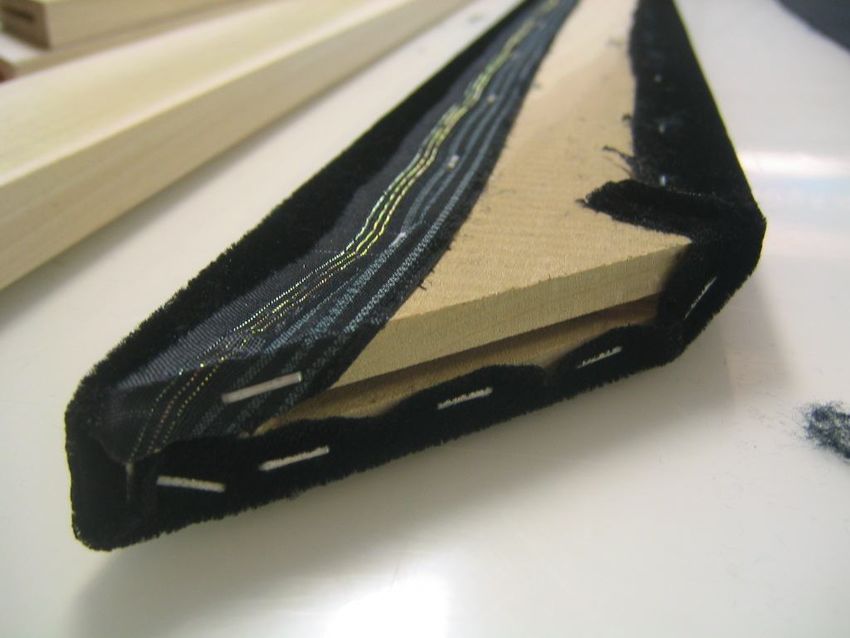
After you get it stapled linearly, attack those ends. The objective here is to get all the staples hidden in
the inside joint surface, and in this case keep the velvet out of the biscuit slot (another reason to scale
this easier and avoid biscuits). Go back with a hammer and smack down the staples to make sure
they’re flat into the wood and snug. Most staplers only do a mediocre job with the initial staple into wood.

Here’s a top side over-exposed close up view after a piece is finished wrapping. You’ll want to de-fuzz
the material afterwards, as it easily picks up fuzzies you didn’t even know you had.

Copyright ©2011, Seymour Products LLC, All Rights Reserved
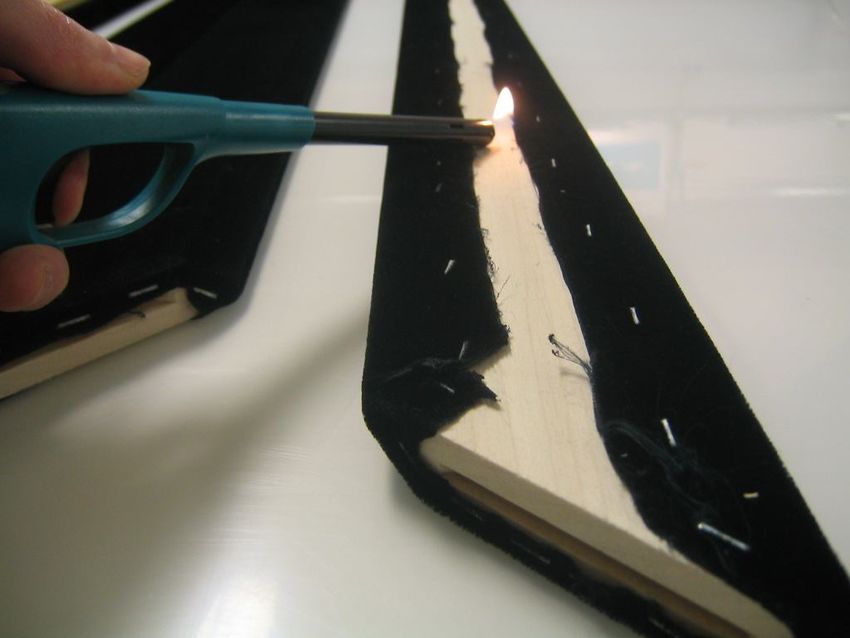
Here are all four framing pieces after the black velvet wrapping is finished.

For this nylon-based black velvet, to make sure the edges wouldn’t fray, we went over all the edges with
a lighter. Those who have cut nylon rope are familiar with this process. Since you’ll be holding the
lighter for several minutes, make sure you either use one of the long fireplace-style ones like shown, or a
flame thrower.

Copyright ©2011, Seymour Products LLC, All Rights Reserved
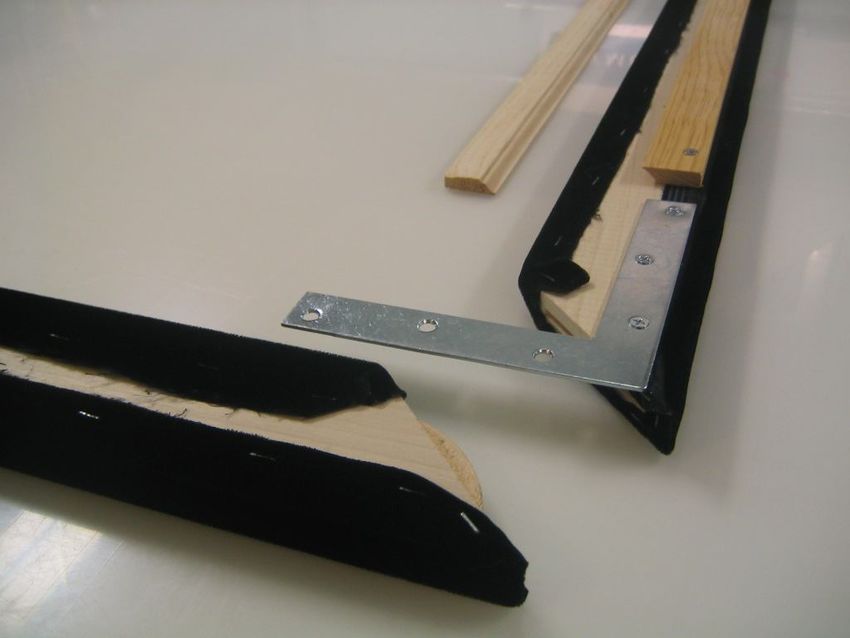
5. Assemble the Frame
Now you can put together the four frame pieces. You can dab a little glue in the corner joint, but use it
very sparingly. You don’t want glue coming out the pretty side. Even if you color it, it’ll not look perfect.
Ensure that you have perfectly perpendicular joints by measuring each diagonal and making sure those
numbers are identical. Note how one piece of trim is attached to the top frame member, and how the
other (loose) piece is inverted and will be mounted to the wall. This French cleat system is super easy to
work with. Just level and attach the loose piece and hang the screen.

Copyright ©2011, Seymour Products LLC, All Rights Reserved
6. Attach the Screen
I don’t have pictures of following steps; we shipped it off. But to attach the screen, simply unroll it along
the backside of the frame and get your staple gun.

          TIP: Place something (clean) in the middle of the frame, under where your screen is to be laid
        down that is as close to the thickness of the frame as possible. For example, a 1” thick piece of
        foam board or even a ¾” piece of plywood will elevate the screen fabric as you’re stapling it to the
        frame and you won’t have to fight the droop of the fabric to the floor on the initial staple. You
        want it nice and taught from this step.

          TIP: Load the staples into the staple gun so that the angle on their chisel point is facing toward
        the screen center, away from you, and likely toward the front of the gun (tip side of the staple
        away from the screen). The staple will have a tendency to move in the direction of the point,
        similar to a chisel. Having them shift slightly outward causes a tightening of the screen material
        as the staple is shot, rather than a loosening effect.

Roughly following the number sequence in the below diagram, start with a staple on the middle of the
long sides, only lightly pulling against each other. If you have a tilted thread cut, then keep in mind that
any pulling should be along the threads. Otherwise, you’ll be creating puckering by pulling all the little
square holes into diamond shapes. With increasing pull force, work your way towards the corners. After
you get about half way to the corners, switch to the short sides and work on them in the same fashion.
After you get all the way to the corners, turn the screen vertically and see if any bulges appear. If so,
simply pull a few staples with pliers and do it again. Don’t pull the staples up by the material, since
mechanical deformation is this fabric’s worst enemy – use pliers or a blade. Folds or pulls in the material
can permanently deform the material.

Copyright ©2011, Seymour Products LLC, All Rights Reserved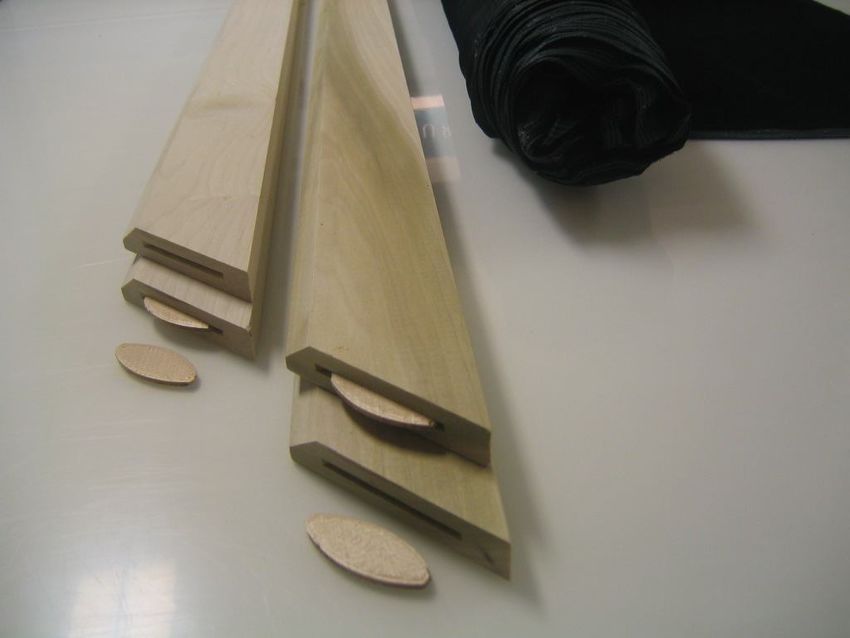
10 9     1 2 5 6 12

                        17
                        16
                        15

                                                                                 18
                                                                                 19
                                                                                 20

                                          11    4 3 7 8 13 14

Center Stage XD screen material only stretches up to one percent. So while you can use force to get it
nice and flat, if you try to resort to large force (e.g. canvas stretcher bars, etc.) you will often not get
much if any benefit for all your bleeding knuckles. Don’t fight the material too much, especially if you are
not pulling along the threads. Like your mother has told you repeatedly, “work smart.”

    7. Install
Place the loose mating piece of trim against the wall, with the angled side up and towards the wall. Hold
a level along the top and screw the trim against the wall into a stud. Repeat along the trim length.
Hanging the screen is then extremely simple. Nudge left or right to center it.

                                   wall

    8. Final Costs
Regardless of how much of this process you’re willing to do yourself, you’re certainly saving money and
giving up nothing in performance from the overpriced manufactured screens. Even if you pay others do
most of the work you can get your screen for around $600, or 1/3 the price of comparable manufactured
AT screens. If you are willing to do all the labor, you can finish a smaller screen for less than $200 in
materials.

Here is an option you might like: we can install grommets around the screen so that you can still build our
trampoline-like tensioning system and tell others you made the screen. As standard, we install
grommets averaging 6” apart, centered 5/8” from the edge of the material, with a 2” margin outside the
image. They cost $3 each and a typical screen uses perhaps 45 to 65 depending on size.

Special thanks to Alan DeAngulo for his contributions.

Copyright ©2011, Seymour Products LLC, All Rights Reserved
You can also read