GETTING STARTED :: FOR TEACHERS - WWW.DRFROSTMATHS.COM @DRFROSTMATHS - DR FROST MATHS
←
→
Page content transcription
If your browser does not render page correctly, please read the page content below

Getting Started ::
 For Teachers
 www.drfrostmaths.com
 @DrFrostMaths

Last modified: 28th September 2021
Contents

 1 Home dashboard / menus Page 3
 2 Setting up classes Page 5
 3 Setting homework/classwork Page 15
 a. Key Skill Tasks Page 18
 b. Uses student demo accounts Page 26
 c. Choosing the questions yourself Page 27
 d. Modified past paper Page 32
 e. Randomly generating worksheets Page 35
 f. Topic Tests Page 37
 4 Viewing progress data from a task Page 38
 5 Exporting reports to Excel Page 42
 6 Starting a Live! game Page 43
 7 Using the virtual whiteboard Page 48
 8 Browsing for downloadable resources Page 53
 9 Browsing for individual exam questions Page 54
 10 The Course/Scheme of work system Page 55

 11 How do I… Page 67
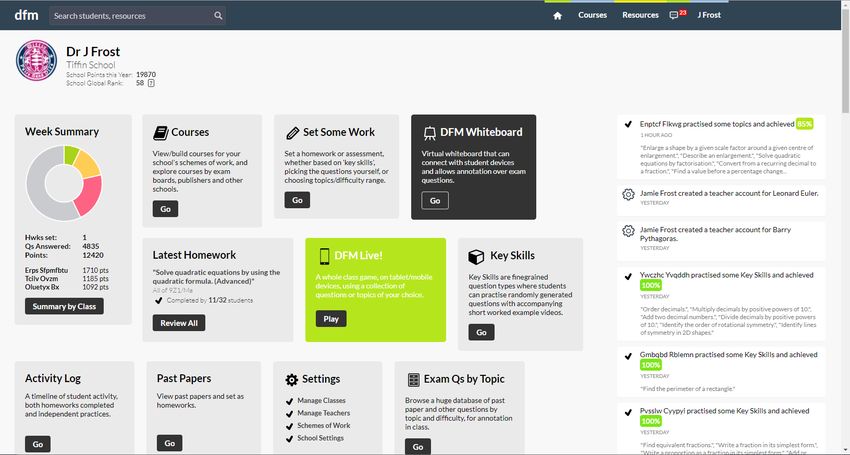
When you first log in… The top menu allows you to quickly
 access different parts of the site.
 You can use this search bar to quickly We’ll explore this further…
 search for skills (e.g. Pythagoras) or
 students (e.g. to change their class)

 On the right are notifications
 related to activity of students in
 your classes. You can click these.
 e.g. Clicking this one would show
 you the questions (and the
 student’s answers) for this
 independent practice they did.

 These various dashboard boxes
 also offer you quick access to
 various parts of this site. e.g. The
 latest homework, the virtual
 whiteboard, and so on.

 The Summary by Class button gives a
 quick weekly or monthly data
 summary (e.g. questions answered) by
 class.
The top menu The home icon will bring you
 back to this webpage.

Courses allow students to work through a scheme of
work, whether produced by an exam board, your school,
or one of the ‘DFM Courses’.
On a course students will be able to answer questions,
watch educational videos and download additional
resources, relating to that course. There’s also links here
to create your own course and view student progress
data organised by course.

 Resources gives access to
 the various resources on the
 site, organised by topic. This gives you access to
 There’s also other tools, like functionality related to you
 the virtual whiteboard and and your students. You can
 timestables games. set work here, view
 students’ answers to set
 If students leave you any work or independent
 feedback on questions practices, manage collections
 they’ve answered, you’ll see of questions (i.e.
 a red notification number. ‘worksheets’) and manage
 your classes.
Setting up your classes

Step 1

 On the top menu, go to [your name] → Classes/Teachers,
 or find the Settings box on your home dashboard and click
 Manage Classes.

Setting up your classes

 On the left are a list of all your classes.
 Click one to view. Notice there is also a
 tab to manage teachers.

 We highly recommend adding all
 your classes via a spreadsheet
 import, particularly if you wish to
 reset your class groupings at the
 start of the academic year. Let’s try
 this option now…

 Use this form to add a new class
 from scratch.
Setting up your classes via a spreadsheet import

 Having pressed the Start the Wizard link, download the
Step 2 spreadsheet indicated by the link here.

 Step 3
 By copying data from your department’s
 tracking spreadsheet, list all your students. This
 can be a mixture of students already with DFM
 accounts (the wizard will find them), and new
 students who require new accounts.

 Key Point: If you don’t specify an email address, a
 username (e.g. jfrost-2594) and random password
 will be allocated to the student for you.

Setting up your classes via a spreadsheet import

Step 4 Use the Browse button to select your saved import Excel spreadsheet.

 If you’re starting a new school year in
 particular, you’ll want the first option.
 This will start all your class groupings
 from afresh. It will never delete any
 active student accounts.

 The second option is useful to add
 additional classes when you’ve
 previously already set some up.
Setting up your classes via a spreadsheet import

Step 5

 The system will read your spreadsheet,
 and allow you to review all the changes
 it is about to make. Do check these.

 Notice that this student already has an account, so
 the wizard is proposing to move them into the new
 class it’s about to create.

 Click Finish to carry out the import. If you provided email addresses, students will receive
 an automated email, allowing them to set a password or link to a GSuite or Office365 or
 Firefly account. If you didn’t provide email addresses, a username and password will be
 automatically provided for each student.
Setting up your classes via a spreadsheet import

 You’ll then see your new class. Use the
Step 6 Export to Excel button to get a list of
 names,email/usernames and passwords
 of students in your class.

 Passwords will only be visible for student accounts if there
 is no associated email address and usernames were used
 instead. If an email address was provided, students will have
 the opportunity to provide their own password (or link to
 GSuite/Office365/Firefly) when they click the activation link
 in the automated email they receive.
Setting up a class from scratch

 You can also create classes without a spreadsheet,
 but we don’t recommend using this form.

 Fill out this form on the Manage Classes
 homepage (the +Class tab at the top).
 Choose the teacher you wish to allocate
 to the class.
 Ignore the Course field for now, unless
 your school has already set up schemes of
 work or use an existing scheme of work
 (e.g. White Rose Maths)

 This will create a new tab for your class
 and select it for you. This will bring up a
 very short tutorial showing you the
 options for adding students. But in
 summary, you have a choice of:
 1. Not entering any student details
 yourself and giving the provided ‘Self
 Registration URL’ to your students.
 2. Entering names of students using the
 +Students button.
Setting up a class from scratch

 As per the instructions, click this
 button to add students.

 The self-registration URL can be
 issued to students if you don’t want
 to enter any names of students
 yourself. For normal school classes
 we do not recommend this.

 Follow the instructions on the Add Student form. Just like the
 import wizard, you’ll get the review the students you’re about
 to add, and see if it’s detected existing accounts.
Managing Existing Students

 To select a student, just click the row. You can then change their
 class and change details such as their name, email and password.

 Important Note: If students use a non school email address to
 register, i.e. their email extension after the @ doesn’t match that
 set for your school, then their email will appear as “Non-School
 Email Address”. This allows for appropriate Safeguarding in cases
 where students don’t have a school email address available for use.

 If an email address is associated with a student account, greyed out rows are
 students who haven’t yet activated their accounts. If you’ve added the accounts
 yourself and provided an email address, this means they haven’t clicked the link in
 Select a class on the left. Ones the automated email they received. If there’s problems with this, select any greyed
 highlighted in grey are yours. out rows and press the Force Activation button. This activates their account and
 temporarily sets their password to password.
Dealing with students who have registered independently

There’s nothing stopping a student registering with a school independently (although
they will receive a warning message telling them to await teacher instructions where
appropriate). If this happens, you can still subsequently put them in a class.

 Uses the ‘Students
 with no class’ tab
 on the left.

 Find the student in the
 list, click them, and
 press ‘Move Class’.

Fine Print: For Safeguarding/GDPR reasons, students who register independently
won’t be able to see the names of anyone else in the school, i.e. on leaderboards.
Set some classwork/homework

 On the top menu, go to
Step 1 [your name] → Set Work.

Step 2

 You’ll be presented with multiple different options for setting work, with
 explanatory text. Let’s explore some of these…
Set some classwork/homework

There are two main sources Key Skill questions should be a starting Exam Questions are, as you’d expect,
of questions on DFM. As point to help students master very questions from past exam papers. We work
 specific skills. with a number of exam boards, e.g. Edexcel,
explained above on the
 AQA and OCR in the UK.
webpage above… Key Skills are randomly generated (and
 hence unlimited!) questions of a specific These will give a broader variety of
 type. You will have the choice to give all questions on a topic.
 students the same questions, or have
 more flexible completion criteria.
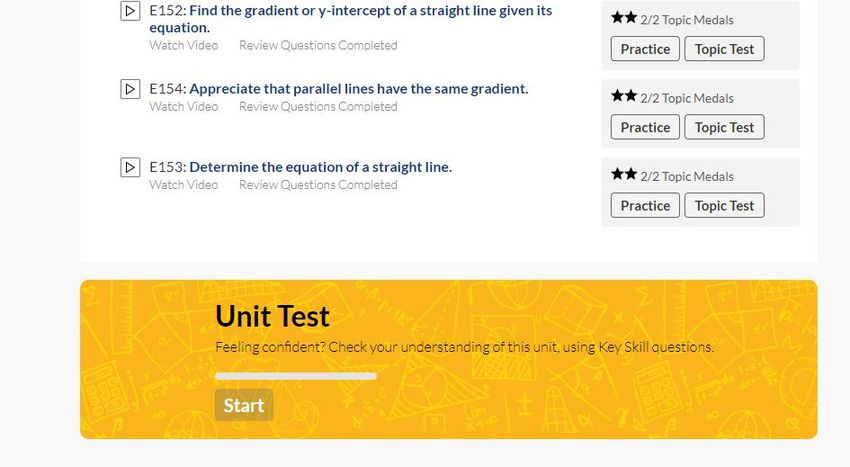
Set some classwork/homework

More on Exam Question tasks…
 There are one or two Topic Tests on
 Particularly during revision periods, each topic (‘Standard’ and
 you can choose a past paper or ‘Advanced’). Achieving 6+ out of 8 on a
 collections of questions created by Topic Test earns students a Topic
 your school/trust. Medal. These are particular suitable
 for use as end of topic tests.
Setting a Key Skill Task

If you choose Key Skills for setting a task, you’ll see this page. Remember that Key Skills are great for
repeated practice of specific types of questions. There’s currently 820 Key Skills, and rising!

 If you give students a code for a Key
 Skill, e.g. K494, they can enter it here. This summarises your
 progress on each Key Skill.
 Answering 6+ questions on
 You can access Key Skills by topic on the left. The red, green a Key Skill gets to Complete,
 and yellow stars gives you the count of Key Skills which and 10+ Master.
 you’ve started, completed, or at master level. Obviously
 these stars are more applicable to students!
Setting a Key Skill Task
 Suppose that we’ve chosen Factors,
 Multiples and Primes on the left…
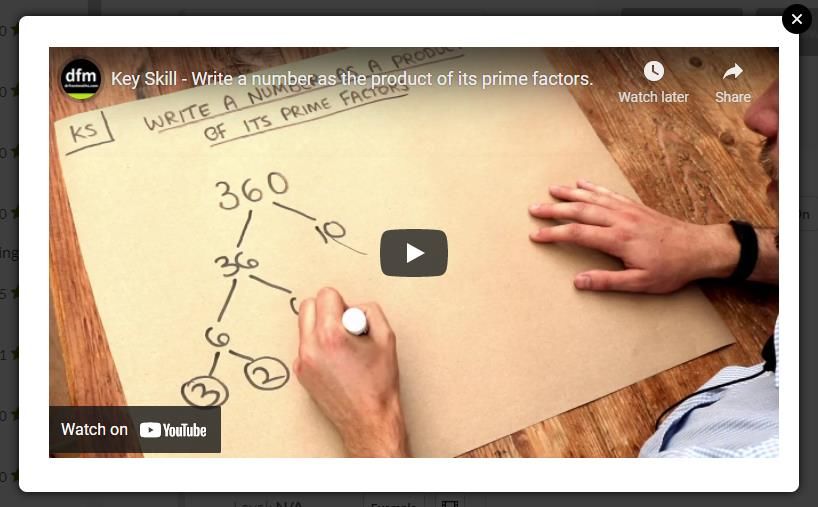
Setting a Key Skill Task

 Pressing the Example button on any Key Skill
 will generate an example question. There’s
 only small surface variation so this should be
 typical of questions students might get.

 …and the video icon brings up a video
 showing a worked example. For Key Skills
 these are typically 2-4 minutes long.
Setting a Key Skill Task
 Clicking anywhere on a Key Skill (other than
 the Example/Video buttons) will select it.
 Your selection will appear on the right. It’s
 possible to mix skills from different topics.

 Have a Go will practise questions on these skills as if a
 student. Generate Worksheet will create a random
 worksheet of questions on your selected skills.
 But let’s click Set to Students.
Setting a Key Skill Task

 As per the instructions, we can either set the
 same questions to each student, or have
 more flexible criteria for students
 completing the task (e.g. “5 out of the last 6
 questions correct”), resulting in different
 questions for different students.
 Let’s do the second option…

 You’ll then get this form.

 Select your classes (or individuals) here.
 You’ll select a class, choose the
 individuals within it (or all of them), and
 this ‘selection to use’ will appear on the
 right. You can pick multiple classes.

 Set immediately or schedule for the future.

 You can either set a fixed number of
 questions (but note: questions are not the
 same for each student for a flexible task), or
 require that students keep going until they
 meet an accuracy criteria.
Setting a Key Skill Task

 Click the ? to provide an explanation of
 each option. This one gives students a
 warning if their first attempt at a
 question is wrong.

 You can require that students show drawn
 working via a mini-whiteboard that appears
 as they do the question.

 You can require that students watch all the
 relevant worked example videos before
 starting the task. This will show you the total
 watch time required.

 If skills are interleaved (applicable only if you’ve selected multiple
 skills), it’ll rotate the questions between the skills. Setting ‘No’
 combined with an accuracy criteria is quite powerful, as students
 will keep getting questions of the same type before getting
 comfortable with it, and the system will them progress them on to
 the next block of questions within the task.
What students will see…
 Once students start their task, this is
 If they get stuck, they can watch a
 kind of interface they’ll see.
 worked example video.

 They have a whiteboard area
 for rough workings.
 This keyboard will pop up if the
 answer box requires algebraic input.
What students will see…

 They’ll get feedback after each
 question (although depending on
 what settings you’ve used this may
 not be the case), with a full
 explanation of the answer.

 The system will
 accept any
 algebraically
 equivalent answer
 5 2 +2
 (e.g. )
They have the option to leave written −3+1 2
feedback for you (which you can
subsequently reply to). This is the
quote icon on your top menu.
How to do the set task as if a student

 Each class you set up also has
Step an associated ‘demo account’.
 Any work you set to anyone in
 1 your class will also be set to
 the demo account.

 This enables you to see what
 the experience is like for a
 student.

 Go to [your name] →
 View as Student

Step
 2 Select a class. As you will now
 be logged in as that demo
 account, you will need to log
 off (and back in) if you wish to
 return to your own account.
Choosing the questions yourself

You can create a custom selection of questions, mixing past paper exam questions and
randomly generated Key Skill questions. We call such a collection a worksheet.
Worksheets can either be set to students as an online task, exported to Word (with
mark scheme) or played as a ‘Live!’ game.

 Step Go to Resources → Past
 Papers/Worksheets or use the
 1 ‘Build a Worksheet’ button on
 the home dashboard.
 Alternatively, [your name] →
 Set Task, then pick ‘You
 Choose the Questions’

 Step Click this button.
 2
Choosing the questions yourself Once your worksheet is saved, you can set it as an
 online task, or export it to Word (with markscheme) or
 play as a ‘Live!’ game. ‘Practice Mode’ allows you to
 practise the worksheet as if as student.

 Add a past paper exam question (or
 user contributed question) to your
 worksheet.

 Add a Key Skill question to your
 worksheet. Recall that these are
 randomly generated questions on
 very specific question types.

 Once you’ve clicked on one of the +
 buttons on the right, click the box to
 choose an exam question or generate
 a Key Skill question.
Choosing the questions yourself

 You’ll see this dialog if you click on a blank Exam
 Question box.
 You can filter by topic, exam board, difficulty, or
 search for a specific word/phrase.

 Select a question on the left. Once you like a
 question, choose Use this question, or if you want
 to use all the neighbouring parts of that original
 exam question (e.g. if the question was part (c) it
 would use (a) and (b)), use the second button.

 Similarly if you click a blank Key Skill question box,
 you’ll be required to choose a Key Skill.
 You can use the Regenerate above button to keep
 randomly generating a new question. Once you’re
 happy with it, press Use this.
Choosing the questions yourself

 You can continue building your worksheet. Use the × to
 delete questions, or drag the question boxes to reorder.
 To set/export your worksheet, first click the Save/Save As
 button.

 Give your worksheet a name. By default the worksheet
 will be saved in your home directory, found under [your
 school] → Individuals. Your school will also have a
 ‘Shared’ and ‘Restricted’ folder, the former good for
 making worksheets accessible to students, and the latter
 good for shared tests within your department.

 Note that students can’t navigate into your own home
 folder, even if you set the viewing permissions for that
 worksheet to ‘Students/Teachers’, and you would need to
 provide a direct link to the worksheet.

 Tip: To quickly access your home directory of worksheets
 elsewhere on the site, go to [your name] → Worksheets
 on the top menu.
Choosing the questions yourself
 Once saved, click the ‘Set to students’ button.
 You will see the usual options for setting a task.

 If all the questions in your worksheet
 are past paper exam questions, you
 have the option to use the original
 number of marks assigned to each
 question, rather than 1 mark per
 question.

 As explained, use the first option for more
 informal work, where students get feedback
 after each question. The second option is for
 formal tests. After each answer submission
 students will just see “Your answer has been
 recorded”, but they can modify previous
The fine print: If you set ‘Prevent reattempts’ to ‘No’ so that students can redo a
homework, they won’t get the correct answer for incorrect answer submissions, answers before their final submission.
to avoid spoiling reattempts.
If you ‘Set as an Assessment’, students will be able to see their score and
their/the correct answers after the Due Date. If no Due Date is set, they will never
know their score.
Setting an abridged/modified past paper

Go to Resources → Past Papers/Worksheets. Then navigate to a
past paper of your choosing.
Setting an abridged/modified past paper

 Click Edit Mode to modify the paper.
Setting an abridged/modified past paper

 You can now:
 • Reorder questions by dragging
 the question boxes.
 • Delete questions using the × in
 the top right corner of each box.
 • Replace questions by simply
 clicking the question within a box.
 • Add questions using the +
 buttons at the end of the
 worksheet.

 Once finished, use the Save As button
 to save your modified copy, then use
 the Set to Students button as before.
Creating a Random Collection of Fixed Questions

You can create a random collection of questions, with Exam Skill or Key Skill, and then set
these to students or export to Word.

Step 1 From Resources → Key Skills, select the Key Skills you want, then click
 either the Generate Worksheet button on the right, or the Set to
 Students button then the Fixed Questions option.

 You can also use the ‘Teacher Tools’ box when viewing a unit or module
 within a course. Or to specify from scratch how your random worksheet
 will be generated, go to [your name] → Worksheet Templates
Creating a Random Collection of Fixed Questions

 On the right is the worksheet builder You can modify/delete/reorder these questions in the
 interface as normal, but populated normal work. As per before, use Set to Students or
 with questions. Export to Word.

 This extra column on the left is known
 as a template. Templates are a
 specification for how to generate the
 random worksheet.

 Press the Generate button to discard
 the questions on the right and
 randomly generate a fresh worksheet.
Set a Topic Test

Topic Tests are end of topic assessments, where we’ve selected 8 past paper exam
questions. Students are allowed 2 attempts per 24 hours, will not get feedback after each
question (it is treated as a ‘Formal Assessment’), and get awarded a Topic Medal if they
achieve 6+ out of 8 correct.
Most exam skills have two Topic Tests: one easier and one more difficult.

 Go to [your name] → Set Task,
 then pick ‘Topic Test’
Step 1

 Step
Step 2 3
 As usual click the ‘Set to Students’ button. Note that it
 is not possible to save modified copies of Topic Tests,
 nor set in any task mode other than ‘Topic Test mode’.

 This will take you to the Topic Tests folder within
 the worksheet explorer. Navigate to one you want.
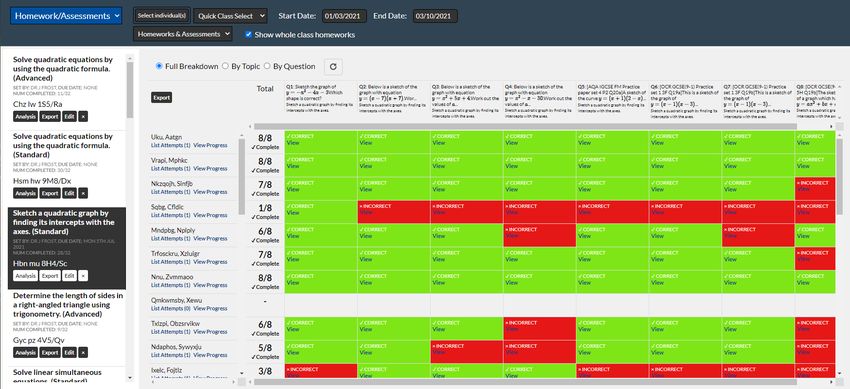
Viewing Pupil Progress Data from Set Tasks

Step 1 Go to [your name] → View Assigned Work,
 or use the Latest Homework box on your
 home dashboard.
 If you have just set a task, you will
 automatically be taken to here.

Step 2

 The tasks you have set, to any class,
 are on the left. Just click one to view.

 To view the tasks just for a particular
 class (or even some individual(s)), use
 the individual or class filter.
Viewing Pupil Progress Data from Set Tasks

This will open the selected task.

 The pictured view below is the ‘full
 breakdown’, allowing you to see every
 individual answer.
 But you can switch mode to see an analysis
 ‘by topic’, or to see a summary ‘by question’.

Use this button to get the latest data Clicking a table heading displays
without having to reload the page. the full question and answer.
This is useful if you are monitoring a
task while students are doing it.
 Click a cell in the table to view the student’s
 answer and the correct answer, as well any
 working/feedback they’ve left.
 You can also overwrite their answer to
 correct/incorrect, or where you have used ‘use
 exam marking’ can award partial marks.
 A whiteboard icon in a cell indicates the student
 has left working. A quote icon indicates they’ve
 left written feedback.
 If they’ve had multiple
 attempts at a homework, you
 can list all answers in all
 attempts by clicking here.
Viewing Pupil Progress Data from Set Tasks

The By Question view is useful to get a summary of answers to each question (including variants of correct
answers, particularly when the answer is algebraic). By default questions are ordered from worst answered to best.
For example, we can see here that a common error (made by a quarter of the class) is that students correctly
expanded ( + 1)( + 4), but failed to notice the −intercept of 12.
Viewing Pupil Progress Data from Set Tasks

 The By Topic view is particularly useful for past papers you
 have set, which ordinarily involve a large mix of skills.
Exporting Reports

While in the progress data interface, click any Export
button that you see (e.g. while viewing a specific
task), or select Report Generator from the blue
dropdown.

 Ensure a class or individuals
 are selected.

 Select a report type and
 follow the instructions.
Starting a Live! game

A Live! game is designed for a classroom environment. Questions are presented on the
board one-by-one. Students use their mobile phones or tablet devices to enter their
answers.
Starting a Live! game

 On the top menu, go to
 Step 1 Resources → Live! Classroom Game

 Alternatively, if you are viewing a
 worksheet, press the Live! Game button.
 And if you have selected skills on the Key
 Skill interface, press the Live! Game button.

 Step 2

Select one the
three options.
We’ll select the
second for
now…
Starting a Live! game

 Step 3

Navigate to a past paper, then click
the Live! Game button.

 Step 4
 Complete the options as described. If you’re
 playing with a school class, choose the
 ‘Select a class’ option at the top. This will
 make it subsequently easier to know which
 students have and haven’t joined the game.
Starting a Live! game

 Step 5
Students just need to go to
dfm.live on their device’s
browser, and enter the join
code given. As people join,
they’ll appear in the
participant list.
If you selected a class, your
class’ students will be listed,
greyed out until each joins.

 Step 6
Click the Start button that will
appear at the top-right.
Starting a Live! game

 Students with correct answers
 will be listed here.

 The question will end once
 students have all entered an
 answer, and the correct answer
 will be displayed. You can also
 press Stop Waiting.
Use the zoom slider to make the You’ll have the option to view
question smaller or larger. your students’ answers.

 At the end of the game, students will
 see their rank on their screen, and Students will see something
 the leaderboard will appear on the like this on their device.
 teacher screen. You’ll see a table of
 all answers in the game, with
 instructions to view this data later.
Using the Virtual Whiteboard

The virtual whiteboard allows a teacher to connect with student whiteboard. Anything
the teacher draws (including imported images or exam questions) will appear on
student screens, and teachers will be able to see a grid of student annotations.

 Go to
 Step 1 Resources → Virtual Whiteboard

 or use the link on your home
 dashboard.

 Choose a mode. Use Classroom
 Step 2 Mode if you are using the
 whiteboard with multiple people.
 If you select a class, it’ll make it
 easier to see which students are
 and are not connected to you.
Using the Virtual Whiteboard

 You will be given a link to
 Step 3 distribute to students. But if
 students are in your class and
 simply access the whiteboard via
 the normal menus, they will
 automatically join your current
 whiteboard.

 Step 4

Click the ‘eye’ icon at the top to view
connected student whiteboards in a grid
view. If you select a class when you loaded
the whiteboard, they will already be in the
grid, but greyed out until they connect to
your whiteboard.
Using the Virtual Whiteboard

 Click Return to Master Whiteboard (i.e
 Step 5 your teacher whiteboard).
 Then click this icon on the top menu to
 import an exam question.

 Use the filters at the top to
 Step 6 find a suitable exam
 question. Click the question
 on the left to view it, and
 once you’re happy, click
 Use this question.
Using the Virtual Whiteboard

 Step 7
The question will now be
underlaid on your
whiteboard. Use the
pen/line/circle/arc/text/
mathematical text tools at
the top to annotate the
question. Anything you do
will appear on all connected
student whiteboards.

 Step 8
By clicking on the ‘eye’ icon on the top menu again, you’ll
be able to see on the student grid when a student does
working on the question you chose. By clicking Interact,
their whiteboard will go full screen on your display. Unlike
the Master Whiteboard, anything you draw on the their
individual whiteboard will only appear on their
whiteboard. Press Back to return.
Using the Virtual Whiteboard

 Using Clear All for All will wipe not only your own
 whiteboard, but all connected whiteboards.
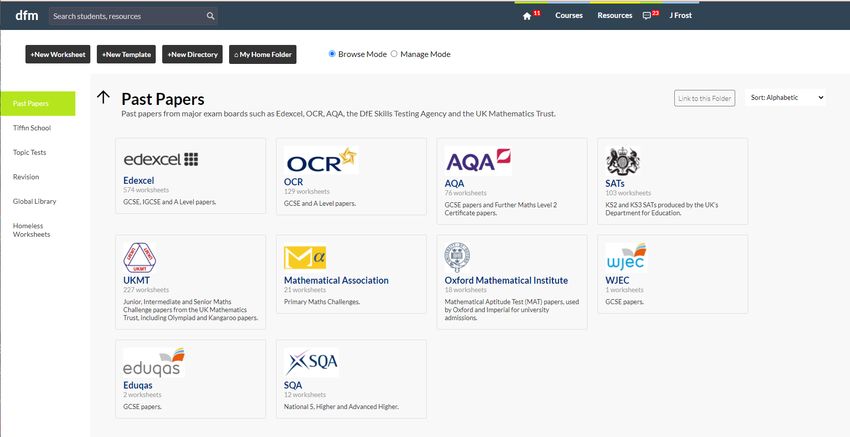
Browsing for Downloadable Resources

 Go to Resources → All Resources

 Browse by topic on the left.

 You’ll then be able to see any downloadable
 slides/worksheets on the left, and the various types of
 resources (e.g. direct access to the exam question
 browser for that skill, and Topic Tests) on the right.
Browsing for Individual Exam Questions

 Go to Resources → Exam Qs by Topic

 Use the filters on the left to
 round your search down.

 Once filtered, select a question
 Tip: If you select the topic on the left. You will be able to
 first, then when filtering by answer the selected question.
 exam board, it’ll list the Using the Annotate button
 number of matching loads the question in a virtual
 questions for each board. whiteboard.
The Course System

Schools ordinarily have a set scheme of work. Or it might be they use another existing
scheme of work, e.g. from an exam board or a publisher such as White Rose Maths. It
would therefore be helpful for students to see everything available to them in a particular
term/module rather than topics individually. This is what the Course system is for.

 On the top menu, look under
 Courses.

 The second option gives you courses by
 exam boards (e.g. Edexcel, AQA, OCR in the
 UK) and publishers (e.g. White Rose Maths).

 DFM Courses are board-agnostic
 courses we’ve crafted where the
 topics are in a nice learning order.
Your school should appear here.
 Create a new course/scheme of work
This will take you to any courses
 or edit an existing one.
your school has set up.

 See how students have been
 progressing on courses they’ve been
 working through.
Looking at Courses

Press Go on the course you are
interested in.

 The green bar shows your progress
 You can switch between different through that course. This is obviously
 types of courses on the left. more relevant to students!
Looking at Courses/Assigning Courses to a Class

Select a particular module. If a module/term has more than one You can assign any course (whether your own
topic, there will also be a ‘Revision’ unit available. or another school’s or a publisher’s) to your
 classes here.
 You can also do so from the Manage Classes
 interface.
 The advantage of this is that students will have
 a box added to the top of their home
 dashboard, allowing them to quickly access
 the course.
Looking at Courses

 There may be downloadable DFM slides,
 worksheets, question compilations and
 external links the teacher has included (this
 box is usually further down the page).

 Use the back button (or your
 browser’s back button) to
 return to the full course view. Any Key Skills associated with this unit will
 be listed here. We’ll explore the options
 further in a moment. Remember that Key
 Skills are randomly generated questions
 designed for mastering very specific
 kinds of questions.

Exam Practice is here. We’ll
look more at this in a moment.
Looking at Courses

 If the unit has multiple Key Skills, students
 can practise a mixture of all of them. This
 contributes 30% to the progress of the
 overall unit (with 35% for Key Skills and
 35% for Exam Skills).
Looking at Courses
 Clicking on the play icon or this video link
 will bring up a popup video with a worked
 example.

 Students (and you!) can press Practice to
 practise questions on this Key Skill.
 Stuents need to answer 4 out of the last 5
 questions right (i.e. 80%+ accuracy) in
Clicking Show Example will bring up a order to fill the bar to full green.
randomly generated example for that Key
Skill.
Setting a Task from an Existing Course

 Scroll to the bottom of the unit.
 You have options to create a random fixed
 set of questions (either consisting of Key
 Skills or Exam Questions), which you can
 subsequently set to students in the usual
 way, or set a Flexible Key Skill homework
 just as you would from the Key Skills
 interface.
 You’ll be able to select which skills to use
 from the unit.

 If you navigate back up to the top of the
 course, you can also similarly create
 worksheets and set tasks using all the
 skills within the whole course.

 If you click the ‘Revision’ unit within a
 If there’s an existing course you like (e.g. you use
 module, you can also do the same on a
 White Rose Maths), you can make a copy of the
 module level.
 course into your school’s courses, allowing you to
 subsequently adapt it.
Viewing Progress Data from a Course

 Step 1 On the top menu, select Courses → Student Progress
 Step 2 Select a class (or individuals).

 Choose from the list of courses (which will be restricted
 Step 3 to courses any of these students have encountered)

 The percentages reflect their progress in Black stars indicate the student has
 the whole course or module or unit or Key completed a Topic Test. There are usually
 Skill/Exam Skill. 2 per Exam Skill: easier and harder.
Creating Your Own Course/Scheme of Work

 Choose Courses → Course Editor
 Step 1 from the menu, or click any Course
 Editor link at the bottom of a course
 page (which will then edit that
 particular part of the course).

 Step 2

 Click +New Course and fill in the details
 about your course.
 Notice the ‘In Development’ label. This
 mean students won’t yet be able to see
 the course.
 Now click Go on your new blank course.
Creating Your Own Course/Scheme of Work

Step 3

 Click +Module. This might be a half-term/term (e.g. “Autumn 1”) or a
 broader module (e.g. “Number 1”), consisting of multiple topics.

 Click +Add Unit on your new module. Units are intended to
 represent a particular topic, e.g Pythagoras Theorem.
Creating Your Own Course/Scheme of Work

Step 4 Add content to your unit.

 If you want some introductory text, e.g.
 the learning objectives from your school’s
 scheme of work, just click here.

 Click the + buttons to add Key Skills, Exam
 Skills or Resources. For the last of these,
 you will be given the option of including
You can add further units to your module. DFM resources (e.g. PowerPoints),
 external links, and direct access to
 collections of questions on DFM you have
 made.

 Tip: You can drag these boxes to change
 the order, for example if you wanted the
 ‘Resources’ box to be first.
Creating Your Own Course/Scheme of Work

Step 5 Make your course visible to students in your school once you’ve
 finished.

 Just click here to modify the visibility
 status of your course. You can choose to
 make visible within your school, or more
 widely to all schools globally.
How do I…

Change my school’s name/logo? See a list of all the class join URLs?
On the top menu, On the top menu,
[your name] → More [your name] → Manage Classes. Then click
→ Manage School Settings ‘Display all existing class registration URLs’.

Generate printable certificates? Change a student’s class?
On the top menu, Type the student into the search bar on the top
[your name] → More → Generate Certificate menu. Click the student and select ‘Move Class’.

 Make an intervention group without
See a complete list of Key Skills/Exam the students leaving their normal
Skills? class?
On the top menu,
 There’s a box which explains how to do this on
[your name] → More → List All Skills
 the Manage Classes homepage.

See summative statistics about my Quickly see all a student’s question
school’s usage? answering activity?
On the top menu, Type the student into the search bar on the top
[your name] → More → School Stats. menu. Click the student and select ‘Activity Log’.
This will show you volume of usage by year
group and volume of recent activity by teacher.
How do I…

Make my own questions? Deal with a topic moving in our
On the top menu, Scheme of Work from one term to
[your name] → More → Build Questions.
 another?
You could then use your questions within a
 While in the Course Editor, navigate to your
worksheet. You can also add the question to
 course. In addition to being able to drag the
the ‘user contributed’ question database
 terms/modules to reorder them, you can also
(subject to approval), so others can use.
 drag the units between terms/modules.

Deal with students who have left
 See an ‘audit log’ if
the school?
On [your name] → Manage Classes, go to the
 accounts/homework mysteriously
‘Students without a class’ tab on the left. go missing.
Select all the relevant accounts and press the Go to [your name] → More → Manage
Archive button. This leaves the account open, School Settings. Click the Audit link here.
but will no longer appear when you search
for students. Retrieve deleted accounts
 We can retrieve deleted user accounts, but
 not deleted tasks or courses. If a class is
 deleted, the user accounts should still be
 there, you just need to recreate the class and
 the existing user accounts will be detected.
To contact us…

 support@drfrostmaths.com
 For general support issues.

 jamie@drfrostmaths.com
 Notify Dr Frost of any technical issues. Please
 do NOT use this email for general support
 queries.
You can also read