INTRODUCTION TO SERVOS - INTRODUCTION - Maker Ed
←
→
Page content transcription
If your browser does not render page correctly, please read the page content below
INTRODUCTION | CYBER ARCADE: PROGRAMMING AND MAKING WITH MICRO:BIT           7-1 | MIDDLE SCHOOL

      WEEK 7           INTRODUCTION TO SERVOS

                       INTRODUCTION
                       In this session, makers are introduced to programming servo
                       motors with the Micro:bit.

                       The servo motor can be a neat addition to the options for coding
                       the Micro:bit, in preparation for the Cyber Arcade projects they’ll
                       be working on in the following weeks.

                       ESSENTIAL QUESTIONS
                       • What is a servo motor and how can I control it with code?

                       • How do artists, engineers, and makers solve problems when
                         they’re working?

                       LEARNING OUTCOMES
                       1. Learn how to use code to program a servo motor.
                       2. Engage in project-based learning through problem-solving and
                          troubleshooting by creating a game using a Micro:bit and code.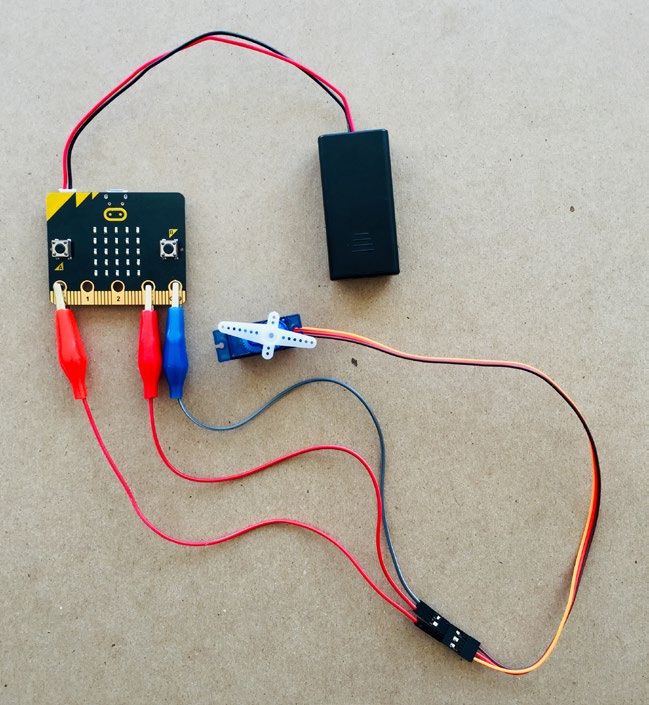
LESSON | RESOURCE
TEACHER   CYBER ARCADE: PROGRAMMING
                  | CYBER            AND MAKING
                          ARCADE: PROGRAMMING   WITH
                                              AND    MICRO:BIT
                                                  MAKING WITH MICRO:BIT     7-2   MIDDLESCHOOL
                                                                            7-2 | MIDDLE SCHOOL

                          VOCABULARY
                          Servo motor: Motor that can be programmed with an
                          electrical signal to move to a specific position

                          Servo mounting horn: Attaches to the servo to allow other
                          objects to be connected to the servo (e.g., a wheel or an arm)

                          User: Person playing and interacting with the game

                          User interface (UI): Physical and digital design of how the
                          user interacts with the game

                          User experience (UX): How natural and enjoyable the
                          experience is

                          Troubleshooting: Using resources to solve issues as they
                          arise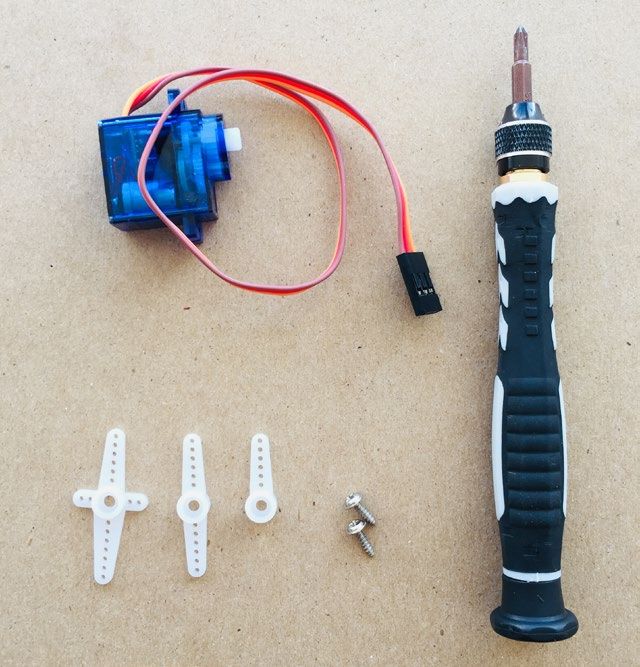
LESSON | RESOURCE
TEACHER CYBER ARCADE: PROGRAMMING
| CYBER AND MAKING
ARCADE: PROGRAMMING WITH
AND MICRO:BIT
MAKING WITH MICRO:BIT 7-3 MIDDLESCHOOL
7-3 | MIDDLE SCHOOL
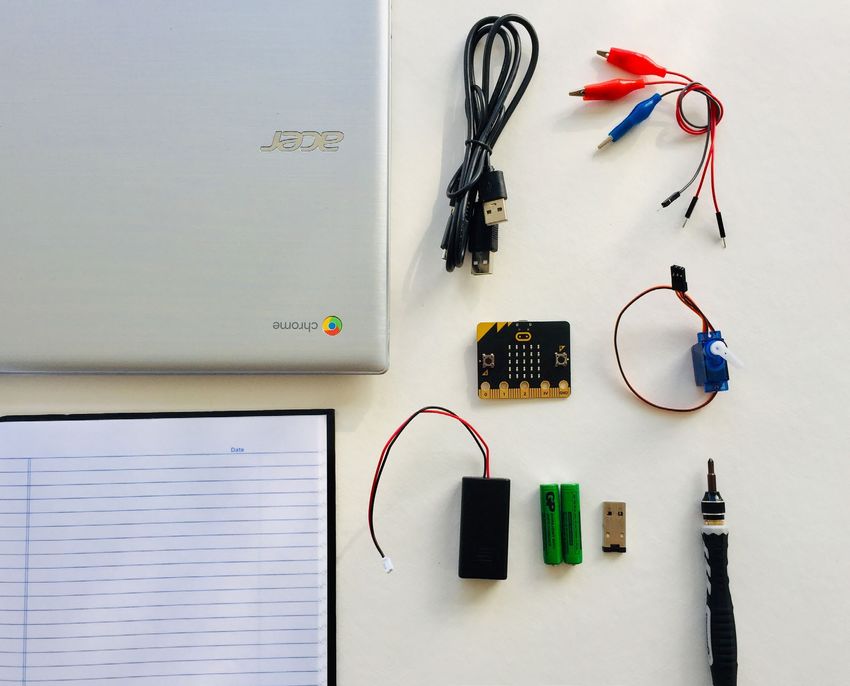
MATERIALS LIST
EACH PAIR OF MAKERS NEEDS: • Laptop with internet
• Micro:bit microcontroller connection
• AAA batteries (2) • USB to micro-USB cord
• External battery pack • USB flash drive
• Alligator-to-pin wires (3) • Notebook
• Servo motor with servo horns • Mini screwdriver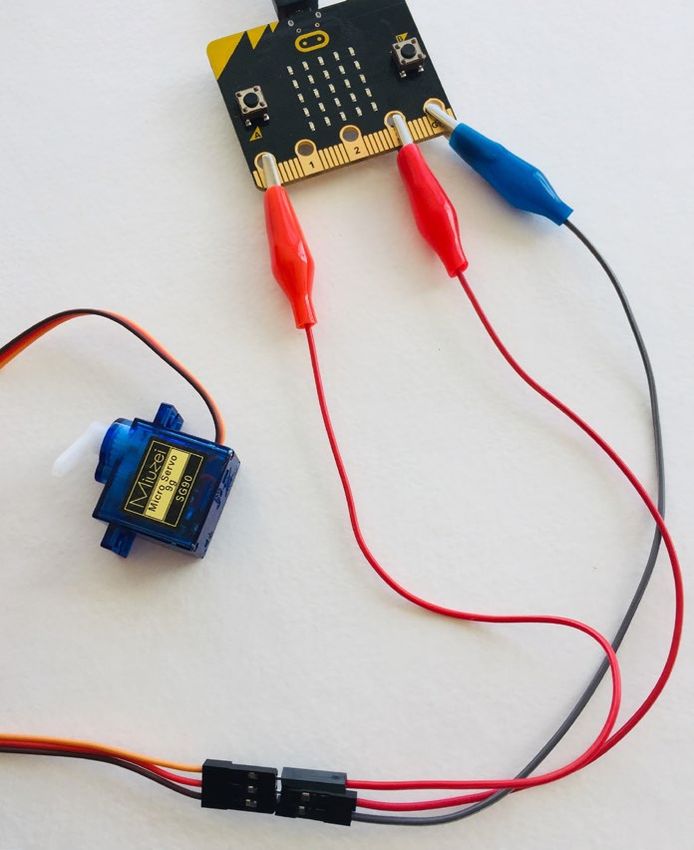
TEACHER RESOURCE | CYBER ARCADE: PROGRAMMING AND MAKING WITH MICRO:BIT       7-4 | MIDDLE SCHOOL

                                                  best for your class. You can portion out
                                                  maker materials into paper trays for
                                                  each table, or have a dedicated area
   TEACHER PREP WORK                              where makers can access materials
   1. Prepare the projector and make              freely as needed.
      sure the internet is working.
                                                  Collaboration: Let smaller issues
   2. Preload the slideshow and videos to         work themselves out. Record specific
      save time.                                  positive examples that you can share
   3. Prepare an example of a servo with          with makers in the moment or at the
      code from Steps 2 and 3 (optional).         end of the project. These examples
                                                  provide models for all learners.
   4. Attach servo mounting horns
      to servo motors using a small               Frustration: When frustration
      screwdriver.                                levels aren’t high, let learners figure
                                                  it out or keep facilitation low touch
   5. Print the Troubleshooting Tips at
                                                  by asking a question and walking
      the end of the lesson and post in
                                                  away. When frustration levels are
      the classroom.
                                                  high, intervene more directly to help
                                                  makers find some success.
   FACILITATION TIPS                              Circulate among the makers and
   Tinkering with electronics: Tinkering          monitor for both collaboration and
   with electrical connections on a servo         frustration.
   can be a bit tricky and won’t work if
   things aren’t securely connected. If           ADDITIONAL RESOURCES
   students get frustrated, encourage
                                                  Behind the MakeCode Hardware:
   them to check the color coding of the
                                                  Servo Motors with Micro:bit
   wires throughout the process and to
   also use the Troubleshooting Tips.             Driving a Servo with the Micro:bit
   They can use painter’s tape or other           Connecting a Servo Motor to the
   non-permanent ways of securing                 Micro:bit
   connections.

   Materials management: It’s up to you
   as the educator to decide what works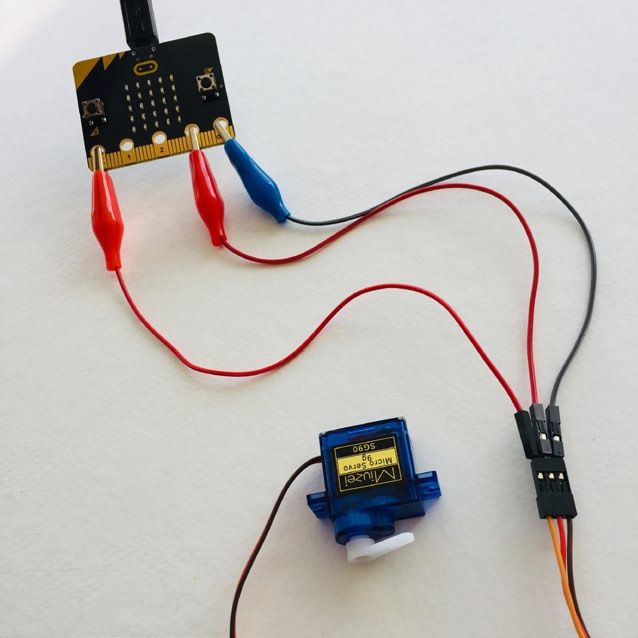
LESSON | CYBER ARCADE: PROGRAMMING AND MAKING WITH MICRO:BIT                                 7-5 | MIDDLE SCHOOL

INTRODUCTION TO SERVOS

STEP 1          5
               MINUTES
                                                   EXPLAIN

                                                   Today we’ll connect and program movement using
Introduce the servo motor.                         a special motor called a servo motor. A servo motor
                                                   can be programmed to turn a specific number of
                                                   degrees up to 180°, a full circle. We can use servos
                                                   in addition to everything else you’ve done so far to
                                                   create fun and interesting user interface/user
                                                   experience (UI/UX) for interactive games or
                                                   devices.

Ask makers:

• What is a motor? (A: Device that                 STEP 2              20
                                                                        MINUTES

  converts electrical energy into rotating
  mechanical energy.)                              Program the servo motor.
• What kinds of devices have motors in             Show makers this short video that
  them? (Students should brainstorm.)              demonstrates Micro:bit buttons A/B
                                                   controlling a moving servo motor.
Give each group of makers a servo
motor with a servo horn attached.
Makers will draw and list parts they
notice in their notebook.

Note: Advise makers to handle gently and to not
force the turning of the arm, as it could break.

Ask makers to:

• Study the servo parts closely.
                                                   “Servo Attached to Micro:bit” on YouTube, uploaded by Teach with
• Describe what they see/notice.
                                                   ICT, 6/25/2018
The parts to emphasize are: the 3 colored
wires, gears, plastic arms, and the fact
that the arm turns.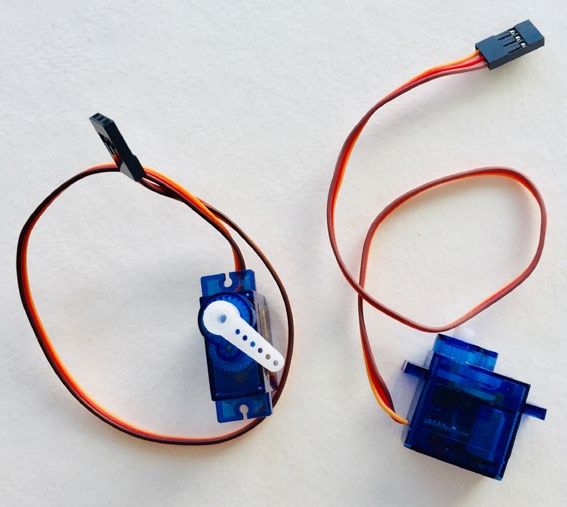
LESSON | CYBER ARCADE: PROGRAMMING AND MAKING WITH MICRO:BIT                        7-6 | MIDDLE SCHOOL

EXPLAIN                                                   3. This will take you to a new page.
                                                             Click on “servo A micro-servo library”.
We can program a servo to turn a specific amount by
                                                             This will add the additional blocks we
connecting it to the Micro:bit board and using special
                                                             need to program the servo.
servo coding blocks. First, let’s work with the code in
the simulator. Then, we’ll upload it to the board and
connect the servo to the board.

DEMONSTRATE AND HAVE
MAKERS FOLLOW ALONG:

1. Go to the MakeCode editor URL
   (makecode.microbit.org) and open a
   new project.
                                                          4. Click and drag over a when button A is
                                                             pressed from the Inputs menu.

2. In the blocks menu, click on
   Advanced and then scroll down                          5. Drag over a pause block from the Basic
   to click on Extensions.                                   menu and nest it in the first block.

                                                          6. Change the pause time to be 1 sec (or
                                                             1000 ms).

                                                          7. Notice there’s a new Servos block
                                                             menu. Click and drag over a set servo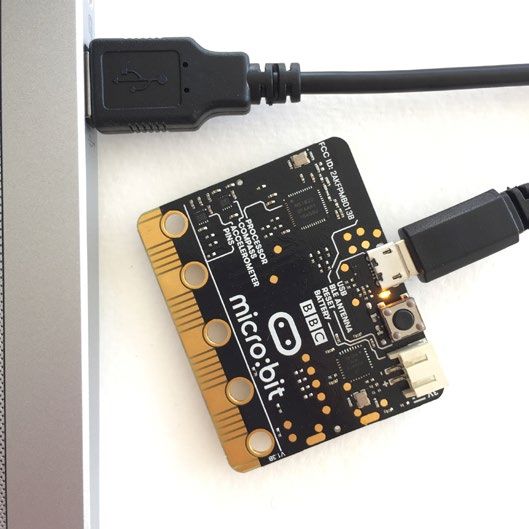
LESSON | CYBER ARCADE: PROGRAMMING AND MAKING WITH MICRO:BIT                 7-7 | MIDDLE SCHOOL

   P0 angle to block under the pause
   block.

                                                  10. Repeat Steps 8 and 9 two more times.
8. Click on the number 90 within the                  You’ll have a series of blocks that look
   block and change it to be the number               like the blocks below. Again, click
   1. Then you’ll notice a servo appear in            on Button A in the simulator and you
   the simulator.                                     should see the servo arm move back
                                                      and forth twice.

9. Repeat the pause and set servo blocks
   by duplicating or dragging over new
   blocks. This time, change the value in
   the set servo block to be 180. Click on
   button A in the simulator, and you’ll
   notice that the servo will move to the
   opposite side.
                                                  11. Name your file with a unique name
                                                      and save the file to the USB flash
                                                      drive. Connect the Micro:bit with the
                                                      USB cord.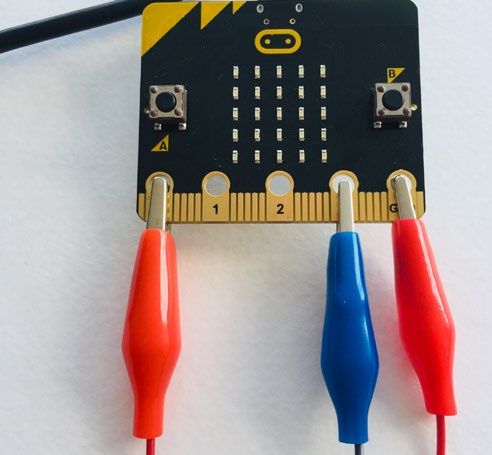
LESSON | CYBER ARCADE: PROGRAMMING AND MAKING WITH MICRO:BIT                         7-8 | MIDDLE SCHOOL

    Click and drag the file on to the               EXPLAIN
    Micro:bit to upload.
                                                    Now that we’ve tested our code and uploaded it to the
                                                    Micro:bit, we’ll connect the servo.

                                                    DEMONSTRATE AND HAVE
                                                    MAKERS FOLLOW ALONG:

                                                    1. In order for the servo to get the code,
                                                       we need to connect 3 of the alligator-
                                                        to-pin wires to the GND, 3V, and PIN
Note: Leave the Micro:bit connected to the laptop       0 terminals on the Micro:bit board
for the next step.                                      using the alligator side of the wire.

STEP 3         20
               MINUTES

Connect the servo motor.

                                                    2. Next, notice on the servo there are 3
                                                       colored wires: black, red, and orange.
                                                       These wires are important to keep
                                                       track of. The brown wire is the ground
                                                       wire (GND) or the (–) terminal and the
                                                       red wire is the 3V or (+) terminal. These
                                                       help to deliver electricity and power to
Once makers have successfully                          the servo. The orange wire is the signal
programmed a servo in the simulator                    wire, or the wire that actually delivers
and uploaded the code to the Micro:bit,                the code from the programmed pin on
it’s time to connect the physical servo to             the Micro:bit to the servo.
the board. The Micro:bit should still be
connected to the laptop.

Give each group 3 alligator-to-pin wires,
one servo, and a battery pack.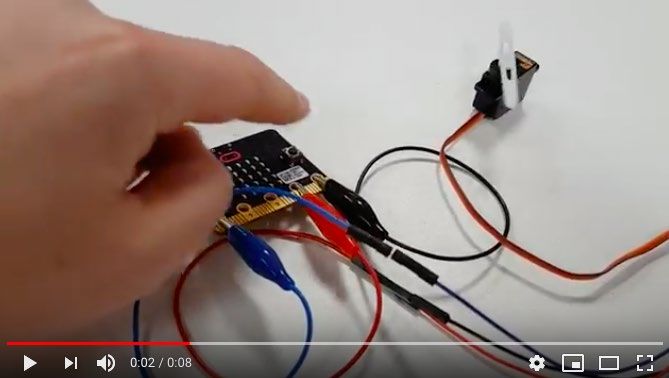
LESSON | CYBER ARCADE: PROGRAMMING AND MAKING WITH MICRO:BIT                7-9 | MIDDLE SCHOOL

3. Connect your servo wires to the                   servo doesn’t already have a plastic
   Micro:bit board following the table               mounted “horn” piece, then use a
   below. If you can match the colors                mini screwdriver to attach one so that
   of the servo motor, great! If not, the            it’s easier to see the movement.
   colors of the alligator-to-pin wires
   don’t actually matter—it’s just helpful
   to use the same colors so we can
   easily track where the wires are going.

                                                  5. If the servo works as displayed on
                                                     the computer simulator, you can
                                                     disconnect the Micro:bit and connect
                                                     it to a battery pack.

                                                  6. If the servo isn’t moving, check your
                                                     wiring to see if the connections are
                                                     right (Steps 2 and 3). If the servo
                                                     is still not moving from 0 to 180
                                                     degrees, then check the code on the
                                                     screen.

    GND Brown
    3V    Red
    PIN   Yellow

4. Once you think you have the
   connections right, try pressing Button
   A and check if the servo is moving or
   not. You’ll hear a mechanical rotating
   sound if the servo is working. If your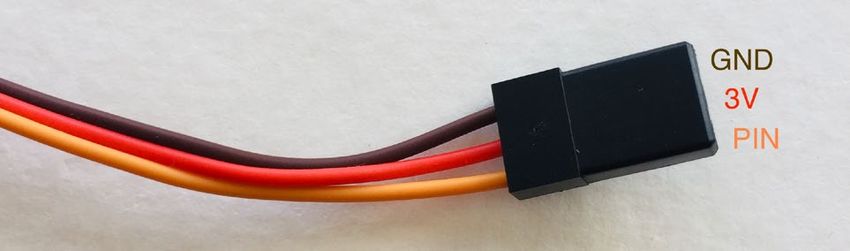
LESSON | CYBER ARCADE: PROGRAMMING AND MAKING WITH MICRO:BIT               7-10 | MIDDLE SCHOOL

STEP 4         10
               MINUTES
                                                  • Put away technology and make sure
                                                    laptops are charging.

Further explore                                   • Return tools and materials that can be
programming the servo.                              used again to the right place.

                                                  • Clear tables of garbage and recycling.

Once makers have successfully
programmed and connected a servo,
have them go back and tinker with the
code (e.g.,. change inputs, add displays,
move a different amount of degrees,
etc.). Remind them that they’ll need
to plug their Micro:bit back into their
computer.

STEP 5          5
               MINUTES

Clean up.
Makers will:

• Save their file with a unique name
  onto the USB flash drive.

• Safely disconnect the Micro:bit from
  the computer.

• Put materials away in their bins.
RESOURCE | CYBER ARCADE: PROGRAMMING AND MAKING WITH MICRO:BIT 7-11 | MIDDLE SCHOOL
TROUBLESHOOTING TIPS
The servo isn’t moving Alligator-to-pin wires
or responding. • Check to see that the wires are properly connected
to the servo (GND to brown, 3V to red, and Pin to
orange).
• Make sure alligator clips are secure on the correct
pins and are touching the metallic parts. Try
extending from the board with a paper fastener.
• Try switching out the alligator clips for new ones.
Power
• The servo might not be getting enough power from
the battery pack. Try powering the Micro:bit using
the USB to the laptop. If it works, replace the
batteries or the battery pack and try again.
• Try pressing the reset button on the Micro:bit.
The servo is making Bugs in the code
some sound but not • Read through the code.
rotating. • Check to make sure there’s a short pause block in
the code before and after every turn. The servo
cannot move without a pause before and after
moving.
• The servo gears could be burnt out or broken. Try
replacing the servo.
The servo isn’t turning Servo type
the amount we • Try connecting a different servo and try again.
thought it should. • Servo gears could be uncalibrated or broken. Replace
the servo and try again.RESOURCE | CYBER ARCADE: PROGRAMMING AND MAKING WITH MICRO:BIT 7-12 | MIDDLE SCHOOL
The LED on the Bad cable or port
Micro:bit isn’t flashing • If the Micro:bit isn’t showing up in the computer
when we click Upload. menu, try a different cable.
• Try a different USB port on the laptop.
Our code isn’t Burnt board
uploading correctly to • Try pressing the reset button on the board.
the board. The board • Try uploading to a new Micro:bit board.
feels hotter than
• Check to see if there’s conductive material touching
usual.
the board. It could be causing a short circuit.
The board isn’t Battery
turning on when • Test the batteries to see if they’re charged.
connected to the • Check to see if the batteries are flipped.
battery pack.
The LED on the Bad cable or port
Micro:bit isn’t flashing • If the Micro:bit isn’t showing up in the computer
when we click Upload. menu, try a different cable.
• Try a different USB port on the laptop.
The connections won’t Alligator clips
stay in place. • Use painters tape to hold the alligator clips in place.
• Try using foil or paper fasteners to extend the metal
parts of the board (Pin, GND, 3V).RESOURCE | CYBER ARCADE: PROGRAMMING AND MAKING WITH MICRO:BIT 7-13 | MIDDLE SCHOOL TROUBLESHOOTING TIPS Print and use the empty rows to fill in with other problems and solutions that can be shared.
You can also read